1
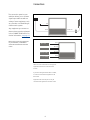
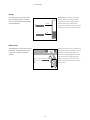
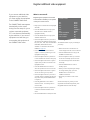
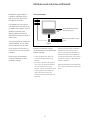
BeoVision 10-32 Guide Contents Menu overview, 3 Edit tuned TV channels, 16 HDMI MATRIX, 29 See an overview of on-screen menus. How to rearrange the order in which How to enter settings in the HDMI MATRIX channels appear in the channel list and how menu. Navigate in menus, 4 to name or delete them. Teletext, 31 See how to use the different remote controls for menu operation. First-time setup, 5 Re-tune or add channels, 19 How to store favourite teletext pages as How to add new channels or how to make a MEMO pages. new automatic tuning. Operate other equipment with Beo4 or Which menus appear when you switch on the television for the very first time. Choose menu language, 6 Loudspeaker setup, 20 Beo5, 32 How to connect loudspeakers and adjust How to operate connected equipment, such speaker balance. as set-top boxes, DVD players or the like, How to select menu language. with the Bang & Olufsen remote control. Adjust picture and sound settings, 21 Connect and operate an audio system, 34 Set positions for the television to turn How to make settings for picture and how to, 7 to adjust bass, treble, etc. How to use game How to connect an audio system to your How to preset positions for a motorised mode. television and operate an integrated audio/ video system. stand to turn to. Daily use of speaker combinations, 24 Tuner setup, 8 How to switch between different speaker How to disable the internal TV tuner or combinations. Distribute sound and picture with BeoLink, 37 How to make link connections, operate a built-in DVB module. Set the television to switch itself on or link system. Connections, 9 off, 25 Examples of where to connect additional How to make your television switch off Your television in a link room, 39 equipment and how to connect a PC. automatically or make it part of a Play Timer. How to set up and operate your television in How to make standby settings for your a link room. Register additional video equipment, 12 television. Two televisions in the same room, 41 How to register connected equipment in the CONNECTIONS menu. Camera and headphones sockets, 15 Set up your Beo4 remote control, 27 Option programming and operation of two Tell the television if your remote control has televisions in the same room. a navigation button or not. How to watch digital pictures on your television and how to connect headphones. Feature activation, 28 How to enter an activation key and get access to additional features. 2 Menu overview 1. TUNING 2. 3. EDIT CHANNELS ADD CHANNELS AUTO TUNING MANUAL TUNING FREQUENCY CHANNEL NO NAME FINE TUNE DECODER TV SYSTEM SOUND SLEEP TIMER PLAY TIMER TIMER OPTIONS CONNECTIONS AV1–AV6 HDMI EXPANDER LINK TUNING TUNER SETUP TV TUNER DVB HD SOUND ADJUSTMENT SPEAKER TYPE PICTURE BRIGHTNESS CONTRAST COLOUR TINT SIZE GAME MODE STAND POSITIONS VIDEO AUDIO STANDBY STAND ADJUSTMENT DTV PLAY TIMER MODE GROUP STANDBY SETTINGS AUTO STANDBY POWER SAVING BEO4 SETTING NAVIGATION BUTTON NO NAVIGATION BUTTON FEATURE ACTIVATION MENU LANGUAGE 3 Navigate in menus Beo4 with navigation button If you have a Beo4 remote control with To back up through menus, press BACK. navigation button and your television is To exit menus, press and hold BACK. set up for use with it, see page 27, you use the centre button with up, down, If your television is set up for use without left and right movement to navigate in navigation button, you must use the ‘star’ menus. Press in the middle of the centre to navigate up, down, left and right in button to confirm selections and settings menus and press the centre button to in menus. confirm selections and settings in menus. To back up through menus, press STOP. Bring up the TV SETUP menu by pressing To exit menus, press BACK. MENU while the TV is on. If you have selected a source which has a menu overlay, you must press MENU twice to bring up the TV SETUP menu. Beo4 without navigation button GO If you have a Beo4 remote control Bring up the TV SETUP menu by pressing without navigation button, you must MENU while the TV is on. If you have use the ‘star’ to navigate up, down, left selected a source which has a menu and right in menus and press the centre overlay, you must press MENU twice to button to confirm choices and settings bring up the TV SETUP menu. in menus. Also your television must be set up for use with a Beo4 without To back up through menus, press STOP. navigation button. To exit menus, press EXIT. Beo5 If you operate your television with the To back up through menus, press BACK. Beo5 remote control, you use the centre To exit menus, press and hold BACK. O AY ST PL P button with up, down, left and right movement to navigate in menus. Press If your Beo5 is set up to be used without in the middle of the centre button to navigation button, press STOP to back confirm selections and settings in menus. up through menus and BACK to exit menus. Bring up the TV SETUP menu by pressing BA MENU while the TV is on. Note that a Beo5 should be re-configured CK when you add new products to your setup. 4 First-time setup The setup procedure is activated when the television is connected to the mains and switched on for the first time. You are led through an automatic series of on-screen menus in which you must set up the TV and register the extra equipment you have connected, such as loudspeakers. If you change your setup at a later date, you can access the same menus and update your settings. The sequence of menus in first-time setup MENU LANGUAGE … You can select the language for on-screen menus. The text on the screen changes as you move from language to language. connected to the television, if any. See page 20, for further information. ADJUSTMENT … Adjust bass, balance, STAND ADJUSTMENT … Set the maximum angle for turn of the television. Use SPEAKER TYPE … Select which speakers are and to turn the television and limit the movement of the stand. STAND POSITIONS … Set your preferred volume, treble, etc. DVB SETUP … If the DVB tuner is enabled, the DVB SETUP menu appears, see the separate DVB Guide for further information. preset positions for the television. For further information about the STAND For information about where to connect POSITIONS menu, see page 7. extra equipment, see the chapter about TUNER SETUP … Disable the television tuner or DVB tuner, if you like, see page 8. STANDBY SETTINGS … The television can be set to switch itself to standby after some time with no operation. You can also switch Power Saving on or off, see page 26. CONNECTIONS … Select the type of equipment you have connected to each socket group, the sockets used, the product name, and the source name. For further information about the CONNECTIONS menu, see page 9. CHECK AERIAL CONNECTION … This prompt only appears, if the television tuner is enabled. AUTO TUNING … When you have registered your connected equipment, a menu for channel tuning automatically appears on the screen. Use the navigation button right to start auto tuning. The television finds all available channels. For further information about tuning TV channels, see page 16. 5 connection panels in Getting Started. Choose menu language The menu language you choose during the first-time setup of your television can be changed at any time. You can select the language for on- Once a menu language is chosen, all menus and display messages are shown in this language. >Bring up the TV SETUP menu and highlight screen menus via the TV SETUP menu. The text on the screen changes as you move from language to language. OPTIONS. >Press the centre button to bring up the OPTIONS menu and highlight MENU LANGUAGE. >Press the centre button to bring up the MENU LANGUAGE menu. >Use the navigation button up or down to move to your language choice. >Press the centre button to make your choice. >Press BACK to back up through previous menus or press and hold BACK to leave the menus. 6 MENU LANGUAGE DANSK DEUTSCH ENGLISH ESPAÑOL FRANÇAIS ITALIANO NEDERLANDS SVENSKA Set positions for the television to turn to If your television is equipped with the optional motorised stand, you can turn it using the remote control. Furthermore, you can program the television to turn automatically to face your favourite viewing position when you switch on the television. It can turn to a different position when you listen to, for example, a connected radio, and turn away to a standby position when you switch it off. Choose one position for when you switch STAND POSITIONS the television on, one for audio mode, and one for when you switch it off. >Bring up the TV SETUP menu and highlight VIDEO AUDIO STANDBY OPTIONS. >Press the centre button to bring up the STAND ADJUSTMENT OPTIONS menu and highlight STAND POSITIONS. >Press the centre button to bring up the STAND POSITIONS menu. >Press the centre button to determine the VIDEO position. >Use and to turn the television and place it according to your viewing position. >Press the centre button to store the position. You can also turn your television by hand. To store a stand position for when an NOTE! For information about first- television … time installation of the motorised >Highlight AUDIO. stand, see Getting Started. >Press the centre button to determine the audio source is switched on from the To store a stand position for when the AUDIO position. >Use and television is switched to standby … >Highlight STANDBY. to turn the television and place it as you wish. >Press the centre button to store the position. >Press the centre button to determine the STANDBY position. >Use and to turn the television and place it as you wish. >Press the centre button to store the position. >During first-time setup, press the green button to continue first time-setup, otherwise … >… press and hold BACK to leave all menus. 7 Tuner setup If you disable the TV tuner, you can activate the optional DVB tuner with the TV button. If you disable the DVB tuner, you can activate a connected peripheral unit with the DTV button. To disable the internal tuner … >Bring up the TV SETUP menu and highlight OPTIONS. >Press the centre button to bring up the TUNER SETUP TV TUNER DVB HD ON ON OPTIONS menu, and highlight TUNER SETUP. >Press the centre button to bring up the TUNER SETUP menu and highlight TV The TUNING menu is only available if the TV TUNER. >Use the navigation button left or right to tuner is enabled. switch between the setting ON or OFF. If you have connected a Bang & Olufsen hard >Highlight DVB HD. >Use the navigation button left or right to switch between the setting ON or OFF. >Press the centre button to store the settings, or … >… press and hold BACK to leave the menus without storing. 8 disk recorder to your TV, we recommend not to disable the TV tuner. Connections The connection panel on your television allows you to connect signal input cables as well as a variety of extra equipment, such as a recorder or a linked Bang & Olufsen music system. DVB Any equipment you connect to these sockets must be registered in the CONNECTIONS menu. For further information, see page 12. POWER LINK AERIAL Before you connect any equipment to your television, remember to AV 2 Decoder disconnect the television from the mains. DVD Satellite (STB) AV 1–6 PUC 1–4 AV 1–6 PUC 1–4 Recorder (HDR) AV 4 There are some restrictions as to the types of equipment that can be connected to the sockets. If you have a Bang & Olufsen HDR1 or HDR2, it must be connected and registered to the AV4 socket. Equipment with VGA output can only be connected and registered to the AV3 socket. 9 >> Connections IR type In the AV menus you can select how a IR-transmitters: To operate non-Bang & PUC controlled product is connected. Olufsen products with a Bang & Olufsen You can choose between ‘PLUG’ (cable) remote control, attach a Bang & Olufsen and ‘IR’ (IR Blaster). IR-transmitter to each of the products. PLUG STB Connect each transmitter to one of the sockets marked PUC on the main connection panel. IR STB DVB module Insert the Smart Card in the CA module with The CA module is a ‘card reader’ for your Smart Card which decodes the coded PCMCIA SMARTCARD the chip facing towards the television. The CA signals sent out by the programme module has one protruding edge on one provider. side and two protuding edges on the other side. The side with one edge should face upwards. The Conax Smart Card must be inserted with the chip facing away from the television front. 10 >> Connections Connect and use a PC Bring up the computer image on the IMPORTANT! Before connecting a PC to screen the television, disconnect the television, To see the computer picture on the screen, the computer, and all equipment you must bring it up with your remote connected to the computer from the mains. control. To connect a computer to the television … To bring up the computer picture … >Using the appropriate type of cable, >Press LIST and use the navigation button connect one end to the DVI, VGA or HDMI up or down to bring up PC in the Beo4 output socket on your computer, and the display and press the centre button to other end to the VGA or HDMI socket on bring up the picture. You can then operate the television. the computer as you normally would. >To hear sound from the computer in the speakers connected to the television, use the appropriate cable and connect the sound output on the computer to the R–L or SPDIF sockets on the television when appropriate. >Reconnect the television, the computer, and all equipment connected to the computer to the mains. Remember, the computer must be connected to a grounded wall outlet as specified in its setting-up instructions. If you have connected your PC to the VGA socket on the television, you must register the PC to the AV3 socket in the CONNECTIONS menu. A PC connected to the HDMI socket can be registered to any of the AV sockets or socket groups. 11 (Beo5: Press Pc). Register additional video equipment If you connect additional video equipment to your television, you must register the equipment in the CONNECTIONS menu. The CONNECTIONS menu appears automatically on the screen during first-time setup for you to register connected equipment, if it is not detected automatically by the television. If you connect equipment at a later date, you must register this equipment in the CONNECTIONS menu. What is connected? Registering the equipment connected to the television enables you to operate it with your remote control. >Bring up the TV SETUP menu and highlight OPTIONS. >Press the centre button to bring up the OPTIONS menu. CONNECTIONS is highlighted already. >Press the centre button to bring up the CONNECTIONS menu. CONNECTIONS AV1 AV2 AV3 AV4 AV5 AV6 HDMI EXPANDER HDMI MATRIX LINK TUNING NONE NONE NONE NONE CAMERA NONE NO NO NO >Use the navigation button up or down to step between the different socket groups: AV1, AV2, AV3, AV4, AV5, AV6 and HDMI The available sockets may vary according to EXPANDER, HDMI MATRIX when your setup. available. For information about LINK TUNING see page 38. >Press the centre button to be able to register a connected product type to the highlighted socket group. >Use the navigation button up and down to move between the sockets in the group. >Use the navigation button left or right to register what you have connected to the highlighted socket. >Press the centre button to be able to select the product from an on-screen list. >Use the navigation button left or right to see lists for other types of products. >Use the navigation button up or down or a number button to highlight the name of the product and press the centre button >Names are shown in the television onscreen display when the source is selected. >Press the centre button to bring up the STANDBY OPTIONS menu. >Use the navigation button up or down to see the list of standby options for when the connected equipment should switch to standby. >Press the centre button to select a standby option. >When you have completed your settings for a single socket group, press the centre button to return to the CONNECTIONS menu. >Repeat the procedure for each socket group. to register it. >Press the green button to be able to At first-time setup only, when you have name the source. The naming menu is registered all connected equipment, press now activated. the green button to store the setup. >Use the navigation button up and down to find the individual characters in the name. >Press the centre button to accept the name. 12 >> Register additional video equipment What’s on the AV1 – AV6 menu … SOURCE … Select the source you have HDMI … Indicates whether or not the equipment is connected to the television connected. The option you select indicates via one of the HDMI sockets. Select the which remote control button switches on appropriate socket: A, B, or C. the source. For example, a source (YPbPr) … Indicates whether or not the registered as V. MEM is switched on when equipment is connected to the television you press the V.MEM button. A source via the YPbPr sockets. Options are YES registered as DTV2 is switched on by and NO. Can only be registered in one of pressing LIST and then the navigation the AV menus (AV2-AV4 or AV6) at any button up or down to display DTV2 and press the centre button. (Beo5: Press DTV2). Options are: AV2 SOURCE NAME IR SOCKET IR TYPE HDMI Y/Pb/Pr S/P-DIF NONE ..... NONE IR NONE NO NONE time. (VGA) … Indicates whether or not the equipment is connected to the television Regarding High Definition (HD) NONE … if nothing is connected. via the VGA socket. Options are YES sources … V.MEM … for a connected video recorder and NO. Standard Definition (SD) signals can be or hard disk recorder. DVD/DVD2 … for a connected DVD player S/P-DIF … Select the S/P-DIF connection used. Options are 1, 2 and NONE. recorded, as well as distributed to a link room television, but HD signals cannot. or recorder. DTV2 … for other equipment, such as a set-top box. DTV … occupied by the DVB module, unless you disable the DVB module. An HDMI Expander must always be Connect both the HD and the SD signals to connected to HDMI C. When connecting an the television. The best signal is always used. HDMI Expander, additional HDMI sockets If no HD signal is available, the SD signal is become available; C1, C2, C3 and C4. shown. V.AUX2 … for other equipment, such as a video game console. TV … occupied by the TV tuner, unless While it is possible to register equipment under any of the available source types, the you disable both tuners in the TUNER type you select affects how you can use your SETUP menu. source. PC … for a connected PC. DECODER … for a connected decoder. The source lists are divided into 4 groups; ‘stb’ are set-top boxes, ‘dvd’ are DVD players and recorders, ‘vmem’ are video recorders including hard disk recorders, ‘other’ are, for example, PCs and media centres. NAME … Allows you to name the source you are registering, the name you enter appears in the on-screen display when you activate the source. (AUTO SELECTION) … Allows a source connected to AV5 to be selected automatically as soon as the television detects a signal, provided the television is on at the time. Options are ON and OFF. IR SOCKET … Select which IR socket is used for the source, options are PUC1, PUC2, PUC3, PUC4 and NONE. IR TYPE … Select the type of IR connection used. Options are PLUG (for a cable connection) and IR (for an IR blaster connection). If you select PLUG you need to select if MODULATION must be set to ON or OFF. 13 >> Register additional video equipment Standby options … When you register a non-Bang & Olufsen product in the CONNECTIONS menu, you can also select different ‘STANDBY OPTIONS’ for your product. This means that you can select if the connected product should switch to standby automatically. The options are: OFF AT SOURCE CHANGE … The product switches to standby immediately when you select another source. OFF AT TV STANDBY … The product switches to standby when you switch the television to standby. ALWAYS ON … The product does not switch to standby automatically. MANUAL CONTROL … The product can be switched on and off by means of the remote control. 14 Camera and headphones sockets You can connect headphones and listen to a programme, or you can connect a Camcorder and watch your home movies on the television. Sockets for temporary connections PHONES R L VIDEO Remove the cover to access the camera and headphones sockets. To remove the cover, press at the right or left side of the cover and you can easily flip it off. PHONES Watch digital pictures on your television You can connect stereo headphones to the To watch your camera pictures, connect the socket marked PHONES. camera to the AV5 socket(s) and switch the – When the sound in the speakers is not television on. The television automatically muted, volume adjustment is directed at registers the signal and you can see the still the speakers. pictures on the screen. – To mute the speakers connected to the television, press the middle of the To select the CAMERA input via Beo4 … button. >Press LIST repeatedly to display CAMERA* – When sound is muted in the speakers, press or to adjust sound in on Beo4 and press the centre button. (Beo5: Press Camera). headphones. – To restore sound in the speakers, press the middle of the button. Note: Prolonged listening at high volume levels can cause hearing damage! R–L For audio connection (right and left sound channel respectively). VIDEO For connection of the video signal. 15 *In order to display CAMERA on Beo4, you must first add it to the Beo4 list of functions. For further information, see the Guide enclosed with Beo4. Edit tuned TV channels If automatic tuning of all channels has not stored the channels on your preferred channel numbers or has not named all the stored channels automatically, you can rearrange the order in which the channels appear and provide them with a name of your own choice. If the tuned channels require additional editing, such as fine tuning, use the MANUAL TUNING menu, see page 18. For tuning of digital channel, see the Guide for your DVB module. Move, name or delete tuned TV channels Once automatic tuning of channels has Move tuned TV channels … been completed, the EDIT CHANNELS >In the EDIT CHANNELS menu, highlight menu appears automatically and you can move or name the TV channels that have been tuned in. You can also delete any tuned TV channel you do not want. the channel you wish to move. >Use the navigation button right to move the channel out of the list. >Use the navigation button up or down to move the channel to the desired channel Enter the EDIT CHANNELS menu … >Bring up the TV SETUP menu and highlight TUNING. number. >Use the navigation button left to move the channel back into the list or change places >Press the centre button to bring up the TUNING menu and highlight EDIT CHANNELS. with the channel which occupies the desired channel number. >Now, move the channel with which you >Press the centre button to bring up the EDIT CHANNELS menu. have changed places to an empty channel number or to a number already occupied and repeat the procedure. >When you have moved the relevant channels, press BACK to back up through menus, or press and hold BACK to exit all menus. 16 >> Edit tuned TV channels Name tuned channels … Delete tuned channels … >In the EDIT CHANNELS menu highlight the >In the EDIT CHANNELS menu highlight the channel you wish to name. >Press the green button to be able to name the channel. The naming menu is now activated. >Use the navigation button up and down to find the individual characters in the name. >Move between character places with the navigation button left and right. >Press the centre button to store the name. >If necessary, repeat the procedure and name other channel numbers. >When you have named the relevant channel you wish to delete. >Use the navigation button right to move the channel out of the list. >Press the yellow button to be able to delete the channel. >Press the yellow button again to confirm the deletion, or press the navigation button left twice to move the channel back into the list. EDIT CHANNELS 1 2TV 2 3. . . . . 4BBC 1 5EUROSPORT 6TV 4 7ZDF 8. . . . . 9DISCOVERY 10 >When you have deleted the relevant channels, press and hold BACK to exit all menus. Move a channel. EDIT CHANNELS 1 2TV 2 3A . . . . 4BBC 1 5EUROSPORT 6TV 4 7ZDF 8. . . . . 9DISCOVERY 10 channels, press the centre button to accept your edited list, or press and hold BACK to exit all menus without storing. Name a channel. EDIT CHANNELS 1 2 3. . . . . 4BBC 1 5EUROSPORT 6TV 4 7ZDF 8. . . . . 9DISCOVERY 10 Delete a channel. 17 TV 2 >> Edit tuned TV channels Adjust tuned channels You can store TV channels on channel If the item SYSTEM appears on the menu, numbers of their own. Fine tune the then make sure that the correct broadcast channel reception, indicate the presence system is displayed before you begin tuning. of coded channels and choose appropriate sound types for the individual channels. If channels are broadcasted with two >Bring up the TV SETUP menu and highlight you can store the channel twice, once with languages and you want both languages, TUNING. each language. >Press the centre button to bring up the MANUAL TUNING FREQUENCY CHANNEL NO. NAME FINE TUNE DECODER TV SYSTEM SOUND 217 7 DR 1 0 OFF PAL B/G STEREO TUNING menu and highlight MANUAL TUNING. >Press the centre button to bring up the Even though you store a type of sound/ MANUAL TUNING menu. language, you can switch between the various >Use the navigation button up and down to types while watching a TV programme. move between the items in the menu. >Use the navigation button left and right to view your choices for each item. >If you choose NAME, then press the green button to start the naming procedure. Use the navigation button up and down to enter the characters in the name you choose. Use the navigation button left and right to move between the characters in the name. >When you have finished editing, press the centre button to accept the settings. >Press the centre button to store the adjusted channel. >Press and hold BACK to exit all menus. 18 Re-tune or add channels You can make your television find your TV channels for you. You can re-tune all your TV channels by Preset up to 99 different TV channels on channel numbers of their own and give each channel a distinct name. a new channel or update a tuned You can tune in new channels, for example, if you move – or re‑tune previously deleted channels. When tuning in channels via the ADD CHANNELS menu, your previously tuned channels are left unchanged. This allows you to keep channel names, their order in the TV list, and any special settings you may have stored for those channels. letting the television tune in all the channels automatically. You can also add AUTO TUNING 1..... channel which, for example, has been moved by the broadcaster. >Bring up the TV SETUP menu and highlight NOTE! If you re-tune all your TV channels, all the channel settings you have made TUNING. >Press the centre button to bring up the disappear! TUNING menu. Re-tune via automatic tuning … >In the TUNING menu highlight AUTO TUNING. >Press the centre button to bring up the AUTO TUNING menu. >Use the navigation button right to start auto tuning. >Once auto tuning is completed, the EDIT CHANNELS menu appears. You can then remove or name channels. Add new TV channels … >In the TUNING menu highlight ADD CHANNELS. >Press the centre button to bring up the ADD CHANNELS menu. >Use the navigation button right to start. New channels are added automatically as they are found. >When tuning is completed and new channels have been added, the EDIT CHANNELS menu appears. You can then remove or name channels. The cursor highlights the first new channel just added to the list. 19 EDIT CHANNELS ..... . . . . . . . . . . . . . . . 31PRIME 32TV 2 33. . . . . 34BBC 1 35EUROSPORT 36TV 4 37ZDF 38. . . . . 39 DISCOVERY 40. . . . . Loudspeaker setup If you want, you can connect Power Link speakers and a BeoLab subwoofer to your television. You can also choose to connect only a subwoofer or a set of external speakers. If you connect both speakers and a subwoofer, the subwoofer must be connected to the television and the speakers must be connected to the subwoofer. Select your speaker type Switch on the television before you SPEAKER TYPE adjust speaker settings. FRONT SUBWOOFER To register the speaker types … >Bring up the TV SETUP menu and highlight OPTIONS. >Press the centre button to bring up the OPTIONS menu and highlight SOUND. >Press the centre button to bring up the SOUND menu and highlight SPEAKER TYPE. >Press the centre button to bring up the SPEAKER TYPE menu and use the navigation button up or down to select your speaker type. >Use the navigation button left or right to switch between YES or NO. >Press the centre button to store or press BACK to leave the menu without storing. 20 . YES YES Adjust picture and sound settings Picture and sound settings are preset from the factory to neutral values which suit most viewing and listening situations. However, if you wish, you can adjust these settings to your liking. Adjust picture brightness, contrast or colour. Sound settings include volume, balance, bass, and treble. Store your picture and sound settings temporarily – until your television is switched off – or store them permanently. Activate GAME MODE if you connect a game console to your television. For information about how to change the picture format, see Getting Started. Adjust brightness, colour or contrast Adjust the picture settings via the PICTURE menu. Temporary settings are cancelled when you switch off the television. >Bring up the TV SETUP menu and highlight OPTIONS. >Press the centre button to bring up the PICTURE BRIGHTNESS CONTRAST COLOUR TINT SIZE GAME MODE .... . . . . .... . . . . .... . . . . .... . . . . .... . . . . OPTIONS menu and highlight PICTURE. >Press the centre button to bring up the When signals are sent in format 720p, PICTURE menu. >Use the navigation button up or down to available in the PICTURE menu. move through menu items. >Use the navigation button left or right to adjust the values. >Press BACK to store your settings until you switch off the television, or >… press the centre button to store your settings permanently. For video sources using the VGA signal, the following options appear as well: HOR. SIZE … Adjusts the picture size along the horizontal axis. VERT. SIZE … Adjusts the picture size along the vertical axis. HOR. POSITION … Adjusts the picture position along the horizontal axis. VERT. POSITION … Adjusts the picture position along the vertical axis. Note that these four settings only apply for the screen resolution in effect at the time you adjust the settings. To temporarily remove the picture from the screen, press LIST and use the navigation button up or down to bring up P.MUTE in the Beo4 display and press the centre button. To restore the picture, press a source button. (Beo5: Press to bring up the Scene display on Beo5, press Picture, then press P.Mute. To restore the picture, press P.Mute again). 21 1080p or 1080i, the menu item SIZE is >> Adjust picture and sound settings Game mode If you connect a game console or play a To activate GAME MODE with Beo5 PC game using the television as a directly … monitor, you can activate ‘Game mode’. >Press Game to activate GAME MODE, Game mode minimises the delay caused by signal processing. Game mode is automatically deactivated when you change source or switch to standby. To use GAME MODE … >Bring up the TV SETUP menu and highlight OPTIONS. >Press the centre button to bring up the OPTIONS menu and highlight PICTURE. >Press the centre button to bring up the PICTURE menu. >Use the navigation button up or down to move to GAME MODE. >Press the centre button repeatedly to switch between ON and OFF. To activate GAME MODE with Beo4 directly … >Press LIST and use the navigation button up or down to bring up GAME in the Beo4 display. >Press the centre button repeatedly to switch between ON and OFF. 22 press again to deactivate GAME MODE. >> Adjust picture and sound settings Adjust volume, balance, bass or treble You can preset levels for sound volume, To adjust sound … balance, bass, treble and a subwoofer. >Bring up the TV SETUP menu and highlight You can switch the loudness feature >Press the centre button to bring up the OPTIONS. on or off. The loudness feature compensates for the human ear’s lack of OPTIONS menu and highlight SOUND. >Press the centre button to bring up the sensitivity to high and low frequencies. SOUND menu, and highlight These frequencies are boosted at low ADJUSTMENT. volume levels so that low music becomes more dynamic. >Press the centre button to bring up the ADJUSTMENT menu. ADJUSTMENT VOLUME * BALANCE BASS TREBLE SUBWOOFER LOUDNESS DEFAULT VIDEO DEFAULT AUDIO .... . . . . .... . . . . .... . . . . .... . . . . .... . . . . ON SPEAKER3 SPEAKER2 >Use the navigation button up or down to If you have connected external speakers, you can preset two default speaker combinations; one to be used each time you switch on a video source in your television, and one to be used each time you switch on an audio source connected to your television. You can still select a select an item to adjust. >Use the navigation button left or right to adjust the values or choose a setting. >Press BACK to store your settings until you switch off your television, or … >… press the centre button to store your settings permanently. different speaker combination any time you wish. For further information about speaker ADJUSTMENT VOLUME * BALANCE BASS TREBLE CENTRE LOUDNESS DEFAULT VIDEO DEFAULT AUDIO .... . . . . .... . . . . .... . . . . .... . . . . .... . . . . ON SPEAKER3 SPEAKER2 combinations, see page 24. The content of the ADJUSTMENT menu varies according to what you have connected to the television. The subwoofer menu is only available if a subwoofer is connected and no external speakers are connected. If external speakers are connected and you have selected SPEAKER3, the CENTRE menu is available. Here you can adjust the balance between internal speakers and the external connected speakers. *BALANCE adjusts the left/right balance between the speakers. To adjust the balance temporarily, see page 24. 23 Daily use of speaker combinations You can select the speaker combination that suits the source you are using, provided that the various speaker modes are available in your television. NOTE! If you have no external speakers connected or only a subwoofer, you will only be able to choose SPEAKER 1. Select speakers for movie sound You can choose between three speaker modes depending on which source you are using and which speakers you have connected to your television. >Press LIST and use the navigation button up or down to bring up SPEAKER in the Beo4 display (Beo5: Press SPEAKER 1 to bring up the Scene display on Beo5, then press Speaker to bring up the Speaker display). >Press 1 – 3 to select the speaker combination you want. (Beo5: Press Optimise or Mode 1 – 3). The selected speakers cut in automatically. >Press and hold BACK to remove SPEAKER SPEAKER 1 from the Beo4 display and return to the source you were using. (Beo5: Press to remove the Speaker display). Adjust speaker balance with Beo4 SPEAKER 2 You can temporarily adjust the balance between the speakers … >Press LIST and use the navigation button up or down to bring up SPEAKER in the Beo4 display and press the centre button. >Now use and to adjust the speaker balance left and right. >Press BACK to remove SPEAKER from the SPEAKER 3 Beo4 display and return to the source you You can preset two default speaker were using. combinations which suit the source you are using, see page 23. 24 Set the television to switch itself on or off Your television has a built in Sleep Timer which means that you can make it switch off after a designated number of minutes. Also you can make the television react to a Play Timer programmed on an Audio or Video Master connected to the television via Master Link. If the Play Timer source is DTV, settings must be made in the DTV PLAY TIMER menu. Sleep Timer Play Timer You can make the television switch off If you connect a Bang & Olufsen audio automatically after a number of minutes. or video product to your television with To activate the Sleep Timer with Beo4 … include it in timed functions via the a Master Link cable, you can exclude or >Press LIST and use the navigation button up or down to bring up SLEEP in the Beo4 system’s Play Timer to OFF if you wish display. >Press the centre button repeatedly to select the number of minutes. will not turn if the TV is switched on by a Play Timer. timed functions to apply only to the television. To deactivate the Sleep Timer with To switch on the Play Timer … Beo4 … >Bring up the TV SETUP menu and highlight >Press LIST and use the navigation button up or down to bring up SLEEP in the Beo4 NOTE! For safety reasons, the stand PLAY TIMER menu. For example, set the television Play Timer to ON and an audio display. PLAY TIMER. >Press the centre button to bring up the PLAY TIMER menu, and highlight TIMER >Press the centre button repeatedly until OFF is shown on the television screen. ON/OFF. >Press the centre button to bring up the TIMER ON/OFF menu. To activate or deactivate the Sleep Timer with Beo5 … >Use the navigation button left or right to reveal ON. >Press Sleep and select the number of minutes or Off. >Press the centre button to store the setting. To set the Sleep Timer via the menu … >Bring up the TV SETUP menu and highlight For further information about how to program Timers and switch the Play Timer on or off for a connected Bang & Olufsen SLEEP TIMER. >Press the centre button to bring up the SLEEP TIMER menu. >Press the centre button repeatedly to switch between the number of minutes and OFF. 25 audio or video product, see the Guide enclosed with the product. >> Set the television to switch itself on or off DTV Play Timer Standby Settings You can program a Play Timer on a The television can be set to switch itself connected Bang & Olufsen audio or to standby after some time with no video product. If the Play Timer uses the operation. The factory setting is 4 hours. DVB Module in the television as source, This function only applies in video mode you must tell it which MODE it should not in audio mode. DTV PLAY TIMER MODE GROUP TV SPORT start in. That is should radio or television switch on. Also you must tell it which To make standby settings … GROUP, that is which of the station or >Bring up the TV SETUP menu and highlight channel groups should be used when the Play Timer is executed. OPTIONS. >Press the centre button to bring up the OPTIONS menu and highlight STANDBY To make settings for a DTV Play Timer … >Bring up the TV SETUP menu and highlight OPTIONS. >Press the centre button to bring up the OPTIONS menu and highlight DTV PLAY TIMER. >Press the centre button to bring up the DTV PLAY TIMER menu, and use the navigation button up or down to move between MODE and GROUP. >Use the navigation button left or right to select the setting you want. bring up the STANDBY SETTINGS menu and use the navigation button up or down to move between AUTO STANDBY and POWER SAVING. >Use the navigation button left or right to setting. AUTO STANDBY POWER SAVING select the setting you want. setting. >Press BACK to back up through previous menus or press and hold BACK to exit all STANDBY SETTINGS menu menus. When AUTO STANDBY is activated, a message appears on your television screen if menus or press and hold BACK to exit all the television has not been operated during menus. the time set in the menu. The television then switches to standby if you do not operate it. Note! If the TV tuner is disabled and the DVB module is activated by pressing TV on STANDBY SETTINGS >Press the centre button to store the >Press the centre button to store the >Press BACK to back up through previous DTV PLAY TIMER menu SETTINGS. Press the centre button to If you set the POWER SAVING to ON, you the remote control, the name of the menu is cannot activate the television or its sources TV PLAY TIMER. from your link room, while the main room Also remember to set the PLAY TIMER menu POWER SAVING is set to ON you cannot to ON, if the television or its speakers are to activate external PLAY TIMERs. television is in standby. Furthermore, when be activated by the Play Timer. 26 4 HOURS OFF Set up your Beo4 remote control You must set up your television to be operated with a Beo4 with, or without a navigation button. Beo4 type Even though your remote control has a navigation button, you can choose to set your television up for operation without navigation button. This can be useful if you have a BeoLink system also comprising a television without the BEO4 SETTING menu. are using has a navigation button or not. NAVIGATION BUTTON To make Beo4 settings … NO NAVIGATION BUTTON If you set up your television for operation without a navigation button and your Beo4 has a navigation button, you must also change the MODE setting of your Beo4. See the Beo4 Guide for further information. In the BEO4 SETTING menu you set up whether the Beo4 remote control you BEO4 SETTING >Bring up the TV SETUP menu and highlight OPTIONS. >Press the centre button to bring up the For information about menu operation OPTIONS menu, and highlight BEO4 with the different types of remote controls, SETTING. see page 4. >Press the centre button to bring up the BEO4 SETTING menu. >Use the navigation button up or down to reveal the setting you want. >Press the centre button to store the setting. >Press BACK to back up through previous menus or press and hold BACK to exit all menus. 27 Feature activation Additional features in your television can be made accessible via the FEATURE ACTIVATION menu. For information about additional features, contact your Bang & Olufsen retailer. Feature activation key In order for additional features to become available, a feature activation key must be entered. The feature key can be purchased from your Bang & Olufsen retailer. The key cannot be deactivated again. To enter an activation key … >Bring up the TV SETUP menu and highlight OPTIONS. >Press the centre button to bring up the OPTIONS menu and highlight FEATURE ACTIVATION. >Press the centre button to bring up the FEATURE ACTIVATION menu. >Select the feature, you wish to activate and press the centre button. >Use the number buttons to enter the 12 digit key. An incorrect number can be deleted by pressing the navigation button left, all numbers can be deleted by pressing BACK. >When the numbers are entered, press the centre button to accept. 28 FEATURE ACTIVATION KEY . . . . - . . . . - . . . . HDMI MATRIX The HDMI MATRIX feature is an additional feature which can be purchased separately. When the purchased feature activation key is entered, additional software becomes available in your television. The HDMI Matrix itself is a physical product that can be connected allowing you to connect up to 32 external sources to your television and access them via the Beo5 remote control. For information about additional features, contact your Bang & Olufsen retailer. Important information The HDMI MATRIX must be connected and set up by your Bang & Olufsen retailer. – Your Beo5 remote control must be reconfigured before you can use the HDMI Matrix. – You cannot operate the HDMI Matrix with HDMI MATRIX MATRIX INPUTS IR SOCKET IR TYPE HDMI YES 16 PUC1 PLUG A a Beo4 remote control. – You cannot connect more than one HDMI Matrix in a setup. – The HDMI Matrix cannot be configured on an HDMI Expander. Settings in the HDMI MATRIX menu … In the HDMI MATRIX menu, you can select settings for your HDMI Matrix. In the CONNECTIONS menu … >Open the HDMI MATRIX menu. >Set the field MATRIX to YES. >Set the field INPUTS to at least the same number of sources as you have connected. >Select an IR socket. You cannot select NONE. >Select an IR TYPE to indicate how the TV control is connected to the HDMI Matrix. If you select PLUG, you must select if MODULATION should be set to ON or OFF. >Select an HDMI socket. You cannot select NONE. >Press the centre button to store the HDMI MATRIX menu. >After you have stored your settings, select an HDMI Matrix type. >Press the centre button to store the settings. If you at a later time disable a stored HDMI Matrix configuration by setting the HDMI Matrix field to NO, your settings for INPUTS are still saved. This means that if you set the field to YES later, the settings reappear. 29 >> HDMI MATRIX Add sources to your setup … The sources connected to the HDMI Matrix must be registered in the television. Configuration of inputs … >Configure each input one by one. >Name each input by following on-screen instructions. If you do not name an input, the name from the selected PUC list is used. >Select a PUC source for the specific input. The sources are divided into four categories: SET-TOP BOX, DVD PLAYER/ RECORDER, VIDEO RECORDER and OTHER. >When you store the input settings, you can configure the next input. Continue the procedure until all connected inputs are configured. >Press the green button to return to the CONNECTIONS menu. 30 HDMI MATRIX INPUT 1 INPUT 2 INPUT 3 INPUT 4 INPUT 5 INPUT 6 INPUT 7 INPUT 8 NONE NONE NONE NONE NONE NONE NONE NONE Teletext Daily use of teletext is described in Getting Started, however, you can also store favourite teletext pages for quick reference. Store favourite teletext pages Day-to-day use of MEMO pages Nine MEMO pages are available for each You may wish to refer to your teletext television channel’s teletext service. MEMO pages quickly, for example, if you are leaving for work and wish to To create a MEMO page … check traffic information on a teletext >Bring up a page you view often. service. >Use the navigation button left or right to move the cursor along the menu bar to To view MEMO pages … SETUP and press the centre button. >Press TEXT to bring up teletext. The 9 available MEMO slots are shown by >Press number. The first is highlighted. >Press the centre button to store the or to move between MEMO pages. >Press BACK to leave teletext. current page. The cursor moves to the next available MEMO slot. >Use the number buttons on Beo4 to select the next teletext page you wish to store. >Repeat the procedure for each page you wish to store. To delete a MEMO page … >Use the navigation button left or right to move the cursor to SETUP and press the centre button >Move the cursor to the MEMO page you >To leave the MEMO setup, move the cursor to BACK on the teletext menu bar and press the centre button. wish to delete and press the yellow button. >Press the yellow button again to confirm. >Press BACK to leave teletext. To view teletext subtitles for a programme … If you want available teletext subtitles to appear automatically for a particular programme, store the teletext subtitles page as MEMO page 9. However, subtitles are not shown when the teletext source is DVB-HD, nor when teletext is shown in dual screen. 31 Operate other equipment with Beo4 or Beo5 The built-in Peripheral Unit Controller acts as an interpreter between connected video equipment, such as a set-top box, video recorder or DVD player, and your Bang & Olufsen remote control. Use the Beo4 remote control If you have a Beo4 remote control, some functions are available directly via Beo4 when you switch on the equipment. Additional functions are available through a menu-overlay that you bring up on the screen. In this menu you can see which Beo4 buttons activate specific Use the Bang & Olufsen remote control to gain access to the functions offered by your nonBang & Olufsen equipment. When you switch on the equipment, the functions are available via a menu-overlay on the television screen, if you use a Beo4 remote control, or via the Beo5 display. For instruction in the various functions offered by your equipment, see the product’s own guide. services or functions. Your Bang & Oufsen retailer can provide you with a show mapping’ survey which GUIDE 1 MENU 2 TEXT 3 INFO 4 WIDE 5 Example of a menu-overlay. The Beo4 explains operation of the connected buttons are shown to the right on the menu, equipment with Beo4 in more detail. and the functions they control are shown to the left. The menu may also list buttons on >Press a source button, for example V MEM, to switch on connected equipment. the remote control included with your connected equipment. >Press MENU to bring up the menu-overlay. >Press the number button that activates the Direct Beo4 operation function you want, or press one of the If you know which Beo4 button activates coloured buttons to activate a function. the function you want, you can activate the function without bringing up the The menu-overlay for equipment connected menu-overlay first. to a main room televison cannot be displayed on the television screen in the link room. While your equipment is on … >Press one of the coloured buttons to activate a function. Not all connected video equipment >Press and hold the centre button to bring are supported by Bang & Olufsen. For up the Program Guide or the ‘Now/Next’ further information about supported banner on the screen if you are using equipment, contact your Bang & equipment that supports these functions. Olufsen retailer. >Use and to step between channels*. >Use and to rewind and wind in, for example, recordings*. >Press MENU and use the number buttons to activate the function you want. *This operation does not apply to Beo4 without navigation button. 32 >> Operate other equipment with Beo4 or Beo5 Use equipment menus Use the Beo5 remote control Once you have activated connected The main functions of your equipment equipment, you can operate its own can be operated with the Beo5 remote menus with your remote control. control. Not all functions may be supported by Beo5. The available While equipment menus are shown … services and functions are shown in the >Use the navigation button up, down left Beo5 display when you activate the and right to move in menus. equipment. DTV Sky i Interactive Help Slow Box office Services R TV Guide >Press the centre button to select and activate a function. >Press the number buttons to enter information in menus or services when relevant. >Press a source button, for example DTV, to switch on connected equipment. >Press the button on the Beo5 display that activates the function you want. >Use the coloured buttons as indicated in the menus of your connected equipment. >Press BACK to back up through previous menus or press and hold BACK to exit all When you have selected connected equipment as a source, press MENU twice to bring up the television’s main menu. menus. 33 Example of a Beo5 display used to operate a set-top box. Connect and operate an audio system If you connect a compatible Bang & Olufsen audio system to the television using a Master Link cable, you obtain the benefits of an integrated audio/video system. Play a CD on your audio system using speakers connected to the television, or switch on a TV programme and send the sound to your audio system speakers. Your AV system can be placed together in one room or in two rooms with the television placed in one room and the audio system with a set of speakers placed in another. Connect your audio system to the television Using a BeoLink cable, connect the sockets marked MASTER LINK on the Option 2 Option 0 television and the audio system. Program the AV setup with Beo4 You can set your television, placed in an AV-system, to the correct Option using Beo4. Switch the entire system to If the television and an audio system is set up in one room with all speakers connected standby first. to the television, set the television to Option 2 Option setting for the television … and the audio system to Option 0. >While holding the • button (standby) on Beo4, press LIST. >Let go of both buttons. Option 1 Option 1 >Press LIST and use the navigation button up or down to bring up OPTION? in the Beo4 display and press the centre button. >Press LIST and use the navigation button to bring up V.OPT in the Beo4 display and If you want to use Master Link to then enter the appropriate number If the television (with or without additional integrate your audio/video system, (1, 2 or 4). speakers) and the audio system (with a connected set of speakers) are set up in the you must set POWER SAVING to OFF, see page 26. Not all Bang & Olufsen audio systems support integration with the television. Option setting for the audio system … same room, set the television to Option 1 >While holding the • button (standby) on and the audio system to Option 1. Beo4, press LIST. >Let go of both buttons. >Press LIST and use the navigation button Option 2 Option 2 up or down to bring up OPTION? in the Beo4 display and press the centre button. >Press LIST and use the navigation button up or down to bring up A.OPT in the Beo4 display and enter the appropriate number (0, 1, 2, 4, 5 or 6). If the audio system is set up in one room, and the television (with or without additional speakers) in another, set the television to Option 2 and the audio system to Option 2. 34 >> Connect and operate an audio system Program the AV setup with Beo5 If your television has been set up in an AV system, you may need to set it to the correct Option with Beo5. Switch the entire system to standby first. Option setting for the television … >Place yourself in front of the television. >While holding the • button (standby), press the centre button to bring up the SETUP menu on Beo5. >Let go of both buttons. >Press Option Pgm to bring up the Option Programming display on Beo5. >Press the button that matches the zone in which the television is placed, for example, Tv Area. Option setting for the audio system … >Place yourself in front of the audio system. >While holding the • button (standby), press the centre button to bring up the SETUP menu on Beo5. >Let go of both buttons. >Press Option Pgm to bring up the Option Programming display on Beo5. >Press the button that matches the zone in which the audio system is placed, for example, Audio Area. 35 >> Connect and operate an audio system Use an audio/video system If you integrate your audio system and your television, you can choose a speaker combination appropriate to the current video or audio programme, and also record video sound on the audio system. Zone ‘A’ LIST TV TV TV AV Zone ‘A’ LIST TV TV AV TV To listen to sound from a television source To listen to sound from a television source on on your audio system speakers without your audio system speakers with the screen switching on the screen, press LIST and use switched on, press TV, press LIST and use the navigation button up or down to bring the navigation button up or down to bring up AV in the Beo4 display , then press TV. up AV in the Beo4 display, then press TV (Beo5: Select the zone for your audio system again. (Beo5: Press TV, then select the zone speakers, then press a source button, such for your audio system speakers and press TV as TV). Beo4 instruction is shown to the again). Beo4 instruction is shown to the right right and Beo5 instruction to the left. and Beo5 instruction to the left. Zone ‘B’ LIST CD AV CD To listen to audio sound on the speakers connected to the television, press LIST and use the navigation button up or down to bring up AV in the Beo4 display , then press CD. (Beo5: Select the zone for speakers connected to the television, and then press an audio source button, such as CD). Beo4 instruction is shown to the right and Beo5 instruction to the left. 36 Distribute sound and picture with BeoLink The BeoLink system makes it possible to distribute picture and/or sound to other rooms throughout the house. Link connections For example, you can connect your television in the living room to another video system or set of speakers in another room, thereby making it possible to distribute the picture or sound to other rooms. If you have a BeoLink distribution system installed, you can either use your television in the main room, such as a living room, or in a link room, such as a study or bedroom. Under certain circumstances, it may be necessary to enter modulator settings. MASTER LINK AERIAL To the MASTER LINK socket on the link room system RF OUT Video signal distribution to link rooms RF Link Amplifier The main room television must be If an audio system is already connected to connected to the link room system with the Master Link socket and you wish to a Master Link cable: connect more equipment, the Master Link >Connect the Master Link cable to the the cable from the link room using a special cable must be split in two and joined with socket marked MASTER LINK on the junction box. Contact your Bang & Olufsen television. retailer for assistance. >If you want to distribute video signals as well, connect an ordinary aerial cable to Digital signals (HDMI) cannot be distributed the socket marked RF OUT on the from a main room television to the link room television. Then run the aerial cable to the system. RF Link Amplifier and the Master Link cable to the link room. Follow the instructions enclosed with the link room equipment. 37 >> Distribute sound and picture with BeoLink System modulator Link frequency If you have an audio setup, such as a If, for example, a TV channel in your BeoLink Active/Passive, and you choose area is broadcasted on the same to set up a non-linkable television in the frequency as the factory setting for the same room, you must set the system BeoLink system; 599 MHz, you must tune modulator to ON. The factory setting is the system modulator to an unoccupied AUTO, which must be used if you are frequency. When you change the link using a linkable Bang & Olufsen frequency in the main room television, television. LINK TUNING FREQUENCY TV SYSTEM MODULATOR 599 B/G AUTO make sure that the link frequency in the link room television corresponds to it. The LINK TUNING menu. To switch on the system modulator … >Bring up the TV SETUP menu and highlight OPTIONS. >Press the centre button to bring up the OPTIONS menu and highlight CONNECTIONS. >Press the centre button to bring up the CONNECTIONS menu, and highlight LINK TUNING. >Press the centre button to bring up the LINK TUNING menu and highlight MODULATOR. >Use the navigation button left or right to reveal ON. >Press the centre button to store the setting, or … >… press and hold BACK to leave all menus without storing. To change the link frequency … >Bring up the TV SETUP menu and highlight OPTIONS. >Press the centre button to bring up the OPTIONS menu and highlight LINK TUNING FREQUENCY FINE TUNE TV SYSTEM 599 0 B/G CONNECTIONS. >Press the centre button to bring up the CONNECTIONS menu, and highlight LINK The LINK FREQUENCY menu. TUNING. >Press the centre button to bring up the LINK TUNING menu and highlight When tuning in the link frequency in the link FREQUENCY. room, a test image is shown. FINE TUNE is >Use the navigation button left or right to find an unused frequency. >Press the centre button to store the setting, or … >… press and hold BACK to leave all menus without storing. 38 only available in link room/Option 4 setups. Your television in a link room If you have BeoLink installed in your home and you choose to place your television in a link room, you can operate all connected systems through the television. Option setting For your entire system to function properly, it is essential that the correct Option before you connect it to the television in the main room! With Beo4 … described below when you connect >While holding the • button (standby), your television for use in a link room: press LIST on Beo4. 1 Connect the link room television to >Let go of both buttons. the mains programme the link room television to the correct Option 3 Disconnect the link room television from the mains >Press LIST and use the navigation button up or down to bring up OPTION? in the Beo4 display and press the centre button. >Press LIST and use the navigation button up or down to bring up V.OPT in the Beo4 display and press 6*. 4 Make the necessary connections 5 Reconnect the link room television to the mains. Link room television in the link room is set to the You must follow the procedure 2 Using your remote control, Main room With Beo5 … >Place yourself in front of the link room television. >While holding the • button (standby), press the centre button to bring up the SETUP menu on Beo5. >Let go of both buttons. >Press Option Pgm to bring up the Option Programming display on Beo5. >Press the button that matches the zone in which the television is placed. 39 ‘Zone XX’ (Option 6) *If you connect the television for use in a link room where other link systems are already connected, such as speakers, you must set the television to Option 5 instead. >> Your television in a link room Link room operation When you are in the link room, you can Listen to stereo sound in your link operate all connected systems with the room … remote control. Usually sound distributed from a main room video source, such as a set-top box, to the Use sources present only in one of the link room is transmitted in mono. However, rooms … you can select stereo sound: >Press the button for the source you wish to use, for example RADIO. >Operate the selected source as usual. > Press TV to switch on the television. >Press LIST and use the navigation button up or down to bring up AV in the Beo4 Use a main room source – source type display. (Beo5: Press AV to bring up a present in both rooms … source display). >Press LIST and use the navigation button >Press, for example DTV, to activate a up or down to bring up LINK in the Beo4 source connected to the main room display. (Beo5: Press Link to bring up a television, such as a set-top box. source display). >Press the button for the source you wish to use, for example TV. >Operate the source as usual. While using this function, distribution of other main room sources to other link room systems is not possible. Use a link room source – source type present in both rooms … >Press the button for the source you wish to use, for example TV. >Operate the source as usual. 40 Main room Link room ‘Zone XX’ (Option 6) Two televisions in the same room If you have placed your television in a room where you already have a Bang & Olufsen television, and commands from your remote control can be received by both televisions, you must change the Option setting of the television. This prevents simultaneous activation of both televisions. One remote control for both televisions For your television to function properly, BeoVision 10 Option 4 it is essential that the television is set to the correct Option, see page 39 for information on Option programming. If you have a Beo4, you must set your television to Option 4, and if you have a Beo5, you must set the television to the correct zone*. When you Option program the Beo4 – Operate your television in television, disconnect the television Option 4 … you do not want to program from Normally, you can activate a source, such the mains. This ensures that only the as TV, simply by pressing the relevant television, you want to program, source button on your remote control. receives the Option programming. However, when you set your television LIST LINK TV TV Beo4 operation. to Option 4, you must do the following, BeoVision 10 Zone ‘A’ if you have a Beo4: >Press LIST* and use the navigation button up or down to bring up LINK in the Beo4 display. >Press a source button, such as TV. Zone ‘A’ TV BeoVision 10 Zone ‘B’ *In order to display LINK on Beo4, you must first add it to the Beo4 list of functions. See Zone ‘B’ TV the Guide enclosed with your Beo4. Beo5 operation. *NOTE! For information about choice of zone, contact your Bang & Olufsen retailer. 41