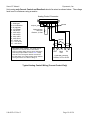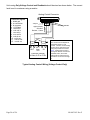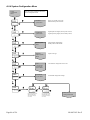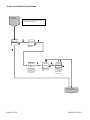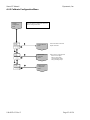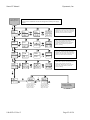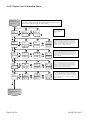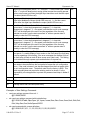
1
Smart LT Manual Dynatronix, Inc. OPERATING MANUAL FOR LT1200X SERIES POWER SUPPLY LT1200X MODELS WITH SMART INTERFACE. 198-0853-02 Rev F Page 1 of 126 Table Of Contents 1. INTRODUCTION ........................................................................................................................................................................ 6 1.1. TWO YEAR NEW PRODUCT WARRANTY ....................................................................................................................... 6 1.2. CONTACT INFORMATION ......................................................................................................................................................... 7 2. SAFETY PRECAUTIONS .......................................................................................................................................................... 8 3. FUNCTIONAL OVERVIEW.................................................................................................................................................... 10 4. PRODUCT SPECIFICATIONS ............................................................................................................................................... 12 5. INSTALLATION INSTRUCTIONS ........................................................................................................................................ 15 5.1. POWER INPUT ........................................................................................................................................................................ 15 5.1.1. Input Power Requirements ............................................................................................................................................ 15 5.1.2. Input Power Connection ............................................................................................................................................... 15 5.2. MOUNTING ............................................................................................................................................................................ 15 5.3. OUTPUT POWER CONNECTIONS ............................................................................................................................................. 16 5.4. INHIBIT SIGNAL CONNECTION ............................................................................................................................................... 16 5.5. SERIAL HOST PORT CONNECTIONS ........................................................................................................................................ 16 5.6. ANALOG CARD CONNECTIONS (OPTIONAL 138-0471-XX CARD) ......................................................................................... 17 6. OPERATING PROCEDURES ................................................................................................................................................. 21 6.1. FRONT PANEL CONTROLS ...................................................................................................................................................... 21 6.1.1. Displays ........................................................................................................................................................................ 21 6.1.2. Encoder Functionality .................................................................................................................................................. 21 6.1.3. Voltage Indicator .......................................................................................................................................................... 22 6.1.4. Current (Amps) Indicator ............................................................................................................................................. 22 6.1.5. Operate / Standby Switch .............................................................................................................................................. 22 6.1.6. Remote / Local Switch ................................................................................................................................................... 23 6.1.7. Inhibit Lamp.................................................................................................................................................................. 23 6.1.8. Fault Lamp.................................................................................................................................................................... 23 6.1.9. Over Temperature Lamp ............................................................................................................................................... 23 6.2. MENU OVERVIEW .................................................................................................................................................................. 25 6.2.1. Menu Organization ....................................................................................................................................................... 25 6.2.2. Menu Access ................................................................................................................................................................. 28 6.2.3. Menu Navigation........................................................................................................................................................... 28 6.3. UNIT CONFIGURATION........................................................................................................................................................... 29 6.3.1. Totalizer Configuration ................................................................................................................................................ 29 6.3.2. Host Port Configuration ............................................................................................................................................... 31 6.3.3. Remote Control Configuration...................................................................................................................................... 32 6.3.4. Power On Configuration............................................................................................................................................... 33 6.3.5. Power Fail Alarm Configuration .................................................................................................................................. 34 6.3.6. Remote Operate/Standby Control (Digital Input) ......................................................................................................... 35 Page 2 of 126 198-0853-02 Rev F Smart LT Manual Dynatronix, Inc. 6.3.7. Front Panel Button Lock Outs ...................................................................................................................................... 37 6.3.8. Hardware Options Configuration ................................................................................................................................. 38 6.3.9. Changing the Unit Configuration Password................................................................................................................. 38 6.3.10. Setting Unit Defaults ................................................................................................................................................... 39 6.4. CYCLE CONTROL SETTINGS ................................................................................................................................................... 40 6.4.1. Manual Cycle Control................................................................................................................................................... 40 6.4.2. Timed Cycle Control (RTC or ATC) ............................................................................................................................. 41 6.4.3. Tolerance Settings......................................................................................................................................................... 43 6.5. ERROR MESSAGES ................................................................................................................................................................. 44 6.5.1. Error Message Display ................................................................................................................................................. 44 6.5.2. Clearing Error Codes ................................................................................................................................................... 45 6.6. RUN SCREENS ........................................................................................................................................................................ 46 6.6.1. Meters Run Screen ........................................................................................................................................................ 47 6.6.2. Totalizer Run Screen ..................................................................................................................................................... 47 6.6.3. Cycle Run Screen .......................................................................................................................................................... 48 6.6.4. Diagnostics Run Screen ................................................................................................................................................ 48 6.7. CURRENT AND VOLTAGE SETTINGS....................................................................................................................................... 49 6.7.1. Voltage Setting Adjustment ........................................................................................................................................... 49 6.7.2. Current Setting Adjustment ........................................................................................................................................... 49 6.8. SETTING ADJUSTMENT AND REGULATION MODES ................................................................................................................ 50 6.8.1. Setting Adjustment (while viewing the setting) ............................................................................................................. 50 6.8.2. Setting Adjustment (while viewing the output value) .................................................................................................... 50 6.8.3. Current Regulation ....................................................................................................................................................... 50 6.8.4. Voltage Regulation ....................................................................................................................................................... 50 6.8.5. Current Regulation with Voltage Limit (crossover) ...................................................................................................... 51 6.8.6. Voltage Regulation with Current Limit (crossover) ...................................................................................................... 51 6.9. CYCLE PAUSE/RESUME USING THE OPER/STBY SWITCH .................................................................................................... 51 7. REMOTE HOST CONTROL ................................................................................................................................................... 53 7.1. OVERVIEW ............................................................................................................................................................................. 53 7.2. HOST PORT COMMUNICATIONS SETTINGS ............................................................................................................................. 53 7.3. HOST PORT CONNECTIONS .................................................................................................................................................... 53 7.4. HOST PORT PROTOCOL .......................................................................................................................................................... 53 8. REMOTE OPERATE/STANDBY CONTROL ....................................................................................................................... 54 9. REMOTE ANALOG CONTROL (OPTION) ......................................................................................................................... 55 9.1. REMOTE ANALOG READ BACK .............................................................................................................................................. 55 9.1.1. Analog Output Scaling .................................................................................................................................................. 55 9.2. REMOTE ANALOG SETTING CONTROL ................................................................................................................................... 56 9.2.1. Analog Input Scaling .................................................................................................................................................... 56 9.3. REMOTE OPERATE/STANDBY FOR ANALOG CONTROL .......................................................................................................... 56 198-0853-02 Rev F Page 3 of 126 10. CALIBRATION PROCEDURE ............................................................................................................................................. 57 10.1. OVERVIEW ........................................................................................................................................................................... 57 10.1.1. Equipment ................................................................................................................................................................... 57 10.1.2. Calibration Summary .................................................................................................................................................. 59 10.1.3. Restoring the default calibration values ..................................................................................................................... 61 10.2. CALIBRATION STEPS ............................................................................................................................................................ 62 10.2.1. Current Output and Read Back Calibration ............................................................................................................... 62 10.2.2. Voltage Output and Read Back Calibration ............................................................................................................... 64 10.2.3. Analog Calibration (Optional).................................................................................................................................... 66 11. OPTIONAL FEATURES AND CONTROLS........................................................................................................................ 70 11.1. ANALOG CONTROL CARD .................................................................................................................................................... 70 12. MAINTENANCE ..................................................................................................................................................................... 70 12.1. CLEANING ........................................................................................................................................................................... 70 12.2. FILTER REPLACEMENT (IF EQUIPPED) .................................................................................................................................. 70 12.3. COOLING FAN REPLACEMENT ............................................................................................................................................. 70 APPENDIX A: MENU TREE ....................................................................................................................................................... 72 A.1 MENU TREE FORMAT............................................................................................................................................................. 73 A.2 POWER ON/OFF SEQUENCES .................................................................................................................................................. 74 A.2.1 Power On in Standby ..................................................................................................................................................... 74 A.2.2 Power On Resume Cycle ............................................................................................................................................... 75 A.3 CYCLE PAUSE/RESUME.......................................................................................................................................................... 76 A.4 DISPLAY SELECT MENU......................................................................................................................................................... 77 A.5 UNIT SETUP MENU ................................................................................................................................................................ 78 A.5.1 Cycle Setup Menu .......................................................................................................................................................... 79 A.5.2 Tolerance Setup Menu ................................................................................................................................................... 80 A.5.3 Error Handling Setup Menu .......................................................................................................................................... 81 A.6 UNIT CONFIGURATION MENU ................................................................................................................................................ 82 A.6.1 Totalizer Configuration Menu ....................................................................................................................................... 83 A.6.2 Host Port Configuration Menu ...................................................................................................................................... 84 A.6.3 Remote Control Configuration Menu ............................................................................................................................ 85 A.6.4 System Configuration Menu .......................................................................................................................................... 86 A.6.5 Calibrate Configuration Menu ...................................................................................................................................... 93 APPENDIX B: HOST PORT PROTOCOL ................................................................................................................................ 98 B.1.1 Host Protocol Version Information ............................................................................................................................... 98 B.1.2 Command List................................................................................................................................................................ 98 B.1.3 Command Format.......................................................................................................................................................... 99 B.1.4 Formatting Rules ........................................................................................................................................................... 99 B.1.5 Unit Addressing (@AA.a) ............................................................................................................................................ 100 B.1.6 Communications Settings (factory default) – RS485 ................................................................................................... 101 B.1.7 CRC Calculation ......................................................................................................................................................... 102 Page 4 of 126 198-0853-02 Rev F Smart LT Manual Dynatronix, Inc. B.1.8 ACK Response Command ............................................................................................................................................ 103 B.1.9 NAK Response Command ............................................................................................................................................ 104 B.1.10 CRC Disable/Enable Command “c” ......................................................................................................................... 106 B.1.11 Delimiter Text Disable/Enable Command “i” .......................................................................................................... 107 B.1.12 Setup Command “s”: ................................................................................................................................................ 108 B.1.13 State Command “a”: ................................................................................................................................................. 110 B.1.14 Readings Command “d”: .......................................................................................................................................... 112 B.1.15 Error Status Command “m”: .................................................................................................................................... 114 B.1.16 Error History Command “h”: ................................................................................................................................... 115 B.1.17 User Settings Command “t”: .................................................................................................................................... 116 B.1.18 Unit Info Command “u”: .......................................................................................................................................... 119 APPENDIX C: ERROR CODES ................................................................................................................................................ 121 REVISION HISTORY ................................................................................................................................................................. 126 198-0853-02 Rev F Page 5 of 126 1. Introduction 1.1. TWO YEAR NEW PRODUCT WARRANTY DYNATRONIX, INC., hereby warrants to the purchaser that all new products sold are guaranteed against defects in materials or manufacture for two years after shipment. DYNATRONIX, INC., expressly reserves the right to offer an extended warranty at its sole discretion. Such express warranty shall not be deemed effective unless expressly authorized by DYNATRONIX, INC., personnel. DYNATRONIX, INC., at its sole discretion, will repair or replace any defective products that are returned in accordance within the time period proscribed by this warranty. All products for repair or examination must be returned to DYNATRONIX, INC., prepaid. The defective product, as repaired or replaced, requires the issuance of a Return Material Authorization Number (“RMA”) from DYNATRONIX, INC., personnel prior to acceptance for repair or replacement by DYNATRONIX, INC. An RMA will be issued upon determination by DYNATRONIX, INC., personnel that the defective product requires factory repair. The customer assumes all shipment expenses of the returned product to and from DYNATRONIX, INC., within the warranty period. DYNATRONIX, INC.’s liability, under this warranty, shall in any event not exceed the original purchase price of the product. To make a claim under this warranty, it is the responsibility of the purchaser to immediately contact DYNATRONIX, INC., and provide proof of the product’s model, part number, input and output voltage and serial number. DYNATRONIX, Inc., will then determine whether the product remains under warranty. This warranty DOES NOT COVER failures caused by any of the following: 1. Misuse, negligence or accident; 2. Alterations made by individuals or parties not directly employed by DYNATRONIX, INC. This warranty DOES NOT EXTEND to commercial sub-assemblies that are guaranteed by a manufacturer’s warranty. This warranty becomes effective upon the date the product is shipped. In the event that a product no longer covered by the NEW PRODUCT WARRANTY is sent for repair, the provisions of the REPAIR WARRANTY as detailed below govern. DYNATRONIX, INC., EXPRESSLY DISCLAIMS ALL OTHER WARRANTIES, INCLUDING, WITHOUT LIMITATION, ALL EXPRESS WARRANTIES, THE IMPLIED WARRANTY OF FITNESS FOR A PARTICULAR PURPOSE AND THE IMPLIED WARRANTY OF MERCHANTABILITY. THERE ARE NO WARRANTIES WHICH EXTEND BEYOND THE DESCRIPTION ON THE FACE HEREOF. REPAIR WARRANTY DYNATRONIX, INC., hereby warrants to the purchaser that products previously purchased as new from DYNATRONIX, INC., and returned to DYNATRONIX, INC., for repair or replacement be hereby governed by the provisions of the REPAIR WARRANTY. DYNATRONIX, INC., expressly reserves the right to extend the REPAIR WARRANTY to products not purchased from DYNATRONIX, INC., at its sole discretion. The REPAIR WARRANTY shall exclude all products not purchased from DYNATRONIX, INC., unless expressly authorized by DYNATRONIX, INC., personnel. DYNATRONIX, INC., guarantees that all repairs be free from defects for ninety (90) days after return shipment to purchaser. Product failures not related to repairs done by DYNATRONIX, INC., shall not be covered by the REPAIR WARRANTY. DYNATRONIX, INC., further warrants that repair investigations that fail to identify product defects shall be guaranteed for a ninety (90) day period after return shipment to customer. In the event that the product fails within the stated ninety (90) day period after the inspection, DYNATRONIX, INC., agrees to assume the in-out freight costs for subsequent returns of the product, experiencing the complained of problem, for an additional ninety (90) day period. Effective Date: January 1, 2006 Page 6 of 126 198-0853-02 Rev F Smart LT Manual Dynatronix, Inc. 1.2. Contact Information Contact Information Corporate Headquarters Dynatronix, Inc 462 Griffin Boulevard Amery, WI 54001 USA Telephone: (715) 268-8118 FAX: (715) 268-8183 Toll-Free USA: (800) 826-7172 www.dynatronix.com Customer Support Dynatronix, Inc. 462 Griffin Boulevard Amery, WI 54001 USA 198-0853-02 Rev F Phone (715) 268- 8118 Fax (715) 268-8183 Toll-Free USA: (800) 826-7172 [email protected] www.dynatronix.com Page 7 of 126 2. Safety Precautions Before proceeding any further through this manual, this section should be read thoroughly to protect yourself and your equipment. CAUTION TO REDUCE THE RISK OF ELECTRIC SHOCK, UNIT MUST BE CONNECTED TO EARTH GROUND. REMOVE POWER BEFORE OPENING PANELS. 1. To properly operate this power cords with a 3-prong grounded system SHOCK. UNIT supply, MUST only BE electric CONNECTED are to be used. TO EARTH GROUND. 2. The electric cord providing power to the machine should be plugged in only to a grounded REMOVE POWER BEFORE outlet that complies with OPENING U.L. and/or OSHA safety requirements, or local regulations. PANELS. 3. If necessary to work inside the cabinet, remember to remove AC power before opening any panels. Not doing so may endanger yourself and your equipment. The means of disconnecting the power supply is either the removal of the detachable power supply cord from the power inlet or power receptacle or both. If the power cord is direct connected to the AC source as well as the power supply, turn off the local safety or power panel branch breaker which provides AC to the power supply. Follow your lock out / tag out procedures to ensure that power is not unexpectedly applied while servicing. 4. This unit contains no user serviceable parts. All repairs or modifications to this unit must be done at the Dynatronix factory, or at an authorized Dynatronix Service Center, or by a qualified service technician. See the Table of Contents section for a list of authorized service centers in the USA and Europe. 5. If necessary to work inside of cabinet with power on DO NOT wear metal objects on hands or wrists because of the various DC and AC voltages present. 6. If the equipment is used in a manner other than mentioned in this manual, the protection provided by this equipment may be impaired. Page 8 of 126 198-0853-02 Rev F Smart LT Manual Dynatronix, Inc. 7. This symbol indicates a protective earth connection. 8. This symbol means to consult the product manual for additional information. ! 9. This label indicates where high AC or DC voltages are located inside of the unit. Be aware of these locations if power is needed for any work being done inside of unit. Not doing so may endanger yourself and your equipment. 10. This label indicates where components or surfaces are operating at temperatures which might cause injury either directly (burn) or indirectly (involuntarily moving body into another danger). This label is used most often on the output transistor heatsinks. 198-0853-02 Rev F Page 9 of 126 11. If this power supply weighs more than 40lb / 18kg (see Section 4 - Specifications), it must be lifted by two persons. Always use proper lifting technique. 12. Use of this product for purposes other than those specified in this manual is not recommended. Use for other purposes may give unexpected results or cause damage to the power supply and/or the system it is being used in. 3. Functional Overview The LT1200X series plating power supply is a compact, high power unit that offers a wide range of features for the plating industry. It has universal power input with power factor correction. The power supply has a sealed design with a fan cooled heat sink tunnel. The unit is packaged in a 316 stainless steel ½ rack sized enclosure. The LT comes with a Smart user interface. The user can set and monitor the voltage and current and there are indicators for errors and status of the unit. The settings are changed using multiturn encoders. The encoders have pushbutton switches for changing the meter display from the readings to the settings for visual adjustment of the set point. By using the proper settings the power supply can be set to run in current, voltage or crossover regulation modes. The LT Smart user interface contains menus that allow various features to be configured and provide for display of information regarding cycle status. The LT supports the following features Manual Cycle Control Real Time Cycle Control (RTC) Amp Time Cycle Control (ATC) User Configurable Totalizer Over Temperature Warning (before shut down) Over Temperature Shut down Fan speed based on internal temperature Configurable Power Up Mode (always in standby, or in last mode) Remote operate/standby control (isolated digital input) Host port (RS485) Optional analog control (4-20mA, 05V, 0-10V) Digital Calibration Alarms and diagnostics Page 10 of 126 198-0853-02 Rev F Smart LT Manual Dynatronix, Inc. Tolerance Power failure Over temperature warning Over temperature shut down Fan diagnostics Various System diagnostics 198-0853-02 Rev F Page 11 of 126 4. Product Specifications PRODUCT SPECIFICATIONS INPUT POWER Universal input, 100-240VAC, 50-60Hz, single phase. **LT12-100 input: 200-240VAC, 50-60Hz, single phase. INPUT PROTECTION Main: The input is protected by two internal fuses (Labeled F1 & F2) located on printed circuit board assembly 138-0512-00. MODEL LT6-5 LT6-10 LT6-25 LT6-50 LT6-75 LT6-100 LT9-10 LT9-25 LT9-50 LT9-75 LT9-100 LT12-10 LT12-25 LT12-50 LT12-75 **LT12-100 LT18-10 LT18-25 LT18-50 LT18-60 LT24-10 LT24-25 LT24-50 LT48-10 LT48-25 Page 12 of 126 MAXIMUM INPUT CURRENT AT 115VAC INPUT 0.4A 1A 2A 4A 5.5A 7.5A 1.5A 3A 5.5A 7.5A 11A 1.5A 3.5A 7A 11A 7.5A ** AT 200VAC INPUT 2.5A 5.5A 11A 12A 3A 7A 14.5A 6A 14.5A FUSE RATING MDA1 – 1Amp, 250VAC MDA2 – 2Amp, 250VAC MDA3 – 3Amp, 250VAC MDA5 – 5Amp, 250VAC MDA8 – 8Amp, 250VAC MDA10 - 10Amp, 250VAC MDA2 - 2Amp, 250VAC MDA5 - 5Amp, 250VAC MDA8 - 8Amp, 250VAC MDA10 - 10Amp, 250VAC MDA15 - 15Amp, 250VAC MDA2 – 2Amp, 250VAC MDA5 – 5Amp, 250VAC MDA10 - 10Amp, 250VAC MDA15 - 15Amp, 250VAC MDA10 - 10Amp, 250VAC MDA3 – 3Amp, 250VAC MDA8 – 8Amp, 250VAC MDA15 - 15Amp, 250VAC MDA15 - 15Amp, 250VAC MDA4 – 5Amp, 250VAC MDA10 - 10Amp, 250VAC MDA15 - 20Amp, 250VAC MDA8 – 8Amp, 250VAC MDA20 - 20Amp, 250VAC 198-0853-02 Rev F Smart LT Manual OUTPUT RATING 198-0853-02 Rev F Dynatronix, Inc. MODEL OUTPUT RATING LT6-5 0-6V, 0-5A, 30W LT6-10 0-6V, 0-10A, 60W LT6-25 0-6V, 0-25A, 150W LT6-50 0-6V, 0-50A, 300W LT6-75 0-6V, 0-75A, 450W LT6-100 0-6V, 0-100A, 600W LT9-10 0-9V, 0-10A, 90W LT9-25 0-9V, 0-25A, 225W LT9-50 0-9V, 0-50A, 450W LT9-75 0-9V, 0-75A, 675W LT9-100 0-9V, 0-100A, 900W LT12-10 0-12V, 0-10A, 120W LT12-25 0-12V, 0-25A, 300W LT12-50 0-12V, 0-50A, 600W LT12-75 0-12V, 0-75A, 900W LT12-100 0-12V, 0-100A, 1200W LT18-10 0-18V, 0-10A, 180W LT18-25 0-18V, 0-25A, 450W LT18-50 0-18V, 0-50A, 900W LT18-60 0-18V, 0-60A, 1080W LT24-10 0-24V, 0-10A, 240W LT24-25 0-24V, 0-25A, 600W LT24-50 0-24V, 0-50A, 1200W LT48-10 0-48V, 0-10A, 480W LT48-25 0-48V, 0-25A, 1200W Page 13 of 126 OUTPUT PROTECTION The internal controller will not accept commands that will exceed the output rating of the power supply. CONTROLS Smart LT Front panel (display, encoders, switches). Host Port (RS485) Optional Analog Interface. ENVIRONMENTAL CONDITIONS INDOOR USE ONLY Operating temperature: 0 - 40C Non-condensing humidity conditions 15-90% RH Storage temperature: -20 - 85C LOAD REGULATION Current: : ±0.5% of maximum current rating for the power supply from 10% -100% load Voltage: : ±0.5% of maximum voltage rating for the power supply from 10% - 100% load LINE REGULATION For line conditions as listed in 4.1 Current: : ±0.5% of maximum current rating for the power supply Voltage: : ±0.5% of maximum voltage rating for the power supply RIPPLE 120mVrms maximum throughout operating range COOLING Variable fan speed forced air cooling: in through front, out through rear. Allow 2 inches (51mm) minimum clearance on front and rear of unit. ENCLOSURE Half-rack enclosure, 316 Stainless Steel SIZE 3.43” (87.1mm)H x 8.45” (214.6mm)W x 16” (406mm)D (18” (457mm)D including controls and connectors) WEIGHT Approximately 17lbs (7.7kg). Page 14 of 126 198-0853-02 Rev F Smart LT Manual Dynatronix, Inc. 5. Installation Instructions 5.1. Power Input 5.1.1. Input Power Requirements The input power and output capacity of each rectifier is specified on the equipment serial tag located on the back of the unit. The power supply has a universal input, 100-240VAC, 50-60Hz, single phase. Derate maximum output power to 1000W for input voltages less than 100Vac. 5.1.2. Input Power Connection Make sure the Main Power Switch is in the OFF (0) position. Plug the female end of the power cord into the back of the power supply. Connect the male end of the power cord* to the correct supply in accordance with U.L. and/or OSHA specifications. *If power supply does not come equipped with a male plug, use Interpower NEMA 6-20 (250Vac, 20A) P/N: 88030180 or equivalent. 5.2. Mounting Place the LT1200X Series power supply on a shelf capable of accepting a 1/2 rack mount package. Cooling is front to rear unless power supply is equipped with a rear filter cooling is from back to front. Do not block airflow to the unit. Leave at least 2 inches (5cm) in front of and behind the power supply for adequate ventilation. Place the unit in an area which has adequate ventilation to prevent condensation. Do not spray liquids on or inside power supply. Keeping units away from Option Card Connector Inhibit Connector Host Port Fan Cover & Rear Air Vent Output Bus-Bars (Air filter if equipped) Power Inlet corrosive plumes will help prolong the life of your capital investment. 198-0853-02 Rev F Page 15 of 126 5.3. Output Power Connections Located at the rear of the LT1200X Series are two output bus-bar connectors which are used to connect to the bath. Make sure the connections to the bus-bars are tight to reduce heating. Loose connections to the bus-bars will damage the power supply. 5.4. Inhibit Signal Connection When the inhibit input is active the power supply output is disabled and the front panel “inhibit” LED illuminates. The inhibit signal can be used for a safety interlock or as a remote operate/standby control. The inhibit signal can be a switch closure or a voltage signal input depending on how the inhibit terminals are wired (see the diagram below). If the inhibit signal is not used pins 1 and 3 must be connected with a jumper wire to enable power supply operation. For details on how to use the inhibit input for remote operate/standby control see 6.3.6.Remote Operate/Standby Control (Digital Input) and 8.0.Remote Operate/Standby Control. Inhibit Connector Signals 1 Inhibit/Standby w/ Open Close to Inhibit Open to Inhibit Connection Connection Method Method Inhibit Connector 1 2 3 12 3 Jumper 1 to 3 2 Inhibit/Standby w/ Close 3 Common External Common External 5-15VDC Open to Inhibit/Standby Close to Inhibit/Standby Inhibit Signal Connection Diagram 5.5. Serial Host Port Connections The serial host port can be used to monitor and/or control the LT power supply using the ASCII Host Protocol (See 7.0.Remote Host Control). The serial host port supports a half duplex RS485 interface. Multiple LT power supplies can be connected to a single RS485 bus (multi-drop). Each device on the RS485 bus is individually addressed using the ASCII Host Protocol. If an RS232 device (such as a PC) will be connected to the LT host port then an RS232 to RS485 converter module will be required (not included). RS485 Connections 1 nc 2 nc 3 nc 4 RS485 Data A 5 nc 6 nc 7 nc 8 RS485 Common 9 RS485 Data B Page 16 of 126 DB9 Female Connector on Back of Unit 5 1 9 6 198-0853-02 Rev F Smart LT Manual Dynatronix, Inc. 5.6. Analog Card Connections (Optional 138-0471-XX Card) Rectifiers which have optional analog control will be equipped with the 138-0471-xx card and require customer supplied wiring. See wiring diagram figures below for connection information. The following give a description of the control and readback signals on the 12 pin terminal strip. VOLTAGE CONTROL (VC) Control of the power supply output voltage can be achieved by connecting the appropriate signal to pins 6 (+) and 5 (-). CURRENT CONTROL (CC) Control of the power supply output current can be achieved by connecting the appropriate signal to pins 8 (+) and 7 (-). VOLTAGE READBACK (VRB) Monitoring of the power supply output voltage can be achieved by connecting the appropriate sensing circuitry to pins 9 (+) and 10 (-). CURRENT READBACK (CRB) Monitoring of the power supply output current can be achieved by connecting the appropriate sensing circuitry to pins 11 (+) and 12 (-). Pin 3 can be used for a DC COMMON connection. Pin 1 can be used as a connection point for the cabling shields. NOTE: To reduce the possibility of electrical noise interfering with the proper operation of the control system, use shielded twisted pair for all wiring between the analog controller and the power supply. Belden™ 8761 or equivalent cable type is recommended. NOTE: The DC COM (pin 3) is used to connect the power supply’s DC common to the controller's DC common. The shielding for the voltage & current control lines should be earth grounded at the controller and should be cut-off at the power supply. The shielding for the voltage & current readback lines should be earth grounded at the power supply (pin 1 - SHIELD) and cut-off at the controller. See diagrams below. NOTE: When using 4-20mA control, the controller’s input channels must be isolated from each other. It is recommended that isolated receivers (ex. OPTO 22 AD3T or equivalent) be used with the curr rd out and volt rb out transmitter channels. These transmitter channels are self powered. The receiver inputs and transmitter outputs are ground isolated from the power supply’s DC common and are isolated from earth ground as well. However, be aware that both input channels and both output channels of the AI board, do share a common signal ground. In other words, there is no isolation from channel to channel or receiver inputs to transmitter outputs except that provided by the differential inputs. A common ground signal from the Remote controller is required. NOTE: MAXIMUM LOOP RESISTANCE THAT CAN BE IN SERIES BETWEEN THE (+) AND (-) OF THE CURRENT OR VOLTAGE READBACK IS 400 OHMS 198-0853-02 Rev F Page 17 of 126 Units with Current and Voltage Control and Readback should be wired as shown below: Analog Control Connector 1 Connector Signals 1 shield gnd 2 no connection 3 dc common 4 +12 (50ma) 5 -volt cntl in 6 +volt cntl in 7 -curr cntl in 8 +curr cntl in 9 +volt rb out 10 -volt rb out 11 + curr rb out 12 - curr rb out 6 12 Shields Shields Shields + - OUT - + Earth Gnd IN Controller (Voltage) 4-20ma, 0-5V or 0-10V + - OUT - + Earth Gnd IN Controller (Current) 4-20ma, 0-5V or 0-10V Typical Analog Control Wiring (Current and Voltage Control) NOTE: The analog control card has control of the output current and voltage if it is enabled by pressing the RMT/LCL button so that the RMT indicator comes on. NOTE: The unit must be in operate, OPER indicator on, for the remote analog control inputs to control the power supply output. NOTE: If the analog control card is not controlling the output when in Remote mode, use the procedure in section 6.3.3.Remote Control Configuration to verify that the source of the voltage and current settings while in remote control mode are set to the options card. Page 18 of 126 198-0853-02 Rev F Smart LT Manual Dynatronix, Inc. Units using only Current Control and Readback should be wired as shown below. The voltage level is set to maximum using a resistor. Analog Control Connector 1 Connector Signals 1 shield gnd 2 no connection 3 dc common 4 +12 (50ma) 5 -volt cntl in 6 +volt cntl in 7 -curr cntl in 8 +curr cntl in 9 +volt rb out 10 -volt rb out 11 + curr rb out 12 - curr rb out 6 12 Shields Jumper Approximately 560 Ohm Resistor, ½ Watt Alternative to the resistor: The voltage can be adjusted to the desired value in Local control. Then the voltage setting source can be changed to host using the procedure in section 6.3.3. Finally when the unit is changed to Remote control with the RMT switch, the voltage setting will be retained as long as there is not a host to change it. Shields + - OUT - + Earth Gnd IN Controller (Current) 4-20ma, 0-5V or 0-10V Typical Analog Control Wiring (Current Control Only) 198-0853-02 Rev F Page 19 of 126 Units using Only Voltage Control and Readback should be wired as shown below. The current level is set to maximum using a resistor. Analog Control Connector 1 Connector Signals 1 shield gnd 2 no connection 3 dc common 4 +12 (50ma) 5 -volt cntl in 6 +volt cntl in 7 -curr cntl in 8 +curr cntl in 9 +volt rb out 10 -volt rb out 11 + curr rb out 12 - curr rb out 6 12 Jumper Shields Approximately 560 Ohm Resistor, ½ Watt Shields + - OUT - + Earth Gnd IN Controller (Voltage) 4-20ma, 0-5V or 0-10V Alternative to the resistor: The current can be adjusted to the desired value in Local control. Then the current setting source can be changed to host using the procedure in section 6.3.3. Finally when the unit is changed to Remote control with the RMT switch, the current setting will be retained as long as there is not a host to change it. Typical Analog Control Wiring (Voltage Control Only) Page 20 of 126 198-0853-02 Rev F Smart LT Manual Dynatronix, Inc. 6. Operating Procedures Error / Status Indicators Current Encoder & Indicator Voltage Meter Current Meter Voltage Encoder & Indicator OVERTEMP FAULT INHIBIT 1234 432 RMT LCL OPER STBY Remote / Local Switch Main Power Switch VOLTS AMPS SET Setting Indicator Air Inlet Operate / Standby Switch 6.1. Front Panel Controls 6.1.1. Displays In addition to providing current and voltage meters the displays can display other supply information. The displays can show numeric parameter values or text messages. 6.1.1.1. Run Screens Run screens are shown during normal supply operation. An example of a run screen is the meters run screen which displays the output current and output voltage and allows for display and edit of the current and voltage settings. Other examples of run screens include totalizer time, cycle time, and diagnostics. The ‘SET’ lamp is off when a run screen is displayed. 6.1.1.2. Menus Menus can be displayed to configure the power supply. The unit configuration menu contains items that are generally only set when a power supply is initially installed. The setup menu contains general cycle configuration such as selecting RTC or ATC control and setting current or voltage tolerances. The display select menu provides a method to select which run screen is displayed. The ‘SET lamp is on steady when a menu is displayed. The ‘SET’ lamp blinks on and off when a parameter is displayed. 6.1.2. Encoder Functionality The encoders can be turned clockwise or counter-clockwise. Each encoder also functions as a momentary switch when it is pushed in. 198-0853-02 Rev F Page 21 of 126 6.1.2.1. Encoder Usage in Run Screens Pushing the encoder switch will display the setting (if available) for the associated display. For example, when the current and voltage meters run screen is displayed pressing the voltage encoder switch will display the voltage setting. Likewise pressing the current encoder switch will display the current setting. The ‘SET’ lamp blinks on and off when a setting is displayed. When a setting is displayed each digit of the setting value can be individually adjusted. The setting digit that is being adjusted will flash on and off. Each press of the encoder switch selects the next digit. Rotating the encoder changes the selected digit value. The setting display will return to the normal run screen display after the setting has not been adjusted for a short time. For example, if the voltage setting were displayed from the meters run screen the display would return to the output voltage meter after the setting had not been changed for a short time. 6.1.2.2. Encoder Usage in Menus The encoders are used to access and navigate menus. Menus are accessed by simultaneously pressing and holding both encoders for some period of time (the amount of time depends on which menu is to be accessed). Once a menu is accessed the encoders can be used to navigate menus and change parameters. Generally the voltage display shows the menu title and the current display shows a sub menu (‘SET’ lamp on) or parameter (‘SET’ lamp blinking on and off). Text that is blinking on and off indicates a selection that can be changed by rotating the associated encoder. Pressing the voltage encoder selects the displayed menu selection or parameter value. Numeric parameters within menus are edited the same way as the voltage and current settings are changed (one digit at a time). 6.1.3. Voltage Indicator This indicator shows when the power supply is regulating the voltage level on the output. The current level will depend on the load resistance. 6.1.4. Current (Amps) Indicator This indicator shows when the power supply is regulating the current level on the output. The voltage level will depend on the load resistance. 6.1.5. Operate / Standby Switch This switch toggles between operate (OPER lamp on) and standby (OPER lamp off) modes. In operate mode the output of the supply is enabled and will output current depending on the settings. In standby mode the output of the supply is disabled. Pressing the OPER/STBY switch while a timed cycle (ATC or RTC) is running will pause the currently running cycle (output disabled). The OPER/STBY lamp blinks on and off when a cycle is paused. Pressing the OPER/STBY switch while a cycle is paused will show the pause menu which allows the cycle to be stopped or resumed. The pause menu allows the user to use the current encoder to select between “End” (stop the cycle) or “Cont” (resume the cycle). With the desired action selected on the pause menu (“End” or “Cont”) pressing the OPER/STBY switch takes the selected action. See 6.9.Cycle Pause/Resume using the OPER/STBY Switch for more information regarding the pause and resume functions. The operate state can be restored after power is cycled, see 6.3.4.Power On Configuration for more information. Page 22 of 126 198-0853-02 Rev F Smart LT Manual Dynatronix, Inc. NOTE: The inhibit input and the host port can also change the operate state. See 8.0.Remote Operate/Standby Control and for details regarding these other methods of operate/standby control. NOTE: The operate switch can be disabled to prevent changing the operate state from the front panel (see 6.3.7.Front Panel Button Lock Outs). 6.1.6. Remote / Local Switch This switch toggles between local control (RMT lamp off) and remote control (RMT lamp on). In local control mode the LT front panel is used to control the supply. In remote control mode the power supply can be controlled by the analog control interface or by the host port (depending on the configuration of the supply, see 6.3.3.Remote Control Configuration). When the supply is in remote control mode host communications are indicated by flashing the remote lamp. The remote/local state is maintained through a power cycle. NOTE: When the unit is in remote control mode (RMT lamp is illuminated) settings (current and voltage settings, cycle settings, and tolerance settings) cannot be adjusted from the front panel. NOTE: The remote switch can be disabled to prevent changing the remote/local state from the front panel (see 6.3.7.Front Panel Button Lock Outs). 6.1.7. Inhibit Lamp The inhibit lamp is ON when the inhibit input is active. The output of the power supply is disabled by a hardware interlock when the inhibit lamp is ON. The inhibit input can be used has a hardware disable of the output or for remote operate/standby control, see 8.0.Remote Operate/Standby Control for details. 6.1.8. Fault Lamp When a fault is active the fault lamp is ON. When one or more faults are active the display will alternate between an error code and the normal display value. Error codes can also be read using the host port. Some faults will cause the output of the power supply to be disabled and will prevent operate mode. Most error codes will self clear when the error condition clears. However certain error codes require manual clearing. An example of such an error code would be a power failure error code. The power failure error code is set if the unit lost power while the supply was in operate mode and the power failure alarm is enabled. When power returns the error code remains active until it is manually cleared. See Appendix C: for a list of error codes. See 6.5.Error Messages for more details regarding the display and clearing of error codes. 6.1.9. Over Temperature Lamp 6.1.9.1. Over Temperature Warning The over temperature lamp blinks on and off when the internal heat sink temperature reaches the warning level. The warning level indicates that the heat sink temperature is approaching unsafe levels that could damage the unit. A warning also indicates that if the temperature continues to increase the unit will be forced to standby mode until it cools down. The display will alternate between the normal display and the heat sink temperature. The output of the power supply is not affected by an over temperature warning. 198-0853-02 Rev F Page 23 of 126 6.1.9.2. Over Temperature Shut Down The over temperature lamp is on steady if the heat sink temperature reaches a shut down level. When a shutdown level is reached the output of the supply is disabled (standby mode), and an error code is displayed, and the heat sink temperature is displayed. Operate mode will not be allowed until the unit cools down. The power supply should not be turned off when it is in an over temperature condition. The power supply should be left on, in standby mode, so that the fan will run to cool down the power supply Page 24 of 126 198-0853-02 Rev F Smart LT Manual Dynatronix, Inc. 6.2. Menu Overview 6.2.1. Menu Organization The LT display is organized into menus and run screens. Run screens provide information about the supply status, the supply output and other cycle status information. Several run screens are available providing various sets of information. Run screens are used during normal supply operation. Menus provide access to a list of parameters and configuration items related to power supply behavior and cycle control. The following diagram is an overview of the menus available and how they are accessed. The diagram shows that there are three menus (green) and that a normal power up will show the last active run screen (blue). The bold arrows show the path of a normal power on sequence. The run screen select menu and the setup menu can be accessed at any time from the active run screen. The unit configuration menu can only accessed at power on. See Appendix A:Menu Tree for details on all the screens in each menu. Pwr ON Both encoder switches pressed at power on. Power up in standby Info Screens: Unit Config Menu Version Info Host Port Info Power up in operate. Info screens time out or OPER/STBY switch pressed, or host sends operate or standby. Active Run Screen The active run screen is the normal operating screen. 198-0853-02 Rev F Encoders pressed three seconds. Encoders pressed one second. Run Screen Select Menu Setup Menu Page 25 of 126 6.2.1.1. Display Select Menu The display select menu allows the operator to select which “run screen” is displayed. The unit will power on showing the last run screen that was viewed. Display Select Menu (select run screen to display) Meters Totalizer Cycle Diagnostics Volt Meter/Settings Amp Meter/Settings View Accumulated Value Count Down & Preset Temperature (C or F) Fan Speed 6.2.1.2. Setup Menu The setup menu contains features and parameters that might be adjusted differently for each process. Setup Menu Cycle Setup Tolerance Setup Error Setup Exit Control Type (Manual, RTC, ATC) Current Tolerance Enable/Disable Error Message Display Units Voltage Tolerance Clear Errors Decimal Location Exit Exit Target Cycle Time Exit Page 26 of 126 198-0853-02 Rev F Smart LT Manual Dynatronix, Inc. 6.2.1.3. Unit Configuration Menu The unit configuration menu contains configuration parameters that will likely be changed infrequently, probably only one time when a unit is installed. This menu can only be accessed at power on and a password is required. An exit from this menu restarts the unit for normal operation (similar to a power cycle). Unit Configuration Menu Unit Configuration Access Code Totalizer Host Remote System Calibrate Exit View/Clear Count Baud Rate Host or Analog control of current Totalizer Units Unit ID Host or Analog control of voltage Start in standby or last Option Card Totalizer Decimal Location Exit Exit Enable Power Fail Alarm Exit Exit Startup Output and Meters Digital Input (inhibit) Enable Operate on hwdr enable Pause/End cycle on hwdr disable Buttons Enable/Disable OPER button Enable/Disable RMT button Hardware Options Option Card Unit Config Access Code Set Defaults Exit 198-0853-02 Rev F Page 27 of 126 6.2.2. Menu Access All menus are accessed by pressing and holding both encoder switches until the desired menu title is displayed. Menus that contain an “End” sub menu item are exited by selecting “End”. Menus with no “End” sub menu item are automatically exited after no changes are made for a period of time, or the voltage encoder switch is pressed to accept the selection. The unit configuration menu is accessed by pressing and holding both encoder switches when the unit is powered on and releasing them after the display changes to “Unit” CFg”. The display select menu is accessed from any run screen by pressing and holding both encoder switches until the display changes to “diSP” “SEL” (approximately one second). The setup menu is accessed from any run screen by pressing and holding both encoder switches until the display changes to “Unit” “SEt” (approximately three seconds). See Appendix A:Menu Tree for more details on menu access. 6.2.3. Menu Navigation When a menu is displayed the SET lamp is illuminated (the SET lamp is off when a run screen is displayed). Menu titles are displayed on the top display. Sub menu names and parameters are displayed on the bottom display. See Appendix A:Menu Tree for more details on menu navigation. 6.2.3.1. Entering and Exiting Sub Menus Text that blinks on and off indicates a sub menu selection (SET lamp is on) or a parameter value that can be changed (SET lamp blinks on and off). Rotate the current encoder to select the desired sub menu. Press the voltage encoder switch to enter the selected sub menu. To exit a menu or sub menu rotate the current encoder to select “End”, then press the voltage encoder switch to exit the sub menu. If there is no “End” selection available press the voltage encoder to accept the selection and exit the menu. 6.2.3.2. Changing Parameter Data When parameter data is displayed the SET lamp blinks on and off. Parameter data can be text (like “on” or “OFF”) or it can be numeric. If the parameter data displayed can be changed it will blink on and off. In the case of numeric data only one digit will blink at a time and only one digit can be changed at a time. To change a text parameter rotate the current encoder to select the desired text value. Press the voltage encoder switch to accept the value and return to the previous menu. To change a numeric value rotate the current encoder to change the selected digit. Press the current encoder switch to select a different digit. When the desired numeric value is displayed press the voltage encoder switch to accept the value and return to the previous menu. Page 28 of 126 198-0853-02 Rev F Smart LT Manual Dynatronix, Inc. 6.3. Unit Configuration The “Unit Configuration Menu” is used to configure the power supply. Parameters in this menu will generally be configured when a unit is installed and will not need to be changed after that. Settings related to cycle control (current and voltage settings, RTC or ATC settings, etc) which may require changes related to the process that is running are located in the “Unit Setup Menu” (see 6.4.Cycle Control Settings for details regarding cycle control settings). The “Unit Configuration Menu” can only be accessed when the power supply is first powered on. The “Unit Configuration Menu” is password protected. The default password is “0000”. The password can be changed from within the “Unit Configuration Menu”. To enter the “Unit Configuration Menu” use the following procedure. See A.6.Unit Configuration Menu for more information regarding navigation of the “Unit Configuration Menu”. 1) With the power supply powered off press and hold both encoder switches. 2) While still holding both encoder switches turn the power on. 3) Continue holding both encoder switches until the display shows “Unit” “CFg”, then release the encoder switches. 4) The unit configuration password must be entered before access to the “Unit Configuration Menu” is granted. The display shows “Unit CFg COdE” on the top display and the default password “0000” on the bottom display. If the password has not been changed from the default then press the voltage encoder switch to enter the “Unit Configuration Menu”. If the password has been changed then the correct password must be entered. Rotate the current encoder to adjust the selected digit (blinking digit). Each press of the current encoder advances the selected digit. Once the correct code has been entered press the voltage encoder switch to enter the “Unit Configuration Menu”. 5) Once access to the “Unit Configuration Menu” has been granted the top display will show “CFg” and the bottom display will show the selected sub menu. Rotating the current encoder will change the sub menu selection. Pressing the voltage encoder will enter the selected sub menu. 6) To exit the “Unit Configuration Menu” rotate the current encoder until the display shows “CFg” “End”, then press the voltage encoder to exit the “Unit Configuration Menu”. The power supply will restart into its normal mode of operation displaying the last selected run screen. 6.3.1. Totalizer Configuration The power supply contains a user configurable totalizer that accumulates amp time while the power supply outputs current. The “Totalizer Configuration Menu” can be used to configure the totalizer units and resolution as well as clear the totalizer. The “Totalizer Configuration Menu” is accessed from the “Unit Configuration Menu” (see 6.3.Unit Configuration). To enter the “Totalizer Configuration Menu” select the “tot” sub menu from the “Unit Configuration Menu” and press the voltage encoder. The “Totalizer Configuration Menu” will show “tot” on the top display and the selected sub menu on the bottom display. For more details regarding “Totalizer Configuration Menu” navigation see A.6.1.Totalizer Configuration Menu. 198-0853-02 Rev F Page 29 of 126 6.3.1.1. Clearing the Totalizer The totalizer can be cleared from the “Totalizer Count Menu” located under the “Totalizer Configuration Menu”. Use the following procedure to clear the totalizer. 1) From the “Totalizer Configuration Menu” select the totalizer count sub menu. The “Totalizer Configuration Menu” displays “tot” on the top display and the selected sub menu on the bottom display. Rotate the current encoder until the display shows “tot” “cnt”, then press the voltage encoder to enter the “Totalizer Count Menu”. 2) The first screen in the “Totalizer Count Menu” shows the totalizer count value. Only half of the totalizer count is displayed at a time. This screen either shows the four most significant digits (“Hi”) or the four least significant digits (“Lo”). The top display indicates the totalizer units and which half of the totalizer count is displayed. Rotating the voltage encoder switches between display of the four most significant digits of the totalizer count and the four least significant digits of the totalizer count. See the table below for a detailed description of what the top display shows. 3) Press the voltage encoder switch to advance from the count display screen to the clear screen. The clear screen shows “CLr tot” on the top display. The bottom display shows the confirmation selection. Rotate the current encoder to change the confirmation selection from “no” to “yES” and then press the voltage encoder switch to clear the totalizer and return to the “Totalizer Configuration Menu”. 4) Rotate the current encoder until the display shows “tot” “End”, then press the voltage encoder switch to return to the “Unit Configuration Menu”. 5) If the totalizer was cleared, or any other changes were made in the “Totalizer Configuration Menu” you will be prompted to store the changes. Select “yES” to accept the changes or “no” cancel the changes. Note that selecting “no” will return the totalizer count back to its original value and it will not be cleared. Totalizer Count Screen Messages: Top Display Message Totalizer Units Totalizer Count Display “tot AmP min Lo” Amp Minutes Four least significant digits “tot Amp min Hi” Amp Minutes Four most significant digits “tot Amp Hr Lo” Amp Hours Four least significant digits “tot Amp Hr Hi” Amp Hours Four most significant digits 6.3.1.2. Totalizer Units and Resolution The totalizer units and resolution can be set from the “Totalizer Configuration Menu”. Use the following procedure to set the totalizer units and resolution. NOTE: Changing the totalizer units or resolution (decimal location) will not reset the totalizer count and it will not convert the previous count to a new count having the new units and resolution. Changes to the totalizer units or resolution could result in an un-expected totalizer count value. For clarity it is best to clear the totalizer count before changing the units or the resolution. Page 30 of 126 198-0853-02 Rev F Smart LT Manual Dynatronix, Inc. 1) From the “Totalizer Configuration Menu” rotate the current encoder until the display shows “tot” “Unit”. Press the voltage encoder switch to enter the “Totalizer Units Menu”. 2) The “Totalizer Units Menu” displays “tot AmP” on the top display and the selected units on the bottom display. Rotate the current encoder to select the desired totalizer units. Select “Hr” for Amp Hours or select “min” for Amp Minutes. Press the voltage encoder switch to accept the selected units and return to the “Totalizer Configuration Menu”. 3) From the “Totalizer Configuration Menu” rotate the current encoder until the display shows “tot” “dEC”. Press the voltage encoder switch to enter the “Totalizer Decimal Menu”. 4) The “Totalizer Decimal Menu” shows “dEC” on the top display and the selected decimal point location on the bottom display. The decimal point location affects the resolution of the totalizer and the maximum value the totalizer can count to. The maximum totalizer count is 99999999, or 9999999.9, or 999999.99, or 99999.999, depending on the decimal point location. The totalizer count will roll over to zero and continue counting if the maximum count is exceeded. Rotate the current encoder to select the desired decimal point location. Press the voltage encoder switch to accept the selected decimal point location and return to the “Totalizer Configuration Menu”. 5) Rotate the current encoder until the display shows “tot” “End”, and then press the voltage encoder switch to return to the “Unit Configuration Menu”. 6) If any changes were made in the “Totalizer Configuration Menu” you will be prompted to store the changes. Select “yES” to accept the changes or “no” to cancel the changes. 6.3.2. Host Port Configuration The host port baud rate and the unit ID are configured in the “Host Port Configuration Menu”. The baud rate is the communications rate in bits per second used by the host port. The unit ID is a unique numeric identification used by the power supply to determine which serial host commands to respond to. When multiple units are connected on a multi-drop RS485 network each power supply should have a unique unit ID so that each power supply can be individually addressed by the connected host. Use the “Host Port Configuration Menu” to configure the host port. The “Host Port Configuration Menu” is located within the “Unit Configuration Menu (see 6.3.Unit Configuration). Use the following procedure to configure the host port. For more details on the “Host Port Configuration Menu” see A.6.2.Host Port Configuration Menu. 1) From the “Unit Configuration Menu” rotate the current encoder until the display shows “CFg” “HOSt”, and then press the voltage encoder switch to enter the “Host Port Configuration Menu”. 2) From the “Host Port Configuration Menu” rotate the current encoder until the display shows “HOSt” “bAUd”. Then press the voltage encoder switch to view and change the host port baud rate. 3) The host port baud rate is indicated by “bAUd” on the top display and the selected baud rate in kilo bits per second on the bottom display. The SET lamp is blinking on and off to indicate that a setting is displayed. Rotate the current encoder to change the 198-0853-02 Rev F Page 31 of 126 selected baud rate. Once the desired baud rate is selected press the voltage encoder switch to accept the value and return to the “Host Port Configuration Menu”. 4) From the “Host Port Configuration Menu” rotate the current encoder until the display shows “HOSt” “id”. Then press the voltage encoder switch to view and change the unit ID. 5) The unit ID is indicated by “id” on the top display and the selected unit ID on the bottom display. The SET lamp is blinking on and off to indicate that a setting is displayed. Rotate the current encoder to change the selected unit ID. Once the desired unit ID is selected press the voltage encoder switch to accept the value and return to the “Host Port Configuration Menu”. 6) From the “Host Port Configuration Menu” rotate the current encoder until the display shows “HOSt” “End”. Then press the voltage encoder switch to exit the “Host Port Configuration Menu” and return to the “Unit Configuration Menu”. 7) If any host port settings were changed you will be prompted to store the changes. Select “yES” to accept the changes or “no” to cancel the changes. 6.3.3. Remote Control Configuration When the power supply is in remote control mode (RMT lamp is on) the current and voltage settings can be set from a remote source. The remote source can be an analog input through an option card or it can be a serial host. The source of these remote settings is set in the “Remote Control Configuration Menu”. The source of the current and voltage settings while in remote control mode can be independently set to the host or the analog option card. Note that the settings in the “Remote Control Configuration Menu” have no affect then the power supply is in local control mode (RMT lamp is off). In local control mode the current and voltage settings can be adjusted from the power supply front panel. For more details on controlling the current and voltage settings remotely see 7.0.Remote Host Control and 9.0.Remote Analog Control (Option). If it is desired to remotely control the current or voltage setting from an analog signal connected to an option card then the remote source for the associated signal should be set to the option card. If it is desired to remotely control the current or voltage setting from a serial host then the remote source for the associated signal should be set to the host. Use the following procedure to configure the source of the current and voltage settings when the power supply is in remote control mode (RMT lamp is on). The “Remote Control Configuration Menu” is located within the “Unit Configuration Menu (see 6.3.Unit Configuration). See A.6.3.Remote Control Configuration Menu for more information regarding the “Remote Control Configuration Menu” navigation. 1) From the “Unit Configuration Menu” rotate the current encoder until the display shows “CFg” “rmt”, and then press the voltage encoder switch to enter the “Remote Control Configuration Menu”. 2) From the “Remote Control Configuration Menu” rotate the current encoder until the display shows “rmt” “I.SEt”. Then press the voltage encoder switch to view and change the source of the current setting in remote mode. 3) The source of the current setting in remote mode is indicated by “dFLt rmt I.SEt” on the top display and the selected source on the bottom display. The SET lamp is blinking on Page 32 of 126 198-0853-02 Rev F Smart LT Manual Dynatronix, Inc. and off to indicate that a setting is displayed. Rotate the current encoder to change the selected source. Select “HOSt” as the source if the current setting will come from the serial host port when the power supply is in remote mode. Select “OPt” if the source of the current setting will come from an analog input connected to an option card when the power supply is in remote mode. Once the desired source is selected press the voltage encoder switch to accept the value and return to the “Remote Control Configuration Menu”. 4) From the “Remote Control Configuration Menu” rotate the current encoder until the display shows “rmt” “E.SEt”. Then press the voltage encoder switch to view and change the source of the voltage setting in remote mode. 5) The source of the voltage setting in remote mode is indicated by “dFLt rmt E.SEt” on the top display and the selected source on the bottom display. The SET lamp is blinking on and off to indicate that a setting is displayed. Rotate the current encoder to change the selected source. Select “HOSt” as the source if the voltage setting will come from the serial host port when the power supply is in remote mode. Select “OPt” if the source of the voltage setting will come from an analog input connected to an option card when the power supply is in remote mode. Once the desired source is selected press the voltage encoder switch to accept the value and return to the “Remote Control Configuration Menu”. 6) From the “Remote Control Configuration Menu” rotate the current encoder until the display shows “rmt” “End”. Then press the voltage encoder switch to exit the “Remote Control Configuration Menu” and return to the “Unit Configuration Menu”. 7) If any settings were changed you will be prompted to store the changes. Select “yES” to accept the changes or “no” to cancel the changes. NOTE: The settings in the “Remote Control Configuration Menu” are the default settings used when the unit is powered on. These settings can be changed at any time by a connected host. This makes it possible for a connected host to dynamically change the remote control source between the host and an option card analog input. See Appendix B:Host Port Protocol for more details. NOTE: If an option card is not installed (see 6.3.8.Hardware Options Configuration to determine if an option card is installed) the source of both the current and voltage settings while in remote mode will be set to the host port. The option card will not be a choice in the “Remote Control Configuration Menu”. 6.3.4. Power On Configuration The power supply can be configured to always power on in standby mode, or it can be configured to power on in the last mode it was in when it was powered off. When the power on configuration is set to “Stby” the unit will always power up in standby mode with the output disabled. If a timed cycle (RTC or ATC) was running (in operate) when the unit was powered off the unit will power on in standby-paused mode. The operator can choose to resume or terminate the cycle when the unit is powered on. If a manual cycle was running when the unit was powered off the unit will power on in standby mode. When the power on configuration is set to “LASt” the unit will power on in the same mode it was in when it powered off. If a timed cycle (RTC or ATC) was running (in operate) when the unit was 198-0853-02 Rev F Page 33 of 126 powered off then when the unit is powered on it will resume the timed cycle where it left off after a short count down period. The automatic resume can be terminated during the count down period by pressing the operate button. If a timed cycle was paused when the unit was powered off then the unit will power on in the paused state. If a manual cycle was running (in operate) when the unit was powered off then the then when the unit is powered on it will go back into operate mode after a short count down period. The return to operate mode can be terminated during the count down period by pressing the operate button. If the power supply was in standby mode when it was powered off then it will power on in standby mode. See A.2.Power On/Off Sequences for more details on what is displayed during power on and power off in various power on configurations. The power on configuration can be changed in the “Unit Start System Menu”. Use the following procedure to change the power on configuration. The “System Configuration Menu” is located within the “Unit Configuration Menu (see 6.3.Unit Configuration). See A.6.4.System Configuration Menu and A.6.4.1.Unit Start System Menu for more information regarding menu navigation. 1) From the “Unit Configuration Menu” rotate the current encoder until the display shows “CFg” “SyS”, and then press the voltage encoder switch to enter the “System Configuration Menu”. 2) From the “System Configuration Menu” rotate the current encoder until the display shows “SyS” “Strt”, and then press the voltage encoder switch to enter the “Unit Start System Menu”. 3) From the “Unit Start System Menu” rotate the current encoder until the display shows “Strt” “CtrL”, and then press the voltage encoder switch to view and change the power on configuration ( or “start control” configuration). 4) The power on configuration (or “start control” configuration) is indicated by displaying “Unit Strt CtrL” on the top display and the selected power on configuration in the bottom display. The SET lamp is blinking on and off to indicate that a setting is displayed. Rotate the current encoder to change the selected power on configuration. Select “Stby” to configure the unit to always power on in standby mode. Select “LASt” to configure the unit to power on in the same mode it was in when it was powered off. Once the desired configuration is selected press the voltage encoder switch to accept the value and return to the “Unit Start System Menu”. 5) From the “Unit Start System Menu” rotate the current encoder until the display shows “Strt” “End”. Then press the voltage encoder switch to exit the “Unit Start System Menu” and return to the “System Configuration Menu”. 6) From the “System Configuration Menu” rotate the current encoder until the display shows “SyS” “End”. Then press the voltage encoder switch to exit the “System Configuration Menu” and return to the “Unit Configuration Menu”. 7) If any settings were changed in the “System Configuration Menu” you will be prompted to store the changes. Select “yES” to accept the changes or “no” to cancel the changes. 6.3.5. Power Fail Alarm Configuration The power supply can be configured to report error codes if power is interrupted while the supply is in operate mode. If the power failure alarms are enabled the appropriate error code (error codes 102 or 103) is set when power fails during operate mode. The error code will remain active Page 34 of 126 198-0853-02 Rev F Smart LT Manual Dynatronix, Inc. until it is manually cleared, even if the unit is powered on and off multiple times. See Appendix C:Error Codes for a complete list of error codes. See 6.5.Error Messages for details regarding error message display and manual clearing of error codes. Power failure alarms can be enabled or disabled in the “Unit Start System Menu”. Use the following procedure to enable or disable power failure alarms. The “System Configuration Menu” is located within the “Unit Configuration Menu (see 6.3.Unit Configuration). See A.6.4.System Configuration Menu and A.6.4.1.Unit Start System Menu for more information regarding menu navigation. 1) From the “Unit Configuration Menu” rotate the current encoder until the display shows “CFg” “SyS”, and then press the voltage encoder switch to enter the “System Configuration Menu”. 2) From the “System Configuration Menu” rotate the current encoder until the display shows “SyS” “Strt”, and then press the voltage encoder switch to enter the “Unit Start System Menu”. 3) From the “Unit Start System Menu” rotate the current encoder until the display shows “Strt” “P.FLt”, and then press the voltage encoder switch to view and change the power failure alarm enable/disable setting. 4) The power failure alarm enable/disable setting is indicated by displaying “Por FAIL FLt” on the top display and the power failure alarm enable/disable setting in the bottom display. The SET lamp is blinking on and off to indicate that a setting is displayed. Rotate the current encoder to change the power failure alarm enable/disable setting. Select “on” to enable power failure alarms. Select “OFF” to disable power failure alarms. Once the desired configuration is selected press the voltage encoder switch to accept the value and return to the “Unit Start System Menu”. 5) From the “Unit Start System Menu” rotate the current encoder until the display shows “Strt” “End”. Then press the voltage encoder switch to exit the “Unit Start System Menu” and return to the “System Configuration Menu”. 6) From the “System Configuration Menu” rotate the current encoder until the display shows “SyS” “End”. Then press the voltage encoder switch to exit the “System Configuration Menu” and return to the “Unit Configuration Menu”. 7) If any settings were changed in the “System Configuration Menu” you will be prompted to store the changes. Select “yES” to accept the changes or “no” to cancel the changes. 6.3.6. Remote Operate/Standby Control (Digital Input) The inhibit input can be used as a digital input to remotely control the operate/standby state. Since the inhibit input is connected to a hardware disable circuit the power supply will always go into standby mode when the inhibit input disables the output. It is possible to independently configure the actions taken when the inhibit input changes from a hardware enable state (INHIBIT lamp is off) to a hardware disable state (INHIBIT lamp is on) or from a hardware disable state (INHIBIT lamp is on) to a hardware enable state (INHIBIT lamp is off). 198-0853-02 Rev F Page 35 of 126 Digital Input Start Configuration: “d.in Strt” = “OFF” “d.in Strt” = “on” No action is taken when the inhibit input changes from a hardware disable state (INHIBIT lamp is on) to a hardware enable state (INHIBIT lamp is off). Use this setting when the inhibit input is used as a safety interlock. When the inhibit input changes from a hardware disable state (INHIBIT lamp is on) to a hardware enable state (INHIBIT lamp is off) the operate state changes from standby to operate (a new cycle is started if a cycle was not paused, or resumed if the cycle was previously paused). Use this setting when the inhibit input is used for remote operate/standby control. CAUTION: This setting will cause the unit to go to operate mode any time the INHIBIT lamp goes from an on to a off state. Digital Input Stop Configuration: “d.in StoP” = “PAUS” “d.in StoP” = “End” When the inhibit input changes from a hardware enable state (INHIBIT lamp is off) to a hardware disable state (INHIBIT lamp is on) the currently running cycle is paused and the output is disabled. If “d.in Strt” = “on” the cycle will resume when the inhibit input changes to a hardware enable state. Use this setting to pause a currently running timed cycles when the inhibit input disables the output. When the inhibit input changes from a hardware enable state (INHIBIT lamp is off) to a hardware disable state (INHIBIT lamp is on) the currently running cycle is terminated and the operate state changes to standby. If “d.in Strt” = “on” a new cycle will start when the inhibit input changes to a hardware enable state. Use this setting to end a currently running timed cycle when the inhibit input disables the output. The digital input configuration can be changed in the “Digital Input System Menu”. Use the following procedure to configure the digital input. The “System Configuration Menu” is located within the “Unit Configuration Menu (see 6.3.Unit Configuration). See A.6.4.System Configuration Menu and A.6.4.2.Digital Input System Menu for more information regarding menu navigation. 1) From the “Unit Configuration Menu” rotate the current encoder until the display shows “CFg” “SyS”, and then press the voltage encoder switch to enter the “System Configuration Menu”. 2) From the “System Configuration Menu” rotate the current encoder until the display shows “SyS” “d.in”, and then press the voltage encoder switch to enter the “Digital Input System Menu”. 3) From the “Digital Input System Menu” rotate the current encoder until the display shows “d.in” “Strt”, and then press the voltage encoder switch to view and change the digital input start configuration. 4) The digital input start configuration is indicated by displaying “d.in CyCL Strt” on the top display and the digital input start configuration in the bottom display. The SET lamp is blinking on and off to indicate that a setting is displayed. Rotate the current encoder to change the digital input start configuration. Select “OFF” if the inhibit input will be used Page 36 of 126 198-0853-02 Rev F Smart LT Manual Dynatronix, Inc. as a safety interlock (no action is taken when the inhibit input enables the output, the unit must be put into operate state using the front panel or a host command). Select “on” to use the inhibit input for remote operate/standby control (the unit goes into operate mode when the inhibit input enables the output). Once the desired configuration is selected press the voltage encoder switch to accept the value and return to the “Digital Input System Menu”. 5) From the “Digital Input System Menu” rotate the current encoder until the display shows “d.in” “StoP”, and then press the voltage encoder switch to view and change the digital input stop configuration. 6) The digital input stop configuration is indicated by displaying “d.in CyCL StoP” on the top display and the digital input stop configuration in the bottom display. The SET lamp is blinking on and off to indicate that a setting is displayed. Rotate the current encoder to change the digital input stop configuration. Select “PAUS” to pause a currently running timed cycle when the inhibit input disables the output. Select “End” to end a currently running timed cycle when the inhibit input disables the output. Once the desired configuration is selected press the voltage encoder switch to accept the value and return to the “Digital Input System Menu”. 7) From the “Digital Input System Menu” rotate the current encoder until the display shows “d.in” “End”. Then press the voltage encoder switch to exit the “Digital Input System Menu” and return to the “System Configuration Menu”. 8) From the “System Configuration Menu” rotate the current encoder until the display shows “SyS” “End”. Then press the voltage encoder switch to exit the “System Configuration Menu” and return to the “Unit Configuration Menu”. 9) If any settings were changed in the “System Configuration Menu” you will be prompted to store the changes. Select “yES” to accept the changes or “no” to cancel the changes. 6.3.7. Front Panel Button Lock Outs The front panel operate and remote buttons can be independently enabled or disabled. It may be desirable to disable (or lock) one or both of these buttons to prevent changes from being made on the front panel when the power supply is being remotely controlled. Note that when the power supply is in remote control mode (RMT lamp is on) settings cannot be changed from the front panel, but the operate state can still be changed by pressing the operate switch on the front panel. To prevent changes to settings or the operate state made from the front panel the power supply can be put into remote control mode (RMT lamp is on) and then both the remote and operate switches can be disabled (locked). CAUTION: If the operate switch is disabled (locked) the operate state can no longer be changed from the front panel. Operate/standby control must be accomplished using the inhibit input or the host port (see 8.0.Remote Operate/Standby Control for details on how to remotely control the operate/standby state). The front panel remote and operate button enable/disable state can be changed from the “Button System Menu”. Use the following procedure to enable or disable the front panel remote and operate switches. The “System Configuration Menu” is located within the “Unit Configuration 198-0853-02 Rev F Page 37 of 126 Menu (see 6.3.Unit Configuration). See A.6.4.System Configuration Menu and A.6.4.3.Button System Menu for more information regarding menu navigation. 1) From the “Unit Configuration Menu” rotate the current encoder until the display shows “CFg” “SyS”, and then press the voltage encoder switch to enter the “System Configuration Menu”. 2) From the “System Configuration Menu” rotate the current encoder until the display shows “SyS” “btn”, and then press the voltage encoder switch to enter the “Button System Menu”. 3) From the “Button System Menu” rotate the current encoder until the display shows “btn” “OPEr”, and then press the voltage encoder switch to view and change the operate button lock state. 4) The operate button lock state is indicated by displaying “OPEr btn LOC” on the top display and the operate button lock state in the bottom display. The SET lamp is blinking on and off to indicate that a setting is displayed. Rotate the current encoder to change the operate button lock state. Select “yES” to lock (disable) the operate button. Select “no” to unlock (enable) the operate button. Once the desired configuration is selected press the voltage encoder switch to accept the value and return to the “Button System Menu”. 5) From the “Button System Menu” rotate the current encoder until the display shows “btn” “rmt”, and then press the voltage encoder switch to view and change the remote button lock state. 6) The remote button lock state is indicated by displaying “rmt btn LOC” on the top display and the remote button lock state in the bottom display. The SET lamp is blinking on and off to indicate that a setting is displayed. Rotate the current encoder to change the remote button lock state. Select “yES” to lock (disable) the remote button. Select “no” to unlock (enable) the remote button. Once the desired configuration is selected press the voltage encoder switch to accept the value and return to the “Button System Menu”. 7) From the “Button System Menu” rotate the current encoder until the display shows “btn” “End”. Then press the voltage encoder switch to exit the “Button System Menu” and return to the “System Configuration Menu”. 8) From the “System Configuration Menu” rotate the current encoder until the display shows “SyS” “End”. Then press the voltage encoder switch to exit the “System Configuration Menu” and return to the “Unit Configuration Menu”. 9) If any settings were changed in the “System Configuration Menu” you will be prompted to store the changes. Select “yES” to accept the changes or “no” to cancel the changes. 6.3.8. Hardware Options Configuration The “Hardware Options System Menu” is used to configure and enable some hardware options. For example, an installed analog control option card would require the option card setting to be set to “AnL”. See A.6.4.4.Hardware Options System Menu for more details. 6.3.9. Changing the Unit Configuration Password The unit configuration password is required to gain access to the unit configuration menu (see 6.3.Unit Configuration). Page 38 of 126 198-0853-02 Rev F Smart LT Manual Dynatronix, Inc. The password can be changed from the “Unit Configuration Access Code System Menu”. Use the following procedure to change the unit configuration password (also referred to as the unit configuration access code). The “System Configuration Menu” is located within the “Unit Configuration Menu (see 6.3.Unit Configuration). See A.6.4.System Configuration Menu and A.6.4.5.Unit Configuration Access Code System Menu for more information regarding menu navigation. 1) From the “Unit Configuration Menu” rotate the current encoder until the display shows “CFg” “SyS”, and then press the voltage encoder switch to enter the “System Configuration Menu”. 2) From the “System Configuration Menu” rotate the current encoder until the display shows “SyS” “COdE”, and then press the voltage encoder switch to enter the “Unit Configuration Access Code System Menu”. 3) The first screen in the “Unit Configuration Access Code Menu” shows the existing access code value. To change the access code rotate the current encoder to change the selected digit (blinking digit). Each press of the current encoder switch advances the selected digit. After the desired code is entered press the voltage encoder to accept the new access code. 4) If the access code is changed an informational warning message is displayed to indicate that the code has been changed. This screen displays “CHng” on the top display and “COdE” on the bottom display. This screen is displayed for a short period of time and can be skipped by pressing the voltage encoder switch. 5) After the warning message is displayed a confirmation screen is displayed. The top display shows “CHng COdE” and the bottom display shows the confirmation selection. Rotate the current encoder to change the confirmation selection. Select “yES” to accept the access code change or “no” to cancel the change. Press the voltage encoder switch to accept the selection and exit the “Unit Configuration Access Code System Menu” and return to the “System Configuration Menu”. 6) From the “System Configuration Menu” rotate the current encoder until the display shows “SyS” “End”. Then press the voltage encoder switch to exit the “System Configuration Menu” and return to the “Unit Configuration Menu”. 7) If any settings were changed in the “System Configuration Menu” you will be prompted to store the changes. Select “yES” to accept the changes or “no” to cancel the changes. You must select “yES” to accept the changes to the access code. 6.3.10. Setting Unit Defaults All settings in the “Unit Configuration Menu” and the “Unit Setup Menu” can be reset to default values from the “Set Defaults System Menu”. Calibration values are not affected. Use the following procedure to reset all settings to default values. The “System Configuration Menu” is located within the “Unit Configuration Menu (see 6.3.Unit Configuration). See A.6.4.System Configuration Menu and A.6.4.6.Set Defaults System Menu for more information regarding menu navigation. 198-0853-02 Rev F Page 39 of 126 1) From the “Unit Configuration Menu” rotate the current encoder until the display shows “CFg” “SyS”, and then press the voltage encoder switch to enter the “System Configuration Menu”. 2) From the “System Configuration Menu” rotate the current encoder until the display shows “SyS” “dFLt”, and then press the voltage encoder switch to enter the “Set Defaults System Menu”. 3) The first screen in the “Set Defaults System Menu” shows “Set Unit dFLt” on the top display and shows “yES” or “no” on the bottom display. Rotate the current encoder to make a selection. Select “yES” to reset all settings to default values, or select “no” to leave the settings unchanged. Press the voltage encoder switch to accept the selection. 4) If “yES” was selected a warning screen is displayed. The warning screen shows “CHng” on the top display and “ALL” on the bottom display. The warning message is displayed for a short period of time and can be skipped by pressing the voltage encoder switch. 5) After the warning message is displayed a confirmation screen is displayed. The top display shows “CHng ALL to dFLt” and the bottom display shows the confirmation selection. Rotate the current encoder to change the confirmation selection. Select “yES” to reset all settings to default value or “no” to cancel. Press the voltage encoder switch to accept the selection and exit the “Set Defaults System Menu” and return to the “System Configuration Menu”. 6) From the “System Configuration Menu” rotate the current encoder until the display shows “SyS” “End”. Then press the voltage encoder switch to exit the “System Configuration Menu” and return to the “Unit Configuration Menu”. 7) If any settings were changed in the “System Configuration Menu” you will be prompted to store the changes. Select “yES” to accept the changes or “no” to cancel the changes. You must select “yES” to complete the reset to default values. 6.4. Cycle Control Settings All cycle control settings are located in the Setup Menu. The Setup Menu can be accessed at any time; however settings cannot be changed while the unit is operating. In addition the settings cannot be changed while in remote control mode (RMT lamp is on). For details on accessing and navigating the Setup Menu see A.5.Unit Setup Menu. 6.4.1. Manual Cycle Control In manual cycle control the power supply output is enabled and disabled by the operate/standby front panel switch, or the digital input (inhibit input), or through serial host port commands (see 8.0.Remote Operate/Standby Control for details on other methods of operate/standby control). Once the supply is put into the operate state or the standby state it will remain in that state until it is commanded to a different state or power is lost (see 6.3.4:Power On Configuration for details on how to retain the operate state through a power off/on sequence). Page 40 of 126 198-0853-02 Rev F Smart LT Manual Dynatronix, Inc. To configure the supply for manual cycle control set the cycle control setting to “manual” in the cycle setup menu. Use the following procedure to configure the supply for manual cycle control. See A.5.1.Cycle Setup Menu for details on the cycle setup menu. 1) Enter the “Unit Setup Menu” by pressing and holding both encoder switches until the display shows “Unit” “SEt” (see A.5.Unit Setup Menu for details). 2) Rotate the current encoder until the display shows “SEt” “CyCL”. Then press the voltage encoder switch to enter the “Cycle Setup Menu”. 3) From the “Cycle Setup Menu” rotate the current encoder until the display shows “CyCL” “CtrL”. Then press the voltage encoder switch to view and change the cycle control setting. 4) The cycle control setting is indicated by “CtrL” on the top display and the selected control type on the bottom display. The SET lamp is blinking on and off to indicate that a setting is displayed. Rotate the current encoder to change the cycle control type to manual “mAn”. Once the desired control type is selected press the voltage encoder switch to accept the value and return to the “Cycle Setup Menu”. 5) From the “Cycle Setup Menu” rotate the current encoder until the display shows “CyCL” “End”. Then press the voltage encoder switch to exit the “Cycle Setup Menu” and return to the “Unit Setup Menu”. 6) If any cycle settings were changed you will be prompted to store the changes. Select “yES” to accept the changes or “no” to cancel the changes. 7) From the “Unit Setup Menu” rotate the current encoder until the display shows “SEt” “End”. Press the voltage encoder switch to exit the “Unit Setup Menu”. 6.4.2. Timed Cycle Control (RTC or ATC) There are two timed cycle control modes. In Real Time Control (RTC) mode an operate cycle runs for a specified period of time, regardless of the current and voltage settings or the supply output. In Amp Time Control (ATC) mode an operate cycle runs until the specified amp time accumulates, as such the actual time that an ATC cycle runs depends on the output current of the supply and the target cycle time. Once a timed operate cycle is started it will run for the specified period of time (RTC) or amp time (ATC) unless it is commanded to stop or to pause the cycle. When a timed cycle completes the operate state changes to standby (OPER/STBY lamp is off and output is disabled) and the display flashes “EOC” “----“ (EOC on the display indicates End Of Cycle). In addition the EOC status bit is set in the host readings command (see Appendix B:Host Port Protocol for more information regarding the host protocol). A timed cycle can be initiated, stopped, or paused from the front panel using the operate/standby switch, or by the inhibit input (configurable) or by a serial host port command (see 8.0.Remote Operate/Standby Control for details on other methods of operate/standby control). If power is lost while a timed cycle is running the supply can be configured to automatically resume the cycle when power comes back on or it can be configured to power on in a paused state allowing the operator to decide if the cycle should be terminated or resumed (see 6.3.4:Power On Configuration for details on how to retain the operate state through a power off/on sequence). 198-0853-02 Rev F Page 41 of 126 To configure the supply for timed cycle control set the cycle control setting to “RTC” or “ATC” and set the desired cycle time in the cycle setup menu. Use the following procedure to configure the supply for RTC or ATC cycle control. See A.5.1.Cycle Setup Menu for details on the cycle setup menu. 1) Enter the “Unit Setup Menu” by pressing and holding both encoder switches until the display shows “Unit” “SEt” (see A.5.Unit Setup Menu for details). 2) Rotate the current encoder until the display shows “SEt” “CyCL”. Then press the voltage encoder switch to enter the “Cycle Setup Menu”. 3) From the “Cycle Setup Menu” rotate the current encoder until the display shows “CyCL” “CtrL”. Then press the voltage encoder switch to view and change the cycle control setting. 4) The cycle control setting is indicated by “CtrL” on the top display and the selected control type on the bottom display. The SET lamp is blinking on and off to indicate that a setting is displayed. Rotate the current encoder to change the cycle control type to “rtc” for RTC control or “Atc” for ATC control. Once the desired control type is selected press the voltage encoder switch to accept the value and return to the “Cycle Setup Menu”. 5) From the “Cycle Setup Menu” rotate the current encoder until the display shows “CyCL” “Unit”. Then press the voltage encoder to view and change the cycle time units. 6) If the cycle control type is set to “rtc” the cycle time units are indicated by “rtc” on the top display and the selected time units on the bottom display. If the control type is set to “Atc” the cycle time units are indicated by “Atc AmP” on the top display and the selected time units on the bottom display. The SET lamp is blinking on and off to indicate that a setting is displayed. Rotate the current encoder to select the desired units. Select “min” for RTC minutes or ATC amp minutes and “hr” for RTC hours or ATC amp hours. Once the desired units are selected press the voltage encoder switch to accept the setting and return to the “Cycle Setup Menu”. 7) From the “Cycle Setup Menu” rotate the current encoder until the display shows “CyCL” “dEC”. Then press the voltage encoder switch to view and change the cycle time decimal point location. 8) The cycle time decimal point location is indicated by “dEC” on the top display and the selected decimal point location on the bottom display. The SET lamp is blinking on and off to indicate that a setting is displayed. Rotate the current encoder to select the desired decimal point location. The decimal point location affects the resolution of the target cycle time setting and also affects the maximum possible target cycle time setting. The maximum target cycle time setting is 9999, or 999.9, or 99.99, or 9.999, depending on where the decimal location is set to. Once the desired decimal location is set press the voltage encoder switch to accept the setting and return to the “Cycle Setup Menu”. 9) From the “Cycle Setup Menu” rotate the current encoder until the display shows “CyCL” “tArg”. Then press the voltage encoder switch to view and change the target cycle time. 10) When the target cycle time is displayed the top display will indicate the units of the target cycle time. For an RTC cycle with units set to minutes the top display will show “tArg min”. An RTC cycle with units set to hours will display “tArg hr” on the Page 42 of 126 198-0853-02 Rev F Smart LT Manual Dynatronix, Inc. top display. Likewise an ATC cycle could display “tArg Amp min” or “tArg Amp hr” on the top display. The bottom display will show the currently selected target cycle time. The decimal place and maximum allowed setting will be dependent on the decimal setting made in the preceding steps. The SET lamp is blinking on and off to indicate that a setting is displayed. Rotate the current encoder to change the selected digit (blinking digit). Each press of the current encoder selects the next digit. Once the desired target cycle time is set press the voltage encoder switch to accept the setting and return to the “Cycle Setup Menu”. 11) From the “Cycle Setup Menu” rotate the current encoder until the display shows “CyCL” “End”. Then press the voltage encoder switch to exit the “Cycle Setup Menu” and return to the “Unit Setup Menu”. 12) If any cycle settings were changed you will be prompted to store the changes. Select “yES” to accept the changes or “no” to cancel the changes. 13) From the “Unit Setup Menu” rotate the current encoder until the display shows “SEt” “End”. Press the voltage encoder switch to exit the “Unit Setup Menu”. 6.4.3. Tolerance Settings The power supply can be configured to report an error code when the current and/or voltage reading is out of tolerance. The out of tolerance error code is displayed on the front panel (see 6.5.Error Messages for details on how error messages are displayed) and is reported in the serial host port alarm status message (see Appendix B:Host Port Protocol for details on the alarm status message). Out of tolerance errors do not affect power supply output or operate/standby state. Once an out of tolerance error is set it will remain set until a new cycle is started or the error is manually cleared (see 6.5.2.Clearing Error Codes for details on manually clearing error codes). Tolerances are set as a percentage of the associated setting. A tolerance setting of 0% disables out of tolerance error reporting for the associated signal. A current tolerance setting of 10% will cause an out of tolerance error to be set if the current reading differs from the current setting by more than 10%. A current tolerance setting of 10% and a current setting of 10.0 amps would cause a current over tolerance alarm for any current reading greater than 11 amps and would cause a current under tolerance alarm for any current reading less than 9 amps. See Appendix C:Error Codes for a list of possible out of tolerance error codes. Use the “Tolerance Setup Menu” in the “Unit Setup Menu” to configure tolerance settings. The following procedure describes how to change tolerance settings. See A.5.2.Tolerance Setup Menu for details on the “Tolerance Setup Menu”. 1) Enter the “Unit Setup Menu” by pressing and holding both encoder switches until the display shows “Unit” “SEt” (see A.5.Unit Setup Menu for details). 2) Rotate the current encoder until the display shows “SEt” “tOL”. Then press the voltage encoder switch to enter the “Tolerance Setup Menu”. 3) From the “Tolerance Setup Menu” rotate the current encoder to select either the current or voltage tolerance setting. The top display will show “tOL”, the bottom display will show “Curr” for current tolerance or “UOLt” for voltage tolerance. Once the desired signal is selected press the voltage encoder switch to view and change the associated tolerance setting. 198-0853-02 Rev F Page 43 of 126 4) The tolerance setting is indicated by “I.tOL” on the top display for current tolerance or “E.tOL” on the top display for voltage tolerance. The selected tolerance in percent is displayed on the bottom display. The SET lamp is blinking on and off to indicate that a setting is displayed. Rotate the current encoder to change the selected tolerance digit (blinking on and off). Each press of the current encoder switch selects the next digit. Enter a tolerance value of zero to disable tolerance error reporting. Once the desired tolerance is set press the voltage encoder switch to accept the value and return to the “Tolerance Setup Menu”. 5) To change another tolerance setting repeat the above procedure starting at step 3 above. To exit the “Tolerance Setup Menu” rotate the current encoder until “tOL” “End” is displayed. Then press the voltage encoder switch to exit the “Tolerance Setup Menu” and return to the “Unit Setup Menu”. 6) If any tolerance settings were changed you will be prompted to store the changes. Select “yES” to accept the changes or “no” to cancel the changes. 7) From the “Unit Setup Menu” rotate the current encoder until the display shows “SEt” “End”. Press the voltage encoder switch to exit the “Unit Setup Menu”. 6.5. Error Messages The power supply can report various error codes to indicate problems with the power supply or the process. Most errors provide warnings and information, but do not affect power supply performance. Errors like the over temperature warning (error code 73) or the cooling fan diagnostic error (error code 72) can provide information warning of problems that could lead to power supply failure if not addressed. The over temperature shut down warning (error code 74) causes the output of the power supply to be shut off to prevent damage to the power supply. Other errors can provide information about the process. There are out of tolerance errors to report when the current output or voltage output is out of tolerance (see 6.4.3.Tolerance Settings for details on tolerance settings). There are errors to report that power was lost while the power supply was in operate mode (see 6.3.5.Power Fail Alarm Configuration for details on enabling power failure alarms). For a complete list of errors see Appendix C:Error Codes. Error messages are displayed while a run screen is active (SET lamp is off). Error messages are not displayed when menus are displayed. When an error becomes active the FAULT lamp turns on and if a run screen is being displayed and the error message display is enabled (it is enabled by default at power on) the display will alternate between the currently selected run screen and a screen showing the active error code. If more than one error code is active the error codes are displayed one at a time, in the order they occurred. See 6.5.1.Error Message Display for details on temporarily disabling the error message display. See 6.5.2.Clearing Error Codes for details on manually clearing error codes. 6.5.1. Error Message Display The display of the active error codes can be disabled. When the error message display is disabled the error codes are no longer displayed, but the FAULT lamp remains operational. If Page 44 of 126 198-0853-02 Rev F Smart LT Manual Dynatronix, Inc. error codes remain active after the error message display is disabled the fault lamp remains on until all the active fault codes are cleared. If new error codes are set while the error message display is disabled the FAULT lamp will blink on and off indicating new error codes have been set. When the error message display is disabled active error codes can be viewed from the “Clear Error Menu” (see 6.5.2.Clearing Error Codes), or by using the host protocol alarm status command (see Appendix B:Host Port Protocol). The error message display can be disabled or enabled from the “Error Handling Setup Menu”. Use the following procedure to enable or disable the display of error messages. See A.5.3.Error Handling Setup Menu for details on the “Error Handling Setup Menu”. 1) Enter the “Unit Setup Menu” by pressing and holding both encoder switches until the display shows “Unit” “SEt” (see A.5.Unit Setup Menu for details). 2) Rotate the current encoder until the display shows “SEt” “Err”. Then press the voltage encoder switch to enter the “Error Handling Setup Menu”. 3) From the “Error Handling Setup Menu” rotate the current encoder to display “Err” “diSP”. Then press the voltage encoder switch to view and change the error display setting. 4) The error display setting is indicated with “Err diSP” displayed on the top display and the error display setting on the bottom display. The SET lamp is blinking on and off to indicate that a setting is displayed. Rotate the current encoder to select the desired setting. Select “on” to enable the display of error messages. Select “OFF” to disable the display of error messages. The default at power on is for error messages to be enabled (“on”). Once the desired error display setting is selected press the voltage encoder switch to accept the setting and return to the “Error Handling Setup Menu”. 5) From the “Error Handling Setup Menu” rotate the current encoder until “Err” “End” is displayed. Then press the voltage encoder switch to exit the “Error Handling Setup Menu” and return to the “Unit Setup Menu”. 6) From the “Unit Setup Menu” rotate the current encoder until the display shows “SEt” “End”. Press the voltage encoder switch to exit the “Unit Setup Menu”. NOTE: Alternatively a shortcut to the error display setting is provided. This shortcut can be used in place of the numbered procedure above. From any run screen press and hold both encoder switches until the display shows “Err” “diSP”. Release the encoder switches and the top display will show “Err diSP” and the bottom display will indicate “on” or “OFF”. Rotate the current encoder to change the on/off selection. Select “OFF” to disable display of error messages. Press the voltage encoder switch to accept the selection and return to the run screen. If the voltage encoder switch is not pressed and no changes are made to the on/off selection for a short period of time the display will automatically return to the run screen. NOTE: The display of error messages is enabled (“on”) by default when the unit powers on. 6.5.2. Clearing Error Codes Most error codes are self clearing when the error condition is corrected. However certain error codes require manual clearing. These error codes are not self clearing because these error codes 198-0853-02 Rev F Page 45 of 126 provide information about conditions that occurred that may affect the process. An example of error codes that require manual clearing are the power failure error codes (102 and 103). If these error codes are enabled they are set when power is lost while the power supply is operating. When power returns the error codes are set and must be manually cleared. For a complete list of error codes see Appendix C:Error Codes. Use the following procedure to view and/or clear active error codes. If the error condition still exists after the error code is cleared it will be set again. See A.5.3.Error Handling Setup Menu for details on the “Error Handling Setup Menu”. 1) Enter the “Unit Setup Menu” by pressing and holding both encoder switches until the display shows “Unit” “SEt” (see A.5.Unit Setup Menu for details). 2) Rotate the current encoder until the display shows “SEt” “Err”. Then press the voltage encoder switch to enter the “Error Handling Setup Menu”. 3) From the “Error Handling Setup Menu” rotate the current encoder to display “Err” “CLr”. Then press the voltage encoder switch to enter the “Clear Error Menu”. 4) The “Clear Error Menu” can be used to view all active error codes, clear individual error codes, or clear all active error codes. The “Clear Error Menu” is indicated by displaying “CLr” on the top display. Rotating the current encoder will scroll through the list of active error codes (bottom display). If no error codes are active the only available selections will be “ALL” and “End”. Selecting “ALL” will proceed to screens that allow all active error codes to be cleared. Selecting “End” exits the “Clear Error Menu” and returns to the “Error Handling Setup Menu”. Selecting an error code will proceed to screens that allow the selected code to be individually cleared. Once the desired action is selected press the voltage encoder switch to proceed. 5) Selecting “ALL” or an error code from the “Clear Error Menu” will display a confirmation screen. The top display will show the error code, the bottom display will show “yES” or “no”. Rotate the current encoder to select “yES” to clear the error code or “no” to leave the error code active. 6) When finished viewing and/or clearing error codes select “End” from the “Clear Error Menu”. Press the voltage encoder switch to exit the “Clear Error menu” and return to the “Error Handling Setup Menu”. 7) From the “Error Handling Setup Menu” rotate the current encoder until “Err” “End” is displayed. Then press the voltage encoder switch to exit the “Error Handling Setup Menu” and return to the “Unit Setup Menu”. 8) From the “Unit Setup Menu” rotate the current encoder until the display shows “SEt” “End”. Press the voltage encoder switch to exit the “Unit Setup Menu” 6.6. Run Screens The power supply display is organized into menus and run screens. Run screens provide information about the supply status, the supply output and other cycle status information. Several run screens are available providing various sets of information. Run screens are used during normal supply operation. The SET lamp is off when a run screen is displayed. See 6.2.Menu Overview for more details on the overall menu and run screen organization. Page 46 of 126 198-0853-02 Rev F Smart LT Manual Dynatronix, Inc. Use the following proceedure to select which run screen is displayed. The run screen selection is retained through a power cycle (for example, if the meters were displayed when the unit was powered off, then the meters will be displayed when the unit powers on). See A.4.Display Select Menu for details on the “Display Select Menu”. 1) Press and hold both encoder switches until the display shows “diSP” “SEL”. 2) The “Display Select Menu” is indicated by showing “diSP” on the top display and the currently selected run screen on the bottom display. Rotate the current encoder to select the desired run screen. Then press the voltage encoder switch to exit the “Display Select Menu” and view the selected run screen. Alternatively the “Display Select Menu” will automatically exit and display the selected run screen if no changes are made for several seconds. 6.6.1. Meters Run Screen The meters run screen is displayed when “mtr” is selected from the “Display Select Menu” (see 6.6.Run Screens for details on using the “Display Select Menu”). The meters run screen shows the voltage meter on the top display and the current meter on the bottom display. The SET lamp is off when the meters are displayed. The current or voltage setting can be displayed and changed by pressing the associated encoder switch. The SET lamp will flash on and off when one or both settings are displayed. When a setting is displayed the selected digit (blinking) can be adjusted by rotating the associated encoder. Each press of the associated encoder switch advances the selected digit. When no changes are made to the settings for a short period of time the display returns to the meter values (SET lamp is off). When the power supply is in operate mode and the meters are displayed (SET lamp is off) rotating an encoder will adjust the least significant digit of the associated setting. The affect of the change will be reflected by the associated meter if the output value changes. The current and voltage settings cannot be adjusted while the power supply is in remote control mode (RMT lamp is on). 6.6.2. Totalizer Run Screen The totalizer run screen is displayed when “tot” is selected from the “Display Select Menu” (see 6.6.Run Screens for details on using the “Display Select Menu”). The top display indicates the totalizer units and which portion of the totalizer is being displayed. Since the totalizer maximum value is 99999999 (decimal point location is dependent on the totalizer settings) only half of the totalizer value is displayed at a time. Rotating the voltage encoder while the totalizer run screen is displayed will switch the bottom display between the upper (“Hi”) four digits and the lower (“Lo”) four digits of the totalizer value. The totalizer accumulates any time there is current output by the power supply. The SET lamp is off when the totalizer run screen is displayed. See 6.3.1.Totalizer Configuration for details on how to configure and clear the totalizer. The following table shows various totalizer run screen messages. Top Display Text Totalizer Units Totalizer digits displayed “tot AmP min Lo” Amp Minutes 4 least significant digits “tot AmP min Hi” Amp Minutes 4 most significant digits “tot AmP Hr Lo” Amp Hours 4 least significant digits 198-0853-02 Rev F Page 47 of 126 “tot AmP Hr Hi” Amp Hours 4 most significant digits 6.6.3. Cycle Run Screen The cycle run screen is displayed when “CyCL” is selected from the “Display Select Menu” (see 6.6.Run Screens for details on using the “Display Select Menu”). The cycle run screen shows a count down of the time remaining in the currently running or paused timed cycle (RTC or ATC). The top display indicates the type of cycle (RTC or ATC) and the units of the cycle time. The bottom display shows time remaining in the currently running or paused cycle. The target cycle time setting can be viewed or changed from the cycle run screen (note that the target cycle time setting can also be changed from the cycle setup menu). Pressing the current encoder will display the target cycle time (SET lamp is flashing on and off). When the target cycle time is displayed the currently selected digit (blinking) can be changed by rotating the current encoder. Each press of the voltage encoder advances the selected digit. When no changes are made to the target cycle time for a short period of time the display returns to the time remaining in the cycle. The target cycle time cannot be changed while the power supply is in operate mode (OPER/STBY lamp is on), and the target cycle time cannot be changed while the power supply is in remote control mode (RMT lamp is on). See 6.4.2.Timed Cycle Control (RTC or ATC) for details on timed cycle settings. The following table shows various cycle run screen messages. Top Display Text Cycle Type Cycle time units “rtc min” RTC Minutes “rtc Hr” RTC Hours “Atc amp min” ATC Amp Minutes “Atc amp Hr” ATC Amp Hours “mAn” Manual N/A 6.6.4. Diagnostics Run Screen The diagnostics run screen is displayed when “diAg” is selected from the “Display Select Menu” (see 6.6.Run Screens for details on using the “Display Select Menu”). The diagnostics run screen shows the internal power supply heat sink temperature in degrees C or degrees F, or it shows the cooling fan speed in percent. When the diagnostics run screen is displayed rotating the voltage encoder will change between the heat sink temperature display and the fan speed display. When the heat sink display is shown rotating the current encoder changes between degrees C and degrees F. If a temperature sensor failure has been detected the heat sink temperature display will not display a temperature but rather it will display “Err”. If a temperature sensor failure is detected the temperature sensor failure error code (error code 75) will be set as well. If a problem is detected with the cooling fan the cooling fan error code (error code 72) is set and the commanded fan speed is set to 100%. Even though the fan is commanded to full speed when a cooling fan error condition is detected the cooling fan may not be operating due to a cooling fan component failure. The cooling fan operation should be checked when the cooling fan error code is active. Page 48 of 126 198-0853-02 Rev F Smart LT Manual Dynatronix, Inc. If a temperature sensor error or cooling fan error is detected the associated error code will be displayed and the FAULT lamp will be on regardless of which run screen is currently displayed (see 6.5.Error Messages for details on how error codes are reported). The diagnostics run screen does not need to be active for these fault conditions to be detected, the diagnostics run screen simply provides more detailed information. 6.7. Current and Voltage Settings The current and voltage settings can be adjusted from the “Meter Run Screen”. To view the “Meter Run Screen” press and hold both encoder switches until the display shows “diSP” “SEL”. Then rotate the current encoder until the display shows “diSP” “mtr”. Then press the voltage encoder to view the meters. The “Meter Run Screen” will show the voltage and current meters (numeric values on the top and bottom display) and the SET lamp will be off. See 6.6.Run Screens for details on using the display select menu. 6.7.1. Voltage Setting Adjustment From the “Meter Run Screen” press the voltage encoder switch to view and/or change the voltage setting. When the voltage encoder switch is pressed from the “Meter Run Screen” the voltage setting is displayed, as indicated by the flashing SET lamp. Rotate the voltage encoder to change the currently selected voltage setting digit. Each press of the voltage encoder switch selects the next voltage setting digit (the blinking digit is the currently selected digit). After no changes are made to the voltage setting for a short period of time the display will return to the voltage meter value (the SET lamp will be off when both the current and voltage meters are displayed). See 6.6.1.Meters Run Screen for more information on displaying the “Meter Run Screen” and adjusting the voltage setting. The voltage setting can be adjusted during operate or standby mode, but cannot be changed in remote control mode (RMT lamp is on). The voltage setting can also be adjusted while in operate mode and viewing the voltage meter value (rather than viewing the voltage setting as described above). While the meter value is displayed (SET lamp is off) and the power supply is in operate mode rotating the voltage encoder will change the least significant digit of the voltage setting. The affects of the change will be seen by changes in the meter value as the output changes. 6.7.2. Current Setting Adjustment From the “Meter Run Screen” press the current encoder switch to view and/or change the current setting. When the current encoder switch is pressed from the “Meter Run Screen” the current setting is displayed, as indicated by the flashing SET lamp. Rotate the current encoder to change the currently selected current setting digit. Each press of the current encoder switch selects the next current setting digit (the blinking digit is the currently selected digit). After no changes are made to the current setting for a short period of time the display will return to the current meter value (the SET lamp will be off when both the current and voltage meters are displayed). See 6.6.1.Meters Run Screen for more information on displaying the “Meter Run Screen” and adjusting the current setting. The current setting can be adjusted during operate or standby mode, but cannot be changed in remote control mode (RMT lamp is on). The current setting can also be adjusted while in operate mode and viewing the current meter value (rather than viewing the current setting as described above). While the meter value is 198-0853-02 Rev F Page 49 of 126 displayed (SET lamp is off) and the power supply is in operate mode rotating the current encoder will change the least significant digit of the current setting. The affects of the change will be seen by changes in the meter value as the output changes. 6.8. Setting Adjustment and Regulation Modes The LT SERIES DC rectifier can be set to current, voltage or crossover regulation. Current/voltage limits can be set with the front panel controls. The following procedures outline the necessary steps: NOTE: Make sure the unit is in local mode. The RMT indicator should be off. If it is on, press the RMT / LCL button to turn it off. 6.8.1. Setting Adjustment (while viewing the setting) The voltage and current settings are adjusted from the meters run screen by using the associated encoder as described in 6.7.Current and Voltage Settings. From operate or standby mode pushing an encoder switch will display the associated setting (the ‘SET’ lamp blinks on and off). If the setting can be changed, the active digit will flash. Turning the encoder will adjust the flashing digit. Each press of the encoder switch will advance the active digit by one digit to the left. When no more adjustments are made after a short period the display will automatically change back to the appropriate meter value and the ‘SET’ lamp turns off. 6.8.2. Setting Adjustment (while viewing the output value) From operate mode minor adjustments to the output of the power supply can be made while viewing the voltage or current meter values (setting is not displayed). While in operate mode turning the appropriate encoder (without pushing the encoder switch) will make minor adjustments to the power supply output (the lowest setting digit is being adjusted). The change in output will be reflected on the associated meter. Note that adjustments made in this manner will affect the setting even though the setting is not displayed. 6.8.3. Current Regulation 1. Set the VOLTAGE setting to its maximum value using the voltage encoder (the maximum value will be the rating of the supply). NOTE: The fastest way to adjust a setting to maximum or minimum is to press the encoder button until the left-most digit is flashing and then turn the encoder. 2. Set the CURRENT setting to the desired value using the current encoder. 3. When regulating current, if the current reaches the supply current rating level the supply will change to voltage regulation to keep the current from going over its rating. 6.8.4. Voltage Regulation 1. Set the CURRENT setting to its maximum value using the current encoder (the maximum value will be the rating of the supply). 2. Set the VOLTAGE setting to the desired value using the voltage encoder. 3. When regulating voltage, if the voltage reaches the supply voltage rating level the supply will change to current regulation to keep the voltage from going over its rating. Page 50 of 126 198-0853-02 Rev F Smart LT Manual Dynatronix, Inc. 6.8.5. Current Regulation with Voltage Limit (crossover) 1. Use the voltage encoder to adjust the VOLTAGE setting to the desired voltage limit. For proper setting of the voltage limit make sure the SET lamp is blinking on and off while making the adjustment (if the SET lamp is not blinking on and off then the value displayed is not the voltage setting but rather the output voltage meter value, which indicates actual voltage on the output, not the voltage limit setting). 2. Use the current encoder to adjust the CURRENT setting to the desired current. For proper setting of the current setting make sure the SET lamp is blinking on and off while making the adjustment. 3. During operation if the bath resistance goes up the voltage will increase until it reaches the voltage limit. The power supply will then switch to voltage regulation to keep the voltage from going over the limit. The current will then decrease as the bath resistance increases. NOTE: The current and voltage settings can be viewed at any time by pressing the associated encoder switch (the SET lamp will blink on and off). 6.8.6. Voltage Regulation with Current Limit (crossover) 1. Use the current encoder to adjust the CURRENT setting to the desired current limit. For proper setting of the current limit make sure the SET lamp is blinking on and off while making the adjustment (if the SET lamp is not blinking on and off then the value displayed is not the current setting but rather the output current meter value, which indicates actual current on the output, not the current limit setting). 2. Use the VOLTAGE encoder to adjust the VOLTAGE setting to the desired voltage. For proper setting of the voltage setting make sure the SET lamp is blinking on and off while making the adjustment. 3. During operation if the bath resistance goes down the current will increase until it reaches the current limit. The power supply will then switch to current regulation to keep the current from going over the limit. The voltage will then decrease as the bath resistance decreases. NOTE: The current and voltage settings can be viewed at any time by pressing the associated encoder switch (the SET lamp will blink on and off). 6.9. Cycle Pause/Resume using the OPER/STBY Switch A timed cycle (RTC or ATC) can be paused at any time by pressing the operate switch while the cycle is running. When the operate switch is pressed the display will change to “PAUS” “End”. This informational screen indicates that the cycle has been paused. Pressing the operate button a second time while the display shows “PAUS” “End” will end the cycle. A paused cycle is indicated when the OPER lamp blinks on and off. The output is disabled when a cycle is paused. A paused cycle (indicated by the OPER lamp blinking on and off) can be resumed at any time by pressing the operate button one time. When the operate button is pressed the display will show “PAUS” End”. Rotate the current encoder to change the display to “PAUS” “Cont” and then press the operate button again to resume (continue) the cycle. A paused cycle (indicated by the OPER lamp blinking on and off) can be terminated at any time by pressing the operate button two times. When the operate button is pressed the first time the display will show “PAUS” “End”. Pressing the operate button a second time ends the cycle. 198-0853-02 Rev F Page 51 of 126 See A.3Cycle Pause/Resume for details on the screens shown when pausing and resuming cycles. Cycles can be paused and resumed by the inhibit input or a host serial command as well (see 8.0.Remote Operate/Standby Control). Page 52 of 126 198-0853-02 Rev F Smart LT Manual Dynatronix, Inc. 7. Remote Host Control 7.1. Overview The LT SERIES DC rectifier can be controlled by a host (computer, plc, etc) using the RS485 host port and the ASCII host protocol defined in Appendix B:Host Port Protocol. The host port can be used to monitor the settings or read back values at any time. The host port can only modify settings if the unit is in Remote mode (RMT indicator is on). The Remote mode is entered by pressing the Remote switch. 7.2. Host Port Communications Settings The host port settings include a Unit ID (1 to 99) and Baud Rate (9600, 19200, 38400, 57600, 115200). If more than one power supply is connected on a multi-drop network each power supply must have a unique unit ID so that it can be individually addressed. The host port settings are displayed momentarily at power up after the version information is displayed. The host port ID is displayed on the voltage display and the baud rate is displayed in kilobits per second on the current display. The following would be displayed on the meters for a unit having an ID of 01 and baud rate of 115200. . . The host port baud rate and the host unit ID can be set using the host port protocol as defined in Appendix B: or they can be changed by using the power supply front panel with the instructions in 6.3.Unit Configuration and 6.3.2.Host Port Configuration. 7.3. Host Port Connections See the 5.5.Serial Host Port Connections for the host port connection diagram. 7.4. Host Port Protocol An ASCII based protocol provides access to all power supply settings for complete power supply control through the host port connection. Multiple power supplies on a multi-drop RS485 network can be individually addressed. See Appendix B:Host Port Protocol for details. 198-0853-02 Rev F Page 53 of 126 8. Remote Operate/Standby Control The power supply operate/standby mode can be remotely controlled by using a digital input (inhibit input) or the host port. See 7.0.Remote Host Control for details on using the host port to control the power supply. See 5.4.Inhibit Signal Connection for details on connections required for remote operate/standby control using the inhibit signal input. See 6.3.6.Remote Operate/Standby Control (Digital Input) for details on configuring the power supply to use the inhibit input for remote operate/standby control. When the inhibit input becomes active (INHIBIT lamp is on) the power supply output is disabled and the power supply mode is changed to standby mode. A timed cycle (RTC or ATC) will either be terminated or paused, depending on the configuration as defined in 6.3.6.Remote Operate/Standby Control (Digital Input). When the inhibit input is configured for remote operate/standby control the power supply will always enable the output and go to operate mode when the inhibit input changes from an inhibit state (INHIBIT lamp is on) to and enabled state (INHIBIT lamp is off). If a timed cycle (RTC or ATC) was paused it will resume when the power supply goes back into operate mode. Page 54 of 126 198-0853-02 Rev F Smart LT Manual Dynatronix, Inc. 9. Remote Analog Control (Option) Analog control and monitoring requires an optional analog control card. If the unit was shipped with the analog control option card from the factory it should be properly configured to use the option card, see 6.3.8.Hardware Options Configuration for details on configuring an option card. Analog control is used when the power supply is put into remote control mode (RMT lamp is on) and the source of the current and/or voltage settings is set to option card control (as opposed to being set to host control). See 6.3.3.Remote Control Configuration for details on selecting the option card for remote control. See 5.6.Analog Card Connections (Optional 138-0471-XX Card) for proper for analog control connections. NOTE: The host can dynamically switch between analog control and host control if desired. See B.1.12.Setup Command “s”: and B.1.17User Settings Command “t”: for more information. NOTE: The local/remote mode will be retained through a power cycle. See 6.3.4.Power On Configuration for information on how to retain the operate/standby mode through a power cycle. 9.1. Remote Analog Read Back The current and voltage readings from the LT SERIES DC rectifier can be monitored using the analog outputs on the analog control card. The option card analog outputs will always reflect the current and voltage readings. The analog outputs are proportional to the readings as shown in the following tables. 9.1.1. Analog Output Scaling Analog Output Level Range Analog I/O Type Minimum Maximum 4 to 20mA 4mA 20mA 0 to 5V 0.0V 5V 0 to 10V 0.0V 10V Analog Output Scaling Unit Reading Analog Output Level 0.0 (volts or amps) Minimum Supply Rating (volts or amps) Maximum 198-0853-02 Rev F Page 55 of 126 9.2. Remote Analog Setting Control The LT SERIES DC rectifier’s voltage and current settings can be controlled through the analog option card when the power supply is in remote mode (indicated by the RMT lamp being on) and the source of the current and/or voltage settings is set to option card control (see 6.3.3.Remote Control Configuration). The RMT/LCL switch is used to change to the remote mode. When the power supply is in remote mode the voltage and current settings cannot be adjusted from the front panel. The unit output levels are proportional to the analog input levels as shown in the following tables. NOTE: The local/remote mode will be retained through a power cycle. See 6.3.4.Power On Configuration for information on how to retain the operate/standby mode through a power cycle. 9.2.1. Analog Input Scaling Analog Input Level Range Analog I/O Type Minimum Maximum 4 to 20mA 4mA 20mA 0 to 5V 0.0V 5V 0 to 10V 0.0V 10V Analog Input Scaling Analog Input Level Unit Setting Minimum 0.0 (volts or amps) Maximum Supply Rating (volts or amps) The regulation modes described in 6.8.3.Current Regulation, 6.8.4.Voltage Regulation, 6.8.5.Current Regulation with Voltage Limit (crossover), and 6.8.6.Voltage Regulation with Current Limit (crossover) also apply to remote operation. 9.3. Remote Operate/Standby for Analog Control See 8.0.Remote Operate/Standby Control for methods that can be used for remote operate/standby control. Page 56 of 126 198-0853-02 Rev F Smart LT Manual Dynatronix, Inc. 10. Calibration Procedure All calibration procedures must be performed by a qualified service technician. Review the entire procedure before starting. LT1200X Series CALIBRATION 10.1. Overview All calibration steps are performed using the LT front panel interface. The calibration values are written to non-volatile memory where they are retained permanently. The number of calibration steps required depends on the configuration of the unit. Calibration accuracy is measured by certified test equipment connected externally, and the supply enclosure does not have to be entered. All calibrations are performed by digitally scaling inputs and outputs. 10.1.1. Equipment Calibration equipment required are a meter, a current shunt and a load as described below. If the optional Analog Control card is being calibrated then a calibrator (Ronan model x86 or equiv.) is required. Meter(s) One or two calibrated Digital Volt Meters (DVMs) of at least 4.5 digit resolution and 0.01% overall accuracy. Using 2 meters is faster when switching from current to voltage calibration but is not required. Current Shunt A certified shunt with a temperature coefficient of no more than 5 ppm should be used. It is recommended that a 100 mV shunt which is rated at an even power of ten (1A, 10A, etc.) be used. This will require less conversion of the meter reading, requiring only decimal point placement. The rating of the shunt should be at least 1.5 times greater than the current rating of the power supply. Certified shunts are available from most shunt manufacturers including: EMPRO MANUFACTURING COMPANY INC. P.O.BOX 26060 INDIANAPOLIS, IN. 46226 PHONE: (317) 823-4478 www.emproshunts.com Part Number - MLA-100-100 for a 100mV/100Amp Shunt 198-0853-02 Rev F Page 57 of 126 Loads The load should be a resistor or set of resistors of approximately twice the required wattage to prevent injury to personnel or equipment and to prevent significant temperature drift. The resistor size is calculated so both the current and voltage can be calibrated with the same load. This can be done because the calibration for the high end values takes place at 95% of rating. An adjustable carbon pile load works well. EXAMPLE LOAD CALCULATION: Power supply rating is 12-100 or 12 Volts at 100 Amps. The voltage developed across load should be approximately 12 volts at 100 amps current. To determine the resistor value use Ohms law: 12Volts / 100Amps = 0.12 ohms To determine the wattage use: 12 volts x 100 amps = 1200 watts To calibrate the unit it will be necessary to connect a load resistor with a value of 0.12 ohms and 2400 watts (twice calculated wattage). Optional Load Method (lower power resistors, 1200W vs. 2400W) This method uses 2 different load values. When chosen properly the same set of resistors can be rewired to work for both current and voltage calibration. When calibrating the current settings, a value should be chosen which allows approximately 50% of the voltage at the rated current of the power supply. When calibrating the voltage settings, the value should allow for 50% of the current at the rated voltage of the power supply. An adjustable carbon pile load works well. Example Load Calculations: Power supply rating is 12-100 or 12 Volts at 100 Amps. Current Calibration Load: The voltage developed across the load should be approximately 6 volts at 100 amps average current. To determine the resistor value use Ohms law: 6 Volts / 100 Amps = 0.06 ohms To determine the wattage use: 6 Volts x 100 Amps = 600 watts To calibrate the current settings it will be necessary to connect a load resistor with a value of 0.06 ohms and 1200 watts (twice calculated wattage). Page 58 of 126 198-0853-02 Rev F Smart LT Manual Dynatronix, Inc. Voltage Calibration Load: The current developed across the load should be 50 amps at 12 volts. To determine the resistor value use Ohms law: 12 Volts / 50 Amps = 0.24 ohms To determine the wattage use: 12 volts x 50 amps = 600 watts To calibrate the voltage settings it will be necessary to connect a load resistor with a value of 0.24 ohms and 1200 watts (twice calculated wattage). 10.1.2. Calibration Summary 4.5 DIGIT DVM (VOLTAGE) POSITIVE OUTPUT POWER SUPPLY 4.5 DIGIT DVM (CURRENT) SHUNT LOAD NEGATIVE OUTPUT 1. Connect the calibration load, shunt and meters to the output of the power supply as shown above. 2. Select the “CAL” sub menu from the “Unit Configuration Menu” (see 6.3.Unit Configuration) to enter the “Calibrate Configuration Menu”. 3. There are two separate calibrations available in the “Calibrate Configuration Menu” (see A.6.5.Calibrate Configuration Menu for more information regarding the calibration menus). Select “LCL” (local) to calibrate the front panel read back meters and the power supply output. Select “OPt” to calibrate the option card (if an option card is installed). 4. Each calibration menu contains a “dFLt” option to load calibration defaults. Loading default calibration values will remove any previously stored calibration values and reset all the associated calibration values to default values. The default calibration values are not customized to each unit and will not likely provide operation within the product specification. Each power supply must be properly calibrated to operate within the product specifications. Units are not shipped with default calibration values, each unit is individually calibrated at the factory. 5. Each calibration menu contains a series of calibration points. Calibration points should be performed in numerical order as described in the calibration procedure. The calibration values for any calibration point can be viewed at any time without changing the values (select “no” when prompted to store changes). 198-0853-02 Rev F Page 59 of 126 6. After completing a calibration the calibration values should be saved by selecting “yES” when prompted to store changes. The calibration values are stored to permanent memory and will be retained through power on and power off cycles. Cal Point Calibration Menu Display Calibration point(s) Description “LCL” Calibration (Read back meters and output) CL01 “I.Hi Out CL01” Upper current output CL02 “I.Hi mtr CL02” Upper current read back meter CL03 “I.Lo Out CL03” Lower current output CL04 “I.Lo mtr CL04” Lower current read back meter CL05 “E.Hi Out CL05” Upper voltage output CL06 “E.Hi mtr CL06” Upper voltage read back meter CL07 “E.Lo Out CL07” Lower voltage output CL08 “E.Lo mtr CL08” Lower voltage read back meter “OPt” Calibration (Analog Option Card) CL09 “I.Hi CtL CL09” Upper analog current control input (optional) CL10 “I.Hi rEAd CL10” Upper analog current reading output (optional) CL11 “I.Lo CtL CL11” Lower analog current control input (optional) CL12 “I.Lo rEAd CL12” Lower analog current reading output (optional) CL13 “E.Hi CtL CL13” Upper analog voltage control input (optional) CL14 “E.Hi rEAd CL14” Upper analog voltage reading output (optional) CL15 “E.Lo CtL CL15” Lower analog voltage control input (optional) CL16 “E.Lo rEAd CL16” Lower analog voltage reading output (optional) Page 60 of 126 198-0853-02 Rev F Smart LT Manual Dynatronix, Inc. 10.1.3. Restoring the default calibration values The default calibration values can be restored with the following procedure. CAUTION: Restoring the default calibration values will cause any previous calibration values to be overwritten. A calibration must be performed after loading the default calibration points by following the calibration procedure in order to get accurate output levels. 1. From the “Unit Configuration Menu” rotate the current encoder until the display shows “CFg” “CAL”. Press the voltage encoder switch to enter the “Calibrate Configuration Menu”. See A.6.Unit Configuration Menu and A.6.5.Calibrate Configuration Menu for more details on menu navigation. 2. From the “Calibrate Configuration Menu” rotate the current encoder to select the desired calibration menu. Select “LCL” for the local current and voltage meters and current and voltage output. Select “OPt” for the analog option card inputs and outputs. 3. From the calibration menu rotate the current encoder until the display shows “dFLt” on the bottom display. Press the voltage encoder switch to proceed with loading default calibration values. 4. The default calibration confirmation screen shows “dFLt” on the top display and “yES” or “np” on the bottom display. Rotate the current encoder to select “yES” and press the voltage encoder switch to load the calibration default values. 5. Proceed with a normal calibration. 198-0853-02 Rev F Page 61 of 126 10.2. Calibration Steps 10.2.1. Current Output and Read Back Calibration This sequence sets the calibration values for the current output and the current read back meter. NOTE: The existing calibration values can be viewed without changing them by leaving the supply in STANDBY mode (OPER indicator is off) and by selecting “no” if prompted to store changes. 1. Connect the appropriate load and shunt for current calibration as determined in Section 10.1.1 and show in the diagram in section 10.1.2. 2. Enter the “Local Calibration Menu” as defined in Section 10.1.2 (“LCL” calibration). The calibration menu contains a “dFLt” sub menu to load default calibration values (see 10.1.3.Restoring the default calibration values) and it contains sub menu selections for each calibration point (CL01 to CL08). Each calibration point should be calibrated in numerical order (first calibrate CL01, then CL02, and so on until CL08 is calibrated). The calibration points can be viewed in any order at any time (remain in STANBY mode to view calibration points, calibration points are not changed while the unit is in STANDBY). The chart in section 10.1.2 describes each calibration point and the text displayed for each point. 3. From the “Local Calibration Menu” rotate the current encoder until the display shows “CAL” “CL01”. Press the voltage encoder switch to view and change CL01 (upper current output calibration point). When CL01 is viewed the top display will show “I.Hi Out CL01”. The bottom display shows the calibration value. 4. When calibrating the upper current output (CL01) the power supply output will be enabled at approximately 95% of the current rating. Verify the proper load connections before proceeding. 5. Press the “OPER” switch to enable the power supply output. 6. Use the current encoder to adjust the output so that the volt meter across the shunt reads the proper value for 95% of the average current rating. Calculate using - unit current rating x shunt voltage / shunt current x 0.95 7. There are two ways to end the calibration of CL01. The first way is to press the OPER switch and return to standby mode (OPER/STBY lamp is off) and then press the voltage encoder to return to the “Local Calibration Menu”. If this method is used to end CL01 then proceed with step 8 below to calibrate CL02. Optionally it is possible to automatically calibrate CL02 before ending CL01. To automatically calibrate CL02 press the voltage encoder switch while the unit is still in operate mode (OPER/STBY lamp is on), the display will momentarily change to “…” while CL02 is calibrated and then the unit will change to standby mode (OPER/STBY lamp is off) and will return to the “Local Calibration Menu”. 8. From the “Local Calibration Menu” rotate the current encoder until the display shows “CAL” “CL02”. Press the voltage encoder switch to view and change CL02 (upper current meter calibration point). When CL02 is viewed the top display will show “I.Hi mtr CL02”. The bottom display shows the calibration value. 9. When calibrating the upper current meter calibration point (CL02) the power supply output will be enabled at approximately 95% of the current rating. Verify the proper load connections before proceeding. The upper current output (CL01) must be calibrated prior to calibrating CL02. Page 62 of 126 198-0853-02 Rev F Smart LT Manual Dynatronix, Inc. 10. Press the “OPER” switch to enable the power supply output. The calibration value for CL02 is updated automatically and displayed on the bottom display. After the calibration value stabilizes press the voltage encoder switch to accept the new calibration value and return to the “Local Calibration Menu” (the voltage encoder switch must be pressed while in operate mode to accept the change to CL02). Optionally you can press the OPER switch and return to standby mode (OPER/STBY lamp is off) to cancel the change to CL02 and return the calibration value to its original value. Press the voltage encoder switch to return to the “Local Calibration Menu”. 11. From the “Local Calibration Menu” rotate the current encoder until the display shows “CAL” “CL03”. Press the voltage encoder switch to view and change CL03 (lower current output calibration point). When CL03 is viewed the top display will show “I.Lo Out CL03”. The bottom display shows the calibration value. 12. When calibrating the lower current output (CL03) the power supply output will be enabled at approximately 10% of the current rating. Verify the proper load connections before proceeding. 13. Press the “OPER” switch to enable the power supply output. 14. Use the current encoder to adjust the output so that the volt meter across the shunt reads the proper value for 10% of the average current rating. Calculate using - unit current rating x shunt voltage / shunt current x 0.10 15. There are two ways to end the calibration of CL03. The first way is to press the OPER switch and return to standby mode (OPER/STBY lamp is off) and then press the voltage encoder to return to the “Local Calibration Menu”. If this method is used to end CL03 then proceed with step 16 below to calibrate CL04. Optionally it is possible to automatically calibrate CL04 before ending CL03. To automatically calibrate CL04 press the voltage encoder switch while the unit is still in operate mode (OPER/STBY lamp is on), the display will momentarily change to “…” while CL04 is calibrated and then the unit will change to standby mode (OPER/STBY lamp is off) and will return to the “Local Calibration Menu”. 16. From the “Local Calibration Menu” rotate the current encoder until the display shows “CAL” “CL04”. Press the voltage encoder switch to view and change CL04 (lower current meter calibration point). When CL04 is viewed the top display will show “I.Lo mtr CL04”. The bottom display shows the calibration value. 17. When calibrating the lower current meter calibration point (CL04) the power supply output will be enabled at approximately 10% of the current rating. Verify the proper load connections before proceeding. The lower current output (CL03) must be calibrated prior to calibrating CL04. 18. Press the “OPER” switch to enable the power supply output. The calibration value for CL04 is updated automatically and displayed on the bottom display. After the calibration value stabilizes press the voltage encoder switch to accept the new calibration value and return to the “Local Calibration Menu” (the voltage encoder switch must be pressed while in operate mode to accept the change to CL04). Optionally you can press the OPER switch and return to standby mode (OPER/STBY lamp is off) to cancel the change to CL04 and return the calibration value to its original value. Press the voltage encoder switch to return to the “Local Calibration Menu”. 198-0853-02 Rev F Page 63 of 126 19. To continue with the voltage output and read back calibration go to 10.2.2.Voltage Output and Read Back Calibration. To save changes to the current output and read back calibration and exit the calibration menu proceed with step 20 below. 20. From the “Local Calibration Menu” rotate the current encoder until the display shows “CAL” “End”. Press the voltage encoder switch to exit the “Local Calibration Menu” and return to the “Calibrate Configuration Menu”. 21. If changes were made to any calibration values you will be prompted to store the changes. Select “yES” to accept the changes or “no” to cancel the changes to the calibration values. 10.2.2. Voltage Output and Read Back Calibration This sequence sets the calibration points for the voltage output and the voltage read back meter. NOTE: The existing calibration values can be viewed without changing them by leaving the supply in STANDBY mode (OPER indicator is off) and by selecting “no” if prompted to store changes. 1. Connect the appropriate load and shunt for current calibration as determined in Section 10.1.1 and show in the diagram in section 10.1.2. 2. Enter the “Local Calibration Menu” as defined in Section 10.1.2 (“LCL” calibration). The calibration menu contains a “dFLt” sub menu to load default calibration values (see 10.1.3.Restoring the default calibration values) and it contains sub menu selections for each calibration point (CL01 to CL08). Each calibration point should be calibrated in numerical order (first calibrate CL01, then CL02, and so on until CL08 is calibrated). The calibration points can be viewed in any order at any time (remain in STANBY mode to view calibration points, calibration points are not changed while the unit is in STANDBY). The chart in section 10.1.2 describes each calibration point and the text displayed for each point. 3. From the “Local Calibration Menu” rotate the current encoder until the display shows “CAL” “CL05”. Press the voltage encoder switch to view and change CL05 (upper voltage output calibration point). When CL05 is viewed the top display will show “E.Hi Out CL05”. The bottom display shows the calibration value 4. When calibrating the upper voltage output (CL05) the power supply output will be enabled at approximately 95% of the voltage rating. Verify the proper load connections before proceeding. 5. Press the “OPER” switch to enable the power supply output. 6. Use the current encoder to adjust the output so that the volt meter across the output terminals reads the proper value for 95% of the voltage rating. Calculate using - unit voltage rating x 0.95 7. There are two ways to end the calibration of CL05. The first way is to press the OPER switch and return to standby mode (OPER/STBY lamp is off) and then press the voltage encoder to return to the “Local Calibration Menu”. If this method is used to end CL05 then proceed with step 8 below to calibrate CL06. Optionally it is possible to automatically calibrate CL06 before ending CL05. To automatically calibrate CL06 press the voltage encoder switch while the unit is still in operate mode (OPER/STBY lamp is on), the display will momentarily change to “…” while CL06 is calibrated and then the unit will change to standby mode (OPER/STBY lamp is off) and will return to the “Local Calibration Menu”. Page 64 of 126 198-0853-02 Rev F Smart LT Manual Dynatronix, Inc. 8. From the “Local Calibration Menu” rotate the current encoder until the display shows “CAL” “CL06”. Press the voltage encoder switch to view and change CL06 (upper volt meter calibration point). When CL06 is viewed the top display will show “E.Hi mtr CL06”. The bottom display shows the calibration value. 9. When calibrating the upper volt meter calibration point (CL06) the power supply output will be enabled at approximately 95% of the voltage rating. Verify the proper load connections before proceeding. The upper voltage output (CL05) must be calibrated prior to calibrating CL06. 10. Press the “OPER” switch to enable the power supply output. The calibration value for CL06 is updated automatically and displayed on the bottom display. After the calibration value stabilizes press the voltage encoder switch to accept the new calibration value and return to the “Local Calibration Menu” (the voltage encoder switch must be pressed while in operate mode to accept the change to CL06). Optionally you can press the OPER switch and return to standby mode (OPER/STBY lamp is off) to cancel the change to CL06 and return the calibration value to its original value. Press the voltage encoder switch to return to the “Local Calibration Menu”. 11. From the “Local Calibration Menu” rotate the current encoder until the display shows “CAL” “CL07”. Press the voltage encoder switch to view and change CL07 (lower voltage output calibration point). When CL07 is viewed the top display will show “E.Lo Out CL07”. The bottom display shows the calibration value. 12. When calibrating the lower voltage output calibration point (CL07) the power supply output will be enabled at approximately 10% of the voltage rating. Verify the proper load connections before proceeding. 13. Press the “OPER” switch to enable the power supply output. 14. Use the current encoder to adjust the output so that the volt meter across the output terminals reads the proper value for 10% of the unit voltage rating. Calculate using unit voltage rating x 0.10 15. There are two ways to end the calibration of CL07. The first way is to press the OPER switch and return to standby mode (OPER/STBY lamp is off) and then press the voltage encoder to return to the “Local Calibration Menu”. If this method is used to end CL07 then proceed with step 16 below to calibrate CL08. Optionally it is possible to automatically calibrate CL08 before ending CL07. To automatically calibrate CL08 press the voltage encoder switch while the unit is still in operate mode (OPER/STBY lamp is on), the display will momentarily change to “…” while CL08 is calibrated and then the unit will change to standby mode (OPER/STBY lamp is off) and will return to the “Local Calibration Menu”. 16. From the “Local Calibration Menu” rotate the current encoder until the display shows “CAL” “CL08”. Press the voltage encoder switch to view and change CL08 (lower volt meter calibration point). When CL08 is viewed the top display will show “E.Lo mtr CL08”. The bottom display shows the calibration value. 17. When calibrating the lower volt meter calibration point (CL08) the power supply output will be enabled at approximately 10% of the voltage rating. Verify the proper load connections before proceeding. The lower voltage output (CL07) must be calibrated prior to calibrating CL08. 198-0853-02 Rev F Page 65 of 126 18. Press the “OPER” switch to enable the power supply output. The calibration value for CL08 is updated automatically and displayed on the bottom display. After the calibration value stabilizes press the voltage encoder switch to accept the new calibration value and return to the “Local Calibration Menu” (the voltage encoder switch must be pressed while in operate mode to accept the change to CL08). Optionally you can press the OPER switch and return to standby mode (OPER/STBY lamp is off) to cancel the change to CL08 and return the calibration value to its original value. Press the voltage encoder switch to return to the “Local Calibration Menu”. 19. From the “Local Calibration Menu” rotate the current encoder until the display shows “CAL” “End”. Press the voltage encoder switch to exit the “Local Calibration Menu” and return to the “Calibrate Configuration Menu”. 20. If changes were made to any calibration values you will be prompted to store the changes. Select “yES” to accept the changes or “no” to cancel the changes to the calibration values. 10.2.3. Analog Calibration (Optional) If the optional analog control interface is installed in the power supply, follow this procedure to calibrate it. NOTE: The existing calibration values can be viewed without changing them by leaving the supply in LOCAL mode (RMT/LCL lamp is off) and by selecting “no” if prompted to store changes. NOTE: When calibrating the analog interface, there will be no current or voltage on the .output of the power supply. This procedure calibrates the analog interface circuitry. NOTE: If an option card is not installed (as determined by the unit configuration, see 6.3.8.Hardware Options Configuration) the option card calibration menu will display “no” “OPt”. The calibration steps will not be available. 10.2.3.1. Analog Calibration Connections Analog Control Connector Connector Signals 1 shield gnd 2 no connection 3 dc common 4 +12 (50ma) 5 -volt cntl in 6 +volt cntl in 7 -curr cntl in 8 +curr cntl in 9 +volt rb out 10 -volt rb out 11 + curr rb out 12 - curr rb out 1 6 12 Connections for current calibration Connections for voltage calibration + - OUT - + IN Calibrator 4-20ma, 0-5V or 0-10V Connections for Analog Calibration Page 66 of 126 198-0853-02 Rev F Smart LT Manual Dynatronix, Inc. 10.2.3.2. Analog Calibration Procedure This sequence sets the calibration values for the optional analog interface. . 1. From the “Calibrate Configuration Menu” rotate the current encoder until the display shows “CAL” “OPt”. Press the voltage encoder switch to enter the “Option Card Calibration Menu” (see A.6.5.Calibrate Configuration Menu and A.6.5.2.Option Card Calibration Menu for more information regarding menu navigation). The calibration menu contains a “dFLt” sub menu to load default calibration values (see 10.1.3.Restoring the default calibration values) and it contains sub menu selections for each calibration point (CL09 to CL16). Each calibration point should be calibrated in numerical order (first calibrate CL09, then CL10, and so on until CL16 is calibrated). The calibration points can be viewed in any order at any time (remain in local control mode to view calibration points, calibration points are not changed while the unit is in local control mode (RMT lamp is off)). The chart in section 10.1.2 describes each calibration point and the text displayed for each point. 2. Connect the calibrator (Ronan model x86 or equiv.) to the Analog Control connector of the power supply as shown above for the current calibration connections (connect the calibrator output to the analog current control input on the LT, connect the calibrator input to the LT analog current read back output). The calibrator should be set to a range that will maximize resolution for a 20mA signal for a 4-20mA interface (5v for 0-5v interface or 10v for 0-10v interface). 3. From the “Option Card Calibration Menu” rotate the current encoder until the display shows “CAL” “CL09”. Press the voltage encoder switch to view and change the upper current control analog input calibration point. The top display will show “I.Hi CtL CL09”, the bottom display shows the calibration point value. 4. Set the calibrator output to 20mA (5V for 0-5V or 10V for 0-10V). 5. Put the supply in REMOTE mode (press the RMT/LCL switch so that the RMT/LCL lamp is on) to begin calibrating the upper current control analog input calibration point. 6. The upper current control analog input calibration value (CL09) is automatically updated to reflect the connected calibrator output. Wait a few seconds for the calibration value to stabilize and then press the voltage encoder switch to accept the new value and return to the “Option Card Calibration Menu”. 7. From the “Option Card Calibration Menu” rotate the current encoder until the display shows “CAL” “CL10”. Press the voltage encoder switch to view and change the upper current read back analog output calibration point. The top display will show “I.Hi rEAd CL10”, the bottom display shows the calibration point value. 8. Put the supply in REMOTE mode (press the RMT/LCL switch so that the RMT/LCL lamp is on) to begin calibrating the upper current read back analog output calibration point. 9. Adjust the current encoder until the calibrator input reads the proper value for 100% of the analog output control signal (20mA for 4-20mA or 5V for 0-5V or 10V for 0-10V). 10. Press the voltage encoder switch to accept the new calibration value and return to the “Option Card Calibration Menu”. 198-0853-02 Rev F Page 67 of 126 11. From the “Option Card Calibration Menu” rotate the current encoder until the display shows “CAL” “CL11”. Press the voltage encoder switch to view and change the lower current control analog input calibration point. The top display will show “I.Lo CtL CL11”, the bottom display shows the calibration point value. 12. Set the calibrator output to 10% of the analog input range (5.6mA for 4-20mA or 0.5V for 0-5V or 1V for 0-10V). 13. Put the supply in REMOTE mode (press the RMT/LCL switch so that the RMT/LCL lamp is on) to begin calibrating the lower current control analog input. 14. The lower current control analog input calibration value (CL11) is automatically updated to reflect the connected calibrator output. Wait a few seconds for the calibration value to stabilize and then press the voltage encoder switch to accept the new value and return to the “Option Card Calibration Menu”. 15. From the “Option Card Calibration Menu” rotate the current encoder until the display shows “CAL” “CL12”. Press the voltage encoder switch to view and change the lower current read back analog output calibration point. The top display will show “I.Lo rEAd CL12”, the bottom display shows the calibration point value. 16. Put the supply in REMOTE mode (press the RMT/LCL switch so that the RMT/LCL lamp is on) to begin calibrating the lower current read back analog output calibration point. 17. Adjust the current encoder until the calibrator input reads the proper value for 10% of the analog output control signal (5.6mA for 4-20mA or 0.5V for 0-5V or 1V for 0-10V). 18. Press the voltage encoder switch to accept the new calibration value and return to the “Option Card Calibration Menu”. 19. Connect the calibrator (Ronan model x86 or equiv.) to the Analog Control connector of the power supply as shown above for the voltage calibration connections (connect the calibrator output to the analog voltage control input on the LT, connect the calibrator input to the LT analog voltage read back output). The calibrator should be set to a range that will maximize resolution for a 20mA signal for a 4-20mA interface (5v for 0-5v interface or 10v for 0-10v interface). 20. From the “Option Card Calibration Menu” rotate the current encoder until the display shows “CAL” “CL13”. Press the voltage encoder switch to view and change the upper voltage control analog input calibration point. The top display will show “E.Hi CtL CL13”, the bottom display shows the calibration point value. 21. Set the calibrator output to 20mA (5V for 0-5V or 10V for 0-10V). 22. Put the supply in REMOTE mode (press the RMT/LCL switch so that the RMT/LCL lamp is on) to begin calibrating the upper voltage control analog input calibration point. 23. The upper voltage control analog input calibration value (CL13) is automatically updated to reflect the connected calibrator output. Wait a few seconds for the calibration value to stabilize and then press the voltage encoder switch to accept the new value and return to the “Option Card Calibration Menu”. 24. From the “Option Card Calibration Menu” rotate the current encoder until the display shows “CAL” “CL14”. Press the voltage encoder switch to view and change the upper voltage read back analog output calibration point. The top display will show “E.Hi rEAd CL14”, the bottom display shows the calibration point value. Page 68 of 126 198-0853-02 Rev F Smart LT Manual Dynatronix, Inc. 25. Put the supply in REMOTE mode (press the RMT/LCL switch so that the RMT/LCL lamp is on) to begin calibrating the upper voltage read back analog output calibration point. 26. Adjust the current encoder until the calibrator input reads the proper value for 100% of the analog output control signal (20mA for 4-20mA or 5V for 0-5V or 10V for 0-10V). 27. Press the voltage encoder switch to accept the new calibration value and return to the “Option Card Calibration Menu”. 28. From the “Option Card Calibration Menu” rotate the current encoder until the display shows “CAL” “CL15”. Press the voltage encoder switch to view and change the lower voltage control analog input calibration point. The top display will show “E.Lo CtL CL15”, the bottom display shows the calibration point value. 29. Set the calibrator output to 10% of the analog input range (5.6mA for 4-20mA or 0.5V for 0-5V or 1V for 0-10V). 30. Put the supply in REMOTE mode (press the RMT/LCL switch so that the RMT/LCL lamp is on) to begin calibrating the lower voltage control analog input calibration point. 31. The lower voltage control analog input calibration value (CL15) is automatically updated to reflect the connected calibrator output. Wait a few seconds for the calibration value to stabilize and then press the voltage encoder switch to accept the new value and return to the “Option Card Calibration Menu”. 32. From the “Option Card Calibration Menu” rotate the current encoder until the display shows “CAL” “CL16”. Press the voltage encoder switch to view and change the lower voltage read back analog output calibration point. The top display will show “E.Lo rEAd CL16”, the bottom display shows the calibration point value. 33. Put the supply in REMOTE mode (press the RMT/LCL switch so that the RMT/LCL lamp is on) to begin calibrating the lower voltage read back analog output calibration point. 34. Adjust the current encoder until the calibrator input reads the proper value for 10% of the analog output control signal (5.6mA for 4-20mA or 0.5V for 0-5V or 1V for 0-10V). 35. Press the voltage encoder switch to accept the new calibration value and return to the “Option Card Calibration Menu”. 36. From the “Option Card Calibration Menu” rotate the current encoder until the display shows “CAL” “End”. Press the voltage encoder switch to exit the “Option Card Calibration Menu”. 37. If changes were made to any calibration values you will be prompted to store the changes. Select “yES” to accept the changes or “no” to cancel the changes to the calibration values. 198-0853-02 Rev F Page 69 of 126 11. Optional Features and Controls This LT1200X Series DC Rectifier may be supplied with any of the following optional features and controls. 11.1. Analog Control Card This option card provides the ability to control the voltage and current settings of the supply using analog inputs to the option card and to monitor voltage and current read back values using the analog outputs from the card. Analog option cards are available with 4-20mA, 0-5V, or 0-10V analog signals. 138-0471-00 ASSY. 4-20mA ANALOG INTERFACE 138-0471-01 ASSY. 0-5V ANALOG INTERFACE 138-0471-02 ASSY. 0-10V ANALOG INTERFACE See section 5.6, for connections. See section 9.0 for more information on using the analog control option. See section 10.0 for analog card calibration. 12. Maintenance 12.1. Cleaning The exterior of this power supply may be cleaned using a damp cloth and a water/detergent solution. Clean air inlet and air exit as needed to prevent build up of debris using compressed air or a vacuum. Do not allow an excess build up of dust and debris to accumulate on the unit as the power supply may run hotter and signal and over-temperature alarm or go into standby mode. Failing to follow cleaning and maintenance procedures may void the warranty and reduce the life of the power supply. 12.2. Filter Replacement (if equipped) Turn off power supply. Unsnap black filter cover located on the back of the power supply, remove cover and foam filter. Do not remove the four fan guard screws. Discard foam filter and replace with a new foam filter. Ensure foam filter is properly seated in cover. Snap cover and foam filter back onto power supply. Failure to use a Dynatronix supplied filter may reduce the life of the power supply and void the warranty. 12.3. Cooling Fan Replacement Page 70 of 126 198-0853-02 Rev F Smart LT Manual Dynatronix, Inc. Only replace fan with a Dynatronix supplied replacement. Failure to use a Dynatronix supplied fan may create an electrical hazard, reduce life of the power supply and void the warranty. A qualified technician is required to replace the fan. Turn off power supply and disconnect AC power. Remove the four screws which secure Fan Cover & Rear Air Vent (Air Filter, if equipped), see figure in section 5.2. Note the fan orientation and cooling direction. 1.) Gently pull fan out of housing until the black and red wire is exposed. 2.) Gently pull on wire to expose fan connector which is secured by Velcro inside the unit. 3.) Unplug and discard old fan. 4.) Clean any debris inside tunnel using compressed air or a vacuum. 5.) Plug in new fan. 6.) Secure connector back inside the housing by pressing the Velcro side up to mate with the Velcro located inside the housing. You should feel a snap when the Velcro is properly seated. 7.) Slide fan back into housing. NOTE: Ensure fan is reinstalled in the same orientation and cooling direction as the fan that was removed. 8.) Reinstall Fan Cover & Rear Air Vent (Air Filter, if equipped). See figure in section 5.2. 9.) Reinstall and tighten the four screws. Do not over tighten. 10.) Plug in AC power cord. 11.) Turn on power supply and verify fan spins freely. 12.) Verify that cooling is from front to rear if unit does not have an air filter. 13.) Verify that cooling is from rear to front if unit does have and air filter. 198-0853-02 Rev F Page 71 of 126 Appendix A: Menu Tree A.1 Menu Tree Format A.2 Power On/Off Sequences A.2.1 Power On in Standby A.2.2 Power On Resume Cycle A.3 Cycle Pause/Resume A.4 Display Select Menu A.5 Unit Setup Menu A.5.1 Cycle Setup Menu A.5.2 Tolerance Setup Menu A.5.3 Error Handling Setup Menu A.6 Unit Configuration Menu A.6.1 Totalizer Configuration Menu A.6.2 Host Port Configuration Menu A.6.3 Remote Control Configuration Menu A.6.4 System Configuration Menu A.6.4.1 Unit Start System Menu A.6.4.2 Digital Input System Menu A.6.4.3 Button System Menu A.6.4.4 Hardware Options System Menu A.6.4.5 Unit Configuration Access Code System Menu A.6.4.6 Set Defaults System Menu A.6.5 Calibrate Configuration Menu A.6.5.1 Local Calibration Menu A.6.5.2 Option Card Calibration Menu Page 72 of 126 198-0853-02 Rev F Smart LT Manual Dynatronix, Inc. A.1 Menu Tree Format Symbol Definitions Indicates rotating the associated encoder. The location of this symbol indicates which encoder switch is being referenced. Indicates pushing the associated encoder switch. The location of this symbol indicates which encoder switch is being referenced. Indicates no action is taken to the associated encoder switch. The location of this symbol indicates which encoder switch is being referenced. Indicates the grayed text in the associated display is blinking on and off. A display that blinks on and off indicates a parameter that can be changed. Used to indicate the next screen in a multi-screen message. In a multi-screen message the display will show a short phrase by alternating text one word at a time. This symbol is used to show the order of the screens displayed. Example Pushing the voltage encoder from the shown screen will enter the totalizer configuration menu. Rotating the current encoder changes between the “tot” and the “HOSt” selection. 198-0853-02 Rev F Totalizer Configuration Menu The grayed text (“HOSt”) is blinking on and off. Page 73 of 126 A.2 Power On/Off Sequences A.2.1 Power On in Standby Power On Start = Standby In this configuration the power supply always powers on in standby mode. If a cycle was running when the unit was powered off the unit will power up in standby mode with the cycle paused so that it can be manually resumed. See the unit start system menu for details on how to change the power on start configuration. Unit Power On Firmware Version Info: Major Version = 03 Minor Version = 00 Revision Number = 22 . Three Seconds Host Port Info: Unit ID = 01 Baud Rate = 115.2kbps (115200bps) . . This is the main menu used during operation. Various run screens can be selected, here the meters are shown. Two Seconds . . Meters Run Screen: Unit is in standby mode (output disabled). Power OK Power Lost Power Failure: Output is disabled, unit is powering off. Unit Power Off Page 74 of 126 198-0853-02 Rev F Smart LT Manual Dynatronix, Inc. A.2.2 Power On Resume Cycle Power On Start = Last This shows the display at power on after the unit was powered off while a cycle was running (unit was in operate). See the unit start system menu for details on how to change the power on start configuration. Unit Power On Resume Operate in 04 Seconds Pressing the voltage encoder or the OPER/STBY button will abort the count down and keep the cycle paused so that it can be manually resumed later. At the end of the count down the cycle resumes where it was when the unit was powered off. Four Seconds Meters Run Screen: In this example two possibilities are shown. . . Power OK Power Lost . . Power OK Power Lost In the branch where the meter values are both zero the count down to operate was aborted by the user and the cycle remains paused (output disabled, OPER/STBY lamp blinking). In the branch where the meter values are not zero the count down to operate completed and the cycle resumed (output enabled, OPER/STBY lamp on steady). Power Failure: Output is disabled, unit is powering off. Unit Power Off 198-0853-02 Rev F Page 75 of 126 A.3 Cycle Pause/Resume . . This example shows how to pause and resume a cycle. In this example an RTC cycle is used. OPER STBY . . The RTC cycle is started. An RTC setting of 5.00 minutes has been set. The OPER/STBY lamp is on. OPER STBY OPER STBY OPER STBY Pressing the OPER/STBY switch while the RTC cycle is running causes the cycle to be paused (unit changes to standby mode, OPER/STBY lamp blinks). In this example the RTC count down stops at 2.33 minutes. A momentary informational message indicates the cycle pause. Note that pressing the OPER/STBY button while this screen is active will end the cycle (pressing the OPER/STBY button two times while a cycle is running causes the cycle to end). 2 Seconds or 5 seconds or 5 seconds . . OPER STBY OPER STBY OPER STBY . . Cycle is terminated. OPER/STBY lamp is off. OPER STBY Pressing the OPER/STBY switch while a cycle is paused will cause the pause screen to be displayed. The pause screen allows the cycle to be terminated (End) or resumed (Cont). OPER STBY OPER STBY OPER STBY . . . . Page 76 of 126 Pressing the OPER/STBY switch from the pause screen while “Cont” is displayed resumes the cycle. The unit goes back into operate mode (OPER/STBY lamp turns on steady) and the RTC count down resumes where it left off (2.33 minutes in this example). The cycle completes and the unit goes into standby mode (OPER/STBY lamp is off). OPER STBY OPER STBY 198-0853-02 Rev F Smart LT Manual Dynatronix, Inc. A.4 Display Select Menu . . Enter the display select menu from any run screen (meters, totalizer, cycle, or diagnostics) by pressing and holding both encoder switches for one second. Once “diSP” “SEL” is displayed release both encoder switches. Meter Run Screen . . Voltage and current . . Pressing the voltage encoder meter run screen. displays the voltage setting and enables edit of the voltage setting. Rotate the voltage encoder to change digit values, press the voltage encoder to select digits. Pressing the current encoder displays the current setting and enables edit of the current setting. Rotate the current encoder to change digit values, press the current encoder to select digits. After the settings are not adjusted for a short period of time the display returns to the meter values. . . . . Totalizer Run Screen First screen showing total amp hours Second screen showing total amp hours Third screen showing total amp hours. If the units were amp minutes then this screen would show “min” rather than “Hr”. Last Screen, blinking ‘Lo’ to indicate the lower four digits of the total amp hours are displayed. Rotate the voltage encoder to change to ‘Hi’ and show the upper four digits. Cycle Run Screen First screen showing ATC amp hours remaining in the currently running cycle. If the currently running cycle were an RTC controlled cycle then “RTC” would be displayed rather than “ATC”. Second screen showing ATC amp hours remaining in the currenlyt running cycle. Last screen showing ATC amp hours remaining in the currenlyt running cycle. If the units were amp minutes then this screen would show “min” rather than “Hr”. Pressing the current encoder displays the target ATC/RTC setting and allows direct edit of the target setting (standby only). After the setting is not changed for a short period of time the display returns to the cycle count down. Diagnostic Run Screen 198-0853-02 Rev F Heat sink temperature = 25C Heat sink temperature = 77F Fan speed = 55% Page 77 of 126 A.5 Unit Setup Menu . . To enter the unit setup menu from any run screen press and hold the current and voltage encoders for three seconds. Continue holding the current and voltage encoders. Once “Unit” “SEt” is displayed release the encoder switches to enter the unit setup menu. Cycle Setup Menu Tolerance Setup Menu Current Tolerance Voltage Tolerance Error Handling Setup Menu Display Error Message Enable/Disable Clear Error Codes Page 78 of 126 . . Control Type (Manual, RTC, ATC) Cycle Units Cycle Decimal Location Cycle Target Setting Return to the previously displayed run screen. 198-0853-02 Rev F Smart LT Manual Dynatronix, Inc. A.5.1 Cycle Setup Menu Cycle Setup Menu Enter the cycle setup menu from the unit setup menu. Cycle Time Control = Manual Time Control Cycle Time Control = Real Time Control Unit = ATC Amp Minutes If RTC cycle control were selected then “RTC” would be displayed rather than “ATC” Cycle target in whole units. . Cycle Time Control = Amp Time Control Unit = ATC Amp Hours If RTC cycle control were selected then “RTC” would be displayed rather than “ATC” . . . Cycle target in tenths of units. Cycle target in hundredths of units. Cycle target in thousandths of units. . . . The cycle target setting can be changed one digit at a time. Rotate the current encoder to change the blinking digit. Press the current encoder switch to advance digits. Discard any changes made during this edit session (only shown if changes were made). 198-0853-02 Rev F Save any changes made during this edit session (only shown if changes were made). Return to Unit Setup Menu Page 79 of 126 A.5.2 Tolerance Setup Menu Tolerance Setup Menu Enter the tolerance setup menu from the unit setup menu. . . Current Tolerance = Disabled Current Tolerance = 1% of the setting . Voltage Tolerance = Disabled Discard any changes made during this edit session (only shown if changes were made). Page 80 of 126 . Voltage Tolerance = 1% of the setting . Current Tolerance = 1% of the setting . Current Tolerance = 11% of the setting . . Voltage Tolerance = 1% of the setting Voltage Tolerance = 11% of the setting Save any changes made during this edit session (only shown if changes were made). Return to Unit Setup Menu 198-0853-02 Rev F Smart LT Manual Dynatronix, Inc. A.5.3 Error Handling Setup Menu Enter the error handling setup menu from the unit setup menu. Error Handling Setup Menu Numeric error code display is enabled. When a fault occurs the active run screen will alternate between its normal view and a numeric error code. Numeric error code display is disabled. Numeric error codes can still be viewed from within the error clear menu. Do not clear error codes . Do not clear error code 096 NOTE: If the error condition still exists after an error code is cleared the error code will be set again. ... . Do not clear error code 102 Clear all active error codes . Clear error code 096 . Clear error code 102 All active error codes are listed. If no error codes are active then only the “ALL” and the “End” menu are shown. 198-0853-02 Rev F Return to Unit Setup Menu Page 81 of 126 A.6 Unit Configuration Menu Unit Configuration Menu To enter the unit configuration menu press and hold both encoder switches at power on. Enter the unit configuration access code to gain access to the unit configuration menu. The default code value is 0000. Totalizer Configuration Menu Host Port Configuration Menu Remote Control Configuration Menu System Configuration Menu Start Up (Power on) Configuration Digital Input (inhibit) Configuration Front Panel Button Configuration Hardware Options Configuration View/Edit Unit Configuration Code Set Default Configuration Calibrate Configuration Menu Calibrate Local (Output and Meters) Calibrate Option Card Unit Restarts Exit Unit Configuration and restart in normal operation mode Page 82 of 126 View/Clear Totalizer Totalizer Units Totalizer Decimal Location Host Port Baud Rate Host Port ID Current Host or Analog Control Voltage Host or Analog Control 198-0853-02 Rev F Smart LT Manual Dynatronix, Inc. A.6.1 Totalizer Configuration Menu Totalizer Configuration Menu Enter the totalizer configuration menu from the unit configuration menu. Reset the totalizer count to zero. First screen showing total amp hours N Totalizer Units = Amp Minutes Totalizer counts in whole units. Discard any changes made during this edit session (only shown if changes were made). 198-0853-02 Rev F Leave the totalizer count un-changed. Second screen showing total amp hours Third screen showing total amp hours. If the units were amp minutes then this screen would show “min” rather than “Hr”. Last Screen, blinking ‘Lo’ to indicate the lower four digits of the total amp hours are displayed. Rotate the voltage encoder to change to ‘Hi’ and show the upper four digits. Totalizer Units = Amp Hours . Totalizer counts in tenths of units. . . Totalizer counts in hundredths of units. Totalizer counts in thousandths of units. Save any changes made during this edit session (only shown if changes were made). Return to Unit Configuration Menu Page 83 of 126 A.6.2 Host Port Configuration Menu Host Port Configuration Menu Enter the host port configuration menu from the unit configuration menu. . . . . Baud Rate = 9600bps Baud Rate = 19200bps Baud Rate = 38400bps Baud Rate = 57600bps Host Port ID = 09 (valid range is 01 to 99) Discard any changes made during this edit session (only shown if changes were made). Page 84 of 126 Host Port ID = 10 (valid range is 01 to 99) . Baud Rate = 115200bps Host Port ID = 11 (valid range is 01 to 99) Host Port ID = 10 (valid range is 01 to 99) Save any changes made during this edit session (only shown if changes were made). Return to Unit Configuration Menu 198-0853-02 Rev F Smart LT Manual Dynatronix, Inc. A.6.3 Remote Control Configuration Menu Remote Control Configuration Menu . Enter the remote control configuration menu from the unit configuration menu. . The default (at power up) remote current setting source is the host. . . The default (at power up) remote voltage setting source is the host. Discard any changes made during this edit session (only shown if changes were made). 198-0853-02 Rev F . The default (at power up) remote current setting source is the analog option card. . The default (at power up) remote voltage setting source is the analog option card. Save any changes made during this edit session (only shown if changes were made). Return to Unit Configuration Menu Page 85 of 126 A.6.4 System Configuration Menu System Configuration Menu Enter the system configuration menu from the unit configuration menu. Unit Start System Menu Power on in standby or last state Enable/Disable power fail alarm . Digital Input System Menu Digital Input Start Signal (remote operate control) Digital Input Stop Signal (remote standby control) Button System Menu Hardware Options System Menu Option Card Type Unit Configuration Access Code System Menu View/Edit unit configuration access code Set Defaults System Menu Load default configuration settings Discard any changes made during this edit session (only shown if changes were made). Page 86 of 126 Operate button enable/disable Standby button enable/disable Save any changes made during this edit session (only shown if changes were made). Return to Unit Configuration Menu 198-0853-02 Rev F Smart LT Manual Dynatronix, Inc. A.6.4.1 Unit Start System Menu Unit Start System Menu Enter the unit start system menu from the system configuration menu. Unit powers on in standby mode (output disabled). . Power fail fault is disabled (turned off). Unit powers on in the last state it was in. If a timed cycle was running the cycle continues where it left off when power was lost. Power fail fault is enabled (turned on). If power fails while a cycle is running the power fail fault is reported when the unit powers on and must be manually cleared. Return to System Configuration Menu 198-0853-02 Rev F Page 87 of 126 A.6.4.2 Digital Input System Menu Digital Input System Menu . Enter the digital input system menu from the system configuration menu. Digital input cycle start = Off When the inhibit input changes from a hardware disable (inhibit lamp is on) to a hardware enable (inhibit lamp turns off) no action is taken. . Digital input cycle stop = Pause When the inhibit input changes from a hardware enable (inhibit lamp is off) to a hardware disable (inhibit lamp turns on) the currently running cycle is paused. Digital input cycle start = On When the inhibit input changes from a hardware disable (inhibit lamp is on) to a hardware enable (inhibit lamp turns off) a cycle is started (or resumed if the cycle was paused). Use this setting for remote operate control. CAUTION: This setting will cause the unit to go to operate mode any time the inhibit lamp turns off. Digital input cycle stop = End When the inhibit input changes from a hardware enable (inhibit lamp is off) to a hardware disable (inhibit lamp turns on) the currently running cycle ends. Return to System Configuration Menu Page 88 of 126 198-0853-02 Rev F Smart LT Manual Dynatronix, Inc. A.6.4.3 Button System Menu Button System Menu Enter the button system menu from the system configuration menu. Operate Button Lock = No Operate button functions normally. Remote Button Lock = No Remote button functions normally. Operate Button Lock = Yes Operate button is locked, operate mode cannot be changed with the operate button. Remote Button Lock = Yes Remote button is locked, remote mode cannot be changed with the remote button. Return to System Configuration Menu 198-0853-02 Rev F Page 89 of 126 A.6.4.4 Hardware Options System Menu Hardware Options System Menu Enter the hardware options system menu from the system configuration menu. Option Card = none No option card is installed Option Card = Analog An anlog control option card is installed (4-20mA,0-10V,etc). Return to System Configuration Menu Page 90 of 126 198-0853-02 Rev F Smart LT Manual Dynatronix, Inc. A.6.4.5 Unit Configuration Access Code System Menu Unit Configuration Access Code System Menu Enter the unit configuration access code system menu from the system configuration menu. Unit Configuration Access Code = 0001 This confirmation message remains for five seconds or until the voltage encoder switch is pressed. Unit Configuration Access Code = 0011 The access code is not changed and is returned to its previous value. The access code is changed. The change must still be stored when the system menu exits. Return to System Configuration Menu 198-0853-02 Rev F Page 91 of 126 A.6.4.6 Set Defaults System Menu Set Defaults System Menu Enter the set defaults system menu from the system configuration menu. Set all parameters to default values. This confirmation message remains for five seconds or until the voltage encoder switch is pressed. Parameters are not changed to default values. All parameters will be returned to default values if the system settings are stored when the system menu exits. Return to System Configuration Menu Page 92 of 126 198-0853-02 Rev F Smart LT Manual Dynatronix, Inc. A.6.5 Calibrate Configuration Menu Calibrate Configuration Menu Enter the calibrate configuration menu from the unit configuration menu. Local Calibration Menu Option Card Calibration Menu Return to Unit Configuration Menu 198-0853-02 Rev F Front Panel Meter Calibration Output Calibration Analog Option Card Calibration Current Control Input Voltage Control Input Current Reading Output Voltage Reading Output Page 93 of 126 A.6.5.1 Local Calibration Menu Local Calibration Menu (Pg 1 of 2) Enter the local calibration menu from the calibrate configuration menu. This menu is used to calibrate the current and voltage meters and the power supply output. . . . . Select YES to reset all local calibration settings to default values. The upper current output is calibrated at 95% of the current rating. In operate mode the output should be adjusted to 95% of the current rating by adjusting the calibration value shown on this screen. Refer to the calibration procedure for details on calibrating. In operate mode the upper current output calibration value is used to output 95% of the current rating and the meter reading calibration value shown is automatically adjusted to achieve the proper meter reading. Refer to the calibration procedure for details on calibrating. The lower current output is calibrated at 10% of the current rating. In operate mode the output should be adjusted to 10% of the current rating by adjusting the calibration value shown on this screen. Refer to the calibration procedure for details on calibrating. In operate mode the lower current output calibration value is used to output 10% of the current rating and the meter reading calibration value shown is automatically adjusted to achieve the proper meter reading. Refer to the calibration procedure for details on calibrating. Local Calibration Menu Page 2 Page 94 of 126 198-0853-02 Rev F Smart LT Manual Local Calibration Menu (Pg 2 of 2) Dynatronix, Inc. Enter the local calibration menu from the calibrate configuration menu. This menu is used to calibrate the current and voltage meters and the power supply output. . . . . Discard any changes made during this calibrate session (only shown if changes were made). 198-0853-02 Rev F The upper voltage output is calibrated at 95% of the voltage rating. In operate mode the output should be adjusted to 95% of the voltage rating by adjusting the calibration value shown on this screen. Refer to the calibration procedure for details on calibrating. In operate mode the upper voltage output calibration value is used to output 95% of the voltage rating and the meter reading calibration value shown is automatically adjusted to achieve the proper meter reading. Refer to the calibration procedure for details on calibrating. The lower voltage output is calibrated at 10% of the voltage rating. In operate mode the output should be adjusted to 10% of the voltage rating by adjusting the calibration value shown on this screen. Refer to the calibration procedure for details on calibrating. In operate mode the lower voltage output calibration value is used to output 10% of the voltage rating and the meter reading calibration value shown is automatically adjusted to achieve the proper meter reading. Refer to the calibration procedure for details on calibrating. Save any changes made during this calibrate session (only shown if changes were made). Return to Calibrate Configuration Menu Page 95 of 126 A.6.5.2 Option Card Calibration Menu Option Card Calibration Menu (Pg 1 of 2) Enter the option card calibration menu from the calibrate configuration menu. This menu is used to calibrate the analog inputs for current and voltage control and the analog outputs for current and voltage readings. . . . . Select YES to reset all option card calibration settings to default values. The upper current control analog input is calibrated at 100% of the analog control signal range (20mA for a 4-20mA signal range). A control signal set to 100% of the specified range should be connected. When the RMT button is pressed this calibration value is automatically updated. Refer to the calibration procedure for details on calibrating. The upper current reading analog output is calibrated at 100% of the analog control signal range (20mA for a 4-20mA signal range). When the RMT button is pressed this calibration value is adjusted until the analog output is equal to 100% of the analog control signal range. Refer to the calibration procedure for details on calibrating. The lower current control analog input is calibrated at 10% of the analog control signal range (5.6mA for a 4-20mA signal range). A control signal set to 10% of the specified range should be connected. When the RMT button is pressed this calibration value is automatically updated. Refer to the calibration procedure for details on calibrating. The lower current reading analog output is calibrated at 10% of the analog control signal range (5.6mA for a 4-20mA signal range). When the RMT button is pressed this calibration value is adjusted until the analog output is equal to 10% of the analog control signal range. Refer to the calibration procedure for details on calibrating. Option Card Calibration Menu Page 2 Page 96 of 126 198-0853-02 Rev F Smart LT Manual Option Card Calibration Menu (Pg 2 of 2) Dynatronix, Inc. Enter the option card calibration menu from the calibrate configuration menu. This menu is used to calibrate the analog inputs for current and voltage control and the analog outputs for current and voltage readings. . . . . Discard any changes made during this calibrate session (only shown if changes were made). 198-0853-02 Rev F The upper voltage control analog input is calibrated at 100% of the analog control signal range (20mA for a 4-20mA signal range). A control signal set to 100% of the specified range should be connected. When the RMT button is pressed this calibration value is automatically updated. Refer to the calibration procedure for details on calibrating. The upper voltage reading analog output is calibrated at 100% of the analog control signal range (20mA for a 4-20mA signal range). When the RMT button is pressed this calibration value is adjusted until the analog output is equal to 100% of the analog control signal range. Refer to the calibration procedure for details on calibrating. The lower voltage control analog input is calibrated at 10% of the analog control signal range (5.6mA for a 4-20mA signal range). A control signal set to 10% of the specified range should be connected. When the RMT button is pressed this calibration value is automatically updated. Refer to the calibration procedure for details on calibrating. The lower voltage reading analog output is calibrated at 10% of the analog control signal range (5.6mA for a 4-20mA signal range). When the RMT button is pressed this calibration value is adjusted until the analog output is equal to 10% of the analog control signal range. Refer to the calibration procedure for details on calibrating. Save any changes made during this calibrate session (only shown if changes were made). Return to Calibrate Configuration Menu Page 97 of 126 Appendix B: Host Port Protocol B.1.1 Host Protocol Version Information Host Protocol Version Firmware Versions 1.xx All versions prior to v3.00 (200-1458-V300) * V3.00 to V#.## (200-1458-V300 to 200-1458-V###) 2.00 * Protocol version defined in this document B.1.2 Command List Command Description Character Section * Slave responses, ACK or NAK, always return the same letter as command received by the slave from the host. a State command B.1.13 c CRC Disable/Enable command B.1.10 d Readings command B.1.14 h Error History command B.1.16 i Delimiter Text Disable/Enable command B.1.11 m Error Status command B.1.15 s Setup command. B.1.12 t User Settings command B.1.17 u Unit info command B.1.18 Page 98 of 126 198-0853-02 Rev F Smart LT Manual Dynatronix, Inc. B.1.3 Command Format Example Command: @00.0e3#2,NN.NNtext1,NNtext2,CRCcrlf command field field description for example above delimiter text @AA.a Sync character (@) and unit address, AA = Unit ID (0 to 99; 0 is a global ID), a = Channel ID (always 0 for LT1200W Series) e3 Command character (e in this example) and Type – 0=read, 1=set, 2=activate, 3=ack, 4=nak #2, Number of fields character (#) and number of fields (2) after the comma (2 in this example), excluding the CRC field NN.NN, Command fields (values shown are just for example) text1 NN, Command fields (values shown are just for example) text2 CRC CRC value in ASCII decimal, (value shown as 54321 in examples), see CRC Calculation below. Calculate from all preceding chars including @ and the comma before the CRC. The CRC value can be 1 to 5 digits. crlf Carriage return and Line feed (0x0D 0x0A) B.1.4 Formatting Rules 1. The protocol is a master/slave format where the LT controller is the slave and the device talking to the LT is the master or host. The master always initiates a command and then waits for a response from the slave. 2. ASCII based, no control characters (except CR-LF terminator), only standard alphanumeric-punctuation characters. 3. Numbers are numeric only (decimal) and can have a decimal point (period) 4. The "@" is the sync character, any @ received in the middle of a command will cause a NAK error and restart the parser. 5. All data fields are delimited by at least a comma “,” 6. Delimiters can be alpha-numeric-punctuation (not period "." or "@") and require a comma "," at the end. 7. Delimiters can have any desired text, except as noted above, between the field number and the comma but cannot start with a numeric (0-9) value (ie. S6LoopTo, is a valid delimiter). 8. The slave response delimiter text is shown in the right most column in the command tables. This text is what the unit will return as a delimiter if enabled with the “i” command. Delimiter text is mainly used for troubleshooting as an easier way to manually decode fields. There is no requirement for the host to send delimiter text if delimiter text is enabled. The 198-0853-02 Rev F Page 99 of 126 host can send delimiter text always if desired whether or not delimiter text is enabled. 9. All command characters are small letters (easier to differentiate from numbers, ie. s5 vs S5). 10. Commands are variable length. 11. Commands have CRC for error checking at the end of the command. The CRC is calculated from all the ascii characters, starting with the sync and ending with the comma before the CRC value. See section B.1.7 for CRC calculation code. 12. Out of range or invalid values received by a slave returns a NAK. If a NAK is returned it does not indicate that none of the command was acted on, it only indicates where there was a problem detected. It is possible for part of a command to be processed and acted on even though one data field was determined to be invalid and a NAK is returned. The NAK message indicates where the first error was detected. If an ACK is returned then all portions of the command were determined to be valid and were processed. See the NAK command, section B.1.9. 13. A NAK response is not returned by a slave if the CRC is enabled and the slave determines that the CRC was incorrect. 14. Commands are terminated by carriage return 0x0D and line feed 0x0A 15. Any chars between a CR-LF and @ are ignored. 16. This protocol is fully text-editor compatible. 17. No scientific notation allowed (i.e. 7.65e2 or 4.56E-1 are not allowed). 18. No signed numbers allowed, sign is inferred as: forward values are positive, reverse values are negative, other values are positive (i.e. -2.54 or +3.75 are not allowed). 19. The ‘no response’ time-out duration the host uses should not be less than 10ms in order for the LT controller to have enough time to process commands. 20. The maximum length of any message (including text deliminters) should not exceed 1024 characters. Messages longer than 1024 bytes will result in a NAK response from the slave. 21. Slaves will not send a response to messages directed to the global address (device address 00). All slaves on the network will perform the requested action if they properly receive the command, however no response is sent B.1.5 Unit Addressing (@AA.a) Unit ID ‘AA’ Channel ID ‘a’ 00 0 Directed to all units 01 0 Directed to unit 1 99 0 Directed to unit 99 Page 100 of 126 Description 198-0853-02 Rev F Smart LT Manual Dynatronix, Inc. For single channel supplies (LT1200W Series) set the channel ID to zero. No response is sent to commands directed to the global unit ID (00). B.1.6 Communications Settings (factory default) – RS485 Baud Rate Bits Parity Stop Bits Handshake *9600 8 none 1 none (master-slave) The RS485 host port can be operated on a multi-drop bus (multiple power supplies connected to a single host, all using the same communications cable). The master is always listening unless sending a command. Slave units are always listening for commands unless sending a response. Slave units only respond to commands that contain their address. * The baud rate is selectable, see the “User Settings” (t) command or Section B.1.17User Settings Command “t”: for setting the baud rate manually. 198-0853-02 Rev F Page 101 of 126 B.1.7 CRC Calculation The CRC is used for error detection. The following is C code for the CRC calculation. ///////////////////////////////////////////////////////////////////////////// // FUNCTION: CRC_Calc() // DESCRIPTION: Calculate the CRC value for a string. // PARAMETERS: Pointer to the string to perform the CRC calculation on. // RETURNS: CRC word, 00000 to 65535. // NOTES: The CRC calculation used by all Dynatronix units. ///////////////////////////////////////////////////////////////////////////// uint16_t CRC_Calc (char * szData) { uint16_t uiCRC = 0xFFFF; int16_t iCount = (int16_t)strlen(szData); int16_t iIndex; char cShiftCnt; for(iIndex = 0; iIndex < iCount; iIndex ++) { cShiftCnt = 8; uiCRC = (uint16_t)(uiCRC ^ (szData[iIndex] & 0xFF)); while (cShiftCnt != 0) { if ((uiCRC & 0x0001) == 0x0001) { uiCRC = (uint16_t)((uiCRC >> 1) ^ (uint16_t)0xA001); } else { uiCRC = (uint16_t)(uiCRC >> 1); } cShiftCnt--; } } return uiCRC; } //CRC_Calc Page 102 of 126 198-0853-02 Rev F Smart LT Manual Dynatronix, Inc. B.1.8 ACK Response Command – Sent if no data requested, otherwise the data to be sent is the ACK @AA.a Sync character (@) and unit address, AA = Unit ID (0 to 99; 0 is a global ID), a = Channel ID (always 0) s3 Command character of command received and Command Type – 3=ack #0, Number of fields character and number of fields after the comma, excluding CRC CRC CRC value in ascii decimal crlf Carriage return and Line feed (0x0D 0x0A) Example of ACK Command: ACK command for set setup command with no data to return from unit 24 @24.0s3#0,54321 Notes: 1. When a slave sends an ACK command it is an indication that the command was determined to be valid and all data fields were determined to be valid and processed. 2. The slave does not send an ACK if the command was directed to the global unit address (00). 198-0853-02 Rev F Page 103 of 126 B.1.9 NAK Response Command – Sent when an error occurs in parsing a command @AA.a Sync character (@) and unit address, AA = Unit ID (0 to 99; 0 is a global ID), a = Channel ID (always 0) s4 Command character of command received and Command Type – 4=nak #10, Number of fields character and number of fields after the comma, excluding CRC 0, undefined na 0, wrong number of fields – blank or 0=ok, 1=error flds 0, parse error, @ where none should be – blank or 0=ok, 1=error pars 0, unknown command – blank or 0=ok, 1=unknown cmd. unkn 0, bad field number – first field to be found bad – blank or 0=ok, 1-XX=field number bfn 0, undefined bfv 0, option not installed error – blank or 0=ok, 1=error oni 0, cannot operate – blank or 0=ok, 1=error opr 0, edit protect flag is enabled – blank or 0=ok, 1=protected editf 0, general NAK code (see possible values below) gnc 1 = Remote mode is required for the specified command 2 = Data out of range (bad field number indicates which field) 3 = Format error (bad field number indicates which field) 4 = Unknown command type (valid command types are set, read, ack, nak, etc) 5 = ‘Set’ command type not allowed for the specifed command 6 = Factory config mode is required for the specified command 7 = Rx buffer overrun (message was greater than 1024 charcters) 8 = Failed to perform the requested save 9 = ‘Set’ command type not allowed while in operate mode CRC CRC value in ascii decimal crlf Carriage return and Line feed (0x0D 0x0A) Example of NAK Command: NAK’d setup command from unit 10 with a formatting error in field 2. @10.0s4#10,0na,0flds,0pars,0unkn,2bfn,0bfv,0oni,0opr,0editf,3gnc,54321 Page 104 of 126 198-0853-02 Rev F Smart LT Manual Dynatronix, Inc. NAK’d setup command, same as above with text delimiters disabled @10.0s4#10,0,0,0,0,2,0,0,0,0,3,54321 Notes: 1. Host does not send a NAK if it gets a bad response. Host should flag it as a communications error or firmware version issue. 2. The NAK indicates the location of the first problem detected. It is possible for the slave to process part of a message properly and still return a NAK for one or more invalid data fields. For example, it would be possible for a slave to receive a setup command and process the current setting but not the voltage setting if the voltage setting were out of range or improperly formatted. In this case the slave would return a NAK message indicating the first field with a problem. 3. The bad field number indicates which field was determined to be a problem. Fields are separated by commas. Field number 1 is the header. In the message “@01.1a1#2,1,0,12345” field number 3 has a value of ‘0’ 4. The slave does not sent a NAK if the command was directed to the global unit address (00). 5. The slave does not send a NAK if it is unable to decode the unit address from the message. 6. The slave does not send a NAK if the CRC is enabled and the transmitted CRC does not match the slave calculated CRC for the message. 198-0853-02 Rev F Page 105 of 126 B.1.10 CRC Disable/Enable Command “c” @AA.a Sync character (@) and unit address, AA = Unit ID (0 to 99; 0 is a global ID), a = Channel ID (always 0) c1 Command character and Type – 0=read, 1=set, 2=activate(n/a), 3=ack, 4=nak #1, Number of fields character and number of fields after the comma, excluding CRC 0, CRC flag – 0=disable, 1=enable. Default on power supply power-up is Enabled. CRC CRC value in ascii decimal. NOTE: examples show actual CRC values. crlf Carriage return and Line feed (0x0D 0x0A) crcf Example of CRC Enable/Disable Command: Disable CRC command @00.0c1#1,0,32516 Enable CRC command @00.0c1#1,1,61189 Read CRC state command. @12.0c0#0,25165 ACK response for Read CRC State command from unit with address = 12, with CRC enabled. Shown with and without the delimiter text enabled. @12.0c3#1,1crcf,58566 @12.0c3#1,1,15265 Notes: 1. Default CRC setting on power supply power-up is Enabled. 2. The channel ID ‘a’ should always be zero. Page 106 of 126 198-0853-02 Rev F Smart LT Manual Dynatronix, Inc. B.1.11 Delimiter Text Disable/Enable Command “i” @AA.a Sync character (@) and unit address, AA = Unit ID (0 to 99; 0 is a global ID), a = Channel ID (always 0) i0 Command character and Type – 0=read, 1=set, 2=activate(n/a), 3=ack, 4=nak #1, Number of fields character and number of fields after the comma, excluding CRC 0, Delimiter text flag – 0=disable, 1=enable. Default on power-up is disabled. CRC CRC value in ascii decimal. NOTE: examples show actual CRC values. crlf Carriage return and Line feed (0x0D 0x0A) txtf Example of Delimiter Text Enable/Disable Command: Disable delimiter text command @00.0i1#1,0,54321 Enable delimiter text command @00.0i1#1,1,54321 Read delimiter text State command. @12.0i0#0,54321 ACK response for read delimiter text state command, unit address = 12. Shown with delimiter text enabled and disabled. @12.0i3#1,1txf,54321 @12.0i3#1,1,54321 Notes: 1. Delimiter Text setting on power supply power-up is Disabled. 2. There is no requirement for the host to send delimiter text if delimiter text is enabled, it is optional. 3. The channel ID ‘a’ should always be zero. 198-0853-02 Rev F Page 107 of 126 B.1.12 Setup Command “s”: @AA.a Sync character (@) and unit address, AA = Unit ID (0 to 99; 0 is a global ID), a = Channel ID ( 0 to 2; 0 is a global channel) s0 Command character and Type – 0=read, 1=set, 2=activate (n/a), 3=ack, 4=nak #12, Number of fields character and number of fields after the comma, excluding CRC. 100.0, Forward Current Setting – amps fi 12.25, Forward Voltage settting – volts fv 0, Source of Current Setting in remote mode (0 = host, 1 = option card, 2 = standard analog input (not implemented)) (DC operation, home link = 0) isrc 0, Source of Voltage Setting in remote mode (0 = host, 1 = option card, 2 = standard analog input (not implemented)) (DC operation, home link = 0) vsrc 0, Current Tolerance - Percent of Setting (0 to 100, 0 = disable tolerance checks) it 0, Voltage Tolerance – Percent of Setting (0 to 100, 0 = disable tolerance checks) vt 2, XTC Control (0 = manual, 1 = RTC, 2 = ATC) xc 1, XTC Units (0=reserved, 1=ATC Amp Min, 2=ATC Amp Hr, 3=reserved, 4=RTC Min, 5=RTC Hr) xn 2, XTC Resolution (0=xxxx, 1=xxx.x, 2=xx.xx, 3=x.xxx) xr 2450, XTC Preset (0 to 9999, units and resolution are dependent on the xtc units and xtc resolution specified in this command) xs 2, Totalizer Units (0=reserved, 1=Amp Min, 2= Amp Hr) tu 1, Totalizer Resolution (0=xxxx, 1=xxx.x, 2=xx.xx, 3=x.xxx) tr CRC CRC value in ascii decimal crlf Carriage return and Line feed (0x0D 0x0A) Examples of Setup Command Read setup command using device address 1, channel 1 @01.1s0#0,54321 Acknowledge read setup command @01.0s3#12,47.5fi,24.00fv,2isrc,2vsrc,0it,0vt,2xc,1xn,2xr,10.25xs,1tu,0tr,54321 Page 108 of 126 198-0853-02 Rev F Smart LT Manual Dynatronix, Inc. Use the setup command to enable the option card analog inputs to be used for adjusting the settings when the supply is in remote mode. Note that the current and voltage setting fields must be blank when changing the source of settings in remote mode if the source is not the host port. @01.1s1#4,,,1,1,54321 Use the setup command to change the channel 1 current and voltage settings. In this example the source of the current setting and the source of the voltage setting will be forced to “host” because the host has just changed the settings (if the unit is not in remote mode the setup command will not be accepted and a NAK response will be sent). @01.1s1#2,25.5,11.75,54321 Notes: 1. Blank fields are ignored so whatever setting is currently active for that field will still be active after a command with a blank field. 2. A command type of 1 (set) is only allowed if the power supply is in remote mode as indicated by the LED on the front panel. 3. The source of the setting automatically changes to “host” if the setting value is changed by the host. For example, if the host changes the voltage setting using the setup command, then the source of the voltage setting is automatically changed to “host”. 4. The “source of the settings in remote mode” setting has no effect when the supply is not in remote mode (remote mode is indicated when the RMT indicator is on). 5. The source of a setting can only be changed to “option card” if the appropriate option card is installed. 6. The voltage and current settings should be blank in any command where the source is set to a value other than the host. 7. The source of a setting in remote mode is the existing source of the setting in remote mode. Changing the source of a setting with this command will immediately change the source of the setting in remote mode. Changes made to the source of a setting in remote mode with this command will not be maintained through a power cycle. Use the user settings ‘t’ command to change the default (at power on) source of the setting. 8. The operate and remote switch functionality when in the remote mode will depend on the settings in the User Settings command. 9. Sending this command with a command type of 0 (read) and the channel ID set to zero will receive no response. The channel must be specified (not zero) when reading settings with this command. 10. Both channels on a power supply can be set (command type 1) to the same value using one instance of this command with the channel set to zero. 11. Setting a XTC unit type that is not compatible with the currently selected XTC control type will cause a NAK response. 12. Changing the totalizer units or resolution will cause the totalizer value to be reset to zero. The totalizer can also be cleared using the user settings “t” command. 198-0853-02 Rev F Page 109 of 126 B.1.13 State Command “a”: @AA.a Sync character (@) and unit address, AA = Unit ID (0 to 99; 0 is a global ID), a = Channel ID (always 0) a0 Command character and Type – 0=read, 1=set, 2=activate (n/a), 3=ack, 4=nak #2, Number of fields character and number of fields after the comma, excluding CRC 1, operate state – 0=standby, 1=operate, 2 = pause opr 0, Simulation state – 0 = normal operation, 1 = simulation mode sim CRC CRC value in ascii decimal crlf Carriage return and Line feed (0x0D 0x0A) Examples of State Command: read state from unit 1. @01.0a0#0,54321 state ack command with delimiter text enabled. @01.0a3#2,1opr,0sim,54321 state ack command with delimiter text disabled. @01.0a3#2,1,0,54321 unit 1 go to operate command (goes to operate from a standby or paused state). @01.0a1#1,1,54321 unit 1 pause command (pauses a timed cycle – RTC or ATC). @01.0a1#1,2,54321 Notes: 1. Blank fields are ignored so whatever setting is currently active for that field will still be active after a command with a blank field. 2. A command type of 1 (set) is only allowed if the power supply is in remote mode as indicated by the RMT indicator on the front panel (and as indicated by the local/remote field in the readings “d” command). 3. The operate and remote switch functionality when in the remote mode will depend on the settings in the User Settings command. 4. Set the operate state to ‘pause’ to temporarily stop a cycle and then set the operate state to ‘operate’ to resume the cycle. 5. Changing the operate state to ‘standby’ will end the current cycle (or clear the EOC state if it was active). Changing the operate state to ‘operate’ will resume a paused cycle. Changing the operate state to ‘operate’ will start a new cycle if the current cycle is not running and is not paused. 6. If simulation mode is active the supply output is disabled. In operate mode the read backs are simulated based on the settings and a simulated load. The simulated load size is computed to allow maximum supply output. The supply will simulate current and voltage regulation as well as Page 110 of 126 198-0853-02 Rev F Smart LT Manual Dynatronix, Inc. cross over points. Simulation mode is indicated on the supply front panel by a flashing operate lamp when in operate mode. Simulation mode is indicated in the readings “d” command by the supply state parameter. 7. The simulation state cannot be changed if the operate state is set to (1) operate. If the current operate state is (1) operate, then the state command must be used to change the operate state to standby and then a separate instance of the state command can be sent to change the simulation state. 198-0853-02 Rev F Page 111 of 126 B.1.14 Readings Command “d”: @AA.a Sync character (@) and unit address, AA = Unit ID (0 to 99; 0 is a global ID), a = Channel ID ( 0 to 2; 0 is a global channel) d0 Command character and Type – 0=read, 1=set(n/a), 2=activate(n/a), 3=ack, 4=nak #12, Number of fields character and number of fields after the comma, excluding CRC 1, supply state – 0=standby, 1=operate, 2= pause (cycle is paused and output is disabled) opr 1, Local/Remote state – 0 = local, 1 = remote, rem 8.2, average forward current – amps afi 10.23, average forward voltage – volts afv 0, Regulation – 0 = not regulating (no output), 1 = voltage, 2 = current reg 2, XTC Mode (0=manual, 1=RTC, 2=ATC) xc 20.5, XTC Reading – Amp time or Real time remaining in the currently running ATC or RTC cycle - units are dependent on the XTC settings in the setup command xtot 1234, Totalizer Value – units are dependent on the totalizer settings in the setup command tot 75, Cooling Fan Speed – 0 to 100% fdty 35, Heat Sink Temperature – degrees C (65535 if there is an error with the sensor, an error code will also be reported in the alarm status command “m”) tmp 0, Status Flags stf Bit 0 = End of Cycle (1 = End of Cycle) Bit 1 = Low Bus Voltage (1 = Low bus voltage, probable primary power loss) Bit 2 = Output Inhibit (1= hardware interlock is active, front panel inhibit LED is on) Bit 3 = Simulation Mode (1 = Simulation Mode is active) Bits 4 to 15 Reserved for future use 0, alarm flag – 0 = no alarms, 1 = one or more alarm codes have not been read (see the alarm status command “m”) CRC CRC value in ascii decimal crlf Carriage return and Line feed (0x0D 0x0A) Page 112 of 126 alrm 198-0853-02 Rev F Smart LT Manual Dynatronix, Inc. Readings Command: (cont.) Examples of Readings Command: read readings command from unit 1. @01.0d0#0,54321 ACK readings command with text delimiters. @01.1d3#12,1opr,1rem,8.2afi,10.23afv,1reg,2xc,10.25xtot,1234tot,75fdty,35tmp,1stf,0alrm,54321 Notes: 1. The usable resolution of any value is limited to the accuracy and precision of the power supply as indicated in the power supply manual. 2. A non-zero error flag indicates errors are present. Use the error status message “m” to determine which errors are present. 3. Using the global unit address (00) has no affect, no response is sent to commands directed to the global unit address. 4. The error flag is set as soon as any active errors are set by the LT controller. This flag will remain set (1) until the error or errors are read using the error status command “m”. This flag does not indicate that errors are currently active, only that errors have been set and have not be read since they were set. To track currently active errors the error status command “m” should be used any time the error flag is set in the readings command. 5. See the host State command “a” for more information on simulation mode. 198-0853-02 Rev F Page 113 of 126 B.1.15 Error Status Command “m”: @AA.a Sync character (@) and unit address, AA = Unit ID (0 to 99; 0 is a global ID), a = Channel ID (always 0) m0 Command character and Type – 0=read, 1=set(n/a), 2=activate(n/a), 3=ack, 4=nak #5, Number of fields character and number of fields after the comma, excluding CRC (variable) 0, Error number (0 to 255) err 1, Error number (0 to 255) err 2, Error number (0 to 255) err 33, Error number (0 to 255) err 35, Error number (0 to 255) err CRC CRC value in ascii decimal crlf Carriage return and Line feed (0x0D 0x0A) Examples of Error Status Command: read error status command from unit 1. @01.0m0#0,54321 ACK error status command with 3 errors and delimiter text enabled. @01.0m3#3,12err,16err,55err,54321 ACK error status command with 7 errors and delimiter text disabled. @01.0m3#7,5,7,9,10,22,23,28,54321 ACK error status with no errors set @01.0m3#0,54321 Notes: 1. Errors stay in the error status buffer until read, then they are removed, unless the error source is still active. Errors reported by the error status command are errors that have been set since the last time the error status command was sent by the host. The errors reported may or may not currently be active. To maintain a list of currently active errors the error status command should be issued any time the error flag in the readings command “d” is set to one. The error status command will report active errors until they clear AND the error status command is issued. For example, if error number 10 is active the error flag in the readings command will be set to one. The error status command will report error 10 each time it is requested, it will not be removed from the error status buffer until it clears. Once error 10 clears the next read of the error status will remove error 10 from the buffer. 2. This is a variable length message, dependent on the number of errors in the error status buffer. 3. Use the table of errors to determine what each error code means. 4. The channel ID ‘a’ should always be zero. Page 114 of 126 198-0853-02 Rev F Smart LT Manual Dynatronix, Inc. B.1.16 Error History Command “h”: @AA.a Sync character (@) and unit address, AA = Unit ID (0 to 99; 0 is a global ID), a (n/a, set to zero) h0 Command character and Type – 0=read, 1=set(n/a), 2=activate(n/a), 3=ack, 4=nak #6, Number of fields character and number of fields after the comma, excluding CRC (variable) 12, Error number (0 to 255) err 1, Occurance Count (1 to 255) occ 12123, Time stamp of last occurrence in minutes (0 to 65535) min 26, Error number (0 to 255) err 4, Occurrence Count (1 to 255) occ 12125, Time stamp of last occurrence in minutes (0 to 65535) min CRC CRC value in ASCII decimal crlf Carriage return and Line feed (0x0D 0x0A) Examples of Alarm Status Command: read alarm status command from unit 1. @01.0h0#0, 54321 ACK alarm status command with default text delimiters. @01.0h3#9,12err,1occ,12125min,27err,5occ,12125min,29err,255occ,12128min, 54321 ACK alarm status command with comma delimiters. @01.0h3#3,12,1,12125, 54321 Notes: 1. This is a variable length message, dependent on the number of errors in the error history. 2. The error history is not an indication of active error codes, use the error status “m” command to determine active error codes. 3. Not all errors are logged to the error history, see the list of error codes for details regarding which error codes are logged. 4. The error history information is preserved through power cycles. 5. There is a limited space to store errors in the error history. Only the most recent errors are stored. Once the error history is full the oldest errors are overwritten. 6. The time stamp of the last occurrence of the error is derived from the total system on time minutes. The logged time stamp has a maximum value of 65535 minutes. The time stamp contains the 16 least significant bits of the total system on time. As such every 1092 hours of operation the time stamp logged will roll over to zero. 7. The channel ID ‘a’ should always be zero. 198-0853-02 Rev F Page 115 of 126 B.1.17 User Settings Command “t”: @AA.a Sync character (@) and unit address, AA = Unit ID (0 to 99; 0 is a global ID), a = Channel ID (always 0) t0 Command character and Type – 0=read, 1=set, 2=activate(n/a), 3=ack, 4=nak #19, Number of fields character and number of fields after the comma, excluding CRC 1, unit address – 1 to 99, (unit address used in the header of each command) addr 0, Host port baud rate – 0 = 9600 (default), 1 = 19200, 2 = 38400, 3 = 57600, 4 = 115200 bps 0, Power Up Mode – 0 = always start in standby, 1 = return to last state pwr Power Fail Error Enable - 1 = enable power failure errors, 0 = disable power failure errors. There is a separate error code for a brief power failure (error code 103) that did not cause a complete power loss but did disable the output, and a complete power loss (error code 102). pf 0, Front panel operate switch enable (0 = locked, 1 = enabled) opsw 0, Front panel remote switch enable (0 = locked, 1 = enabled) rmsw 1, Default current setting source in remote mode CH1 (0 = host, 1 = option card, 2 = standard analog input (not implemented)). This determines the default (at power on) source of the ch1 current setting while in remote mode. isrc 1, Default current setting source in remote mode CH2(0 = host, 1 = option card, 2 = standard analog input (not implemented)). This determines the default (at power on) source of the ch2 current setting while in remote mode. isrc 1, Default voltage setting source in remote mode CH1 (0 = host, 1 = option card, 2 = standard analog input (not implemented)). This determines the default (at power on) source of the ch1 voltage setting while in remote mode. vsrc 1, Default voltage setting source in remote mode CH2 (0 = host, 1 = option card, 2 = standard analog input (not implemented)). This determines the default (at power on) source of the ch2 voltage setting while in remote mode. vsrc 0, Clear Active Errors ( 0 = no action, A numeric value clears the associated error code, 32767 clears all active error codes). If the error conditions still exists after an error code is cleared the error code will be set again. The action of setting this parameter to a non-zero number clears the associated alarm, the value of this parameter is not stored and will always be read as zero. eclr 0, Clear Totalizer CH1 (0 = no action, 1 = set totalizer value to zero) The action of setting this parameter to ‘1’ clears the totalizer, the value of this parameter is not stored and will always be read as zero. tclr 0, Clear Totalizer CH2 (0 = no action, 1 = set totalizer value to zero) The action of setting this parameter to ‘1’ clears the totalizer, the value of this parameter is not stored and will always be read as zero. tclr Page 116 of 126 198-0853-02 Rev F Smart LT Manual Dynatronix, Inc. 0, Digital Input Enable(start) Action – 0 = no action, 1 = start a new cycle; When set to ‘1’ a cycle will always start running (either resume the currently paused cycle or start a new one) when the digital input transitions such that the output is enabled (inhibit LED turns off). dst 0, Digital Input Disable(stop) Action – 0 = pause the current cycle when the digital input disables the output (inhibit LED turns on), 1 = end the current cycle when the digital input disables the output (inhibit LED turns on). dsp 0, Front Panel Run Screen Select CH1 – 0 = meters, 1 = totalizer status, 2 = cycle status, 3 = heat sink temperature in degrees C, 4 = heat sink temperature in degrees F, 5 = fan speed (note that the end of cycle message “EOC” will be displayed at the end of a cycle regardless of the currently selected run screen, use the state command “a” with an operate state of standby to clear the EOC message) scr 0, Front Panel Run Screen Select CH2 – 0 = meters, 1 = totalizer status, 2 = cycle status, 3 = heat sink temperature in degrees C, 4 = heat sink temperature in degrees F, 5 = fan speed (note that the end of cycle message “EOC” will be displayed at the end of a cycle regardless of the currently selected run screen, use the state command “a” with an operate state of standby to clear the EOC message) scr 0, Front Panel Error Message Disable – 1 = Disable display of error codes on the front panel, 0 = enable display of error codes on the front panel (the fault lamp is active regardless of this setting, if the error messages are disabled (0) then the fault lamp will flash on and off when a new error code is set). This setting is not retained through a power cycle and defaults to 0 at power up. edis 0, Front Panel Unit Configuration Password (code) – 0 to 9999. This is the code that needs to be entered from the front panel to access the unit configuration menu. If the code is known it can also be changed from the front panel within the unit configuration menu. The default code from the factory is 0000. This serial command does not require the existing code to be known, it is the responsibility of host application to protect this password and keep in hidden if desired. pswd CRC CRC value in ascii decimal crlf Carriage return and Line feed (0x0D 0x0A) Examples of User Settings Command: read user settings command from unit 1. @01.0t0#0,54321 ack read user settings command with text delimiters. @01.0t3#19,01addr,3bps,0pwr,1pf,1opsw,1rmsw,2isrc,2isrc,2vsrc,2vsrc,0eclr,0tclr,0tclr, 0dst,1dsp,0scr,0scr,0edis,0pswd,54321 ack read command with comma delimiters. @01.0t3#19,01,3,0,1,1,1,2,2,2,2,0,0,0,1,0,0,0,0,0,54321 198-0853-02 Rev F Page 117 of 126 set baud rate to 19200 (note the ACK response from this command will be sent at the original baud rate, the baud rate change occurs after the ACK to this command) @01.0t1#2,,1,54321 Notes: 1. All user settings are stored in non-volatile memory and will be retained through a power cycle. 2. The unit address must be set using the global address on a single drop bus unless the address of the unit is known. Optionally it is possible to set the host port communications settings to the desired values from the front panel. See 6.3.2.Host Port Configuration. 3. If the power up mode is set to 1 and the unit was powered down in operate mode, then the unit will display a count down when it powers up. If no action is taken the unit switches to the operate state when the countdown expires. If the operate/standby switch is pressed at any point prior to the countdown expiration the countdown will terminate and the unit will remain in standby mode. If the host requests (using the state command) operate or standby prior to the countdown expiration the countdown is terminated and the requested mode is set. 4. The default current and voltage setting source in remote mode are where the current and voltage settings will come from by default when the unit is in remote mode. Changing the default source does not immediately affect the existing source of the setting in remote mode, it only affects what the source of the setting in remote mode will be by default at power up. The existing source of the settings in remote mode can be changed at any time using the setup ‘s’ command. 5. The channel ID ‘a’ should always be zero. 6. The channel 2 settings are only applicable in units with two channels. 7. Each time the unit configuration password is changed with this command the value is written to non-volatile memory. Periodic writes to this value could result in premature failure of the associated memory device. Leave this field blank unless the code needs to be changed. All other parameters in this command that are stored to non-volatile memory are written to non-volatile memory at power down and can be safely changed at periodic intervals. Page 118 of 126 198-0853-02 Rev F Smart LT Manual Dynatronix, Inc. B.1.18 Unit Info Command “u”: @AA.a Sync character (@) and unit address, AA = Unit ID (0 to 99; 0 is a global ID), a = Channel ID (always 0) u0 Command character and Type – 0=read, 1=set(n/a), 2=activate(n/a), 3=ack, 4=nak #24, Number of fields character and number of fields after the comma, excluding CRC 00, Model Type Start model types start at 20. 20 = 1200W, 21 = 36kW mdl 0123456, serial number – 01 is 2 digit year, 234 is day of year, 56 is unit build count sn 750, Amp Rating – amps fir 750, Volt Rating – volts fvr 750, Amp Rating – amps (second channel, if present) fir 750, Volt Rating – volts (second channel, if present) fvr 6000, unit on time – minutes ton 3000, unit operate time – minutes topr 12345, Unit amp hours ch1 ahr 0, Unit amp hours ch2 ahr 3, LT control panel firmware major version number – 0-255 [in PT# 2001458-V301 the major version number is 3] av1 0, LT control panel firmware minor version number – 0-255 [in PT# 2001458-V301 the minor version number is 1 (01)]. av2 1, LT control panel firmware revision number – 0-255 [the revision is not part of the part number] av3 6, LT Boot loader major version number – 0-255 [in PT# 200-0458-V601 the major version number is 6] bv1 0, LT Boot loader minor version number – 0-255 [in PT# 200-0458-V601 the minor version number is 1 (01)] bv2 1, LT Boot loader revision number – 0-255 [the revision is not part of the part number] bv3 200, LT control panel firmware part number class [in PT# 200-1458-V301, the class is 200] ap1 1458, LT control panel firmware part number type [in PT# 200-1458-V301, the type is 1458] ap2 301, LT control panel firmware part number version [in PT# 200-1458-V301 the version is 301] ap3 200, LT boot loader firmware part number class [in PT# 200-0458-V601, the class is 200] bp1 198-0853-02 Rev F Page 119 of 126 458, LT boot loader firmware part number type [in PT# 200-0458-V601, the type is 0458] bp2 601, LT boot loader firmware part number version [in PT# 200-0458-V601, the version is 601] bp3 2, Host protocol major version number pv1 0, Host protocol minor version number pv2 CRC CRC value in ascii decimal Crlf Carriage return and Line feed (0x0D 0x0A) Unit Info Command: (cont.) Examples of Unit Command: read unit command. @01.0u0#0,54321 ACK read unit command with default descriptor text delimiters. @01.0u3#22,20mdl,712647sn,100fir,12fvr,0fir,0fvr,112245ton,9864topr,1234ahr,0ahr,3av1,0av2,0av3, 3bv1,1bv2,2bv3,200ap1,1458ap2,300ap3,200bp1,458bp2,301bp3,54321 Notes: 1. Values that do not apply to a unit can be blank or zero (for example, the second channel ratings on a single channel supply). 2. The channel ID ‘a’ should always be zero. Page 120 of 126 198-0853-02 Rev F Smart LT Manual Dynatronix, Inc. Appendix C: Error Codes When a fault conditions occurs the FAULT lamp on the front panel illuminates. The display will switch back and forth between the normal read back meters and an error code. If multiple error codes are active each active error code is displayed one at a time until all active error codes have been displayed. See 6.5.Error Messages for more details regarding the display of error codes. The following is a list of possible error codes. NOTE: The error history information can be viewed using the host port. See B.1.16Error History Command “h”: for more information. Error Code 1.2kW 36kW 1 X X DSP detects brownout caused a reset 2 X X 3 Fault Description Corrective Action Output Inhibited Logged to Error History Cycle power. If fault continues report to Dynatronix, Inc. NO YES DSP detects a watch dog timeout caused reset Cycle power. If fault continues report to Dynatronix, Inc. NO YES N/A N/A N/A N/A 4 X X DSP detects a reset because of the MEM CLR line Cycle power. If fault continues report to Dynatronix, Inc. NO YES 5 X X DSP illegal op code trap Cycle power. If fault continues report to Dynatronix, Inc. NO YES 6 X X DSP trap conflict trap Cycle power. If fault continues report to Dynatronix, Inc. NO YES 7 X X DSP oscillator fail trap Cycle power. If fault continues report to Dynatronix, Inc. NO YES 8 X X DSP address error trap Cycle power. If fault continues report to Dynatronix, Inc. NO YES 9 X X DSP stack overflow or underflow trap Cycle power. If fault continues report to Dynatronix, Inc. NO YES 10 X X DSP math errror trap Cycle power. If fault continues report to Dynatronix, Inc. NO YES 11 X X DSP DMA error trap Cycle power. If fault continues report to Dynatronix, Inc. NO YES 12 X X control was passed to an unused interrupt vector Cycle power. If fault continues report to Dynatronix, Inc. NO YES N/A Cycle power. If fault continues report to Dynatronix, Inc. N/A N/A 13 14 X X N/A N/A NO YES 15 X X N/A N/A NO YES 16 X N/A N/A NO YES 17 X Invalid checksum in user EEPROM, or an error writing to user EEPROM. Cycle power. All user settings will be set to default values. If the fault continues there could be a component failure. YES X 198-0853-02 Rev F Page 121 of 126 18 X X Invalid checksum in configuration EEPROM Cycle power. All factory configuration settings are set to default values, unit may not operate correctly. There could be a component failure. Contact Dynatronix. YES YES 19 X X I2C bus communications error with EEPROM Cycle power. If fault continues report to Dynatronix, Inc. YES YES X The initialization sequence did not complete without errors Cycle power. If fault continues report to Dynatronix, Inc. YES YES 20 21 X X Voltage setting is outside of the power supply ratings. Cycle power. The setting will be changed to zero. Adjust the setting to the desired value. YES NO 22 X X Voltage setting is outside of the power supply ratings. Cycle power. The setting will be changed to zero. Adjust the setting to the desired value. YES NO 23 X X Current setting is outside of the power supply ratings. Cycle power. The setting will be changed to zero. Adjust the setting to the desired value. YES NO 24 X X Current setting is outside of the power supply ratings. Cycle power. The setting will be changed to zero. Adjust the setting to the desired value. YES NO 25 X X The displayed current could not be auto-ranged for proper display and may be truncated. Cycle power. If fault continues report to Dynatronix, Inc. NO YES 26 X X The displayed current could not be auto-ranged for proper display and may be truncated. Cycle power. If fault continues report to Dynatronix, Inc. NO YES 27 X N/A N/A N/A N/A 28 X N/A N/A N/A N/A 29 X N/A N/A N/A N/A 30 X N/A N/A N/A N/A 31 X N/A N/A N/A N/A 32 X N/A N/A N/A N/A 33 N/A N/A N/A N/A 34 N/A N/A N/A N/A 35 X N/A N/A N/A N/A 36 X N/A N/A N/A N/A 37 X N/A N/A N/A N/A 38 X N/A N/A N/A N/A 39 X N/A N/A N/A N/A 40 X N/A N/A N/A N/A 41 N/A N/A N/A N/A 42 N/A N/A N/A N/A 43 X N/A N/A N/A N/A 44 X N/A N/A N/A N/A 45 X N/A N/A N/A N/A 46 X N/A N/A N/A N/A 47 X N/A N/A N/A N/A Page 122 of 126 198-0853-02 Rev F Smart LT Manual Dynatronix, Inc. 48 X N/A N/A N/A N/A 49 X N/A N/A N/A N/A 50 X N/A N/A N/A N/A 51 X N/A N/A N/A N/A 52 X N/A N/A N/A N/A 53 X N/A N/A N/A N/A 54 X N/A N/A N/A N/A 55 X N/A N/A N/A N/A N/A N/A N/A N/A 56 57 X N/A N/A N/A N/A 58 X N/A N/A N/A N/A 59 X N/A N/A N/A N/A 60 X N/A N/A N/A N/A 61 X N/A N/A N/A N/A 62 X N/A N/A N/A N/A 63 X N/A N/A N/A N/A 64 X N/A N/A N/A N/A 65 X N/A N/A N/A N/A 66 X N/A N/A N/A N/A 67 X N/A N/A N/A N/A 68 X N/A N/A N/A N/A 69 X N/A N/A N/A N/A X N/A N/A N/A N/A X The model type in the LT controller EEPROM has not been set (Model Type = 0xFF) Cycle power. If fault continues report to Dynatronix, Inc. YES NO 70 71 X 72 X Fan circuit drawing more current than expected. Possible locked rotor condition. Check the fan for proper operation. Make sure the fan blades turn freely. NO YES 73 X Over temperature sensor indicates a temperature greater than 70C. The over temperature lamp blinks on and off. The temperature sensor reading is alternately displayed with the normal display. Change to standby mode (leave the power on so the fan continues to run) as soon as possible. The fault will clear when the unit cools down to 65C. Check the fan intake and output to ensure proper air flow. NO YES 74 X Over temperature sensor indicates a temperature greater than 75 C. The over temperature lamp is on steady. The temperature sensor reading is alternately displayed with the normal display. The unit will automatically change to standby mode to avoid damage. Leave the unit running so the fan can cool it down. The fault will clear when the unit cools down to 65C. Check the fan intake and output for proper air flow. YES YES 198-0853-02 Rev F Page 123 of 126 75 X The temperature sensor value is outside the valid range of temperatures. Failed temperature sense circuit or unit is located in an environment where the ambient temperature is outside the recommended temperature range. Verify that the rectifier is located where ambient temperatures do not exceed the recommended temperature range. Power off the rectifier and allow it to return to ambient temperature. If fault re-occurs report the condition to Dynatronix. YES YES 76 X Modules detected at power up do not match the module configuration stored in EEPROM There is either a problem with the configuration, or the incorrect power modules have been installed. YES NO 77 X One or more calibration values could not be stored to EEPROM. Re-calibrate. If the fault persists contact Dynatronix. NO YES X N/A N/A N/A N/A 78 79 X X N/A N/A N/A N/A 80 X X N/A N/A N/A N/A 81 X N/A N/A N/A N/A 82 X N/A N/A N/A N/A 83 X N/A N/A N/A N/A 84 X N/A N/A N/A N/A 85 X N/A N/A N/A N/A 86 X N/A N/A N/A N/A 87 X N/A N/A N/A N/A 88 X N/A N/A N/A N/A 89 X N/A N/A N/A N/A 90 X N/A N/A N/A N/A 91 X N/A N/A N/A N/A 92 X N/A N/A N/A N/A 93 X N/A N/A N/A N/A 94 X X Current over tolerance alarm (CH1). The difference between the current reading and the current setting on CH1 exceeded the tolerance setting (reading greater than the current setting). Out of tolerance alarms self clear at the start of a new cycle. Optionally out of tolerance alarms can be manually cleared at any time, but will be set again if the condition persists. NO YES 95 X X Current over tolerance alarm (CH2). The difference between the current reading and the current setting on CH2 exceeded the tolerance setting (reading greater than the current setting). Out of tolerance alarms self clear at the start of a new cycle. Optionally out of tolerance alarms can be manually cleared at any time, but will be set again if the condition persists. NO YES 96 X X Current under tolerance alarm (CH1). The difference between the current reading and the current setting on CH1 exceeded the tolerance setting (reading less than the current setting). Out of tolerance alarms self clear at the start of a new cycle. Optionally out of tolerance alarms can be manually cleared at any time, but will be set again if the condition persists. NO YES 97 X X Current under tolerance alarm (CH2). The difference between the current reading and the current setting on CH2 exceeded the tolerance setting (reading less than the current setting). Out of tolerance alarms self clear at the start of a new cycle. Optionally out of tolerance alarms can be manually cleared at any time, but will be set again if the condition persists. NO YES Page 124 of 126 198-0853-02 Rev F Smart LT Manual Dynatronix, Inc. 98 X X Voltage over tolerance alarm (CH1). The difference between the voltage reading and the voltage setting on CH1 exceeded the tolerance setting (reading greater than the voltage setting). Out of tolerance alarms self clear at the start of a new cycle. Optionally out of tolerance alarms can be manually cleared at any time, but will be set again if the condition persists. NO YES 99 X X Voltage over tolerance alarm (CH2). The difference between the voltage reading and the voltage setting on CH2 exceeded the tolerance setting (reading greater than the voltage setting). Out of tolerance alarms self clear at the start of a new cycle. Optionally out of tolerance alarms can be manually cleared at any time, but will be set again if the condition persists. NO YES 100 X X Voltage under tolerance alarm (CH1). The difference between the voltage reading and the voltage setting on CH1 exceeded the tolerance setting (reading less than the voltage setting). Out of tolerance alarms self clear at the start of a new cycle. Optionally out of tolerance alarms can be manually cleared at any time, but will be set again if the condition persists. NO YES 101 X X Voltage under tolerance alarm (CH2). The difference between the voltage reading and the voltage setting on CH2 exceeded the tolerance setting (reading less than the voltage setting). Out of tolerance alarms self clear at the start of a new cycle. Optionally out of tolerance alarms can be manually cleared at any time, but will be set again if the condition persists. NO YES 102 X X A complete power failure occurred while the unit was in operate mode. The output was disabled for an unknown period of time (while the power was off). This error code is only reported if power failure alarms are enabled. Power failure alarms must be manually cleared. Once a power failure alarm is set it will remain active (even through multiple power on/off cycles) until it is manually cleared. NO YES 103 X X Power was temporarily lost and then recovered before a complete shutdown occurred. Power was lost and the output was disabled until power was recovered. The period of time that the output was disabled depends on how long power was lost, but was not more than the maximum amount of time the supply controls can remain active after primary power has been lost. Note that if this fault is set in combination with error 102 then the total amount of time that the output was disabled cannot be determined since error 102 indicates a complete loss of power where the controls are no longer active. Error 102 and 103 can occur together when primary power is lost and recovered multiple times at various intervals. This error code is only reported if power failure alarms are enabled. Power failure alarms must be manually cleared. Once a power failure alarm is set it will remain active (even through multiple power on/off cycles) until it is manually cleared. NO YES 198-0853-02 Rev F Page 125 of 126 Revision History Rev Description 01 Start with 198-0853-01 dated 01-28-2009 and make updates to support firmware v3.00 A Production Release – No changes from rev -01 B ECO Date Initials 03/11/09 MRT 3812 2/11/10 MAH Update per CO 4314 4314 10/12/11 NPK C Update fonts per CO 4344 4344 10/24/11 NPK D Update Contact info 4581 9/21/2012 MRT E Update fault code #75 description to indicate output is disabled (starting in firmware v03.02.00) 4586 9/21/2012 MRT F Minor corrections in Section 4 REL 1036 3/15/13 BGH THIS DOCUMENT IS THE PROPERTY OF DYNATRONIX INC AND MAY NOT BE REPRODUCED OR USED IN ANY MANNER WIHTOUT PERMISSION OF DYNATRONIX INC. Page 126 of 126 198-0853-02 Rev F