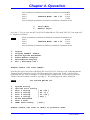
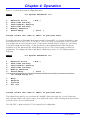
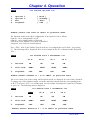
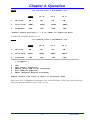
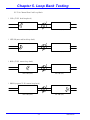
1
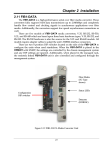
USER MANUAL
FMUX-01
Fiber Optical Multiplexer
Standalone / Rack Type
4, 8, 12 or 16 Channel
G.703 E1, T1(DS1)
Datacom V.35, X.21, RS-530, RS-449, RS-232
Ethernet 10/100Base-TX Bridge
SNMP Manageable
The information contained in this document is subject to change without prior notice.
TRADEMARKS
Microsoft is a registered trademark of Microsoft Corp.
HyperTerminal™ is a registered trademark of Hilgraeve Inc.
WARNING:
This equipment has been tested and found to comply with the limits for a Class A digital device, pursuant to Part 15 of
the FCC Rules. These limits are designed to provide reasonable protection against harmful interference when the
equipment is operated in a commercial environment. This equipment generates, uses, and can radiate radio frequency
energy and if not installed and used in accordance with the instruction manual may cause harmful interference in which
case the user will be required to correct the interference at his own expense. NOTICE: (1) The changes or modifications
not expressively approved by the party responsible for compliance could void the user's authority to operate the
equipment. (2) Shielded interface cables and AC power cord, if any, must be used in order to comply with the emission
limits.
CISPR PUB.22 Class A COMPLIANCE:
This device complies with EMC directive of the European Community and meets or exceeds the following technical
standard. EN 55022 - Limits and Methods of Measurement of Radio Interference Characteristics of Information
Technology Equipment. This device complies with CISPR Class A.
WARNING:
This is a Class A product. In a domestic environment this product may cause radio interference in which case the user
may be required to take adequate measures.
CE NOTICE
Marking by the symbol CE indicates compliance of this equipment to the EMC directive of the European Community.
Such marking is indicative that this equipment meets or exceeds the following technical standards:
EN 55022:1994/A1:1995/A2:1997 Class A and EN61000-3-2:1995, EN61000-3-3:1995 and EN50082-1:1997
CTC Union Technologies Co., Ltd.
Far Eastern Edison Science and Technology Center
6F-3, No. 15, Lane 360
NeiHu Rd., Section 1
NeiHu, Taipei, 114
Taiwan
Phone: +886-2-2659-1021
FAX: +886-2-2799-1355
FMUX-01 4, 8, 12, 16 E1, T1, Datacom, and 10/100Base-TX Bridge
Installation and Operation Manual
Version 1.0a Nov 2002 Pilot Release
Version 1.0b Mar 2003 Pre-Release to Print
Version 1.0c Apr 2003 Released for first printing
This manual supports the following models:
FMUX-01
This document is the first official release manual. It tries to follow what the final release model will
be as closely as possible. However, as of this printing date, many features such as SNMP, Datacom
Port Cards, and Ethernet Bridge Port Card were still under development. Please check CTC Union's
website for any updated manual or contact us by E-mail at [email protected]. Please address any
comments for improving this manual or to point out omissions or errors to [email protected].
Thank you.
The information and specifications in this document are subject to change without notice.
Table of Contents
Chapter 1. Introduction … … … … … … … … … … … … … … … … ... 1-1
1.1 General … … … … … … … … … … … … … … … … … … … … .. 1-1
1.2 Functional Description … … … … … … … … … … … … … … . 1-1
1.3 Technical Specifications … … … … … … … … … … … … … ... 1-4
1.4 E1 Signal Structure … … … … … … … … … … … … … … … .. 1-8
1.5 T1 Signal Structure … … … … … … … … … … … … … … … .. 1-8
1.6 Applications / Capabilities … … … … … … … … … … … … … 1-9
Chapter 2. Port Card Overview … … … … … … … … … … … … … 2-1
2.1 Introduction … … … … … … … … … … … … … … … … … … ... 2-1
2.2 Port Card Overview … … … … .… .… … … … … … … … … ... 2-1
2.3 4 x E1 I/F Module Overview … … … … … … … … … … ..… . 2-1
2.4 4 x T1 I/F Module Overview … … … ...… … … … … … … … . 2-1
2.5 External Clock Overview … … … .… … … … … … … … … … 2-1
2.6 4 x Data I/F Module Overview … … … … … … … … … … … 2-2
2.7 Ethernet Bridge Module Overview … .… … … … … … … … 2-7
Chapter 3. Installation … … … … … … … … … … … … … … … … … . 3-1
3.1 General … … … … … … … … … … … … … … … … … … … … .. 3-1
3.2 Site Preparation … … … … … … … … … … … … … … … … … 3-1
3.3 Mechanical Assembly … … … … … … … … … … … … … … ... 3-1
3.4 Electrical Installation … … … … … … … … … … … … … … … 3-2
3.5 Removal/Replacement Procedures … … .… … … … … … … 3-4
i
Table of Contents
Chapter 4. Operation … … … … … … … … … … … … … … … ..… ..... 4-1
4.1 Introduction … … … … … … … … … … … … … … … … ...… ... 4-1
4.2 LCD Menu Operation … … … … … … … … … … … … .… … . 4-1
4.3 Terminal Mode Operation … … ..… … … … … .… … … ...… . 4-4
Chapter 5. Loop Back Testing … … … … … … … … … … … ...… … 5-1
5.1 General … … … … … … … … … … … … … … … … … … … … .. 5-1
5.2 Loop Back Modes … … … … … … … … … … … … … … … … ..5-1
Chapter 6. SNMP Operation … … … … … … … … … … … … … … . 6-1
6.1 General … … … … … ...… … … … … … … … … … … … … … … 6-1
6.2 SNMP Operations .… … … … … … … … … … … … … … … … 6-1
6.3 Management Information Base … ...… … … … … … … … … 6-2
6.4 MIB Structure … … … … … … … … … … ...… … … … … … … 6-2
6.5 SNMP Communities … … … … … ...… … … … … … … ..… … 6-3
6.6 Configuring the SNMP Agent .… … … … … … … … … … … 6-3
Notes: … … … … … … … … … … … … … … … … … … … … … … … … … .
Technical Inquiry Form … … … … … … … … … … … … … ..… …
ii
Chapter 1. Introduction
1.1 General
Thank you for choosing the Fiber Multiplexer. If you would like to skip right to the
installation and configuration of the Multiplexer, proceed to Chapters 3 and 4.
The MULTIPLEXER UNIT is a 1U (1.75") high standalone or 19" rack mountable
E1/T1/Data/LAN Bridge multiplexer over fiber link, built upon a highly modular design.
The MULTIPLEXER UNIT provides an economic optical connection solution in highdensity E1 and/or T1 installations such as between central offices. By utilizing a modular
design, a large variety of configurations may be realized and the unit may be custom
tailored for each specific application. The 4-CHANNEL E1, T1, V.35 (X.21/RS-530/RS449) data, Ethernet Bridge Port cards and optical interface card are all optional. The
standard unit is a chassis with local control and provisions for single or dual power. The
appropriate optical interface card may be selected to support multi-mode or single-mode
fiber cable operation, with or without redundancy. Optical interface connections may be
chosen from a wide variety of connectors including ST™ , SC, FC, LC, or MT-RJ. WDM
(Wave Division Multiplexing) optical interfaces are also available. The range of
transmission for optical connection is from 2Km (for multi-mode) up to 120Km (single
mode). Optional External Clock Card (external or internal clock source) and SNMP Card
(for local and remote management purposes) may be installed in the chassis.
1.2 Functional Description
The MULTIPLEXER UNIT basic chassis is available in five power supply
configurations. Depending on the model, power may be derived from single AC
100~240VAC, single DC +20~60VDC, dual AC 100~240VAC, dual DC +20~60VDC, or
AC plus DC power sources. The MULTIPLEXER UNIT provides all Line Card
connections on the rear panel. There are 4 slots available for installation of 4-CHANNEL
E1 or T1 Port Cards (G.703 E1/T1), 4-CHANNEL Data Port Cards, or SingleCHANNEL Ethernet Bridge LAN Port Cards into the MULTIPLEXER UNIT chassis.
Each 4-CHANNEL Port Card provides 4 individual channels of E1, T1, or Datacom per
Port Card. The first release of the Single-CHANNEL Ethernet Bridge LAN Port Card
provides one 2048kbps WAN link for 10/100Base Ethernet bridging. A later release version
will provide full 8Mbps (E1 x 4) link speed.
The 4-CHANNEL E1 Port Card has the option of using BNC (75 Ohm unbalanced)
or RJ-45 (120 Ohm balanced) connectors for E1 Line interface connections and supports
four separate E1 channels at a transmission rate of 2048Kbps (transparent unframed E1)
each.
1-1
Multiplexer Unit : Apr 2003
Chapter 1. Introduction
The 4-CHANNEL T1 Port Card provides four RJ-45 (100 Ohm balanced) connectors
for T1(DS1) Line interface connections and supports four separate T1 (DS1) channels at a
transmission rate of 1544Kbps (transparent unframed T1) each.
The 4-CHANNEL Data Port Card provides four standard nx56/nx64Kbps, up to
2048Kbps for V.35 (or X.21, RS-530, RS-449, RS-232) DCE ports on MB34 (DB15,
DB25, DB37, DB25) female or male connectors (required adapter cables optional) for
direct connection to terminal equipment.
The Ethernet Bridge Port Card provides an RJ-45 connector for 10Base-T or
100Base-TX Ethernet (auto negotiation) connections. The bridging function provides LAN
to LAN segment links which operate under the same network address space.
When any port card is inserted in a slot, LEDs on the front panel will show both the
channel statuses and any alarm indications.
The MULTIPLEXER UNIT E1 and T1 Interface Cards fully meet all E1 and T1
specifications including ITU-T G.703, G.732, G.733, G.823 and G.824. The Bridge
Interface Card meets all Ethernet specifications for IEEE802.3 and IEEE802.3u.
Each 4-CHANNEL Port Card features diagnostic capabilities for performing local
loop back or remote loop back (except for Ethernet Bridge card). The loop back function is
controlled by the front panel LCD menu, terminal mode (RS-232 console) or via option
SNMP.
Up to five clock source selections are provided. Without the external clock card option,
the unit operates from clock recovery only. When the external clock card option is installed,
additional clock sources may be selected from an additional internal oscillator (located on
the option card) or from an external clock references for E1 PCM, E1 TTL, T1 PCM, or T1
TTL. All E1 and T1 connected equipment must recover or slave their timing to the
MULTIPLEXER UNIT's internal oscillator or from an external reference clock (with
option).
When the MULTIPLEXER UNIT is ordered with an optional SNMP Card, the card is
installed inside the chassis. Configuration is accomplished via local control on the
asynchronous RS-232 port with a standard VT-100 terminal, via Ethernet and Telnet, or via
any standard SNMP network management software over Etherenet. If the SNMP Card
option is not installed, local and remote management are still possible via the units internal
menu system accessible from the front panel LCD and menu keys, or via the asynchronous
RS-232 port with a standard VT-100 terminal.
1-2
Multiplexer Unit : Apr 2003
Chapter 1. Introduction
The MULTIPLEXER UNIT also includes the ability to do in-band remote
configuration. Once the fiber optic link has been established, the remote unit may be
configured or status checked from the local unit using any of the available management
options. The following graphic shows the major components which make up the
MULTIPLEXER UNIT (without the External Clock or SNMP options installed).
PWR-2 PWR-1
POWER POWER
M ain Cont rol
Board
Assembly
Port 1
C a rd
Port 2
Slot
Port 3
C a rd
Optical
C a rd
Port 4
C a rd
Figure 1-1 : MULTIPLEXER UNIT Major Components
1-3
Multiplexer Unit : Apr 2003
Chapter 1. Introduction
1.3 Technical Specifications
Framing
Bit Rate
Line Code
Line Impedance
Receiver sensitivity
"Pulse" Amplitude
"Zero" Amplitude
Transmit Frequency Tracking
Internal Timing
Jitter Performance
Complies With
Interface Connectors
Test Loops
Framing
Bit Rate
Line Code
Line Impedance
Receiver sensitivity
"Pulse" Amplitude
"Zero" Amplitude
Transmit Frequency Tracking
Internal Timing
Jitter Performance
Complies With
Interface Connectors
Test Loops
E1 Link
Unframed (transparent)
2.048 Mbps
AMI
HDB3
Unbalanced 75 ohms (BNC)
Balanced 120 ohms (RJ-45)
-20dB
Nominal 2.37V? 10% for 75 ohms
Nominal 3.00V? 10% for 120 ohms
? 0.3V
(w/external clock card option)
? 30 ppm
According to ITU-T G.823
ITU-T G.703, G.706 and G.732
RJ-45
BNC
LLB (Local Loop Back)
NELB (Near End Loop Back)
RLB (Remote Loop Back)
RRLB (Request Remote Loop Back)
T1 Link
Unframed (transparent)
1.544 Mbps
AMI
B8ZS
Balanced 100 ohms (RJ-45)
-20dB
Nominal 3.00V? 10% for 100 ohms
? 0.3V
(w/external clock card option)
? 30 ppm
According to ITU-T G.824
ITU-T G.703, G.706 and G.733
RJ-45
LLB (Local Loop Back)
NELB (Near End Loop Back)
RLB (Remote Loop Back)
RRLB (Request Remote Loop Back)
1-4
Multiplexer Unit : Apr 2003
Chapter 1. Introduction
Data Port Channels
Interface Types
Interface Connectors
V.35 Interface
X.21 Interface
RS-530 Interface
RS-449 Interface
RS-232 Interface
Line Code
Data Rate (each channel)
Clock Modes
Control Signals
Test Loops
Interface Type
Interface Connector
WAN Data Rate
Complies with
Test Loops
LCD
Pushbutton Switches
Alarm Output
Pin Assignment (DB9F)
V.35
X.21
RS-530/V.36
RS-449
RS-232
(provided by adapter cables)
34 pin, Female or Male
15 pin, D-type Female or Male
25 pin, D-type Female or Male
37 pin, D-type Female or Male
25 pin, D-type Female or Male
NRZ
n? 64Kbps (64 ~ 2048Kbps)
where n equal 1 to 32
RS-232 maximum is 128Kbps
Transparent, recovery, External, or Internal
CTS constantly ON or follows RTS
DSR constantly ON, except during test loops
DCD constantly ON, except during signal loss
LLB (Local Loop Back)
RLB (Remote Loop Back)
V.54
Bridge Port Channels
10Base-T, 100Base-TX (auto-negotiation)
RJ-45
2048Kbps (to 8192Kbps depending on version)
IEEE802.3 10Base-T
IEEE802.3u 100Base-TX
NONE
Local Setup and Configuration
2 rows of 16 characters
ESC
Left Arrow (-)
Right Arrow (+)
Enter
Alarm Output Relays
Four pairs of Normally Open contacts for Major
and Minor alarms, both audio and visual.
Contact ratings: 1A at 30 VDC resistive
or 0.5A at 125 VAC resistive
1 - 2 / Major (audio)
3 - 4 / Major (visual)
5 / frame ground
6 - 7 / Minor (audio)
8 - 9 / Minor (visual)
1-5
Multiplexer Unit : Apr 2003
Chapter 1. Introduction
Power 1
Power 2
Optical 1
Green
Green
RED
Optical 2
RED
Channels
GREEN
Audible Alarm Amber
Cutoff
Minor Alarm
Amber
Major Alarm
RED
Far End Error
Near End Error
System Failure
Optical
Amber
RED
RED
(Dual)
E1
(Dual)
T1
(Dual)
Port interface
Port connector
Data rate (*default)
Data format
RJ-45 Pin Usage
LED Indicators
Power Module 1 active
Power Module 2 active
Off = off
On = working (ALS is off)
On = working & linked (ALS is set Auto)
Blinking = working & not linked
(If ALS is disabled, then the not linked condition will
not be indicated by a blinking LED)
Off = disabled
On = standby (ALS is off)
On = standby & linked (ALS is set Auto)
Blinking = Standby & not linked
(If ALS is disabled, then the not linked condition will
not be indicated by a blinking LED)
One LED for each channel (A-D) of each Port (1-4)
or a total of 16 LED.
On = In Service
Off = Out of Service
Blinking = Loss of Signal
Audible Alarm has sounded, alarm cutoff switch has
been pushed
Indicates a minor alarm has occurred, includes E1 or
T1 BPV or fiber sync slip.
Indicates a major alarm has occurred, includes E1,
T1, and fiber signal loss.
Indicates a far end (remote) error has occurred
Indicates a near end (local) error has occurred
Indicates a failure in the "system" such as fiber LOS
GREEN = optical link established
RED = optical link failure
GREEN = E1 active, no errors
RED = E1 Signal Loss
Off = No E1
GREEN = T1 active, no errors
RED = T1 Signal Loss
Off = No T1
RS-232 Console Port
V.24/RS-232 asynchronous, DCE
RJ-45
19200 bps
-One start bit
-8 data bits
-No parity
-One stop bit
RJ-45(DCE)
4
GND
5
TD
6
RD
1-6
DB9(DTE)
5
2
3
Multiplexer Unit : Apr 2003
Chapter 1. Introduction
Optical Specifications (redundant fiber has identical specifications as primary)
Standard Types
WDM Types*
Type
M-M
S-M
S-M
S-M
S-M
S-M
S-M
S-M
S-M
Distance (Km)
2
15
30
50
120
20(A)* 20(B)* 40(A)* 40(B)*
Tx:1310 Tx:1550 Tx:1310 Tx:1550
Wavelength
1310
1310
1310
1310
1550 Rx:1550 Rx:1310 Rx:1550 Rx:1310
(nm)
BER
<10-10 <10-10 <10-10 <10-10 <10-10 <10-10 <10-10 <10-10 <10-10
-31dBm -32dBm -35dBm -36dBm -35dBm -32dBm -32dBm -32dBm -32dBm
Sensitivity
Output Power -20dBm -20dBm -15dBm -8dBm -7dBm -18dBm -15dBm -10dBm -7dBm
Power Margin 11dBm 12dBm 20dBm 28dBm 28dBm 14dBm 17dBm 22dBm 25dBm
-12dBm -12dBm -12dBm -12dBm -12dBm -14dBm -14dBm -14dBm -14dBm
Return Loss
ST
v
v
v
v
v
Conn.
SC
v
v
v
v
v
v
v
v
v
Types
LC
v
v
v
v
v
MT-RJ
v
v
v
v
v
FC
v
v
v
v
v
M-M: multi-mode S-M: single-mode
* WDM types must match (A) with (B) in pairs
All fiber transceivers in the Multiplexer incorporate an automatic laser shutdown feature (ALS)
designed to protect personnel that may come into contact with a disconnected fiber connection. This
feature may also be disabled for testing purposes via the front panel LCD, console terminal mode or
SNMP (when SNMP option is installed).
Physical
Height:
Width:
Depth:
Weight:
43 mm (1.75")
438 mm (17.25")
251 mm (9.875")
4.5 kg (10 lb.) Net
Voltage (AC source)
Voltage (DC source)
Frequency
Power consumption
Power supply
90 ~ 250 VAC
20 ~ 60 VDC
47 to 63 Hz for AC power
40 VA
Temperature
Humidity
Environment
0-50? C / 32-122? F
0 to 90% non-condensing
1-7
Multiplexer Unit : Apr 2003
Chapter 1. Introduction
1.4 E1 Signal Structure
E1 link line rate
The E1 line operates at a nominal rate of 2.048Mbps.
E1 link line coding
The basic E1 line signal is coded using either the Alternate Mark Inversion (AMI) or
HDB3 rule.
In the AMI format, "ones" are alternately transmitted as positive and negative pulses,
whereas "zeros" are transmitted as a zero voltage level. AMI is not used in most 2.048Mbps
transmissions because synchronization loss occurs during long strings of data zeros.
In the HDB3 format, a string of four consecutive zeros is replaced with a substitute
string of pulses containing an intentional bipolar violation. The HDB3 code substitutions
provide high pulse density so that the receiving equipment is able to maintain
synchronization with the received signal.
The 4-CHANNEL E1 Port Card supports two E1 line codes:
AMI coding.
HDB3 coding.
The 4-CHANNEL E1 Port Card supports only transparent unframed format.
1.5 T1(DS1) Signal Structure
T1 link line rate
The T1 line operates at a nominal rate of 1.544Mbps.
T1 link line coding
The basic T1 line signal is coded using either the Alternate Mark Inversion (AMI) or
B8ZS rule.
In the AMI format, "ones" are alternately transmitted as positive and negative pulses,
whereas "zeros" are transmitted as a zero voltage level. AMI is not used in most 1.544Mbps
transmissions because synchronization loss occurs during long strings of data zeros.
In the B8ZS format, a string of eight consecutive zeros is replaced with a substitute
string of pulses containing an intentional bipolar violation. The B8ZS code substitutions
provide high pulse density so that the receiving equipment is able to maintain
synchronization with the received signal.
1-8
Multiplexer Unit : Apr 2003
Chapter 1. Introduction
The 4-CHANNEL T1 Port Card supports two T1 line codes:
AMI coding.
B8ZS coding.
The 4-CHANNEL T1 Port Card supports only transparent unframed format.
1.6 Applications / Capabilities
In the following example, the MULTIPLEXER UNIT utilizes an optical fiber
connection between a pair of units to provide 4, 8, 12 or 16 channels of E1, T1, Datacom, or
1 to 4 channels of Ethernet Bridge between the units.
The timing scheme for the typical point-to-point application would set all connected
E1 or T1 equipment to recovery (receive timing from the MULTIPLEXER UNITs ).
Figure 1-2 : Typical Point-to-Point Application of MULTIPLEXER UNIT
1-9
Multiplexer Unit : Apr 2003
Chapter 1. Introduction
This page left blank intentionally.
1-10
Multiplexer Unit : Apr 2003
Chapter 2. Port Card Overview
2.1 Introduction
This chapter provides brief descriptive over-view of the available 4-Channel Port
card options. Detailed specifications are in Chapter 1, while removal and replacement
procedures are detailed in Chapter 3. Unit configuration is all covered in Chapter 4. The
cards are NOT designed to be "hot" swappable, therefore make sure the MULTIPLEXER
UNIT chassis is powered off before replacing a card or pulling it from the chassis. Removal
and installation of 4-Channel Port Cards with the rack chassis under power is NOT
RECOMMENDED and will definitely effect the operation of the other 4-Channel Port
Cards (and possibly cause permanent damage to the unit).
2.2 Port Card Overview
The 4-Channel Port Cards for the MULTIPLEXER UNIT are modular PCAs which
slide into the MULTIPLEXER UNIT chassis, and interface with the internal "main board".
The main board provides an interface connection to the 4-Channel Port Cards for power,
data connection and other logic (for local management terminal and optional SNMP).
2.3 4 x E1 I/F Module Overview
The 4 x E1 4-Channel Port Cards for the MULTIPLEXER UNIT are modular PCAs
which slide into the MULTIPLEXER UNIT chassis and provide four completely
independent G.703 E1 interfaces. The module is available in two options. One, with 4 pairs
of BNC connectors for 75 Ohm unbalanced connections and the other with four RJ-45 jacks
for 120 Ohm balanced connections.
2.4 4 x T1 I/F Module Overview
The 4 x T1 4-Channel Port Cards for the MULTIPLEXER UNIT are modular PCAs
which slide into the MULTIPLEXER UNIT chassis and provide four completely
independent T1(DS1) interfaces. The module is available with four RJ-45 jacks for 100
Ohm balanced connections.
2.5 External Clock Overview
The MULTIPLEXER UNIT is available with an external clock option that allows the
unit to be synchronized with external clocks or equipment. The MULTIPLEXER UNIT
may receive an external clock source from E1 PCM, E1 TTL, T1 PCM or T1 TTL signal
sources. Additionally, the option includes its own precision crystal based clock. The
external clock is received via an RJ-45 jack from the rear panel.
2-1
FMUX-01Mar 2003
Chapter 2. Port Card Overview
Ext Clk
1. Rx - (RRing)
2. Rx + (RTip)
Figure 2-1. External Clock Connector
2.6 4 x Data I/F Module Overview
The 4 x Data 4-Channel Port Cards for the MULTIPLEXER UNIT are modular
PCAs which slide into the MULTIPLEXER UNIT chassis and provide four completely
independent Data (V.35, X.21, RS-530, RS-449, or RS-232) interfaces. The Data module is
available in one of ten interface and cable options.
1. 4 x V.35 with MB34 Female connectors
2. 4 x V.35 with MB34 Male connectors
3. 4 x X.21 with DB15 Female connectors
4. 4 x X.21 with DB15 Male connectors
5. 4 x RS-530 with DB25 Female connectors
6. 4 x RS-530 with DB25 Male connectors
7. 4 x RS-449 with DB37 Female connectors
8. 4 x RS-449 with DB37 Male connectors
9. 4 x RS-232 with DB25 Female connectors
10. 4 x RS-232 with DB25 Male connectors
When the MULTIPLEXER UNIT is ordered with an X21 Port Card option, a 4CHANNEL X.21 Card and adapter cable are supplied with each DB15 wired according to
the following table.
Signal
Function
DB15
PIN#
Abbreviation
Direction
Shield
1
FG
?
Ground
8
SG
?
Transmit(A)
Transmit(B)
Receive(A)
Receive(B)
Control(A)
Control(B)
Indication(A)
Indication(B)
Ext. Timing(A)
Ext. Timing(B)
Signal Timing(A)
Signal Timing(B)
2
9
4
11
3
10
5
12
7
14
6
13
TD(A)
TD(B)
RD(A)
RD(B)
RTS(A)
RTS(B)
DCD(A)
DCD(B)
ETC(A)
ETC(B)
RC(A)
RC(B)
To MUX
UNIT
Fm. MUX
UNIT
To MUX
UNIT
Fm. MUX
UNIT
To MUX
UNIT
Fm. MUX
UNIT
Description
Chassis ground.
May be isolated from signal ground.
Common signal ground.
Serial digital data from DTE.
Serial digital data at the output of the
MULTIPLEXER UNIT receiver.
A ON signal to the MULTIPLEXER UNIT when
data transmission is desired.
Constantly ON, except when a loss of the
received carrier signal is detected.
A transmitted data rate clock input from the data
source.
A received data rate clock for use by an external
data source.
Table 2-1 : DB15 adapter cable pin out for X.21
2-2
FMUX-01Mar 2003
Chapter 2. Port Card Overview
When the MULTIPLEXER UNIT is ordered with an V35 Port Card option, a 4CHANNEL V.35 Card and adapter cable are supplied with each MB34 wired according to
the following table.
Signal
Function
Frame
Ground
Signal
Ground
Transmit
Data
Receive
Data
Request
To Send
Clear
To Send
Data Set
Ready
Data Terminal
Ready
Data Carrier
Detect
External
Transmit Clock
Transmit
Clock
Receive
Clock
Remote
Loopback
Local
Loopback
Test Indicator
MB34
PIN#
V.35
Circuit
Direction
Description
A
Frame
?
Chassis ground.
May be isolated from signal ground.
B
Signal Ground
?
Common signal ground.
P
S
R
T
TD(A)
TD(B)
RD(A)
RD(B)
C
RTS
D
CTS
E
DSR
H
DTR
F
DCD
U
W
Y
AA
V
X
ETC(A)
ETC(B)
TC(A)
TC(B)
RC(A)
RC(B)
HH
RL
JJ
LL
KK
TM
To MUX UNIT
Serial digital data from DTE.
Fm. MUX
UNIT
Serial digital data at the output of the
MULTIPLEXER UNIT receiver.
A ON signal to the MULTIPLEXER UNIT when
To MUX UNIT
data transmission is desired.
Fm. MUX
Constantly ON.
UNIT
Fm. MUX
Constantly ON,
UNIT
Except during test loops.
DTR not used, used for a received serial data
To MUX UNIT
rate clock input from the DTE.
Fm. MUX
Constantly ON, except when a loss of the
UNIT
received carrier signal is detected.
A transmitted data rate clock input from the
To MUX UNIT
data source.
Fm. MUX
A transmitted data rate clock for use by an
UNIT
external data source.
Fm. MUX
A received data rate clock for use by an
UNIT
external data source.
When on, commands MULTIPLEXER UNIT
To MUX UNIT
into remote loop back.
When on, commands MULTIPLEXER UNIT
To MUX UNIT
into local loop back.
Fm. MUX
ON during any test mode
UNIT
Table 2-2 : MB34 cable pin out for V.35
2-3
FMUX-01Mar 2003
Chapter 2. Port Card Overview
When the MULTIPLEXER UNIT is ordered with an RS449 Port Card option, a 4CHANNEL RS-449 Card and adapter cable are supplied with each DB37 wired according
to the following table.
SIGNAL
FUNCTION
Protective
Ground
Signal
Ground
Transmitted
Data
Received
Data
Request to
Sent
Clear to
Sent
Data Set
Ready
Data Terminal
Ready
Data Carrier
Detect
External
Transmit clock
Transmit
Clock
Receive
Clock
Remote
Loop back
Local
Loop back
DB37
PIN
RS-449
CIRCUIT
1
Frame
?
Chassis ground.
May be isolated from signal ground.
19,20,
37
4
22
6
24
7
25
9
27
11
29
12
30
13
31
17
35
5
23
8
26
SG,RC,
SC
SD(A)
SD(B)
RD(A)
RD(B)
RS(A)
RS(B)
CS(A)
CS(B)
DM(A)
DM(B)
TR(A)
TR(B)
RR(A)
RR(B)
TT(A)
TT(B)
ST(A)
ST(B)
RT(A)
RT(B)
?
Common signal ground.
Test Indicator
14
RL
10
LL
18
TM
Direction
To MUX
UNIT
Fm. MUX
UNIT
To MUX
UNIT
Fm. MUX
UNIT
Fm. MUX
UNIT
To MUX
UNIT
Fm. MUX
UNIT
To MUX
UNIT
Fm. MUX
UNIT
Fm. MUX
UNIT
To MUX
UNIT
To MUX
UNIT
Fm. MUX
UNIT
DESCRIPTION
Serial digital data from DTE.
Serial digital data at the output of the
MULTIPLEXER UNIT receiver.
A ON signal to the MULTIPLEXER UNIT when
data transmission is desired.
Constantly ON.
Constantly ON,
Except during test loops.
DTR not used, used for a received serial data rate
clock input from the DTE.
Constantly ON, except when a loss of the received
carrier signal is detected.
A transmitted data rate clock input from the data
source.
A transmitted data rate clock for use by an
external data source.
A received data rate clock for use by an external
data source.
When on, commands MULTIPLEXER UNIT into
remote loop back.
When on, commands MULTIPLEXER UNIT into
local loop back.
ON during any test mode
Table 2-3 : DB37 adapter cable pin out for RS-449
2-4
FMUX-01Mar 2003
Chapter 2. Port Card Overview
When the MULTIPLEXER UNIT is ordered with an RS530 Port Card option, a 4CHANNEL RS-530 Card and adapter cable are supplied with each DB25 wired according
to the following table.
SIGNAL
Function
Protective
Ground
Signal Gnd
DB25 CIRCUIT
PIN
1
Frame
DIRECTION
7
AB
Transmitted
Data
Received
Data
Request to
Sent
Clear to
Sent
Data Set
Ready
Data
Terminal
Ready
Data Carrier
Detect
External
Transmit
clock
Transmit
Clock
Receive
Clock
Remote
Loop back
Local
Loop back
Test Indicator
2
14
3
16
4
19
5
13
6
22
20
23
BA(A)
BA(B)
BB(A)
BB(B)
CA(A)
CA(B)
CB(A)
CB(B)
CC(A)
CC(B)
CD(A)
CD(B)
8
10
24
11
CF(A)
CF(B)
DA(A)
DA(B)
Fm MUX UNIT
15
12
17
9
21
DB(A)
DB(B)
DD(A)
DD(B)
RL
Fm MUX UNIT
18
LL
To MUX UNIT
25
TM
Fm MUX UNIT
?
?
DESCRIPTION
Chassis ground.
May be isolated from signal ground.
Common signal ground.
To MUX UNIT
Serial digital data from DTE.
Fm MUX UNIT
Serial digital data at the output of the
MULTIPLEXER UNIT receiver.
A ON signal to the MULTIPLEXER UNIT when
data transmission is desired.
Constantly ON.
To MUX UNIT
Fm MUX UNIT
Fm MUX UNIT
To MUX UNIT
To MUX UNIT
Fm MUX UNIT
To MUX UNIT
Constantly ON,
Except during test loops.
DTR not used, used for a received serial data
rate clock input from the DTE.
Constantly ON, except when a loss of the
received carrier signal is detected.
A transmitted data rate clock input from the
data source.
A transmitted data rate clock for use by an
external data source.
A received data rate clock for use by an
external data source.
When on, commands MULTIPLEXER UNIT
into remote loop back.
When on, commands MULTIPLEXER UNIT
into local loop back.
ON during any test mode
Table 2-4 : DB25 adapter cable pin out for RS-530
2-5
FMUX-01Mar 2003
Chapter 2. Port Card Overview
When the MULTIPLEXER UNIT is ordered with an RS232 Port Card option, a 4CHANNEL RS-232 Card and adapter cable are supplied with each DB25 wired according
to the following table.
Signal
Function
Protective
Ground
Signal
Ground
Transmitted
Data
Received
Data
Request to
Sent
Clear to
Sent
Data Set
Ready
Data Terminal
Ready
Data Carrier
Detect
External Transmit
Clock
Transmit
Clock
Receive
Clock
Remote
Loop back
Local
Loop back
Test Indicator
DB25
PIN
Circuit
1
AA
?
Chassis ground.
May be isolated from signal ground.
7
AB
?
Common signal ground.
2
BA
To MUX UNIT Serial digital data from DTE.
3
BB
Fm MUX UNIT
4
CA
5
CB
Fm MUX UNIT Constantly ON.
6
CC
Fm MUX UNIT
20
CD
To MUX UNIT
8
CF
Fm MUX UNIT
24
DA
To MUX UNIT
15
DB
Fm MUX UNIT
17
DD
Fm MUX UNIT
21
RL
To MUX UNIT
18
LL
To MUX UNIT
25
TM
Fm MUX UNIT ON during any test mode
Direction
Description
Serial digital data at the output of the MULTIPLEXER
UNIT receiver.
A ON signal to the MULTIPLEXER UNIT when data
To MUX UNIT
transmission is desired.
Constantly ON,
Except during test loops.
DTR not used, used for a received serial data rate
clock input from the DTE.
Constantly ON, except when a loss of the received
carrier signal is detected.
A transmitted data rate clock input from the data
source.
A transmitted data rate clock for use by an external
data source.
A received data rate clock for use by an external data
source.
When on, commands MULTIPLEXER UNIT into
remote loop back.
When on, commands MULTIPLEXER UNIT into local
loop back.
Table 2-5 : DB25 adapter cable pin out for RS-232
2-6
FMUX-01Mar 2003
Chapter 2. Port Card Overview
2.7 Ethernet Bridge Module Overview
When the MULTIPLEXER UNIT is ordered with an ET100 Port Card option, a
Single-Channel Bridge Port Card is supplied. Complete bridging functions are provided.
BRIDGE FEATURES
10BASE-T/100BASE-TX, Full Duplex or Half Duplex
HP Auto-MDIX, detects and corrects crossed cables
IEEE 802.3x flow control
Real-time filtering with 256 address tables
Automatic address learning, aged and deleted with 5 minutes
Up to 340 packet-buffering capacity
Auto padding undersize packets to meet the minimum LAN packet size requirement
Buffering modes can be selected according to the set of WAN and LAN line speeds
Automatic TP polarity correction
BRIDGE SPECIFICATIONS
Compliance:
Connector:
Data Rate:
Filtering and Forwarding:
Delay:
WAN Protocol:
IEEE 802.3/802.3u
Shielded RJ-45
10/100Mbps; Half Duplex (20/200Mbps; Full duplex)
90,000 packets/sec
1 frame
HDLC
Filter:
When this feature is disabled (DIP1-1 OFF), all frames are passed transparently. In this
configuration, the ET100 acts as an Ethernet repeater. When the filter is enabled (DIP-1 ON),
frame destinations are tested against the internal MAC address table. Filtering enabled is the normal
selection for Bridging.
Auto Negotiation:
When this feature is disabled (DIP1-3 ON), the LAN configuration is defined by the Duplex
(DIP-4) and Speed (DIP-5) settings. This is the preferred method of configuration, but requires the
specific knowledge of the capabilities of the device to which the bridge is connected. Failure to
make the proper Ethernet settings can result in reduced LAN performance or in worst case, no LAN
function at all. When Auto Negotiation is enabled (DIP-3 OFF), by default, the bridge will try to
determine the proper speed and duplexity of the connected device. If the negotiation fails, as it will
with a legacy device that doesn't support auto-negotiation, the settings will fallback to 10Mpbs
speed and Half Duplex for compatibility.
2-7
FMUX-01Mar 2003
Chapter 2. Port Card Overview
Duplex:
The original specifications for Ethernet did not allow any bi-directional transmissions. The
Ethernet operated in a half duplex mode. Modern Ethernet has the ability to operate in Full duplex
mode which essentially doubles the throughput from 10Mbps to 20Mbps on 10Base-T or from
100Mbps to 200Mbps on 100Base-TX. Using this setting requires connection to equipment which
also supports Full duplex Ethernet. Setting DIP-4 OFF will enable this Full duplex mode. However,
if Auto-negotiation is enabled (DIP-3 OFF), then this switch's setting is ignored.
Speed:
DIP-5 is used to set the Ethernet speed at 10Mbps (10Base-T) or 100Mbps (100Base-TX).
When set ON, the Ethernet connection will operate in the slower 10Base-T speed. When DIP-5 is
set OFF, the Ethernet connection will operate at 100Base-TX speed. However, if Auto-negotiation
is enabled (DIP-3 OFF), then this switch's setting is ignored.
Auto MDI:
Auto MDI is a new Ethernet feature which allows Ethernet connections between MDI
devices and/or MDI-X devices (HUBs) all using only straight thru, one-to-one, UTP connections.
When DIP-6 is ON, this feature is enabled. When this feature is disabled (DIP-6 OFF), the device
becomes MDI only and requires a crossover UTP cable to connect to another MDI device (such as
PCs). Straight cable connections are used for connecting to MDI-X devices such as HUBs.
DIP Switch Settings
DIP
State
Function
1
ON*
Enable MAC filtering
OFF
Disable Filtering (repeater)
2
ON
Enable 802.3x flow control
OFF*
Disable 802.3x flow control
3
ON
NO Auto-negotiation
OFF*
Auto-negotiation
4
ON
Half Duplex 1
OFF*
Full Duplex 1
5
ON
10BASE-T LAN speed1
OFF*
100BASE-TX LAN speed1
6
ON
Enable Auto MDIX
OFF*
MDI (1:1 to HUB)
7 | 8 OFF OFF Memory configuration #1
ON
OFF
Memory configuration #2
OFF
ON
Memory configuration #3
ON
ON
Reserved
Table 2-6 DIP switch settings
* factory default settings
1
no effect when sw3 is off (auto-negotiation is on),
if auto-negotiation fails, the interface falls back to
10Base-T and half-duplex mode to support legacy
Ethernet devices.
LED Indicators
Designation
Indication
Full (yellow)
ON=Full Duplex
Link (green)
ON=LAN Link
Error (red)
ON=LAN Error
100M (yellow)
ON=Fast Ethernet
Receive (yellow)
ON=LAN Rx data
Transmit(yellow) ON=LAN Tx data
Table 2-7 LED indicators
Memory configuration detail
#1 LAN to WAN 308 packets, WAN to LAN 32 packets
#2 LAN to WAN 170 packets, WAN to LAN 170 packets
#3 LAN to WAN 32 packets, WAN to LAN 308 packets
MDI
1. Tx +
2. Tx 3. Rx +
6. Rx Table 2-8 ET100 pin allocation
2-8
FMUX-01Mar 2003
Chapter 3. Installation
3.1 General
This chapter explains in detail the requirements and procedures for the installation of
the MULTIPLEXER UNIT Standalone/Rack Mount Fiber Optical Multiplexer.
3.2 Site Preparation
Install the MULTIPLEXER UNIT within reach of an easily accessible grounded AC
outlet. The outlet should be capable of furnishing 90 to 250 VAC (20 to 60 VDC for DC
supply). Allow at least 10cm (4 inch) clearance at the rear and front of the MULTIPLEXER
UNIT for signal lines and interface cables.
3.3 Mechanical Assembly
The MULTIPLEXER UNIT is designed for rack mount installation and only requires
1U space (1 3/4") in a standard EIA 19 inch rack. It is highly recommended that the unit be
placed in a rack. The MULTIPLEXER UNIT may or may not be delivered completely
assembled. No provision is made for bolting the MULTIPLEXER UNIT to a tabletop.
Figure 3-1 : Rack mount Installation of the MULTIPLEXER UNIT
3-1
FMUX-01Mar 2003
Chapter 3. Installation
3.4 Electrical Installation
3-4-1. Power connection
For a model with AC power supply, AC power (90~250VAC) is supplied to the
MULTIPLEXER UNIT through a standard IEC 3-prong receptacle, located on the rear of
the chassis. For a model with DC power supply, DC –48V (20~60VDC) is connected to the
terminal block, observing the proper polarity. In the AC/DC model, both IEC receptacle and
DC terminal block are provided for dual power operation. The MULTIPLEXER UNIT
should always be grounded through the protective earth lead of the power cable in AC
installations, or via the frame ground connection for DC installations.
Mains
Switches
DC IN
Terminal
Block
AC IN
Connector
Figure 3-2 : Supply connections, AC/DC model shown
3-2
FMUX-01Mar 2003
Chapter 3. Installation
3-4-2. Rear and Front panel connectors
All 4-Channel Port Cards install into the rear of the MULTIPLEXER UNIT. The back
plane provides both DC power to the 4-CHANNEL Port interface cards and routes signals
from the cards to the multiplexing circuitry. From here, the multiplexed signal is sent to the
Fiber Interface module installed in the front panel.
T1 balanced RJ-45
E1 balanced RJ-45
Mains Switches
IEC AC Mains Input
Alarm Relay
E1 unbalanced BNCs
Figure 3-3 : Rear Panel Connections
The front panel of the MULTIPLEXER UNIT, holds the optical interface, LCD
display, menu keypad, LCD contrast trimmer and the status and alarm LEDs. On the optical
interface, two interface connector groups are provided for connection to either the primary
optical transmit and receive pair or to the redundant optical transmit and receive pair (if the
optical interface card has the redundant optical option). The front panel also provides the
connections to the RS-232 Console Interface (terminal mode) and to the LAN network for
SNMP control (when the SNMP option is installed).
Optical
Interface
LAN
Interface
RS-232
Console
Interface
LCD
Contrast
adjustment
LCD
Configuration
Panel
Optical and Channel
Status
Indicators
Menu
Function
Keys
Alarm
Status
Indicators
Figure 3-4 : Front Panel Controls and Indicators
3-3
FMUX-01Mar 2003
Chapter 3. Installation
3.5 Removal/Replacement Procedures
3-5-1. Optical Module Removal / Replacement
****CAUTION**** All removal/replacement procedures must be done with all
power sources disconnected.
The optical interface is installed into the front of the MULTIPLEXER UNIT. The
front plane of the internal mainboard provides both DC power to the optical interface card
and routes signals from the card to the multiplexing/de-multiplexing circuitry. Two
interface connector groups are provided for connection to either the primary optical transmit
and receive pair or to the redundant optical transmit and receive pair (if the optical interface
card as the redundant optical option). From here, the de-multiplexed signal s are sent to the
individual 4-CHANNEL Card module/channel installed in the rear of the unit (see 3-5-2 for
removal/replacement procedures).
To remove the interface module, remove the two upper and one lower flat head screws
using a No.2 Philips head screwdriver. Save the screws. Then gently pull the card straight
forward to avoid binding. The card is only held by the friction of the connector. To install
the optical module, reverse the procedure, taking care when seating the module to avoid
connector damage. Gently, don't force it! Re-install th e three flathead screws and don't
over-tighten.
Mounting
Screws
Removed
Figure 3-5 : Optical Interface Removal / Replacement
3-4
FMUX-01Mar 2003
Chapter 3. Installation
3-5-2 Channel Port I/F Module Removal / Replacement
All 4-Channel Port Cards install into the rear of the MULTIPLEXER UNIT. The
channel connector is held by two "thumb" screws. Loosen both thumb screws (use a flat
blade screwdriver if they are too tight), then remove the connector adapter by gently pulling
straight back. The 4-Channel Port cards are held in by three small flathead screws. Using a
No.2 Philips screwdriver, remove the two upper and one lower screw, then pull the module
straight out (refer to the pictures below). To install the 4-Channel Port module, reverse the
procedure, taking care when seating the module to avoid connector damage. Gently seat it,
do not force it! Re-install the three flathead screws and do not over-tighten. Then re-install
the appropriate channel adapter and tighten the thumb screws gradually and evenly.
Tightening by hand is sufficient.
Channel
Adapter
held by
"Thumb"
Screws
Adapter
removed
exposing
the 4Channel
Port
Module
4-Channel
Port
Module
being slid
from
chassis
Figure 3-6 : 4-Channel Port Module Removal / Replacement
3-5
FMUX-01Mar 2003
Chapter 3. Installation
3-5-3 Top cover Removal / Replacement for internal access
Normally, there is no need to remove the cover of the unit. All interface cards can be
removed and replaced without the need to access the internal portion of the
MULTIPLEXER UNIT. However, to change any AC or DC power module, add the SNMP
and/or External clock feature, or to change the internal firmware, internal access is required
and the cover must be removed.
***CAUTION***
This procedure should only be performed by qualified service personnel. In
addition, all power connections must be removed before attempting to open the case.
1. If the unit is installed in a rack, it must be removed.
2. The rack mounting "ears" must both be removed.
3. Follow the procedure in 3-5-2 and remove the Port No. 2 4-Channel Port module.
4. The top cover is held in place by seven screws. Remove the two upper screws on
each side of the unit.
5. From the back of the unit, remove the upper screws on the far left, far right, and
center of the unit. (The center screw is hidden unless the No.2 Port module is removed.)
6. Use your finger to push up the top panel through the open Port No.2 hole.
7. Once the back of the top panel is up and cleared, pull it towards the rear of the unit
so that the panel slides out from under the lip of the front cover. The internals are now
exposed.
Follow the procedure in reverse to re-install the top panel. Install the screws in the
reverse order as well, starting with the rear panel center screw, then the left and right rear
panel screws and lastly the side panel screws. Re-install the rack mount ears if they were
removed.
3-6
FMUX-01Mar 2003
Chapter 3. Installation
3-5-4 External Clock Feature Removal / Replacement
***CAUTION***
This procedure should only be performed by qualified service personnel. In
addition, all power connections must be removed before attempting to open the case.
1. If the unit is installed in a rack, it must be removed.
2. Follow the procedure in 3-5-3 to remove the top cover.
3. Remove the two screws on the cover plate for the external clock feature. Once the
feature is installed, this cover is no longer needed.
4. Place the ribbon cable on the feature card with the cable going away from the back
of the card, noting the polarity of the cable. Place the red stripe to pin #1 on the feature
card.
5. Place the RJ-45 connector into the hole cut-out first, align the three holes in the PC
board with the three stand-offs. Insert the three pan-head screws that were supplied with the
external clock feature kit. Tighten firmly but do not over tighten.
6. Connect the ribbon cable to the mainboard and confirm all pins are properly seated.
7. Re-install the top cover by following the reverse order.
Figure 3-7 : External Clock
Rear View
Figure 3-8 : External Clock Option Removal / Replacement
3-7
FMUX-01Mar 2003
Chapter 3. Installation
3-5-5 SNMP Feature Removal / Replacement
***CAUTION***
This procedure should only be performed by qualified service personnel. In
addition, all power connections must be removed before attempting to open the case.
1. If the unit is installed in a rack, it must be removed.
2. Follow the procedure in 3-5-3 to remove the top cover.
3. The connector for the SNMP daughter card is just behind the front panel display
connector. Carefully seat the card, ensuring no pins are bent. The three holes in the PCB
should line up with the three stand-offs on the mainboard.
4. Install the three pan-head screws supplied. Tighten firmly, but do not over tighten.
Refer to the photo below.
5. Re-install the top cover.
Figure 3-9 : SNMP daughter card Removal / Replacement
3-8
FMUX-01Mar 2003
Chapter 4. Operation
4.1 Introduction
This chapter will go into the details of the specific configuration and operation of the
MULTIPLEXER UNIT. Broken into two parts, the first part outlines the procedures and
functions when using the integral LCD display with push-button menu keys. The second
section will outline the operation when using a VT-100 terminal connected to the RS-232
Console port. For rapid and more complete operation, a terminal connection to the Console
port is recommended.
4.2 LCD Menu Operation
All controls (push-button switches), LCD display and LED indicators are located on
the MULTIPLEXER UNIT front panel. The pushbutton switches are used to activate menu
selections and select parameter settings.
Use the ‘<' and ‘>' function keys to browse the menus and select parameters.
Use the ‘ESC' function key to return to a previous menu or to abandon setup.
Use the ‘Enter' function key to set a parameter of a selection or to enter a sub-menu.
When first powered on, the following "Administration" menu will be displayed. If a
password has been set, it must be entered to continue. The default password is "0000" (no
quotes), four zeros. Pressing an ARROW key at this point will give the option to administer
the remote site (as long as there is a valid optical link). Pressing the ENTER key at this
point will page the operator at the top of the 6 top level Menus. When administering the
local unit, the graphic "arrows" in the LCD display will display as solid black (??). While
administering the remote unit, the menu arrows will appear as "less than" and "greater than"
signs (< >). Pressing ESC from this menu will briefly display the unit's firmware
version number.
?A D M I N I S T R A T I O N ?
L O C A L
S I T E
Initial LCD display. Press ENTER to move to the top level Menus, Arrow key to access remote
unit, ESC to display version numbers of firmware.
4.2.1 Top Level Menus The following are the 6 top level Menus. Press an arrow key to select
another top level Menu or press ENTER to reach a sub menu.
?
S Y S T E M
?
C O N F I G
Set the Ext Clock, Save User Set, Load Defaults, Load User Set, Modify Password or Logout.
Pressing ESC at this menu will display the firmware and FPGA version numbers.
?
?
O P T I C A L
C O N F I G
4-1
Version 1.0b Mar 2003
Chapter 4. Operation
?
P O R T
1 - E 1
1 2 0 ?
C O N F I G
Entering this menu allows configuration of the Port Card installed in the Port 1 slot. For the E1
card, the "in service state", Line Code and Loop back functions can be set for each of 4 channels.
?
P O R T
2 - E 1
7 5
?
C O N F I G
Entering this menu allows configuration of the Port Card installed in the Port 2 slot. For the E1
card, the "in service state", Line Code and Loop back functions can be set for each of 4 channels.
?
P O R T
3 - T 1
1 0 0 ?
C O N F I G
Entering this menu allows configuration of the Port Card installed in the Port 3 slot. For the T1
card, the "in service state", Line Code and Loop back functions can be set for each of 4 channels.
?
P O R T
4 - N / A
?
C O N F I G
Entering this menu allows configuration of the Port Card installed in the Port 4 slot. "N/A" means
that no card is installed in Port 4.
?
A L A R M
?
R E P O R T
Entering this menu allows Clearing the alarm history, setting alarm thresholds, displaying alarm
history, and setting function of alarm relays.
?
P E R F O R M A N C E
?
D I S P L A Y
Entering this menu allows displaying the current internal performance, the nearest internal
performance, resetting the nearest or All performance data.
?
D A T E
&
T I M E
?
D I S P L A Y
Entering this menu allows displaying the current date and time, as well as setting or resetting the
real time clock's date and time.
?
L O G O U T
?
S Y S T E M
Pressing ENTER at this menu will logout of the menu system and allow re-login or connection to
Set the
working
Optical 1, Optical 2 (if installed), Automatic Laser Shutoff or Loopback
the remote
system
for modes
further of
configuration.
function.
4-2
Version 1.0b Mar 2003
Chapter 4. Operation
The following is a breakdown of the menu system for the Multiplexer Unit (LCD).
Power on self test
ADMINISTRATION
Local / Remote top menu
SYSTEM CONFIG
OPTICAL CONFIG
Port X-YY, Channel A~D
ALARM REPORT
PERFORMANCE DISPLAY
DATE & TIME DISPLAY
[Arrow]
[ENTER]
[ESC]
(login to remote)
(enter local configuration)
Firmware version
Menu Item
[ESC]
Ext Clk
Parameter Settings [display]
FPGA/Firmware version
OFF
E1 PCM
E1 TTL
T1 PCM
T1 TTL
X'TAL
(saves user defined set)
(restore factory defaults)
(loads previously saved set)
(set administration password)
work / Off
standby / disable
Auto / Disable
OFF/LLB/RLB/RRLB
ON / OFF
HDB3 / B8Z3 / AMI
OFF/LLB/NELLB/RLB/RRLB
Save User Set
Load Default
Load User Set
Modify PWD
Opti 1:
Opti 2:
ALS: (Auto Laser Shutoff)
Loopback:
Service
Line Code
Loopback
Clear History
Threshold Set
CV:
ES:
SES:
UAS:
Show History
Relay
Current Interval
CV:
(Port 1-4,Ch.A~D) ES:
SES:
UAS:
Nearest Interval
CV:
(Port 1-4,Ch.A~D) ES:
SES:
UAS:
Reset Current
Reset All
Date:
Time:
LOGOUT SYSTEM
[255 / 2048 / 65535 bits]
[900 sec. / 60 min. / 24 hr.]
[900 sec. / 60 min. / 24 hr.]
[900 sec. / 60 min. / 24 hr.]
Both/Audible/Visible/All Off
[?? bits]
[?? sec.]
[?? sec.]
[?? sec.]
[?? bits]
[?? sec.]
[?? sec.]
[?? sec.]
[2003/03/17]
[13:47:49]
(return to Administration)
4-1 LCD Menu System
4-3
Version 1.0b Mar 2003
Chapter 4. Operation
4.3 Terminal Mode Operation
The MULTIPLEXER UNIT Control Port (labeled RS-232 CONSOLE on the front
panel) is a console terminal port designed to facilitate setup of all parameters through the
use of a standard text based terminal or any terminal emulation program running on a
Personal Computer.
4-2 Terminal Connection
A notebook computer has become an invaluable tool of the Systems Engineer.
Connection to the computer is very straight forward. The only other hardware required is a
RJ-45 to DB9F adapter cable (see page 1-6 for pinout). The MULTIPLEXER UNIT's RS232 Console port acts as a DCE to the PC's DTE communications port. A convenient
application, provided with the Microsoft Windows® 98/NT/2K operating systems, is
"HyperTerminal? ". Set the properties to match the MULTIPLEXER UNIT control port
defaults as follows: Baud=19200, Data bits=8, Parity=None, Stop bits=1, and handshaking
=none. Make the appropriate connections, start the terminal application, apply power to the
MULTIPLEXER UNIT, then press ENTER on the PC keyboard. If you are using
"HyperTerminal? " the display should look like that on the following page.
4-4
Version 1.0b Mar 2003
Chapter 4. Operation
******************************************
**
****
****
****
CONSOLE MODE Ver 1.
12
****
****
****
********************************************
1.
2.
Local ogin
L
Remote Login
Press the "1" key to enter into the Local Unit Terminal Mode. The main "LOCAL" root menu will
be displayed as follows.
LOCAL
0.
1.
2.
3.
4.
5.
********************************************
****
****
****
CONSOLE MODE Ver 1.
12
****
****
****
********************************************
Logout
Display FMUX-01 Status
Define System Parameter
Alarm Buffer Display
Performance Display
ACO ( Alarm Cut-Off )
Please select the item number.
Note that the upper left corner will display the word "LOCAL" in inverse text, indicating that the
Terminal Mode connection is to the local unit and not the remote unit. If this is our first time
connecting and we wish to configure or check the unit's configuration, we can directly enter the
"Define System Parameter" menu by pressing "2". The following menu will be displayed.
LOCAL
1.
2.
3.
4.
5.
6.
7.
8.
9.
<<< Define y
Sstem >>>
System Config
Optical Port Config
Port 1 Config.
[ E1 120 ]
Port 2 Config.
[ E1 75 ]
Port 3 Config.
[ T1 100 ]
Port 4 Config.
[ N/A ]
Alarm Threshold
Date & Time
SNMP Card Config
[ N/A ]
Please select the item or <ESC> to previous menu.
4-5
Version 1.0b Mar 2003
Chapter 4. Operation
Press "1" to enter the System Configuration menu.
LOCAL
1.
2.
3.
4.
5.
6.
<<< System Parameter >>>
External Clock
[ N/A ]
Save User Setting
Load Default Setting
Load User Setting
Modify Password
Alarm Relay
[ Both
]
Please select the item or <ESC> to previous menu.
From this menu the (1) External Clock source may be selected OFF, or if option is installed, it may
be selected for E1 PCM, E1 TTL, T1 PCM, T1 TTL or to X'TAL (crystal) mode. The (2) current
user settings may be saved for later recall, (3) the factory defaults may be loaded, (4) a previously
saved user setting may be loaded, (5) the password to enter administration of this unit may be
modified, or (6) the function of the Alarm Relay may be set. The system setting are fairly self
explanatory. To configure the Major and Minor Alarm Relays press "6". The following menu is
displayed.
LOCAL
<<< System Parameter >>>
1. External Clock
[ N/A ]
2. Save User Setting
3. Load Default Setting
4. Load User Setting
5. Modify Password
6. Alarm Relay
[ Both ]
============================================================
<<< Alarm Relay >>>
1.
2.
3.
4.
Both
Audible
Visible
All Off
Please select the item or <ESC> to previous menu.
The Alarm Relays may be set to activate the "audible" alarm relay only, the "visual" alarm relay
only, both the "audio" and "visual" relays, or to disable the relays. After selecting the desired action,
press the <ESC> key to exit this menu.
We will <ESC> again and select "2" for Optical Port Configuration.
4-6
Version 1.0b Mar 2003
Chapter 4. Operation
LOCAL
1.
2.
3.
4.
<<< Define Optical >>>
Optical 1
Optical 2
ALS
Loopback
[
[
[
[
Work ]
Standby ]
Auto
]
OFF
]
Please select the item or <ESC> to previous menu.
The functions in this menu allow configuration of the Optical Card as follows:
Optical 1 set to working mode or Off
Optical 2 set to Standby mode or Disabled
ALS (Auto Laser Shutoff) set to Auto or Disabled
Loopback set to Off or to Local loopback
If we <ESC> back to the "Define System" menu we can configure the card in Port 1 by pressing
"3". The following will be displayed. Here is the example for the E1 4-channel module (balanced
120? )
LOCAL
<<< Define Port 1 Parameter >>>
Ch A
Ch B
Ch C
Ch D
1.
Service
ON
ON
ON
ON
2.
Line Code
HDB3
HDB3
HDB3
HDB3
3.
Loopback
OFF
OFF
OFF
OFF
Please Select Channel A ~ D or <ESC> to previous menu
The service status, Line Code setting, and Loopback mode are displayed for each of the 4 channels.
To change any of the channel settings, select the individual channel with the corresponding letter
A~B~C~D or press <ESC> to exit this menu. For an example of turning on Loopback for Channel
A, press "A". The following menu is displayed.
LOCAL
<<< Define Port 1 Parameter >>>
Ch A
Ch B
Ch C
Ch D
1.
Service
ON
ON
ON
ON
2.
Line Code
HDB3
HDB3
HDB3
HDB3
3.
Loopback
OFF
OFF
OFF
OFF
Please select Function 1 ~ 3 or <ESC> to previous menu.
4-7
Version 1.0b Mar 2003
Chapter 4. Operation
To modify the Loopback status press "3"
LOCAL
<<< Define Port 1 Parameter >>>
Ch A
Ch B
Ch C
Ch D
1.
Service
ON
ON
ON
ON
2.
Line Code
HDB3
HDB3
HDB3
HDB3
3. Loopback
OFF
OFF
OFF
OFF
============================================================
[ Loopback ]
1.
2.
3.
4.
5.
OFF
LLB (Local Loopback)
NELLB (Near End Local Loopback)
RLB (Remote Loopback)
RRLB (Request Remote Loopback)
Please select the item or <ESC> to pre
vious menu.
Notice that "ch A" is highlighted, indicating it is the selected channel. Choose the desired loopback
mode from the menu shown or press <ESC> to exit.
If we <ESC> back to the "Define System" menu we can configure the card in Port 2 by pressing
"4". The following will be displayed. Here is the example for the E1 4-channel module. (unbalanced
75? )
LOCAL
<<< Define Port 2 Parameter >>>
Ch A
Ch B
Ch C
Ch D
1.
Service
ON
ON
ON
ON
2.
Line Code
HDB3
HDB3
HDB3
HDB3
3.
Loopback
OFF
OFF
OFF
OFF
Please Select Channel A ~ D or <ESC> to previous menu
The service status, Line Code setting, and Loopback mode are displayed for each of the 4 channels.
To change any of the channel settings, select the individual channel with the corresponding letter
A~B~C~D or press <ESC> to exit this menu. For an example of turning on Loopback for Channel
A, press "A". The following menu is displayed.
4-8
Version 1.0b Mar 2003
Chapter 4. Operation
LOCAL
<<< Define Port 2 Parameter >>>
Ch A
Ch B
Ch C
Ch D
1.
Service
ON
ON
ON
ON
2.
Line Code
HDB3
HDB3
HDB3
HDB3
3.
Loopback
OFF
OFF
OFF
OFF
Please select Function 1 ~ 3 or <ESC> to previous menu.
To modify the Loopback status press "3"
LOCAL
1.
Service
2.
Line Code
<<< Define Port 2 Parameter >>>
Ch A
Ch B
Ch C
Ch D
ON
ON
ON
ON
HDB3
HDB3
HDB3
HDB3
3. Loopback
OFF
OFF
OFF
OFF
============================================================
[ Loopback ]
1.
2.
3.
4.
5.
OFF
LLB (Local Loopback)
NELLB (Near End Local Loopback)
RLB (Remote Loopback)
RRLB (Request Remote Loopback)
Please select the item or <ESC> to previous menu.
Notice that "ch A" is highlighted, indicating it is the selected channel. Choose the desired loopback
mode from the menu shown or press <ESC> to exit.
4-9
Version 1.0b Mar 2003
Chapter 4. Operation
If we <ESC> back to the "Define System" menu we can configure the card in Port 3 by pressing
"5". The following will be displayed. Here is the example for the T1 4-channel module. (100? )
LOCAL
<<< Define Port 3 Parameter >>>
Ch A
ChB
Ch C
Ch D
1.
Service
ON
ON
ON
ON
2.
Line Code
B8Z3
B8Z3
B8Z3
B8Z3
3.
Loopback
OFF
OFF
OFF
OFF
Please Select Channel A ~ D or <ESC> to previous menu
The service status, Line Code setting, and Loopback mode are displayed for each of the 4 channels.
To change any of the channel settings, select the individual channel with the corresponding letter
A~B~C~D or press <ESC> to exit this menu. For an example of turning on Loopback for Channel
A, press "A". The following menu is displayed.
LOCAL
<<< Define Port3 Parameter >>>
Ch A
Ch B
Ch C
Ch D
ON
1.
Service
ON
ON
ON
2.
Line Code
B8Z3
B8Z3
B8Z3
3.
Loopback
OFF
OFF
OFF
B8Z3
OFF
Please select Function 1 ~ 3 or <ESC> to previous menu.
To modify the Loopback status press "3"
LOCAL
<<< Define Port 3 Parameter >>>
Ch A
Ch B
Ch C
Ch D
1.
Service
ON
ON
ON
ON
2.
Line Code
B8Z3
B8Z3
B8Z3
B8Z3
3. Loopback
OFF
OFF
OFF
OFF
============================================================
4-10
Version 1.0b Mar 2003
Chapter 4. Operation
[ Loopback ]
1.
2.
3.
4.
5.
OFF
LLB (Local Loopback)
NELLB (Near End Local Loopback)
RLB (Remote Loopback)
RRLB (Request Remote Loopback)
Please select the item or <ESC> to previous menu.
Notice that "ch A" is highlighted, indicating it is the selected channel. Choose the desired loopback
mode from the menu shown or press <ESC> to exit.
Next we want to escape back to the Define System menu and select item seven for the Alarm
Threshold settings. Press "7" and the display will look like this:
LOCAL
1.
2.
3.
4.
CV
ES
SES
UAS
<<< Define Alarm hreshold
T
>>>
(Code Violation)
[
(Error Seconds)
[
(Severely Error Seconds)[
(Unavailable Seconds)
[
255 ]
900 Sec. ]
900 Sec. ]
900 Sec. ]
Please select the item or <ESC> to previous menu.
The current threshold settings are shown. The Code Violation, Error Seconds, Severely Error
Seconds and Unavailable Seconds thresholds may all be modified here. To modify a setting, choose
its item number. The available definitions for all are as follows:
CV: 255, 2048, or 65535 bits
ES: 900 sec., 60 min., or 24 hr.
SES: 900 sec., 60 min., or 24 hr.
UAS: 900 sec., 60 min., or 24 hr.
4-11
Version 1.0b Mar 2003
Chapter 4. Operation
For example to modify the Code Violation threshold, press "1".
LOCAL
<<< Define Alarm Threshold >>>
1. CV (Code Viol
ation)
[ 255 ]
2. ES (Error Seconds)
[ 900 Sec. ]
3. SES (Severely Error Seconds)[ 900 Sec. ]
4. UAS (Unavailable Seconds)
[ 900 Sec. ]
============================================================
<<< CV Threshold >>>
1.
2.
3.
255 bits
2048 bits
65535 bits
Please select the item or <ESC> to previous menu.
Select one of the available settings or press <ESC> to exit.
If we go back again to the Define System menu, we can next select the Date & Time setting
function. Escape back, then press "8" for item 8.
LOCAL
<<< Date and Time >>>
1.
Date.
[ 2002/11/01 ]
2.
Time.
[ 13:34:15 ]
Please select the item or <ESC> to previous menu.
To correct the date or time, press "1" or "2" respectively. The cursor will be placed on the setting
for year in Date or for hour in Time. Use the "+" and "-" keys to the correct Date and Time values.
Press <ESC> when finished.
LOCAL
<<< Date and Time >>>
1.
Date.
[ 2002/11/01 ]
2.
Time.
[ 13:34:15 ]
Press <+>,<-> Key to set, or Press <ESC> to Exit.
(The setting of the SNMP agent is covered under a separate chapter. Please refer to the SNMP
operation chapter.)
4-12
Version 1.0b Mar 2003
Chapter 4. Operation
<<< FMUX UNIT SYSTEM STATUS >>>
11:27:24
PORT 1
PORT 2
PORT 3
PORT 4
Optic PWR
| 1A 1B 1C 1D 2A 2B 2C 2D 3A
3B 3C 3D 4A 4B 4C 4D O1 O2 P1 P2
--- LOCAL --------+------------+-----------+-----------+-----------+-----+-----Service Status
| v v v v |
|
|
|v S |v
Loss of Signal
|
|
|
|
|
|
Loopback Status
|
|
|
|
|
|
Major Alarm
|
|
|
|
|
|
Minor Alarm
|
|
|
|
|
|
| 1
A 1B 1C 1D 2A 2B 2C 2D 3A 3B 3C 3D 4A 4B 4C 4D O1 O2 P1 P2
--- REMOTE -------+------------+-----------+-----------+-----------+-----+-----Service Status
| v v v v |
|
|
|v S |v
Loss of Signal
|
|
|
|
|
|
Loopback Status
|
|
|
|
|
|
Major Alarm
|
|
|
|
|
|
Minor Alarm
|
|
|
|
| |
------------------+------------+-----------+-----------+-----------+-----+-----PORT 1
PORT 2
PORT 3
PORT 4
Optic PWR
[v]In Service [*]LOS [o]Loopback [a]minor [A]major [S]Standby
Press <ESC> key to Exit.
The System Status display gives a overview of the entire system, both local and remote unit, the
channel conditions, optical connections, and power supply status. In the above display note that
only a Port 1 card is installed and that all 4 channels (1A~1B) are in service (v) without any errors
from local or remote side. The optical 1 (O1) connection is in service (v) and optical 2 (O2) is in
standby (S) mode. Only one power supply (P1) is active in both local and remote side units.
The display screen will refresh every 5 seconds. Of course if the optical link is completely lost then
no status information will be available from the remote side, all fields will go blank, and the refresh
will take more than 20 seconds.
Another important diagnostic display of the FMUX is the Alarm Buffer display. Note that it is item
three on the root menu. If we press "3" the Alarm Buffer will display.
LOCAL
Channel
Terminal
Terminal
Optical
Optical
Port 1-Ch D
Port 1-Ch D
Terminal
Terminal
Terminal
Terminal
<<< Alarm Buffer Display >>>
Alarm Type
ON/OFF
Local Logout
Remote Login
Loopback
Loopback
Loopback
Loopback
Local Logout
Local Login
Local Logout
Local Login
ON
OFF
ON
OFF
DATE
TIME
2002/11/01 11:10:04
2002/11/01 11:10:12
2002/11/01 11:12:22
2002/11/
01 11:12:33
2002/11/01 11:13:45
2002/11/01 11:14:08
2002/11/01 11:22:55
2002/11/01 11:2
3:55
2002/11/01 11:30:52
2002/11/01 11:32:56
End
Alarm
If we escape out to the root menu, we
can of
select
item #1History
to display the FMUX status. The display
will look like that on the following page.
Press <ESC> key to Exit. or Press <C> to Clear Alarm Buffer.
4-13
Version 1.0b Mar 2003
Chapter 4. Operation
The Alarm Buffer can be cleared by pressing the "c" key. Note that each entry in the buffer is "time
stamped" with the actual time of occurrence. So it is important to properly set the Date & Time as
described previously.
Another important diagnostic display is the Performance Monitor display. This display is also
accessible from the root menu, as item "4". The display looks similar to the following.
LOCAL
<<< Performance Display >>>
Line
Line
Path
Path
Path
Path
CV:
ES:
CV:
ES:
SES:
UAS:
P1A
0
0
0
0
0
0
P1B
0
0
0
0
0
0
P1C
0
0
0
0
0
0
P1D
0
0
0
0
0
0
P2A
0
0
0
0
0
0
P2B
0
0
0
0
0
0
P2C
0
0
0
0
0
0
P2D
0
0
0
0
0
0
Line
Line
Path
Path
Path
Path
CV:
ES:
CV:
ES:
SES:
UAS:
P3A
0
0
0
0
0
0
P3B
0
0
0
0
0
0
P3C
0
0
0
0
0
0
P3D
0
0
0
0
0
0
P4A
0
0
0
0
0
0
P4B
0
0
0
0
0
0
P4C
0
0
0
0
0
0
P4D
0
0
0
0
0
0
Opt
0
0
0
0
0
0
All 16 channels are shown, 4 for each of 4 ports, plus the optical performance.
The very last item on the root menu is the Alarm Cut Off function. To turn off an activated audible
or visual alarm, the ACU pushbutton on the front of the unit may be pushed or in terminal mode,
the alarm may be cut off for the local or remote unit. Press item "5" from the root menu. The
"Audible Alarm Cut-off" LED will light on the front panel to indicate ACO.
This completes the overview of the LCD and Console mode configuration and status monitoring of
the MULTIPLEXER UNIT.
4-14
Version 1.0b Mar 2003
Chapter 5. Loop Back Testing
5.1 General
In this chapter we shall explain the functioning of the loop back modes available in
the MULTIPLEXER UNIT. As of printing of this manual (F/W ver. 1.03) the loop back
modes available include Local, Remote, and Remote Request Loop Backs for the Optical
interface and the secondary Optical interface (if redundant) as well as Local Loop Back,
Near End Loop Back, Remote Loop Back, and Request Remote Loop Back for the E1 and
T1 4-Channel Port Cards.
5.2 Loop Back Modes
Optical Section
* LLB (Optical local loop back)
near end (NE)
far end (FE)
* RLB (Optical Remote loop back)
near end (NE)
far end (FE)
* RRLB (Request optical remote loop back)
near end (NE)
far end (FE)
5-1
FMUX-01Mar 2003
Chapter 5. Loop Back Testing
E1/T1 4-Channel Port Card Loop Back
* LLB (T1/E1 local loop back)
near end (NE)
far end (FE)
* NELLB (near end local loop back)
near end (NE)
far end (FE)
* RLB (T1/E1 remote loop back)
near end (NE)
far end (FE)
* RRLB (request T1/E1 remote loop back)
near end (NE)
far end (FE)
5-2
FMUX-01Mar 2003
Chapter 6. SNMP Operation
6.1 General
The Simple Network Management Protocol (SNMP) is one of many protocols in the
Internet Protocol (IP) suite. SNMP is the protocol recommended specifically for the
exchange of management information between hosts residing on IP networks. Network
management allows you to monitor and control network devices remotely using
conventional computer network technology.
The SNMP management functions of the MULTIPLEXER UNIT are provided by an
internal SNMP agent, which utilizes out-of-band communication over standard 10Base-T or
100Base-TX Ethernet. The SNMP agent is compliant with the SNMPv1 standard. SNMP
communication uses the User Datagram Protocol (UDP). UDP is a connectionless transport
protocol, part of the IP suite. The SNMP application uses an asynchronous
command/response polling protocol and operates at the OSI Layer 7 (Layer 7 is the
Application Layer. Other IP applications that operate at this layer are FTP, Telnet, SMTP,
etc.). All management traffic is initiated by the SNMP-based network management station.
Only the addressed managed entity (agent) answers the polling of the management station
(except for trap messages).
6.2 SNMP Operations
The SNMP protocol includes four types of operations:
getRequest
getNextRequest
setRequest
trap
Command for retrieving specific value of an "instance "
from the managed node. The managed node responds
with a getResponse message.
Command for retrieving sequentially specific
management information from the managed node.
The managed node responds with a getResponse
message.
Command for manipulating the value of an "instance"
within the managed node. The managed node responds
with a getResponse message.
Management message carrying unsolicited
information on extraordinary events (that is, events
which occurred not in response to a management
operation) reported by the managed node.
6-1
FMUX-01Mar 2003
Chapter 6. SNMP Operation
6.3 The Management Information Base
The management information base (MIB) includes a collection of managed objects.
Managed objects are defined as parameters that can be managed, such as specific
information on device configuring or on performance statistics values.
The MIB includes the definitions of relevant managed objects (MIB variables) for the
specific node. Various MIB's can be defined for various management purposes, types of
equipment, etc. The management data itself is a collection of integer, string and MIB
address variables that contain all the information necessary to manage the node.
A leaf object's definition includes the range of instances (values) and the "access" rights:
Read-only
Read-write
Write-only
Not accessible
Instances of an object can be read, but cannot be set.
Instances of an object can be read or set.
Instances of an object can be set, but cannot be read.
Instances of an object cannot be read, nor set.
6.4 MIB Structure
The MIB has an inverted tree-like structure (root over leaves), with each definition of
a managed instance forming one leaf, located at the end of a branch of that tree. Each "leaf"
in the MIB is reached by a unique path, therefore by numbering the branching points,
starting with the top, each leaf can be uniquely defined by a sequence of numbers. The
formal description of the managed objects and the MIB structure is provided in a special
standardized format, called Abstract Syntax Notation 1, or ASN.1 (pronounced A-S-N dot
one).
Since the general collection of MIB's can also be organized in a similar structure,
under the supervision of the Internet Activities Board (IAB), any parameter included in a
MIB that is recognized by the IAB is uniquely defined.
To provide the flexibility necessary in a global structure, MIB's are classified in
various classes (branches), one of them being the experimental branch, another being the
management (mgmt) branch, and yet another the group of private (enterprise-specific)
branch. Under the private enterprise-specific branch of MIB's, each enterprise
(manufacturer) can be assigned a number, which is its enterprise number. The assigned
number designates the top of an enterprise-specific sub-tree of non-standard MIB's. Within
this context, CTC Union has been assigned the enterprise number 4756.
6-2
FMUX-01Mar 2003
Chapter 6. SNMP Operation
Under this scheme, the path to CTC Union's Enterprise branch would be:
iso(1).org(3).dod(6).internet(1).private(4).enterprises(1).ctcu(4756)
Enterprise-specific MIB's are published and distributed by their creators, who are
responsible for their contents. Specific information regarding the CTC Union's sub-tree are
available from CTC Union's Research and Development Division.
The MIB supported by the MULTIPLEXER UNIT SNMP Agent follows RFC 1158
(MIB-II standard).
6.5 SNMP Communities
To enable the delimitation of management domains, SNMP uses "communities". Each
community is identified by a name, which is an alphanumeric string of up to 255 characters
defined by the user. Any SNMP entity (this term includes both managed nodes and
management stations) is assigned by its user a community name. In parallel, the user
defines for each SNMP entity a list of the communities which are authorized to
communicate with it, and the access rights associated with each community (this is the
SNMP community name table of the entity).
In general, SNMP agents support two types of access rights:
Read-only
the SNMP agent accepts and processes only SNMP getRequest
and getNextRequest commands from management stations
which have a read-only community name.
Read-write
the SNMP agent accepts and processes all the SNMP
commands received from a management station with a read-write
community name. SNMP agents are usually configured to send traps to
management stations having read-write communities.
6.6 Configuring the SNMP Agent
The agent for the MULTIPLEXER UNIT resides in the SNMP option card installed
in the MULTIPLEXER UNIT. Configuration of the agent is accomplished via the RS-232
Control Port of the MULTIPLEXER UNIT. From the Define System Parameter menu
select "9", SNMP Agent.
6-3
FMUX-01Mar 2003
Chapter 6. SNMP Operation
Connect a terminal to console port as usual. Login to the local unit.
********************************************
****
****
****
CONSOLE MODE Ver 1.12
****
****
****
********************************************
1.
2.
Local Login
Remote Login
Press the "1" key to enter into the Local Unit Terminal Mode. The main "LOCAL" root menu will
be displayed as follows.
LOCAL
0.
1.
2.
3.
4.
5.
********************************************
****
****
****
CONSOLE MODE Ver 1.12
****
****
****
*******************
*************************
Logout
Display FMUX-01 Status
Define System Parameter
Alarm Buffer Display
Performance Display
ACO ( Alarm Cut-Off )
Please select the item number.
Note that the upper left corner will display the word "LOCAL" in inverse text, indicating that the
Terminal Mode connection is to the local unit and not the remote unit. If this is our first time
connecting and we wish to configure or check the unit's configuration, we can directly enter the
"Define System Parameter" menu by pressing "2". The following menu will be displayed.
LOCAL
1.
2.
3.
4.
5.
6.
7.
8.
9.
<<< Define System >>>
System Config
Optical Port Config
Port 1 Config.
Port 2 Config.
Port 3 Config.
Port 4 Config.
Alarm Threshold
Date & Time
SNMP Card Config
[
[
[
[
E1 120 ]
E1 75 ]
T1 100]
N/A ]
Please select the item or <ESC> to previous menu.
6-4
FMUX-01Mar 2003
Chapter 6. SNMP Operation
Press "9" to enter the SNMP Card Configuration menu.
LOCAL
1.
2.
3.
4.
<<< SNMP Card Config >>>
SNMP Agent Config
Manager Config
TFTP and Flash
Save and Restart
Please select the item or <ESC> to previous menu.
Under item 1, "Agent Config", the parameters for the local SNMP agent (the internal SNMP
card) can be configured. This includes the IP address, subnet mask, and gateway for the card as
well as the IP address and server path to the TFTP server for upgrade purposes.
Press "1" to enter the SNMP agent configuration menu.
LOCAL
1.
2.
3.
4.
5.
<<< SNMP Agent Config >>>
IP Address
[ 0. 0. 0. 0]
Subnet Mask
[ 0. 0. 0. 0]
Gateway IP
[ 0. 0. 0. 0]
TFTP Server IP [ 0. 0. 0. 0]
TFTP Server Path [ ]
Please select the item or <ESC> to previous menu.
The configuration items are fairly self-explanatory. Select item #1 to set the IP address of the
SNMP agent in decimal format, item #2 to set the subnet mask, and item #3 to set the default
gateway IP address for the network to which the agent is attached. Remember, when setting the
"server path" information for a UNIX or LINUX based server, the upper and lower case must be
correctly observed. Also remember that UNIX path separators use "/" while Windows® uses "\"
to separate path directories. When finished, <ESC> back to the previous menu and select item
"4" to save and restart or select item "2", to continue to manager configuration.
6-5
FMUX-01Mar 2003
Chapter 6. SNMP Operation
LOCAL
1.
2.
3.
4.
5.
6.
Access IP
Access IP
Access IP
Access IP
Community
Community
<<< Manager Config >>>
#1
[ 0. 0.
#2
[ 0. 0.
#3
[ 0. 0.
#4
[ 0. 0.
String #1 (R/W)
String #2 (Read)
0. 0][community
0. 0][community
0. 0][community
0. 0][community
[ ]
[ ]
string]
string]
string]
string]
[trap]
[trap]
[trap]
[trap]
Please select the item or <ESC> to previous menu.
Enter the information about the workstation that will be running the management software for
your network. Up to four separate management stations may be configured to access the SNMP
agent. Under each station, a read/write or read only community string may be defined as well as
which traps will go to which management station. Under "Manager Config" items 5 and 6 you
can set the specific community strings for read/write and read only.
To upgrade the SNMP firmware, configure a TFTP server on your network. Place the upgrade
binary file on the server and set the IP address and path of the server in the SNMP agent. From
the main SNMP configuration menu, select item #3 to start the upload and upgrade process.
For any changes to be remembered in the agent, please select item #4 to "Save and Reset". DO
NOT INTERRUPT POWER DURING SAVE OPERATION OR THE FLASH MEMORY
MAY BECOME CORRUPT.
The actual "get", "set", and "trap" items for the MULTIPLEXER UNIT were unavailable
at the time of this printing. Please check your distributor for any updated information.
This completes the section of SNMP operation. For importing the MIB and SNMP
operation, please refer to the documentation for your management software.
6-6
FMUX-01Mar 2003
notes:
A-7
notes:
A-8
Technical Inquiry Form
MODEL No.: FMUX01
Please fill in the co nfiguration settings with ' ?' marks into the following table. Send it to us
by fax, and we will reply to you immediately.
Firmware Version: _____________________
FPGA Version: ____________________
(Press the ESC key from the 'SYSTEM CONFIG' display on the LCD.)
Installed Options (if any)
Optical
Opti 1:
Type:
Connector:
Loopback:
Work
2KM-M
ST
Off
External Clock Card
Off
15KM-S
SC
LLB
ALS:
Opti 2:
30KM-S
FC
RLB
SNMP Card
Auto
Standby
50KM-S
LC
RRLB
Disable
Disable
120KM-S
MT-RJ
PORT Card 1
G.703 E1
T1 (DS1)
Datacomm
Bridge
Channel A
Channel B
Channel C
Channel D
Service
Service
Service
Service
ON
OFF
ON
OFF
ON
OFF
ON
OFF
Line Code
Line Code
Line Code
Line Code
AMI HDB3/B8Z3
AMI
HDB3/B8Z3
AMI
HDB3/B8Z3
AMI
HDB3/B8Z3
Loop Back:
Off
LLB
NELLB
RLB
RRLB
PORT Card 2
G.703 E1
T1 (DS1)
Datacomm
Bridge
Channel A
Channel B
Channel C
Channel D
Service
Service
Service
Service
ON
OFF
ON
OFF
ON
OFF
ON
OFF
Line Code
Line Code
Line Code
Line Code
AMI HDB3/B8Z3
AMI
HDB3/B8Z3
AMI
HDB3/B8Z3
AMI
HDB3/B8Z3
Loop Back:
Off
LLB
NELLB
RLB
RRLB
PORT Card 3
G.703 E1
T1 (DS1)
Datacomm
Bridge
Channel A
Channel B
Channel C
Channel D
Service
Service
Service
Service
ON
OFF
ON
OFF
ON
OFF
ON
OFF
Line Code
Line Code
Line Code
Line Code
AMI HDB3/B8Z3
AMI
HDB3/B8Z3
AMI
HDB3/B8Z3
AMI
HDB3/B8Z3
Loop Back:
Off
LLB
NELLB
RLB
RRLB
PORT Card 4
G.703 E1
T1 (DS1)
Datacomm
Bridge
Channel A
Channel B
Channel C
Channel D
Service
Service
Service
Service
ON
OFF
ON
OFF
ON
OFF
ON
OFF
Line Code
Line Code
Line Code
Line Code
AMI HDB3/B8Z3
AMI
HDB3/B8Z3
AMI
HDB3/B8Z3
AMI
HDB3/B8Z3
Loop Back:
Off
LLB
NELLB
RLB
RRLB
E1/T1 DSU/CSU Series
Fiber Converter Series
CTC Union Technologies Co., Ltd.
Far Eastern Edison Science and Technologies Center
(Nei-Hu HI -TEC Park)
6F-3, No.15, Lane 360, Nei -Hu Road, Section 1
Nei-Hu, Taipei, Taiwan
Phone:(886) 2.2659.1021 Fax:(886) 2.2799.1355
E-mail: [email protected] http://www.ctcu.com