1
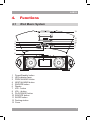
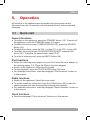
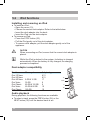
iPod Music System
ASB15I
User manual
Gebruiksaanwijzing
Manuel de l’utilisateur
Manual de instrucciones
Gebrauchsanleitung
Οδηγίες χρήσεως
Brugsanvisning
GB 2
NL 19
FR 35
ES 51
DE 67
EL 83
DA 99
Table of contents
1.
2.
3.
4.
5.
Safety............................................................................ 3
1.1
1.2
1.3
Intended use.....................................................................3
Labels in this manual........................................................3
General safety instructions...............................................3
2.1
2.2
Unpacking.........................................................................4
Package contents.............................................................4
3.1
3.2
3.3
Connecting random equipment.........................................5
Connecting to the mains...................................................6
Remote control.................................................................6
4.1
iPod Music System...........................................................7
5.1
5.2
5.3
5.4
5.5
5.6
Quick start.........................................................................9
iPod functions.................................................................10
Radio functions...............................................................11
Clock functions...............................................................12
Setting the SLEEP function.............................................14
Alarm function.................................................................14
Preparations for use.................................................... 4
Installation.................................................................... 5
Functions...................................................................... 7
Operation...................................................................... 9
6.
Cleaning and maintenance....................................... 15
7.
Troubleshooting......................................................... 15
8.
Technical data............................................................ 16
9.Disposal of used electrical and electronic
equipment................................................................... 17
Copyright notice
Design and specifications are subject to change without notice.
ASB15I
1.
Safety
1.1
Intended use
The iPod Music System functions as a docking station to play music from an
iPod. The appliance also plays music from radio. The clock function includes
an alarm and sleep program. Read the manual carefully before the first use.
1.2
WARNING
A warning means that injury or death is possible if the instructions
are not obeyed.
CAUTION
A caution means that damage to the equipment is possible.
!
!
i
Labels in this manual
1.3
A note gives additional information, e.g. for a procedure.
General safety instructions
WARNING
Do not put force on the appliance. The appliance can fall and can
cause serious injury.
CAUTION
Do not spill any liquid on the appliance.
WARNING
Do not insert any objects in the ventilation holes.
CAUTION
Do not block the ventilation holes.
!
!
!
!
3
i
This appliance is double insulated; therefore no earth wire is
required. Always check that the mains voltage corresponds to the
voltage on the rating plate.
2.
Preparations for use
2.1
Unpacking
● Unpack the appliance carefully.
● Check the package contents as described below. If any item is missing,
please contact your reseller.
● Remove the labels from the front panel carefully if present.
i
2.2
We recommend that you retain the original carton and packing
materials in case it ever becomes necessary to return your product
for service. This is the only way to safely protect the product
against damage in transit. If you do dispose of the carton and the
packing materials, please remember to recycle with due care to the
environment.
Package contents
The following items are included in the received package:
1 iPod Music System
1 Remote control
1 Battery cell (CR2025)
4 iPod dock adaptors
1 Mains cable
1 Operator manual
i
4
If any item is missing, please contact your reseller.
ASB15I
3.
Installation
● Put the appliance on a horizontal flat surface.
● Connect the random equipment to the appliance.
Read the paragraph "Connecting random equipment".
● Connect the appliance to the mains. Read the paragraph
"Connecting to the mains".
● Install the batteries in the remote control. Read the paragraph
"Remote control".
!
CAUTION
● Do not put the appliance near a heat source.
● Do not expose the appliance to direct sunlight.
i
3.1
This appliance is equipped with rubber feet to prevent it from
moving. The feet are made from non-migrating material specially
formulated to avoid leaving any marks or stains on furniture.
However, certain types of furniture polishes, wood preservatives or
cleaning sprays cause the rubber to soften and leave marks or
a residue on the furniture, and potentially risk the surface to
become damaged. To prevent damage to wooden surfaces, we
recommend that you apply self-adhesive pads to the bottom of the
rubber feet before installation.
Connecting random equipment
Audio connections (input)
These connections allow you to
receive audio signal from a connected
CD/DVD or amplifier.
● AUX IN: Connect a suitable cable to
the L/R channels of the AUX IN
connection.
5
3.2
Connecting to the mains
● Connect the female connector on
the mains cable to the
AC IN connection.
● Connect the mains plug to a wall
socket.
3.3
Remote control
Installing the battery
● Pull out the battery tray.
● Insert 1 lithium battery, type
CR2025 3V battery with the
stamped (+) mark facing upward.
● Insert the battery tray into the
remote control.
6
ASB15I
4.
Functions
4.1
iPod Music System
13
1
2
3
4
5
12
11
10
9
8
7
6
1
2
3
4
5
6
7
8
9
10
11
12
13
Power/Standby button
LED indicator lamp
PREV/ALARM1 button
NEXT/ALARM2 button
SNOOZE button
Display
VOL - button
VOL + button
PLAY/PAUSE button
SOURCE button
SLEEP button
Docking station
Cover
7
Display
14
15
16
17
SLEEP indicator
ALARM1 indicator
ALARM2 indicator
CLOCK indicator
14
15 16 17
Remote control
18
19
20
21
22
23
24
25
26
27
28
29
30
31
32
33
34
35
36
37
38
8
STANDBY/SNOOZE button
18
SOURCE button
19
PLAY/PAUSE / ST/MO button
20
FWD / SEARCH + button
21
REV / SEARCH - button
22
STOP button
23
PLAYLIST + button
24
PLAYLIST - button
MEMORY button
VOLUME + button
25
VOLUME - button
SCAN button
26
MENU button
27
ENTER button
28
Arrow buttons
REPEAT button
PREV / ALARM1 / CH - button
NEXT / ALARM2 / CH + button
Electronic Preset Equalizer button (EQ)
SLEEP/TIME button
MUTE button
38
37
36
35
34
33
32
31
30
29
ASB15I
5.
Operation
All functions of the appliance are accessible using the remote control.
All instructions refer to operation with the remote control, unless indicated
otherwise.
5.1
Quick start
General functions
● To switch on the appliance, press the STANDBY button (18). To switch off
the appliance, press the STANDBY button (18) again.
● To select the source mode (TUMER/iPOD/AUX-IN), press the SOURCE
button (19).
● To adjust the volume, press the VOL + button (27) or the VOL - button (28).
● To enable the sound mode (CLASS/POP/ROCK/JAZZ), press the EQ
button (36). To disable the sound mode, select FLAT.
● To mute or restore sound, press the MUTE button (38).
iPod functions
● Select the matching dock adaptor for your iPod. Insert the dock adaptor in
the docking station (12). Place the iPod on the dock adaptor.
● Switch on the appliance. Select the iPod mode.
● To start playback, press the PLAY/PAUSE button (20) once.
● For extended instructions, read the paragraph "iPod functions" further on
in this manual.
Radio functions
● Switch on the appliance. Select the tuner mode.
● To quickly install the station list: Press the SCAN button (29) to start the
search program that sets the available channels automatically.
● For extended instructions, read the paragraph "Radio functions" further on
in this manual.
Clock functions
● Read the paragraph "Clock functions" further on in this manual.
9
5.2
iPod functions
Installing and removing an iPod
● To install an iPod:
• Open the cover (13).
• Choose the correct dock adaptor. Refer to the table below.
• Insert the dock adaptor into the dock.
• Insert the iPod into the dock adaptor.
● To remove an iPod:
• Press the STOP button (23).
• Pull the iPod gently out of the dock adaptor.
• To remove dock adaptor, pull the dock adaptor gently out of the
appliance.
CAUTION
When connecting an iPod, ensure that the correct dock adaptor is
placed.
Whilst the iPod is docked in the system, its battery is charged
automatically. When the battery is fully charged, the charging
process is completed.
!
i
Dock adaptor compatibility
Model
Memory size iPod 1G Nano
iPod 2G Nano
iPod 4G Nano 8 GB & 16 GB
iPod Video
30 GB
iPod Classic
80 GB & 120 GB
iPod Video
60 GB & 80 GB
iPod Classic
160 GB
Audio playback
Adaptor type
8/11
8/11
17
9
9
10
10
During playback, the following functions are available:
● To select a track, press the PREV button (34) or the
NEXT button (35) until the desired track is set.
10
17
8/11
9
10
ASB15I
● To forward or rewind the track, press and hold the FWD button (21) or the
REV button (22).
● To pause playback, press the PLAY/PAUSE button (20) once; to resume
playback, press the button again.
● To stop playback, press the STOP button (23).
In order to operate the following functions, the iPod has to be unlocked.
● To select a playlist, press the PLAYLIST + button (24) or the PLAYLIST button (25) until the desired playlist is set.
● To enter the iPod menu, press the MENU button (30).
● To enter and navigate through the menu:
-- Press the up/down arrow buttons (32) to select a submenu.
-- Press the right arrow button (32) to enter the submenu.
-- Press the ENTER button (31) to select a setting, or the left arrow button
(32) to cancel the selection.
-- To return to the main menu, press the MENU button (30).
● To repeat one or all tracks:
-- Press the REPEAT button (33) once to repeat the current track.
-- Press the button twice to repeat all tracks.
-- Press the button three times to cancel the function.
i
5.3
In order to operate the REPEAT or PLAYLIST function, the iPod
has to support these functions.
Radio functions
● To select a preset radio station, press the CH +/- buttons (35/36) to zap
through the list.
● To search for a specific frequency, press the SEARCH + button (21) or the
SEARCH - button (22) repeatedly until the desired frequency is set.
● To search automatically, press and hold the SEARCH + button (21) or the
SEARCH - button (22). The appliance searches for the next available
station.
● To improve the reception of the FM frequency, press the ST/MO button (20).
i
To improve the reception of the FM frequency, extend the aerial
antenna.
11
Programming radio stations
Per radio band (FM), 20 radio stations can be preset.
● Press the SEARCH + button (21) or the SEARCH - button (22) repeatedly
until the desired frequency is set.
● Press the MEMORY button (26).
● Press the CH - button (34) or the CH + button (35) to select the preset
memory number.
● Press the MEMORY button (26) to confirm the selection.
5.4
Clock functions
With the clock function, the following parameters can be set:
-- current time
-- alarm time (incl. alarm mode, snooze time)
● Press and hold the TIME button (37). The clock icon (17) appears on the
display. The hour digits start flashing.
● Set the current time:
• Press the PREV button (34) or the NEXT button (35) to set the desired
hour.
• Press the TIME button (37) to confirm. The minute digits start flashing.
• Press the PREV button (34) or the NEXT button (35) to set the desired
minutes.
• Press the TIME button (37) to confirm. The second digits start flashing.
• Press the PREV button (34) or the NEXT button (35) to set the desired
seconds.
• Press the TIME button (37) to confirm. The alarm icon (15) appears on
the display. The hour digits start flashing.
● Set the alarm time:
Two time slots are available (ALARM1 and ALARM2).
To set ALARM1:
• Press the PREV button (34) or the NEXT button (35) to set the desired
hour.
• Press the TIME button (37) to confirm. The minute digits start flashing.
• Press the PREV button (34) or the NEXT button (35) to set the desired
minutes.
• Press the TIME button (37) to confirm. The alarm mode flashes on the
display.
12
ASB15I
• Press the PREV button (34) to set the desired alarm mode (RADIO/
AUX-IN/BUZZER/IPOD).
• Press the TIME button (37) to confirm. The alarm icon (16) appears on
the display. The hour digits start flashing.
To set ALARM2:
• Press the PREV button (34) or the NEXT button (35) to set the desired
hour.
• Press the TIME button (37) to confirm. The minute digits start flashing.
• Press the PREV button (34) or the NEXT button (35) to set the desired
minutes.
• Press the TIME button (37) to confirm. The alarm mode flashes on the
display.
• Press the PREV button (34) to set the desired alarm mode
(RADIO/AUX-IN/BUZZER/IPOD).
• Press the TIME button (37) to confirm. The snooze time appears on the
display.
● Set the snooze time:
• Press the PREV button (34) or the NEXT button (35) to set the snooze
time (5, 6, 7 .. 12 min).
• Press the TIME button (37) to confirm.
i
● To set the time, the appliance must be switched off.
● During a power failure, or when unplugging the appliance, the time
settings are lost.
Check the settings
The clock settings can be checked when the appliance is switched on.
● Press the TIME button (37). The current time appears on the display.
● Press the button once again. The ALARM1 time appears on the display.
● Press the button once again. The ALARM1 mode appears on the display.
● Press the button once again. The ALARM2 time appears on the display.
● Press the button once again. The ALARM2 mode appears on the display.
● Press the button once again. The snooze time appears on the display.
13
5.5
Setting the SLEEP function
● Select the desired radio station.
● Press and hold the SLEEP button (37). The sleep time (00 min) appears
on the display.
● Press the button repeatedly until the desired setting is found
(10, 20, 30 .. 90 min). The SLEEP indicator (14) is ON.
The appliance stops playing after the chosen time has elapsed.
● To cancel the SLEEP function, press the SLEEP button (37).
5.6
Alarm function
● Press the TIME button (37).
To activate ALARM1:
● Press the ALARM1 button (34) once. The ALARM1 indicator (15) is ON.
● To cancel the alarm, press the ALARM1 button (34) once again.
To activate ALARM2:
● Press the ALARM2 button (35) once. The ALARM2 indicator (16) is ON.
● To cancel the alarm, press the ALARM2 button (35) once again.
Snooze alarm
● To snooze the alarm, press the SNOOZE button (18) once. The alarm
sounds again after the snooze time has elapsed.
● To stop the alarm, press the STANDBY button (18). The alarm is
automatically set for the next day.
14
ASB15I
6.
!
Cleaning and maintenance
WARNING
Before performing any cleaning or maintenance, switch off and
unplug the appliance.
● Clean the outside of the appliance with a soft cloth. When the appliance is
very dirty, dampen the cloth slightly with water and a neutral solution.
7.
Troubleshooting
Trouble
Action
No sound or incomplete audio Check if the correct source is selected.
Check volume or mute setting.
Check if the random equipment are switched on
and set correctly.
Check cables for connection problems.
No powerCheck if the power cord has been properly
connected to the power outlet.
The operation keys do not work. Internal error. Reset the appliance.
Radio
Trouble
Action
Noise or sound distorted
Station is not tuned properly. Adjust tuning control.
on FM broadcasts.Wire aerial is not positioned correctly. Extend the
aerial.
FM stereo indicator does
Selected station broadcasts in mono
not light.
Extend the aerial.
Station signal is too weak. Try other strong stations.
iPod
Trouble
Action
iPod volume control does
iPod volume control only controls the volume output
not increase audio volume to the headphone jack. Set the unit volume control
when the iPod is docked on the unit.
No response to REPEAT
iPod does not support these functions.
or PLAYLIST function.
15
AUX
Trouble
Action
No sound on the unit system.Input source is low. Increase the volume level on
the audio source device.
8.
Technical data
Parameter
Voltage
Power consumption
Max power output
Radio bands
Dimensions (W x H x D)
Weight
Frequency range
Parameter
FM radio
Remote control
Parameter
Power consumption
Battery size
16
Value
100 ~ 240VAC / 50 ~ 60 Hz
< 15 W
2x3W
FM
391 x 152 x 98 mm
1290 g
Value
87,5 ~ 108 mHz
Value
3V
CR2025
ASB15I
9.
isposal of used electrical
D
and electronic equipment
Z
The meaning of the symbol on the material, its accessory or packaging
indicates that this product shall not be treated as household waste.
Please, dispose of this equipment at your applicable collection point for the
recycling of electrical and electronic equipments waste. In the European
Union and Other European countries which there are separate collection
systems for used electrical and electronic product. By ensuring the correct
disposal of this product, you will help prevent potentially hazardous to the
environment and to human health, which could otherwise be caused by
unsuitable waste handling of this product. The recycling of materials will help
conserve natural resources. Please do not therefore dispose of your old
electrical and electronic equipment with your household waste.
For more detailed information about recycling of this product, please contact
your local city office, your household waste disposal service or the shop
where you purchased the product.
For more information and warranty conditions, please visit: www.akai.eu
17