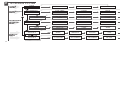
1
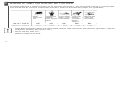
The use of the MSC-HR10 or MSC-HR20 watch is for sport purposes only and it is not meant to replace any
medical advice.
This manual contains important safety and care information, and provides step-by-step instructions for using
this product. Read the manual thoroughly and keep it in a safe place for future reference.
PACKAGE CONENTS
• Watch
• Heart Rate Sensor
• Fastening belt
• 2 x CR2032 lithium batteries (installed)
TABLE OF CONTENTS
1.0
Wrist Watch
3.2
Exercise Profile
6.0
Batteries
2.0
Basic Operation
3.3
Using Exercise Profiles
7.0
Care Instructions
2.1
Changing Settings
3.4
Memory Functions
7.1
Aquatic & Outdoor Activities
2.2
Setting the Clock
3.5
Alarm
8.0
Specifications
2.3
Stopwatch Mode
3.6
Backlight
9.0
Screen Flow
2.4
Recording Laps (HR20)
4.0
Heart Rate Sensor
10.0
Limited Warranty
3.0
Profile Mode
5.0
Activity Score
11.0
Spare Parts
3.1
User Profile
5.1
Fitness Index
1
1.0
PROPER USE OF THE CATEYE MSC-HR10/20
WRIST WATCH
3
WARNING:
• Pace maker users should never use this device.
• Do not leave any battery within the reach of children, and dispose of it correctly.
If a battery is swallowed, consult a doctor immediately.
4
2
1
6
7
IMPORTANT:
• The following objects and places generate strong electromagnetic wave and interference, which
may cause incorrect measurement:
1. TV, PC, radios, motors/ engines, or in cars and trains.
2. Railroad crossings and near railway tracks, around television transmitting stations and radar
bases.
• Do not place more than one transmitter within 1.5 m of the main unit. Do not use the main unit together with other cordless devices. Doing so may result in incorrect measurement.
• Do not drop or carelessly handle the main unit, the heart rate sensor, or other components; protect
from strong shock.
• Stop using the fastening belt or the electrode pad if rashes appear on the skin.
• Do not forcefully twist or pull the heart rate sensor.
• The heart rate sensor may deteriorate after extended use, resulting in measurement errors.
If measurement errors tend to occur often, replace the heart rate sensor with a new one.
2
0
HR10: MEMORY (MEM/-)
HR20: MEMORY/LAP
(MEM/LAP/-)
Record a lap (HR20)
Recall Stopwatch or
Program Memory
• Decrease a setting value
•
•
• Lights up when MSC-HR10/20 is
3 Stopwatch icon
• Flashes when it receives Heart Rate
ready to receive Heart Rate signal.
• Flashes in the Clock Mode if the
signal.
0 Zone Alert Icon (
4 Auto-light icon
)
• Flashes when Heart Rate is outside
the target Heart Rate Zone
5 Key lock icon
8
)
2 Alarm icon
Stopwatch is active
5
9
9 Heart Rate Icon (
1 Measurement icons
6 Sound icon
7 Battery icon
8 Measurement units
START/STOP (ST/SP/+)
•
•
Start and stop timer
Increase a setting value
LIGHT ( )
•
•
Turn on back light
Hold down to turn on/off key lock
SET (SET)
MODE (MODE)
•
Press to cycle through modes
Enter a setting mode
Confirm a setting
• Switch sub-fucntion mode
•
•
3
2.1
2.0
BASIC OPERATION
•
•
•
•
•
FIRST TIME OPERATION
Press any key for 2 seconds to activate the LCD display.
Navigation
Each button operates either by pressing once, or by holding for 2 seconds.
STOPWATCH
COUNTDOWN PROGRAM
2.2
Basic Operation
You can navigate through each of the four main modes by pressing the MODE button.
CLOCK
USER/EXERCISE
PROFILE
All Reset
Press 4 main buttons for 2 seconds to reset the MSC-HR10/20.
When malfunctions occur, do All Reset and repeat Profile edits.
Without any programming you can attach the Heart Rate Sensor, press the MODE button until you
are in the Stopwatch Mode and begin using the MSC-HR10/20 with simple timer and heart rate
functions.
4
CHANGING SETTINGS
NOTE:
The MSC-HR10/20 returns to Clock Mode if left
idle for 30 seconds, or if the MODE button is
pushed.
When a digit is flashing that unit can be changed.
Press the ST/SP/+ button to increase the digit.
Press the MEM/- button to decrease the digit.
Press and hold the ST/SP/+ or MEM/- button to increase or decrease the digits rapidly.
Press the SET button to confirm it and advance to the next setting.
SETTING THE CLOCK
• From Clock mode press and hold the SET button for two seconds.
• The hours are now flashing. Use the ST/SP/+ or MEM/- buttons to adjust and
press the SET button to continue.
• The minutes are now flashing. Adjust and press the SET button.
• The year data is now flashing. Adjust and press the SET button.
• The month is now flashing. Adjust and press the SET button.
• The day is now flashing. Adjust and press the SET button.
• The 12-hour/24-hour clock setting is now flashing. Adjust and press the SET
button.
• The day/month display order is now flashing. Adjust and press the SET button.
• The clock is now set.
(2 SEC.)
NOTE: The clock is programmed with a 50-year auto-calendar.
5
2.4
2.3
STOPWATCH MODE
RECORDING LAPS (HR20)
In Stopwatch mode you can press the MEM/LAP/- button to record a lap.
The screen will freeze on the current lap time and lap number for two seconds. You can save up to 44 laps.
After two seconds the screen returns to the Stopwatch mode.
• Use the ST/SP/+ button to start and stop the timer function in the Stopwatch mode.
NOTE:
The stopwatch begins measurement in
min:sec:1/100 sec. After 59 minutes pass,
the display will change to hrs:min:sec.
• Use the SET button to navigate between the different screens available in the Stopwatch mode.
The SET button navigates between the following screen with current heart rate in the lower portion of
the screen.
STOPWATCH
% OF MAX HEART RATE
MAX HEART RATE
AVERAGE HEART RATE
CALORIES BURNED/
% BURNED AS FAT
CLOCK
• All lap data will be cleared after the Stopwatch has been reset and restarted.
• If the Stopwatch is stopped and there is no heart rate signal for 30 seconds, the watch returns to the
Clock mode.
• To reset the Stopwatch data, with the timer stopped, press and hold the SET button for two seconds.
6
7
3.0
PROFILE MODE
3.1
The MSC-HR10/20 can be programmed with specific information including your age, body weight, etc, to
make the data collected more accurate and useful. In the User Profile (USER PF), you must set up the
user data correctly in order to achieve more accurate calculation of the Calorie Expenditure and the %
Burned as Fat. Note that initial set up is slightly different from changing your user profile once it is set up.
SET UP YOUR USER PROFILE (USER PF)
• USER PROFILE - Press MODE button until User Profile (USER PF) or Exercise Profile (Ex PF) appears on
the screen. If the Ex PF appears on the screen, press the SET button to have USER PF appear. Press and
hold the SET button for two seconds to access the User Profile and change or set the data.
(2 SEC.)
•
•
•
•
8
Select M for male or F for female. Press the SET button.
Birth year is now flashing. Adjust and press the SET button.
The birth month is now flashing. Adjust and press the SET button.
The birth date is now flashing. Adjust and press the SET button.
• Maximum Heart Rate (MHR) is now flashing. The default value is 220 minus your age. Adjust if necessary
and press the SET button.
• “kg” for kilograms or “lb” for pounds is flashing. Select your preference and press the SET button.
• Enter your weight and press the SET button.
• “cm” or “feet/inches” is flashing for height scale. Select your preference and press the SET button.
• Enter your height and press the SET Button.
• “Activity Score (ACT)” is flashing. See section 5.0 for details. Adjust and press the SET button.
• Your “Fitness Index (FIT)” is now displayed. See section 5.1 for details. Your fitness index will change
only as you enter new personal data, such as weight, age, etc. Press the MODE button to return to the
User Profile screen.
• At any time in the set up you can press the MODE button to escape to the User Profile screen.
• If you do not press a button for 30 seconds the watch returns to the Clock mode.
NOTE:
Once you have set your User Profile your lower and upper heart rate limit will be set automatically. However, you can manually
change your upper and lower heart rate limit if the automatic setting does not suit you. If you change the Activity Score (ACT),
your upper / lower and maximum heart rate will automatically be updated.
9
3.2
• Audio Alert can be turned on or off. The alert will beep once every minute if you have gone below your
target Heart Rate Zone, and twice if you have gone above it. Adjust and press the SET button.
• Set your hours and minutes of your Exercise timer. Press the SET button to advance.
• Set the Warm Up timer (0, 5, 10 or 15 minutes). Press the SET button to advance.
• For HR20, set the Recovery timer (0, 5, 10 or 15 minutes). Press the SET button to advance.
• After the Exercise Profile has been set, it can be modified quickly by the same method.
Note that once the Exercise Profile has been established, the screens are arranged so the data you
would most likely change is first, like Maximum Heart Rate and Weight.
SET UP AN EXERCISE PROFILE (EX PF)
MSC-HR10/20 can be programmed with Exercise Profiles or workouts. HR10 can program 1 Exercise
Profile and HR20 can program 3 Exercise Profiles. Each Exercise Profile can have a countdown Warm
Up, Exercise, and Recovery (HR20 only) timer.
3.3
EXERCISE PROFILE (EX PF) - Press MODE button until User Profile (USER PF) or Exercise Profile (Ex
PF) appears on the screen. If the USER PF appears on the screen, press the SET button to have Ex PF appear. For HR20, press the SET button to cycle through each of the three Exercise Profiles listed on screen
as EX 1 PF, EX 2 PF and EX 3 PF. Press and hold the SET button for two seconds to access the Exercise
Profile and change or set the data.
USING EXERCISE PROFILES
NOTE:
You cannot use the Stopwatch mode
while running the Countdown program.
Once you have set your Exercise Profile(s), you can train
according to the guidelines in your profile.
For HR20, select from three Exercise Profiles in the Profile mode by pressing the SET button.
•••
• Select the Woukout Activity (T.ACT) from WALKING, CYCLING, or RUNNING. Press the SET button to advance.
• The Lower Heart Rate limit for your training zone will flash. Adjust and press the SET button.
• The Upper Heart Rate limit of your training zone will flash. Adjust and press the SET button.
10
•
•
•
•
Press the MODE button until you enter the Countdown Program mode.
Press the ST/SP/+ button to start or pause the program.
To skip the Warm Up timer to the Exercise timer press and hold the ST/SP/+ for two seconds.
To skip the Exercise timer and start the Recovery timer (HR20 only), hold ST/SP/+ for another 2
seonds.
• For HR20, if the Recovery timer has a non-zero value, the Recovery timer will begin.
• To end the Recovery timer early, press and hold the ST/SP/+ button for two seconds.
11
3.4
MEMORY FUNCTIONS
There are two Memory functions; one for the Stopwatch and the other for the Countdown Program.
Press the MEM/- button in the Stopwatch mode.
HR20 only: • “ALL” displays at first.
• Press SET to view data for the entire workout.
• Press ST/SP/+ or MEM/Lap/- to scroll and view data for the desired Lap numbers. Press
SET to continue.
• Total Time (workout) and Maximum Heart Rate is displayed (this is the first display for HR10). Press
the SET button.
• Total Time (workout) and Average Heart Rate is displayed. Press the SET button to view next data.
• Calories consumption and Percentage of Calories Burned as Fat are displayed. Press the SET button to
view next data.
• The time in the Heart Rate Zone is displayed. Press the SET button.
• The time above the Heart Rate Zone is displayed. Press the SET button.
• The time below the Heart Rate Zone is displayed. Press the SET button to return to the top of the
Memory function screen. Press the MODE button to return to the Clock mode.
TOTAL TIME/
MAX HEART RATE
TOTAL TIME/
CALORIES BURNED/
TIME IN TARGET
AVERAGE HEART RATE % CALORIES BURNED AS FAT HEART RATE ZONE
TIME ABOVE TARGET
HEART RATE ZONE
Press the MEM/- button in the Countdown Program mode.
• Total Time (workout) and Average Heart Rate is first displayed. Press the SET button to continue.
• Recovery Start and End Heart Rate are displayed at 1 sec interval (HR20 only *1) and Average Heart
Rate is displayed.
• Calories consumption and Percentage of Calories Burned as Fat are displayed. Press the SET button to
view next data.
• The time in the Heart Rate Zone is displayed. Press the SET button.
• The time above the Heart Rate Zone is displayed. Press the SET button.
• The time below the Heart Rate Zone is displayed. Press the SET button to return to the top of the
Memory function screen. Press the MODE button to return to the Clock mode.
TOTAL TIME/
MAX HEART RATE
RECOVERY HR RANGE *1/
CALORIES BURNED/
AVERAGE HEART RATE % CALORIES BURNED AS FAT
TIME IN TARGET
HEART RATE ZONE
TIME ABOVE TARGET
HEART RATE ZONE
TIME BELOW TARGET
HEART RATE ZONE
TIME BELOW TARGET
HEART RATE ZONE
IMPORTANT:
You must update the User Profile in order for all the memory data to be accurate.
12
13
3.6
The MSC-HR10/20 also has an alarm. Follow the steps below to set it.
• From the Clock mode press the SET button.
• The current Alarm time appears. Press the ST/SP/+ or the MEM/- button to turn on or off the alarm.
• Press the SET button for two seconds to change the hour and minutes.
• The hours are flashing. Adjust and press the SET button.
• The minutes are now flashing. Adjust and press the SET button.
• Press the MODE button to exit the setup.
BACKLIGHT
When the Auto-light is set to OFF:
• Press LIGHT button to turn on the backlight for 3 seconds. Press any other key whilst the light is on
and it will extend the light time by another 3 seconds.
When the Auto-light is set to ON:
• Press any key to turn ON or extend the backlight for 3 seconds.
To help conserve power, the Auto-light setting will automatically switch to OFF after 2 hours.
NOTE:
The backlight does not work when the low battery icon is shown and will return to normal once the batteries are replaced.
14
4.0
3.5
ALARM
WEARING THE HEART RATE SENSOR
Back side
Electrode pad
The Heart Rate Sensor is used to count your heartbeat and transmit the data to the MSC-HR10/20.
To wear the Heart Rate Sensor:
1. Wet the conductive pads on the underside of the Heart Rate Sensor with a few drops of water or a
conductive gel to ensure solid contact.
2. Strap the Heart Rate Sensor across your chest. To ensure an accurate heart rate signal, adjust the
strap until the belt sits snugly below your pectoral muscles.
NOTE:
• The position of the Heart Rate Sensor affects its performance. Move the Heart Rate Sensor along the strap so that it falls
above your heart.
• Avoid areas with dense chest hair.
• In dry, cold climates, it may take several minutes for the Heart Rate Sensor to function steadily. This is normal and should
improve with several minutes of exercise, or by wetting the sensor contacts.
• If the watch is kept idle without receiving a heart rate signal for 5 minutes, the Heart Rate receiving function turns OFF and
return to the Clock mode.
15
5.0
ACTIVITY SCORE
The activity score is based on your own self-assessment of the amount of exercise you regularly perform.
TRANSMISSION SIGNAL:
The Heart Rate Sensor have a maximum transmission range of about 31.5 inches (80 cm).
ACTIVITY SCORE
DESCRIPTION
1 Hour per week
Low - You do not usually participate in programmed recreation,
sports or excercise.
• Shorten the distance between the MSC-HR10/20 and the Heart Rate Sensor.
• Re-adjust the position of the Heart Rate Sensor.
• Check the conductive pads are moist enough to ensure solid contact.
• Check the batteries. If they are low or exhausted, the range may become shorter.
2 Hours per week
Medium - You are engaged in modes physical activity (such as golfing, horseback riding, table tennis, calisthenics, bowling, weight lifting or gymnastics) 2-3 times a week, totaling 2 hours per week.
WARNING:
Signal interference in the environment can be due to electromagnetic disturbances. These may occur
near high voltage power lines, traffic lights, overhead lines of electric railways, electric bus lines or
trams, televisions, car motors, bike computers, some motor driven exercise equipment, cellular
phones or when you walk through electric security gates.
More than 2 Hours
per week
High - You actively and regularly participate in heavy physical exercise (such as running, jogging, swimming, cycling, or any conditioning exercise) or engage in vigorous aerobic exercise (such as tennis,
basketball or handball).
IMPORTANT:
In the event that you experience a weak signal or your signal is disrupted by interference in the environment, follow the instructions below to identify and resolve the situation.
If the signal is weak - The display will only show “Ø”:
16
17
6.0
5.1
FITNESS INDEX
Your MSC-HR10/20 will generate a fitness index based on your aerobic fitness. This index is dependent
and limited by the body’s ability to deliver oxygen to the working muscles in training. It is often measured by maximum oxygen uptake (VO2 Max), which is defined as the highest amount of oxygen that can
be utilized when exercising at an increasingly demanding level. The lungs, heart, blood, circulatory system, and working muscles are all factors in determined VO2 Max. The unit of VO2 Max is ml/kg min.
The higher the index, the fitter you are. See the tables below for a rough guide to what your fitness index
means. Your fitness index is a reference and can be adjusted by changing your personal data.
FITNESS INDEX FOR MEN
60
AV
E
50
RA
FA
IR
40
60
GO
OD
Age
Age
50
FITNESS INDEX FOR WOMEN
GE
30
GO
OD
27
32
Fitness index
37
42
15
20
25
30
To replace the battery in MSC-HR10/20:
1. Turn the MSC-HR10/20 over so that you are looking at the back plate.
2. Use a small screwdriver to remove the four screws that hold the back plate into position.
3. Remove the back plate and set it aside.
4. Using a thin blunt instrument (such as a paperclip), hook the release catch and lift the clip.
5. With your finger, remove the old battery.
6. Slide the new battery into the battery compartment with the + side upwards.
7. Replace the battery clip.
8. Replace the back plate and screws.
After the battery change, it
is necessary to re-enter
the User Profile.
20
22
The batteries typically last one year when used an average of 30 minutes per day. It is recommended to
contact the retailer or our customer service department if you need to replace them.
IMPORTANT:
30
20
18
FA
IR
40
AV
ER
AG
E
BATTERIES
35
40
Fitness index
19
7.0
To replace the Heart Rate Sensor battery:
1.
2.
3.
4.
Locate the battery compartment on the back of the Heart Rate Sensor.
Using a coin, as shown above, turn the compartment cover counter-clockwise until it clicks out of place.
With your finger, remove the old battery and set it aside.
Insert the new battery with the + side upwards.
5. Replace the battery compartment cover by turning it clockwise until it is firmly in position.
IMPORTANT:
• Non-rechargeable and rechargeable batteries must be disposed of properly according to your local regulations.
CARE INSTRUCTIONS
To ensure you receive the maximum benefit from using this product, please observe the following
guidelines:
• Clean the MSC-HR10/20 and Heart Rate Sensor thoroughly after each training session. Never store the
products when wet.
• Use a soft, slightly moistened cloth. Do not use abrasive or corrosive cleaning agents, as these may
cause damage.
• Avoid pressing the keys with wet fingers, under water, or in heavy rain, as this may allow water to gain
entry into the electrical circuitry.
• Do not bend or stretch the transmitter part of the Heart Rate Sensor.
• Do not subject the product to excessive force, shock, dust, temperature changes, or humidity. Never
expose the product to direct sunlight for extended periods. Such treatment may result in malfunction.
• Do not tamper with the internal components. Doing so will terminate the product warranty and may
cause damage. The main unit contains no user-serviceable parts.
• Do not scratch hard objects against the LCD display as this may cause damage.
• Remove the batteries whenever you are planning to store the product for a long period of time.
• When replacing batteries, use only new batteries.
• Batteries are extremely dangerous when swallowed! Keep batteries and the article away from children.
If a battery has been swallowed seek immediate medical advice.
• The batteries supplied must not be recharged, reactivated by any other means, dismantled, put into fire or
short-circuited.
20
21
8.0
7.1
AQUATIC AND OUTDOOR ACTIVITIES
The MSC-HR10/20 is water-resistant up to 100 feet (30 meters). The Heart Rate Sensor is splash proof
and should not be used for underwater activities. Refer to the table for proper use guidelines.
RAIN
SPLASHES,
ETC
30 m / 100 ft
OK
SHOWERNG LIGHT SWIM(WARM /
MING / SHALCOOL WATER LOW WATER
ONLY)
OK
OK
SHALLOW
DIVING /
SURFING /
WATER
SPORTS
SNORKELING
/ DEEP WATER DIVING
NO
NO
• Keep MSC-HR10/20 water resistant! Avoid contact with chemicals and solvents (gasoline, chlorine,
perfumes, alcohol, hair sprays, etc.).
• Rinse and dry after use.
• Reduce exposure to heat.
22
SPECIFICATIONS
CLOCK
Time format:
Date format:
Year format:
Alarm:
12hr/24hr
DD/MM or MM/DD
2001 – 2050 (auto calendar)
One alarm
STOPWATCH
Stopwatch:
Resolution:
*Lap counter:
99:59:59:99 (HH:MM:SS)
1/100 sec.
44 laps share 99:59:59:99 (HH:MM:SS)
EXERCISE PROFILE
Warm-up timer:
Exercise timer:
*Recovery timer:
5, 10, 15, or 0 mins
99:59:59:99 (HH:MM:SS)
5, 10, 15, or 0 mins
DISPLAY FUNCTIONS
Heart Rate (HR) alarm:
Heart Rate (HR) alarm:
Lower HR settable range:
Upper HR settable range:
Calories consumption:
% Burned as Fat:
Audible and visual
30 – 240bpm (beats per minute)
30 – 220bpm
80 – 240bpm
0 – 9,999 kcal
0 – 99%
TRANSMISSION
Minimum range:
Maximum range:
25 in. (62.5cm)
31.5 in. (80cm) –
may decrease with low battery
WATER RESISTANT
MSC-HR10/20:
Heart Rate Sensor:
100 ft (30m) – not actuating keys
Splash proof
BATTERY
MSC-HR10/20:
Heart Rate Sensor:
1 x CR2032 3v lithium battery
1 x CR2032 3v lithium battery
OPERATING ENVIRONMENT
Operation temperature: 41˚F – 104˚F (5˚C – 70˚C)
Storage temperature: -4˚F – 158˚F (-20˚C – -70˚C)
* HR20 Only
23
9.0
SCREEN FLOW
ALARM
BEEP
LIGHT
STOPWATCH
HR
LAP TIME
HR
%MHR
HR
MHR
HR
AVE HR
HR
CALORIE
%FAT
CLOCK
HR
TOTAL EX. TIME
MHR
TOTAL EX. TIME
AVE HR
CALORIE
%FAT
IN-ZONE
TIME
ABOVE-ZONE
TIME
BELOW-ZONE
TIME
%MHR
HR
MHR
HR
AV HR
HR
CALORIE
%FAT
CLOCK
HR
RECOVERY HR
AVE HR
CALORIE
%FAT
IN-ZONE
TIME
ABOVE-ZONE
TIME
BELOW-ZONE
TIME
CLOCK
MODE
STOPWATCH
MODE
TOTAL EX. TIME
LAP
COUNTDOWN
PROGRAM
MODE
(2 Sec.)
DATE
CLOCK
COUNTDOWIN TIMER
HR
TOTAL EX. TIME
MHR
USER
PROFILE
MHR
WEIGHT
ACTIVITY
SCORE
SEX
BIRTHDAY
YEAR
BIRTHDAY
MO/DAY
WEIGHT
UNIT
EXERCISE
PROFILE
T. ACTION
LOWER
HR LIMIT
UPPER
HR LIMIT
ALERT
EX TIMER
WARM UP
TIMER
RECOVERY
TIMER
HEIGHT
UNIT
HEIGHT
: HR20 Only
FITNESS
INDEX
PROFILE
MODE
(
24
: EX.1-3)
25
10.0
LIMITED WARRANTY
Two-year warranty period: applied to the MSC-HR10/20 and the Heart Rate Sensor only (excluding batteries).
Should the MSC-HR10/20 or the Heart Rate Sensor fail under normal conditions of use, we will repair or
replace it free of charge. The warranty service should be performed directly by CatEye; please return
through the point of purchase, or directly to CatEye.
11.0
CO.,LTD.
26
Service & Research Address for United States Consumers:
CATEYE Service & Research Center
1705 14 th St. 115 Boulder CO 80302
Phone: 303-443-4595
FAX: 303-473-0006
Toll Free: 800-5 CATEYE
URL: http://www.cateye.com
Japan Office:
2-8-25 Kuwazu, Higashi Sumiyoshi-ku, Osaka 546-0041 Japan
Attn: CATEYE Customer Service Section
SPARE PARTS
# 249-9940
# 249-9920
# 166-5150
WATCH STRAPS
HEART RATE SENSOR
BATTERY (CR2032)