1
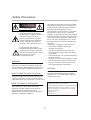
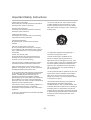
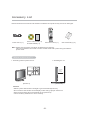
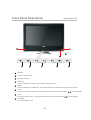
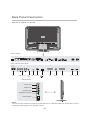
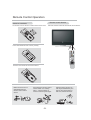
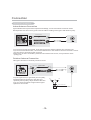
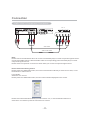
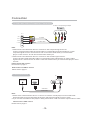
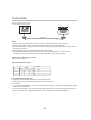
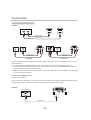
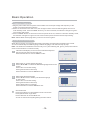
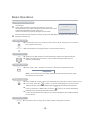
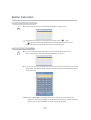
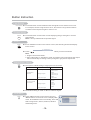
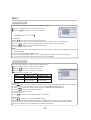
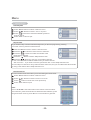
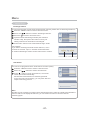
USER MANUAL
LC26T 31 E/LC32T 3 1E
Contents
Safety Precautions
1
Important Safety Instructions
2
Accessory List
4
Overview of TV
i. Front Panel Description
5
ii . Back Panel Description
6
Remote Control Overview
8
Remote Control Operation
9
Connection
i. Antenna Connection
10
ii. YPbPr/YCbCr (component) Connection
11
iii.S-Video and Video (Composite) Connection
iv. VGA Connection
12
12
v. Scart Connection
13
vi. HDMI / DVI Connection
14
Basic Operation
15
Button Instruction
17
Menu
i. Picture Menu
19
ii. Sound Menu
19
iii. Channel Menu
20
iv. Window Menu
v. Setting Menu
23
23
Teletext
26
Troubleshooting And Maintenance
Display Mode
27
29
Specifications
30
Safety Precautions
This equipment generates, uses and can radiate
radio frequency energy and, if not installed and
used in accordance with the instruction manual,
may cause harmful interference to radio
communications. However, there is no guarantee
that interference will not occur in a particular
installation. If this equipment does cause harmful
interference to radio or television reception, which
can be determined by turning the equipment off
and on, the user is encouraged to try to correct
the interference by one or more of the following
measures:
!Reorient or relocate the receiving antenna.
!Increase the separation between the
equipment and receiver.
!Connect the equipment into an outlet on a
circuit different from that to which the receiver
is connected.
!Consult the dealer or an experienced radio/TV
technician for help.
!When in use, there must be a distance at least
5cm between the TV and some object front or
back of it, at least 5cm between the TV and
some object leftward or rightward of it .
CAUTION
RISK OF ELECTRIC SHOCK
DO NOT OPEN
The lightning flash with arrowhead
symbol within an equilateral triangle is
intended to alert the user to the
presence of uninsulated "dangerous
voltage" within the unit's cabinet that
may be of sufficient magnitude to
constitute a risk of electric shock to
The exclamation point within an
equilateral triangle is intended to alert
the user to the presence of important
operating and maintenance (servicing)
instructions in the manual
accompanying the unit.
WARNING:
To prevent fire or electric shock, do not expose the
unit to rain or moisture. never attempt to open the
cabinet, dangerous high voltages are present in the
unit. refer servicing to qualified service personnel.
CAUTION:
DON’T PLACE TO WET LOCATION
Apparatus shall not be exposed to dripping or
splashing with water, and do not place objects
filled with liquids on the apparatus, such as vases.
Do not attempt to modify this product in any
way without written authorization from AMOI
Electronics Co., Ltd. Unauthorized modification,
warranty will be void.
NOTE TO CABLE/TV INSTALLER:
RECORD YOUR MODEL NUMBER
(Do this now, while it is convenient)
This equipment has been tested and found to
comply CE regulation standard. These limits are
designed to provide reasonable protection
against harmful interference when the equipment is
operated in a residential installation.
The model and serial number of your Machine are
located on the back of the TV cabinet. For your
future convenience, we suggest that you record
these numbers here:
MODEL NO._____________________
SERIAL NO._____________________
-1-
Important Safety Instructions
12.Use only with the cart, stand, tripod, bracket,
or table specified by the manufacturer, or sold
with the apparatus. When a cart is used, please
take caution when moving the cart to avoid injury
from tip-cover.
1.Read These Instructions
All the safety and operating instructions should be
read before the product is operated.
2.Keep These Instructions
The safety and operating instructions should be
retained for future reference.
3.Adhered to all warning
All warnings on the product and in the operating
instructions should be adhered to.
4.Follow All Instructions
All operating and use instructions should be
followed.
5.Do not use this product near water
Do not use this product near water for example,
near a bathtub, wash bowl, kitchen sink, or laundry
tub; in a wet basement; or near a swimming pool;
and the like.
13.Unplug this apparatus during lightning or
unused for a long period of time.
6.Clean only with dry cloth
Unplug this product from the wall outlet before
cleaning. Do not use liquid cleaners or aerosol
cleaners. Use dry cloth for cleaning.
14.Refer all servicing to qualified service
personnel. Servicing is required when the
apparatus has been damaged in any way, such
as power-supply cord or plug is damaged, liquid
has been spilled or objects have fallen into the
apparatus, the apparatus has been exposed to
rain or moisture, does not operate normally, or
has been dropped.
7.Do not block any ventilation openings. Install in
accordance with the manufacturer instructions.
8.Do not install near any heat sources such as
radiators, heat register, stoves, or other apparatus
(including amplifiers) that produce heat
15.This product should be operated only from the
type of power source indicated on the marking
label. If you are not sure of the type of power
supply to your home, consult your product dealer
or local power company.
9. Do not defeat the safety purpose of the polarized
or grounding-type plug. A polarized plug has two
blades ,one blade is wider than the other. A
grounding type plug has two blades and third
grounding prong. The wide blade or the third prong
are provided for your safety. If the provided plug
does not fit into your outlet, consult an electrician for
replacement of the obsolete outlet.
16.Protective Attachment Plug -The product is
equipped with an attachment plug having
overload protection. This is a safety feature. See
Instruction Manual for replacement or resetting of
protective device. If replacement of the plug is
required, be sure the service technician has used
a replacement plug specified by the manufacturer
that has the same overload protection as the
original plug.
10.Protect the power cord from being walked on or
pinched particularly at plugs, convenience
receptacles, and the point where they exit from the
apparatus.
11.Only use attachments and accessories specified
by the manufacturer.
-2-
Important Safety Instructions
17.Power Lines
An outside antenna system should not be located
in the vicinity of overhead power lines or other
electric light or power circuits, or where it can fall
into such power lines or circuits. When installing an
outside antenna system, extreme care should be
taken to keep from touching such power lines or
circuits as contact with them might be fatal
.
18.Overloading
Do not overload wall outlets, extension cords, or
integral convenience receptacles as this can result
in a risk of fire or electric shock.
23.Outdoor Antenna Grounding
If an outside antenna or cable system is connected
to the product, be sure the antenna or cable
system is grounded so as to provide some
protection against voltage surges and built-up static
charges. Article 810 of the National Electrical Code,
ANSI/NFPA 70, provides information with regard to
proper grounding of the mast and supporting
structure, grounding of the lead-in wire to an
antenna discharge unit, size of grounding
conductors, location of antenna discharge unit,
connection to grounding electrodes, and
requirements for the grounding electrode. See
figure below.
19.Object and Liquid Entry
Never push objects of any kind into this product
through openings as they may touch dangerous
voltage points or short-out parts that could result in
a fire or electric shock. Never spill any kind of liquid
on the product.
20.Replacement Parts
When replacement parts are required, be sure the
service technician has used replacement parts
specified by the manufacturer or have the same
characteristics as the original part. Unauthorized
substitutions may result in fire, electric shock, or
other hazards.
21.Safety Check
Upon completion of any service or repairs to this
product, ask the service technician to perform
safety checks to determine that the product is in
proper operating condition.
22.Wall or Ceiling Mounting
The product should be mounted to a wall or ceiling
only as recommended by the manufacturer. Any
mounting of the product should follow the
manufacturer instructions, and should use a
mounting accessory recommended by the
manufacturer.
-3-
Accessory List
Please check the accessories and ask the local dealer for help when they are lost or damaged.
POWER
MUTE
SOURCE
LAST
SOURCE
OK
DTV/TV
MENU
DTV
MENU
FAV
EXIT
FAV-
FAV+
GUIDE
1
2
4
5
3
LIST
6
DISPLAY
i
7
8
9
0
DUAL
TXT/MIX
Quick Start
CH+
VOL
VOL
CH-
SUBTITLE
AUDIO
PAGE
ASPECT FREEZE VIDEO OFF VOG
Power Cord (×1)
User’s manual CD (×1)
and Quick Start(×1)
Remote control (×1)
"AA" size battery (×2)
Note: Please use the power cord which includes the ground wire.
This TV set shall be connected to a main socket outlet with a protective grounded AC
power outlet.
Where to place the TV
2. Handling the TV.
1. Selecting where to place the TV.
2 inches
(5 cm)
or more
(Picture A)
(Picture B)
Caution:
• Select a place without direct sunlight or good ventilation ( Picture A)
• Do not remove the stand from the display unless using a proper wall mount.
• Keep enough space above and behind the TV. ( Picture B)
• The TV is heavy. M ake sure to move it safely.
-4-
Front Panel Description
Overview of TV
1
1
3
2
4
5
1
Speaker
2
Remote control sensor
3
Standby indicator
4
SOURCE
6
7
8
Press it to display the menu of the available viewing source.
5
MENU
Press it to display the OSD menu. The button also acts as select button "OK" in source menu.
6
CH+/Press it to choose the channel. The two buttons also act as direction buttons
7
VOL+/Press it to adjust volume . The two buttons also act as direction buttons
8
in menu display.
STANDBY
Turn on/standby the TV.
-5-
in menu display.
Back Panel Description
Back Panel of Model: LC32T31E
Rear interface
Rear interface description
100-240 V
50/60HZ
POWER
COMPONENT IN
VGA
AUDIO IN
EXT1
VGA IN OPTICAL
ANTENNA
EXT2
HDMI - 1 IN
HDMI - 2 IN
Side interface:
AV IN
Video input
Audio input
S-Video input
Headphone Output
Power Switch
Notes:
1.The service only interface is used to upgrade and service . Without permission, please don’t connect.
2. When input the earphone, the speaker is silent.
-6-
Back Panel Description
Back Panel of Model: LC26T31E
Rear interface
Rear interface description
100-240 V
50/60HZ
POWER
VGA IN OPTICAL COMPONENT
AUDIO VGA
IN
IN AUDIO IN
EXT1
ANTENNA
EXT2
HDMI - 1 IN
HDMI - 2 IN
Side interface:
AV IN
Video input
Audio input
S-Video input
Headphone Output
Power Switch
Notes:
1.The service only interface is used to upgrade and service . Without permission, please don’t connect.
2. When input the earphone, the speaker is silent.
-7-
Remote Control Overview
Standard Remote Control
POWER
Standby button
MUTE
Mute
SOURCE
Main source
Teletext Page up
LAST
SOURCE
OK
Last source
DTV/TV
*DTV/TV
Enter OSD setup mode
MENU
EXIT
Direction buttons
Enter
Teletext Page down
Exit
Colour (red/green/yellow/blue) buttons
DTV
MENU
FAV
FAV-
FAV+
Fav, Fav-, Fav+ *
*DTV Menu
GUIDE
*Guide
1
2
3
4
5
6
7
8
9
0
DUAL
LIST
Channel list
Numerical buttons
DISPLAY
Display status
i
TXT/MIX
Txt/Mix
Last channel
Next /Previous channel
CH+
VOL
Stereo/Mono sound selection
VOL
CH-
Volume up/down
Teletext Sub page
Teletext hold
SUBTITLE
*Subtitle
PAGE
AUDIO
*Audio
Teletext reveal
ASPECT FREEZE VIDEO OFF VOG
Page
Teletext size
Video on graphic*(not available for 26"and 32")
Video off
Picture proportion
Freeze
Notes:
1.This remote control needs two pieces of batteries.
2 .These functions marked * are only available for the model built-in DVB-T tuner.
3.For details of the buttons operation, please refer to the "Button Instruction" (Page 17).
-8-
Remote Control Operation
Remote control direction
Batteries Installation
Push as the arrow shows to take off the back cover.
Point the remote control at the remote control sensor.
TEAC
Insert the batteries with correct polarity.
30
30
POWER
MUTE
SOURCE
LAST
SOURCE
OK
DTV/TV
MENU
DTV
MENU
FAV
EXIT
FAV-
FAV+
GUIDE
1
2
4
5
6
7
8
9
0
DUAL
3
LIST
DISPLAY
i
TXT/MIX
CH+
VOL
VOL
CH-
SUBTITLE
AUDIO
PAGE
ASPECT FREEZE VIDEO OFF VOG
Put the cover back as the arrow shows .
Make sure there are no
objects between the
remote control and its
sensor.
Don't place the remote control
near a heater or in a damp
place. A strong impact on
remote control may damage it.
-9-
Signal from the remote con trol may be disturbed by sun
light or other strong light. In
this case, darken the room.
Connection
Antenna Connection
Indoor Antenna Connection
Typical Wall antenna jack used in apartment buildings, connect the antenna cable as shown
below (Please use the correct type of antenna cable according to the type of wall antenna jack).
75 ohm Round Cable
Bronze Wire
300 ohm Flat Wire
Apartment buildings
ANTENNA
Antenna Converter
Wall Connection Jack
*If you have a 75 ohm round cable, insert the bronze wire and then tighten the connection nut.
*If you have a 300 ohm flat wire, connect the twisted wire to the antenna converter and then connect
the converter to the antenna jack on the TV.
*When using 75 ohm round cable, please do not bend the bronze wire, it may make the video
quality poor.
Outdoor Antenna Connection
This type of antenna is commonly used in a house.
VHF Antenna
75 ohm Round Cable
UHF Antenna
300 ohm Flat Wire
ANTENNA
Antenna Converter
House
*In poor signal areas, to get better picture quality,
install the antenna as shown to the right. For
optimum picture quality, adjust antenna direction.
*You can share the antenna signal with a signal
splitter for two TV sets.
UHF
VHF
75 ohm Round Cable
Signal
Amplifier
-10-
Connection
YPbPr/YCbCr (Component) Connection
Y
Suit for 26"
Pb/Cb
-
-
DVD , etc
Pr/Cr
AUDIO(L)
AUDIO(R)
Suit for 32"
Audio Cable
YPbPr/YCbCr Cable
Note:
Please refer to the illustration above to connect TV with DVD player or other component signal sources.
Connect the YPbPr/YCbCr Cable and Audio Cable to corresponding jacks of the DVD player or other
component signal sources.
Please select "Component" in the source menu when you connect component signal source.
How to select the viewing source
Please press the "SOURCE" button, then use numerical buttons directly to select source item, or use
the direction to select source.
For example:
Select the "TV" source .
Please press the "SOURCE" button, the source menu will be displayed on the screen.
SOURCE
1
TV
2
AV
3
S-Video
4
EXT1
5
EXT2
6
Component
7
HDMI1
8
HDMI2
9
VGA
Please use numerical buttons directly to select source "TV", o r use the direction buttons to
select item "TV" and then press the "OK" button to confirm.
-11-
Connection
S-Video and Video (Composite) Connection
S-Video or composite signal output
POWER
VCR
VIDEO
AUDIO(L)
AUDIO(R) S-VIDEO
AV-3 IN
AV IN
VIDEO
AV Cable
AUDIO-L
AUDIO-R
S- Video Cable
S-VIDEO
Note:
1.Please refer to the illustration above to connect TV with composite signal sources.
Connect composite video cable and audio cable to corresponding jacks of DVD player or other
composite signal sources. Please choose "AV" in the source menu when you connect DVD
player or other sources. The AV and S-Video share audio input.
2.Please refer to the illustration above to connect TV with S-Video signal sources.
Connect S-Video cable and audio cable to corresponding jacks of DVD player or other S-Video
signal sources. Please choose "S-Video" in the source menu when you connect DVD player or other
sources.
How to select "AV" source
Please refer to page 11.
How to select "S-Video" source
Please refer to page 11.
VGA Connection
VGA AUDIO IN
PC
VGA IN
VGA
AUDIO
VGA Cable
Audio Cable
Note:
1.Please refer to the illustration above to connect TV with PC or DVD player.Connect VGA Cable
and Audio Cable to the corresponding jacks of PC and s elect the signal source as " VGA ".
2.If you connect VGA Cable to disc player or STB, please select "VGA" and set the output mode as "VGA".
How to select "VGA" source
Please refer to page 11.
-12-
Connection
Scart Connection
DVD , etc
-
-
1
Scart
Scart Cable
Note:
1.Please refer to the illustration above to connect TV with DVD player or other devices.
2 . Connect Scart Cable to the corresponding jacks of DVD player or other devices.
3. Please select "EXT1", " EXT2 " in the s ource menu when you connect DVD player or other sources
with Scart connection.
4.The signal type input to EXT1 will be detected automatically.
5.Select the desired signal type on "Source Setting" in the "Setting" menu--only for EXT2.
The setting will be stored and can be viewed on "SOURCE" menu.(See page 24)
How to select "EXT1/EXT2" source
Please refer to page 11.
Input/Output Specification:
Input
Output
Connector
CVBS
EXT1
EXT2
√
√
S-Video
RGB
√
√
√
CVBS
TV
TV/ AV(CVBS)/ EXT1(CVBS)/EXT2(CVBS)
Scart Auto Playback Function:
1. Support the Auto Playback between TV and EXT sources.
2. When signal is lost, the searching preference: EXT1,EXT2,TV.
For example:
1. If you connect EXT 2 when you are watching program from EXT 1 signal, the TV will display signal
from EXT 2 automatically.
2.If you disconnect EXT 1 when you are watching program from it or turn off the signal source from
EXT 1, and there are no signals from EXT 2, the TV will play TV source automatically.
-13-
Connection
HDMI/DVI Connection
Picture A
HDMI - 1 IN
DVD1
DVD2
HDMI
HDMI
HDMI - 2 IN
HDMI Cable
HDMI Cable
VGA AUDIO IN
HDMI1 IN
DVI
HDMI2 IN
AUDIO(R) AUDIO(L)
DVI
HDMI / DV I Cord
HDMI / DV I Cord
Audio Cord
Audio Cord
Picture B
AUDIO(R) AUDIO(L)
Picture C
Connet TV with corresponding jacks on DVD or STB, and switch the source to HDMI in Source menu.
(Picture A/B/C)
1. If connecting with an HDMI cable, it is not necessary to connect an audio cable (Picture A).
2. If connecting to equipment which has only a DVI output terminal, DVI or HDMI adapter cables and
an audio cable are necessary (Picture B/C).
3. When DVI connect HDMI1 , the input audio is from VGA . When DVI connect HDMI2 , the input audio
is from YPbPr (Picture B/C).
How to select "HDMI" source
Please refer to page 11.
When connecting with HDMI, you can get better audio effect by connecting digital audio signal device
to other playing devices like an amplifier through Optical connector (Picture D).
Picture D
VOLUME
INPUT SELECTOR
POWER
BYPASS
PRO LOGIC
3 STEREO
MODE
TEST
CHANNEL
KARAOKE
MUTE
UP
DOWN
BASS
1
MIC
2
1
MIC VOL
2
EXCITE
Digital Out(HDMI)
OPTICAL
Optical cable
-14-
MIC
TREBLE
ECHO
Basic Operation
Power on / Power off
1.Plug the power cable into the power socket . M ake sure the output voltage and frequency of the
power is consistent with this machine.
2.Power on the switch on the side cover, the red light on the front board will be lighted, then the TV
enter standby mode. Press "POWER" touch key on the front board, the indicator change into green.
The TV enter Play mode.
3.Press "POWER" button on the remote control to power off the TV, and the TV will enter standby mode,
the indicator changes from green to red. Close the main power switch and it will stop working.
Note: Please draw out the plug when you won't use it for long time.
Initial Auto Installation
When the TV powers on for the first time after purchasing, the initial auto installation is involved.
You can automatically set OSD language, teletext language, and channels step by step.
Note: The initial auto installation functions only once. (The following red, green, yellow, blue buttons
are the colour buttons on remote control)
1
This menu will display on the TV screen automatically after
the TV being turned on for the first time.
Press Green button to choose " Next " to start.
Initial Auto Installation
Welcome!
Next
2
3
4
Setting the on-screen display language
Press "▲/▼ /◄/► " to select the desired language listed on the
screen.
Press "OK" to enter the setting.
Press green button to Next step.
Press red button to choose Cancel to exit.
Setting the teletext language
Press "▲/▼" button to select your teletext language
on the screen.
Press "OK" to enter the setting.
Press green button to Next step.
Press yellow button to get back.
Press red button to choose Cancel to exit.
Channel Preset
Press green button to choose Yes to enter auto search .
Press yellow button to get back.
Press red button to choose No to exit.
You do not need to do anything during the auto search.
OSD Language
English
Français
Magyar
Dansk
Español
Česko
Svenska
Nederlands
Polski
Suomi
Português
Pусский
Deutsch
Norsk
Cancel
Back
Teletext Language
Western Europe
Eastern Europe
Russian
Arabic
Cancel
Next
Back
Channel Preset
Do you want to search channel automatically?
No
-15-
Next
Yes
Back
Basic Operation
Initial Auto Installation
Auto Search
5
6
Auto Search
Press "EXIT" button to stop the auto search, but you are
recommended not to stop it during the search process since the
initial autoinstallation functions only once.
You do not need to do anything during the auto search.
Current Channel
9
104.25MHz
After the auto search finished, the finishing sign menu will display on the screen. Then the TV will
display at channel one.
Channel Shift
● In TV mode, press "CH+" button to select next channel, and press "CH-" button to
CH+/-
select previous channel.
CH+
CH-
Last channel
● Press this button to toggle between current and last channel.
Direct Select
Number
1
2
3
4
5
6
8
9
7
● Select a one-digit channel: Press 0-9 directly to select your desired channel.
● Select two-digit channel: Press 1-9 to input the first digit and press 0-9 to
input the second digit.
0
Volume Adjust
VOL+/VOL
-
● Press "VOL+/VOL- " buttons to increase or decrease the speaker volume.
VOL
+
40
Volume
Note: It is the same way to increase and decrease the earphone volume when
the earphone is connected.
Display Status
Display
i
● Press "DISPLAY" button, the screen will display the information of the Current source.
● In TV mode, press the "
●
●
Display
i
" button, the screen will display the Current channel
number/Channel name/Sound System/Dual Mode/Mute Status/Freeze Status.
Display
In PC / Component / HDMI mode, press the "
i
" button, the screen will display
Resolution/ Source/Mute Status/Freeze Status.
In other modes different from above, the screen will display Source/Mute Status/
Freeze Status.
Close Video
VIDEO OFF
● Press this button to enjoy music without video, and again to resume.
-16-
Button Instruction
Browse The Channel List
LIST
● Press "LIST" button, the channel list will display on the screen.
Channel list
Channel Frequency
1
2
3
4
5
6
7
8
9
10
Sound System
144 . 28
B/G
-------------------
-------------------
Channel Name
---------------------
Skip Channel
Off
On
On
On
On
On
On
On
On
On
Use direction buttons to select specific channel. Use "
"
PAGE
PAGE
" and
" button to switch the listing page. Press the "EXIT" button to quit.
Press "OK" button to watch the channel you have selected.
Rename Channel
LIST
● You can rename the channel when you are browsing the channel list.
Press "LIST" button, the Channel list will display on screen.
Channel list
Channel Frequency
1
2
3
4
5
6
7
8
9
10
Sound System
144 . 28
B/G
-------------------
-------------------
Channel Name
---------------------
Skip Channel
Off
On
On
On
On
On
On
On
On
On
● Use direction buttons to select specific channel and press "OK" button to confirm.
Then p ress " OK " button again, the Rename Channel window will display on the
screen as below.
Note: Press "▲/▼/◄/►" and "OK" button on the remote control to select the
character . Press the red button to delete the last character . Press the green
button to save . Press "MENU" or "EXIT" button to get back.
-17-
Button Instruction
Last Source
LAST SOURCE
● Press this button to switch between the last signal source and the current one.
For example, when the signal source is TV, last source is AV, press this button
to switch to AV and press it again to return to TV.
Freeze Image
FREEZE
● Press this button to freeze the current displaying image, and again to exit the
freeze mode.
Note: It is only available when input SD signal.
ASPECT
ASPECT
● Press "ASPECT" button on the remote control, the following window will display
on the screen.
Aspect Ratio
Full Screen
● Press "
/ " buttons or " Aspect " button to select your favourite mode.
Note:
1. Support "Auto Scale Mode".
2. Auto scale mode: In " Standard " mode, AV,TV,EXT source will change the aspect
ratio automatically according to the input signal to get perfect aspect ratio.
Stereo/Mono Sound
DUAL
● The options of Dual setting in single picture is as follows:
In the NICAM TV
broadcasts
Source
Options
A stereo signal
Mono
Nicam stereo
A bilingual signal
Momo
Nicam Dual_A
Nicam Dual_B
A monaural signal
Mono
Nicam Mono
A stereo signal
Mono
Stereo
A bilingual signal
Momo
Dual_A
Dual_B
In the TV mode of A2
TV broadcasts
A monaural signal
Mono
● The default setting of "Dual" is "Mono" if without signal.
View Menu
MENU
● Press "MENU" button on the remote control or
"MENU" button on the front cover to display OSD
menu. Press"MENU" button continually, and it will
shift among Picture, Sound, Channel, Window
and Setting menu.
-18-
Picture
Picture Mode
User
Brightness
50
Contrast
50
Colour
50
Tint
0
Sharpness
6
Menu
Picture Menu
You can adjust the Picture to get your desired picture effect.
Picture
1
2
Press the "MENU" button to enter Picture menu.
Press "
" buttons to select "Picture Mode".
Picture Mode
Picture Mode
User
Brightness
50
Contrast
50
Colour
50
Tint
0
Sharpness
6
User
Picture Mode
Press " / " buttons to select your favourite mode.
Only i n the "User" mode, you can adjust Brightness, Contrast, Colour, Tint, Sharpness.
A: Press " / " buttons to select "Brightness/ Contrast /Colour/ Tint/ Sharpness".
B: Press " / " buttons to reach the desired setting.
C: Press "EXIT" button to quit.
Note:
1. "Colour/ Tint" are not adjustable when the Input Source is PC. When receiving RGB signal "Colour"
is not adjustable.
2. "Tint" is not adjustable in HDMI mode.
3. IN "TV/AV/EXT(CVBS/S-Video)", "Tint" is adjustable only when receiving NTSC signal.
4. "Colour” is not adjustable when the input source is EXT(RGB).
Sound Menu
You can use this function to get the perfect audio effect.
1
Press "MENU" button to select "Sound" menu.
2
Press "
" buttons to select sub items.
Press "
" buttons to change the setting.
Press "EXIT " button to quit.
3
Selected item
button
For weaker bass
Bass
For weaker treble
Treble
Decrease audio from
Balance
the right speaker
Sound
button
For stronger bass
For stronger treble
Decrease audio from
the left speaker
Sound Mode
Simulated Stereo
BBE
Bass
Treble
Balance
User
Off
High
Sound Mode:
Press "
" buttons to change the sound mode. (Five options: Standard/Soft/Music/Cinema/User)
In "User " mode , you can adjust " Simulated Stereo / BBE /Bass/Treble/Balance ".
A: Press "
" buttons to select " Simulated Stereo / BBE /Bass/Treble/Balance".
B: Press "
" buttons to change the setting.
C: Press "EXIT " button to quit.
Simulated Stereo:
Press "
" buttons to switch Simulated Stereo ON/OFF.
BBE Setting:
Press "
" buttons to change to the BBE setting.
BBE feature is designed to make the sound more balanced, full, and clear. This technology is
able to adaptively correct the sound distortion resulting from every cause inside the system,
thereby the original voice is retrieved as accurately as possible.
-19-
Menu
Channel Menu
Sound System
Channel
1
Press "MENU" button to select "Channel " menu.
2
Press "
3
Press "
" buttons to select the suitable system for
local TV signal.
Press "EXIT" button to quit.
4
" buttons to select " Sound System" .
D/K
Sound System
Current Channel
12
Skip Channel
Off
Rename Channel
...
Exchange Channel
...
Auto Search
...
Manual Search
...
Fine Tune
...
Skip Channel
If you'd like to skip a channel automatically when you browse programs by pressing
"CH+/ CH -" button, please use this function.
Channel
1
Press the "MENU" button to select " Channel " menu .
2
Press the "
3
Press the "
" buttons to select the number of the
channel to be skipped.
4
" buttons to select " Current Channel ".
Press the "
D/K
Sound System
Current Channel
12
Skip Channel
Off
Rename Channel
...
Exchange Channel
...
Auto Search
...
Manual Search
...
Fine Tune
...
" button to select "Skip Channel" item.
Press the "
" buttons to set "On" on the "Skip Channel"
item. Then the channel will be hidden when you select channel
with "CH+/ CH -". If you want to cancel it, please set " O ff " on the "Skip Channel" item.
You can skip one channel or many channels at the same time, but you can still browse all channels
by using "LIST" button when "Skip Channel" is on.
5
Rename Channel
You can rename the channel when you are browsing the channel list.
Channel
1
Press "MENU" button to select "Channel " menu.
2
Press "
3
Press "
4
" buttons to select " Rename Channel " .
" button to enter this menu.(Picture A)
Press " EXIT " button to quit.
Sound System
12
Skip Channel
Off
Exchange Channel
→
...
Auto Search
...
Manual Search
...
Fine Tune
...
Rename Channel
Note:
Press "▲/▼/◄/►" and "OK" button on the remote control to select
the character, press the red button to delete the last character, press
the green button to save, press "Menu" or "Exit" button to get back.
(Picture A)
-20-
D/K
Current Channel
Menu
Channel Menu
Exchange Channel
You can exchange the current channel with another channel, please refer to "Exchange Channel".
1
Press the "MENU" button to select "Channel" menu.
2
Press the "
3
4
5
Press the "
" buttons to select " Exchange Channel " .
" button to enter this menu.
Input the Channel Exchange number (the maximum
number is 99), then press " OK " button to save your
setting.Then the two channels are exchanged.
Press "EXIT" button to exit "Channel Exchange" mode.
For example:
If you want to exchange channel 12 with channel 1, move
to channel 12 at first. Input "1" with the numerical buttons
in "Channel Exchange" window. Press "OK" button to confirm.
Channel
D/K
Sound System
Current Channel
12
Skip Channel
Off
Rename Channel
...
Exchange Channel
Auto Search
→
...
Manual Search
...
Fine Tune
...
Exchange Channel
1
12
Current Channel Exchange channel
Auto Search
You can set TV program list with "Auto Search" function quickly.
1
Press the "MENU" button to select "Channel" menu.
2
Press the "
3
Press" " button to enter "Auto Search", the TV will
search channels automatically.
All channels will be saved once searching finished.
In the course of auto searching, you can press "EXIT" to
stop the searching process.
" buttons to select "Auto Search".
Channel
D/K
Sound System
Current Channel
12
Skip Channel
Off
...
Rename Channel
Exchange Channel
...
Auto Search
Manual Search
→
...
Fine Tune
...
Searching
Current Channel
0
104.25MHz
Note:
Actually it is not necessary to operate "Auto Searching function" after the " Initial Auto Installation " .
If the TV still can not display all channels, you can use this function to start the channel
searching again.
-21-
Menu
Channel Menu
Manual Search
You can also set program list again step by step to "Manual Search"
function.
Channel
1
2
3
4
Press the " MENU " button to select "Channel" menu .
D/K
Sound System
Current Channel
12
Press the "
" buttons to select " Manual Search ".
Press the " "button to enter "Manual Search".
Skip Channel
Off
Auto Search
...
Press "
Manual Search
→
...
/
...
Rename Channel
...
Exchange Channel
" buttons to search channels. When a channel is
Fine Tune
found, the searching process will stop, the channel will be
saved with current channel number. If the program is not your
expected one, please press "
5
/
" buttons to continue the searching.
Press "EXIT" button to quit.
Manual Search
Current Channel
2
104.25MHz
Fine tuning
"Fine tune" helps you adjust the image and sound quality of specific program.
1
2
3
4
5
Press the "MENU" button to select "Channel" menu.
Press the "
" buttons to select "Fine tune".
Press " " button to enter "Fine Tune".
Press "
" to get satisfying effect .
Press "EXIT" button to quit.
Channel
D/K
Sound System
Current Channel
12
Skip Channel
Off
Rename Channel
...
Exchange Channel
...
...
Auto Search
Manual Search
...
Fine Tune
→
Fine Tune
Current Channel
2
104.25MHz
-22-
Menu
Window Menu
Aspect
Window
You can adjust the aspect as your desired.
Aspect ratio
Full Screen
H Position
255
Press "MENU" button to select "Window" menu.
V Position
0
Frequency
128
Press "
Phase
" buttons to select " Aspect Ratio ".
9
...
Auto Adjust
Press "◄/►" buttons to select "Aspect Ratio".
Aspect Ratio
H Position:
Press " ◄/► " buttons to enter the menu,
Full Screen
H Position
253
V Position
253
Phase
253
Frequency
253
Press"◄/►" buttons to select "H Position" ;
V Position:
Press " ◄/► " buttons to enter the menu,
Press"◄/►" buttons to select "V Position";
Phase:
Press " ◄/► " buttons to enter the menu,
Press"◄/►" buttons to select "Phase";
Frequency:
Press " ◄/► " buttons to enter the menu,
Press"◄/►" buttons to select "Frequency";
Auto adjust:
To verify the H Position/V Position/Phase Frequency automatically. The "Auto Adjust" is valid only
in "Full Screen" aspect.
Note :
1 . The "Auto Adjust" is valid only in "Full Screen" aspect.
2 . "H Position / V Position / Frequency / Phase / Auto Adjust" are adjustable when the Input Source
is VGA.
3 . Press "MENU" button to return main menu . Press "EXIT" button to quit.
Setting Menu
OSD Language Setting
Press "MENU" button to select "Setting" menu.
Press "
Press "
4
" buttons to select " OSD Language ".
" buttons to change the setting.
S e tting
OSD Language
OSD Position
OSD Background
Teletext Language
EXT2
Press "EXIT" button to quit.
-23-
English
Center
Opaque
Western Europe
CVBS
Blue Screen
On
Sleep Timer
Off
Colour Temperature
...
Menu
Setting Menu
OSD Position
1
Press "MENU" button to select "Setting" menu.
2
Press "
" buttons to select " OSD Position ".
S e tting
OSD Language
English
OSD Position
Center
Opaque
OSD Background
Teletext Language
3
Press "◄/►" buttons to select your wanted OSD position.
EXT2
CVBS
Blue Screen
4
Press " EXIT" button to quit.
Western Europe
On
Sleep Timer
Off
Colour Temperature
...
OSD Background
1
Press "MENU" button to select "Setting" menu.
2
Press "
3
Press "◄/►" buttons to select "Opaque" or "translucence"
" buttons to select " OSD Background ".
S e tting
OSD Language
English
OSD Position
Center
Opaque
OSD Background
Teletext Language
4
Press " EXIT" button to quit.
EXT2
Western Europe
CVBS
Blue Screen
On
Sleep Timer
Off
Colour Temperature
...
Teletext Language
1
2
3
4
Press "MENU" button to select "Setting" menu.
Press "
" buttons to select " Teletext Language ".
Press "
" buttons to change the setting.
Press "EXIT" button to quit.
S e tting
OSD Language
English
OSD Position
Center
Opaque
OSD Background
Teletext Language
Western Europe
EXT2
CVBS
Blue Screen
On
Sleep Timer
Off
Colour Temperature
...
EXT 2
In this function, you can choose the internal source of EXT2 .
S e tting
OSD Language
1
Press "MENU" button to select "Setting" menu.
OSD Position
2
Press "
" buttons to select " EXT 2 ".
Teletext Language
3
Press "
" buttons to change the setting.
4
Press "EXIT" button to quit.
English
Center
Opaque
OSD Background
Western Europe
EXT2
CVBS
Blue Screen
On
Sleep Timer
Off
Colour Temperature
...
Blue Screen
In this function, you can choose the internal source of EXT2 .
S e tting
OSD Language
1
Press "MENU" button to select "Setting" menu.
OSD Position
2
Press "
Teletext Language
3
Press "
" buttons to select " Blue Screen ".
" buttons to change the setting.
OSD Background
EXT2
Blue Screen
English
Center
Opaque
Western Europe
CVBS
On
Sleep Timer
Off
Colour Temperature
...
For example:
If you set the "Blue Screen" mode "On", a blue screen will be displayed automatically when there is
no TV signal. If you switch the "Blue Screen" mode to "Off" ,the screen will display noisy picture .
This function is only valid in TV mode.
-24-
Menu
Setting Menu
Sleep Timer
Press " MENU" button to select "Setting " menu.
Press "
/
" buttons to select "Sleep Timer ".
Press the "
" buttons repeatedly to select the duration
from current to the time TV switching to standby automatically.
You can select Off /10/20/30/60/90/120/180/240 minutes.
For example: The current time is 8:25.You can set the timer
of 30 minutes. Then the TV will be switched to standby mode
in 8:55 automatically.
S e tting
OSD Language
English
OSD Position
Center
Opaque
OSD Background
Teletext Language
Western Europe
EXT2
CVBS
Blue Screen
On
Sleep Timer
Off
Colour Temperature
...
Colour Temperature
Press "MENU" button to select "Setting" menu.
2
3
4
Press "
Press "
" buttons to select " Colour Temperature".
" buttons to enter the sub menu.
Press " ◄/► " buttons to change the Colour Temperature mode.
In "User" mode, you can adjust Red, Green, and Blue.
5
Press " ▲/▼ " buttons to select "Red/ Green/Blue".
6
Press " ◄/► " buttons to reach the desired setting.
7
Press " EXIT" button to quit.
Selected item
button
button
Red
For weaker red
Green
For weaker green For stronger green
Blue
For weaker blue
For stronger red
For stronger blue
-25-
S e tting
OSD Language
OSD Position
English
Center
OSD Background
Teletext Language
EXT2
Opaque
Western Europe
CVBS
Blue Screen
On
Sleep Timer
Off
Colour Temperature
S e tting
Colour Temperature
Red
Green
Blue
→
Colour Temperature
User
126
126
126
Teletext
Teletext is an information system broadcast by certain channels which can be consulted like a
newspaper. It also offers access to subtitles for viewers with hearing problems or who are
not familiar with the transmission language (cable networks, satellite channels, etc.).
Teletext Language Selection.
The default Teletext Language is Western Europe. If the Teletext language is not Western Europe in
your region, please kindly change the language according to the instruction in P24.
TXT/MIX
Press the TXT/Mix button to activate the Teletext mode. Press it again to view the TV program with
teletext page. You can return to normal viewing by pressing the TXT/MIX button for the third time.
SIZE
Repeatedly pressing the SIZE button doubles the character size in the following order:
Upper half of the page-> Lower half of the page-> Return to normal size.
REVEAL
Press the button once to reveal hidden information (solutions to puzzles, riddles, etc).
This button is applicable only to teletext page with puzzles, riddles, etc.)
SUBPAGE---Viewing of subpage.
Pressing the sub page button to enter the subpage mode. You can use subpage up/subpage down to
displayed subpage.
Press SUBPAGE button again to exit.
COLOUR BUTTONS
Red, green, yellow and blue field are shown at the bottom of the screen.
HOLD
Press the button once to hold page and the second time to release holding of page.
NUMBER (0-9)
Selecting a page by numeric buttons directly
You can select a page by numeric buttons directly in TXT/MIX mode.
PAGE DOWN/UP
OK
Use these direction buttons to page up/down.
Use the "OK" button to get the index page.
Note:
The buttons for Teletext function are invalid when menu displaying.You can activate the teletext
function buttons by pressing the "TXT/MIX" button .
-26-
Troubleshooting And Maintenance
Troubleshooting
Please read this user's manual before using the TV set. If you have any troubles in using this
TV set, try to solve it by the suggestions mentioned below. If you can not remove the trouble
after adopting corresponding suggestions, please contact the technical service center or
dealer authorized by us. For the sake of your safety, please do not open the cover and repair
it by yourself, or it may cause further damage to the TV set, electric shock or fire.
Q : There is no sound but picture is normal .
1.Ensure that if the volume is turned down to the lowest.
2.Check whether the TV set works is in mute mode.
Q:There is no picture or sound.
1.Ensure that the power cord has a good connection.
2.Ensure that the power switch is on.
3.The contrast and the brightness are adjusted properly.
Q:Picture is black and white or colourless.
1.Adjust the colour setup.
2.Check whether the broadcast system selection is correct.
Q:Picture is blurred or there is snowflake or noise.
1.Adjust direction and position of the right antenna.
2.The feedback cord of antenna is damaged or broken.
Q:Sound and picture has interfered.
Check whether the TV set is very near to other electrical appliance. If so, remove it away.
Q:Picture is not stable and rolling in PC mode.
1.Check whether the display frequencies and bandwidth of PC or video source are compatible format
with the TV.
2.Check the display setup of control panel in computer. If the setup is incorrect, change it by
computer programming tools.
Q:Screen displays to check signal cords.
1.Check whether the signal cords are connected to PC or video source.
2.Check whether PC or video source is work.
Q:Remote control is insensitive or does not work.
1.Check the batteries of the remote control and make sure that they are powerful and well conductive.
2.Direct the remote control to the IR sensor of the TV.
3.Check whether there are some obstacles between the remote control and IR sensor.
Maintenance
Care for your TV
Careful and regular cleaning can extend the life of the TV.
Be sure to turn the power off and remove the plug before you begin any cleaning.
Screen Cleaning
1. Wet a soft cloth in a mixture of lukewarm water and a little fabric softener or dish washing detergent.
Wring the cloth until it is almost dry, and then use it to wipe the screen.
2. Make sure not to put excess water on the screen, let it air-dry before you turn on the TV.
Cabinet Cleaning
1. Use a soft cloth with a mild soap solution to wipe the cabinet
2. Let the cabinet air-dry before turning the TV on.
Extended Absence
If the TV is not in use for a long time (such as a vacation), please remove the plug to protect against
possible damage from lightning or power surges. If you use an antenna, you may also need to
disconnect it from the back of the TV before leaving.
-27-
Troubleshooting And Maintenance
Maintenance
Screen Burn
A characteristic of Plasma and LCD TV Panels is that displaying the same image for a long period of
time may cause a permanent after-image to remain on the screen. This is called screen burn. Most
pictures shown on your TV will be constantly moving and fill the screen.
Examples of images that you need to watch out for are as follows (this is not an all-inclusive list):
1.Black Bars: I f black bars appear at the left/right or top/bottom of the screen it is recommended to
change the format so that the picture fills the entire screen.
2.TV Channel Logos: e.g. Shopping channel logos and pricing displays - especially if they are bright
and stationary. Moving or low-contrast graphics are less likely to cause ageing of the screen.
3.PIP and Multipip: Do not view for long periods of time using the PIP or Multipip functions.
4.Time Displays
5.Teletext: Do not view a stationary page for long periods of time.
6.TV/DVD Menus: e.g. Listings of DVD disk content.
7.Pause Mode: Do not leave the screen in pause mode for long periods of time, e.g. When watching
DVDs or videos.
Note: To prevent screen burn if viewing any of the above for long periods of time, reduce contrast and
brightness when viewing. Once burn-in occurs it will never disappear completely.
-28-
Display Mode
Both screen position and size will vary depending on the type of PC monitor and its resolution.
The table below shows all of the display modes that are supported:
VGA:
Resolution
Horizontal Frequency
(KHz)
Vertical Frequency
(Hz)
640X480
31 . 5
60 . 000
800X600
37.9
60.000
1024X768
48.4
60 . 000
1280X960
60 . 000
60.000
1280X1024
63 . 981
60 . 020
Sync Polarity
(H/V)
The interlace mode and SOG mode are not supported ,the H/V Separated mode and
H/V Composited mode are supported.
YPbPr/ YCbCr :
480i /60Hz
480 p/60Hz
576 i /50Hz
576p/50Hz
720p/50Hz
720p/60Hz
10 80i /50Hz 10 80i /60Hz
480 p/60Hz
576 i /50Hz
576p/50Hz
720p/50Hz
720p/60Hz
10 80i /50Hz 10 80i /60Hz
HDMI:
480i /60Hz
DVI:
640
480/60Hz
800
600/60Hz
1024
768/60Hz
Note: Some unstandard input signal is not supported.
-29-
1280
960/60Hz
1280
1024/60Hz
-30-
This symbol on the product or in the instructions means that your
electrical and electronic equipment should be disposed at the end
of life separately from your household waste.
There are separate collection systems for recycling in the EU.
For more information, please contact the local authority or your
retailer where you purchased the product.
AMOI ELECTRONICS CO ., LTD .
45 TIYU RD , XIAMEN , FUJIAN 361012 , CHINA
Http: // www.amoi.com