1
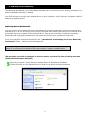
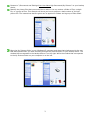
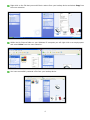
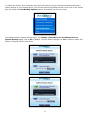
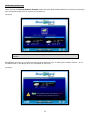
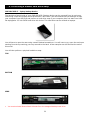
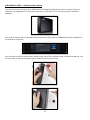
BounceBack Ultimate 14.2 Disaster Recovery Guide This guide presents you with information on how to perform a restore using BounceBack Ultimate version 14.2. Contents 1. 2. 3. 4. 5. 6. 7. Definition of Terms Manual Data Recovery Starting your computer from the USB backup drive Troubleshooting tips when attempting to start from the USB backup drive Launching a system restore while running from the USB backup drive Performing a manual hard drive swap Support 1. Definition of Terms 1. What is UEFI: The Unified Extensible Firmware Interface (UEFI) is a firmware technology that prepares a computer to boot into an operating system after it is turned on. It has been marketed as a replacement for the Basic Input Output System (BIOS). 2. What is UEFI Legacy Mode: A computer that is configured to run in UEFI Legacy Mode will prepare your computer to boot from an operating system using a traditional BIOS. This feature may also be named Legacy BIOS. 3. How to determine if your computer is booting in UEFI or Legacy Mode: Completely shut down your computer. Power on the system. As soon as the first logo screen appears, immediately press the function key that is presented to you in order to enter the computers setup utility. We provided you with some examples below. You may also contact your computers manufacturer to obtain assistance on how to access your computers setup utility or to verify if your computer was preconfigured in UEFI mode. This applies to standard BIOS and UEFI based computers. Manufacturer Acer Dell Fujitsu Gateway HP / Compaq IBM / Lenovo Sony Toshiba Function Key F2 F2 Spacebar F2 F10 / Esc then F10 F1 F2 F2 / Esc then F1 Use the arrow keys to select Boot. Your boot configuration setting will be displayed while highlighting Boot Mode 2. Manual Data Recovery The data that was backed up by BounceBack Ultimate can be recovered to your existing computer or to another Windows computer if needed. You will first have to connect your backup device to your computer. Verify that your computer is able to detect your backup device. Restoring Data in Windows XP You can connect your external drive into a Windows XP computer and simply view the contents of the external drive. You can do this by going into My Computer then double left-click on your external drive; this should open the contents of your external drive. Then all you would do is locate the necessary files/folder and copy/paste the data from the external drive into your computer’s hard drive. In XP your data files should be found within the "\Documents and Settings\Your User Name\My Documents” folder - Inside of your backup device. Note: You might have to search for your files in other locations within your backup device if you performed a backup of files that resided in custom created folders. (We provided you with an example on how to restore a picture file from a backup that was made with BounceBack Ultimate) Open My Computer. Verify that your backup device is identified by Windows. Double left-click on your backup device in order to be able to browse this device. 2 Browse to “\Documents and Settings\Your User Name\My Documents\My Pictures” on your backup device. Identify the picture files that you would like to restore. You can restore a folder of files, a single file, or a group of files. This example will show you how to perform a basic restore of a single picture file. The instructions that are given can be applied on folders and a group of files aswell. Open the My Pictures folder in your Windows XP computer and place that window next to the one that was opened when you were browsing through the pictures folder on your backup device. The window that corresponds to the backup device is on the right. While the window that corresponds to the My Pictures folder on your computer is on the left. 3 Right-click on the file that you would like to restore from your backup device and select Copy from the menu selection. Within the My Pictures folder on your Windows XP computer you will right-click on an empty space and select Paste from the menu selection. You have successfully restored a file from your backup device. 4 Restoring Data in Windows Vista, Windows 7, and Windows 8 & 8.1 You can connect your external drive into a Windows Vista, 7, or 8 & 8.1 computer and simply view the contents of the external drive. You can do this by going into Computer then double left-click on your external drive; this should open the contents of your external drive. Then all you would do is locate the necessary files/folder and copy/paste the data from the external drive into your computer’s hard drive. In Windows Vista, 7, and 8 & 8.1 your data files should be found within the "\Users\Your User Name\Documents” folder - Inside of your backup device. Note: You might have to search for your files in other locations within your backup device if you performed a backup of files that resided in custom created folders. (We provided you with an example on how to restore a PDF document from a backup that was performed by BounceBack Ultimate) Open My Computer. Verify that your backup device is identified by Windows. Double left-click on your backup device in order to be able to browse this device. Browse to “\Users\Your User Name\Documents” on your backup device. Identify the PDF files that you would like to restore. You can restore a folder of files, a single file, or a group of files. This example will show you how to perform a basic restore of a single PDF file. The instructions that are given can be applied on folders and a group of files aswell. 5 Open the Documents folder in your Windows computer and place that window next to the one that was opened when you were browsing through the Documents folder on your backup device. The window that corresponds to the backup device is on the right. While the window that corresponds to the Documents folder on your computer is on the left. Right-click on the file that you would like to restore from your backup device and select Copy from the menu selection. Within the Documents folder on your Windows computer you will right-click on an empty space and select Paste from the menu selection. You have successfully restored a file from your backup device. 6 3. Starting your computer from the USB backup drive Recommended Method Step 1 – Disconnect all USB mass storage devices from your computer Step 2 - Connect your backup device to your computer via USB and power on the backup device (If applicable) Step 3 - If using a desktop, it is highly recommend that you connect this device to a USB port on the back of the computer. Step 4 – Power On or Restart your computer You will be presented with a Startup Menu with the choice to start from your computer’s operating system or from your BounceBack Backup Drive. Select the option to start from your BounceBack Backup Drive. (Example: You will need to utilize your mouse in Windows 8 and 8.1 when making your selection) (Example: You will use the up and down arrows to highlight your selection and then press the Enter key to choose it on computers running Windows XP, Vista, and Windows 7) Note: This feature must first be enabled via the Backup Options section in BounceBack Ultimate 14.2. You will not have success in enabling this feature if your computer’s hard drive has already failed or if you attempt to enable this feature using a different computer. The BounceBack Ultimate 14.2 User Guide contains information on how to enable this feature during normal use. We revisited the Backup Options feature below to give users an example on how the feature can be enabled. 7 To enable this feature your computer must still be functional and you must have already performed a system backup to your backup device. You will then access the Backup Monitor which runs in the system tray and select the View Backup Options feature. An example can be seen below. The Backup Options window will then open. The Display a Start Menu for the Backup Drive on System Startup toggle is set to No by default. You will need to change it to Yes in order to enable this feature. Examples can be seen below. 8 Advanced Method Step 1 – Disconnect all USB mass storage devices from your computer Step 2 - Connect your backup device to your computer via USB and power on the backup device (If applicable) Step 3 - If using a desktop, it is highly recommend that you connect this device to a USB port on the back of the computer. Step 4 – Power On or Restart your computer Step 5 – Press the proper function key on your keyboard to launch the BIOS boot options on your computer. We provided you with some examples below. You may also contact your computers manufacturer to obtain assistance on how to launch the BIOS boot options. This applies to standard BIOS and UEFI based computers. Manufacturer Acer Dell Fujitsu Gateway HP / Compaq IBM / Lenovo Sony Toshiba Function Key F12 F12 Spacebar F10 F9/ Esc then F9 F1 F8 F12 Select the option to start from USB or Removable Drive on BIOS based computers Select the option to start from BounceBack on UEFI based computers (Example) Important Note: Running your system from the USB backup drive is not a permanent solution to a failed system drive. There are drawbacks to running your system from the booted USB recovery drive. To name a few: 1. The Recovery drive may run slower on some systems. 2. The page-file in Windows Vista and 7 is not supported; some applications may not run if the system does not have enough RAM memory (1GB or above). 3. Hibernation and sleep may not function properly on some systems. 9 4. Troubleshooting tips when attempting to start from the USB backup drive Note: USB Boot is not a feature that is supported on all computers and is not the only option to restore a computer in the event of an operating system or hard drive failure. There are a few systems that may not be able to start from the USB backup drive without first altering some settings in the BIOS. To do this you have to start your computer and immediately press a function key, such as the F1, F2, F10 or F12 key. Once the Boot Menu is displayed locate the option for USB Hard Drive, USB Device etc… See the examples below or refer to your computer’s documentation for more information. Note: The following table contains information that is intended as a guide only. Consult your computer’s documentation or the manufactures’ website for the latest information. Altering the BIOS settings to enable USB Boot To start the BIOS program to make these changes, you must restart your system and then press the appropriate function key to enter the BIOS program. See the examples below or refer to your computer’s documentation for more information. Manufacturer Acer Dell Fujitsu Gateway HP / Compaq IBM / Lenovo Sony Toshiba Function Key F2 F2 Spacebar F2 F10 / Esc then F10 F1 F2 F2 / Esc then F1 Some of the settings you may need to change include: Post Settings – May need to be set to thorough Enable External Device Boot – Should be set to Enabled Quick Boot – Needs to be Disabled Diagnostic Mode – Set to Enabled • Make sure that you only have one USB mass storage device attached to your computer and that it is directly attached to an open USB 2.0 port on your computer. (Or USB 3.0 in the event that you are using BounceBack Ultimate 14 with a USB 3 hard drive enclosure and a computer that has built-in support for USB 3.0) You will not be able to start your computer from USB if you are using a USB 1.0 device or if the backup drive is attached to a USB hub or docking station. Note: You might not be able to start your computer from a USB 3.0 device if you are using a USB 3.0 PCI Express card adapter on your desktop. 10 5. Launching a system restore while running from the USB backup drive Identifying your System Environment You will notice that your computers desktop will look the same as if you were to start your computer normally. Your desktop may load at a slower speed now that you are booting your system via a USB connection. Once your desktop is fully loaded the BounceBack software will inform you that you have started from your backup device. This balloon message will appear for a few seconds but you may also hover over the Backup Monitor to verify that you have started your computer from the USB backup drive. (Examples) Balloon Message Hovering over the Backup Monitor To launch a system restore you will first need to click on the Backup Monitor. Clicking on the Backup Monitor will present you with the option to Launch Restore Process. Note: Memory intense applications might not function properly on your computer when starting your computer via USB. We recommend that you perform a recovery of your system if you need to use these applications. 11 Performing a Recovery Upon clicking the Launch Restore Process button the main BounceBack software will launch and prompt you to select a target drive to restore your system to. (Example) Note: You must have a functional primary internal hard drive in order to perform a restore. BounceBack will ask you to confirm the target drive selection prior to starting the system restore. All of the data found on the target drive will be erased at this point. (Example) 12 Once the restore process is complete you will receive a Restore Complete message. (Example) The recovery is now complete Power down your computer Disconnect your backup device from your computer Restart your computer if needed 13 6. Performing a manual hard drive swap CMS ABS USB 3 – laptop backup device The hard drive found inside of your CMS ABS USB 3 backup device can be removed from its enclosure. Performing a hard drive swap should be done as a last resort. We recommend that you attempt to start your computer from USB first and perform a hard drive swap if your computer does not start from USB. We equipped a 2.5 inch SATA hard drive this device. This hard drive can be utilized on laptops. You will have to open the case using a small flathead screwdriver. You will have to pry open the enclosure starting from the top working your way around to the back. A few examples can be found at the end of this email. You will then perform a physical hard drive swap. TOP BOTTOM SIDE You must uninstall BounceBack Ultimate from the swapped backup hard drive. 14 CMS ABSPlus USB 3 – desktop backup device The hard drive found inside of your CMS ABS USB 3 desktop backup device can be removed from its enclosure. We equipped a 3.5 inch SATA hard drive in this device. This hard drive can be utilized on desktops. You must first power off your backup device and remove the power and USB cables that are attached to the hard drive enclosure. You will then remove the two screws found at each end of the enclosure using a Phillips screwdriver. You will then have to pull the enclosure apart. Examples can be seen below. 15 Now that you have removed the screws, you may remove the top cover from the enclosure case. The hard drive is held together by Phillips screws on both sides. You will need to use your Phillips screw driver to remove the screws that are found on both sides of the hard drive. 16 The hard drive can then be ejected after you have removed the screws. You will then perform a physical hard drive swap. You must uninstall BounceBack Ultimate from the swapped backup hard drive before you attempt to perform future backups. Note: If you own a third party external hard drive it is advised that you contact their Technical Support department to receive information on how to disassemble your external hard drive. 17 7. Support •To obtain the most recent copy of the Disaster Recovery Guide for this software visit the Guides and Manuals section in our support forum. http://www.cmsproducts.com/boards/forum/11/guides-andmanuals •If you require assistance, you may contact our technical support department directly. 1. Email: [email protected] Mon - Fri 2. Support Forum: http://www.cmsproducts.com/boards 18