1
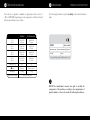
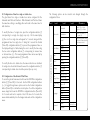
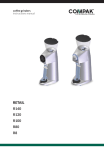
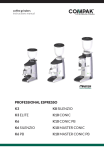
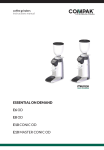
Notes
K-10 Conic Fresh
K- 8 Fresh
Instructions Manual
K-10 Conic Fresh K-8 Fresh
molinos de café
moulins à café
kaffeemühlen
macinadosatori
Index
1 - Description
2 - Technical characteristics
3 - Identification
1 Description
ORIGINAL INSTRUCTIONS
Congratulations. You have just acquired one of the most state-of-the art
coffee grinders on the market today. We appreciate your patronage and
sincerely hope that you enjoy the product.
The Fresh line of grinders is designed to grind roasted coffee beans
on demand, in order to obtain the freshest, high quality coffee possible.
Quick and easy operation through a single or double timed dose can be
obtained at the precise level of coarseness or fineness desired by the
user.
4 - External Features
5 - Installation
6 - Adjustments
7 - Functions
8 - Configuration
9 - Cleaning
10 - Maintenance
11 - Safety measures
12 - Declaration of EC Conformity
CYCLE
FUNCTION STOP
K-8 Fresh
5 sec.
20 sec.
5
sec.
20 sec.
K-10 Conic Fresh
2 Technical characteristics
3 Identification
The Fresh line of grinders is available in single phase, with a choice of
110V or 220V-240V, depending on local requirements. Further electrical/
technical specifications are as follow:
K-8 Fresh
K-10 Conic Fresh
110 v
60 hz
280w/150w
1030 rpm
680w/370w
265 rpm
220 v
60 hz
420w/198w
1600 rpm
825w/430w
375 rpm
230 v
50 hz
400w/200w
1300 rpm
800w/450w
325 rpm
240 v
50 hz
435w/210w
1350 rpm
850w/460w
311 rpm
Production 7 gr.
Burrs
Net weight
Height x width x depth
2.5 s
1.6 s
83 mm.
68 mm. conical
15.2 Kg.
17 Kg.
ORIGINAL INSTRUCTIONS
The following information is printed indelibly on the technical features
plate:
MODEL
ELECTRICAL DATA
OPTIONS
SERIAL NUMBER
DATE OF MANUFACTURE
ORDER
OBSER.
Compak S.A. Bigues i Riells · 08415 Barcelona · Spain
660 x 210 x 380 mm
i
NOTE: The manufacturer reserves the right to modify the
components of the machine according to the requirements of
specific markets or due to the results of technological advances.
4 External Features
5 Installation
All models in the Fresh line of grinders share the following external
features, independent of burr size, voltage or model.
1 Hopper lid
2 Hopper
Bean trap 3
lever
4 Hopper security
screw
6 Main display
Configuration
7 buttons
Grind adjustment 5
knob
8 Refill button
9 Exit chute
Fork
adjustment 13
screw
Dosis button 11
3 position 15
switch
ORIGINAL INSTRUCTIONS
The grinder should rest on a flat, hard surface in close proximity to the
coffee machine. To guarantee proper operation, the minimum work space
should measure at least 310 mm wide by 400 mm deep by 800 mm high.
Unpack the grinder carefully and place it in the assigned work space.
Before placing the bean hopper on the grinder, loosen the security screw
found on the upper collar of the grinder (4). Place the bean hopper
(2) on the upper part of the grinder so that the bean trap lever (3) is
positioned on the right side of the grinder in the CLOSED position (Fig. 1).
Once the bean hopper is placed on the grinder, rotate it clockwise until it
is firmly in place and can rotate no further. If desired, replace the hopper
security screw (4) to ensure the hopper cannot be removed manually.
Place beans in the hopper and replace hopper lid (1). Finally, the bean
trap lever (3) must be in an open position, allowing the beans to fall into
the grinding chamber.
Before plugging in the grinder, confirm that the electrical configuration
found on the description plaque on the grinder matches the power on
site. Once confirmed, plug in the grinder and press the 3 position switch
(15) to position 2. The refill button (8), main display (6), and 3 position
(15), will all illuminate once connected when the power (Fig. 1). If the
bean hopper has not been installed properly, the main display (6) will
show error message “Hopper!”
Upper
10 portafilter
holder
Lower
12 portafilter
holder
14 Coffee tray
Fig. 1
7 Functions
6 Adjustments
Portafilter Forks – Loosen the two adjustment screws (13), found on
each side of the upper portafilter fork (10), and slide downward on the
adjustable lower portafilter fork (12) until the appropriate space remains to
accommodate operator’s specific portafilter(Fig. 2). Once proper portafilter
spacing adjustment is reached, retighten the two adjustment screws (13).
Grind Point Adjustment - Place portafilter in portafilter fork (10) and
push the refill button (8) until ground coffee begins to dispense from exit
chute (9) and falls into portafilter. The grinders are pre-set and shipped at
an espresso grind setting. To adjust the grind point, simply turn the grind
adjustment knob (5). A clockwise adjustment will render a finer grind and a
counter clockwise adjustment will render a more coarse grind.
ORIGINAL INSTRUCTIONS
To activate the grind function, the dosis button (11) must be pressed
using the portafilter which should be resting in the portafilter fork
assembly (10, 12).
Once the dosis button (11) is activated, ground coffee will begin streaming
from the exit chute (9) and fall into the portafilter. The Refill button (8)
should be used to top off the portafilter if desired.
There are three different modes of to choose from: Automatic, Preselect,
and Manual, which are described in detail below. The mode is selected
using the configuration menu on the main display (Fig. 3).
!
Caution: It is important to have the grinder free of beans, or running
when adjusting from a coarse to a finer grind point. Burr blockage can
occur if adjusted to a finer grind point with beans in the grind chamber.
When turning the grind adjustment knob (5) it should be noted that a grind
point reference scale of 1 to 100 will appear on the main display (6). This
scale should be used as a reference in setting the desired grind point.
Fig. 3
Fig. 2
ORIGINAL INSTRUCTIONS
7.1. Automatic Mode
In this mode, user should press/release the dosis button (11) once for
a single dosis and twice for a double dosis. The display screen (6) will
indicate an icon representing either a single or double dose, along with the
programmed time of the dose counting down from total dose time to zero.
Also, once the dose cycle has been activated, the dosis button (11) can be
pressed/released, to suspend the cycle. If the dose pulse button is pressed/
released again, within 8 seconds, the cycle will continue from the point at
which it was suspended. If more than 8 seconds pass, the dose cycle will
start a new, complete dose cycle.
7.2. Pre-select Mode
In this mode, a single or double dose setting is selected using the
configuration buttons (7). The pre-selection of a single or double dose
will remain active until changed by selecting another dose option. The preselection will be illustrated on the display screen with the corresponding
single or double icon.
The pre-selected dose is activated with a single press/tap of the dosis button
(11). The display screen (6) will indicate an icon representing either a single
or double dose, along with the programmed time of the dose counting
down from total dose time to zero.
Also, once the dose cycle has been activated, the dosis button (11) can be
pressed/released, to suspend the cycle. If the dose pulse button is pressed/
released again, within 8 seconds, the cycle will continue from the point at
which it was suspended. If more than 8 seconds pass, the dose cycle will
start a new, complete dose cycle.
7.3. Manual Mode
The Manual mode dose is activated with a press of the dosis button (11)
and will continue grinding while this button is held down. The display screen
(6) will show an icon representing Manual dose mode, accompanied by a
timed counter which will continue counting up as the dosis button (11)
is held down.
7.4. Refill Button
If you press and hold down on the refill button (8), you can manually refill
the porta with the desired amount of ground coffee.
7.5 3 Position Switch
The power switch comes with 3 different positions of use. Position 0 is
off, position 1 is for manual use in case of electronical malfuntion and
position 2 will work the grind in the automatic mode.
8
Configuration
There are two distinct configuration differences which are as follows:
• Configuration of time for a single or double dose.
Procedure to follow by the operator that can be realized at any time
without password protection.
• Configuration of the grinder’s Main Menu
Procedure to follow when using the advanced features found in the
main menu that can be password protected.
ORIGINAL INSTRUCTIONS
To modify the time of a single dose, press the configuration button (7)
corresponding to a single dose (single cup icon). On the main display
(6) the icon for a single dose will appear for 5 seconds, along with the
programmed time for a single dose. If during the 5 seconds the Central
(Menu-OK) configuration button (7) is pressed, the programmed time on
the display will begin to flash, allowing the user to modify the time using
the two outer configuration buttons (7) corresponding to increase time
or decrease time (+,-). This newly programmed time can be saved by by
pressing the configuration button (7) (Menu-OK).
To modify the time of a double dose, the same instructions as described
for a single dose should be followed, however the configuration button (7)
corresponding to double dose should be pressed (two cup icon).
8.2 Configuration of the Grinder’s Main Menu
To access the grinder’s main menú, hold down the CENTRAL configuration
button (7) (Menu-OK) for 3 seconds. Use the SIDE configuration buttons
(+,-) to toggle through menu options, and use the Central configuration
button (Menu-OK) to confirm the selected option. To exit the configuration
menu, simply hold down the CENTRAL configuration button (Menu-OK)
for 3 seconds until exit is complete. Also, if left alone for 5 seconds, the
menu will automatically store the changes made and exit the configuration
menu.
The following options can be selected and changed through the
configuration Menu:
Level 1
Level 2
Push mode
# of coffees
CONFIGURATION MENU
8.1. Configuration of time for a single or double dose.
The grind times for a single or double dose can be configured for the
Automatic and Pre-Select functions. Both Automatic and Pre-Select share
the same time setting so modifying either will result in the same time for
both functions.
Time
Sound
Level 3
Level 4
Automatic
1 push (11)= 1 dosis
2 pushes (11)= 2 dosis
Preselection
Select 1 or 2 dosis (7)
+ 1 push (11)
Manual
Amount of ground coffee
based on the time that the
dosis button is held
Absolute
Relative
Reset Relative to 0/
Time
Date
Activate
Deactivate
See Message
Message
Edit Message
Brightness
Grams per coffee
Burr
Amount of Kgs
Change Alarm
Activate/Deactivate
Set Grinding
Point
Adjust to 0/
Language
Castellano
English
Français
Deutsch
Italiano
Português
Password
Observations
Activate
Deactivate
Introduce 4 digit
PIN defined by user
9 Cleaning
9.1. General cleaning
To guarantee the correct operation of the machine as well as the quality
of the ground coffee, we should periodically clean the parts that come into
contact with the coffee (at least once a week). Before performing any type
of maintenance
work, the following indications must be taken into consideration:
• Always turn off the machine using the 3 position switch (15).
• Disconnect the machine from the power supply.
• Do not submerge the machine in water or use waterjet.
ORIGINAL INSTRUCTIONS
holders (10,12) should be wiped periodically to prevent build up of
coffee grounds and oils It is recommending to clean the outer portions
of the grinder with a damp cloth and mild cleaning soap.
9.2. Cleaning of the coffee bean hopper
Before cleaning, make sure that there are no beans left in the hopper (2).
Close the hopper opening lever (3), turn it counter-clockwise until it comes
off the grinder. Clean it with a damp cloth or soap and water to eliminate
the oil residues from the coffee, washing it carefully and then drying. Replace
the hopper and turn it clockwise back into position. If it is not correctly
positioned, a warning message will appear on the display.
9.3. Cleaning the coffee exit chute
It is very important to maintain the exit chute (9) clean of coffee in order
to assure the consistency of the dosis and the continued functioning of the
grinder.
A tubular chute brush should be used for this cleaning process. Simply inset
the brush up into the mouth of the exit chute (9) (Fig. 4), carefully twisting
the brush to remove any remaining grounds in the chute.
!
Caution: Do not force brush too high up the chute as there is a
fragile rubber dosis curtain at the upper end of the chute. Damage to the
rubber curtain can result in less precise dosing.
Also, the dosis button (11) along with the upper and lower portafilter
Fig. 4
10 Maintenance
11 Safety Measures
9.1 General warnings
Before performing any type of maintenance work, the following indications
should be taken into consideration:
• Always turn off the machine using the 3 position switch (15).
• If a blockage occurs, please contact your sales representative.
• Disconnect the machine from the power supply.
In the event of a breakdown or malfunction, turn the machine off. Do not
try to repair it or intervene directly. Please call your local technical service.
Note: manufacturer cannot accept responsibility for any damage
caused by improper use of the machine or failure to respect the safety
measures indicated below.
Users are asked to pay careful attention to the following indications:
Additional safety elements incorpated into our grinder models:
• Hand protector located in the doser in order to avoid fingers accidentally getting caught in the grinding burrs
• Special fixing screw to hold the hopper in place
i
Note: Failure to respect this warning could endanger the safety of
both the machine and user.
9.2. Regular maintenance
To guarantee the efficiency and correct operation of the grinder, it is essential to follow manufacturer instructions and ensure that all maintenance
work is carried out by qualified staff. Regular, monthly programmed inspections are recommended of the parts subject to wear and tear. Systematically check the usage level of the burrs. The perfect condition of the burrs
guarantees an even grind of the coffee and optimum quality of the product
served. It also reduces electrical consumption and the risk of the motor and
burrs overheating.
i
Note: Based on extensive experience and a medium-hard coffee
blend, we recommend replacing the burrs on the K-10 Conic Fresh after
grinding 1500 Kg/3300 Lbs of coffee and on the K-8 Fresh after grinding
400 Kg/880 Lbs of coffee.
ORIGINAL INSTRUCTIONS
i
i
•
The coffee grinder should only be used for grinding coffee beans.
• Do not use the machine to grind other types of foods such as nuts,
dried fruits or to fine-grind granulated foods such as sugar, etc.
• The appliance is not to be used by children or persons with reduced
physical, sensory or mental capacities, or lack of experience and knowledge, unless they have been given supervision or instruction.
• Any other use of the machine will be considered improper and dangerous.
• Do not allow liquids to come into contact with the internal or external
surfaces of the machine at any time, except for those parts that have
been expressly referred to in the “CLEANING” section. If, for any reason,
this should occur, immediately disconnect the machine from the power
supply and dry all surfaces carefully. Should it be necessary to access the
internal parts of the machine, where the electrical components are located, take the machine to your local technical service.
• In the event of any broken components or intervention, we recommend that you contact your local technical service, who will repair or
replace the part, guaranteeing the maintenance of the safety standards.
• Replacement of the main power cable of any grinder model should
only be done by an authorized supplier.
12 Declaration of EC Conformity
In accordance with European
community directives, quality certificates have been applied. All
materials have been adapted and
technical reports are available at
our offices.
06/95/EC of 12/12/2006 on the
harmonization of the laws of
the Member States relating to
electrical equipment designed for
use within certain voltage limits.
04/108/EC on the approximation
of the laws of the Member States
relating to electromagnetic compatibility.
02/96/EC of 27/01/2003 on the
approximation of the laws of the
Member States on waste electrical
and electronic equipment (WEEE).
06/42/EC amending Directive
95/16/EC on the approximation
of the laws of the Member States
relating to machinery.
Environment
Do not throw the
appliance away with
the normal household
waste; hand it in at an
official recycling
collection point. By doing
this, you will help to preserve the environment.
REG.
1935/2004
amending
Directive 89/109/EC on the
approximation of the laws of
the Member States relating to
material and objects destinated
to make contact with nutritional
products.
03/108/EC amending Directive
2002/96/EC on waste electrical
and
electronic
equipment
(WEEE).
The Legal Representative
Notes