1
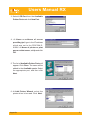
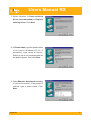
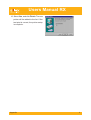
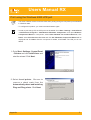
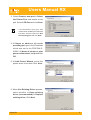
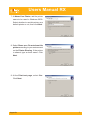
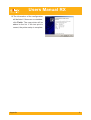
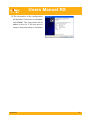
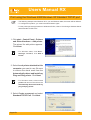
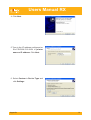
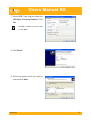
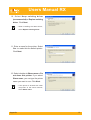
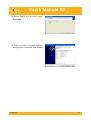
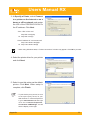
Users Manual RX
Appendix
Other Printing Methods
Print using the Windows NT 4.0 LPR port
TIP
- The Aficio G status monitor cannot be used when printing through a LPR printer port embedded
in the Windows NT 4.0.
- To configure this product, you must have the Administrator rights.
- In order to print using LPR, LPR port must be added. Go to Start - Settings - Control Panel Network and select Services. Click Add, select Microsoft TCP/IP Printing, and click OK.
Component is installed. Restart the computer.
1. Go to Start-Settings-Printers and click
Add Printer and start the wizard. At
Add Printer Wizard, select My
Computer and click Next.
2. Click Add Port and create a new port.
If you have already created a port
when you installed the PRICOM R9100U, select the port from the list and
continue with step 6.
Appendix
1
Users Manual RX
3. Select LPR Port from the Available
Printer Ports and click New Port.
4. At Name or address of server
providing lpd, type in the IP address
which was set to the PRICOM R9100U. At Name of printer or print
queue on that server, add lp and click
OK.
5. The list of Available Printer Ports will
appear. Click Close. The name will be
added to the Available ports. Select
the appropriate port, and then click
Next.
6. At Add Printer Wizard, select the
printer driver to be used. Click Next.
Appendix
2
Users Manual RX
7. Select whether to Keep existing
driver (recommended) or Replace
existing driver. Click Next.
8. At Printer name, type the printer name
to be used in Windows NT 4.0. If
necessary, type name of choice.
Select to use or not use this printer as
the default printer, then click Next.
9. Select Shared or Not shared according
to your environment. If the printer is
shared, type a share name. Click
Next.
Appendix
3
Users Manual RX
10. Select Yes, and click Finish. The new
printer will be added to the list. If the
test print is correct, the printer setup
is complete.
Appendix
4
Users Manual RX
Print using the Windows 2000 LPR port
TIP
NOTE
- The Aficio G status monitor cannot be used when printing through a LPR printer port embedded
in Windows 2000.
- To configure this product, you must have Administrator rights.
- In order to print using LPR, the LPR port must be added. Go to Start - Settings - Control Panel
- Add /Remove Programs - Add/Remove Windows Components and open Windows
Components Wizard. In Component, select Other Network File and Print Services, click
Detail, select Print Services for Unix and click OK. Windows Component Wizard will be
displayed and click Next. After the component is added, click Finish. The LPR port is now
added.
1. Go to Start - Settings - Control Panel
- Printers and click Add Printer and
start the wizard. Click Next.
2. Select Local printer. Be sure to
remove a check mark from the
Automatically detect and install my
Plug and Play printer. Click Next.
Appendix
5
Users Manual RX
3. Select Create a new port in Select
the Printer Port and create a new
port. Select LPR Port and click Next.
NOTE
- If the destination print port was
created when installing the PRICOM
R-9100U, select the port from Use
the following port and click Next.
4. At Name or address of server
providing lpd, type in the IP address
which was set to the PRICOM R9100U. At Name of printer or print
queue on that server, add lp and click
OK.
5. At Add Printer Wizard, select the
printer driver to be used. Click Next.
6. When Use Existing Driver appears,
select whether to Keep existing
driver (recommended) or Replace
existing driver. Click Next.
Appendix
6
Users Manual RX
7. At Name Your Printer, add the printer
name to be used in Windows 2000.
Select whether to use this printer as a
default printer or not, then click Next.
8. Select Share as or Do not share this
printer according to your environment
on the Printer Sharing. If the printer
is shared, type a share name. Click
Next.
9. At the Print test page, select Yes.
Click Next.
Appendix
7
Users Manual RX
10.The information of the configuration
will be listed. If there are no mistakes,
click Finish. The new printer will be
added to the list. If the test print is
correct, the printer setup is complete.
Appendix
8
Users Manual RX
Print using the Windows XP/Windows Server 2003 LPR port
TIP
NOTE
- The Aficio G status monitor cannot be used when printing through a LPR printer Port embedded
in Windows XP, Windows Server 2003.
- To configure this product, you must have Administrator rights.
- The following example uses Windows XP. If you use Windows Server 2003, the screen will be
different.
- In order to print using a LPR, the LPR port must be added. Go to start-Control Panel-Add or
Remove programs-Add/Remove Windows Components and open Windows Components
Wizard. In Components, select Other Network File and Print Services, click Details, select
Print Services for Unix and click OK. Windows Components Wizard will be displayed, and
then click Next. After the component is added, click Finish. The LPR port is now added.
1. Click start – Control Panel – Printers
and Other Hardware – Add printer.
The wizard for add printer appears.
Click Next.
2. Select Local printer attached to this
computer. Be sure to remove a check
mark from the Automatically detect
and install my Plug and Play printer.
Click Next.
Appendix
9
Users Manual RX
3. Select Create a new port in Select a
Printer Port and create a new port.
Select LPR Port and click Next.
NOTE
- If the destination print port was
created when installing the PRICOM
R-9100U, select the port from Use
the following port and click Next.
4. At Name or address of server
providing lpd, type in the IP address
which was set to the PRICOM R9100U. At Name of printer or print
queue on that server, add lp and click
OK.
5. At Install Printer Software, select the
printer driver to be used. Click Next.
6. When Use Existing Driver appears,
select whether to Keep existing
driver (recommended) or Replace
existing driver. Click Next.
NOTE
Appendix
- If the latest driver is installed, select
Replace existing driver.
10
Users Manual RX
7. At Name your printer, add the printer
name to be used in Windows PC.
Select whether to use this printer as
a default printer or not, then click Next.
8. Select Share name or Do not share
this printer according to your
environment on the Printer Sharing.
If the printer is shared, type a share
name. Click Next.
9. At the Print test page, select Yes.
Click Next.
Appendix
11
Users Manual RX
10.The information of the configuration
will be listed. If there are no mistakes,
click Finish. The new printer will be
added to the list. If the test print is
correct, the printer setup is complete.
Appendix
12
Users Manual RX
Print using the Windows 2000/Windows XP Standard TCP/IP port
TIP
- The following example uses Windows XP. If you use Windows 2000, the screen will be different.
- To configure this product, you must have Administrator rights.
- For the printer port setup procedure in Windows XP SP2, refer to “Print Using a Windows Server
2003 Standard TCP/IP Port”.
1. Click start – Control Panel – Printers
and Other Hardware – Add printer.
The wizard for add printer appears.
Click Next.
NOTE
- For Windows 2000, click Start Settings- Printers, click Add a
Printer.
2. Select Local printer attached to this
computer you want to use. Be sure
to remove the check mark from the
Automatically detect and install my
Plug and Play printer. Click Next.
NOTE
- For Windows 2000, select Local
printer and remove a check from the
Automatically detect and install my
plug and play printer.
3. Select Create a new port and select
Standard TCP/IP Port. Click Next.
Appendix
13
Users Manual RX
4. Click Next.
5.Type in the IP address configured on
the PRICOM R-9100U in printer
name or IP address. Click Next.
6. Select Custom in Device Type and
click Settings.
Appendix
14
Users Manual RX
7. Select LPR. Type in lp and check the
LPR Byte Counting Enabled. Click
OK.
NOTE
- Click OK. It will take you back to Step
6. Click Next.
8. Click Finish.
9. Select the printer driver you want to
use and click Next.
Appendix
15
Users Manual RX
10. Select Keep existing driver
(recommended) or Replace existing
driver. Click Next.
NOTE
- When installing the latest driver,
select Replace existing driver.
11. Enter a name for the printer. Select
Yes to make this the default printer.
Click Next.
12. Select whether to Share name or Do
not share this printer. If you select
Share name, you can type the printer
name you want to use. Click Next.
NOTE
Appendix
- If the printer is shared with other
computers in the same network,
select Share name.
16
Users Manual RX
13. Select Yes to do a print test page.
Click Next.
14. If the test page is printed properly,
configuration is complete. Click Finish.
Appendix
17
Users Manual RX
Print using the Windows Server 2003 Standard TCP/IP port
TIP
- The Aficio G status monitor cannot be used when printing through a Standard TCP/IP printer
port embedded in Windows 2003 server.
- To configure this product, you must have Administrator rights.
1. Click start - Control Panel - Printers
and Other Hardware - Add a printer.
Click Next.
2. Check local printer attached to this
Computer you want to use. Be sure
to remove a check mark form the
Automatically detect and install my
Plug and Play printer. Click Next.
3. Select Create a new port and select
Standard TCP/IP Port. Click Next.
Appendix
18
Users Manual RX
4. Click Next.
5. Type in the IP address configured on
the PRICOM R-9100U in printer
name or IP address. Click Next.
6. Click Finish.
Appendix
19
Users Manual RX
7. Select the printer driver you want to
use and click Next.
8. Select Keep existing driver
(recommended) or Replace existing
driver. Click Next.
NOTE
- When installing the latest driver,
select Replace existing driver.
9. Enter a name for the printer. Click
Next.
Appendix
20
Users Manual RX
10. Select whether to Share name or Do
not share this printer. If you select
Share name, you can type the printer
name you want to use. Click Next.
NOTE
- If the printer is shared with other
computers in the same network,
select Share name.
11. Select Yes to do a print test page.
Click Next.
12. If the test page is printed properly,
configuration is complete. Click Finish.
Appendix
21
Users Manual RX
Print using the Windows 2000/WindowsXP/Windows Server 2003
IPP port
TIP
NOTE
- The Aficio G status monitor cannot be used when printing through the IPP printing function
embedded in Windows 2000, Windows XP, Windows Server 2003.
- To configure this product, you must have Administrator rights.
- The following example uses Windows XP. If you use Windows 2000 or Windows Server 2003,
the screen will be different.
- When printing using IPP, your web browser needs to have proper proxy server settings in order
to print over the Internet. For Internet Explore 4/5, right-click Internet from the Start menu, open
Internet properties - Connections - LAN settings and then configure for your proxy server.
1. Go to start-Control Panel-Printers
and Other Hardware and double click
Add a printer. Add Printer Wizard will
start. Click Next.
2. Select A network printer, or a printer
attached to another computer for
printer connection. Click Next.
Appendix
22
Users Manual RX
3. At Specify a Printer, select Connect
to a printer on the Internet or on a
home or office network and assign
the URL of the PRICOM R-9100U or
the IP address. Click Next.
- If the URL is "abc.com"
http://abc.com/ipp/lp
or http://abc.com/ipp
-If the IP address is "192.168.20.190"
http://192.168.20.190/ipp/lp
or http://192.168.20.190/ipp
- When using Windows 2000, a "Printer connections" window may appear. Click OK to proceed.
NOTE
4. Select the printer driver for your printer
and click Next.
5. Select to use this printer as the default
printer. Click Next. When setup is
complete, click Finish.
TIP
Appendix
- To print via the proxy server, be sure
to set up the proxy server on your
Web browser. In Internet Explorer4/
5, go to start-Internet and then right
click. Go to Internet PropertiesConnections-LAN Settings. You will
see the display on the right.
23
Users Manual RX
Using a Web Browser
The PRICOM R-9100U has HTTP which enables you to check or change the configuration
as well as checking the device status.
TIP
- For Web browser, we recommend Netscape Navigator 4.0 (or higher) or Internet Explorer 4.0
(or higher) version. If a different web browser is used, it must be compatible with HTTP 1.0
(RFC1945) and HTML 2.0 (RFC1866).
- The information may be different depending on the products.
- The PRICOM R-9100U cannot be initially configured using a Web browser.
- When using the Web browser, the TCP/IP protocol must be loaded and an IP address must be
assigned to the PRICOM R-9100U.
- If the firmware version of the PRICOM R-9100U is 2.0.0 or newer, the model name will be
displayed as "R-9100U+."
Connecting with the PRICOM R-9100U using a Web browser
Type the IP address of the PRICOM R-9100U in the Web browser to open the PRICOM’s
web page.
Example: http://192.168.20.190/
If this product was assigned
“192.168.20.190”, enter
[http:// 192.168.20.190/].
- The manual explanations are based on the English screen shot descriptions.
NOTE
Appendix
24
Users Manual RX
Display Status
Printer status and system information of the printer, which the PRICOM R-9100U is connected
to, can be seen here.
Printer Status
The information for a printer connected to
this product is displayed. A printer name and
the status information of a printer are
displayed.
System Status
This screen displays the status information
and configuration for this product.
Appendix
25
Users Manual RX
Change the configuration
Print server functions
It is possible to change the configuration of this product by using a web browser. When
changing the configuration of a PRICOM from a web browser, a user name and password
are required.
TIP
Appendix
- Input root for the username then click
OK, or enter the password if you have
created one. The default is no
password (Blank).
26
Users Manual RX
Restart Print Server
The PRICOM R-9100U can be reset from
the web browser. The PRICOM R-9100U is
rebooted by choosing Yes on the reboot
screen.
Displaying our home page
silex technology, Inc. (Information)
The silex technology web page can be linked
from the PRICOM R-9100U. If you have
questions about our product, please refer to
our web page.
Appendix
27
Users Manual RX
Other functions
This chapter explains other functions about the PRICOM R-9100U. A web browser or TELNET
is required for configuration.
NOTE
- For further details on how to use the PRICOM R-9100U Web browser, TELNET or the procedure
to change the PRICOM R-9100U configuration, refer to "Connecting with the PRICOM R-9100U
using a Web browser" or "About TELNET" in this section.
IP filtering
The PRICOM can define scopes of IP addresses to allow or deny communication. When
setting up for "DENY", communications from the designated IP address scope will be prohibited.
When setting up "ALLOW", communication will be allowed only from the designated IP
addresses. Up to 4 IP address scopes can be registered for the DENY/ALLOW functions. IP
filtering can protect illegal access from unexpected network client users.
(Example)
To allow access from the IP address scope between 192.168.20.1-192.168.20.50 using a web browser;
1. Log in to the PRICOM via a web
browser, then go to the "TCP/IP" tab.
2. Enter the necessary parameters at "IP
filter Configuration" in the "TCP/IP"
item. For this case, enable "ALLOW"
at the Filter Mode, then enter
192.168.20.1 and 192.168.20.50 for
both "Start Address" and "End
Address" area respectively.
Appendix
28
Users Manual RX
About TELNET
After assigning an IP address to the PRICOM R-9100U, parameters can be configured with
TELNET in your TCP/IP or SNMP software. TELNET allows you to display and set parameters
for the PRICOM R-9100U by using the following commands. Below are some examples.
- Only one PRICOM unit can be connected with a PC over TELNET.
TIP
NOTE
- The MS-DOS Prompt or Command Prompt embedded in the Windows operating system can be
used to connect with the PRICOM unit over TELNET. For Windows 95/98/Me/NT 4.0 users, go
to Start, Programs, then activate MS-DOS Prompt. For the Windows 2000/XP/Server 2003
users, go to Start, All programs-Accessories, then activate the "Command prompt".
Connecting with the PRICOM R-9100U over TELNET
Command to connect with the PRICOM R-9100U over TELNET
telnet xxx.xxx.xxx.xxx
(IP Address)
Example of display when logged in using TELNET
PRICOM R-9100U Ver x.x.x TELNET server.
Copyright (C) 2003 silex technology, Inc.
login: root
'root' user needs password to login.
password:
User 'root' logged in.
No. Item
Value
(level.1)
---------------------------------------------------------------------1 : Configure General
2 : Configure TCP/IP
3 : Configure SNMP
96 : Display Status
97 : Reset Settings to Defaults
98 : Restart Print Server
99 : Exit
Please select(1 - 99)?
Appendix
29
Users Manual RX
Display Example for Each Menu
Each menu item is designed in a layered structure. (level.xx) on the upper right of the screen
indicates a layer. When changing a configuration, select the number of items to be changed,
and enter a parameter. When deleting a setting, and leaving the setting item blank, enter
""(two double quotations). When configuration is complete, select "99:Back to prior menu"
and return to "level.1." Then select "99:Exit." Since the exit option can be selected, make
sure to select "Save and Restart" when a configuration change needs to be reflected to the
PRICOM R-9100U. Display examples for each layer are shown as follows.
Configure General Menu [1]
No. Item
Value
(level.2)
---------------------------------------------------------------------1 : Change root Password
: "*******"
2 : LAN Interface
: AUTO
99 : Back to prior menu
Please select(1 - 99)?
Configure TCP/IP Menu [2]
No. Item
Value
(level.2)
---------------------------------------------------------------------1 : DHCP/BOOTP
: DISABLE
2 : RARP
: DISABLE
3 : IP Address
: 192.168.20.190
4 : Subnet Mask
: 255.255.255.0
5 : Default Gateway
: 192.168.20.254
6 : IP Filter Config
99 : Back to prior menu
Please select(1 - 99)?
Configure SNMP menu [3]
No. Item
Value
(level.2)
---------------------------------------------------------------------1 : Authentic Community
: "***************"
2 : Trap Community
: "public"
3 : Trap Address(IP)
: 0.0.0.0
4 : SysContact
: ""
5 : SysName
: ""
6 : SysLocation
: ""
7 : EnableAuthenTrap
:2
99 : Back to prior menu
Please select(1 - 99)?
Appendix
30
Users Manual RX
Display Status menu [96]
Display Status
1 : prn1
2 : system
99 : Back to prior menu
Please select(1 - 99)?
prn1 menu [96-1]
prn1 :
Ready
system menu [96-2]
R-9100U Version x.x.x
TCP/IP status
IP address
Subnet Mask
Gateway addr
Appendix
: 192.168.20.190
: 255.255.255.0
: 192.168.20.254
31
Users Manual RX
Parameter Configuration
After you have finished installing the PRICOM R-9100U, you need to configure the functions.
Below are the explanations on how to configure the PRICOM R-9100U.
General
Factory Default
none
(no password)
AUTO
Explanation
Set up a password for the administrator. This password will
be used for Telnet, Web page, and setup utility.
Set up the LAN interface. Normally use in AUTO. If you see
no blinking on the HUB after you turn on the PRICOM,
change to appropriate type.
DHCP/BOOTP
Factory Default
ENABLE
Explanation
Enable or disable DHCP/BOOTP. This is a protocol which
acquires an IP address from DHCP/BOOTP server when
booted. In order to use this function with the PRICOM, a
DHCP/BOOTP server must exist in the network and properly
set up. the PRICOM will automatically acknowledge.
RARP
ENABLE
Enable or disable RARP. RARP is a protocol which acquire
IP address from RARP server when booted. In order to use
this function with the PRICOM, a DHCP/BOOTP server must
exist within the same subnetwork and properly set up.
IP Address
0.0.0.0
Set up an IP address. The value must be configured in the
format of four part series of numbers separated by decimal
points, such as “xxx.xxx.xxx.xxx”.
Subnet Mask
0.0.0.0
Set up a subnet mask. The value must be configured in the
format of four part series of numbers separated by decimal
points, such as “xxx.xxx.xxx.xxx”. The gateway must reside
within the same subnetwork as the PRICOM. If you set as
0.0.0.0, this section will be invalid.
Default Gateway
0.0.0.0
Set up a gateway IP address. The parameter should be a
decimal that looks like “xxx.xxx.xxx.xxx”. Gateway must
reside within the same subnetwork as the PRICOM. If you
set as 0.0.0.0, this section will be invalid.
Change root
Password
LAN Interface
TCP/IP
Appendix
32
Users Manual RX
Filter Mode
DENY
Specify the filter mode.
Filter #0 Start
Address
Filter #0 End
Address
Filter #1 Start
Address
Filter #1 End
Address
Filter #2 Start
Address
Filter #2 End
Address
Filter #3 Start
Address
Filter #3 End
Address
0.0.0.0
Specify the filter start Address.
0.0.0.0
Specify the filter end Address.
0.0.0.0
Specify the filter start Address.
0.0.0.0
Specify the filter end Address.
0.0.0.0
Specify the filter start Address.
0.0.0.0
Specify the filter end Address.
0.0.0.0
Specify the filter start Address.
0.0.0.0
Specify the filter end Address.
NOTE
- Communication from a designated range of IP addresses can be blocked when Filter Mode is
set to "DENY." On the other hand, when Filter Mode is set to "ALLOW," communication from
only a designated range of IP addresses can be enabled.
SNMP
Factory Default
Authentic Community "Public"
Explanation
Setup SNMP authentic community name. This community
name is authenticated when receiving SNMP Set Request.
Trap Community
"Public"
Trap Address (IP)
0.0.0.0
SysContact
""
Enter TRAP community name. This name will be used when
the PRICOM executes a trap.
Enter the TRAP address. The TRAP address is disabled if
the IP address is set 0.0.0.0.
Enter SysContact for MIB-II object. Normally enter
administrator’s mail address.
SysName
""
SysLocation
""
EnableAuthenTrap
2
Appendix
Enter SysName for MIB-II object. Normally enter the
PRICOM’s host name or domain name.
Enter SysLocation for MIB-II object. Normally enter location
where the PRICOM is located.
Enable or disable authenticate trap for MIB-II. When enabled,
in occurrence of community error, a SNMP trap will be sent
to the address set at “Trap Address”.
33