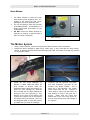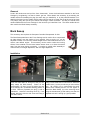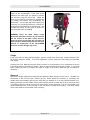
1
Models VL-200 & VL-300
Laser Engraving and Cutting Systems
Safety, Installation, Operation,
and Basic Maintenance Manual
Universal Laser Systems, Inc.
16008 North 81st Street
Scottsdale, AZ 85260 USA
Customer Support Department
Phone: 480-609-0297
Fax: 480-609-1203
Web Based Email Support: www.VersaLASER.com
March 2004
Notice
This publication and its contents are proprietary to Universal Laser Systems, Inc. (ULS), and are intended
solely for the contractual use of ULS, Inc. customers.
While reasonable efforts have been made to assure the accuracy of this manual, ULS shall not be liable
for errors contained herein or for incidental or consequential damage in connection with the furnishing,
performance, or use of this material.
ULS reserves the right to revise this manual and make changes from time to time without obligation by
ULS to notify any person of such revision or changes.
ULS does not assume any liability arising out of the application or use of any products, circuits, or
software described herein. Neither does it convey a license under its patent rights nor the patent rights of
others.
This publication and its contents may not be reproduced, copied, transmitted, or distributed in any form,
or by any means, radio, electronic, mechanical, photocopying, scanning, facsimile, or otherwise, or for
any other purpose, without the prior written permission of ULS.
ULS provides no warranties whatsoever on any software used in connection with a ULS Laser Engraving
System, express or implied. Neither does it guarantee software compatibility with any off-the-shelf
software package or any software program that has not been written by ULS.
Intended use of this system must be followed within the guidelines of this manual. In no event will ULS
be liable for any damages caused, in whole or in part, by customer, or for any economic loss, physical
injury, lost revenue, lost profits, lost savings or other indirect, incidental, special or consequential
damages incurred by any person, even if ULS has been advised of the possibility of such damages or
claims.
HP is a registered trademark of Hewlett-Packard Corporation.
Windows is a registered trademark of Microsoft Corporation.
Macintosh is a registered trademark of Apple Computer Corporation.
PostScript, Photoshop, and Streamline are registered trademarks of Adobe Systems Inc.
CorelDRAW is a registered trademark of Corel Corporation.
AutoCAD is a registered trademark of AutoDesk Inc.
ULS Platforms are protected under one or more of U.S.
patents 5,661,746; 5,754,575; 5,867,517; 5,881,087;
5,894,493; 5,901,167; 5,982,803; 6,181,719; 6,313,433;
6,342,687; 6,424,670; 6,423,925. Other U.S. and International
patents pending.
© Universal Laser Systems Inc., 2003
All Rights Reserved
Introduction
All of us at Universal Laser Systems, Inc. (ULS) would like to thank you for your purchase. Since 1988,
the staff at ULS has been dedicated to total customer satisfaction. When you buy Universal you get more
than a money making product, you get a team of talented, experienced, and enthusiastic people who are
focused on your satisfaction. Our commitment is to help you be successful right now and in the future.
To begin with, we highly recommend that this entire manual be read before attempting to use the device.
The manual includes important information about safety, assembly, use, troubleshooting, and basic
maintenance.
How To Get Help
Before contacting our Technical Support Department, make sure that you have read this entire manual as
well as any other accompanying manuals included with your laser system.
Step 1:
Try to recreate the problem and write down the circumstances in which the problem occurred. Try to
recall if the problem began all of a sudden, worsened over time, or began after you performed any recent
maintenance. Also be prepared to describe all pertinent information about the computer being used such
as graphics software, VersaLASER Controller software version, computer operating system and computer
type, configuration, and accessories.
Step 2:
Make sure that you have the serial number available. The serial number tag is located on the back of the
machine, next to the exhaust port. It can also be found located in the ABOUT tab of the VersaLASER
Controller software. We may not be able to assist you without this number.
Step 3:
Contact your local VersaLASER reseller. If possible, call from a phone that is close to the VersaLASER
so that it can be operated while speaking on the telephone.
Step 4:
If your local VersaLASER reseller cannot assist you and you would like to use our FREE, email based
support system, log on to our website: www.VersaLASER.com. Click on the “Technical Support” link,
then click on the “Technical Support Request Form” and follow the instructions.
Step 5:
If you are unable to obtain Internet access, you may contact our Technical Support Department at:
Universal Laser Systems, Inc.
Technical Support Department
16008 North 81st Street
Scottsdale, AZ 85260
Phone: 480-609-0297
Fax: 480-609-1203
M-F 7am – 6pm Arizona Time
Specifications
System Operating Environment Requirements (user provided)
Model
Operating Environment
VL-200
VL-300
Well-ventilated office (recommended)
or clean, light-duty manufacturing area
Operating Temperature
50ºF (10ºC) to 95ºF (35º C) capable
73ºF (22ºC) to 77ºF (25º C) for best performance
Storage Temperature
50ºF (10ºC) to 95ºF (35º C)
Operating Humidity
Non-condensing
Electrical Power
Particulate/Odor Outside
Ventilated Exhaust System
110/220 VAC, 10/5A, Grounded
110/220 VAC, 10/5A, Grounded
High-pressure vacuum blower capable of
150 CFM (cubic feet per minute) @ 6 inches static pressure
(255m3/hr at 1.5kPa)
Computer Requirement
Windows XP Home or Professional Editions
Available USB 1.1 port or higher
Software Requirement
Any Windows based Graphics or CAD application
System Specifications
Laser Safety
CO2 Laser, Interlocked Safety Enclosure = Class I
Red Diode Pointer = Class IIIa
Laser Source
25 or 30 watt CO2 Laser
Cooling
Work Area
30,40, or 50 watt CO2 Laser
Air Cooled
16” x 12” (406.4 x 304.8 mm)
24” x 12” (609.6 x 304.8 mm)
Printer Driver
Windows XP
Hardware Interface
USB 1.1
Dimensions
26”Wide x 25” Deep x 14”Height
(660.4mm x 635mm x 355.6)
34”Wide x 25” Deep x 14”Height
(863.6mm x 635mm x 355.6)
System Weight
System = 85 lbs. (38 kg)
System = 100–106 lbs. (45-48 kg)
Laser Cartridge Weight
25/30 Watt = 20 lbs (9 kg)
40 Watt = 23 lbs (10 kg)
50 Watt = 26 lbs (12 kg)
Available Options
Cart, Integrated Air Cleaner, Rotary Fixture, Air Assist, Compressed Air,
Cutting Table, Focus Lens Kits
Specifications subject to change without notice
Table of Contents
Section 1 - Safety
Description of Appropriate Use ................................................................................. 1-1
General Safety ........................................................................................................ 1-1
Laser Safety............................................................................................................ 1-2
Safety Labels .......................................................................................................... 1-2
EU Compliance (CE)................................................................................................ 1-4
FCC Compliance..................................................................................................... 1-5
Section 2 – Step-By-Step Installation
Establishing a Proper Operating Environment ............................................................ 2-1
Providing a Suitable Electrical Power Source............................................................. 2-1
Extracting Fumes and Particulates ............................................................................ 2-1
Computer and Operating System.............................................................................. 2-2
Recommended Software Programs .......................................................................... 2-3
Unpacking and Assembling the VersaLASER ............................................................ 2-3
The VersaLASER Software Installation CD-ROM....................................................... 2-4
Configuring Your Graphics Software ......................................................................... 2-5
Section 3 –Operation
How it Works........................................................................................................... 3-1
The VersaLASER Keypad ........................................................................................ 3-1
The VersaLASER On-screen Control Panel (VCP)..................................................... 3-2
Running Your First Job, Step-By-Step ....................................................................... 3-3
Step 1 - Creating Your Artwork ........................................................................... 3-3
Step 2 – Printing Your Artwork ............................................................................ 3-3
Step 3 – Powering On the VersaLASER.............................................................. 3-4
Step 4 – Loading and Positioning Your Material ................................................... 3-4
Step 5 – Focusing the Laser Beam ..................................................................... 3-4
Step 6 – Running Your Job................................................................................. 3-4
Step 7 – Powering Off the VersaLASER.............................................................. 3-4
Section 4 – Basic System Maintenance
Safety ..................................................................................................................... 4-1
Cleaning and Maintenance Supplies ......................................................................... 4-1
Optics ..................................................................................................................... 4-2
Optics Handling Guidelines ................................................................................ 4-2
Optics Cleaning Procedure ................................................................................. 4-2
Accessing the Optics ......................................................................................... 4-2
#2 Mirror ........................................................................................................... 4-3
#3 Mirror and Focus Lens ................................................................................... 4-3
Beam Window ................................................................................................... 4-4
The Motion System.................................................................................................. 4-4
The Main Enclosure................................................................................................. 4-5
Adjustments and Lubrication..................................................................................... 4-5
Interlock Safety Check ............................................................................................. 4-5
Fuse Replacement ................................................................................................... 4-5
Cooling Fan Filters ................................................................................................... 4-6
Maintenance Schedule............................................................................................. 4-6
Section 5 – Accessories
Rotary Fixture.......................................................................................................... 5-1
Cutting Table ........................................................................................................... 5-4
Integrated Cart ........................................................................................................ 5-6
Computer Controlled Air Cleaner / Cart ..................................................................... 5-6
Computer Controlled Compressed Air Unit ................................................................ 5-9
Air Assist Cone ...................................................................................................... 5-10
Back Sweep .......................................................................................................... 5-12
Section 1
Safety
Description of Appropriate Use
This device is designed for laser cutting and engraving of the materials listed in the VersaLASER printer
driver. Materials to be processed must fit completely inside the system for proper operation. Use of the
equipment in a manner other than that described in this manual may result in injury to yourself and others
and may cause severe damage to the equipment and your facility.
General Safety
•
Exposure to the laser beam may cause physical burns and can cause severe eye damage.
Proper use and care of this system are essential to safe operation.
•
Never operate the laser system without constant supervision of the cutting and engraving
process. Exposure to the laser beam may cause ignition of combustible materials and start a fire. A
properly maintained fire extinguisher should be kept on hand at all times.
•
A properly configured, installed, maintained, and operating particulate/fume exhaust system is
mandatory when operating the laser system. Fumes and smoke from the engraving process must
be extracted from the laser system and either filtered through the Integrated Exhaust Filtration
Module (an optional accessory) or exhausted outside through a user supplied exhaust system.
•
Some materials, during and after laser processing, may produce toxic fumes. We suggest that
you obtain the Material Safety Data Sheet (MSDS) from the materials manufacturer. The MSDS
discloses all of the hazards when handling or processing that material. Some materials continue
emitting fumes for several minutes after laser processing and may pose a health hazard. Avoid using
this device in small, enclosed, or non-ventilated areas.
•
Some materials, during and after laser processing, may produce corrosive fumes.
DISCONTINUE processing any material that produces signs of chemical deterioration in the laser
system such as rust, metal etching or pitting, peeling paint, etc. Damage to the laser system from
corrosive materials is NOT covered under warranty.
•
Care should be taken when moving or lifting this device. Obtain assistance from 1 or 2 additional
people when lifting or carrying (secure motion system and access door). Severe bodily injury may
occur if improper lifting techniques are applied or the system is dropped.
•
Dangerous voltages are present within the electronics and laser enclosures of this system.
Although access to these areas is not necessary during normal use, if it becomes necessary to open
one of these enclosures for service reasons, please remember to disconnect the power cord from
your electrical supply.
•
This device is specifically designed to comply with CDRH performance requirements under 21
CFR 1040.10 and 1040.11. CDRH is the Center for the Devices of Radiological Health division of the
Food and Drug Administration (FDA) in the USA. It also complies with CE (European Community)
safety regulations. No guarantees of suitability or safety are provided for any use other than those
specified by Universal Laser Systems, Inc.
SAFETY
Laser Safety
The device contains a sealed carbon dioxide (CO2) laser in a Class I enclosure that produces intense
invisible and visible laser radiation at a wavelength of 10.6 microns in the infrared spectrum. For your
protection, this enclosure is designed to completely contain the CO2 laser beam.
CAUTION – Use of controls or adjustments or performance of procedures other than those
specified herein may result in hazardous radiation exposure.
•
•
•
•
The intense light that appears during the engraving or cutting process is the product of material
combustion or vaporization. DO NOT STARE AT THIS LIGHT FOR EXTENDED PERIODS OR
ATTEMPT TO VIEW IT WITH OPTICAL INSTRUMENTS.
This device contains a visible Red Dot Pointer (Class IIIa, 5mw maximum output, 630-680 nm). DO
NOT STARE AT THIS RED LIGHT FOR EXTENDED PERIODS OR ATTEMPT TO VIEW IT WITH
OPTICAL INSTRUMENTS.
The user access door of this device is safety interlocked and will disable the CO2 laser beam when
the access door is opened. The Red Dot Pointer is NOT safety interlocked and is activated when the
user access door is open.
DO NOT OPERATE THE LASER SYSTEM IF ITS SAFETY FEATURES HAVE BEEN MODIFIED,
DISABLED OR REMOVED. This may lead to exposure to invisible and visible CO2 laser radiation
which may cause permanent blindness and/or severe burns to the skin.
Safety Labels
CDRH and CE regulations require that all laser manufacturers affix warning labels in specific locations
throughout the equipment. The following warning labels are placed on the laser system for your safety.
DO NOT remove them for any reason. If the labels become damaged or are removed for any reason, DO
NOT OPERATE the laser system and immediately contact Universal Laser Systems, Inc. for free
replacements. Labels are NOT to scale.
WARNING
NEVER OPERATE THE LASER SYSTEM
WITHOUT CONSTANT SUPERVISION
Scottsdale, Arizona
Model No:
Manufactured:
Serial No:
Made in USA
221-0002-0
EXPOSURE TO THE LASER BEAM MAY
CAUSE IGNITION OF COMBUSTIBLE
MATERIALS WHICH CAN CAUSE SEVERE
DAMAGE TO THE EQUIPMENT
221-0012-0
THIS EQUIPMENT CONFORMS
TO PROVISIONS OF
US 21 CFR 1040.10
AND 1040.11
221-0015-0
DANGER
DANGER
INVISIBLE AND VISIBLE LASER RADIATION
WHEN OPENAND INTERLOCK FAILED OR
DEFEATED AVOID EYE OR SKIN EXPOSURE
TO DIRECT OR SCATTERED RADIATION
INVISIBLE AND VISIBLE LASER
RADIATION WHEN OPEN
AVOID EYE OR SKIN EXPOSURE TO
DIRECT OR SCATTERED RADIATION
INVISIBLE LASER RADIATION IS
EMITTED FROM THIS APERTURE
221-0016-0
221-0017-0
221-0018-0
WARNING
TO AVOID RISK OF ELECTRIC SHOCK
ALWAYS DISCONNECT POWER CORD
BEFORE REMOVING THIS COVER
221-0020-0
AVOID EXPOSURE
INPUT POWER:
110 VAC; 50/60 Hz; 10 A
221-0022-0
Section 1-2
221-0031-0
SAFETY
DANGER
CAUTION LASER RADIATION
DO NOT STARE INTO BEAM OR VIEW
DIRECTLY WITH OPTICAL INSTRUMENTS
CLASS 3A LASER PRODUCT
LASER RADIATION - AVOID
DIRECT EYE EXPOSURE
INPUT POWER:
220 VAC; 50/60 Hz; 5 A
LASER DIODE
WAVELENGTH: 630-680 nm
MAX. OUTPUT: 5 mW
CLASS IIIa LASER PRODUCT
LASER DIODE
WAVELENGTH: 630-680 nm
MAX. OUTPUT: 5 mW
221-0033-0
221-0034-0
221-0065-0
221-0036-0
WARNING
THIS SYSTEM IS DESIGNED FOR
USE WITH INERT AND
NON-OXIDIZING GASES ONLY
(i.e. DRY CLEAN AIR, CARBON
DIOXIDE, HELIUM, NITROGEN).
CONNECTING FLAMMABLE OR
OXIDIZING GASES TO THIS
SYSTEM CREATES A SERIOUS
SAFETY AND/OR FIRE HAZARD.
DO NOT CONNECT ANY GAS
SOURCES EXCEEDING 75 PSI
(5 ATM) PRESSURE.
UNIVERSAL LASER SYSTEMS
ASSUMES NO RESPONSIBILITY
ARISING FROM THE IMPROPER
USE OF THIS SYSTEM.
221-0037-0
Section 1-3
SAFETY
EU Compliance (CE)
L A S E R
S Y S T E M S
I N C.
Product Identification:
VersaLASE R VL-200 and VL-300
Laser Engraving and Cutting Systems
Manufacturer:
Universal Laser Systems, Inc.
st
16008 N. 81 St.
Scottsdale, AZ 85260
Phone: (480) 483-1214 Fax: (480) 483-5620
USA
This equipment Is manufactured in conformity with the following directives:
89/336/EEC
73/23/EEC
89/392/EEC
(EMC Directive)
(Low Voltage Directive)
(Machinery Directive)
based on the standards listed.
Standards Used:
Safety:
EN 60950: 1995
EN 60825: 1994 (Class IIIa)
EMC:
EN 55022: 1995 (Class A)
EN 50082-1: 1992
EN 61000-3-2: 1996 (class A)
EN 61000-3-3: 1995
EN 60000-4-2: 1993 (4kV CD, 8kV AD)
EN 61000-4-3: 1997 (3 V/m)
EN 61000-4-4: 1995
(1 kV power line, N/A signal lines (less than 3 meters in length))
EN 61000-4-5: 1996 (class 3)
Note: This is not a declaration of conformity. The importer of this equipment
supplies the declaration of conformity.
Warning - This is a Class A product. In a domestic environment, this product
may cause radio interference in which case the user may be required to take
adequate measures.
Section 1-4
SAFETY
FCC Compliance
This ULS laser system has been tested and found to comply with Federal Communication Commission
(FCC) directives regarding Electromagnetic Compatibility (EMC). In accordance with these directives ULS
is required to provide the following information to its customers.
FCC Compliance Statement and Warnings
This device complied with FCC Rules Part 15. Operation is subject to the following two conditions:
1.
This device may not cause harmful interference, and
2.
This device must accept any interference received, including interference that may cause
undesired operation.
This equipment has been tested and found to comply with the limits for a Class A digital device as set
forth in Part 15 of the FCC Rules. These limits are designed to provide reasonable protection against
harmful interference when the equipment is operated in a commercial environment. This equipment
generates, uses and can radiate radio frequency energy and, if not installed and used in accordance with
manufacturer’s instructions, may cause harmful interference to radio communications. Operation of this
equipment in a residential area is likely to cause harmful interference in which case the user will be
required to correct the interference at his or her own expense.
Users should be aware that changes or modifications to this equipment not expressly approved by the
manufacturer could void the user’s authority to operate the equipment.
This equipment has been type tested and found to comply with the limits for a Computing Device per FCC
part 15, using shielded cables. Shielded cables must be used in order to insure compliance with FCC
regulations.
Section 1-5
Section 2
Step-By-Step Installation
In this section we will step you through site preparation, computer and software setup, and unpacking and
assembling the VersaLASER. Please follow the instructions in the order shown.
Establishing a Proper Operating Environment
•
•
•
•
The device MUST be installed in an office-type or light duty manufacturing environment. Airborne
pollutants can damage the device. Keep the device isolated from any sandblasting, sanding or
machining equipment or any other machinery that produces airborne particles. Also, do not
operate or store this device near sources of water, saltwater, or oil vapor.
For best results, we recommend operating this air-cooled device in the ambient temperature
range of 73ºF (22ºC) to 77ºF (25º C). However, it can operate in the ambient temperature range
of 50ºF (10ºC) to 95ºF (35º C).
Avoid storing the device outside the temperature range of 50ºF (10ºC) to 95ºF (35º C) as
excessively cold or hot temperatures can damage the laser cartridge or reduce its lifetime.
Ambient humidity levels must be non-condensing.
Providing a Suitable Electrical Power Source
•
•
•
•
•
•
The electrical power requirements can be found either in the “Specifications” table in the
beginning of this manual or printed on the sticker next to the power inlet of the VersaLASER.
The VersaLASER and VersaLASER accessories are equipped with standard IEC 60320
“computer style” power cord receptacles. A power cord may or may not be included with the
device. If the power cord is not present, please refer to the “Additional Requirements”
supplement for more information.
Never remove the ground (earth) lead to the electrical cord and plug the system into a nongrounded (non-earthed) outlet. Operating the device without the ground connection is very
dangerous and can lead to a severe, if not fatal, electrical shock. It may also cause the device to
exhibit unpredictable behavior.
Noisy or unstable electricity as well as voltage spikes may cause interference and possible
damage to the device’s electronics. If electrical power fluctuations, brown outs, or constant
power outages are a problem in your area, an electrical power stabilizer, UPS (Uninterruptible
Power Supply), or backup generator may be required.
To prevent the overload of your electrical power circuit or to control an unstable or noisy electrical
power source, it may be necessary to connect the device to a dedicated electrical circuit.
The device is designed as a Class I, Group A, pluggable device. It is also designed for connection
to IT power systems.
Extracting Fumes and Particulates
Fumes, smoke, and particulates are a byproduct of the cutting and marking of materials in the
VersaLASER and MUST be extracted (vacuumed) from the VersaLASER. You may choose to either filter
the byproducts or exhaust them to the outside environment.
•
•
External Exhaust (most common): We recommend that you contact a local contractor to
design and install an exhaust system that not only meets the minimum requirements of this
device but also complies with local environmental laws. Please refer to the “Additional
Requirements” supplement for more information about exhausting particulates, smoke and fumes
to the outside environment.
Filtration System: If you have chosen to purchase the optional Computer Controlled Air Cleaner
(CCAC) accessory, exhausting to the outside environment is not required but is recommended.
Refer to the Accessories section for more details.
INSTALLATION
Computer and Operating System
Your computer is critical component in the operation of the VersaLASER. In fact, you cannot power on
the VersaLASER if your computer is not connected, powered on, running Windows, and running the
VersaLASER Control Panel software (VCP).
Only ONE VersaLASER per computer is allowed. You will need to purchase a separate computer for
each VersaLASER you own. Also, the VersaLASER is NOT designed to be a network printer. YOU
MUST operate the VersaLASER using the computer that is directly attached to it via the PROVIDED, 3
foot, USB cable. USB cables longer than 3 feet may cause the VersaLASER to malfunction.
Minimum Computer Requirement
• A PC-based computer with either the Windows XP Home or Professional Edition operating
system. MacIntosh computers are NOT compatible with the VersaLASER
• 1.5GHz processor with 256 MB RAM and a 40 GB hard drive
• CDROM drive
• Monitor (minimum 800 x 600 resolution)
• Mouse or other pointing device
• Available USB 1.1 compliant port (or higher)
NOTE: Some computer motherboard manufacturers USB ports DO NOT comply with USB 1.1
standards. This may cause erratic behavior from the VersaLASER such as freezing and lock-ups.
If this occurs, you may need to do one of the following although we have found that item #2 below
has been the best solution to the problem:
1) Try a different USB port on that computer or use a different computer
2) Add a USB port PCI card that is compliant with version 1.1 and install it into your computer
3) Purchase an external USB port hub, that has its own AC power adapter, and install it between the
computer’s USB port and the VersaLASER’s USB port.
Other USB peripheral devices that demand a large amount of computer processing power may slow
down the operation and productivity of the VersaLASER. We recommended not using these devices
while operating the VersaLASER.
Recommended Accessories or Upgrades
• Faster processor (2.0 GHz or higher) with 512 MB RAM or greater
• Larger hard drive (80 GB or greater)
• Large monitor (17” or larger)
• 600 DPI scanner (optical)
• Writeable CDROM drive
• Internet connection and email address
Optimizing Windows XP Performance
Windows XP, by default, displays many “visual effects” that slow down the computer by utilizing RAM and
processor time. We recommend that you turn OFF these effects by right-clicking on the My Computer
icon on your desktop, then click Properties and then click the Advanced tab. In the Performance section,
click Settings, then click Adjust For Best Performance, and then click Apply.
Please contact Microsoft about questions regarding the upgrading and the use
Microsoft products.
Section 2-2
INSTALLATION
Recommended Software Programs
All software necessary to control the VersaLASER is included. However, the software necessary to create
the artwork is NOT included. ULS recommends the following software for use with the VersaLASER:
•
•
•
•
•
Graphics Programs
CorelDRAW11 (recommended)** or Macromedia Freehand
Bitmap / Scanning Software
Adobe Photoshop (recommended) or Corel PHOTO -PAINT**
Raster to Vector Conversion Software
Adobe Streamline (recommended) or CorelTRACE**
CAD Software
AutoCAD or AutoCAD LT for Windows
FONTS
Use True Type fonts ONLY. Do not use PostScript or bitmapped fonts.
**Most users purchase the CorelDRAW11 Graphics Suite package which contains all the software
necessary to operate the VersaLaser to its fullest capability. Earlier versions of CorelDRAW have
experienced problems with the XP operating system, which in turn, causes problems with the
operation of the VersaLASER. As a result ULS recommends CorelDRAW11 over earlier versions.
Whether you decide to use CorelDRAW11 or a different graphics software package, it is critical
that you fully understand how to use the software in order to successfully operate the VersaLaser.
While ULS has made reasonable efforts to make the VersaLaser as compatible as possible with
graphics and CAD software written for the Windows XP operating systems, ULS cannot guarantee
complete compatibility with any software not manufactured by ULS.
Unpacking and Assembling the VersaLASER
1.
2.
3.
4.
With the assistance of one or two other people, pick up the VersaLASER and place it on top of a
table strong enough to support its weight (refer to the specifications section). To lift the unit
properly, note the lifting points shown by the arrows.
Completely open the access door by lifting up on the handle. Remove all packing material that may
be used to secure the motion system arm during shipment. YOU MUST DO THIS BEFORE
PLUGGING IN THE POWER CORD OTHERWISE SERIOUS DAMAGE MAY OCCUR. Gently
move the arm toward and away from you. It should slide freely.
The motion system arm cover is hinged and is held down by magnets. Grasp the bottom of the
cover and rotate it up to expose the motion system carriage.
Remove any remaining packing material that may be preventing the motion system carriage from
sliding left and right. Close the cover.
NOTE: Your chosen software MUST be installed and operational before
proceeding to the next step.
Section 2-3
INSTALLATION
1.
Power on your computer and boot into
Windows. If your computer is already
running, save your work and close all
programs except Windows.
2.
Connect the power cord rf om your power
source to the power cord inlet (6) of the
VersaLASER.
3.
If you have an external exhaust system,
connect your external exhaust hose to the
exhaust port (5) and secure with a hose
clamp.
4.
Connect a provided USB cable from USB
port (1) of the VersaLASER to an available
USB port in your computer.
1.
2.
3.
4.
5.
6.
7.
First USB port (to computer)
Second USB port (to optional
accessory)
Third USB port (to optional accessory)
USB connectivity and status LED’s.
Exhaust port
Power cord inlet
Air hose connection
NOTE: If you purchased either the Computer Controlled Air Cleaner (CCAC) or the Computer
Controlled Compressed Air Unit (CCAU), DO NOT connect their respective USB cables to the
VersaLASER at this time. We will address those options later in this section.
•
After you have connected the USB cable and within about 15 sections the “Found New Hardware
Wizard” dialog box will appear.
•
Windows asks if you would like to install the software automatically or you choose to install from a
specified location (Advanced). Select the advanced method and click “Next”. Select the “Search
Removable Media” choice and proceed to the next step.
The VersaLASER Software Installation CD-ROM
The VersaLASER Software Installation CD-ROM can be found in a pocket on the inside of the back cover
of this manual.
•
Insert the CD-ROM into your CD-ROM drive now and click “Next”.
•
The software will begin loading and the Windows Logo Testing warning will appear. Ignore this
statement by Microsoft and simply click “Continue Anyway”.
•
The VersaLASER software will continue to load and at some point may ask you for your VersaLASER
model type. Choose the appropriate model. If you choose a model that does not match what you
have purchased, you will have problems running the VersaLASER. If you are unsure what model you
have, refer to the serial tag located on the back of your VersaLASER.
•
Click “Finish” to complete the installation and RE-BOOT your computer.
•
If you purchased the Computer Controlled Air Cleaner (CCAC) accessory and/or the Computer
Controlled Compressed Air Unit (CCAU), at this time, proceed to Section 5 of this manual and
follow the installation instructions for that device. When you have completed the installation,
return to this section to continue configuring the software.
Section 2-4
INSTALLATION
Configuring Your Graphics Software
After the VersaLASER software installation is completed, you must configure your graphics software to
work correctly with the VersaLASER. The basic setup should include the following:
•
Set the default page orientation to Landscape and page size to a width of 16 inches (406.4mm)
(model VL-200) or 24 inches (609.6mm) (model VL-300) and height of 12 inches (304.8mm).
•
Set the default line thickness to Hairline or the smallest available by the software (for vector
output).
•
Use only the color Black for fills for raster engraving, Red outlines for vector cutting, and Blue
outlines for vector marking. We will discuss more about using your graphics software in Section 3
of this manual.
Since most users use CorelDRAW11, we have included the following specialized configuration
instructions:
CorelDRAW11
1.
Using Windows Explorer, locate the file named “VersaLASER.CPL”, on the VersaLASER
Installation CD, and copy this file over to the C:\Program Files\Corel\Corel Graphics 11\Custom
Data\Palettes folder.
2. While still in Explorer, locate a file named “corelapp.ini” located in the C:\Program
Files\Corel\Graphics11\Config folder. Double-click on the file it will open up in Notepad. Scroll
down past the semi-colons to the [Config] header. Then scroll down 22 lines to the line that reads
“Fontrasterizer=1”. Change the 1 to a 0 (this is a zero, not an o), save the file, and exit Notepad.
3. Open CorelDRAW11 and start a new graphic.
4. In the menu bar, click on “Window”, then “Color Palettes”, and then click “None”. Once again click
“Window”, then “Color Palettes”, and then “Open Palette”. In the pop-up box, double-click on
"VersaLASER.CPL" which allows it to appear on the right side of the screen.
5. On the property bar, click on the landscape orientation (the sideways rectangle). Enter the page
width of 16 inches (406.4mm) (model VL-200) or 24 inches (609.6mm) (model VL-300) and
height of 12 inches (304.8mm).
6. The rulers on screen need to match the rulers in the VersaLASER. Adjust the ruler's vertical
origin by double-clicking directly on the vertical (side) ruler. The “Options” dialog box will appear.
In the vertical origin box, type in 12 inches (304.8mm)
7. Set the default value for line width and color of the graphic objects, by clicking the outline tool and
then the outline pen dialog in the flyout. With “Graphic” being the only selection checked, click
“OK”. Click the down arrow in the Color dropdown box to expand the list and click on the color
red. Click the down arrow in the “Width” dropdown box and click “Hairline”. The units can be
“inches”, “millimeters” or anything else you prefer. Click “OK to close the Outline Pen dialog box.
8. In the top menu, click “Tools, then click “Color Management”. Click on the down arrow to expand
the “Style” dropdown list. Click “Color Management Off”, and then click “OK”.
9. Finally, at the top of the screen, click on “Tools”, then “Options”, then “Document”, and then select
“Save Options as Defaults for New Documents”. Make sure ALL the options listed are
CHECKED then click “OK”.
10. The setup defaults for CorelDRAW11 are now complete. Whenever you start a new document,
all of the default settings that we had setup will automatically apply to the new document.
Remove the VersaLASER Installation CD-ROM from your CD-ROM drive and store it either back
into the pocket of the rear cover of the manual or in a safe place.
Section 2-5
Section 3
Operation
How it Works
The VersaLASER uses the intense energy of the laser beam
to vaporize material from the work piece (wood, plastic, etc.),
placed on the VersaLASER work surface, by either raster
engraving, vector cutting, or vector marking. Raster engraving
is the technique where the laser beam traverses left and right,
engraving horizontal lines of material as it steps down the work
piece vertically, similar to a laser or inkjet printer. Vector
cutting or vector marking is the technique in which the laser
beam follows a path to cut or mark a desired outline, which is
Raster
Vector
similar to a pen plotter. The difference between vector cutting
(completely passing through the work piece) and vector marking the material (lightly marking the surface)
is laser power applied. You determine whether you want your artwork raster engraved, vector marked, or
vector cut into the work piece by the colors you assign to the elements of the objects in your graphic
images. Black colored (filled) and shades of black (grays or grayscale) objects will raster engrave. Red
colored outlined objects, set to a hairline thickness, will vector cut. Blue outlined objects, also set to a
hairline thickness, will be vector marked.
Using the VersaLASER is as simple as creating your artwork, according to the rules outlined above, and
simply printing to the VersaLASER as you would to any other type of printer. The VersaLASER printer
driver will then pop up and prompt you for the type of material you are processing and its measured
thickness. After choosing a material from the list and entering the material thickness, your artwork will be
turned into a print job and stored in the VersaLASER print cache on your hard drive. You can then use
the VersaLASER On-Screen Control Panel to select and preview the saved print job you wish to run,
position your material in the VersaLASER, and press the START button.
The VersaLASER Keypad
•
•
•
•
•
POWER: Turns the VersaLASER on ONLY if the computer is powered on, booted
into Windows, the VersaLASER On-Screen Control Panel is running, and the USB
cable is connected from the computer to the VersaLASER. Also, holding the key
down for 5 seconds will power off the VersaLASER.
UP and DOWN ARROWS: Raises and lowers the Z-axis table (work surface).
Press momentarily for slow movement and hold down for faster movement.
PAUSE: If, during processing, you wish to stop or pause the VersaLASER, press
PAUSE once. Press PAUSE again and the VersaLASER will resume processing
from the point at which it was “paused”. If you press START while the VersaLASER
is “paused” the VersaLASER will start over from the beginning of the print job.
START: Begins processing from the beginning of a job.
RED and GREEN LED’s: The RED LED and GREEN LED located between the
PAUSE and START buttons provide information on the status of the machine.
CONDITION
RED LED
GREEN LED
OFF
The user door is closed
The VersaLASER is off
ON
The user door is open
The VersaLASER is on
SYSTEM OPERATION
The VersaLASER On-Screen Control Panel (VCP)
The purpose of the VersaLASER On-Screen Control Panel (VCP for short) is to be able to remotely
control your VersaLASER by being able to view and print your stored print jobs. You will not be able to
operate the VersaLASER without the VCP running in the taskbar.
Once you have installed the VCP using the installation disk, a green, square-shaped icon will appear in
the lower right corner of your Windows taskbar. This icon indicates that the VCP is active. It will
automatically activate itself every time you power on your compute. If for any reason the VCP is
deactivated you can reactivate it by double-clicking on the shortcut found on your computers desktop
screen. You can access the VCP at anytime by left-clicking once on the icon in the taskbar. The follow
describes the features of each tab of the VCP:
VIEWER
• Shows a preview window of the currently selected job.
• The cursor becomes a magnifying glass (Zoom Tool) if you pass it over the preview window. Leftclicking your mouse zooms in and right-clicking zooms out.
• Displays, in the lower left corner, the name of current job, the date and time it was stored on your
hard drive, and the run time.
• The print job navigation buttons (left and right arrows in the lower right corner) allow you to preview
the print jobs stored on your hard drive.
• The “open folder” button displays and allows you to select your print jobs in a file management style.
It also allows you to delete print jobs stored from your hard drive.
• The upper right side contains the software version of the keypad buttons found on the VersaLASER
itself. These buttons operate identically to the physical buttons on the VersaLASER.
SETUP
• The PRINT CACHE number is adjustable. It indicates the maximum number print jobs that you would
like to be stored on your hard drive. If you exceed the number shown, the software will automatically
begin deleting the oldest jobs as newest ones enter the cache.
• The PURGE button deletes ALL cached print jobs stored on your hard drive.
• UNITS allows you to choose between English or metric units.
• AUTO Z should be enabled if you would like the device to focus the laser beam by automatically
adjusting the height of the Z-axis engraving table. This operating principle is based on the material
thickness that you specify in the VersaLASER Settings popup (explained later). If it is disabled, you
will need to set focus manually by using the included Focus Tool (also explained later).
• AUTO-ZOOM enabled causes the preview window to automatically zoom in until your graphic fills the
entire window. This only works for the next job that you print.
• The TUNING number is a value set by the VersaLASER manufacturing factory for your particular
machine. In the future, as your system gets broken in, it may be necessary to change this value to
sharpen the engraved image. Do not change this number unless instructed to do so by our customer
support department.
• The LENS SIZE choice from the dropdown list should be the same as the number printed on the lens
assembly on the side of your VersaLASER’s Focus Carriage. If you change lenses (available
accessory) other than the standard 2.0, then you MUST select the value that matches your installed
lens otherwise your VersaLASER will not focus the laser beam properly.
FOCUS
• Manually positions the Focus Carriage to an absolute position in the engraving field to either manually
focus the laser beam to the surface of your material, instead of using the Autofocus feature, or to
locate an absolute position within the engraving area by using the Red Dot pointer. To illuminate the
Red Dot pointer, simply open the user door. Using your mouse, position the on-screen crosshairs to
the desired engraving field position, indicated by the X-axis (left) and Y-axis (right) coordinates next to
the crosshair, and left-clicking once. The Focus Carriage will then move to that position. Or, you can
accomplish the same thing by typing in the X-axis and Y-axis coordinates of the location you desire in
the X-axis and Y-axis boxes at the bottom left of the screen and left-clicking the “MOVE” button.
Section 3-2
SYSTEM OPERATION
•
•
•
•
GO HOME will move the Focus Carriage to the upper right edge of the work area.
RESET X-Y button will electronically and mechanically re-home the Focus Carriage if you
accidentally bump it out of position.
RESET Z will electronically and mechanically re-home the Z-axis engraving table. You MUST select
this if you accidentally stall the t able by placing excessive weight on it otherwise the VersaLASER
will not focus the beam properly.
The UP and DOWN arrow buttons are identical to the up and down buttons on the VersaLASER
keypad and will raise or lower the Z-axis respectively.
ABOUT
This tab displays the version of the VCP software, information about us, and the serial number and the
firmware version of your VersaLASER (only shown if your VersaLASER is connected to your computer).
Running Your First Job, Step-By-Step
We will now illustrate how to use the VersaLASER with CorelDRAW11 by creating a wooden keychain. In
this example, we will raster engrave and vector cut the key chain from a 2 by 4 inch, 1/8 inch thick piece
of hardwood.
Step 1 - Creating Your Artwork
Open CorelDRAW11 and create a new graphic. Draw some text
using a BLACK colored fill and NO outline. For example, type in the
word “KEYCHAIN”. Then, draw a RED hairline rectangular outline
(with no fill) around the text and round the edges if desired. Add a
circle (RED hairline outline also with no fill), for the key ring. Position
the graphic, on your computer screen, in the upper left corner of the
page as shown.
0
1
1
2
3
4
KEYCHAIN
2
Step 2 – Printing Your Artwork
When you are ready to print the file, select PRINT, in CorelDraw11, from the FILE menu. When the print
dialog appears, ensure that the VersaLASER printer name is in the dropdown list, and then click PRINT.
The VersaLASER Settings dialog box will pop up. Choose your material by selecting the appropriate
category from the material categories on the left (in this case wood) and then select the correct material
type from the material types on the right (in this case hardwood). Instead, if the material has already
been assigned an official VersaLASER Material Code, you can simply type in the code in the code field
and the correct material will be automatically highlighted from the database. Since we are placing the
material directly on the work surface, leave the Fixture Type set to Standard Table. If you were using an
optional accessory or custom fixture you would choose it from the fixture list. Using a calipers or similar
measuring device, enter the thickness of the material (in this case .125 inch). The Intensity control allows
you to increase or decrease the already pre-programmed laser power setting. We suggest that you
always leave it set to “0” until you are more comfortable using the system. When you have made all the
appropriate selections and entered the material thickness, click PRINT. As the print job is being created
and small printer icon will appear in your taskbar in the lower right corner of your computer screen. Once
the icon disappears the print job is completed and is now stored on your hard drive. Click on the
VersaLASER icon in the taskbar and the last print job will appear in the viewer of the VCP.
Step 3 – Powering On the VersaLASER
To power on the VersaLASER you can either left-click on the POWER button in the VCP or press the
POWER button on the VersaLASER keypad. The VersaLASER will always reset itself in the X-Y position
when it is powered on. However, the Z-axis engraving table will reset only when your computer is first
turned on. It will not reset each time you power on the VersaLASER. It will, however, reset only when you
power on your computer on.
Section 3-3
SYSTEM OPERATION
Step 4 – Loading and Positioning Your Material
Open the user door and position the wood (1) into the upper left
corner of the engraving table, up against the rulers. If necessary,
use the UP or DOWN arrow buttons on the keypad or in the VCP to
raise or lower the Z-axis to make loading easier.
0
1
2
3
4
I
1
2
Step 5 – Focusing the Laser Beam
In the Setup tab of the VCP, if you have AUTO Z enabled and the LENS SIZE matches the number
printed on the side of the Focus Carriage, then the VersaLASER WILL AUTOMATICALLY focus the
laser beam based on the material thickness you entered when the VersaLASER Settings dialog box
popped up. However, if you would like to override the AUTO Z feature and manually focus the laser
beam, follow the steps below:
•
•
•
•
Disable AUTO Z in the Setup tab of the VCP.
Position the Focus Carriage (1) above your material.
Place the Focus Tool on top of the material (2).
Raise or lower the Z-axis engraving table so that the
flat edge of the tool rests against the front side of the
Focus Carriage (3). Slowly raise the table until you
observe the tool either tilting or sliding away from the
Focus Carriage (4). This will occur when the bottom
edge of the Focus Carriage meets with the top of the
beveled edge of the Focus Tool (5). The objective is
to stop moving the table at the point where the tool just
starts to move or tilt.
1
5
3
4
2
Step 6 – Running Your Job
If you have an external exhaust system, power it on now. If you have purchased the optional Computer
Controlled Air Cleaner (CCAC), it will automatically power on when processing begins. Once your
material is loaded and the access door is closed you can start your job by left-clicking on the START
button on the VCP or pressing the START button VersaLASER keypad. Once processing is complete,
wait a few seconds for the smoke to clear, or the CCAC to power off, then open the access door and
remove the material. If you would like to repeat the process, load a fresh piece of material, close the
door, and press START again.
NOTE: If you start the engraving process with the door open, the laser beam will not fire, but the
Red Dot pointer will illuminate, showing you where the engraving will be located. If desired, you
may use may use the center of the stroke as your center reference for positioning your material.
Step 7 – Powering Off the VersaLASER
When you have finished processing your materials and wish to power the VersaLASER off, simply leftclick the POWER button in the VCP or hold down the POWER button on the VersaLASER Keypad for 5
seconds until it powers off.
WARNING: NEVER UNPLUG THE USB CABLE WHILE THE VERSALASER IS POWERED ON. THIS
MAY CAUSE THE USB PORT OF YOUR COMPUTER TO ELECTRONICALLY LOCK ITSELF OUT OF
THE WINDOWS OPERATING SYSTEM RENDERING IT UNUSABLE UNTIL RECONFIGURED. IF
THIS OCCURS, PLEASE CONTACT OUR TECHNICAL SUPPORT FOR ASSISTANCE.
Section 3-4
Section 4
Basic System Maintenance
Keeping the VersaLASER clean will ensure the highest quality engraving and prolong the lifetime of the
mechanical components. The frequency of cleaning will depend entirely on the type of material being
engraved, the performance of your exhaust system, the operating environment, and the amount of laser
system usage. Dirt or debris that is allowed to build up on the motion system components may cause
uneven or rough engraving, loss of engraving position, and may cause premature mechanical component
failure. Optical contamination will result in loss of laser power, or premature failure of the optic. Use good
judgment and keep in mind that a clean machine is the best performing machine.
WARNING
Failure to properly and adequately maintain your VersaLASER may invalidate your warranty.
Safety
•
Always make sure that the VersaLASER is powered off and is unplugged before performing any
cleaning or maintenance procedure.
•
When using any chemical, be sure to follow the safe handling procedure printed on its label.
•
NEVER pour or spray any chemical directly onto or into the VersaLASER. Always dampen your
cotton swab, paper towel, or cloth, with the cleaning solution, outside of the machine and then wipe
down the appropriate part.
•
Use only the appropriate chemical to clean specific parts of the system otherwise cosmetic or
operational damage may occur. Pay strict attention to the cleaning procedures outlined in this
section. Unapproved chemicals and inappropriate cleaning methods may invalidate your warranty.
Cleaning and Maintenance Supplies
•
Vacuum cleaner
•
Soap solution mixture of 1 tablespoon (2 cl) liquid soap and 1 quart (liter) of water in a spray bottle
•
Paper towels, cotton cloth or terrycloth, normal facial tissue
•
Denatured alcohol
•
Regular acetone and reagent grade acetone
•
Cotton swabs
•
Lens cleaner (supplied)
•
Set of Allen wrenches sized from .050 to 3/16 inch
BASIC SYSTEM MAINTENANCE
Optics
A visual inspection of the optics should be performed at least once a day. If the optic appears cloudy or
has material deposits formed on the surface, it should be cleaned. If, after inspection, the optic appears
visually uncontaminated, DO NOT clean the optic. Excessive cleaning can damage the optic. The
guidelines listed below describe how to handle optics:
Optics Handling Guidelines
•
•
•
•
•
•
Wash your hands thoroughly before handling any optic.
NEVER touch the surface of the optic with your fingers.
NEVER clean any optic immediately after engraving or cutting.
Wait for the optic to cool, at least 3-5minutes, otherwise it may
crack from thermal shock.
DO NOT use compressed air to clean the optic.
DO NOT clean an optic that is visually clean. Excessive
cleaning may damage the optical coating.
Use only cotton swabs and approved lens cleaner or reagent
grade acetone to clean the optics.
Optics Cleaning Procedure
•
•
•
Dampen an unused cotton swab with lens cleaner.
GENTLY wipe the optical surface with the damp swab. DO NOT RUB HARD.
Control the wiping speed so that you do not leave streaks. If streaks remain, dampen an unused
cotton swab with reagent grade acetone and gently wipe the optical surface to remove the streaks.
Accessing the Optics
1.
2.
Slowly slide the X-axis Arm forward.
Grasp the bottom lip of the cover.
1. Rotate the cover up and over the top
of the X-axis Arm. The cover is held down
by magnets so it may “stick” slightly when
you first begin to pull it forward.
Section 4-2
BASIC SYSTEM MAINTENANCE
#2 Mirror
•
•
•
Locate the #2 Mirror Holder (red). Grasp its protruding handle with your thumb and forefinger and
slide it out. It is held in place by magnets so you may feel a slight resistance when you begin to
slide it out. The picture reveals the backside of the mirror.
Turn the #2 Mirror Holder over and inspect the optic for visual contamination. Clean as necessary.
Re-insert the #2 Mirror Holder by sliding it into the mounting slot until it stops. NOTE: Installing
the mirror backwards will cause the handle to protrude in such a way that the X-axis Arm
cover will not close properly and will destroy the mirror once the laser beam penetrates the
backside of the mirror so be sure that you re-install the mirror correctly.
#3 Mirror and Focus Lens
1.
2.
3.
•
•
•
Focus Carriage
Thumbscrews (2)
Front Cover Plate (red)
1.
2.
#3 Mirror
Focus Lens
Loosen the two thumbscrews completely. They are held captive by retaining clips so they will not
come out all the way.
Grasp the Front Cover Plate. Gently slide it forward and out of the Focus Carriage.
Inspect the #3 Mirror and focus lens and clean as necessary. Be sure to inspect the top and
bottom side of the Focus Lens.
Section 4-3
BASIC SYSTEM MAINTENANCE
Beam Window
•
•
•
The Beam Window is where the laser
beam enters into the engraving area. It is
located in the upper left hand corner,
towards the rear of the engraving area.
It is only necessary to clean the front side
of the Beam Window. The backside is in a
sealed environment and should not get
contaminated.
DO NOT remove the Beam Window for
inspection or cleaning. Inspect the optic in
place and clean if necessary.
1.
Beam Window
The Motion System
•
•
•
Using a vacuum cleaner, vacuum all loose dirt and debris from the inside of the device.
Outside the device, dampen a paper towel, cotton cloth, or terry cloth with the soap solution,
alcohol, or acetone and wipe down the Z-axis Engraving Table. Be careful not to spill any chemical
on any painted surface.
Locate the four X-axis Bearings (1).
Dampen a cotton swab with either the
soap solution or alcohol. Place the
dampened swab against the bearing (2),
grasp the focus carriage (3), slide the
focus carriage left and right, allowing the
bearing to roll in the v-groove (4). Pay
attention to the part of the bearing that
contacts the v-groove both on the top and
the bottom side of the bearing. Also, use
the dampened swab to clean the v-groove
(4). Make sure you clean all 4 bearings.
•
Locate the left and right side Y-axis Rails
and their respective v-grooves as the
arrows in the photos indicate. This is
where the Y-axis Bearings (not visible)
make contact with the rail. Dampen a
cotton swab or cotton cloth with either the
soap solution or alcohol, and clean the vgroove.
Gently slide the X-axis Arm
towards the front or rear of the device so
that you have access to the entire length of
the v-groove.
Section 4-4
BASIC SYSTEM MAINTENANCE
The Main Enclosure
•
•
Clean the acrylic user door with a non-abrasive cotton cloth or facial tissue and the soap solution.
The top window is made out of acrylic. DO NOT use paper towels because they will scratch the
acrylic. Also, DO NOT use window cleaner, alcohol, or acetone, as these chemicals will crack the
acrylic. Only use cleaners compatible with acrylic.
Use a soft cloth dampened with the soap solution to clean the enclosure. DO NOT use alcohol,
acetone, or any other harsh chemical, as this will damage the paint.
Adjustments and Lubrication
•
•
•
•
Periodic adjustments are not required.
The bearings in the motion system will self adjust to take up any clearances as they begin to wear.
All bearings in the system are sealed and do not require lubrication. DO NOT lubricate the
bearings.
The belts are fiber reinforced and will not stretch under normal use.
Optical alignment is not necessary under normal use.
Interlock Safety Check
As mentioned earlier in the Safety section of this manual, the user door is safety interlocked. To verify
that it is functioning normally, perform the following test:
Power on the VersaLASER. Without any job running, open and close the user door. Observe the Red
Dot Pointer turning on and off respectively. If there is no change while opening and closing the door,
power off the VersaLASER and contact our Technical Support Department immediately. DO NOT use
the device until the problem has been corrected.
Fuse Replacement
If the power input fuses are blown, this indicates that there is a problem with a component inside the
VersaLASER and that component must be repaired or replaced otherwise the replacement fuses will blow
also. Please contact our Customer Support Department if the fuses blow.
The fuses are located on the bottom of the power input plug receptacle. To remove and check or replace
the fuses, use a small screwdriver or your fingernails to push the two retaining tabs (arrows) toward each
other and pull out the fuse holder. Pull out the two fuses from the holder and check them with an
ohmmeter or for visual damage. When reinstalling the fuses, be sure to push the holder in all the way
until it “clicks” into position.
Section 4-5
BASIC SYSTEM MAINTENANCE
Cooling Fan Filters
1.
2.
3.
Side cooling fan filter (inside cover)
Rear cooling fan filter (inside cover)
Rear cover mounting screws
4.
Lift the cover straight up and off
The side (#1) and rear (#2) cooling fan filters are located inside the Rear Cover. To access them, remove
the two mounting screws (#3) underneath the rear of the system. Lift the cover straight up and off.
Locate the filters on the inside of the cover (not shown). Remove the plastic retainer and the filter media.
Rinse the filter media with soap and water. Allow them to air dry off or dry them off before re-installing.
Maintenance Schedule
Since the maintenance requirements of the VersaLASER is dependent on the type of material being run,
the quantity of material being removed, the hours of operation, and the quality of the exhaust blower, it
must be user defined.
However, as a starting point, we recommend the following schedule:
•
As necessary
Engraving table
Main enclosure
User door
•
Every 8 hours of engraving
Clean X-axis bearings and bearing tracks
Check Beam window, #2 Mirror, #3 Mirror, and Focus Lens for debris. Clean ONLY if dirty.
•
Every month
Clean side and rear cooling fan filters
•
Every 6 months
Exhaust plenum
If you are noticing a considerable buildup of debris on the optics and the motion system, clean
the system at more frequent intervals. If your system has remained relatively clean, you can
extend your cleaning intervals. Keep in mind that a clean machine is a better performing machine
and can extend the life of the parts as well as reduce the possibility of down time. If you have any
questions about maintaining the laser system, please contact our Customer Support Department.
Section 4-6
Section 5
Accessories
As an addition to the regular VersaLASER, we offer a wide variety of optional accessories. Before
attempting to use any of the accessories in this section, make sure that you are comfortable
operating the VersaLASER, the VCP, and your graphics software.
Rotary Fixture
This accessory allows the VersaLASER to be quickly reconfigured to
raster engrave, vector mark, or vector cut (material dependent),
cylindrical objects such as glassware, etc.
NOTE: If this is your first time using the Rotary Fixture, we highly recommend that you practice
this procedure several times on some inexpensive scrap material before attempting to engrave
the actual object.
Installation
Lower the table all the way down to the bottom of its travel or down far enough so that you can remove
the table and install the Rotary Fixture without interfering with the moving parts of the VersaLASER.
Remove the table by loosening the two captive
thumbscrews (1). Insert your fingers into the two
holes (2) and slowly lift the table out of the
VersaLASER being careful not to bump it around.
Inside the VersaLASER you will find the large
recessed slot with a self-aligning electrical
connector to the right side (1) and the two
alignment pins (2).
ACCESSORIES
On the underside of the Rotary Fixture notice the
self-aligning electrical connector (1) and two
alignment holes (2).
Insert the Rotary Fixture into the slot (OK to do
with the power on because it is hot swappable)
and move it around until the connector engages,
the pins protrude through the alignment holes,
and the fixture sits flat. It will indicate that it is
installed properly by automatically rotating its
cone slightly and a Rotary button will appear in
the Focus tab of the VCP.
Basic Operation
In this example, we are going to engrave a simple drinking glass.
Before loading the glass into the fixture, using a
dry erase marker or some other marking device,
make a mark on the glass where you would like
the place the TOP CENTER point of the graphic.
Using a caliper or similar measuring device,
measure the diameter across the area of the glass
where you marked. Either remember this number
or write it down.
Section 5-2
ACCESSORIES
Lift the lever (1) on the adjustable end of the
fixture (2) and slide it to the left, out of the way.
Place the open end of the glass into the cone, and
slide the adjustable end of the fixture to the right
(3) up against the base of the glass so the glass
rests firmly centered inside of the inverted cone.
Apply light pressure to the right, only enough force
to prevent the glass from slipping while it rotates,
and push the lever down (1) to lock it in place. By
hand, rotate the cone or the glass, until your mark
points as straight up as possible. The electrical
power to the Rotary Fixtures motor is lowered
when it is sitting idle so that you can rotate the
cone of the fixture easily. This is OK and will not
damage the Rotary Fixtures.
Click the Rotary button in the Focus tab of the
VCP. This will bring the X-axis arm directly over
the centerline of the fixture and will also turn on
the Red Dot pointer. Align the Red Dot pointer
with the center of your mark by using your mouse
to click on the main window in the Focus tab of
the VCP. Notice that your Y-axis coordinates will
be locked in place and you can only click left and
right (in the X-axis direction). The Red Dot will
move to the location where you clicked (or type in
the coordinates in the X-Axis and Y-Axis boxes
and click Move). Adjust the position of the Red
Dot until it lines up with your mark, left and right.
If your mark does not line up with the Red Dot in
the rotational direction, simply grasp the glass or
the cone and manually rotate it while it is in the
fixture.
Continue repositioning until the Red Dot is on top of your mark. When it is aligned, in the VCP, locate the
X-axis coordinate number. Either write this number down or remember it. This is the coordinate of the
Red Dot pointer and it is also where you will need to position your graphic. Ignore all other coordinates.
Graphics Setup
Open your graphics software. In this case we will use
CorelDRAW11 and create a new graphic.
Using the Transformations menu, rotate your graphic
90 degrees to the right to match the glasses
orientation. Reposition your graphic so that its RIGHT
CENTER anchor point, which was the TOP CENTER
before we rotated it 90 degrees, is located at the same
X-axis coordinate as the Red Dot pointer. The vertical
placement of where you position your graphic within
your graphic software is irrelevant because the VCP
will automatically match the vertical center of the
graphic with the mark you placed on the glass. Just
make sure that the graphic is positioned within the
printable page area.
Section 5-3
ACCESSORIES
Printing
WARNING: The following steps are critical. Make sure that you enter the correct information
otherwise the VersaLASER might not only adjust the Z-axis and scale the graphic incorrectly,
which can ruin your material, but it can also damage itself if the moving parts of the X-axis crash
into the Rotary Fixture.
Print as if you were engraving a flat object. When the
VersaLASER Settings dialog box pops up, choose
your category and type of material as usual. In the
Fixture section, select Rotary Fixture from the
dropdown list and also type in the diameter of the
glass that you measured earlier and click print. As
usual, the print job will be stored on your hard disk
and become available in the VCP as the next job
ready to be processed.
For each glass that you would like to engrave your
graphic in a precise location, you must follow each of
the steps from the beginning of this section. If it does
not matter to you if the engraving begins anywhere
around the circumference of the glass, then simply load the next glass and run the job again without
having to make any marks or lining up the Red Dot.
Once you have practiced using the Rotary Fixture, you will naturally come up with some shortcuts to save
on setup time.
Cutting Table
The Cutting Table accessory, with its honeycomb design, assists
with the vector cutting of materials by minimizing the surface contact
area of the backside of the material. This simple yet functional
design also provides a slight vacuum for sheet stock to hold it flat
while cutting, and it assists with smoke removal by drawing it down
and underneath the material.
Installation
Lower the table all the way down to the bottom of its travel or down far enough so that you can remove
the table and install the Rotary Fixture without interfering with the moving parts of the VersaLASER.
Remove the table by loosening
the two captive thumbscrews
(1). Insert your fingers into the
two holes (2) and slowly lift the
table out of the VersaLASER
being careful not to bump it
around. On the underside of
the Cutting Table find the selfaligning electrical connector (3)
and two alignment holes (4).
Section 5-4
ACCESSORIES
Inside the VersaLASER you will find the large
recessed slot with a self-aligning electrical
connector to the right side (1) and the two
alignment pins (2).
By using the thumbscrews as handles (3), insert
the Cutting Table into the slot (it is OK to do with
the power on because it is hot swappable) and
move it around until the connector engages and
the fixture sits flat.
Graphics Setup
Open your graphics software. In this case we will use CorelDRAW11 and create a new graphic. Layout
your graphic the same way as if the regular table is installed.
The border of the honeycomb material of the Cutting Table is slightly larger than the printable area of the
VersaLASER. Since there are no reference rulers attached to the table, if you desire, you can use the
Red Dot pointer as your positioning reference.
Printing
Print as normal. When the VersaLASER Settings
dialog box pops up, choose your category and type of
material as usual. In the Fixture section, select NONE
from the dropdown list. Using a caliper or similar
measuring device, measure the thickness of your
material and enter it into the Material Thickness box
and click Print. As usual, the print job will be stored on
your hard disk and become available in the VCP as
the next job ready to be processed. The VersaLASER
automatically knows that the Cutting Table is installed
and it will automatically compensate for the focus
height difference. Place your material directly on the
Cutting Table and proceed to cut.
Note: You may experience a slight “notching effect” on the backside edge of the material. This is
due to the reflectivity of the honeycomb material and is normal. To reduce the effect, try reducing
the Intensity setting. To completely eliminate the effect, you may want to elevate you material off
of the honeycomb by using some sort of spacers, at least 1/8th to 1/4 inch thick, between the
honeycomb surface and your material that does not interfere with the beam path. If you are to do
this, be sure to select Custom for the Fixture type and enter the thickness of your spacer in the
Height box.
Section 5-5
ACCESSORIES
Integrated Cart
Features:
•
•
•
•
•
Size: 25”W x 22” D x 30”H / Weight: 95 lbs
Maximum stability at low cost / Powder-coated, durable
construction
Four “foot” ports to secure the VersaLASER to the cart to
prevent slipping (1)
Two large storage drawers (2 & 3)
Locking casters for moving convenience (4)
Installation
•
•
•
•
Push down on the tabs of the locking casters so that the cart does not roll.
Obtain the assistance of another person. One person should grasp the front of the machine and
place his hands where the arrows indicate. The other person should stand in the back of the machine
and place his hands where the arrows indicate.
Pick up the VersaLASER, place it on top of the cart and locate the VersaLASER’s four feet into the
four, foot ports.
If this is the first time you will be making connections to the VersaLASER, proceed back to Section 2
to complete the installation process.
Computer Controlled Air Cleaner / Cart (CCAC)
Features
•
•
•
•
•
•
•
Size: 25”W x 22” D x 30”H / Weight: 200 lbs
Eliminates smoke, dust and fumes from the engraving process.
Controlled through a USB port connected to the VersaLASER and is activated only when jobs are
in process
Filters are concealed within the two drawers
Foot ports to secure the VersaLASER to the cart to prevent slipping
Powder-coated, durable construction
Locking casters for moving convenience
Section 5-6
ACCESSORIES
Figure 1 (Front View)
1.
2.
3.
4.
Four “foot” ports to secure the
VersaLASER to the cart and prevent
slipping (1)
Pre-filter and HEPA filter drawer
Charcoal filter drawer
Locking casters
Figure 2 (Rear View)
1.
2.
3.
4.
5.
Exhaust intake port
Cable retainer clips
USB port
Exhaust output port
Power inlet, electrical power requirement
label, Warning label, fuse holder
How it works
This device contains a pre-filter to remove coarse (larger) particulates, a HEPA filter to remove fine
(smaller) particulates, an activated charcoal filter to remove fumes and odors, and a high-pressure
vacuum motor to pull these byproducts through the filters. It also serves as a moveable base, or stand,
for the VersaLASER. To reduce noise, minimize electrical consumption, and prolong filter life, the CCAC
is controlled from the VersaLASER via a USB cable. The VersaLASER powers on the CCAC when
processing begins and powers it off a few seconds after the processing completes to remove any
remaining particulates, fumes, or smoke.
NOTE: When the filters are reaching their useful life, the VCP software will prompt you and inform
you how much of a percent of its useful life has expired, starting at 85%. That would be a good
time to reorder filters.
Section 5-7
ACCESSORIES
Installation
•
•
•
Push down on the tabs of the locking casters so that the cart does not roll.
Obtain the assistance of another person. One person should grasp the front of the machine and
place his hands where the arrows indicate. The other person should stand in the back of the machine
and place his hands where the arrows indicate.
Pick up the VersaLASER, place it on top of the cart and locate the VersaLASER’s four feet into the
four, foot ports.
Making the Connections
NOTE: Before continuing, you MUST have completed Section 2 of this manual which includes
loading the VersaLASER Installation Software. If not, go back to that section, complete the
installation, and return here.
•
•
•
•
•
Connect the short exhaust hose and secure it with the provided hose clamps (1) and install the sheet
metal cover over the exhaust hose.
Make sure you computer is powered on and booted into Windows.
As instructed in Section 2 plug in a power cord to the VersaLASER’s power inlet (6) and attach a USB
cable from your computer to the VersaLASER USB port 1.
Plug in a power cord to the CCAC’s power inlet (5) and then connect a 3 ft. USB cable between the
second USB port (2) of the VersaLASER and the USB port located towards the bottom of the CCAC
(3). NOTE: Windows will indicate to you that it has recognized the device by powering it on for
about 5 seconds and then automatically turning it off. Once this occurs, it is ready for use. If
Windows does not recognize the device it will prompt you for the device driver disk again.
Insert your VersaLASER Installation CD-ROM and follow the on-screen instructions.
Secure the USB cable using the retainer clips (4).
Section 5-8
ACCESSORIES
Computer Controlled Compressed Air Unit
This integrated accessory provides dry, oil-free compressed air to protect the
VersaLASER’s optics and assist with cutting and engraving of materials that tend
to flame up or produce heavy quantities of smoke or debris. It MUST be used in
conjunction with either the Air Assist Cone or Back Sweep accessories. The Air
Compressor is designed to automatically power on when the VersaLASER starts a
print job, and then power off automatically and finishes it.
WARNING: The use of compressed air IS NOT intended to decrease
maintenance of the VersaLASER. Actually, it has been known to increase the
frequency of cleaning maintenance due to debris being blown around, inside the engraving area,
during proce ssing.
Features
•
•
•
•
•
Size: 12”W x 6” D x 14”H / Weight: 14 lbs
Controlled through a USB port connected to the VersaLASER and is activated only when jobs are
in process
An air dryer is integrated into the unit to remove the moisture that can damage the optics.
Noise insulated for quiet operation.
Powder-coated finish, durable construction.
Installation
Push down on the release lever of the fitting on the
back of the VersaLASER until it “clicks” (1). Insert
one end of the blue hose into the fitting until it also
“clicks”.
Connect the other end of the blue hose to the Air
Compressor (1) in the same fashion. Plug in a
power cord from your power source to the power
inlet (3) of the CCCAU.
NOTE: Before continuing, you MUST have completed Section 2 of this manual which includes
connecting the USB cable and power cord to the VersaLASER and loading the VersaLASER
Installation Software. If not, go back to that section, complete the installation, and return here.
•
•
Make sure you computer is powered on and booted into Windows.
Connect a 3 ft. USB cable between the VersaLASER’s USB port #3 and the USB port located
towards the bottom of the CCCA U. NOTE: Windows will indicate to you that it has recognized
the device by powering it on for about 5 seconds and then automatically turning it off. Once
this occurs, it is ready for use. If Windows does not recognize the device it will prompt you
for the device driver disk again. Insert your VersaLASER Installation CD-ROM and follow the
on-screen instructions.
Section 5-9
ACCESSORIES
Periodic Maintenance
At least once per month, check the condition of
the two filters on the back of the device. If they
are plugged, simply remove them by snapping off
the cover, removing the filter media, washing it out
with ordinary soap and water, dry the filters, and
re-install. If the filters remained relatively clean,
adjust your maintenance schedule accordingly.
Below the device you will find a tray. With your
hands, slide the tray forwards. Inside the tray you
will find sponges that are designed to absorb the
water that was generated from condensation. In
humid areas you may need to check the sponges
more than once per week. In drier areas it is
possible to extend that period. Check them at
least once per week and adjust your schedule
accordingly.
The sponges may need to be
cleaned with soap and water and dried out, or
replaced.
Air Assist Cone
This accessory also requires the Computer Controlled Compressed Air Unit.
NEVER install the Air Assist Cone without having the Computer
Controlled Air Compressor Unit installed and operating, and
NEVER shut off the needle valve completely.
The lack of
WARNING
pressurized air present in the cone, during processing, will allow
smoke to contaminate the lens and can destroy it within seconds.
The cone attaches to the base of the Focus Carriage and will force air directly onto the surface of your
material to reduce the burning effects of the material from the laser beams intense heat. It also helps
disperse the smoke and gases that are created from the cutting or engraving of materials. It contains a
needle-valve assembly to control airflow through the cone.
Section 5-10
ACCESSORIES
Installation
Lower the table down far enough so that you can
attach the cone. Power off the VersaLASER. By
hand, move the X-axis arm and Focus Carriage to
a comfortable working position in the field. Remove
(if present) the plug (1) with a screwdriver.
Using a 3/16 socket tool or 5mm wrench, attach the
needle valve to the port where you removed the
plug. Be careful not to cross-thread the small
device when installing and do not over tighten it.
Loosen the thumbscrew (1) on the side of the
Focus Carriage (if already attached). Insert the
cone (2) by pushing it straight up into the bottom of
the Focus Carriage ensuring that it is up all the way
and is seated properly, and gently tighten the
thumbscrew. If this is the first time using the cone,
open the needle valve (3) all the way, counter
clockwise. This will result in maximum airflow
through the cone. To lock the adjustment in place,
rotate the round locking nut (4) clockwise until it
seats.
Usage
Power on the VersaLASER and run a job. Make sure that the CCAC unit turns on (if purchased) or your
compressed air source is operating when the job starts processing. Observe how the smoke is pushed
away from the tip of the cone. If you would like to reduce the flow, pause the job and adjust the needle
valve as necessary.
WARNING
NEVER install the Air Assist Cone without having the Computer Controlled Air
Compressor Unit installed and operating, and NEVER shut off the needle valve
completely. The lack of pressurized air present in the cone, during processing, will allow
smoke to contaminate the lens and can destroy it within seconds.
Section 5-11
ACCESSORIES
Removal
Loosen the thumbscrew and pull the Cone downwards. Leave the thumbscrew attached to the focus
Carriage by re-tightening it so that it doesn’t get lost. Either detach the accessory by unscrewing the
needle valve and reinstalling the plug (the same way you installed it), or by the preferred method of unattaching the hose from the needle valve by either using a wrench to loosen the nut at the end of the hose
or by simply using the cone as your wrench and turning it counter clockwise. This way, the needle valve
remains attached to the Focus Carriage for the next time you install the Cone. The same needle valve is
also used for the Back Sweep accessory.
Back Sweep
This accessory also requires the Computer Controlled Compressed Air Unit.
The Back Sweep attaches to the Focus Carriage and is used to force compressed
air either directly onto the surface of your material, from an angle, or it can be
adjusted to where it can blow the smoke straight back to the Exhaust Plenum or at
various, user defined angles. This accessory can be used to reduce the burning
effects of the material from the laser beams intense heat, or to direct the smoke
away from the beam during processing. It contains a needle-valve assembly to
control airflow, one height adjustment, and one angle adjustment.
Installation
Lower the table down far enough so that you can
easily attach the Back Sweep. Power off the
VersaLASER. By hand, move the X-axis arm and
Focus Carriage to a comfortable working position in
the field. Remove (if present) the plug (1) with a
screwdriver. Attach the mounting block (2), if not
already attached, with the 4-40 screw and using a
3/32 Allen wrench.
Using a 3/16 socket tool or 5mm wrench, attach the
needle valve (1) to the port where you removed the
plug. Be careful not to cross-thread the small
device when installing and do not over tighten it.
Attach the Back Sweep (2) to the mounting block
using the thumbscrew (3) and making sure that it is
adjusted so that it is as high up (4) as possible.
Section 5-12
ACCESSORIES
Power on the VersaLASER. Load some scrap
material of the same type you intend to process
and set focus using the Focus Tool. Adjust the
angle of the nozzle by loosening the thumbscrew
(1), rotating the bracket, and re-tightening the
thumbscrew. You can also adjust the height (2) by
loosening the mounting thumbscrew, making the
adjustment and re-tightening the thumbscrew. Use
the Red Dot pointer as your guide to where the
laser beam will strike the material.
WARNING: Since the Back Sweep hangs
downwards toward the surface of your material
and the surface of the table, ensure that the
motion of the Focus Carriage will not cause the
Back Sweep to mechanically interfere with your
material or components of the VersaLASER
otherwise serious damage may occur.
Usage
If this is the first time using the Back Sweep, open the needle valve all the way, counter clockwise. This
will result in maximum airflow. To lock the adjustment in place, rotate the round locking nut clockwise
until it seats.
Load and run a job. Make sure that the CCAC unit turns on (if purchased) or your compressed air source
is operating when the job starts processing. Observe how the smoke is being pushed away. If you would
like to reduce the flow or to change the angle or height of the airflow, pause the job and adjust as
necessary.
Removal
Remove the height adjustment thumbscrew and detach the Back Sweep from the mount. Re-attach the
thumbscrew to the mount so that it doesn’t get lost. Either detach the accessory by unscrewing the
needle valve and reinstalling the plug (the same way you installed it), or by the preferred method of unattaching the hose from the needle valve by either using a wrench to loosen the nut at the end of the hose
or by simply using the cone as your wrench and turning it counter clockwise. This way, the needle valve
remains attached to the Focus Carriage for the next time you install the accessory. The same needle
valve is also used for the Air Assist Cone accessory.
Section 5-13