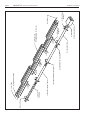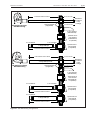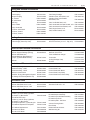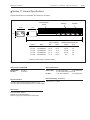
1
®
Vantage EV
Installation, Operation &
Service Manual
EV-80
EV-110
EV-140
EV-170
EV-200
FOR YOUR SAFETY
If you smell gas:
1. Open windows.
2. DO NOT try to light any appliance.
3. DO NOT use electrical switches.
4. DO NOT use any telephone in your building.
5. Leave the building.
6. Immediately call your local gas supplier after
leaving the building. Follow the gas supplier’s
instructions.
7. If you cannot reach your gas supplier, call the
Fire Department.
APPROVED
Installer
Please take the time to read and understand
these instructions prior to any installation. Installer
must give a copy of this manual to the owner.
Owner
Keep this manual in a safe place to provide your
serviceman with information should it become
necessary.
Roberts-Gordon, Inc.
Roberts-Gordon Canada Inc.
1250 William Street
P.O. Box 44
Buffalo, New York 14240-0044
Telephone: 716.852.4400
Fax: 716.852.0854
Toll Free: 800.828.7450
241 South Service Road West
Grimsby, Ontario L3M 1Y7 Canada
Telephone: 905.945.5403
Fax: 905.945.0511
Toll Free: 800.663.9025
http://www.rg-inc.com
© Copyright 1998 Roberts-Gordon, Inc.
P/N 151100NA
Rev. B
11/98
Table of Contents
1
2
Warnings . . . . . . . . . . . . . . . . . . . . . . . . . . . . . . . . 1
Read this section carefully. Improper installation,
adjustment, operation or maintenance will result
in death, injury or property damage.
9
General Requirements . . . . . . . . . . . . . . . . . . . . . .21
Manifold Pipe Requirements . . . . . . . . . . . . . . . . . .21
Venting the Vacuum Pump . . . . . . . . . . . . . . . . . . .21
EP-200 Installation . . . . . . . . . . . . . . . . . . . . . . . . .22
EP-100 Installation . . . . . . . . . . . . . . . . . . . . . . . . .22
Installation Precautions . . . . . . . . . . . . . . . . . . . . . .22
Side Wall Venting Configurations . . . . . . . . . . . . . .23
Vacuum Pump Assembly and Mounting . . . . . . . . .24
Outside Combustion Air Supply . . . . . . . . . . . . . . .25
Introduction . . . . . . . . . . . . . . . . . . . . . . . . . . . . . . .2
Checking Shipment . . . . . . . . . . . . . . . . . . . . . . . . . .2
Installer Responsibility . . . . . . . . . . . . . . . . . . . . . . .2
3
Planning . . . . . . . . . . . . . . . . . . . . . . . . . . . . . . . . . 2
National Standards and Applicable Codes
Gas Codes . . . . . . . . . . . . . . . . . . . . . . . . . . . . . .2
Aircraft Hangars . . . . . . . . . . . . . . . . . . . . . . . . . .2
Public Garages . . . . . . . . . . . . . . . . . . . . . . . . . . .2
Electrical . . . . . . . . . . . . . . . . . . . . . . . . . . . . . . . .3
Venting . . . . . . . . . . . . . . . . . . . . . . . . . . . . . . . . .3
Hazardous Locations . . . . . . . . . . . . . . . . . . . . . .3
Critical Considerations . . . . . . . . . . . . . . . . . . . . . . .4
Installation Procedure . . . . . . . . . . . . . . . . . . . . . . . .4
4
Design Requirements . . . . . . . . . . . . . . . . . . . . . . .5
5
Clearances to Combustibles . . . . . . . . . . . . . . . . .6
6
Standard Parts List . . . . . . . . . . . . . . . . . . . . . . . . .8
7
Assembly Overview . . . . . . . . . . . . . . . . . . . . . . .10
8
Venting and Ducting . . . . . . . . . . . . . . . . . . . . . . .21
10 Gas Piping . . . . . . . . . . . . . . . . . . . . . . . . . . . . . . .27
11 Wiring . . . . . . . . . . . . . . . . . . . . . . . . . . . . . . . . . . .28
Control Methods . . . . . . . . . . . . . . . . . . . . . . . . . . .28
Critical Considerations . . . . . . . . . . . . . . . . . . . . . .28
SmartSet™ Energy Management System . . . . . . . .28
Internal Wiring . . . . . . . . . . . . . . . . . . . . . . . . . . . . .29
Ladder Diagram . . . . . . . . . . . . . . . . . . . . . . . . . . .29
Vacuum Pump Motor Wiring . . . . . . . . . . . . . . . . . .30
Panel Box Label . . . . . . . . . . . . . . . . . . . . . . . . . . .31
Thermostat Wiring . . . . . . . . . . . . . . . . . . . . . . . . .32
1 Zone/2 Burner . . . . . . . . . . . . . . . . . . . . . . . .33
2 Zone/4 Burner . . . . . . . . . . . . . . . . . . . . . . . .34
12 Operation . . . . . . . . . . . . . . . . . . . . . . . . . . . . . . . .35
Checking the Gas Line . . . . . . . . . . . . . . . . . . . . .35
Checking the Electrical System . . . . . . . . . . . . . . .35
Starting the System . . . . . . . . . . . . . . . . . . . . . . . .35
Setting the Vacuum . . . . . . . . . . . . . . . . . . . . . . . . .36
Sequence of Operation . . . . . . . . . . . . . . . . . . . . . .37
Overview Key . . . . . . . . . . . . . . . . . . . . . . . . . . . . .10
EV-80 Layout . . . . . . . . . . . . . . . . . . . . . . . . . . . . .11
EV-110 Layout . . . . . . . . . . . . . . . . . . . . . . . . . . . .12
EV-140 Layout . . . . . . . . . . . . . . . . . . . . . . . . . . . .13
EV-170 Layout . . . . . . . . . . . . . . . . . . . . . . . . . . . .14
EV-200 Layout . . . . . . . . . . . . . . . . . . . . . . . . . . . .15
13 Troubleshooting . . . . . . . . . . . . . . . . . . . . . . . . . .38
Component Installation . . . . . . . . . . . . . . . . . . . .16
14 Maintenance . . . . . . . . . . . . . . . . . . . . . . . . . . . . .39
Tube Coupling Installation . . . . . . . . . . . . . . . . . . . .16
Elbow Package Installation . . . . . . . . . . . . . . . . . . .17
Reflector End Cap Installation . . . . . . . . . . . . . . . .17
Suspension Details . . . . . . . . . . . . . . . . . . . . . . . . .18
Turbulator Installation . . . . . . . . . . . . . . . . . . . . . . .18
Side Extension Reflector Installation . . . . . . . . . . .19
Decorative Grille Installation . . . . . . . . . . . . . . . . . .20
15 Illustrated Parts List
. . . . . . . . . . . . . . . . . . . . . .40
16 Engineering Specifications . . . . . . . . . . . . . . . . .43
17 General Specifications . . . . . . . . . . . . . . . . . . . . .44
18 VANTAGE® EV Limited Warranty . . . . . . . . . . . . .45
©1998
All rights reserved. No part of this work covered by the copyrights herein
may be reproduced or copied in any form or by any means – graphic,
electronic, or mechanical, including photocopying, recording, taping, or
information storage and retrieval systems – without written permission of
Roberts-Gordon.
Printed in U.S.A.
ROBERTS-GORDON
SECTION
WARNING
FIRE OR EXPLOSION HAZARD
Failure to follow these instructions will result in
personal injury or property damage:
1. Read this manual carefully before installing or
servicing this equipment. Improper installation,
service or maintenance will result in death, injury or
property damage.
2. Check clearances given on the outside of each burner to
make sure the product is suitable for your application.
3. Installer must be a trained, experienced service
technician or representative.
4. All service must be performed only by a trained
service technician or representative.
5. After installation is complete, check product operation
as provided in these instructions.
Combustibles: Failure to maintain the specified
minimum clearances to combustibles will result in a
serious fire hazard. Do not locate flammable or
combustible materials within this distance. Signs should
be posted in storage areas to specify maximum stacking
height to maintain required clearances to combustibles.
Do not locate in hazardous atmospheres containing
flammable vapors or combustible dust. United States:
Installations in public garages or airplane hangars are
permitted when in accordance with ANSI Z83.6 and
NFPA-409 and 88 Codes. Canada: Installation in public
garages is permitted when in accordance with CAN/CGA
B.149.1 or .2. Installation in air plane hangars is
permitted when in accordance with the requirements of
the enforcing agency.
Vehicles: Minimum clearances must be maintained from
vehicles parked below the heater. Ensure that adequate
clearance is maintained where vehicle lifts are in
operation.
Gas Connection: There is an expansion of the radiant
pipe with each firing cycle, and this will cause the burner
to move with respect to the gas line. This can cause a
gas leak resulting in an unsafe condition if the gas
connection is not made strictly in accordance with Figure
25 of these instructions.
Ignition: This appliance does not have a pilot. It is
equipped with an ignition device which automatically
lights the burner. Do not try to light the burner with a
match.
Mechanical Hazard–Suspension: Use appropriate
suspension hardware, beam clamps (rod or perforated
strap) and turnbuckles at predetermined locations. The
weight and normal movement of the heating system may
cause support failure if the following minimum suspension
requirements are not met: distance between supports must
be 10 ft. (3 m) or less; chain must be galvanized straight link
welded chain, 3/16” or larger in Diameter, with a working
load limit of a mimimum of 750 lbs. Failure of the supports
will cause death, injury or property damage.
1:
WA R N I N G S
pg 1
WARNING
Failure to follow these instructions will result in
personal injury or property damage:
Do not use in an atmosphere containing halogenated
hydrocarbons or other corrosive chemicals. Some
compounds in the air can be drawn into the equipment
and can cause an accelerated rate of corrosion of some
parts of the heat exchanger. The use of such chemical
compounds in or near the enclosure should be avoided
where a longer life of the burner, tubing and other parts
is desirable.
Caution should be used when running the system near
combustible materials such as wood, paper, rubber, etc.
Consideration should be given to partitions, storage
racks, hoists, building construction, etc. Figure 2 gives
minimum acceptable clearances to combustibles.
If the building has a slight negative pressure or
contaminants are present in the air, an outside
combustion air supply to the heaters is strongly
recommended.
CAUTION
Failure to follow these instructions will result in
damage to the system components:
Do not high pressure test the gas piping with the burners
connected. Failure to follow this procedure will exceed
the pressure rating of burner gas controls and this will
require complete replacement of these parts.
This heater is designed for heating nonresidential indoor
spaces. These instructions, the layout drawing, local
codes and ordinances, and applicable standards that
apply to gas piping, electrical wiring, venting, etc., must
be thoroughly understood before proceeding with the
installation
WARNING
Improper installation, adjustment, alteration,
service or maintenance will result in death, injury
or proper ty damage. Read the installation,
operation and service manual thoroughly before
installing or ser vicing this equipment. For
assistance or additional information, consult a
qualified installer, service agency or your gas
supplier.
FOR YOUR SAFETY:
Do not store or use gasoline or other flammable objects,
liquids or vapors in the vicinity of this heater or any other
appliance.
pg 2
VANTAGE® EV
ROBERTS-GORDON
I N S TA L L AT I O N M A N U A L
Section 2. Introduction
Roberts-Gordon pioneered low-intensity infrared heating
systems in 1962 with the introduction of its revolutionary
custom-engineered CORAYVAC® system. Now RobertsGordon offers over 35 years of infrared expertise in an
economical vacuum system.
VANTAGE ® EV model heaters are low-cost, noncondensing, field assembled vacuum-assisted heating
systems that are easy to install and require only minimal
maintenance. They are designed to provide years of
economical operation and trouble-free service.
VANTAGE® EV heaters are ideal for installations requiring
minimum roof or wall penetrations to exhaust combustion
products. This is especially beneficial in large open
spaces and buildings with high (25’+) ceilings.
With some systems, zone control is eliminated due to
manifolding requirements. With VANTAGE® EV, up to 4
zones can be accommodated.
Checking Shipment
Check the shipment against the Bill of Lading for
shortages. Also, check for external damage to cartons.
Note any shortages, and/or external damage to cartons
on the Bill of Lading in the presence of the carrier. The
carrier should acknowledge any shortages or damage by
initialing this “noted” Bill of Lading.
Immediately report any claims for damaged material, or
shortages that were not evident at the time of shipment,
to the carrier and your Rober ts-Gordon Factor y
Representative.
Installer Responsibility
All heaters and associated gas piping should be installed
in accordance with applicable specifications and this
installation made only by firms (or individuals) well
qualified in this type of work. Consult local Building
Inspectors, Fire Marshals or your local Roberts-Gordon
Representative for guidance.
VANTAGE ® EV heaters are installed on the basis of
information given in a layout drawing, which together with
the cited codes and regulations, comprise the basic
information needed to complete the installation. The
installer must furnish all needed material that is not
fur nished as standard equipment, and it is his
responsibility to see that such materials, as well as the
installation methods he uses, result in a job that is
workmanlike and in compliance with all applicable codes.
Roberts-Gordon Factory Representatives have had
training and experience in the application of this
equipment and can be called on for suggestions about
installation which can save material and money.
Section 3. Planning
The following codes and instructions should be followed
when planning the installation of the heater. In addition to
these instructions, the warnings in Section 1 must be
carefully adhered to since improper installation will result
in death, injury or property damage.
National Standards and Applicable Codes
Gas Codes
The type of gas appearing on the nameplate must be the
type of gas used. Installation must comply with local
codes and recommendations of the local gas company.
United States: Refer to National Fuel Gas Code, ANSI
Z223.1 - latest revision, (same as NFPA Bulletin 54).
Canada: Refer to CAN/CGA B149.1 and B149.2:
Installation Codes for Gas Burning Appliances.
• Clearance between the heater and its vent and
adjacent combustible material (which is part of the
building or its contents) shall be maintained to conform
with the above listed codes.
Aircraft Hangars
Installation in aircraft hangars must be in accordance with
the following codes: United States: Refer to Standard for
Aircraft Hangars, ANSI/NFPA-409 - latest revision.
Canada: Refer to Standard CAN/CGA B149.
• Heaters in aircraft storage or service areas shall be
installed a minimum of 10 ft. above the upper surface of
wings or engine enclosures of the highest aircraft which
may be housed in the hangar. (This should be
measured from the bottom of the heater to the wing or
engine enclosure, whichever is highest from the floor).
• In other sections of aircraft hangars, such as shops or
office, heaters must not be installed less than eight feet
above the floor.
• Heaters installed in aircraft hangars shall be located so
as not to be subject to damage by aircraft, cranes,
movable scaffolding or other objects.
Public Garages
Installation in garages must be in accordance with the
following codes: United States: Standard for Parking
Structures NFPA-88A - latest revision or the Standard for
Repair Garages, NFPA 88B - latest revision. Canada:
Refer to CAN/CGA B149.1 and B149.2: Installation
Codes for Gas Burning Appliances.
• Heaters must not be installed less than eight feet above
the floor. Minimum clearances to combustibles must be
maintained from vehicles parked below the heater.
• When installed over hoists, minimum clearances to
combustibles must be maintained from the uppermost
point on the hoist.
ROBERTS-GORDON
SECTION
Electrical
3:
PLANNING–CODES
pg 3
Hazardous Locations
WARNING
WARNING
Electrical Shock Hazard
Heater must be installed and grounded
according to national codes.
Failure to follow these instructions will
result in death or electrical shock.
The heater must be electrically grounded in accordance
with the following codes: United States: Refer to National
Electrical Code, ANSI/NFPA-70 - latest revision. Wiring
must conform to the most current National Electrical
Code, local ordinances, and any special diagrams
furnished. Canada: Refer to Canadian Electrical Code,
CSA C22.1 Part 1 - latest revision.
Fire Hazard
Burn Hazard
Some objects will catch fire
or explode when placed close
to heater.
Keep all persons, especially
children, away from heater.
Keep all flammable objects,
liquids and vapors the
required safe distances away
from heater.
Failure to follow these
instructions will result in
death or injury.
Do not touch any part of the
heater.
Heater is very hot.
Failure to follow these
instructions will result in
severe injury.
Venting
WARNING
Carbon Monoxide Hazard
Unvented heaters must be interlocked with
sufficient building exhaust.
Vented heaters must be vented outdoors.
Unvented and vented heaters must be
installed according to the installation manual.
Failure to follow these instructions will result
in death or injury.
The venting must be installed in accordance with the
following codes: United States: Refer to NFPA-54/ANSIZ223.1 - latest revision, National Fuel Gas Code.
Canada: Refer to CAN/CGA B149.1 and B149.2:
Installation Codes for Gas Burning Appliances.
Partial information with regard to these codes is provided
in Section 9 of this installation manual with regard to size
and configurations for venting arrangements.
Any portion of vent pipe passing through a combustible
wall must be dual insulated and have an approved
thimble to conform with above listed codes.
ATTENTION
Risque d’incen
Risque de brûlure
Certains objets placés près
du radiateur peuvent
s’enflammer ou exploser.
Ne laisser personne, en
particulier des enfants,
s’approcher du radiateur.
Tenir tous les objets, liquides
et vapeurs inflammables à la
distance de sécurité requise
du radiateur.
Ne toucher aucune partie du
radiateur.
Le non-respect de ces
consignes peut causer mort,
blessures ou dommage
matériel.
Le non-respect de ces
consignes peut entraîner des
blessures graves.
Le radiateur est brûlant.
Where there is the possibility of exposure to combustible
airborne material or vapor, consult the local Fire Marshall,
the fire insurance carrier or other authorities for approval
of the proposed installation.
pg 4
VANTAGE® EV
ROBERTS-GORDON
I N S TA L L AT I O N M A N U A L
Critical Considerations
Installation Procedure
WARNING
WARNING
Several steps are involved in the installation of the heater.
Do not attempt to operate the heater until all steps of the
installation have been accomplished.
Failure to follow these instructions will result in death,
injury or property damage.
Fire Hazard
Some objects will catch fire or explode when placed close to
heater.
Keep all flammable objects, liquids and vapors the required
safe distances away from heater.
Failure to follow these instructions will result in death, injury
or property damage.
ATTENTION
Risque d’incen
Certains objets placés près du radiateur peuvent s’enflammer
ou exploser.
Tenir tous les objets, liquides et vapeurs inflammables à la
distance de sécurité requise du radiateur.
Le non-respect de ces consignes peut causer mort, blessures
ou dommage matériel.
The EV-Series is a suspended heater. Therefore, its
stability, flexibility, and safety are very important. Before
starting installation, be sure the system can meet the
following requirements:
Take maximum advantage of the building upper structure,
beams, joists, purlins, etc., from which to suspend the
heater. There is no unique sequence for installation of the
tubing. On-site observation will usually reveal a logical
sequence. Watch for swinging doors, overhead cranes,
car lifts, etc. Reflectors and tubing can be installed as you
move along. Carefully adjust system pitch at each
position to level the heater. Pitch down 1/2" per 20' (1 cm
per 5 m ) away from burner.
Do Not:
• Pressure test the gas line using high pressure (greater
than 1/2 PSIG) without closing the high-pressure
shutoff cocks. Failure to do so will result in damage to
the burners.
Do:
• Familiarize yourself with local and national codes.
• Develop a planned procedure which will conserve
material and labor on the job site.
• Maintain specified clearances to combustibles, and
safe distance from heat-sensitive material, equipment
and work stations.
• Check to see that all material and equipment is on the
job site before starting installation.
• Provide a suspension with vertical length of chain or
swinging rod. Be sure the suspension system is
sufficiently flexible to accommodate thermal expansion
which occurs as the system heats up (see Figure 15).
• Install the gas connector only as shown in instructions.
(See Figure 25)
• Provide access to burners for servicing, preferably on
both sides, above, and behind for burner removal.
• Provide for a minimum of 24” (61 cm) of clearance
between burners and building walls. Always observe
minimum clearances to combustibles.
• Be sure the heater has a downward pitch of 1/2" per 20'
(1 cm per 5 m) away from the burner.
• Provide signs in storage areas to specify maximum
stacking height to maintain required clearances to
combustibles.
• Plan location of supports. Locate a support near all
elbows.
• Allow for thermal expansion of the hot tube.
• Have slip joints where required between reflectors to
keep them from buckling or coming apart.
• Provide one square inch of free air opening to each
1,000 BTU/hr of heater input but not less than 100
square inches in enclosed spaces. (6.5 cm2 per 250
kcal/hr). One opening should be within 12 inches (30
cm) of the top and one within 12 inches (30 cm) of the
bottom of the enclosure.
ROBERTS-GORDON
SECTION
4:
pg 5
DESIGN REQUIREMENTS
Section 4. Design Requirements
EV-Series systems are typically shipped as burner
packages and tube and accessory packages. The tube
and accessory packages contain enough tube and
reflector and hanging parts for one EV burner. Elbows,
tees, tailpipe, vacuum pumps, controls, and any other
parts must be purchased separately. See Figure 1 below
for a general overview of a simple EV system. Depending
on system requirements, EV systems may be controlled
by either the control panel (shown) or by a relay system.
but are not required. The system design parameters are
such that the manifold sections are not subjected to
condensate. As a precaution, it is recommended that
aluminized heat-treated or coated tubing is used for the
manifold to increase system life and to handle the initial
condensation during start-up. Damper couplings may be
necessary to balance system vacuum.
Table 1 below summarizes the design requirements for a
VANTAGE® EV system. For “mixed” systems: the number
of burners allowed corresponds to the number of burners
allowed for the particular pump and the LARGEST firing
rate being used.
A number of radiant tube sections are interconnected by
manifold sections to a vacuum pump to form a complete
system. Reflectors can be used over the manifold pipe
Table 1. Design Requirements
Burner Model:
EV-80
EV-110
EV-140
EV-170
EV-200
Maximum # of Burners Allowed per Vacuum Pump (EP-100)
4
4
4
2
2
Maximum # of Burners Allowed per Vacuum Pump (EP-200)
6
6
6
4
4
Radiant Tube Length (ft.)
30
40
50
60
70
Maximum Manifold Length (ft.)
20
20
20
30
30
Minimum Distance from Burner to Elbow (ft.)
20
20
20
20
20
Elbows Allowed per Burner
2
2
2
2
2
Elbow
Turbulator
Radiant Tube
Damper Couplings
(if necessary)
Transition Tube
Radiant Tube
Turbulator
Zone 2 Burner
Manifold Pipe
(coated or aluminized)
Tee
Radiant Tube
Vacuum Pump
Zone 2
Thermostat
Exhaust to Outside
Radiant Tube
Electronic Control Panel
(optional)
Coupling
Transition Tube
Zone 1 Burner
Zone 1 Thermostat
Figure 1. Illustrative View of Typical VANTAGE® EV Installation
6
VA N TAG E ® E V
ROBERTS -GORDON
I N S TA L L AT I O N M A N U A L
Section 5. Clearances to Combustibles
WARNING
Fire Hazard
Burn Hazard
Some objects will catch fire
or explode when placed close
to heater.
Keep all persons, especially
children, away from heater.
Keep all flammable objects,
liquids and vapors the
required safe distances away
from heater.
Failure to follow these
instructions will result in
death or injury.
Do not touch any part of the
heater.
Heater is very hot.
Failure to follow these
instructions will result in
severe injury.
ATTENTION
Risque d’incen
Risque de brûlure
Certains objets placés près
du radiateur peuvent
s’enflammer ou exploser.
Ne laisser personne, en
particulier des enfants,
s’approcher du radiateur.
Tenir tous les objets, liquides
et vapeurs inflammables à la
distance de sécurité requise
du radiateur.
Ne toucher aucune partie du
radiateur.
Le non-respect de ces
consignes peut causer mort,
blessures ou dommage
matériel.
Le non-respect de ces
consignes peut entraîner des
blessures graves.
Le radiateur est brûlant.
In all situations, clearances to combustibles must be
maintained. Failure to observe clearances to combustibles
will result in death, severe injury or property damage. Signs
should be posted in storage areas to specify the maximum
stacking height to maintain required clearances to
combustibles. Minimum clearances must be maintained
from vehicles parked below the heater. Caution should be
used when running the system near combustible materials
such as wood, paper, rubber, etc. Consideration should be
given to partitions, storage racks, hoists, building
construction, etc. Figures 2a through 2f give the minimum
acceptable clearances to combustibles.
ROBERTS-GORDON
SECTION
5:
pg 7
C L E A R A N C E S TO C O M BU S T I B L E S
NOTE: All dimensions are in inches.
A
B
C
D
Model
A B C D
EV-80
4 33 63 33
EV-110
4 33 63 33
EV-140
4 36 66 36
EV-170
4 39 73 39
EV-200
6 45 78 45
20 ft. downstream (all models)
4 17 40 17
Figure 2a. Standard Reflector
A
C
D
B
C
B
D
Figure 2c. 2 Side Reflectors
B
D
C
Figure 2d. 45° Tilt Reflector
Model
A B C D
EV-80
4 4 69 51
EV-110
4 4 69 51
EV-140
4 4 71 56
EV-170
4 4 76 58
EV-200
6 4 82 64
20 ft. downstream (all models)
4 4 43 34
A
C
B
D
Model
A B C D
EV-80
4 33 63 33
EV-110
4 33 63 33
EV-140
4 36 66 36
EV-170
4 39 73 39
EV-200
6 45 78 45
20 ft. downstream (all models)
4 17 40 17
Figure 2e. 2-Foot Deco Grille
Figure 2b. One Side Reflector
A
A
Model
A B C D
EV-80
6 4 56 60
EV-110
6 4 56 60
EV-140
6 4 60 66
EV-170
6 4 66 68
EV-200
8 4 68 75
20 ft. downstream (all models)
6 4 32 34
Model
A B C D
EV-80
4 22 70 22
EV-110
4 22 70 22
EV-140
4 25 73 25
EV-170
4 29 80 29
EV-200
6 30 87 30
20 ft. downstream (all models)
4 9 48 9
E
Burner Side View
Wall
Figure 2f. Burner End
Model
EV-80
EV-110
EV-140
EV-170
EV-200
E
24
24
24
24
24
pg 8
VANTAGE® EV
ROBERTS-GORDON
I N S TA L L AT I O N M A N U A L
Section 6. Standard Parts List
This section provides information about assembling
VANTAGE® EV systems. The heaters must be assembled
according to the following illustrations and tables in order
to ensure safe and proper operation.
VANTAGE® EV burner cartons contain the basic burner
unit, a Pipe Nipple and Flex Gas Line for gas connection,
and a 10 ft. Turbulator
The remaining heater components are shipped in one of
two ways:
1) Typically, tubes, reflectors, hangers, etc. are
pre-packaged at the factory. Components for VANTAGE® EV
systems up to 40 ft. (12 m) length are accommodated in
one carton that includes a 10 ft. (3 m) transition tube.
Longer VANTAGE® EV systems require two accessory
cartons. One carton will include a transition tube. (A few
Table 2.
minor components such as end caps may be duplicated.)
Required accessory packages for the various VANTAGE®
EV models are shown in Table 2 below. Components
should be assembled as shown in Figures 9 thru 18.
2) In some cases, the VANTAGE® EV system may be
received with the accessor y components noncartoned, or packaged for a specific installation. In
those cases, be sure to acquaint yourself with the
individual components shown in Figure 3. Also follow
carefully the appropriate diagram (Figures 4 thru 8) for
the heater you ordered. These indicate the quantity
and location of all necessary components.
Figures 4 through 8 show specific assembly details. Refer
to Section 9 for venting assembly, Section 10 for gas
piping assembly, and Section 11 for field wiring.
VANTAGE® EV Component Package Guide
nnnnnnnRequired Accessory Packagesnnnnnn
Model
Tubing Length
Standard
Aluminized
For Assembly
see page
EV-80
30' (9 m)
CP30HRS
CP30ALUM
pg 11
EV-110
40' (12 m)
CP40HRS
CP40ALUM
pg 12
EV-140
50' (15 m)
CP30HRS + EXP20HRS
CP30ALUM + EXP20ALUM
pg 13
EV-170
60' (18 m)
CP30HRS + EXP30HRS
CP30ALUM + EXP30ALUM
pg 14
EV-200
70' (21 m)
CP40HRS + EXP30HRS
CP40ALUM + EXP30ALUM
pg 15
Table 3.
Part No.
Contents of VANTAGE® EV Burner Carton
Description
EV-80
EV-110
EV-140
EV-170
EV-200
VANTAGE EV Burner Assembly (rate and fuel varies)
1
1
1
1
1
02568200
Gasket (Burner to Transition Tube)
1
1
1
1
1
151100NA
Installation Manual
1
1
1
1
1
91201708
Pipe Nipple (Black) 1/2 x 3-1/2
1
1
1
1
1
94237914
Hex Head Cap Screw 5/16 - 18 x 7/8
4
4
4
4
4
96411600
Split Lockwasher
4
4
4
4
4
91412200
Flexible Gas Connector Assembly (1/2” NPT)
1
1
-
-
-
91412203
Flexible Gas Connector Assembly (3/4” NPT)
-
-
1
1
1
03051503
Turbulator Adapter
1
1
1
1
1
03051504
Turbulator 2.5 ft. (76 cm) Section Piece
4
4
4
4
4
®
ROBERTS-GORDON
Table 4.
SECTION
6:
pg 9
S TA N D A R D PA R T S L I S T
Contents of Accessory Packages
Extension Packages
Core Packages
Description
91409300
Tube, Hot Rolled Steel, 10 ft.
1
2
3
-
-
-
-
1
2
3
4
-
-
-
-
91409408
Tube, HT Aluminized, 10 ft.
-
-
-
-
1
2
3
-
-
-
-
1
2
3
4
03051100
Transition Tube, Aluminized, 10 ft.
1
1
1
-
1
1
1
-
-
-
-
-
-
-
-
03051600
Transition Tube, HT Aluminized, 10 ft.
-
-
-
1
-
-
-
-
-
-
-
-
-
-
-
01312700
Standard Coupling Assembly
1
2
3
-
1
2
3
1
2
3
4
1
2
3
4
02750303
Standard 8 ft. Reflector
3
4
6
2
3
4
6
2
3
4
6
2
3
4
6
02750800
End Cap
2
2
2
2
2
2
2
-
-
-
-
-
-
-
-
03090100
Tube and Reflector Hanger
3
4
5
2
3
4
5
1
2
3
4
1
2
3
4
91907302
S-Hook
3
4
5
2
3
4
5
1
2
3
4
1
2
3
4
03050010
Refl. Support Pkg. (Strap, Wire Form, Screws) 2
3
5
1
2
3
5
2
3
4
6
2
3
4
6
91107720
U-Clip Package
1
1
1
1
1
1
1
1
1
1
1
1
1
1
1
90502700
Vent Adapter
1
1
1
1
1
1
1
-
-
-
-
-
-
-
-
01318901
Tube Clamp Package
1
1
1
1
1
1
1
-
-
-
-
-
-
-
-
CP20HRS
CP30HRS
CP40HRS
CP10ALUM
CP20ALUM
CP30ALUM
CP40ALUM
EXP10HRS
EXP20HRS
EXP30HRS
EXP40HRS
EXP10ALUM
EXP20ALUM
EXP30ALUM
EXP40ALUM
Hot Rolled
Aluminized
Hot Rolled
Aluminized
20' 30' 40' 10' 20' 30' 40' 10' 20' 30' 40' 10' 20' 30' 40'
Part No.
Package Part Numbers:
Table 5.
Contents of Vacuum Pump Packages
Part No.
Contents of Vacuum Pump Packages
EP-100
EP-200
0000-0000
1/3-HP Vacuum Pump
1
-
0000-0000
3/4-HP Vacuum Pump
-
1
90430600
Vacuum Proving Switch
1
1
0000-0000
Boots (neoprene spacers included with EP-200)
2
2
91901300
Boot Clamps
5
5
01312200
Bird Screen
1
1
01312102
Wall Mounting Kit
-
1
pg 10
VANTAGE® EV
ROBERTS-GORDON
I N S TA L L AT I O N M A N U A L
Section 7. Assembly Overview
This section provides a general overview of component
placement in a VANTAGE® EV system. The location of
some components such as supports and couplings is
crucial to proper installation. Assemble the system
components as shown in Figures 4 thru 8.
Optional reflector configurations are shown in Figure 2.
Install appropriate suspension hardware, beam clamps,
chain or rod at predetermined locations. Adjustment of
chain length will provide uniform pitch.
Vacuum Pump
(EP-200 model shown)
Every VANTAGE ® EV system of
1-6 burners requires a vacuum
pump. Pump must be installed
with the proper discharge direction
and motor rotation. See Section 4
for design requirements.
Burner Housing
(shown with tube gasket)
Must be installed with the
flame observation window
facing down.
Transition Tube
Supplied in 10 ft. (3 m) lengths.
Transition tube is always the first
tube after the burner. Attach to burner
housing using the (4) split lock-washers,
(4) cap screws and tube gasket provided
in the burner package.
Heat Exchanger Tube
Supplied in 10 ft. (3 m) lengths.
Tube type as indicated. Also used
as manifold to connect the radiant
tube to the vacuum pump.
Tube and Reflector Hanger
with Clamp Package
Position this hanger no more
than 4" (10 cm) away from the
burner assembly. Install tube
clamp package as shown.
Suspend from S-Hook.
Tube and Reflector Hanger
Suspend system from these
hangers. Minimum one (1)
required per tube. Suspend
from S-Hook.
TIGHT
SCREWS
LOOSE
SCREWS
Reflector Support Package
One support is required at
every reflector overlap. The
support closest to the burner
and every other support after
should have the screws
loosened approx. 1/16" (2 mm)
to allow for reflector slippage.
Figure 3. Assembly Overview
Reflectors
Alternate overlap as shown on
overview using amount indicated.
Minimum overlap is 9" (23 cm).
Standard Coupling
Coupling should be oriented with slide bar
on top.
Reflector End Cap
Punch out center section to accommodate
tube. Attach with U-Clips provided.
Electronic Control Panel
(optional) Provides system management
and zone temperature control for the
VANTAGE® EV system.
Turbulator
Turbulator must be installed in the last standard section of
radiant tube. All VANTAGE ® EV burner cartons will include
the appropriate 10 ft. long turbulator assembly.
(2) Stainless Steel Couplings
(1) 10 ft.
Turbulator
S-Hook (Typ.)
TIGHT
SCREWS
Figure 4. Assembly of 30 ft (9 m) Radiant Tube Section - EV-80
(1) Tube Clamp
Package
A S S E M B LY OV E RV I E W
(1) Burner Assembly
(1) Gasket
(3) Reflector Supports
(4) U-Clips
7:
(1) Transition Tube
LOOSE
SCREWS
(4) Reflectors
Overlap approx. 10" (25 cm)
SECTION
(4) Tube and Reflector Hangers
(2) Heat Exchanger Tubes
LOOSE
SCREWS
(4) U-Clips
(2) Reflector End Caps
ROBERTS-GORDON
pg 11
S-Hook (Typ.)
Figure 5. Assembly of 40 ft (12 m) Radiant Tube Section - EV-110
LOOSE
SCREWS
(1) Burner Assembly
(1) Tube Clamp
Package
(4) U-Clips
I N S TA L L AT I O N M A N U A L
(1) Gasket
(5) Reflector
Supports
(6) Reflectors
Overlap approx. 21" (53 cm)
LOOSE
SCREWS
(1) Transition Tube
TIGHT
SCREWS
(3) Stainless Steel Couplings
(5) Tube and Reflector Hangers
TIGHT
SCREWS
VANTAGE® EV
(3) Heat Exchanger Tubes
(1) 10 ft.
Turbulator
LOOSE
SCREWS
(2) Reflector End Caps
(4) U-Clips
pg 12
ROBERTS-GORDON
Figure 6. Assembly of 50 ft (15 m) Radiant Tube Section - EV-140
TIGHT
SCREWS
LOOSE
SCREWS
TIGHT
SCREWS
(1) Transition Tube
LOOSE
SCREWS
(1) Tube Clamp
Package
A S S E M B LY OV E RV I E W
(1) Burner Assembly
(1) Gasket
(6) Reflector
Supports
(4) U-Clips
7:
(4) Stainless Steel Couplings
TIGHT
SCREWS
LOOSE
SCREWS
(7) Reflectors
Overlap approx. 13" (33 cm)
SECTION
(6) Tube and Reflector Hangers
(4) Heat Exchanger Tubes
S-Hook (Typ.)
(1) 10 ft. Turbulator
(2) Reflector End Caps
(4) U-Clips
ROBERTS-GORDON
pg 13
Figure 7. Assembly of 60 ft (18 m) Radiant Tube Section - EV-170
LOOSE
SCREWS
TIGHT
SCREWS
LOOSE
SCREWS
(1) Transition Tube
TIGHT
SCREWS
(5) Stainless Steel Couplings
(7) Tube and Reflector Hangers
(5) Heat Exchanger Tubes
TIGHT
SCREWS
LOOSE
SCREWS
(1) Burner Assembly
(1) Tube Clamp
Package
(4) U-Clips
I N S TA L L AT I O N M A N U A L
(1) Gasket
(7) Reflector
Supports
TIGHT
SCREWS
(8) Reflectors
Overlap approx. 9" (23 cm)
VANTAGE® EV
S-Hook (Typ.)
(1) 10 ft. Turbulator
(2) Reflector End Caps
(4) U-Clips
pg 14
ROBERTS-GORDON
Figure 8. Assembly of 70 ft (21 m) Radiant Tube Section - EV-200
LOOSE
SCREWS
TIGHT
SCREWS
LOOSE
SCREWS
LOOSE
SCREWS
(1) Transition Tube
LOOSE
SCREWS
(9) Reflector
Supports
(1) Tube Clamp
Package
(4) U-Clips
A S S E M B LY OV E RV I E W
(1) Burner Assembly
(1) Gasket
LOOSE
SCREWS
(10) Reflectors
Overlap approx. 14" (36 cm)
7:
(6) Stainless Steel Couplings
TIGHT
SCREWS
TIGHT
SCREWS
(2) Reflector End Caps
SECTION
(8) Tube and Reflector Hangers
(6) Heat Exchanger Tubes
S-Hook (Typ.)
TIGHT
SCREWS
(1) 10 ft. Turbulator
(4) U-Clips
ROBERTS-GORDON
pg 15
pg 16
VANTAGE® EV
I N S TA L L AT I O N M A N U A L
ROBERTS-GORDON
Section 8. Component Installation
Hammer-drive the slide bar until the coupling is secured
snugly to the tubes. Overdriving the slide bar will distort
the coupling or slide bar lip and will decrease the holding
capability of the coupling. Coupling should be tight when
the slide bar is ±2" (5 cm) from the end of the coupling.
See Figure 9a.
Tube Coupling Installation
Tube and tube fittings are connected by wrap-around
couplings which clamp by means of a tapered, hammerdriven lock member.
Loosen
Tighten
Impact Block
Slide Bar
S-hook
Carriage Bolt
Flat Washer
and Hex Nut
Stainless Steel
Coupling
Lanced Clip
When assembling coupling, the wide end of
the slide bar moves toward the lanced clip
C
L
Tube Clamp
Burner Assembly
Orient coupling so that the impact
block is above tube centerline.
Figure 9a.
Transition Tube
Position tube and
reflector hanger no
more than 4" (10 cm)
away from the burner
assembly.
Coupling Assembly
To assemble the coupling, hook the free end of the
coupling sleeve into the lanced clip. Place the wide end of
the tapered slide bar on the coupling so that it moves
toward the lanced clip. Insert the two tube ends into the
coupling. Be sure the tube ends are in line and are flush
against the stop pins inside the coupling.
Figure 10.
Tube Clamp Package
Reflector
Wire form
Sheet metal
screw
Reflector
support strap
Use a 4 ft. level as indicated to establish pitch of
tubing and to ensure that tubes fit squarely at ends.
This in turn will insure the proper fit of couplings.
Figure 9b.
Level Tubing
Heating tube
Reflector Support P/N 03050010
includes Support Strap, Wire Form, and (2) Screws.
For slip joint, loosen screws approx. 1/16" (2mm).
Figure 11.
Reflector Support Package
ROBERTS-GORDON
8:
SECTION
C O M P O N E N T I N S TA L L AT I O N
pg 17
Elbow Package Installation
(P/N 02718702) Elbow Package includes: (1) elbow, (1)
coupling, (1) end cap, (1) reflector joint piece, and (1)
package of U-Clips. Install elbow into radiant tube
sequence where plans indicate a 90° bend. Install
reflector joint piece using the following procedure:
1. Flatten reflector edge where joint piece matches. Put a
mark on the reflector, directly over the tube center.
Center the accessory joint piece on the mark and
scribe its contour on the reflector. Scribe the location
of the mounting holes.
2. Cut away the reflector to clear the tube, leaving about
one inch of material inside the scribed contour to
attach the accessory joint. Drill or punch six 3/32" (2
mm) diameter holes in reflector in the positions shown
in Figure 13.
Reflector
Reflector
Joint Piece
Flatten Edge
Scribe
Contour
2" Maximum
Step 1
3. Use six #10 sheet metal screws to attach the joint
piece. Install a reflector end cap of the open end.
Cut away contour
with tin snips, leaving
approx. 1" (2.5 cm)
15-1/4"
(38.7 cm)
9" (23 cm) radius
Punch six 3/32"
(2 mm) holes
Step 2
6-1/4"
(16 cm)
90° Elbow
Install reflector
end cap over
the open end
Figure 12.
90° Elbow Fitting Dimensions
Step 3
Figure 13.
Reflector End Cap Installation
Attach reflector joint
piece with six #10
sheet metal screws
Reflector Joint Piece Installation
Reflector
Reflector end caps must be installed over the open ends
of reflectors. Attach the end cap to the reflector using a
minimum of four U-clips per end cap.
Reflector
End Cap
Before installing the end cap, the center section must be
removed. Carefully break the tabs on the bottom flange of
the end cap first. Then gently flex the center section until
it releases. Be very careful not to distort or otherwise
damage the end cap during this procedure.
If the end cap is used at a joint piece to cover a 90° elbow
or U-tube, the center section should not be removed.
(4) U-Clips
Figure 14.
Carefully remove
center section
Reflector End Cap Installation
pg 18
VANTAGE® EV
ROBERTS-GORDON
I N S TA L L AT I O N M A N U A L
Concrete Beam
Bar Joist Clip
Beam Clamp
I-Beam
Truss
Screw Hook
min. 3/8" (10mm)
Locknut Washer
Anchor
I-Beam
Washer
24" (60cm)
minimum
Wood Beam
12" (30 cm)
minimum
3/16" or
larger
Chain
S-Hook
Turnbuckle
(not included)
Figure 15. Typical Suspension Details
Turbulator Installation
For ease of installation, the turbulator should be installed in the tube before hanging the system.
Use the following procedure (see Figure 16):
1. Assemble turbulator pieces by “twisting” matching
ends together.
2. Insert a long wire (11 ft. minimum) down the length of
the tube. Attach the wire to the hole in the tab on the
turbulator adapter piece.
3. Using the wire, pull the assembled turbulator into the
tube from the opposite end. Pull the turbulator through
until just the tab comes out. Detach the wire.
4. Bend the tab around the tube. When installed the next
coupling will lock the tab in place.
Attach a wire to this tab.
TO VACUUM
PUMP
Turbulator adapter piece
“Twist-lock”
sections together
Turbulator 2.5 ft.
section pieces
(3 sections plus
one adapter piece)
Lock tab in place
with next coupling
Last standard section of
heat exchanger tubing
Pull turbulator into
tube using long wire
TO BURNER
Figure 16. Turbulator Baffle Assembly Detail
ROBERTS-GORDON
SECTION
8:
C O M P O N E N T I N S TA L L AT I O N
pg 19
Side Extension Reflector Installation
Optional Side Extension Reflectors may be installed on
either side of the unit. Each 8 ft. section of Side Reflector
should match a reflector and have identical overlap to
adjacent reflectors. Provide slip joints in the same locations
as the reflectors. Proceed as follows (see Figure 17):
1. Attach a reflector side extension support bracket to the
tubes where needed. These brackets should be located
adjacent to the overlapped joints of the reflectors.
2. Inser t lower edge of reflector side extension in
extension support bracket.
3. Cut suitable relief notches where the side extension
reflector meets tube and reflector hangers and
reflector support brackets.
4. Hook the top edge of the side extension reflector over
the edge of the reflector.
5. A slip joint must be provided in the perimeter side
extension at the location of each slip joint in the
reflector. The overlap should be the same as the
reflector.
6. Where severe air movement may be encountered, as
at a large door, one or two sheet metal screws should
be used to attach the side extension reflectors
together. Additional reflector suppor ts are also
recommended.
7. To Install the Retainer Clips: Lay bracket over the side
extension reflector and standard reflector at the
selected location. By using the hole in the clip as a
template, drill or punch a 3/32" (2 mm) diameter pilot
hole in the standard reflector. Secure the retainer clip
using #8 x 3/8" sheet metal screws.
#8 x 3/8" Sheet metal screw
Retainer clip
Tube and reflector hanger
Standard reflector
Tube not shown
Relief notch
Reflector support
Side extension reflector
support bracket
Side extension reflector
Reflector Side Extension Package (P/N 02712700) includes:
(1) Side Extension Reflector, (2) Retainer Clips and (2) Sheet
Metal Screws. Order at least (2) Side Extension Reflector
Support Brackets (P/N 01329910) for each package.
Figure 17. Installation of Side Extension Reflectors
pg 20
VANTAGE® EV
ROBERTS-GORDON
I N S TA L L AT I O N M A N U A L
Reflector
Cut Relief Notches for Tube
and Reflector Hangers
Tube
A
2 ft. (60 cm) Aluminum Grille
Shield
P/N 01365900
Suspended Ceiling Frame
Reflector Side Extension
Figure 18. Installation of 2 ft. (60 cm) Decorative Aluminum Grille (optional)
Decorative Grille Installation
WARNING
Cut Hazard
Wear protective gloves when handling
aluminum grille.
Edges are sharp.
Failure to follow these instructions will
result in injury.
When running the heater over a suspended ceiling,
decorative grille must be used directly below the heater.
The use of regular ceiling tiles directly below the heater
will create an unsafe condition.
The decorative grille option allows the heater to be
installed over suspended ceilings. The aluminum grille
(P/N 91407000) comes in standard 2 ft. x 4 ft. (60 cm x
120 cm) sections and is installed in place of ceiling tile.
Table 6.
The system is hung in a normal fashion with the tube
suspended over the grille at a height between 1.6" and
14.4" (between 4 cm and 36.5 cm). To select the
appropriate side extension reflectors, calculate the
distance "A" between the radiant tube and the decorative
grille. See Table 6 below.
Shields (P/N 01365900) must be placed over ceiling
frame members that pass underneath the heater. The
side extension reflectors are available in standard 4ft.
(120 cm) sections and have notches in the bottom
corners to accommodate suspension system. Lay the
side extension reflectors along the standard reflectors
and cut suitable notches for the tube and reflector
hangers where appropriate. It is generally not necessary
to cut notches for the reflector support straps. Gloves
should be worn when handling the aluminum grille to
protect hands from sharp edges.
Side Extensions for Decorative Grille
Distance "A"
Minimum
Maximum
1.6" (4.1 cm)
5.8" (14.6 cm)
5.8" (14.6 cm)
10.1" (25.7 cm)
10.1" (25.7 cm) 14.4" (36.6 cm)
Extension
Part No.
Width
01370408
8" (20 cm)
01370412
12" (30 cm)
01370416
16" (40 cm)
ROBERTS-GORDON
SECTION
9:
VENTING AND DUCTING
pg 21
Section 9. Venting and Ducting
General Requirements
WARNING
Carbon Monoxide Hazard
Vented heaters must be vented outdoors.
Vented heaters must be installed
according to the installation manual.
Failure to follow these instructions will
result in death or injury.
6. Vent terminal opening must extend beyond any
combustible overhang.
7. Install vent terminal at a height sufficient to prevent
blockage by snow.
8. Protect building materials from degradation by flue
gases.
9. Any portion of flue pipe passing through a combustible
wall must be dual insulated or an approved thimble
must be used.
Manifold Pipe Requirements
Heater must be vented in accordance with the proper
national and local codes. Partial information relating to
these specifications is provided in this section with regard
to size and configurations for venting arrangements.
United States: refer to ANSI Z223.1 - latest revision.
Canada: refer to CAN/CGA-B149.1 and B149.2
The pump may vent to the outdoors either vertically or
horizontally (see Figures 21 & 22). For horizontal venting:
1. Vent must exit building not less than seven feet (2.1 m)
above grade when located adjacent to public walkways.
2. Vent must terminate at least three feet (1 m) above
any forced air inlet located within ten feet (3 m).
3. Vent shall terminate at least four feet (1.2 m) below,
four feet (1.2 m) horizontally from or one foot (0.3 m)
above any door, window or gravity air inlet into
building.
4. Locate vent terminal at least 12 inches (30 cm) from
any opening through which vent gases could enter a
building.
5. Use only corrosion resistant materials for the
discharge line from the pump to the point of discharge.
Manifold pipe, when specified on the layout drawing, is
used to connect radiant tubing to the vacuum pump.
When more than one burner is connected to a pump, a
special connection point is utilized, such as a cross or tee
section (see Figure 19). It is recommended that 4" O.D.
(10 cm) aluminized or coated tubing be used for manifold
pipe. Reflectors are not required, but may be used over
manifold pipe. Manifold pipe must be supported properly,
with at least one tube and reflector hanger per 10 ft. (3m)
section.
Maximum manifold pipe lengths are:
From end of radiant tubing section to connection point
junction:
• 20 ft. (6 m) for EV-80, EV-110, and EV-140 burners.
• 30 ft. (9 m) for EV-170 and EV-200 burners.
From connecting point junction to vacuum pump inlet:
• 10 ft. (3 m) for all burners
Venting the Vacuum Pump
The exhaust connection from the vacuum pump is 4" (10
cm) diameter. Connect one of the flexible isolation boots
provided to the flue pipe. Connections to flue pipe larger
than 4" O.D. (10 cm) require use of an appropriate “taper
pattern reducer” (not supplied).
20"
10"
20"
20"
Porcelain Coated Cross
P/N 0133092D
Aluminized Steel Cross
P/N 01330903
Figure 19. Tailpipe Connection Points
Porcelain Coated Tee
P/N 0133022D
Aluminized Steel Tee
P/N 01330203
pg 22
VANTAGE® EV
Venting the Vacuum Pump (Continued)
Venting from the pump may discharge either horizontally or
vertically; corrosion resistant pipe is recommended. Vent
lengths are allowed as follows:
LENGTH
ROBERTS-GORDON
I N S TA L L AT I O N M A N U A L
EP-200 PUMP
EP-100 PUMP
up to 10'(3m) 4"(10cm) vent/no elbows
up to 25'(7.5m) 5"(12.5cm) vent/3 elbows 4"(10cm) vent/3 elbows
up to 50'(15m) 6"(15cm) vent/3 elbows
5"(12.5cm) vent/3 elbows
Pump Model EP-100 Installation (See pump manual
P/N 127201NA for assembly details.)
The Model EP-100 is mounted the same way as the EP200 (see above directions). Optionally, the pump may be
suspended from chains (see Figure 22). This installation
method requires 3 lengths of chain and 3 S-Hooks (not
supplied).
Installation Precautions
If the vent pipe is over 30' (9 m) long, insulate it to
minimize condensation. Seal all discharge pipe joints with
General Electric RTV 106 or Permatex Form-A-Gasket
red high-temperature silicone adhesive or equivalent.
WARNING
Carefully read Warnings in Section 1 before proceeding
with installation.
Improper installation or operation will result in death,
injury or property damage.
Pump Model EP-200 Installation (See pump manual
P/N 127200NA for assembly details.)
The layout drawing shows the general location of the
vacuum pump. Specific pump location and discharge
details must meet general venting requirements listed on
the previous page as well as the following criteria:
• To avoid staining building wall, extend discharge three
feet from building, if possible.
• Horizontal discharge (see Figure 21) is preferred.
Vertical discharge must be arranged as shown in
Figure 20.
A common practice is to mount the pump on the building
wall, using the mounting hardware furnished (see Figure
22). If this is not practical, it may be mounted on a
platfor m suspended from the ceiling, or for noise
reduction, in an enclosure.
WARNING
Pumps are shipped partially assembled.
Do not operate a partially assembled pump.
Failure to follow these instructions will result in death,
injury or property damage.
The pump scroll attaches to the pump frame (see Figure
22) with either right- or left-hand discharge as the job
requires. Please note that the motor must be wired
differently depending on discharge direction. The
discharge must be bottom horizontal. Any other
arrangement will permit condensate to collect in the
scroll.
Approved
Vent Cap
See sidewall venting illustration for guidelines on
matching pump capacity to vent size. Length of pipe
is equal to total of vertical and horizontal length.
2 ft. minimum
Approved Thimble
(If Applicable)
EP-100/200 Vacuum Pump
Roof Venting
4" Tee
Single Wall Pipe
Attach 1/2" Line to Drain
Figure 20. Roof Venting of Vacuum Pump
ROBERTS-GORDON
SECTION
25 feet and 3 elbows maximum
9:
VENTING AND DUCTING
18" min.-40" max.
Bird Screen
(included w/
Pump
Package)
4" Single Wall Pipe/Tube
Approved Thimble
(If Applicable)
EP-100 Vacuum Pump
Side Wall Venting
pg 23
18" min.-40" max.
4" Vent Terminal
(P/N 02537800)
Tjernlund VH1-4"
Vent Terminal
(P/N 90502100,
or equivalent)
5" to 4" Reducer
6" to 5" Reducer
5" Single Wall Pipe
50 feet and 3 elbows maximum
10 feet maximum and no elbows
Tjernlund VH1-6"
Vent Terminal
(or equivalent)
18" min.-40" max.
Bird Screen
(included w/
Pump
Package)
4" Single Wall Pipe/Tube
EP-200 Vacuum Pump
Side Wall Venting
Approved Thimble
(If Applicable)
18" min.-40" max.
4" Vent Terminal
(P/N 02537800)
Tjernlund VH1-4"
Vent Terminal
(P/N 90502100,
or equivalent)
5" to 4" Reducer
6" to 5" Reducer
5" Single Wall Pipe
Tjernlund VH1-6"
Vent Terminal
(or equivalent)
25 feet and 3 elbows maximum
6" to 4" Reducer
6" Single Wall Pipe
50 feet and 3 elbows maximum
Figure 21. Side Wall Venting Configurations
Tjernlund VH1-6"
Vent Terminal
(or equivalent)
pg 24
VANTAGE® EV
Chain Mounting
(Optional, EP-100 Pump only)
Chain
(3/16" min)
S-Hooks
(optional,
3 required)
ROBERTS-GORDON
I N S TA L L AT I O N M A N U A L
Wall Mounting
Frame Parallel
Wall Mounting
Frame Perpendicular
Min. 8"
from wall
Spring Lockwasher Washer
(P/N 96411600) (P/N 95211600)
Hex Head Screw
5/16"–18 x 3/4"
(P/N 93413912)
11-5/16"
7"
Hex Nut
(P/N 92113900)
2 ft. Angle Irons
(P/N 01365000)
Vacuum Proving Switch
(P/N 90430600)
Pump Scroll
Pump Inlet
5-6" distance from tailpipe
Band Clamp
Pump Frame
Inlet
EP-100: 6-1/8"
EP-200: 6-3/4"
Acoustical Boot
Outlet
EP-100: 3-5/8"
EP-200: 3-1/4"
Outlet
Pump Outlet
5-6" distance from vent pipe
Inlet
Mounting Hole
Outlet
EP-100: 3-5/16"
EP-200: 3-7/8"
EP-100: 7-1/2"
EP-200: 8-1/2"
Inlet
EP-100: 9-7/16"
EP-200: 6-1/2"
Figure 22. Vacuum Pump Assembly and Mounting
EP-100: 4" x 8" Boot
EP-200: 4.5" x 8" with spacer
ROBERTS-GORDON
SECTION
Outside Combustion Air Supply
IMPORTANT: If the building has a slight negative
pressure or contaminants are present in the air, an
outside combustion air supply to the heaters is strongly
recommended.
Some compounds such as halogenated hydrocarbons or
other corrosive chemicals in the air can be drawn into the
equipment and cause an accelerated rate of corrosion of
some of the heater components. The use of such
chemical compounds near the enclosure should be
avoided.
Non-Pressurized Outside Air Supply
For an outside air supply, a 4" O.D. single wall pipe may
be attached to the heater. The duct may be up to 45 ft.
maximum length or 2 ft. minimum length with no more
than 2 elbows. See General Requirements heading on
page 21 for more detailed guidelines. An outside air
9:
VENTING AND DUCTING
pg 25
supply should not be used with the draft hood venting
configuration.
The air supply duct may have to be insulated to prevent
condensation on the outer surface. The outside air
terminal should be securely fastened to the outside wall
by drilling four 1/4" diameter holes in the outside flange;
wood screws or bolts and expansion sleeves may be
used to fasten the terminal.
Pressurized Outside Air Supply
If a pressurized outside air supply is desired, the air
supply system should be installed as indicated on the
heating plans. If there are any questions, consult the
sales representative.
When a pressurized outside air supply is required, the
optional electronic control panel should be used to
facilitate installation and control.
Outside Air Terminal: Use Metalbestos #31267
(RG P/N 90502300), or equivalent. PVC pipe,
“dryer hose”, or equivalent may be used instead
of standard vent pipe.
Outside Air
Terminal
Roof
Important: Outside air terminal must not be
located higher than vent terminal.
Wall
Flex Pipe
6" to 12" long
Outside Air Collar
Burner Box
4" Flue Pipe
Seal All Joints
Motor
6" Inlet
6" Discharge
Figure 23. Outside Air Supply Duct
Air Pressure Switch
If used, the outside air supply blower (P/N 90707500
should be wired in parallel with the vacuum pump,
and in accordance with the National Electric Code
and local ordinances. The blower air pressure switch
should be wired in series with the vacuum proving
switch on the vacuum pump.
All joints and seams in the air supply system must
be made airtight, preferably by use of duct tape. See
above instructions on attaching duct to the burner.
Mount the blower according to the manufacturer’d
instructions. Additional mounting materials should be
provided by the contractor.
pg 26
VANTAGE® EV
ROBERTS-GORDON
I N S TA L L AT I O N M A N U A L
VERTICAL INSTALLATION
Outside Air Terminal
Roof
6"
Flex Pipe
6" to 12" Long
4"
Band Clamp
Burner Assembly
Sweeping Tee Connection
HORIZONTAL INSTALLATION
Wall
6"
Band Clamp
Burner
Assembly
Outside Air Terminal
Sweeping 'Y' Connection
4"
4" Single Wall Pipe
(Seal All Joints)
Flex Pipe
6" to 12" Long
4"
Figure 24. Non-Pressurized Outside Air Supply for a Maximum of Two Heaters Controlled by a Common Thermostat
Outside Combustion Air Supply (Continued)
When air is supplied for combustion to a maximum of two
heaters through a common duct, the following rules
apply:
1.
Follow the venting rules on page 21 for detailed
guidelines.
2.
The two units must be controlled by a common
thermostat.
3.
Use 4” O.D. (10 cm O.D.) single wall or PVC pipe
between the heater connection and the common
source. The common source will be a minimum of
6” O.D. (15 cm O.D.) single wall or PVC pipe.
4.
Combined length of the 4” and 6” pipe shall not
exceed 45 feet (13.7 m) with 2 elbows maximum
per unit (see Figure 24). See also Vent Length
Requirements heading on page 22 for more
detailed guidelines.
5.
Entry of the 4” pipes will not oppose one another.
Example: 4 feet of 6” O.D. (15 cm O.D.) common
supply air pipe and one 6”x4”x4” tee are
attached to 4” pipe x 4 feet long,
attached to EV units. This will limit the
flue length to 45 feet of 4” pipe.
ROBERTS-GORDON
SECTION
10:
GAS PIPING
pg 27
Section 10. Gas Piping
A 1/2" (EV-80 & -110) or 3/4" (EV-140, -170 & -200) gas
supply connection at each burner location must be
located and oriented as shown in Figure 25. To check
system pressure, put a plugged 1/8" NPT tapping in the
gas line at the connection to the burner furthest from the
supply. Before connecting the burners to the supply
system, verify that all high pressure testing of the gas
piping has been completed.
WARNING
Fire Hazard
Explosion Hazard
Connect gas according to
Figure 25.
Do not high pressure test the
gas piping with the burner
connected.
Gas line moves during normal
operation
Failure to follow these
instructions will result in death,
injury or property damage.
Failure to follow these
instructions will result in death,
injury or property damage.
Read applicable warnings in Section 1 before proceeding
with Gas Piping installation. Improper installation will
result in death, severe injury or property damage.
Meter and service must be large enough to handle all the
burners being installed plus any other connected load. The
gas line which feeds the system must be large enough to
supply the required gas with a maximum pressure drop of
1/2" w.c. When gas piping is not included in the layout
drawing, the local gas supplier will usually help in planning
the gas piping.
Shut-Off Valve
(included with connector)
Follow these instructions to ensure a professional gas
supply system installation:
• Support all gas piping with suitable pipe hanging
materials.
• Use wrought iron or wrought steel pipe and malleable
iron fittings. All pipe and fittings should be new and free
from defects. Carefully ream the pipe and tubing ends
to remove obstructions and burrs.
• Use LP-gas-resistant joint compound on all threads.
• Check the pipe and tubing ends for leaks before
placing heating equipment into service. When checking
for gas leaks, use a soap and water solution; never use
an open flame.
Install the flexible gas connector assembly as shown. This
gas connector accommodates expansion of the heating
system and allows for easy installation and service of the
burner.
Shut-Off Valve must be parallel to burner gas inlet.
The 2" (5 cm) displacement shown is for the cold
condition. This displacement may reduce when the
system is fired.
0°
2" (5 cm)
45°
12"
(30 cm)
90°
Flexible Gas Connector Assembly
Figure 25. Gas Line Connection with Flexible Gas Connector Assembly
45°
pg 28
VANTAGE® EV
ROBERTS-GORDON
I N S TA L L AT I O N M A N U A L
Section 11. Wiring
WARNING
Electrical Shock Hazard
Disconnect electrical power before servicing.
Failure to follow these instructions will result in death or electrical shock.
VANTAGE ® EV systems may employ a solid-state
Electronic Control Panel. In addition to providing system
management, the control panel can also be used to
provide individual zone temperature control for up to four
zones.
The control panel is required on large systems (as
defined by electrical requirements) and is optional on
small systems. Small systems can use a thermostat and
relay to provide zone temperature control for up to two
different areas. Refer to the layout and specification
drawings for your application to determine what method
of control has been indicated by the system designer.
Control Methods
There are three different ways to control an EV system:
1. ELECTRONIC CONTROL PANEL (P/N 02770001)
With a single 20 amp 120V supply, the Electronic
Control Panel can operate the vacuum pump and up
to (6) bur ners within a system with up to (4)
temperature zones. The Electronic Control Panel is
required for use with the Smar tSet ™ Energy
Management System (Figure 29 & 30).
2. SPST TRANSFORMER RELAY (P/N 90417600)
With single 20 amp, 120V supply can operate the
vacuum pump and up to 9 burners in a system with
only one zone (Figure 31).
3. DPST TRANSFORMER RELAY (P/N 90436300)
With single 20 amp, 120V supply can operate the
vacuum pump and up to 9 burners in a system with
up to two zones (Figure 32).
Critical Considerations
DO NOT USE THERMOSTATS THAT DRAW POWER
FROM THE SYSTEM.
Low voltage or pilot duty thermostats should be used.
Thermostats that require a power supply of 24V to
operate must not be used because control voltage
available on the circuit board is only 12 VDC.
When using an outside air blower, the Electronic Control
Panel and a separate Load Relay Package
(P/N 05023000) are required. Wire the Electronic Control
Panel for the relay in parallel with the vacuum pump. The
outside air blower must have a separate 20A, 120V power
supply.
SmartSet™ Energy Management System
Systems requir ing “Night Setback” and other
features, need the SmartSet ™ Energy Management
System (P/N 02770101).
SmartSet™ is a microprocessor-based control system that
interfaces directly to the Electronic Control Panel. It
provides the user with a convenient touch-pad and digital
readout for system programming.
The system features comprehensive control of multiple
Setback periods and Holiday Setback for individual
zones. The system can also automatically compensate for
Daylight Savings Time.
If equipped, install SmartSet™ according to “SmartSet™
Installation, Operation and Service Instructions” (P/N
127101US, included with the SmartSet™ package).
WARNING
Electrical Shock Hazard
Vacuum Pump and Heater must be installed
and grounded according to national codes.
Failure to follow these instructions will
result in death or electrical shock.
The control panel, burner, vacuum pump and outside air
blower if used, must be electrically grounded in
accordance with the following codes: United States: Refer
to National Electrical Code, ANSI/NFPA-70 - latest
revision. Wiring must conform to the most current
National Electrical Code, local ordinances, and any
special diagrams furnished. Canada: Refer to National
Electrical Code, CSA C22.1 Part 1 - latest revision.
ROBERTS-GORDON
SECTION
COM
BLK
N.O.
BLK
11:
WIRING
pg 29
DOOR
SWITCH
THERMAL
BUSHING
TRANSFORMER
BLUE
1
5
3
4
WHT
120VAC
BLK
AIR
SWITCH
BLUE
GRN
YEL
BLUE
GRN
POWER
BRN
YEL
VALVE
SENSE
GROUND
YEL
BLK
IGNITION
MODULE
ELECTRODE
GAS VALVE
Figure 26. EV Burner Internal Wiring
WARNING
ATTENTION
If any of the original wire as supplied with the heater must be
replaced, it must be replaced with wiring material having a
temperature rating of at least 105oC and 600 volts.
Si une partie du câblage d’origine fourni avec le radiateur doit
être remplacée, elle doit l’être par du matériel de câblage
tolérant une température d’au moins 105oC et 600 volts.
© P/N 91038800
L1
POWER SUPPLY
120V
L2
120V
BLK
WHT
TRANSFORMER
24V
BLUE
YEL
AIR
SWITCH
DOOR
SWITCH
GROUND
POWER
Power
BLUE
BLK
SENSE
SPARK
GAP
VALVE
ELECTRODE
IGNITION MODULE
BRN
GAS VALVE
Figure 27. EV Burner Ladder Diagram (Direct Spark Ignition System)
YEL
pg 30
VANTAGE® EV
ROBERTS-GORDON
I N S TA L L AT I O N M A N U A L
Or
an
ge
/Black
llow
Ye
Re
d
n
ow
Br
Black
Yellow
Hot (+)
115V Power Supply
(Control Panel or Relay)
Neutral (-)
W h i te
Magnetek TENV Motor:
to reverse rotation, interchange
black and red leads
Bro
wn/
White
Bro
wn
/Wh
ite
Ground
Screw
Motor Junction Box
Figure 28. Vacuum Pump Motor Wiring
Motor Interlock
(only on EP-200)
See figure 29 for
wiring details.
ROBERTS-GORDON
SECTION
11:
WIRING
pg 31
WARNING
Electrical Shock Hazard
Disconnect electrical power before servicing.
Failure to follow these instructions will result in death or electrical shock.
Power
Supply
Gnd.
Hot Neut.
Vacuum
Pump
Zone 1
Burners
Zone 2
Burners
Hot
Hot
Hot
Neut.
Neut.
Zone 3
Burners
Zone 4
Burners
Neut. Hot Neut. Hot Neut.
Fused
Disconnect
Switch
Thermostats
COM T 1
T2
T3
T4
Night
MBR
Smart Set
Set Back MBR COM
Zone 1
Zone 2
120V-60 Hz
Supply Circuit
(20 Amps)
Zone 3
Zone 1
Zone 2
Zone 3
Zone 4
Wiring for Burners
Zone 4
Smart Set (Optional)
Night Set Back(Optional)
Notes:
Thermostats
1. A load relay is required for the (optional) outside air
blower on either Vantage® EV or CoRayVac® systems.
2. The vacuum proving switch is required for all systems.
3. Low voltage or pilot duty thermostats should be used.
Thermostats that require a power supply of 24V to
operate must not be used because control voltage
available on the circuit board is only 12VDC.
Centrifugal Motor Interlock
(only 3/4-hp motor)
Vacuum Proving
Switch
4. For more in-depth information regarding the installation
or operation of this ROBERTS GORDON ® heating
system, consult the Installation Manual provided, or
contact your local Roberts-Gordon representative.
Vacuum Pump
THIS PANEL IS CERTIFIED AS A COMPONENT PART OF
ROBERTS GORDON® CoRayVac® AND Vantage® EV INFRARED
HEATING EQUIPMENT.
ELECTRICAL RATING:
120
V
60
Hz
< 12
A
Load Relay
(120V Coil)
120V-60 Hz
Supply Circuit
(20 Amps)
APPROVED
Printed in USA
Figure 29. EV Panel Box Label
Outside Air
Blower
If connecting
Outside Air Blower,
break this connection
Optional Outside Air Blower
© P/N 91016500 Rev. A
pg 32
VANTAGE® EV
3 Thermostats controlling Burner Zones 1-3 and
optional SmartSet™ and Night Setback Thermostats.
(Requires optional SmartSet™ panel).
COM
T1
T2
ROBERTS-GORDON
I N S TA L L AT I O N M A N U A L
T3
T4
MBR
SCT NST MBR COM
4 Thermostats controlling Burner Zones 1-4.
COM
T1
T2
T3
T4
Night Setback
Zone 1 Zone 3 SmartSet™
Zone 2
1 Thermostat controlling Burner Zones 1-4.
COM
T1
T2
T3
T4
MBR
SCT NST MBR COM
MBR
SCT NST MBR COM
Zone 4
Zone 1 Zone 3
Zone 2
2 Thermostats controlling Burner Zones 1-2 and 3-4.
COM
T1
T2
T3
T4
Jumper Wire
Jumper Wire
Zone 1
Figure 30. Typical Thermostat Wiring to Control Panel
MBR
SCT NST MBR COM
Zone 1
Zone 2
ROBERTS-GORDON
SECTION
11:
WIRING
SPST
Transformer
Relay
Night Set Back
(Optional)
R
C
W G
Y
Thermostat
Black
1
3
2
4
COIL
COIL
Black
Hot
120V-60 Hz
Supply Circuit
(Fused)
5
6
Neutral
White
Ground
Red
H
H
Vacuum
Proving
Switch
N
N
Vacuum
Pump
Motor
Figure 31. 1 Zone/2 to 9 Burner Operation Without Control Panel
Zone 1
Burners
Nine Burners Maximum
pg 33
pg 34
VANTAGE® EV
ROBERTS-GORDON
I N S TA L L AT I O N M A N U A L
DPST
Transformer
Relay
R
DPST
Transformer
Relay
C
W G
R
C
W G
Y
Zone 1
Thermostat
Y
Zone 2
Thermostat
Purple
1
4
COIL
2
5
Red
3
1
6
4
Purple
COIL
Red
3
2
COIL
5
6
COIL
Black
Black
Black
Red/Yellow
White
120V-60 Hz
Supply Circuit
(Fused)
White
Hot
Neutral
Ground
H
H
Vacuum
Proving
Switch
Red/Yellow
Black
N
H
N
N
Vacuum
Pump
Motor
Figure 32. 2 Zone/4 to 9 Burner Operation Without Control Panel
Zone 1
Burners
Zone 2
Burners
Nine Burners Total Maximum Between Zones
ROBERTS-GORDON
SECTION
12:
O P E R AT I O N
pg 35
Section 12. Operation
WARNING
Disconnect gas and electrical supplies before performing
service or maintenance.
Replace door before operating.
Failure to follow these instructions will result in death,
injury or property damage.
Starting the System
Checking the Gas Line
1. Open main valve and verify that no gas is flowing
through the gas meter.
2. Purge the line if this was not done following pressure
testing with air.
3. Verify that the gas pressure is not above 14" w.c. (1/2
PSIG)
4. Close main gas valve.
Note: During the initial firing, the protective oil on the
tube may smoke for 30 to 60 minutes and
adequate ventilation should be provided.
The optional VANTAGE® EV control panel provides a prepurge, which delays energizing the burners for about one
minute after the vacuum pump starts, and post-purge,
which keeps the vacuum pump running for about one
minute after the last thermostat is satisfied.
1. Start with all thermostats below room temperature.
2. Open main gas valve.
Checking the Electrical System
1. Set all thermostats below room temperature.
2. Turn on power supply to the system controls.
3. Check to see that no part of the system (i.e. burners,
vacuum pump, outside air supply blower) is powered.
4. Individually check each zone by energizing the
thermostats separately. Each zone thermostat should
start the vacuum pump immediately. When the vacuum
pump reaches the nominal running RPM, the air
proving switch closes and activates the ignition
module. On VANTAGE® EV systems equipped with the
optional control panel, a pre-purge period of 45 to 60
seconds will precede burner ignition trial.
5. If more than one system is installed, be sure that no
part of one system is affected by the controls of a
different system.
6. Make a preliminary vacuum check at burners in
branches which have an adjustable damper coupling.
See Figure 33 for vacuum measuring instructions. This
check is to ensure that all dampers are open before
the system is fired. The vacuum measured in the
burner control housing should be approximately 1" to
1-1/2" w.c. differential or more.
3. Turn up thermostats one at a time, waiting to see that
all burners in a zone start. When the burner ignites, a
large blue flame will be observed through the viewer
window.
4. If any abnormal operation occurs, see the troubleshooting section of these instructions.
pg 36
VANTAGE® EV
ROBERTS-GORDON
I N S TA L L AT I O N M A N U A L
Setting the Vacuum
1. Set thermostats above room temperature. See that all
burners are operating properly.
Check the vacuum differential at all burners, then
adjust the damper coupling to obtain approximately
equal vacuum differential readings. Then adjust the
pump inlet damper until vacuum differential readings
are a minimum 0.5" to 0.6" w.c.. With systems
designed to capacity, it may not be possible to obtain
vacuum differential readings at slightly above 1" w.c.
(when cold). If so, adjust damper couplings to
maximum but approximately equal vacuum readings.
Be sure to lock all dampers securely after adjustment.
2. Allow at least one-half hour operation for temperature
to normalize before checking system vacuum balance.
Vacuum differential can be measured by connecting a
manometer across the “tee” tappings inside the control
housing (after measurement, the caps must be
installed on the “tees” to prevent leakage). See Figure
33 for manometer connection to bur ner control
housing.
3. Reset thermostats to desired room temperature.
Approximately 1.0” w.c. of vacuum differential is
required at the burner, when the system is cold.
Normal operating vacuum differential is 0.5" to 0.6"
w.c. Vacuum adjustments are made by means of the
damper inlet, and the adjustable damper coupling(s).
4. If heat is not required, turn off main switch and close
main gas valve.
Burner
Remove Cap
Attach Manometer Hose
Remove Cap
Attach Manometer Hose
2
1
0.5" to 0.6"
0
1
2
Figure 33. Vacuum Differential Reading
Manometer
ROBERTS-GORDON
SECTION
12:
O P E R AT I O N
pg 37
Sequence of Operation
Burner Sequence of Operation
Sequence of Operation (no control panel)
1. When sufficient vacuum differential (minimum 0.5" w.c.)
is available at the burner, and the control system is
supplying line voltage to the burner, the air sensing
switch within the burner closes and energizes the
direct spark ignition module.
1. Thermostat, on a call for heat, energizes the relay coil,
closing the relay contacts.
2. The vacuum pump motor is energized when the relay
contacts are closed.
3. The vacuum proving switch senses vacuum and
closes, thus directing line voltage to the burners.
However, trial ignition does not begin.
4. If sufficient vacuum is available at the burner, the air
sensing switch within each burner control housing
closes, beginning the Burner Sequence of Operation
as described below.
Sequence of Operation with control panel
1. Thermostat, on a call for heat, signals the control panel
to energize the vacuum pump terminals. The vacuum
pump (and outside air supply blower, if used) are
activated.
2. When the pump motor achieves normal running RPM,
the centrifugal motor end switch and the vacuum
proving switch at the pump inlet both close.
3. After a minimum 45-60 second pre-purge delay, the
zone relay corresponding to the thermostat calling for
heat is energized, and line voltage is directed to the
burners in the zone.
4. If sufficient vacuum is available at the burner, the air
sensing switch within each burner control housing
closes, beginning the Burner Sequence of Operation
as described below.
2. After a 45 second Pre-purge the ignition module then
opens the redundant gas valve and energizes the
electrode.
3. When the flame is established, the sparking sequence
ceases.
4. If the flame is not established during the ignition
sequence, the ignition module closes the gas valve
and purge begins. The ignition module will try 2
additional times for ignition (with purge between). If
ignition is not established, the module will lock-out.
NOTE: After 1 hour, the module will re-set
automatically and return to steps 2,3 and 4.
5. If a flame is detected, the gas valve remains open.
When the call for heat is satisfied and the system
control mechanism de-energizes the burner line
voltage supply, and the gas valves are turned off.
6. If the flame extinguishes during operation, the ignition
module will attempt to re-establish the flame as
described in the preceding step. If ignition is not reestablished, the module will lock-out.
7. After lock-out, the control must be reset by turning
down the thermostat for five seconds, then raising it
again to the desired temperature, or by disconnecting
and re-connecting power to the control.
8. When the thermostat is satisfied, all power to the unit
is shut off.
After a 45 pre-purge period,
does the burner light?
Yes
Turn up thermostat.
Does the pump turn on?
No
No
Yes
Yes
Yes
Repair or Replace switches
as necessary.
Replace main control board.
(P/N 90437500)
No
No
No
Yes
Yes
Replace transformer.
(P/N 90436900)
Yes
With the blue and yellow wires
still removed, is the voltage at No
the transformer black and
white leads 120V?
Reset dampers
Reconnect transformer wires.
Place a jumper wire across the
pressure switch. Is there a
spark?
Remove the blue and yellow
wires from the transformer. Is No
there 24V at the transformer
secondary?
Yes
Check vacuum per page 36.
No
Is it okay?
Yes
Carefully reset spark
gap to 1/8".
Are the air hoses to the
pressure switch secure
and leak free?
Is the igniter gap
set at 1/8"?
No
Yes
Replace Door.
No
Is blower side
door in place?
Replace pump relay.
(P/N 90437900, Omron G4B112T1-US, or equivalent)
No
Is the vent pipe or the inlet of
the burner obstructed?
Replace appropriate zone
relay on main board.
(P/N 90438100, Omron
G2R-1-S, or equivalent)
Yes
Disconnect power to the motor.
Does the motor turn freely? No
No
Is the motor hot?
No
Yes
Remove obstruction.
Check wiring between the
power cord and transformer.
Replace igniter and ignition wire
as needed.
Yes
Unplug burner and check
igniter and ignition wire. Are
they Damaged?
Check wiring and Diagram.
No
No
Is there spark at the igniter?
Yes
Remove door. Is voltage
Depress switch. Check voltage.
at door switch 120V?
Is it 120V?
Replace
Replace
Check voltage between door Yes Check voltage between door No
Switch.Switch
switch and burner neutral
switch and burner neutral
(white).
(white).
Motor bearings may have failed.
Replace motor.
No
Is the pump impeller
obstructed?
Motor may have tripped
overload switch. Wait 10-15
minutes for automatic reset.
I N S TA L L AT I O N M A N U A L
Replace pressure switch.
(P/N 90436701)
Repair, replace or tighten
hoses as necessary.
Remove obstruction.
No
No
Yes
Reconnect MBR and
MBR-COM. Are the vacuum
Yes
proving and/or motor end
switches operating properly?
Disconnect wires from MBR
and MBR-COM. Is there at least Yes
12V DC between the terminals?
No
No
Is there proper gas pressure
Yes
and flow to the burners?
Correct gas problem.
See page 27 for details.
Check wiring to the burner.
Make sure the burner is
plugged in.
Is there power (120V) at the
Yes
burner receptacle?
No
No
Is the fuse on the circuit
board blown?
No
Is there power (120V)
between the panel
MH and MN terminals?
Is the motor connected properly?
Refer to the wiring diagrams on the
motor and in the installation manual
Is there at least 12V DC at the
Replace main control board.
Yes pump relay coil? (W2 and W1 No
(P/N 90437500)
on circuit board.)
Replace fuse.
(P/N 90438200)
250V 3A size 3AG
Test thermostat by placing a
jumper wire between COM
and appropriate thermostat No
T(1,2,3,4) terminal. Does the
pump turn on?
Is there power (120V) between
control panel BH and BN
Yes
terminals of the zone
calling for heat.
Check circuit breaker and/or
fuse on panel supply circuit.
No
Is there power (120V) to the
control panel H and N
Yes
terminals?
Check thermostat wiring and
replace thermostat if necessary.
pg 38 VANTAGE® EV
ROBERTS-GORDON
Section 13. Troubleshooting
No
Do all the burners
ignite smoothly?
No
Does the pump shut down
after a 45 second post-purge
period?
Yes
Replace ignition module.
(P/N 90434002K)
Turn valve on.
No
Check thermostat wiring for
shorts and replace thermostat
if necessary.
No
Check thermostat wiring for
shorts and replace thermostat
if necessary.
Yes
Yes
Replace pump relay.
(P/N 90437900, Omron G4B112T1-US, or equivalent)
No
Replace/Correct wires.
Check gas line stop cock.
Contact gas company.
No
T RO U B L E S H O OT I N G
Replace main control board.
(P/N 90437500)
No
Reconnect thermostat
wires. Disconnect W1 wire
from pump relay. Does the
pump still run?
Replace main control board.
(P/N 90437500)
Ignition module may have
failed. Replace module.
(P/N 90434002K)
Yes
No
With the thermostats connected, measure
the voltage between the thermostat terminals
(T1, T2, T3, T4, SCT and NST) and the Yes
COM terminal. Are all the voltages 5V.
Disconnect all thermostat wires
Make sure that all thermostats
(including SmartSet and
Yes from COM. Does the pump Yes
continue to run after a 45 sec.
Night Set Back) are satisfied.
post-purge period?
Make sure that all
thermostats (including
SmartSet and Night Set
Back) are established.
Troubleshoot ends.
If problem persists, contact your
local Roberts-Gordon
Representative.
Yes
No
Yes
Are the wires connecting the
ignition module OK?
No
Is the knob on the gas
valve in the on position.
No
13:
Do burners shut off after the
call for heat is satisfied?
Adjust system for proper
vacuum. See page 36 for
details.
Is the vacuum setting
to high?
Yes
Re-Establish Continuity.
Re-Establish Continuity.
Is the insulation on the
igniter/sensor leads OK?
No
Yes
No
Is the continuity of the earth
wire established?
Yes
Replace gas valve.
(Natural P/N 90032500)
(LP P/N 90032502)
Yes
Is the inlet gas pressure during
ignition correct? (Natural 4.6"
Yes
min, 5.0 for EV-175, -200,
LP should be 11.0" min)
Yes
Measure voltage on valve
terminals. Is there 24V
during ignition period?
Yes
Is there gas outlet pressure
available during the ignition
period?
No
Replace door.
Does the burner light?
Were the gas lines
purged of air?
Purge Lines.
No
Yes
Yes
Is the gas outlet pressure
3.5" for Natural Gas
(10.5" for LP)?
Check for the proper orifice and
air plate inside the burner.
SECTION
Yes
Yes
No
Does the burner stay on?
Yes
No
Adjust the valve pressure.
Yes
Replace ignition module.
(P/N 90434002K)
ROBERTS-GORDON
pg 39
pg 40
VANTAGE EV
®
I N S TA L L AT I O N M A N U A L
Section 14. Maintenance
WARNING
Disconnect gas and electrical supplies before performing
service or maintenance.
Failure to follow these instructions will result in death,
injury or property damage.
For best perfor mance, the following maintenance
procedures are recommended prior to each heating
season. Only firms or individuals qualified to perform work
in accordance with the applicable specifications should
be engaged to service a VANTAGE® EV System.
1. Be sure gas and electrical supply to heater are off
before performing any service or maintenance.
2. Inspect vacuum pump and flue pipe for soot or dirt or
any obstruction to the outdoors. After cleaning as
necessary, re-attach the flue pipe to the heater. Inspect
acoustical boots for cracks or leaks. Replace as
necessary.
3. Check condition of burner. Carefully remove any dust
or debris from inside the burner box. Remove burner
cup and check its condition.
Procedure to Remove Burner Cup
a. Remove housing doors.
b. Remove 2 screws holding igniter in place and
remove igniter.
c. Remove burner cup from housing by unscrewing
counterclockwise from manifold threads.
d. To reassemble, reverse above steps.
ROBERTS-GORDON
4. Check to see that the burner observation window is
clean and free of cracks or holes. Clean or replace as
necessary.
5. Check the inside of the firing tube with a flashlight. If
carbon or scale are present, scrape out the deposits
with a wire brush or rod, or metal plate attached to a
wooden pole.
6. Outside surfaces of burner may be cleaned by wiping
with a damp cloth. Reflector may be cleaned with
window cleaner.
7. Inspect outside air blower and blower intake for leaks
or obstructions.
8. Check performance of heater and visually observe
flame for proper flame characteristics.
9. A qualified service agency should be contacted for
service other than routine maintenance.
ROBERTS-GORDON
SECTION
15:
pg 41
I L L U S T R AT E D PA R T S L I S T
Section 15. Illustrated Parts List
WARNING
Use only genuine Roberts-Gordon replacement parts.
Failure to follow these instructions will result in death, injury
or property damage.
5
8
7
10
1
9
TOP VIEW
2
3
4
SIDE VIEW
6
11
10
Figure 34. VANTAGE® EV Burner Replacement Parts
2
4
pg 42
VANTAGE EV
®
I N S TA L L AT I O N M A N U A L
Replacement Parts List (See Figure 34)
Item
Part Number
Description
1
90427400
Electrode
02558501
Electrode Gasket
2
90436900
Transformer
3
90436701
Air Sensing Switch
4
90434004
DSI Module
5
90436800
Door Switch
6
91911700
Flue Collar 4"
7
03020100
Burner Cup Assembly
8
03090700T
Manifold
9
90032500
Gas Valve (Natural Gas)
90032502
Gas Valve (LP Gas)
10
02553203
Mica Window Assembly
11
02568200
Tube Gasket
ROBERTS-GORDON
ROBERTS-GORDON
SECTION
15:
I L L U S T R AT E D PA R T S L I S T
pg 43
Tubing and Related Accessories
Plain Coupling
P/N 01312700
45° Elbow, Aluminized
P/N 01336101
Lined Coupling
P/N 0131270 I
Tube Clamp Package
P/N 01318901
Damper Coupling
P/N 01331900
Transition Tube, Aluminized, 10 ft.
P/N 03051100
Tee, Coated
P/N 0133022D
Tee, Aluminized
P/N 01330203
Transition Tube, Heat Treated
Aluminized, 10 ft.
P/N 03051600
Tube Plug
P/N 01330800
Tube, Hot Rolled Steel, 10 ft.
P/N 91409300
Cross, Coated
P/N 0133092D
Tube, Aluminized Non-Heat Treated, 10 ft. P/N 91409403
Cross, Aluminized
P/N 01330903
Tube, Aluminized Heat Treated, 10 ft.
P/N 91409408
90° Elbow, Aluminized
P/N 01335801
Tube, Single Coated, 10 ft.
P/N 9141030C
90° Elbow, Coated
P/N 0133580D
Tube, Double Coated, 10 ft.
P/N 9141030D
45° Elbow, Coated
P/N 0133610D
Venting Accessories
OTS Air Supply Blower Mounting Kit
P/N 01316000
Air Supply Blower/Power Venter
P/N 90707500
OTS Air Supply Take-off (4" Dia)
P/N 01324401
OTS Air Flex Duct (4” x 8 ft. - Pkg. of 8)
P/N 91409601
Reflectors and Related Accessories
Reflector Side Extension Support
P/N 01329910
Reflector End Cap
P/N 02750800
Reflector Support Package (Tubing)
P/N 03050010
Reflector Joint Piece
P/N 02750900
Tube and Reflector Hanger
P/N 03090100
Turnbuckle
P/N 91903201
U-Clip (Package of 20)
P/N 91107720
S-Hook
P/N 91907302
P/N 90424300
Reflector Side Extension
(Includes Reflector Side Extension,
(2) Clips, (2) Sheet Metal Screws)
P/N 02712700
Reflector
P/N 02750303
Controls and Thermostats
Load Relay Package
P/N 05023000
Thermostat Guard
Transformer Relay - SPST
P/N 90417600
Control Panel Fuse
P/N 90438200
Transformer Relay - DPST
P/N 90436300
Control Panel Main Board
P/N 90437500
Electronic Control Panel
P/N 02770001
Control Panel Pump Relay
P/N 90437900
Control Panel Burner Zone Relay
P/N 90438100
™
SmartSet Energy Management System P/N 02770101
Low Voltage Thermostat (Marked 1-5)
P/N 90423000
Decorative Grille
Shield Frame
P/N 01365900
Reflector Side Extension 16" x 48"
P/N 01370416
Reflector Side Extension 8" x 48"
P/N 01370408
Aluminum Grille 2 ft. x 4 ft.
P/N 91407000
Reflector Side Extension 12" x 48"
P/N 01370412
Bird Screen with Clamp
P/N 01312200
Vacuum Pump Parts
EP-100 Vacuum Pump
Includes: (1) 1/3-HP Pump, (2) Boots,
(5) Clamps, (1) Bird Screen
P/N 02719105
EP-200 Damper Assembly
P/N 01313800
EP-200 Pump Inlet Plate Assembly
P/N 01327401
EP-200 Pump Scroll
P/N 01394400
EP-200 Vacuum Pump
Includes: (1) 3/4-HP Pump, (2) Boots,
(5) Clamps, (1) Bird Screen,
(2) Neoprene Spacers, (1) Mounting Kit
EP-200 Boot Replacement w/Spacer
EP-200 Impeller - 5/8" Bore
P/N 01394602
P/N 02716305
P/N 02771000
Vacuum Proving Switch
P/N 90430600
Boot Clamp
P/N 91901300
EP-100 Boot Replacement
P/N 91412801
Rubber Mounts for Motor
P/N 91906100
EP-200 3/4-HP Motor
P/N 90604500
Wall Mounting Kit
P/N 01312102
EP-100 1/3-HP Motor
P/N 90604600
pg 44
VANTAGE EV
®
I N S TA L L AT I O N M A N U A L
ROBERTS-GORDON
Section 16. Engineering Specifications
The total heating system supplied shall be design B. Heat Exchanger
cer tified by the American Gas Association and the
1. Radiant tubing shall be 4" diameter, 16 gauge,
Canadian Gas Association. The heating system shall be
aluminized steel first 10 feet, hot rolled steel remainder
of negative pressure, dry, non-condensing design and
of unit (or when specified, all aluminized for entire
shall utilize one or more burners on a single vacuum
radiant tube length). Sections shall be joined by
pump.
stainless steel wrap-around couplings.
A. Burner and Burner Controls
1.
2.
3.
4.
5.
6.
7.
8.
2. Reflector to be of 0.024” thick aluminum material and
designed to direct all radiant output below horizontal
Burners shall be capable of firing with one of the fuel
centerline of radiant tube. Reflectors shall be certified
options as specified on the purchase documents:
for 0° or 45° mounting.
Natural Gas or LP.
3. Reflectors shall have end caps to prevent heat loss
Burners shall be supplied to fire at any one of the input
due to convection.
firing rates as specified:
4. Steel turbulators to be used as specified for even heat
EV-80
80,000 BTU/Hr.
distribution.
EV-110
110,000 BTU/Hr.
EV-140
140,000 BTU/Hr.
5. Manifold tubing connecting heaters to vacuum pump
EV-170
170,000 BTU/Hr.
shall be 4" diameter, 16 gauge corrosion resistant
EV-200
200,000 BTU/Hr.
tubing (either porcelain lined or aluminized steel shall
be acceptable).
Burner(s) shall be equipped with fully automatic directspark 100% shut-off ignition device. Power supplied to
C. Vacuum Pump
each heater shall be 120V, 60 HZ, single phase.
Burners shall be rated for 1.0 Amp
1. Systems having a total heater input greater than
560,000 BTU/Hr shall be equipped with a vacuum
Burner shall be equipped with combustion air proving
pump constructed of heavy duty cast iron. Pump shall
safety pressure switch, and viewing window for flame
be acoustically isolated from system with flexible
observation.
boots. Pump motor shall be 115/230V, 60Hz, single
When specified, in contaminated environments, the
phase, 3450 RPM, reversible rotation, 3/4 HP, TENV
burner shall be capable of supplying outside air to
capacitor start, sealed ball bearings and thermally
each burner for the support of combustion.
protected and shall be secured with flexible mounts for
acoustical isolation.
All burners shall be pre-wired with an electrical supply
junction box.
2. Systems having a total heater input less than or equal to
560,000 BTU/Hr shall be equipped with a vacuum
At customer’s choice (or depending on system
pump constructed of 16 ga. stamped steel. Pump shall
requirements) burner system may either be controlled
be acoustically isolated from system with flexible boots.
by pre-wired electronic control panel or by means of
Pump motor shall be 115/230V, 60Hz, single phase,
transformer relays. Low voltage thermostats are to be
3450 RPM, reversible rotation, 1/3 HP, TENV capacitor
used.
start, sealed ball bearings and thermally protected and
Gas supply to the burners shall be as follows:
shall be secured with flexible mounts for acoustical
isolation.
1/2" NPT gas connector size (EV-80 and -110)
3/4” NPT gas connector size (EV-140, -170 and -200)
Natural Gas: 4.6" W.C. MIN, 14.0" W.C. MAX
5.0" W.C. MIN. (EV-200)
LP Gas:
11" W.C. MIN, 14.0" W.C. MAX
ROBERTS-GORDON
SECTION
17:
G E N E R A L S P E C I F I C AT I O N S
pg 45
Section 17. General Specifications
General Specifications for VANTAGE® EV heaters are as follows:
Heat Exchanger
Tubing
13.75"
Reflector
Turbulator
17.5"
9.5"
Model
EV-80
EV-110
EV-140
EV-170
EV-200
Rate
80,000 Btu/hr
110,000 Btu/hr
140,000 Btu/hr
170,000 Btu/hr
200,000 Btu/hr
TOTAL LENGTH
Min.
Max.*
31' 9"
51' 9"
41' 9"
61' 9"
51' 9"
71' 9"
61' 9"
91' 9"
71' 9"
101' 9"
SUGGESTED
MINIMUM MOUNTING HT.
Space
Spot
10'–12'
12'
12'–15'
12'
15'–20'
15'
20'–24'
20'
25'+
20'
*Maximum Total Length includes manifold.
Figure 35. VANTAGE® EV System Specifications
Gas Pressure at Manifold:
Gas Inlet Pressure:
Natural Gas:
LP Gas:
Natural Gas:
3.5" W.C.
10.5" W.C.
LP Gas:
4.6" W.C. Minimum
14.0" Maximum
5.0" W.C. Minimum for EV-200
11.0" W.C. Minimum
14.0" Maximum
Pipe Connection:
Electrical Rating: (All Models)
1/2" NPT Gas Connector Size (EV-80 and -110)
3/4” NPT Gas Connector Size (EV-140, -170 and -200)
120V- 60 Hz., 1.0 Amp
Dimensions:
Flue Connection Size: 4"
Outside Air Connection Size: 4"
Refer to Figure 35 for dimensional information.
ROBERTS-GORDON
SECTION
18:
L I M I T E D WA R R A N T Y
pg 47
Section 18. VANTAGE® EV Limited Warranty
WARRANTY COVERAGE:
Roberts-Gordon, Inc. (“Seller”) warrants that entire
heating systems sold by it (individually a “System”) and any
replacement parts which it sells relating to any System
(“Parts”) shall be free from defects in workmanship and
material for the time periods described as follows. With
respect to a System this warranty shall apply for a period of
three years from delivery to the original purchaser
(“Buyer”). With respect to Parts, this warranty shall apply
for the longer of the original System warranty period or for
a period of one year. (“Systems” and “Parts” are hereinafter
collectively referred to as “Products”.) This warranty
extends only to the original purchaser of Products.
Seller manufactures products which are designed only
to provide predetermined ranges of heat rises in various
enclosures when properly used in systems designed by
purchaser or others and installed by others. Seller makes
no representation or warranty with respect to the effect
upon enclosure, or upon any of the contents of the
enclosure, including, without limitation, all plant or animal
life, kept or processed in the enclosure subject to the
limitations outlined below.
WARNING:
This warranty is void if the products have been
damaged due to accident, abuse, mishandling or any other
cause whatsoever other than defects in material or
workmanship. Specifically, Seller’s warranty shall not apply:
(a) to damage to Products when used in an atmosphere
containing halogenated hydrocarbons or other corrosive
chemicals. Some compounds in the air can be ingested
into the equipment and can cause an accelerated rate of
corrosion of some of the Products. The use of such
chemical compounds in or near the enclosure should be
avoided where a longer life of the burner, tubing and other
parts is desirable; (b) to Products which have been
repaired or replaced with other than factory parts, modified
in any way, misused or damaged, or which have been
installed or used contrary to Seller’s written instructions or
manuals; or (c) to any damage resulting from improper
service or a lack of proper maintenance.
LIMITATIONS OF WARRANTY:
Other than as stated herein or in any other warranty of
Seller, there are no other warranties of any kind
whatsoever, express or implied, and all other express and
all implied warranties of merchantability and/or fitness for
any particular purpose are hereby specifically disclaimed.
EXCLUSIVE REMEDY:
The sole and exclusive remedy for any loss, damage
or liability, or otherwise, is limited to the obligation of Seller
to repair or replace parts, at its factory, of any product
owned by original buyer and returned to the Seller’s factory
within one year after invoice, with transportation charges
prepaid, which examination reveals to have been defective.
Under no circumstances shall Seller be liable for any loss,
damage, cost, expenses, or incidental or consequential
damages of any kind, in connection with the sale,
installation, use, maintenance, or repair of any Product.
BUYER RESPONSIBLE FOR DATA:
Seller and its representative may furnish Buyer, upon
Buyer’s request, data relating to the function and use of
Products. Seller shall not be liable for loss, damage, cost,
expenses or incidental or consequential damages of any
kind, sustained directly or indirectly, by any person, or to
any property, if Buyer adopts and uses such data in whole
or in part.
LIMITATIONS ON AUTHORITY OF REPRESENTATIVES:
No representative of Seller, other than an Executive
Officer, has authority to change or extend these provisions.
Changes or extension shall be binding only if confirmed in
writing by Seller’s duly authorized Executive Officer.
Direct any question or warranty claims to the original
installer:
Company: ______________________________________
Address: _______________________________________
______________________________________________
Phone: ________________________________________
Or to:
Warranty Claims
Roberts-Gordon, Inc.
1250 William Street
P.O. Box 44
Buffalo, NY 14240-0044
Warranty Claims
Roberts-Gordon Canada Inc.
241 South Service Road West
Grimsby, Ontario L3M 1Y7