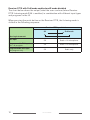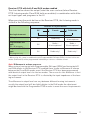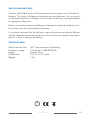
1
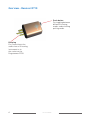
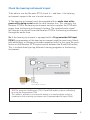
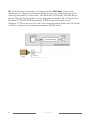
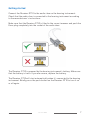
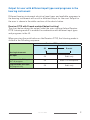
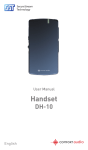
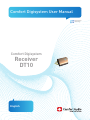
Comfort Digisystem User Manual
SecureStream
Technology
Comfort Digisystem
Receiver
DT10
English
English
User Manual
Table of Contents
Page
Introduction Comfort Digisystem
3
Presentation of the Receiver DT10
3
Overview - Receiver DT10
4
Check the hearing instrument’s input
5
Getting started
7
Acoustic indication, sound signals
8
Modes in the Receiver DT10
8
Output for user with different input types and
programs in the hearing instrument
9
Pairing 12
Trouble shooting
Service and warranty
14
Technical data
15
Important safety instructions
16
2
Receiver DT10
15
Introduction to the Comfort Digisystem
Thank you for choosing Comfort Digisystem. Our products are easy to use and
give you crystal clear sound.
Before using the product, please read this manual carefully.
The Comfort Digisystem products feature SecureStream Technology – a
unique, patented digital technology allowing eavesdrop-secure radio transfer
in real time.
Comfort Digisystem Receiver DT10
— the world’s first digital mini receiver
The Comfort Digisystem Receiver DT10 is a digital mini receiver that you
can easily connect to any hearing aid with a standard three-pin Europlug
audio shoe.
The receiver weighs 1,5 gram and is powered by the hearing instrument’s
battery. To minimize energy consumption, the mini receiver is equipped with
an optional auto-sleep feature.
Together with existing microphones and receivers in the Comfort Digisystem
assortment, the Receiver DT10 provides clear speech perception.
The Receiver DT10 is the world’s first mini receiver, taking full advantage of
digital technology in enabling outstanding sound reproduction.
The optional professional tool Programmer DT05 can be used to configure the
Receiver DT10.
The Programmer DT05 also makes it easy to test the Receiver DT10 with or
without a hearing instrument.
Receiver DT10
3
Overview - Receiver DT10
Push-button
For toggling between
different listening
modes and activating
pairing mode.
Europlug
For connecting to the
audio shoe on a hearing
instrument or to
the socket on the
Programmer DT05.
4
Receiver DT10
Check the hearing instrument’s input
To be able to use the Receiver DT10, check if — and how — the hearing
instrument supports the use of a mini receiver:
1. The hearing instrument must be equipped with an audio shoe with a
powered Europlug socket made for mini receiver use. This connects the
Receiver DT10 to the hearing instrument and also supplies the DT10 with
power from the hearing instrument’s battery. The received audio signal
will then be transferred from the Receiver DT10 to the hearing instrument
through the audio shoe.
2a. If the hearing instrument is equipped with a Programmable DAI input
(DPAI), programming of the hearing instrument might be necessary (check
with audiologist or hearing instrument manufacturer). In this case the pushbutton on the Receiver DT10 cannot switch between the R and R+M modes.
This is instead done by using different listening programs in the hearing
instrument.
Europlug
TIP! The volume of the Receiver DT10’s R and R+M mode can be set individually
by using the Programmer DT05.
This makes it possible to use the push-button as a simple volume control in
combination with a hearing instrument with Programmable DAI input (DPAI).
Receiver DT10
5
2b. If the hearing instrument is equipped with a DAI input (check with
audiologist or hearing instrument manufacturer), no programming of the
hearing instrument is necessary. The Receiver DT10 works with the Microphone (M) listening program on your hearing instrument. By setting up the
Receiver DT10 with the Programmer DT05, the push-button on the
Receiver DT10 can be used to select the listening mode: Radio only (R mode)
or Radio + Hearing instrument microphone (R+M mode).
Europlug
6
Receiver DT10
Getting started
Connect the Receiver DT10 to the audio shoe on the hearing instrument.
Check that the audio shoe is connected to the hearing instrument according
to the manufacturer’s instructions.
Make sure that the Receiver DT10 is fitted in the correct manner and push the
Euro-plug completely into the socket of the audio shoe.
The Receiver DT10 is powered by the hearing instrument’s battery. Make sure
that the battery is fresh. If you are unsure, replace the battery.
The Receiver DT10 will start automatically when it’s connected to the hearing
instrument. Briefly press the push-button on the Receiver DT10 to turn it on
or off again.
Receiver DT10
7
Acoustic indication, sound signals
The following is a description of the acoustic indications (sound signals). The
sound signals consist of various combinations of two different tones: one high
pitch tone (1000 Hz) and one low pitch tone (500 Hz), and two different tone
lengths.
Action:Sound signal:Indicate this:
•
Button pressed Short high pitch
Selecting mode
briefly or turning on
Button pressed briefly
••
Short high pitch x 2
— Turning off
+ long low pitch
Button pressed 2 sec.
Short low pitch
+ short high pitch
Pairing Short high pitch x 2
Pairing Long high pitch
+ long low pitch
•
• Pairing mode
••
Successful pairing
—
— Pairing failed
Listening modes in the Receiver DT10
The available listening modes in the Receiver DT10 can be setup in
different configurations:
R Default setting
R+M Setup with Programmer DT05 is necessary
R and R+M Setup with Programmer DT05 is necessary
The Programmer DT05 is used to configure and enable or disable different
listening modes in the Receiver DT10. The push-button on the Receiver DT10
is used to toggle between the activated listening modes.
It is also possible to disable the push-button completely.
8
Receiver DT10
Output for user with different input types and programs in the
hearing instrument
Different hearing instrument electrical input types and available programs in
the hearing instrument will result in different output for the user. Output for
the user is shown in the white sections of the charts below.
Receiver DT10 with R mode enabled (default setting)
The chart below shows the output (what the user can hear) when Receiver
DT10 listening mode R is enabled in combination with different input types
and programs in the HI.
When pressing the push button on the Receiver DT10, the listening mode is
shifted in the following sequence:
Receiver DT10 push-button
Off
R mode
Off
Radio only
Off
Radio + HI microphone
Off
Radio only
Hearing instrument:
DAI input
Programmable DAI input
DAI + M program
Programmable DAI input
DAI program only
Receiver DT10
9
Receiver DT10 with R+M mode enabled and R mode disabled
The chart below shows the output (what the user can hear) when Receiver
DT10 listening mode R+M is enabled, in combination with different input types
and programs in the HI.
When pressing the push-button on the Receiver DT10, the listening mode is
shifted in the following sequence:
Receiver DT10 push-button
Off
R+M mode
Off
Radio + HI microphone
Off
Radio + HI microphone
Off
Radio only
Hearing instrument:
DAI input
Programmable DAI input
DAI + M program
Programmable DAI input
DAI program only
10
Receiver DT10
Receiver DT10 with both R and R+M modes enabled
The chart below shows the output (what the user can hear) when Receiver
DT10 listening modes R and R+M both are enabled, in combination with different input types and programs in the HI.
When pressing the push-button on the Receiver DT10, the listening mode is
shifted in the following sequence:
Receiver DT10 push-button
Off
R mode
R+M mode
Off
Radio only
Radio +
HI microphone
Off
Radio +
HI microphone *
Radio +
HI microphone *
Off
Radio only *
Radio only *
Hearing instrument:
DAI input
Programmable DAI
input
DAI + M program
Programmable DAI
input
DAI program only
* When using this setup in combination with Programmable DAI input (DPAI), the level of the two
modes (R+M and R) can be programmed individually to serve as a volume control.
Note! Difference in volume can occur
When using a hearing aid with Programmable DAI input (DPAI) and having both R
and R+M modes in the Receiver DT10 enabled there can be a difference in volume
between the R and R+M modes even if the Receiver DT10 has been programmed
with identical output levels for the two modes. The reason for this difference is that
the output level in the Receiver DT10 is affected by the input impedance of the hearing instrument.
The difference in output level can vary between different hearing instruments usually the output level will be slightly higher in the R+M mode. An adjustment
might be done with the Programmer DT05 in order to meet the users requirements.
Receiver DT10
11
Pairing
The Receiver DT10 can receive but not transmit pairing information. To pair
the Receiver DT10 with your Comfort Digisystem transmitter the Receiver
DT10 must be connected either to your hearing instrument or to the
Programmer DT05.
Press the push-button on the Receiver DT10 for 2 seconds to activate pairing
mode.
When pairing mode is activated, you receive an acoustic indication: • •
Send the pairing information within 15 seconds.
To interrupt pairing mode, briefly press the push-button.
Example 1: Pairing a Receiver DT10 into an existing Comfort Digisystem
consisting of one Conference Microphone DC20 and one Receiver DH10:
1.
2.
3.
4.
5.
Connect the Receiver DT10 to the hearing instrument’s audio shoe
according to the instructions.
Initiate pairing mode in the DT10 by pressing
the push-buttons for 2 seconds. Acoustic indication: • •
Start the Conference Microphone DC20.
Rapidly press the pairing button on the DC20 twice. The display on the
DC20 responds with the text Sending info.
The Receiver DT10 confirms successful
••
pairing with an acoustic indication:
Example 2: Make a new eavesdrop secure configuration with one Microphone DM80 and two hearing instruments with Receiver DT10s:
1.
2.
3.
4.
12
Connect the Receiver DT10s to the hearing instrument’s audio shoes
according to the instructions.
Activate pairing mode in the two DT10’s by pressing
the push-buttons for 2 seconds. Acoustic indication: • •
Start the Microphone DM80 and open the menu. Select Communication/
Pairing/New code key and answer Yes to the question of whether you
want to create a new code key and transmit it.
The Receiver DT10s confirm successful
••
pairing with an acoustic indication:
Receiver DT10
Example 3: Make a new eavesdrop secure configuration with one Microphone DM80 and two Receiver DT10s using the Programmer DT05:
1.
Put one of the Receiver DT10s into the Programmer DT05.
2.
Start the Programmer DT05 and connect headphones or a neck loop to
be able to listen.
3.
Activate pairing mode for the DT10 by pressing the push-button for
2 seconds.
In the headphones/neckloop you receive an acoustic indication: • •
4.
Start the Microphone DM80 and open the menu. Select Communication/
Pairing/New code key and answer Yes to the question of whether you
want to create a new code key and transmit it.
5.
The Receiver DT10 confirms
successful pairing with an acoustic indication: • •
6.
Remove the paired DT10 and connect the other DT10
into the Programmer DT05.
7.
Activate pairing mode on the DT10 by pressing the push-button for
2 seconds.
In the headphones/neckloop you receive an acoustic indication: • •
8.
Open the menu on the DM80 and select Communication/Pairing/Send
info.
9.
The Receiver DT10 confirms successful
••
pairing with an acoustic indication:
Receiver DT10
13
Trouble shooting
The receiver does not start
1. Check that the correct listening program is selected on the hearing
instrument.
2. Make sure the Receiver DT10 is correctly connected to the hearing
instrument’s audio shoe. Also check the connection between the audio
shoe and the hearing instrument.
3. Make sure all connecting surfaces are clean.
4. Check/replace the hearing instrument’s battery.
5. Remember to press the push-button briefly to switch the DT10 on.
Poor speech intelligibility
The distance between the transmitter and the receiver may be too long. The
range is around 15 meters.
The distance between the microphone and the talking person may also be too
long; move the microphone closer to the talking person.
Try changing the channel/environment.
Poor range and interference
In some environments, such as in buildings with a lot of concrete, iron or
sheer metal structures, the range may be reduced.
There may also be electronic equipment nearby causing interference. Change
the channel.
No sound
Check that the transmitter and the receiver are set to the same channel.
Loud hissing noise
Check that the Comfort Digisystem units you are using are paired together.
If Auto sleep is enabled, the Receiver DT10 goes into sleep mode if there is
no radio signal. But if another radio signal (with the same frequency you are
using) is present, the Receiver DT10 might start again automatically. This
could cause a loud hissing noise and that’s why Auto sleep should be used
with caution.
14
Receiver DT10
Service and warranty
Comfort Audio AB accords a limited warranty for two years as of the date of
delivery. This covers all defects of manufacture and materials. For accessories the warranty period is 90 days as of the date of delivery. Local agreements
or regulations may exist.
Defects caused by careless handling or intervention inside the product or its
accessories are not covered by the warranty.
It is perfectly normal that the battery’s capacity decreases gradually. Battery
lifetime depends on how the product is used. Contact your point of purchase
when it is time to change the battery.
Technical data
Radio transmission:
Frequency range:
Range:
Dimensions:
Weight: SST - SecureStream Technology
F1 operates in 850-872 MHz
Approx. 15 m
9,7 x 11,2 x 21,3 mm
1,5 g
!
Receiver DT10
15
Important safety instructions —
read before using your product
1) Read these instructions.
2) Keep these instructions.
3) Heed all warnings.
4) FolIow all instructions.
5) Do not use this apparatus near water.
6) Clean only with dry cloth.
7) Do not use near any heat sources such as radiators heat registers stoves,
or other apparatus (including amplifiers) that produce heat.
8)
Do not defeat the safety purpose of the polarized or grounding plug. A
polarized plug has two blades with one wider than the other. A grounding
plug has two blades and a third grounding prong. The wide blade or the
third prong is provided for your safety. If the provided plug does not fit
your electrical outlet, consult an electrician for replacement of the
incorrect outlet — (only when using polarized plug).
9) Protect the power cord from being walked on or pinched particularly at
plugs convenience receptacles. and the point where they exit from the
apparatus.
10) Only use attachments/accessories specified by Comfort Audio AB.
11) Unplug this apparatus during Iightning storms or when unused for long
periods of time.
12) Refer all servicing to qualified service personnel. Servicing is required
when the apparatus has been damaged in any way (such as if a Iiquid has
been spilled on the apparatus, the apparatus has been subject to impact
by another object or dropped or the apparatus has been exposed to rain
or moisture) or does not operate normally.
13) Start listening at a low volume.
16
Receiver DT10
14) Too high a volume can seriously damage your hearing.
15) Don’t dissasemble the product.
16) Should the product break open because of damage, service should only
be done by qualified service personnel.
17) Never use a transmitter or receiver set to a non-permitted frequency.
Check with the frequency regulatory agency in the country where the
equipment is to be used.
18) The product contains sensitive electronic equipment and must be handled
carefully.
19) Never charge product in closed, unaired spaces such as handbags, cases
or other closed storage bags.
20) Only use batteries and power supply specified by Comfort Audio AB.
21) You must not change the battery yourself; please contact your point of
purchase.
22) CAUTION! Danger of explosion if battery is incorrectly replaced.
23) The product must not be exposed to excessive heat such as sunshine,
open flames or the like.
24) Products include radio transmitters. Do not use products where the use
of electronic equipment is not permitted, such as on airplanes.
25) The necklace should not be used if there is a risk of getting stuck, e.g. in
a machine or other objects.
26) Keep small parts out of reach of children and animals. Choking hazard if swallowed.
26) Do not leave the product unloaded for too long, the battery could get
damaged.
27) Do not keep the product connected to the charger if it is not used for a
longer period.
Subject to change
Receiver DT10
17
18
Receiver DT10
Receiver DT10
19
Comfort Audio AB
Box154, SE-301 05 Halmstad, Sweden
Tfn +46 35 260 16 00 Fax +46 35 260 16 50
[email protected] www.comfortaudio.com
MA0171 Ver 1.0 Rev B 120704
Manufactured by: