1
we protect digital worlds
NOD32 for Linux/BSD
Mail Server
Installation Manual
and User’s documentation
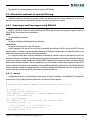
Table of contents
NOD32 for Linux/BSD Mail Server, First Edition
Published on 6th December 2006
Copyright © 2006 Eset, s.r.o.
NOD32 for Linux/BSDMail Server was developed by
Eset, s.r.o. For more information visit www.nod32.com.sg.
NOD32 for Linux Mail Server was developed in
co-operation with ProWeb Consulting. For more
information visit www.pwc.sk.
All rights reserved. No part of this documentation
may be reproduced, stored in a retrieval system or
transmitted in any form or by any means, electronic,
mechanical, photocopying, recording, scanning, or
otherwise without a permission in writing from the
author.
Eset, s.r.o. reserves the right to change any of the
described application software without prior notice.
1. Introduction ........................................................... 3
2. Installation.............................................................. 5
3. Product’s Roadmap .................................................. 7
4. Integration with E-mailMessaging System ................11
4.1. Scanning of inbound e-mail messages ............................... 13
4.1.1. Renaming the original MDA and its replacement by
NOD3 2MDA .................................................................... 13
4.1.2. Setting of NOD32MDA (in MTA) as MDA........................... 14
4.1.2.1. Setting NOD32MDA in Sendmail MTA ........................... 14
4.1.2.2. Setting NOD32MDA in Postfix MTA ............................... 15
4.1.2.3. Setting NOD32MDA in Qmail MTA ................................ 16
4.1.2.4. Setting NOD32MDA in MTA Exim version 3 ................... 17
4.1.2.5. Setting NOD32MDA in MTA Exim version 4 ................... 19
4.2. Scanning of outbound e-mail messages ............................ 20
4.3. Content Filtering in MTA ..................................................... 22
4.3.1. Content filtering in MTA Postfix ....................................... 22
4.3.2. Content filtering in MTA Sendmail ................................... 23
4.3.3. Content filtering in MTA Exim 3 ....................................... 23
4.3.4. Content filtering in MTA Exim 4 ....................................... 25
4.3.5. Content filtering in MTA Qmail ........................................ 26
4.4. Alternative methods of content filtering ............................ 27
4.4.1. Scanning e-mail messages using AMaViS........................ 27
4.4.1.1. amavis.......................................................................... 27
4.4.1.2. amavisd........................................................................ 28
4.4.1.3. amavisd-new ............................................................... 28
5. Important NOD32LMS/NOD32BMSMechanisms..........31
5.1. User Specific Configuration................................................. 32
5.2. Handle Object Policy .......................................................... 33
5.3. Black-list and white-list ..................................................... 33
5.4. Samples Submission System .............................................. 35
6. NOD32 System Update andMaintenance ...................37
6.1. Basic concept of NOD32 system update .............................. 38
6.1.1. NOD32 mirror creation..................................................... 38
6.1.2. Generation of NOD32 scanner loading modules .............. 38
6.2. Automatic update of the virus definitions database ........... 39
7. Tips and Tricks .........................................................41
7.1. Dropping messages marked by NOD32
as deleted in MTA Postfix ................................................ 42
7.2. NOD32LMS/NOD32BMS and TLS support in MTA ................ 42
8. Let us know ............................................................45
NOD32 for Linux/BSD Mail Server
Chapter 1:
1 Introduction
Introduction
Dear user, you have acquired NOD32 for Linux/BSD Mail Server - NOD32LMS/NOD32BMS - probably the best antivirus system running under the Linux/BSD OS. As you will soon find out, the system using, the state-of-the-art NOD32
scanning engine, has unsurpassed scanning speed and detection rate, combined with a very small footprint that makes
it the ideal choice for any Linux/BSD OS server.
In the rest of this chapter we review a key features of the system.
• NOD32 scanning engine algorithms provide both the highest detection rate and the fastest scanning times.
• The system is developed to run on the single-processor units as well as on the multi-processor units.
• It includes unique advanced heuristics for Win32 worms and back-doors.
• Inbuilt NOD32 archivers unpack archived objects without the need for any external programs.
• In order to increase speed and efficiency of the system, its architecture is based on the running daemon (resident
program) where all the scanning requests are sent to.
• The system supports selective scanner configuration specific for user or client/server identification.
• Six various levels of logging can be configured to get information about system activity and infiltrations.
• One of the major advantages is the fact that the system installation does not require external libraries or programs
except for LIBC.
• The system can be configured to notify any person in case of detected infiltration.
• Information about infiltration can be configured to be written into an e-mail header, footer and subject.
• The system is MTA-independent, i.e. it does not depend on Mail Server used.
To run efficiently, the system requires just 16MB of hard-disk space and 32MB of RAM. The NOD32LMS/NOD32BMS
runs smoothly under the 2.2.x, 2.4.x and 2.6.x LinuxOS kernel versions and also under 5.x, 6.x FreeBSD OS kernel
versions. The NOD32LMS/NOD32BMS system supports most popular server software including Sendmail, Postfix, Qmail,
Exim, etc.
From lower-powered, small office servers to enterprise-class ISP servers with thousands of users, the system delivers
the performance and scalability you expect from a UNIX based solution and the unequaled security of NOD32.
NOD32 for Linux/BSD Mail Server
Chapter 2:
2 Installation
Installation
This product is distributed as a binary file. Its format for Linux OS is:
nod32ls.i386.ext.bin
where ’ext’ is a Linux OS distribution dependent suffix, i.e. ’deb’ for Debian Linux OS distribution, ’rpm’ for RedHat and
SuSE Linux OS distributions, ’tgz’ for other Linux OS distributions.
Note that we support also RedHat Ready and Novell (SuSE) Ready variation of the product . The RedHat and Novell
(SuSE) Ready variation of the binary file format is:
nod32ls-rsr.i386.rpm.bin
Slightly different format is used to name the binary file for BSD OS,
nod32bs.i386.ext.tgz.bin
where ’ext’ stands for BSD OS distribution dependent suffix, i.e. ’fbs4’ for FreeBSD 4.xx, ’fbs5’ for FreeBSD 5.xx and
’fbs6’ for FreeBSD 6.xx OS distributions.
In order to install or update the product on Linux OS, use the statement:
sh ./nod32ls.i386.ext.bin
resp. the RedHat Ready or Novell (SuSE) Ready variation of the product is installed using the following statement:
sh ./nod32ls-rsr.i386.rpm.bin
In case of BSD OS, the install statement is as follows.
sh ./nod32bs.i386.ext.tgz.bin
As a result the User License Acceptance Agreement related with the product is shown. Once you have confirmed
the Acceptance Agreement, the whole installation package is extracted into the current working directory and relevant
information regarding installation or update of the package extracted as well as information necessary for uninstall the
already installed package is printed into terminal.
Once the package is installed and the main NOD32 daemon service is running, in Linux OS you can check its operation
by using command:
ps -C nod32d
In case of BSD OS you can use a similar command:
ps -ax nod32d | grep nod32d
You will see the following (or similar) message on return:
PID 2226 2229 TTY
? ? TIME
00:00:00
00:00:00
CMD
nod32d
nod32d
where at least two main NOD32 daemon ’nod32d’ processes running in the background have to be present. One of
the processes is so-called process and threads manager of the system. The other serves as NOD32 scanning process.
The difference from the original RedHat and SuSE Linux OS package is that the RedHat Ready and Novell (SuSE) Ready package
meets criteria defined by FHS (File-system Hierarchy Standard defined as a part of Linux Standard Base) document required by the
RedHat Ready and Novell (SuSE) Ready certificate. This means in particular that the package is installed as an add-on application,
i.e. the primary installation directory is ’/opt/eset/nod32’ instead of the base Linux OS directory structure. However, there are more
differences between the original and ’Ready’ variation of the product that are beyond the scope of this document.
NOD32 for Linux/BSD Mail Server
Chapter 3:
3 Product’s Roadmap
Product’s Roadmap
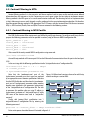
Once the product package has been successfully installed, it is time to become familiar with its content.
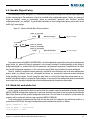
The structure of the NOD32LMS/NOD32BMS is shown in the figure 3-1. The system is composed of the following
components.
Figure 3-1. Structure of NOD32LMS/NOD32BMS.
AGENTS
NOD32SMTP
NOD32SMFI
NOD32PIPE
NOD32MDA
NOD32CLI
CORE
NOD32D
LIBNOD32.SO
NOD32.00X
CONFIGURATION
nod32.cfg
license
scripts
UPDATE
nod32_update
nod32update
templates
extern
CORE
Core of the NOD32LMS/NOD32BMS consists of main NOD32 system control and scanning daemon module nod32d.
The daemon uses NOD32 API library libnod32.so and NOD32 loading modules nod32.00X to provide essential system
tasks: anti-virus scanning, maintenance of the agent daemon processes, maintenance of the samples submission system,
logging, notification, etc.. To get detailed information on the main NOD32 system control and scanning daemon, please
refer to nod32d(8) manual page.
AGENTS
The purpose of NOD32 agent modules is to integrate the NOD32LMS/NOD32BMS with the e-mail messaging system
environment. Their functionality is build with respect to needs of most common e-mail messaging systems in the
present. Please note a special chapter in this document devoted to the topic.
UPDATE
The update utilities create a particular fraction of the system. They are built with only one purpose, i.e. update of
NOD32 loading modules containing for instance virus signatures database, archives support, advanced heuristics
support etc. Please notice a special chapter in this document devoted to the topic.
CONFIGURATION
Proper configuration is the most important condition for the system operation. Therefore we describe all the related
components in the rest of this chapter. We also strongly recommend to read nod32.cfg(5) manual page, an essential
information source regarding NOD32LMS/NOD32BMS configuration.
After the product package is successfully installed, all the components related with its configuration and
authorization are stored in directory
NOD32 for Linux/BSD Mail Server
/etc/nod32
Note that in case of RedHat Ready and Novell (SuSE) Ready variation of the NOD32 for Linux Mail Server the
configuration and authorization directory is
/etc/opt/eset/nod32
The directory consists of the following files.
nod32.cfg
This is the most important configuration file as it maintains the major part of the product functionality. For this
reason the file is further referred to as ‚main configuration file‘ or ‚main NOD32 configuration file‘. After exploring the
file you can see that it is built from various parameters distributed within sections. Note the section names always
enclosed in square brackets. In the main configuration file there is always one global and several so-called agent
sections. Parameters in global section are used to define configuration options of main NOD32 daemon ‚nod32d‘ as
well as default values of NOD32 scanning engine configuration options. Parameters in agent sections are used to define
configuration options of so-called agents, i.e. modules used to intercept various data flow types in the computer and
in its neighborhood and prepare this data for anti-virus scanning. Note that besides the number of parameters used
for the system configuration, there is also a number of rules determining organization of configuration file. To become
familiar with this knowledge. please refer to nod32.cfg(5), nod32d(8) manual page and also to manual pages related
to relevant agents.
license
This directory is used to store the product license key you have acquired from your vendor. Note that the main
NOD32 daemon will always check only this directory to evaluate license key validity unless it is redefined by the main
configuration file parameter ’nod32_lic_dir’.
scripts/nod32d_license_warning_script
This script, if enabled by main configuration file parameter ’license_warn_enabled’, is executed since 30 days (once
per day) before product license expiration. It is used to send e-mail notification about the expiration status to system
administrator.
scripts/nod32d_script
This script, if enabled by main configuration file parameter ’exec_script’, is executed in case the infiltration has been
detected by the anti-virus system. It is used to send e-mail notification about the event to system administrator.
templates/lms_sig_*.html.example
These files are html templates used to define text of messages inserted as a footnote into the scanned e-mails.
To enable these html templates the ‚example‘ suffix must be removed from all of the template file names. Note also
that the appearance of the e-mail messages footnotes is maintained by main configuration file parameter ’write_to_
footnote’. The meaning of individual template files is as follows.
The following footnote templates are used in e-mails found as infected:
chapter 3 / Product’s Roadmap
e-mail header
| From:
.
| To:
-------------------------e-mail body
| text of
.
|
.
| content
. | list of
.
| content
e-mail body
of lms_sig_header_infected.html
infiltrations found by the scanner
of lms_sig_footer_infected.html
The following footnote templates are used in e-mails found as clean:
e-mail header | From:
.
| To:
-------------------------e-mail body
| text of
.
|
.
| content
.
| list of
.
| content
e-mail body
of lms_sig_header_clean.html
objects scanned by the scanner
of lms_sig_footer_clean.html
The following footnote templates are used in e-mails that could not be scanned:
e-mail header | From:
.
| To:
-------------------------e-mail body
| text of
.
|
.
| content
.
| list of
.
| content
10
e-mail body
of lms_sig_header_not_scanned.html
object scanned by the scanner
of lms_sig_footer_not_scanned.html
NOD32 for Linux/BSD Mail Server
Chapter 4:
4 Integration with E-mail Messaging System
Integration with E-mail
Messaging System
This chapter describes integration of the NOD32LMS/NOD32BMS with the variety of known email messaging systems.
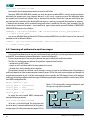
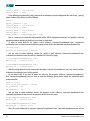
Knowledge of e-mail messaging system basic principles (figure 4-1) is of paramount importance for understanding of
the NOD32LMS/NOD32BMS operation.
Figure 4-1. Scheme of UNIX OS e-mail messaging system.
MTA - Mail Transport Agent
A program (for instance sendmail, postfix, qmail, exim,
INTERNET
etc.) providing e-mail messages transfer among local and
remote domains.
TCP port 25 (SMPT)
(SMPT)
MDA - Mail Delivery Agent
e-mail server
A program (for instance maildrop, procmail, deliver, local.
MTA
S3
mail, etc.) providing delivery of locally addressed e-mail
S1
PIPE
messages into particular mailboxes.
MUA - Mail User Agent
MDA
A program (for instance MS Outlook, Mozilla Mail,
FILE
Eudora, etc.) providing access and management of e-mail
Mailbox
messages, i.e. reading, composing, printing etc., stored in
S2
mailboxes.
TCP port 110 (POP3)
TCP port 25 (SMPT)
MAILBOX
OR 143 (IMAP)
A file or a file structure on a disk serving as the storage
Client
Clients
space for e-mail messages. Note that there are several
MUA
Computer
formats of MAILBOX in Linux/BSD OS: an old fashioned
format where e-mails for each user are stored sequentially
in one user appropriate file located in directory ‚/var/spool/mail‘; MBOX (a bit newer but still an old format) with e-mails
stored sequentially in one file located within user home directory; MAILDIR with e-mails stored in a separate files within
a hierarchical directory structure.
The e-mail server receives data communication typically using SMTP - Simple Mail Transfer Protocol communication.
The received message is transferred by MTA either to another remote e-mail messaging system or it is delivered using
local MDA into particular MAILBOX (we assume each local network user owns a MAILBOX located at the server disk).
Note that it is responsibility of the user‘s local MUA to provide download and correct interpretation of the message at
the user’s computer. When retrieving data from MAILBOX the MUA uses typically POP3 - Post Office Protocol or IMAP
- Internet Message Access Protocol to communicate with the MTA. To send data to the Internet the SMTP protocol
communication is used.
The NOD32LMS/NOD32BMS operating principle is based on data communication interception and scanning at the
various phases of its transfer. The interception locations are marked in the figure 4-1 by symbols S1, S2 and S3.
S1
Scanning of inbound e-mail messages, i.e. messages with the target address corresponding to the destination located
inside the local domain.
S2
Scanning of outbound e-mail messages, i.e. messages bound to some remote Internet domain via its target address.
S3
Bi-directional e-mail messages scanning, i.e. content filtering in MTA.
The rest of this chapter reviews methods of integration of NOD32LMS/NOD32BMS with variety of supported
messaging systems.
12
NOD32 for Linux/BSD Mail Server
4.1. Scanning of inbound e-mail messages
Scanning of the inbound e-mail messages is
performed during the messages transfer between MTA
and MDA. Scheme of this process is in the figure 4-2.
The incoming e-mail is intercepted by nod32mda
module, scanned by main NOD32 daemon ’nod32d’ and
delivered to MAILBOX using original MDA. As shown in
the figure, the virus scanning can be enabled by proper
configuration setting of MTA and nod32mda module. It is
also apparent that the solution is MDA independent.
Note that the majority of mail servers use procmail
or maildrop (MDA). The nod32mda module supports
any MDA. In particular the following MDAs were tested:
procmail, maildrop, deliver and local.mail.
Next sections reviews two different procedures of
nod32mda module integration with e-mail messaging
system.
Figure 4-2. Inbound e-mail messages delivery without
(the left part of the figure) and with (the right part of the
figure) NOD32 scanning.
MTA
MTA
PIPE
PIPE
NOD32MDA
NOD32D
FILE
MDA
MDA
FILE
Mailbox
FILE
Mailbox
4.1.1. Renaming the original MDA and its replacement by NOD32MDA
This is a simple approach even without a need to make any changes in MTA configuration file. The idea is based on
replacing of original MDA by nod32mda module. Note that the information, on what MDA is used by your MTA, can be
grabbed only by exploring the MTA configuration file. Let‘s assume that the MDA used is for instance /usr/bin/procmail.
You simply rename the original procmail binary file for instance to procmail.real:
mv /usr/bin/procmail /usr/bin/procmail.real
and create the soft link to module nod32mda with the name ‚procmail‘:
ln -s /usr/bin/nod32mda /usr/bin/procmail
In case of RedHat Ready and/or Novell (SuSE) Ready variation of NOD32 for Linux Mail Server the installation path to
the nod32mda is different so an appropriate statement is as follows:
ln -s /opt/eset/nod32/bin/nod32mda /usr/bin/procmail
With the above modifications, you ensure that all messages originally sent to MDA are primarily catched by
nod32mda module. Still there remains to provide that all messages processed by nod32mda will be sent to the original
MDA ‚procmail‘ binary file (currently named ‚procmail.real‘). To do so, just modify parameter ‚mda_path‘ within section
[mda] of main NOD32 configuration file in the following way:
mda_path = “/usr/bin/procmail.real“
After the modifications yet enter
/etc/init.d/nod32d reload
and newly created configuration will be reread by the system.
Note that we have used ‚procmail‘ MDA in this case, but the advantage of the procedure is that it can be repeated
with arbitrary known MDA. Disadvantage of this method, on the other hand, is that after original MDA upgrade your
chapter 4 / Integration with E-mail Messaging System
13
configuration will be broken as the new version of MDA will cancel the link to nod32mda module.
4.1.2. Setting of NOD32MDA (in MTA) as MDA
This section contains a more rigorous approach to provide scanning of inbound messages.
Note: Some MTA modules may be configured to not use MDA component for e-mail messages delivery. In this case,
it is necessary to configure them in a way to use any, by NOD32LMS/NOD32BMS supported MDA (for instance procmail
or maildrop).
4.1.2.1. Setting NOD32MDA in Sendmail MTA
First one has to grab information on the MDA used by Sendmail. This can be found in Sendmail configuration
file ’/etc/mail/sendmail.cf’ (some older versions use the ‚/etc/sendmail.cf‘). In the section ‚Local and Program Mailer
specification‘ find the parameter ’P’ in sentence starting with ‚Mlocal‘. This parameter represents the full path to the
MDA used. In the same sentence you will see the parameter ‚A‘ representing the MDA command line used.
Replace the path at parameter ’P’ with nod32mda module path and the name at parameter ’A’ with nod32mda
module name to provide complete replacement of original MDA by nod32mda module. Note that the command line
parameters present at the parameter ’A’ must stay the same as before replacement. For instance, if the original MDA
component path is /usr/bin/procmail, the appropriate sentence in the Sendmail configuration file can be:
Mlocal, P=/usr/bin/procmail, F=lsDFMAw5:/|@qSPhnu9,
S=EnvFromL/HdrFromL, R=EnvToL/HdrToL,
T=DNS/RFC822/X-Unix,
A=procmail -t -Y -a $h -d $u
After the modifications have been performed, the appropriate sentence will be the following:
Mlocal, P=/usr/bin/nod32mda, F=lsDFMAw5:/|@qSPhnu9,
S=EnvFromL/HdrFromL, R=EnvToL/HdrToL,
T=DNS/RFC822/X-Unix,
A=nod32mda -t -Y -a $h -d $u
Note that in case of RedHat Ready and/or Novell (SuSE) Ready variation of NOD32 for Linux Mail Server the
nod32mda module path is different, so an appropriate Sendmail configuration file sentence will be as follows.
Mlocal, P=/opt/eset/nod32/bin/nod32mda, F=lsDFMAw5:/|@qSPhnu9,
S=EnvFromL/HdrFromL, R=EnvToL/HdrToL,
T=DNS/RFC822/X-Unix,
A=nod32mda -t -Y -a $h -d $u
Warning: In case you are reading the ASCII form of this guide, do not drag and drop any of above sentences, since
it may not work. The reason is that the command line switches present at parameter ’A’ of the sentence depend on the
version of original MDA and thus may not work in your case.
With the above modifications you have ensured that all the e-mail messages originally sent to MDA will be catched
by nod32mda module. Yet there remains to provide that all messages processed primarily by nod32mda will be sent to
the original MDA for further delivery. In order to do so, just modify ‘mda_path‘ parameter within [mda] section of main
NOD32 configuration file. In case the original MDA is ‘/usr/bin/procmail‘ the ‘mda_path‘ parameter will be as follows:
mda_path = “/usr/bin/procmail“
Note (for Linux Debian users): The Debian distribution uses ’/usr/lib/sm.bin/sensible-mda’ as MDA. Note that this is
14
NOD32 for Linux/BSD Mail Server
not a full-blown MDA, it is rather a wrapper; the ‘mda_path‘ parameter in this case has the following format:
mda_path = “/usr/lib/sm.bin/sensible-mda“
To reread of newly created NOD32 configuration, enter the following command:
/etc/init.d/nod32d reload
To accomplish the whole procedure, one has to restart the MTA Sendmail.
Note that NOD32LMS/NOD32BMS provides you with the option to define NOD32 scanning engine parameters
individually for recipient users (resp. recipient domains). In this case it is necessary to pass the information about the
recipient user to nod32mda module using its command line interface. Note that in case you would like to pass any
command line parameter to the whole nod32mda agent it is necessary to prepend the parameter by sentence ‚--‘,
otherwise the parameter will be assumed to be passed to original MDA specified by the ‘mda_path‘ parameter. Thus
for instance to pass command line option --user to nod32mda agent the above discussed parameter ‘A‘ of Sendmail
configuration file has to be defined in a following way:
A=nod32mda -t -Y -a $h -d $u -- --user $u
With this setting a special section [user], if defined in NOD32 configuration file, will be used by main NOD32 daemon
for scanning.
4.1.2.2. Setting NOD32MDA in Postfix MTA
First one has to grab information on the MDA used by Postfix. This can be found in Postfix configuration file ’/etc/
postfix/main.cf’. The Postfix authors have written a helper utility ‘postconf‘ to work with the file, so we will use it in this
procedure. Thus by entering command
postconf mailbox_command
you can receive the following information on return:
mailbox_command = maildrop -d “$USER“ “$EXTENSION“
From the line above you can see that the MDA used by Postfix is program called ’maildrop’. In order to replace the
original MDA by nod32mda module, enter the following command
postconf -e ’mailbox_command = nod32mda -d “$USER“ “$EXTENSION“’
Keep in mind that the command line switches used in ’mailbox_command’ after the nod32mda component must
stay the same as in the original configuration file, otherwise the configuration may not work properly. The reason is that
the switches depend on the version of original MDA used by the Postfix.
With the above modifications you have ensured that all the e-mail messages originally sent to MDA will be catched
by nod32mda module first. Still there remains to provide that all messages processed by nod32mda will be sent to the
original MDA for further delivery. To do so, just modify parameter ‘mda_path‘ within section [mda] of main NOD32
configuration file. In case of ’maildrop’ MDA the parameter ‘mda_path‘ will be as follows:
mda_path = “/usr/bin/maildrop“
For reread of newly created NOD32 configuration, enter the following command:
/etc/init.d/nod32d reload
To accomplish the whole procedure, one has to restart the MTA Postfix.
Note that NOD32LMS/NOD32BMS provides you with the option to define NOD32 scanning engine parameters
individually for recipient users (resp. recipient domains). In this case it is necessary to pass the information about the
chapter 4 / Integration with E-mail Messaging System
15
recipient user to nod32mda module using its command line interface. Note that in case you would like to pass any
command line parameter to the whole nod32mda agent it is necessary to prepend the parameter by sentence ‚--‘,
otherwise the parameter will be assumed to be passed to original MDA specified by the ‘mda_path‘ parameter. Thus
for instance to pass command line option --user to nod32mda agent the ‘mailbox_command‘ option has to be defined
in the following way.
postconf -e ’mailbox_command = nod32mda -d “$USER“ “$EXTENSION“ \
-- --user “$USER“’
With this setting a special section [user], if defined in NOD32 configuration file, will be used by main NOD32 daemon
for scanning.
4.1.2.3. Setting NOD32MDA in Qmail MTA
The delivery options in the Qmail program are configured via the command line parameters at the time of program
execution or by using short scripts where the appropriate command line statements are stored. In the following text we
assume that the Qmail is installed in a ’/var/qmail’ directory and there is a QMail’s starting script ’rc’ within this directory
that is always executed at the start-up of Qmail by running the standard statement
qmailctl start
In a simplest case the script ‘/var/qmail/rc‘ is of the following content:
#!/bin/sh
exec env - PATH=“/var/qmail/bin:$PATH“ \
qmail-start ./Maildir/ splogger qmail
Note the first qmail-start argument instructing qmail where to deliver e-mail messages to. This time it is a special
directory structure located in ’./Maildir/’ within the local user home directory. However, generally there are also other
possible variants of the argument. For instance - ./Mailbox - that instructs qmail to deliver e-mail messages to the
MAILBOX file located at the local user home directory or - ‘|preline procmail‘ - to use the ‘procmail‘ MDA as a local
delivery agent, etc. See dot-qmail(5) manual page to get detailed information on this topic.
In order to instruct qmail to use nod32mda module in the message delivery process, you have to prepend the first
command line argument of qmail-start with the absolute path of nod32mda module, i.e. the starting script ‘var/qmail/
rc‘ will contain:
#!/bin/sh
exec env - PATH=“/var/qmail/bin:$PATH“ \
qmail-start ’|/usr/bin/nod32mda ’./Maildir/ splogger qmail
Note that the nod32mda module absolute path is different in the RedHat Ready and/or Novell (SuSE) Ready variation
of NOD32 for Linux Mail Server, so the starting script ‘var/qmail/rc‘ in that case will appear to be of the form
#!/bin/sh
exec env - PATH=“/var/qmail/bin:$PATH“ \
qmail-start ’|/opt/eset/nod32/bin/nod32mda ’./Maildir/ splogger qmail
Note that there is space before the second character ‚ and no space after it. Keep also in mind that the argument ./Maildir/ - is used this time only as an example and in your case you must prepend argument used in your original ‚/
var/qmail/rc‘ script.
With above modifications you have ensured that all the e-mail messages originally sent to MDA will be catched by
16
NOD32 for Linux/BSD Mail Server
nod32mda module first. Still there remains to provide that all messages processed by nod32mda will be passed back to
QMail’s program for further message delivery. To do so, just modify parameter ‚mda_path‘ within section [mda] of main
NOD32 configuration file in the following way:
mda_path = “/var/qmail/bin/qmail-nod32mda“
Create the script ’/var/qmail/bin/qmail-nod32mda’ with the following content and run command ‚chmod a+x‘ on
it:
#!/bin/sh
exec qmail-local -- “$USER“ “$HOME“ “$LOCAL“ ““ “$EXT“ “$HOST“ “$SENDER“ “$1“
Using this script the nod32mda will automatically (based on present environment variables) use QMail’s recognized
exit codes related with the ’temporary error status’ and also ’infected e-mail message status’ (see also qmail-command(8)
manual page to get information on exit codes of Qmail).
To reread the newly created NOD32 configuration, enter the following command:
/etc/init.d/nod32d reload
To accomplish the whole procedure, one has to restart the MTA Qmail.
Note that NOD32LMS/NOD32BMS provides you with the possibility to define NOD32 scanning engine parameters
individually for recipient users (resp. recipient domains). In this case it is necessary to pass the information about the
recipient user to nod32mda module using its command line interface.Note that in case you would like to pass any
command line parameter to the whole nod32mda agent it is necessary to prepend the parameter by sentence ’--’,
otherwise the parameter will be assumed to be passed to original MDA specified by the ’mda_path’ parameter. Thus
for instance to pass command line option --user to nod32mda agent the ’/var/qmail/rc’ script shall be of the following
content,
#!/bin/sh
exec env - PATH=“/var/qmail/bin:$PATH“ \
qmail-start ’|/usr/bin/nod32mda ’./Maildir/’ \
-- --user “$USER“’ splogger qmail
respectively in case you use RedHat Ready and/or Novell (SuSE) Ready variation of NOD32 for Linux Mail Server the
’/var/qmail/rc’ script shall be slightly different.
#!/bin/sh
exec env - PATH=“/var/qmail/bin:$PATH“ \
qmail-start ’|/opt/eset/nod32/bin/nod32mda ’./Maildir/’ \
-- --user “$USER“’ splogger qmail
4.1.2.4. Setting NOD32MDA in MTA Exim version 3
Let’s look inside the exim configuration file ’/etc/exim/exim.conf’ (resp. in older versions ’/etc/exim.conf’) to
become familiarwith its content. It is typically compound from the so-called TRANSPORTERS CONFIGURATION section
and DIRECTORS CONFIGURATION section. In order to configure exim to use NOD32LMS/NOD32BMS you have to define
special DIRECTORS CONFIGURATION entry in a following way:
# DIRECTORS CONFIGURATION
nod32_director:
driver = smartuser
chapter 4 / Integration with E-mail Messaging System
17
condition = “${if eq {$received_protocol}{virus-scanned} {0}{1}}“
transport = nod32_transport
verify = false
Note that above entry has to be placed as a first of the DIRECTORS CONFIGURATION section. You also have to define
an appropriate TRANSPORTERS CONFIGURATION entry responsible for e-mail messages delivery to nod32mda agent.
Content of the entry is as follows:
# TRANSPORTS CONFIGURATION
nod32_transport:
driver = pipe
command = /usr/bin/nod32mda -oMr virus-scanned $local_part@$domain
user = mail
group = mail
Note that in RedHat Ready and/or Novell (SuSE) Ready variation of NOD32 for Linux Mail Server the absolute path to
nod32mda module is different, so the definition of TRANSPORTS CONFIGURATION entry in this case is as follows:
# TRANSPORTS CONFIGURATION
nod32_transport:
driver = pipe
command = /opt/eset/nod32/bin/nod32mda -oMr virus-scanned $local_part@$domain
user = mail
group = mail
Be sure that the ’user’ (usually ’mail’) used in the above settings is listed in a ’trusted_users’ list for this parameter.
Also be sure that the option ’qualify_domain’ is undefined or set to your fully qualified domain name.
With the above settings you have ensured that all the e-mail messages originally sent to local domain user will
be primarily catched by nod32mda module. Yet there remains to provide that all messages processed by nod32mda
will be sent to the appropriate mailbox. To do so, just modify parameter ‘mda_path‘ within section [mda] of main
NOD32 configuration file. In case the absolute path to the exim is ‘/usr/sbin/exim‘ the parameter ‘mda_path‘ will be
as follows:
mda_path = “/usr/sbin/exim“
To reread the newly created NOD32 configuration, enter the following command:
/etc/init.d/nod32d reload
To accomplish the whole procedure, one has to restart the MTA Exim.
Note that NOD32LMS/NOD32BMS provides you with the option to define NOD32 scanning engine parameters
individually for recipient users (resp. recipient domains). In this case it is necessary to pass the information about
the recipient user to nod32mda module using its command line interface. Note that in case you would like to pass
any command line parameter to the whole nod32mda agent it is necessary to prepend the parameter by sentence ‘-‘, otherwise the parameter will be assumed to be passed to ‘exim‘ specified by the ‘mda_path‘ parameter. Thus for
instance to pass command line option --user to nod32mda agent, the parameter ‘command‘ defined in TRANSPORTS
CONFIGURATION entry must by as follows:
command = /usr/bin/nod32mda -oMr virus-scanned $local_part@$domain \
-- --user $local_part
resp. in case of RedHat Ready and Novell (SuSE) Ready variation of NOD32 for Linux Mail Server used, the ’command’
18
NOD32 for Linux/BSD Mail Server
parameter has to be defined as follows:
command = /opt/eset/nod32/bin/nod32mda -oMr virus-scanned $local_part@$domain \
-- --user $local_part
4.1.2.5. Setting NOD32MDA in MTA Exim version 4
Let’s look inside the exim configuration file ’/etc/exim4/exim4.conf’ to become familiar with its content. It is
typically compound from TRANSPORTS CONFIGURATION section and ROUTERS CONFIGURATION section. Usually there is
a ROUTERS CONFIGURATION entry ’localuser’ responsible for e-mail messages local delivery. In order to configure exim to
use NOD32LMS/NOD32BMS you have to define special ROUTERS CONFIGURATION entry in a following way:
# ROUTER CONFIGURATION
nod32_router:
driver = accept
domains = +local_domains
condition = “${if eq {$received_protocol}{virus-scanned} {0}{1}}“
transport = nod32_transport
verify = false
Note that above entry has to be placed as a first in the ROUTERS CONFIGURATION section. You have also define
an appropriate TRANSPORTERS CONFIGURATION entry responsible for e-mail messages delivery to nod32mda agent.
Content of the entry is as follows:
# TRANSPORTS CONFIGURATION
nod32_transport:
driver = pipe
command = /usr/bin/nod32mda -oMr virus-scanned $local_part@$domain
user = mailnull
group = mail
Note that in RedHat Ready and/or Novell (SuSE) Ready variation of NOD32 for Linux Mail Server the absolute path to
nod32mda module is different, so the definition of TRANSPORTS CONFIGURATION entry in this case is as follows:
# TRANSPORTS CONFIGURATION
nod32_transport:
driver = pipe
command = /opt/eset/nod32/bin/nod32mda -oMr virus-scanned $local_part@$domain
user = mailnull
group = mail
Be sure that the ’user’ (usually ’mailnull’) is the value of ’exim_user’ or pick a name from the list ’trusted_users’ for
this parameter. Also be sure that the option ’qualify_domain’ is undefined or set to your fully qualified domain name.
With the above settings you have ensured that all the e-mail messages originally sent to local domain user will
be primarily catched by nod32mda module. Yet there remains to provide that all messages processed by nod32mda
will be sent to the appropriate mailbox. To do so just modify parameter ‚mda_path‘ within section [mda] of main
NOD32 configuration file. In case the absolute path to the exim is ‘/usr/sbin/exim‘ the parameter ‘mda_path‘ will be
as follows:
mda_path = “/usr/sbin/exim“
To reread the newly created NOD32 configuration, enter the following command:
chapter 4 / Integration with E-mail Messaging System
19
/etc/init.d/nod32d reload
To accomplish the whole procedure, one has to restart the MTA Exim.
Note that NOD32LMS/NOD32BMS provides you with the option to define NOD32 scanning engine parameters
individually for recipient users (resp. recipient domains). In this case it is necessary to pass the information about
the recipient user to nod32mda module using its command line interface. Note that in case you would like to pass
any command line parameter to the whole nod32mda agent it is necessary to prepend the parameter by sentence ‚-‘, otherwise the parameter will be assumed to be passed to ‘exim‘ specified by the ‘mda_path‘ parameter. Thus for
instance to pass command line option --user to nod32mda agent, the parameter ‘command‘ defined in TRANSPORTS
CONFIGURATION entry must by as follows:
command = /usr/bin/nod32mda -oMr virus-scanned $local_part@$domain \
-- --user $local_part
resp. in case of RedHat Ready and Novell (SuSE) Ready variation of NOD32 for Linux Mail Server used, the ’command’
parameter has to be defined as follows:
command = /opt/eset/nod32/bin/nod32mda -oMr virus-scanned $local_part@$domain \
-- --user $local_part
4.2. Scanning of outbound e-mail messages
Scanning of the outbound e-mail messages is performed during transfer of e-mail messages between the local MUA
and the MTA. A more detailed scheme of the process is shown in the figure 4-3.
The most important part of scanning the outbound messages is done by the nod32smtp module.
This filter is a resident program (daemon) that performs in general three functions:
• receives data via INET socket,
• extracts e-mail/s and feeds nod32d (scanning daemon) to scan it,
• forwards the e-mail to another port or computer.
The operation principle of outbound e-mail messages scanning is based on the following idea. We configure a
nod32smtp daemon to listen to communication incoming to port 2525 of the email server computer and forward the
scanned communication to port 25 of the same computer where, typically, the MTA daemon listens to. To configure
nod32smtp to intercept outbound email messages the following parameters must be specified in section [smtp] of the
main NOD32 configuration file.
agent_enabled
listen_addr =
listen_port =
server_addr =
server_port =
= yes
“localhost“
2525
“localhost“
25
To reread the newly created NOD32 configuration,
enter the following command.
/etc/init.d/nod32d reload
So far this is just half of the job. The second part that
has to be done is automatic redirection of all the packets
arriving on port 25 of the server computer to port 2525. In
20
Figure 4-3. The scheme of the scanning of outbound e-mail
messages by using nod32smtp module.
NOD32D
INTERNET
MTA
NOD32SMPT
TCP port 25
TCP port 2525
FILE
Local Network 192.168.1.0/24
NOD32 for Linux/BSD Mail Server
case you use ipchains (resp. iptables) tool for network filtering an appropriate rules will be as follows.
Kernel 2.2.X:
ipchains -I INPUT -p tcp -s 192.168.1.0/24 -d 0.0.0.0/0 25 \
-j REDIRECT 2525
Kernel2.4.X:
iptables -I PREROUTING -t nat -p tcp -s 192.168.1.0/24 --dport 25 \
-j REDIRECT --to-ports 2525
Now all the communication arrives to the nod32smtp that can be checked in the module logging output. Note
that the port 2525 with this setting provides an open relay as nod32smtp accepts all the packets that arrive on port
2525 (including packets from outside the local network). The daemon nod32smtp forwards this traffic to port 25 that
is interpreted by MTA as a local communication on the so called loop-back interface and therefore will not be rejected
by MTA rules. You can solve this problem by ensuring that all communication with port 2525 will be disabled except the
local network communication. Use following ipchains (resp. iptabels) rules to do so.
Kernel 2.2.X:
ipchains -I INPUT -p tcp -s ! 192.168.1.0/24 -d 0.0.0.0/0 2525 \
-j REJECT
Kernel 2.4.X:
iptables -I INPUT -p tcp -s ! 192.168.1.0/24 --dport 2525 \
-j DROP
Note that the BSD OS uses ipfw tools for network filtering. Thus in case of BSD OS an appropriate rules for
communication rerouting from the LAN arriving on port 25 to port 2525 will be as follows.
natd -interface xl0 -redirect_port tcp 192.168.1.10:2525 25
where xl0 is the network interface of the server computer with IP address 192.168.1.10. To add the diverting rule
into the ipfw firewall you have to enter following rule.
/sbin/ipfw add divert natd all from any to any via xl0
Note that in order to have ipfw firewall and natd daemon working properly, the BSD OS kernel has to be compiled
with the options IPFIREWALL and IPDIVERT. Moreover the following options has to be written into ’/etc/rc.conf’.
gateway_enable=“YES“
firewall_enable=“YES“
firewall_type=“OPEN“
Now all the communication arrives to the nod32smtp that can be checked in the module logging output. Note
that the port 2525 with this setting provides an open relay as nod32smtp accepts all the packets that arrive on port
2525 (including packets from outside the local network). The daemon nod32smtp forwards this traffic to port 25 that
is interpreted by MTA as a local communication on the so called loop-back interface and therefore will not be rejected
by MTA rules. You can solve this problem by ensuring that all communication with port 2525 will be disabled except the
local network communication. Use following ipfw rule to do so.
ipfw add deny tcp from not 192.168.1.0/24 to 192.168.1.10 2525 via xl0
chapter 4 / Integration with E-mail Messaging System
21
4.3. Content Filtering in MTA
Content filtering method is in the present a well known method used to screen and/or exclude certain defined
information from the Internet or its part. Concerning an e-mail server system the best place to implement content
filtering method is the MTA agent as an e-mail communication traffic nod. The advantage of such an implementation
is that it allows one to scan e-mails inbound as well as outbound in the same implementation algorithm. On the other
hand the content filtering method is MTA dependent. The ESET comes with four content filters built for most common
MTA, i.e. MTA Sendmail, Postfix, Exim and QMail. These are reviewed in the following sections.
4.3.1. Content filtering in MTA Postfix
The MTA Postfix content filter requirements are fulfilled by nod32smtp daemon. To configure nod32smtp for this
purpose the following parameters must be specified in section [smtp] of the main NOD32 configuration file.
agent_enabled
listen_addr =
listen_port =
server_addr =
server_port =
= yes
“localhost“
2526
“localhost“
2525
After reread of the newly created NOD32 configuration using command:
/etc/init.d/nod32d reload
the nod32smtp module will listen on port 2526 and will forward all communication from this port to the local port
2525.
In the next step, add the following specification into the ’/etc/postfix/master.cf’ configuration file.
localhost:2525 inet n - n - - smtpd
-o content_filter=
-o myhostname=nod32.yourdomain.com
Note that the ’yourdomain.com’ part of the
’myhostname’ parameter must be in your case replaced
by an appropriate server’s domain specification. Note also
that the MTA Postfix does not like when the ’yourdomain.
com’ part of ’myshostname’ parameter above matches
domain name specified in the parameter ’myhostname’
of the ’/etc/postfix/main.cf’ configuration file. The trick
to overcome this problem relies on using IP address in
’myhostname’ parameter of ’/etc/postfix/main.cf’ while
DNS name of the domain name used in ’/etc/postfix/
master.cf’.
Finally, add ’content_filter’ specification into ’/
etc/postfix/main.cf’ configuration file by entering the
following command.
Figure 4-4. Bidirectional scanning scheme of an nod32smtp
module working as a content filter.
POSTFIX
SMTPD
LOCAL
CLEANUP
QUEUE
SMTPD
SMTP
PICKUP
SMTP
TCP port 2525
TCP port 2526
NOD32SMPT
postconf -e “content_filter = smtp:localhost:2526“
Entire entire process described above is illustrated in figure 4-4.
22
NOD32 for Linux/BSD Mail Server
4.3.2. Content filtering in MTA Sendmail
The nod32smfi module is a third-party program with the purpose to serve as a content filter for MTA Sendmail.
Using Sendmail’s Milter interface the nod32smfi accesses all e-mail messages being processed by MTA Sendmail. In
order to enable filtering, enter the following lines into the [smfi] section of main NOD32 configuration file.
agent_enabled = yes
smfi_sock_path = “/var/run/nod32smfi.sock“
In the next step, modify the ’/etc/mail/sendmail.cf’ file by entering the following specification into the section MAIL
FILTER DEFINITIONS:
Xnod32smfi, S=local:/var/run/nod32smfi.sock, F=T, T=S:2m;R:2m;E:5m
With these settings the MTA Sendmail will communicate with the nod32smfi module via unix socket ’/var/run/
nod32smfi.sock’. Flag F=T will result in temporary fail connection if the filter is unavailable. Flag T=S:2m defines
timeout 2 minutes for sending information from MTA to filter. Flag T=R:2m defines timeout 2 minutes for reading reply
from the filter. Flag T=E:5m means overall timeout 5 minutes between sending end-of-message to filter and waiting
for the final acknowledgment.
Note that in case the timeouts for the nod32smfi filter are set too small, the Sendmail can temporarily reject the
message which will attempt to pass through at a later time. This will lead to the continuous rejection of one and the
same message later. In order to avoid the problem, the timeouts have to be set properly. Thus one has to get into
account ’confMAX_MESSAGE_SIZE’ parameter defined in a sendmail.mc file that will provide not accepting messages
bigger than the appropriate parameter value (given in bytes). Taking into account this value and the maximum time
for processing of this amount of data by MTA (this can be measured) one can evaluate the appropriate timeouts for
nod32smfi filter.
Finally, uncomment and modify the following line in the ’/etc/mail/sendmail.cf’ file.
O InputMailFilters=nod32smfi
To reread the newly created NOD32 configuration, enter the following command.
/etc/init.d/nod32d reload
To accomplish the whole procedure, one has to restart the MTA Sendmail.
4.3.3. Content filtering in MTA Exim 3
Let’s look inside the exim configuration file ’/etc/exim/exim.conf’ (resp. in older versions ’/etc/exim.conf’) to become
familiar with its content. It is typically compound from the so called TRANSPORTS CONFIGURATION section, DIRECTORS
CONFIGURATION section and ROUTERS CONFIGURATION section. In order to configure exim to use our anti-virus you have
to define special DIRECTORS CONFIGURATION entry:
# DIRECTORS CONFIGURATION
nod32_director:
driver = smartuser
condition = “${if eq {$received_protocol}{virus-scanned} {0}{1}}“
transport = nod32_transport
verify = false
chapter 4 / Integration with E-mail Messaging System
23
and place it as a first in the DIRECTORS CONFIGURATION section and you have to define special ROUTERS
CONFIGURATION entry:
# ROUTERS CONFIGURATION
nod32_router:
driver = domainlist
route_list = “* localhost byname“
condition = “${if eq {$received_protocol}{virus-scanned} {0}{1}}“
transport = nod32_transport
verify = false
and place it as a first in the ROUTERS CONFIGURATION section. You have also define an appropriate TRANSPORTERS
CONFIGURATION entry responsible for e-mail messages delivery to nod32mda agent. Content of the entry is as follows:
# TRANSPORTS CONFIGURATION
nod32_transport:
driver = pipe
command = /usr/bin/nod32mda -oMr virus-scanned $local_part@$domain
user = mail
group = mail
Note that in RedHat Ready and/or Novell (SuSE) Ready variation of this anti-virus product the absolute path to
nod32mda module is different, so the definition of TRANSPORTS CONFIGURATION entry in this case is as follows:
# TRANSPORTS CONFIGURATION
nod32_transport:
driver = pipe
command = /opt/eset/nod32/bin/nod32mda -oMr virus-scanned $local_part@$domain
user = mail
group = mail
Make sure that the ‘user‘ (usually ‘mail‘) used in the above settings is listed in a ‘trusted_users‘ list for this parameter.
Also be sure that the option ‘qualify_domain‘ is undefined or set to your fully qualified domain name.
With the above settings you have ensured that all the e-mail messages originally sent to local domain user will
be primarily catched by nod32mda module. Yet there remains to provide that all messages processed by nod32mda
will be sent to the appropriate mailbox. To do so just modify parameter ‘mda_path‘ within section [mda] of main
NOD32 configuration file. In case the absolute path to the exim is ‘/usr/sbin/exim‘ the parameter ‘mda_path‘ will be
as follows.
mda_path = “/usr/sbin/exim“
To reread the newly created NOD32 configuration, enter the following command.
/etc/init.d/nod32d reload
To accomplish the whole procedure, one has to resatrt the MTA Exim.
Note that our product provides you with the option to define NOD32 scanner parameters individually for recipient
users (resp. recipient domains). In this case it is necessary to pass the information about the recipient user to nod32mda
module using its command line interface. Note that in case you would like to pass any command line parameter to the
whole nod32mda agent it is necessary to prepend the parameter by sentence ‘--‘, otherwise the parameter will be
assumed to be passed to ‘exim‘ specified by the ‘mda_path‘ parameter. Thus for instance to pass command line option --
24
NOD32 for Linux/BSD Mail Server
user to nod32mda agent, the parameter ‘command‘ defined in TRANSPORTS CONFIGURATION entry must by as follows:
command = /usr/bin/nod32mda -oMr virus-scanned $local_part@$domain \
-- --user $local_part
resp. in case of RedHat Ready and Novell (SuSE) Ready variation of this anti-virus product used, the ’command’
parameter has to be defined as follows:
command = /opt/eset/nod32/bin/nod32mda -oMr virus-scanned $local_part@$domain \
-- --user $local_part
4.3.4. Content filtering in MTA Exim 4
Let’s look inside the exim configuration file ’/etc/exim4/exim4.conf’ to become familiar with its content. It is typically
compound from TRANSPORTS CONFIGURATION section and ROUTERS CONFIGURATION section. In order to configure exim
to use our anti-virus as a content filter you have to define special ROUTERS CONFIGURATION entry in a following way:
# ROUTER CONFIGURATION
nod32_router:
driver = accept
condition = “${if eq {$received_protocol}{virus-scanned} {0}{1}}“
transport = nod32_transport
verify = false
Note that above entry has to be placed as a first in the ROUTERS CONFIGURATION section. You have also define
an appropriate TRANSPORTERS CONFIGURATION entry responsible for e-mail messages delivery to nod32mda agent.
Content of the entry is as follows:
# TRANSPORTS CONFIGURATION
nod32_transport:
driver = pipe
command = /usr/bin/nod32mda -oMr virus-scanned $local_part@$domain
user = mailnull
group = mail
Note that in RedHat Ready and/or Novell (SuSE) Ready variation of this anti-virus product the absolute path to
nod32mda module is different, so the definition of TRANSPORTS CONFIGURATION entry in this case is as follows:
# TRANSPORTS CONFIGURATION
nod32_transport:
driver = pipe
command = /opt/eset/nod32/bin/nod32mda -oMr virus-scanned $local_part@$domain
user = mailnull
group = mail
Make sure that the ‘user‘ (usually ‘mailnull‘) is the value of ’exim_user’ or pick a name fromthe list ’trusted_users’ for
this parameter. Also be sure that the option ’qualify_domain’ is undefined or set to your fully qualified domain name.
With the above settings you have ensured that all the e-mail messages originally sent to local domain user will
be primarily catched by nod32mda module. Still there remains to provide that all messages processed by nod32mda
will be sent to the appropriate mailbox. To do so, just modify parameter ‘mda_path‘ within section [mda] of main
chapter 4 / Integration with E-mail Messaging System
25
NOD32 configuration file. In case the absolute path to the exim is ‘/usr/sbin/exim‘ the parameter ‘mda_path‘ will be
as follows:
mda_path = “/usr/sbin/exim“
To reread the newly created NOD32 configuration, enter the following command:
/etc/init.d/nod32d reload
To accomplish the whole procedure, one has to restart the MTA Exim.
Note that our product provides you with the option to define NOD32 scanner parameters individually for recipient
users (resp. recipient domains). In this case it is necessary to pass the information about the recipient user to nod32mda
module using its command line interface. Note that in case you would like to pass any command line parameter to
the whole nod32mda agent it is necessary to prepend the parameter by sentence ‘--‘, otherwise the parameter will
be assumed to be passed to ‚exim‘ specified by the ‘mda_path‘ parameter. Thus, for instance to pass command line
option --user to nod32mda agent, the parameter ‘command‘ defined in TRANSPORTS CONFIGURATION entry must by
as follows:
command = /usr/bin/nod32mda -oMr virus-scanned $local_part@$domain \
-- --user $local_part
resp. in case of RedHat Ready and Novell (SuSE) Ready variation of this anti-virus product used, the ’command’
parameter has to be defined as follows:
command = /opt/eset/nod32/bin/nod32mda -oMr virus-scanned $local_part@$domain \
-- --user $local_part
4.3.5. Content filtering in MTA Qmail
Nod32pipe can serve as a content-filter for Qmail. However, you need to download and compile the qmail-qfilter
program, version 2.0 or newer. Following instructions do not require you to use the QMAILQUEUE patch. We assume your
qmail is installed in ’/var/qmail’. First create the script ’/var/qmail/bin/qmail-nod32pipe’ with the following content
and run chmod a+x on it:
#!/bin/sh
export QQF_QMAILQUEUE=/var/qmail/bin/qmail-queue.nod32save
exec qmail-qfilter /usr/bin/nod32pipe
Note that in RedHat Ready and/or Novell (SuSE) Ready variation of this anti-virus product the absolute path of
nod32pipe module is different, so in this case an appropriate script content will be as follows:
#!/bin/sh
export QQF_QMAILQUEUE=/var/qmail/bin/qmail-queue.nod32save
exec qmail-qfilter /opt/eset/nod32/bin/nod32pipe
Next, enter the following commands:
mv /var/qmail/bin/qmail-queue /var/qmail/bin/qmail-queue.nod32save
ln -s /var/qmail/bin/qmail-nod32pipe /var/qmail/bin/qmail-queue
In this configuration, in case of infection or temporary error, nod32pipe will automatically (based on present
environment variables) use QMail’s recognized exit codes (31, 71 or 99, see qmail-queue(8) and qmail-qfilter(1) manual
pages for details). It will also ask nod32d to use the user specific configuration based on the first envelope recipient.
26
NOD32 for Linux/BSD Mail Server
To accomplish the whole procedure, one has to restart the MTA Qmail.
4.4. Alternative methods of content filtering
Although mechanisms described in previous sections are concerned to be the basic mechanisms of the e-mail
messages scanning, there exists yet other possibilities that are all described in this section.
4.4.1. Scanning e-mail messages using AMaViS
AMaViS - A Mail Virus Scanner is a tool that interfaces your MTA and several anti-virus scanners. It supports Sendmail,
QMail, Postfix, Exim and comes in three branches:
amavis
for low/medium mail volume
amavisd
for higher mail volume, daemonized version of amavis
amavisd-new
for higher mail volume, Anti-Spam, ISP features, ...
Amavis cooperates with the anti-virus by using its command line interface nod32cli (see the nod32cli(1) manual
page for details). Yet before we go into detailed explanation of the Amavis configurations, we would like to discuss the
impact of the method on the anti-virus software functionality.
First, note that Amavis does not allow modification of the body of scanned e-mail messages directly by anti-virus
software. Particularly, no infected e-mail message processed and delivered to the final recipient will be cleaned directly
by anti-virus software. Second consequence is that no NOD32 footnote will be written into the e-mail body. Another
feature of the described method is that the modification of e-mail header is indirect from the point of view of the
antivirus software. Particularly, status dependent, header modification directly by the anti-virus is disabled. Taking into
account the above statements we recommend the use of Amavis configuration (described in the next sections) only in
case the above discussed features of the product are not requested by the user.
4.4.1.1. amavis
Configuration of Amavis is performed during the process of Amavis installation. For installation, first unpack the
source amavis-0.x.y.tgz and overwrite the file amavis/av/nod32cli with this contents:
#
# ESET Software NOD32 Command Line Interface, Version 2.52
#
if ($nod32cli) {
do_log(2,“Using $nod32cli“);
chop($output = ‘$nod32cli --subdir $TEMPDIR/parts‘);
$errval = retcode($?);
do_log(2,$output);
if ($errval == 0) { # no errors, no viruses found
$scanner_errors = 0;
} elsif ($errval == 1 || $errval == 2) {
# no errors, viruses discovered
$scanner_errors = 0;
chapter 4 / Integration with E-mail Messaging System
27
@virusname = ($output =~ /virus=“([^“]+)“/g);
do_virus();
} else {
do_log(0,“Virus scanner failure: $nod32cli (error code: $errval)“);
}
}
Note that the above modification provides accepting of the message only in case it was originally clean. The rest
of non-error states returned by the anti-virus will be treated in a way that the message will be dropped. The messages
resolved by the anti-virus as cleaned/deleted will be dropped as well as nod32cli module has no exclusive access to
the message and therefore is not able to guarantee its cleaning/deletion. Above modification also treats the „error in
archive“ status (3) of nod32cli in a way that the message is rejected. Particularly, messages with the password protected
attachment are treated in this way as it is not possible to mark the messages with the „not scanned“ status. In order to
change these default settings user is free to modify the above text, however, it is not recommended unless he is sure
about the consequences. Please, read the discussion at the end of foreword to this section to get more information on
the product functionality when configured with Amavis.
Also, if you are running the RedHat Ready and/or Novell (SuSE) Ready variation of this product, you have to update
your PATH environment variable by issuing the following command:
export PATH=“$PATH:/opt/eset/nod32/bin“
For successful installation you may need to install additional software like arc, unarj, unrar, zoo. You also have to
make a symlink in /usr/bin from uncompress to gzip and create the user amavis in group amavis with home dir /var/
amavis. Rename (at least for the amavis configuration) the file ‘/usr/sbin/nod32‘ to ‘/usr/sbin/nod32.bak‘. Now continue
with the usual installation process (./configure, make, make install) and follow the rules README.mta according your
mail server.
4.4.1.2. amavisd
Configuration of Amavisd is performed during the process of Amavisd installation. Unpack the source amavisd0.x.tgz and follow the rules for amavis described in previous section of this guide.
Note: After ’make install’ you may need to move ‘/usr/etc/amavisd.conf‘ to ‘/etc‘ and do a ’make install’ again. Don’t
forget to run amavisd as user amavis after finishing the installation.
4.4.1.3. amavisd-new
In order to install the product with Amavisd-new, unpack and install the source amavisdnew- 2.x.y.tgz in your
installation directory. Now to configure the product with newly installed Amavisd-new, delete the clause for ’ESET
Software NOD32’ and replace the clause for ’ESET Software NOD32 - Client/Server Version’ in file ’amavisd.conf’ with
the following one:
### http://www.eset.com/
[’ESET Software NOD32 Command Line Interface v 2.52’,
’/usr/bin/nod32cli’, ’--subdir {}’,
[0], [1,2], qr/virus=“([^“]+)“/ ],
Note that in RedHat Ready and Novell (SuSE) Ready variation of this product an appropriate script will look like
this:
28
NOD32 for Linux/BSD Mail Server
### http://www.eset.com/
[’ESET Software NOD32 Command Line Interface v 2.52’,
’/opt/eset/nod32/bin/nod32cli’, ’--subdir {}’,
[0], [1,2], qr/virus=“([^“]+)“/ ],
Please, note the NOD32 scanning status values written within square brackets of the above setting. They are set to
follow the same performance of Amavis cooperation as defined by default in the section discussing Amavis configuration.
User is free to modify the above text, however, it is not recommended unless he is sure about the consequences. Please,
read end of the foreword to this section and end of the section discussing Amavis configuration in order to get more
information.
You may need to install additional Perl modules Archive-Tar, Archive-Zip, BerkeleyDB, Compress-Zlib, Convert-TNEF,
Convert-UUlib, IO-stringy, MailTools, MIME-Base64, MIME-tools, Net-Server and Unix-Syslog from www.cpan.org/
modules. The procedure is by each as follows: perl Makefile.PL; make; make install.
After configuration, please follow the recommendation for configuring Amavisd-new in README.mta located in
Amavisd-new directory according your mail server.
chapter 4 / Integration with E-mail Messaging System
29
NOD32 for Linux/BSD Mail Server
Chapter 5:
5 Important NOD32LMS/NOD32BMS Mechanisms
Important NOD32LMS/
NOD32BMS Mechanisms
5.1. User Specific Configuration
User Specific Configuration mechanism is implemented in the product in order to provide user with enhanced
configuration functionality. It allows to define NOD32 anti-virus scanner parameters selectively for client/server
identification.
Regarding the NOD32LMS/NOD32BMS the NOD32 anti-virus scanner parameters can be defined individually for first
recipient and/or sender of the e-mail messages processed.
Please note that the detailed description of this functionality can be found in nod32.cfg(5) manual page and
manual pages referenced there. Thus in this section we will only provide short example of user specific configuration
definition.
Let’s say we use nod32smtp module for the scanning purpose. This module is subjected to the [smtp] configuration
section found within main NOD32 configuration file. The example of the section can be as follows:
[smtp]
agent_enabled = yes
listen_addr = “localhost“
listen_port = 2526
server_addr = “localhost“
server_port = 2525
action_on_processed = accept
In order to provide individual parameters setting one has to define ‚user_config‘ parameter with the path to the
special configuration file where the individual setting will be stored. In the next example we create reference to the
special configuration file ’nod32smtp_spec.cfg’ located within default configuration file directory.
[smtp]
agent_enabled = yes
listen_addr = “localhost“
listen_port = 2526
server_addr = “localhost“
server_port = 2525
action_on_processed = accept
user_config = “nod32smtp_spec.cfg“
Note that the parameter ’user_config’ accepts also absolute path to the specific configuration file.
Once special configuration file referenced from within [smtp] section we have to create this file and provide the file
with an appropriate individual settings.
In the next example we create individual parameter setting of parameter ’action_on_processed’ for recipient
[email protected] and for sender [email protected].
[[email protected]|[email protected]]
action_on_processed = reject
Note that the section header name of the special section contains identification of the recipient and sender for
which we have created the individual setting. The section body then contains individual parameters specified for this
identification. Thus with this special configuration all e-mails will be processed, i.e. scanned for infiltrations, with
exception of the e-mails sent from [email protected] [email protected] be rejected without
scanning. Note that this also a good example of how to create black-list.
32
NOD32 for Linux/BSD Mail Server
5.2. Handle Object Policy
The Handle Object Policy (see figure 5-1) is a mechanism that provides handling of the scanned objects depending
on their scanning status. The mechanism is based on so-called action configuration options (’action_on_processed’,
’action_on_infected’, ‚action_on_uncleanable‘, ‚action_on_notscanned‘) combined with Anti-Virus enabling
configuration option (‚av_enabled‘). To get detailed information on these configuration options, please refer to the
nod32.cfg(5) manual page.
Figure 5-1. Scheme of Handle Object Policy mechanism.
action_on_processed
accept
defer, discard, reject
object not accepted
av_enabled
NO
YES
action_on_infected
action_on_uncleanable
action_on_notscanned
accept
defer, discard, reject
object not accepted
object accepted
Every object processed by NOD32LMS/NOD32BMS is at first handled with respect to the setting of the configuration
option ’action_on_processed’. Once this parameter is set to ’accept’, the object is handled according to the setting of
configuration option ’av_enabled’. Note that this parameter is of paramount importance if combined with so-called
User Specific Configuration mechanism. In this case various types of black-lists and white-lists can be configured.
Once ’av_enabled’ is enabled the object processed is scanned for virus infiltrations and set of action configuration
options ’action_on_infected’, ’action_on_uncleanable’ and ’action_on_notscanned’ is taken into account to evaluate
further handling of the object. If action ’accept’ has been taken as a result of the three above action options or ’av_
enabled’ is disabled the object is accepted for further delivery. In case any of action configuration options caused other
than ‚accept‘ value, the object is blocked and will be handled according to the particular action taken.
5.3. Black-list and white-list
In this section we describe the black-list and/or white-list creation using the combination of already discussed
NOD32LS/NOD32BS configuration mechanisms. In particular the black-list or white-list can be created using the Handle
Object Policy features and User Specific Configuration mechanism. Thus the black-list or white-list can be created for
recipients and/or senders of e-mail messages scanned by NOD32LS/NOD32BS.
In the next example we demonstrate the black-list and also white-list creation for the nod32smtp module as a
content filter of MTA Postfix. The original configuration section related to the module is as follows,
agent_enabled = yes
listen_addr = “localhost“
listen_port = 2526
chapter 5 / Important NOD32LMS/NOD32BMS Mechanisms
33
server_addr = “localhost“
server_port = 2525
In the following we provide the [smtp] section with the reference to special configuration file ’nod32smtp_spec.cfg’
where the black-list or white-list will be defined.
[smtp]
agent_enabled = yes
listen_addr = “localhost“
listen_port = 2526
server_addr = “localhost“
server_port = 2525
user_config = “nod32smtp_spec.cfg“
Now it is necessary to create the referenced file within NOD32 configuration directory and provide it with the
appropriate content related with the black-list or white-list definitions.
In order to create black-list for sender’s e-mail addresses ’[email protected]’, ’sndrname2@
sndrdomain2.com’, we have to create the following group section within the referenced special configuration file:
[black-list]
action_on_processed = reject
and we have to create individual sections for sender’s e-mail addresses ’[email protected]’,
’[email protected]’, that will be a member of the ’black-list’ group.
[|[email protected]]
parent_id = “black-list“
[|[email protected]]
parent_id = “black-list“
With the setting above all e-mails coming from the address ’[email protected]’, resp. from the address
’[email protected]’ will be rejected.
On the other hand, if we want to create the white-list for recipient’s addresses ’rcptname1@rcptdomain1.
com’, ’[email protected]’, we have to create the following group section within the referenced special
configuration file:
[white-list]
action_on_processed = accept
av_enabled = no
as_enabled = no
and we have to create individual sections for recipient’s e-mail addresses ’[email protected]’,
’[email protected]’, that will be a member of the ’white-list’ group.
[[email protected]]
parent_id = “white-list“
[[email protected]]
parent_id = “white-list“
Now, all e-mails addressed to recipients ’[email protected]’, ’[email protected]’ will be
34
NOD32 for Linux/BSD Mail Server
accepted without scanning.
Please, note the character ’|’ placed in front of the header name of the special section in case of sender address and
not placed there in case of recipient address. To get description of the special header name syntax, please refer to the
appropriate NOD32 agent module manual page (in this case it is nod32smtp(1)).
5.4. Samples Submission System
Sample submission system is functionality that provides catching of the infected objects found by advanced
heuristics method and delivering these objects to the sample submission system server. All virus samples catched by
the sample submission system will be processed by the team of NOD32 virus laboratory department and consequently
added into the NOD32 virus database, if necessary.
NOTE: ACCORDING TO OUR LICENSE AGREEMENT, BY ENABLING SAMPLE SUBMISSION SYSTEM YOU ARE AGREEING
TO ALLOW THE COMPUTER AND/OR PLATFORM ON WHICH THE NOD32D IS INSTALLED TO COLLECT DATA (WHICH MAY
INCLUDE PERSONAL INFORMATION ABOUT YOU AND/OR THE USER OF THE COMPUTER) AND SAMPLES OF NEWLY
DETECTED VIRUSES OR OTHER THREATS AND SEND THEM TO OUR VIRUS LAB. THIS FEATURE IS TURNED OFF BY DEFAULT.
WEWILL ONLY USE THIS INFORMATION AND DATA TO STUDY THE THREAT AND WILL TAKE REASONABLE STEPS TO PRESERVE
THE CONFIDENTIALITY OF SUCH INFORMATION.
In order to turn on this feature, enable both parameters ’samples_enabled’ and ’samples_send_enabled’ in global
section of main configuration file.
ThreatSense.NET technology is able to send infected samples also via http proxy server with basic authentication.
See the nod32d manual page for details.
chapter 5 / Important NOD32LMS/NOD32BMS Mechanisms
35
NOD32 for Linux/BSD Mail Server
Chapter 6:
6 NOD32 System Update and Maintenance
NOD32 System Update and
Maintenance
6.1. Basic concept of NOD32 system update
In order to keep the anti-virus system effective, it is necessary to keep NOD32 virus signatures databse up to date.
The nod32update utility has been developed for this purpose. To get details on the operation of the utility, read the
nod32update(8) manual page. Basic concept of the NOD32 system update is composed from two parts.
6.1.1. NOD32 mirror creation
First, the mirror of all relevant so-called NOD32 precompiled modules have to be created from the origin ESET
server(s). In the product developed for Linux OS and BSD OS the precompiled NOD32 modules introduced above are
downloaded by default in directory
/var/lib/nod32/mirror
The Linux RedHat Ready and Novell (SuSE) Ready product downloads the modules in directory
/var/opt/eset/nod32/lib/mirror
The NOD32 modules are divided into two categories; engine category and component category. The modules of
component category are currently only for use on the MS Windows OS.
Currently the following types of engine category modules are supported: base scanning modules (prefix engine)
containing virus signatures database, archives support modules (prefix archs) supporting various file system archive
formats, advanced heuristics modules (prefix advheur) containing implementation of so-called advanced heuristics
method of virus and worm detection, packed worm scanner modules (prefix pwscan) used on MS Windows OS, NOD32
utilities modules (prefix utilmod) used on MS Windows OS and ThreatSense.NET technology support modules (prefix
charon).
These modules are always necessary for proper running of any NOD32 anti-virus scanner based application and
therefore are all downloaded by default at each download process. On the other hand the component category modules
are platform dependent and language localization dependent and thus the download of component category modules
is optional.
After download of precompiled NOD32 modules the ‚update.ver‘ file is created in the mirror directory as well. This
file contains the information about the modules currently stored in the newly created mirror. The newly created mirror
thus serves as fully functional modules download server and can be used to create subordinate mirros, however, some
more conditions have to be fullfilled yet. First, as the update utility uses http protocol to download the NOD32 modules
there must be a http server installed on the computer where the modules are going to be downloaded from. Second, the
NOD32 modules to be downloaded by other computers have to be placed at the directory path
/http-serv-base-path/nod_upd
where ‚http-serv-base-path‘ is a base http server directory path, as this is the first place where update utility looks
the NOD32 modules for.
6.1.2. Generation of NOD32 scanner loading modules
Second part of the update process is the compilation of NOD32 modules loadable by NOD32 scanner from those
stored in the local mirror.
Typically the following NOD32 loading modules are created: base module (nod32.000), archives support module
(nod32.002), advanced heuristics module (nod32.003), packed worm scanner module (nod32.004), windows utilities
38
NOD32 for Linux/BSD Mail Server
module (nod32.005) and ThreatSense.NET support module (nod32.006) in the directory:
/var/lib/nod32
resp. in RedHat Ready and Novell (SuSE) Ready variation of the product the target directory is as follows:
/var/opt/eset/nod32/lib
Note that the above directory is exactly the NOD32 base directory where main NOD32 daemon loads NOD32
modules from.
6.2. Automatic update of the virus definitions database
To provide the highest security for the user, the NOD32 team collects the virus definitions continuously from all
over the world. The new patterns can appear within the database in very short intervals. It is therefore useful, and also
recommended, to trigger an update attempt on a regular basis.
Threre are two ways to provide periodic update of the system. First, the main NOD32 daemon can provide the update
once ‚av_update_period‘ parameter defined in [update] section of the main NOD32 configuration file. Second, the
update can be triggeret externally by using script:
/usr/sbin/nod32_update
Note that the Linux RedHat Ready and Linux Novell (SuSE) Ready products locates the script in directory
/opt/eset/nod32/sbin/nod32_update
In order to trigger update script in one hour intervals, configure periodic scheduler (cron) in Linux OS and BSD OS
by entering the following line
0 * * * * /usr/sbin/nod32_update
into its configuration file (crontab). To add the above line into the crontab use command line statement
crontab -e
to invoke the editor set up for the current system environment (defined by EDITOR environment variable).
Similar command is valid for Linux RedHat Ready and Linux Novell (SuSE) Ready product
0 * * * * /opt/eset/nod32/sbin/nod32_update
chapter 6 / NOD32 System Update and Maintenance
39
NOD32 for Linux/BSD Mail Server
Chapter 7:
7 Tips and Tricks
Tips and Tricks
This chapter is devoted to describe tips and tricks concerned with configuration of NOD32LMS/NOD32BMS. This
means it describes configuration of NOD32LMS/NOD32BMS in circumstances when for instance MTA is configured to
use other software with similar functionality or with functionality that could normally lead to misconfiguration of
NOD32LMS/NOD32BMS.
7.1. Dropping messages marked by NOD32 as deleted in MTA Postfix
In the Internet there has recently appeared non-negligible increase of the number of the e-mail messages
containing so-called worm programs. In most cases the infected attachment of such messages cannot be cleaned but
rather deleted and whole messages even does not contain any reasonable information. In this case it has a sense to
discard (or treat in special way) this kind of messages. Mechanism described in this section can be used to suppress
messages marked as deleted in MTA Postfix.
First of all one has to add the following entry:
write_to_header = 1
into section [smtp] of the main NOD32 configuration file. This setting will result in a modification of each non-clean
e-mail message by means the string ’X-NOD32Result: status’ is inserted into header of themessage. Word ’status’ of the
string is replaced by actual status of the scanning process.
In order to discard all messages that has been marked as ’deleted’, add the following line:
header_checks = regexp:/etc/postfix/header_checks
into the ’/etc/postfix/main.cf’ configuration file. At the same time you will have to create file ’/etc/postfix/header_
checks’ with the following content:
/^X-NOD32Result: deleted/ DISCARD
To reread the newly created NOD32 configuration, enter the following command:
/etc/init.d/nod32d reload
To accomplish the whole procedure, one has to restart the MTA Postfix.
Note that in older Postfix versions DISCARD functionality may not work. In this case warning message ’Postfix does
not know the command DISCARD’ appears in the MTA Postfix logging output. This can be only solved by update of the
Postfix software.
7.2. NOD32LMS/NOD32BMS and TLS support in MTA
Transport Layer Security (TLS) is a protocol guaranting
data privacy in client/server communication over the
Internet. The basic principle of TLS is based on the
SSL encryption of data traveling between client and
server (We have on our mind the SMTP communication
between MTA client and server). This has of course nonnegligible consequences for scanning of this kind of
communication. For instance, once TLS support in MTA is
enabled, the ’wrapping’ methods are impossible as the
whole intercepted SMTP communication is encrypted at
this stage. On the other hand, there is possibility to use
42
Figure 7-1. Scheme of content filtering in Postfix MTA with
enabled TLS.
25
POSTFIX
INTERNET
25
SMPT/TLS
2526
MAILBOX
2525
NOD32
Content filter
NOD32 for Linux/BSD Mail Server
data encryption in communication between local MTA and Internet and still use the ’content filtering’ methods. In MTA
Sendmail content filtering there is no problem with SMTP TLS support at all as the Sendmail Milter does not relay
on the SMTP communication and content filtering is done rather internally. On the other hand the Postfix uses SMTP
protocol for data communication between content filter and MTA. Therefore once the TLS is enabled in Postfix, the
content filtering method fails as whole the SMTP communication is encrypted. Fortunately, this can be solved on the
Postfix TLS configuration level. The situation is depicted in a figure 7-1.
As is shown in the figure above, once the TLS is enabled, all the SMTP communication channels including SMTP
communication with content filter are affected. The only possibility in this case is to disable the TLS support for
communication between client and server located within localhost. This can be achieved by adding the following line
into the main Postfix configuration file:
smtp_tls_per_site = hash:/etc/postfix/smtp_tls_per_site
In addition you have to create ‚etc/postfix/smtp_tls_per_site‘ file with the following content:
localhost
NONE
and provide its appropriate hash table by entering the following command from ‚/etc/postfix‘ directory:
postmap hash:smtp_tls_per_site
By using the above statement the ’/etc/postfix/smtp_tls_per_site.db’ file is created that is used by Postfix to enable
TLS on per site basis. As far as we have disabled TLS for localhost the content filtering can be used and at the same time
the SMTP communication between local MTA and Internet is encrypted.
chapter 6 / Tips and Tricks
43
NOD32 for Linux/BSD Mail Server
Chapter 8:
8 Let us know
Let us know
Dear user, this guide should have given you a good knowledge about the product installation, configuration and
maintenance. However, writing a documentation is a process that is never finished. There will always be some parts that
can be explained better or are not even explained at all. Therefore, in case of bugs or inconsistencies found within this
documentation, please report a problem to our support center
http://www.nod32.com.sg/support
We are looking forward to help you solve any problem concerning the product.
NOD32 for Linux/BSD Mail Server