1
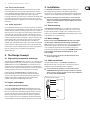
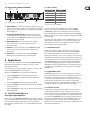
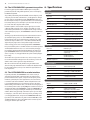
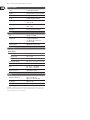
User Manual
ULTRAGAIN PRO MIC2200
Audiophile Vacuum Tube Microphone/Line Preamplifier
2
ULTRAGAIN PRO MIC2200 User Manual
Table of Contents
Thank you........................................................................ 2
Important Safety Instructions....................................... 3
Legal Disclaimer.............................................................. 3
Limited warranty............................................................. 3
1. Introduction................................................................ 4
1.1 Online registration............................................................... 4
1.2 Technical background........................................................ 4
1.2.1 Noise as a physical phenomenon............................ 4
1.2.2 What are audio dynamics?......................................... 5
1.3 The tube used in the ULTRAGAIN PRO......................... 5
1.3.1 Tube history..................................................................... 5
1.3.2 Design and functional principle of tubes............. 6
1.3.3 Properties of tubes....................................................... 6
1.3.4 The best of both worlds.............................................. 7
1.3.5 Studio applications....................................................... 7
2. The Design Concept................................................... 7
2.1 High quality components and design......................... 7
2.2 Inputs and outputs............................................................. 7
2.2.1 Balanced inputs and outputs.................................... 7
3. Installation.................................................................. 7
3.1 Rack mounting...................................................................... 7
3.2 Mains voltage........................................................................ 7
3.3 Audio connections.............................................................. 7
4. Control Elements........................................................ 8
4.1 Front panel control elements.......................................... 8
4.2 Rear panel control elements........................................... 9
5. Applications................................................................ 9
5.1 The ULTRAGAIN PRO as a
microphone preamplifier......................................................... 9
5.1.1 Basic setting..................................................................... 9
5.1.2 MIC GAIN control........................................................... 9
5.1.3 PHASE REV. switch......................................................... 9
5.1.4 LO CUT function............................................................. 9
5.1.5 Phantom power............................................................ 10
5.2 The ULTRAGAIN PRO as a level translator ................ 10
5.3 The ULTRAGAIN PRO as a direct-injection box ...... 10
5.4 The ULTRAGAIN PRO’s parametric equalizer........... 11
5.5 The ULTRAGAIN PRO as a tube interface.................. 11
6. Specifications............................................................ 11
3
ULTRAGAIN PRO MIC2200 User Manual
Important Safety
Instructions
Terminals marked with this symbol carry
electrical current of sufficient magnitude
to constitute risk of electric shock.
Use only high-quality professional speaker cables with
¼" TS or twist-locking plugs pre-installed. All other
installation or modification should be performed only
by qualified personnel.
This symbol, wherever it appears,
alerts you to the presence of uninsulated
dangerous voltage inside the
enclosure - voltage that may be sufficient to constitute a
risk of shock.
This symbol, wherever it appears,
alerts you to important operating and
maintenance instructions in the
accompanying literature. Please read the manual.
Caution
To reduce the risk of electric shock, do not
remove the top cover (or the rear section).
No user serviceable parts inside. Refer servicing to
qualified personnel.
Caution
To reduce the risk of fire or electric shock,
do not expose this appliance to rain and
moisture. The apparatus shall not be exposed to dripping
or splashing liquids and no objects filled with liquids,
such as vases, shall be placed on the apparatus.
9. Do not defeat the safety purpose of the polarized
or grounding-type plug. A polarized plug has two blades
with one wider than the other. A grounding-type plug
has two blades and a third grounding prong. The wide
blade or the third prong are provided for your safety. If the
provided plug does not fit into your outlet, consult an
electrician for replacement of the obsolete outlet.
10. Protect the power cord from being walked on or
pinched particularly at plugs, convenience receptacles,
and the point where they exit from the apparatus.
11. Use only attachments/accessories specified by
the manufacturer.
12. Use only with the
cart, stand, tripod, bracket,
or table specified by the
manufacturer, or sold with
the apparatus. When a cart
is used, use caution when
moving the cart/apparatus
combination to avoid
injury from tip-over.
13. Unplug this apparatus during lightning storms or
when unused for long periods of time.
14. Refer all servicing to qualified service personnel.
Servicing is required when the apparatus has been
damaged in any way, such as power supply cord or plug
is damaged, liquid has been spilled or objects have fallen
into the apparatus, the apparatus has been exposed
to rain or moisture, does not operate normally, or has
been dropped.
15. The apparatus shall be connected to a MAINS socket
outlet with a protective earthing connection.
16. Where the MAINS plug or an appliance coupler is
used as the disconnect device, the disconnect device shall
remain readily operable.
Caution
These service instructions are for use
by qualified service personnel only.
To reduce the risk of electric shock do not perform any
servicing other than that contained in the operation
instructions. Repairs have to be performed by qualified
service personnel.
1. Read these instructions.
2. Keep these instructions.
3. Heed all warnings.
4. Follow all instructions.
5. Do not use this apparatus near water.
6. Clean only with dry cloth.
7. Do not block any ventilation openings. Install in
accordance with the manufacturer’s instructions.
8. Do not install near any heat sources such as
radiators, heat registers, stoves, or other apparatus
(including amplifiers) that produce heat.
LEGAL DISCLAIMER
TECHNICAL SPECIFICATIONS AND APPEARANCES
ARE SUBJECT TO CHANGE WITHOUT NOTICE AND
ACCURACY IS NOT GUARANTEED. BEHRINGER,
KLARK TEKNIK, MIDAS, BUGERA, AND TURBOSOUND
ARE PART OF THE MUSIC GROUP (MUSIC-GROUP.COM).
ALL TRADEMARKS ARE THE PROPERTY OF THEIR
RESPECTIVE OWNERS. MUSIC GROUP ACCEPTS NO
LIABILITY FOR ANY LOSS WHICH MAY BE SUFFERED
BY ANY PERSON WHO RELIES EITHER WHOLLY OR
IN PART UPON ANY DESCRIPTION, PHOTOGRAPH
OR STATEMENT CONTAINED HEREIN. COLORS AND
SPECIFICATIONS MAY VARY FROM ACTUAL PRODUCT.
MUSIC GROUP PRODUCTS ARE SOLD THROUGH
AUTHORIZED FULLFILLERS AND RESELLERS ONLY.
FULLFILLERS AND RESELLERS ARE NOT AGENTS OF
MUSIC GROUP AND HAVE ABSOLUTELY NO AUTHORITY
TO BIND MUSIC GROUP BY ANY EXPRESS OR IMPLIED
UNDERTAKING OR REPRESENTATION. THIS MANUAL
IS COPYRIGHTED. NO PART OF THIS MANUAL MAY
BE REPRODUCED OR TRANSMITTED IN ANY FORM
OR BY ANY MEANS, ELECTRONIC OR MECHANICAL,
INCLUDING PHOTOCOPYING AND RECORDING OF ANY
KIND, FOR ANY PURPOSE, WITHOUT THE EXPRESS
WRITTEN PERMISSION OF MUSIC GROUP IP LTD.
ALL RIGHTS RESERVED.
© 2013 MUSIC Group IP Ltd.
Trident Chambers, Wickhams Cay, P.O. Box 146,
Road Town, Tortola, British Virgin Islands
LIMITED WARRANTY
For the applicable warranty terms and conditions
and additional information regarding MUSIC Group’s
Limited Warranty, please see complete details online at
www.music-group.com/warranty.
4
ULTRAGAIN PRO MIC2200 User Manual
1. Introduction
The universal level translator
With the ULTRAGAIN PRO you have purchased an extremely musical and
flexible microphone preamplifier. Our ULTRAGAIN range of devices has been a
hit ever since we introduced our first model some 5 years ago. This high-end
microphone preamp is based on many years of experience and findings in
amplifier technology and is used throughout the world in renowned studios,
sound reinforcement systems as well as in broadcast and television studios.
Improving the legendary ULTRAGAIN even further was a real challenge, and we
are proud of our success. The BEHRINGER ULTRAGAIN PRO meets highest and
no-compromise requirements in terms of operation, sound, specifications
and workmanship.
In addition to a high-grade microphone preamp, the ULTRAGAIN PRO features a
separate level translator which can both raise and lower line level signals. You can
use it to translate home recording to studio levels so as to easily connect tape/
video recorders and other hi-fi devices to professional equipment (and vice versa,
i.e. reducing studio levels to match those of semi-professional equipment).
Future-oriented BEHRINGER technology
Please register your new BEHRINGER equipment right after your purchase
by visiting http://behringer.com and read the terms and conditions of our
warranty carefully.
Compared to its predecessor models, the ULTRAGAIN PRO not only has additional
features, but also boasts dramatically enhanced audio qualities. For example,
it uses a special tube stage to provide the program material with typical tube
“warmth”, and has a fully parametric equalizer per channel, which gives you even
more sound-processing flexibility.
The heart of the ULTRAGAIN PRO is an extremely low-noise microphone preamp
circuit that uses discrete components to produce a highly transparent sound.
In combination with our BEHRINGER tube technology, the operational amplifiers
4580 and a sophisticated circuit topology, the ULTRAGAIN PRO yields excellent
noise and distortion properties! The switchable +48 V phantom power supply
allows for connecting almost any kind of microphone and suppresses power-up
thumps with its “soft mute” function.
BEHRINGER tube circuitry
Our engineering team has made it possible to enhance the traditional tube
circuitry (particularly for our ULTRAGAIN PRO) and adapt it to meet the
high sound quality and dynamics requirements of modern, pro-level audio
technology. The fact that we are still fascinated by “antique” tube radios and
amps as well as the fine and warm tonal character that we usually associate
with them, are the reasons why vacuum tubes have kept their ground even
in state-of-the-art circuit topologies used especially in professional audio
technology or so-called high-end devices. We are particularly proud that we have
found a highly effective symbiosis between solid-state and tube technologies
making them affordable to almost anybody in audio technology.
The parametric equalizer
Parametric equalizers represent the most advanced form of equalization systems.
Basically, the user has control over the three parameters that define the so-called
Gaussian equalization curve: bandwidth, frequency and amplitude.
The ULTRAGAIN PRO’s on-board parametric equalizer combines the technical
properties of a parametric equalizer with those of a narrow-band notch filter.
Capable of eliminating feedback frequencies, a parametric equalizer is a
perfect match for a microphone preamp. Moreover, as its design is based on our
well-known ULTRA-Q, the ULTRAGAIN PRO’s audio qualities and specifications
are well within the so-called “high-end” class. Its on-board equalizer can be used
not only to “tweak” the frequency response but also to creatively process audio
material, thus giving you undreamed of equalization flexibility. Both in creative
audio-processing applications in recording and broadcast/TV studios, in video
post-production, and on stage, equalizers are highly efficient and all-purpose
audio tools ideally complementing microphone preamps.
◊ The following operational manual will introduce you to the BEHRINGER
ULTRAGAIN PRO and its various functions. After reading the manual
carefully, make sure it is always on hand for future reference.
1.1 Online registration
Should your BEHRINGER product malfunction, it is our intention to have it
repaired as quickly as possible. To arrange for warranty service, please contact
the BEHRINGER retailer from whom the equipment was purchased. Should your
BEHRINGER dealer not be located in your vicinity, you may directly contact
one of our subsidiaries. Corresponding contact information is included in the
original equipment packaging (Global Contact Information/European Contact
Information). Should your country not be listed, please contact the distributor
nearest you. A list of distributors can be found in the support area of our website
(http://behringer.com).
Registering your purchase and equipment with us helps us process your repair
claims more quickly and efficiently.
Thank you for your cooperation!
1.2 Technical background
By employing current modern analog technology it is possible to manufacture
audio equipment with a dynamic range of up to 130 dB. In contrast to analog
techniques, the dynamic range of digital equipment is approximately 25 dB
less. With conventional record and tape recorder technology, as well as
broadcasting, this value is further reduced. Generally, dynamic restrictions are
due to noisy storage in transmission media and also the maximum headroom of
these systems.
1.2.1 Noise as a physical phenomenon
All electrical components produce a certain level of inherent noise.
Current flowing through a conductor leads to uncontrolled random electron
movements. For statistical reasons, this produces frequencies within the
whole audio spectrum. If these currents are highly amplified, the result will be
perceived as noise. Since all frequencies are equally affected, we term this white
noise. It is fairly obvious that electronics cannot function without components.
Even if special low-noise components are used, a certain degree of basic noise
cannot be avoided.
This effect is similar when replaying a tape. The non-directional magnetic
particles passing the replay head can also cause uncontrolled currents and
voltages. The resulting sound of the various frequencies is heard as noise.
Even the best possible tape biasing can “only” provide signal-to-noise ratios of
about 70 dB, which is not acceptable today since the demands of listeners have
increased. Due to the laws of physics, improving the design of the magnetic
carrier is impossible using conventional means.
5
ULTRAGAIN PRO MIC2200 User Manual
1.2.2 What are audio dynamics?
1.3 The tube used in the ULTRAGAIN PRO
A remarkable feature of the human ear is that it can detect the most wide
ranging amplitude changes—from the slightest whisper to the deafening roar
of a jet-plane. If one tried to record or reproduce this wide spectrum of sound
with the help of amplifiers, cassette recorders, records or even digital recorders
(CD, DAT etc.), one would immediately be restricted by the physical limitations of
electronic and acoustic sound reproduction technology.
A closer look at developments and trends in audio technology shows that tubes
are enjoying a renaissance today, in a time when even amateur musicians are free
to use digital effects processors and recording media, and ever more affordable
digital mixing consoles are becoming a natural part of the equipment of many
semi-professional studios. Manufacturers try with ever new algorithms to get the
most out of DSP’s (Digital Signal Processors), the heart of any digital system.
The usable dynamic range of electro-acoustic equipment is limited as much
at the low end as at the high end. The thermal noise of the electrons in the
components results in an audible basic noise floor and thus represents the
bottom limit of the transmission range. The upper limit is determined by the
levels of the internal operating voltages; if they are exceeded, audible signal
distortion is the result. Although in theory, the usable dynamic range sits
between these two limits, it is considerably smaller in practice, since a certain
reserve must be maintained to avoid distortion of the audio signal if sudden level
peaks occur. Technically speaking, we refer to this reserve as “headroom”—
usually this is about 10 - 20 dB. A reduction of the operating level would allow for
greater headroom, i.e. the risk of signal distortion due to level peaks would be
reduced. However, at the same time, the basic noise floor of the program material
would be increased considerably.
Still, many audio engineers, particularly old hands often prefer using both old
and new tube-equipped devices. As they want to use their warm sound character
for their productions, they are ready to accept that these “little darlings”
produce a higher noise floor than modern, transistor-based devices. As a
consequence, you can find a variety of tube-based microphones, equalizers,
preamps and compressors in today’s recording and mastering environments.
The combination of semiconductor and tube technologies gives you the
additional possibility of using the best of both worlds, while being able to make
up for their specific drawbacks.
P/dB
140
120
Cassette
Recorder
Radio
Ear
40
Tape Recorder
60
Power Amplifier
80
Microphone Amplifier
100
Fig. 1.1: The dynamic range capabilities of various devices
It is therefore useful to keep the operating level as high as possible without
risking signal distortion in order to achieve optimum transmission quality.
P/dB
Clipping
+20
0
Headroom
Operating level
-20
-40
Effective SNR
-60
-80
Noise floor
t
Fig. 1.2: The interactive relationship between the operating level and the headroom
1.3.1 Tube history
Due to many patent litigations, it is difficult to determine exactly when the tube
was “born”. First developments in tube technology were reported between
1904 and 1906. It was a research task of that time to find a suitable method for
receiving and rectifying high frequencies. On April 12, 1905, a certain Mr. Fleming
was granted a patent for his “hot-cathode valve” which was based on Edison’s
incandescent lamp. This valve was used as a rectifier for high-frequency signals.
Robert von Lieben was the first to discover (probably by chance) that the anode
current can be controlled by means of a perforated metal plate (grid)—one of
the milestones in the development of amplification tubes. In 1912, Robert van
Lieben finally developed the first tube for the amplification of low-frequency
signals. Initially, the biggest problem was to produce sufficient volume levels,
which is why resonance step-ups (though impairing the frequency response)
were used to maximize the attainable volume. Later, the objective was to
optimize the electroacoustic transducers of amplifiers in such a way that a broad
frequency band could be transmitted with the least distortion possible.
However, a tube-specific problem is its non-linear amplification curve, i.e.
it modifies the sound character of the source material. Despite all efforts to
ensure a largely linear frequency response, it had to be accepted that tube
devices produce a “bad” sound. Additionally, the noise floor generated by the
tubes limited the usable dynamics of connected storage media (magnetic tape
machines). Thus, a one-to-one reproduction of the audio signal’s dynamics
(expressed as the difference between the highest and lowest loudness
levels of the program material) proved impossible. To top it all, tube devices
required the use of high-quality and often costly transducers and sophisticated
voltage supplies.
With the introduction of semiconductor technologies in the field of audio
amplification, it soon became clear that the tube would have to give way to
the transistor, as this device featured an enormously enhanced signal-to-noise
ratio, required a less complex power supply and yielded an improved frequency
response. Plus, semiconductor-based circuits can be realized much more easily—
for less money.
Two decades later, the introduction of binary signal processing meant the
beginning of a new era of recording media that provided plenty of dynamic
response and allowed for the loss-free copying of audio signals. As digital media
were enhanced, however, many people began to miss the warmth, power and
liveliness they knew from analog recordings. This is why purists still today
consider digital recordings as “sterile” in sound.
6
ULTRAGAIN PRO MIC2200 User Manual
1.3.2 Design and functional principle of tubes
Tubes can be roughly classified according to the number of electrodes they use.
There are tubes with two, three or five electrodes usually referred to as diodes,
triodes or pentodes.
vacuum
anode
In a triode the capacitance between grid and anode is a problem with regard to
high frequencies and large amplification factors. For this reason, the pentode
has a positively charged screen grid between the control grid and the anode.
However, the positive charge of the screen grid attracts electrons emitted from
the anode plate when it is hit by arriving electrons. To prevent this electron
emission, a decelerating or suppressor grid is placed between anode and screen
grid. As it is negatively charged it blocks the electrons, so that they cannot reach
the screen grid. Pentodes are most commonly used in power stages.
1.3.3 Properties of tubes
cathode
heating
Fig. 1.3: diode
The diode contains two electrodes in a vacuum glass bulb that have electrical
connection to the outside. The vacuum allows for a free movement of electrons.
When one of the electrodes is heated up (= thus becoming a cathode), it begins
to emit electrons. When a positive DC voltage is applied to the other electrode
(= anode), the negative electrons start to migrate from the cathode to the
anode. With reverse polarity between cathode and anode, a current flow is not
possible because the unheated anode emits more or less no electrons. This design
was used, for example, as a rectifier in the power supplies of amplifiers.
The magnitude and velocity of the flow of electrons depend on the cathode’s
temperature, the material it consists of, and the magnitude of the anode voltage.
When the electrons hit the anode they produce heat that is dissipated by using
large anode plates.
vacuum
anode
grid
cathode
heating
Fig. 1.4: triode
The triode has an additional metal grid between anode and cathode.
By applying a negative voltage, this grid can be used to control the internal
resistance of the tube, and hence the anode current. When the grid bias voltage
(voltage between cathode and grid) becomes negative, the current flowing to
the anode is reduced because the negatively charged grid repels the arriving
electrons. As a consequence, there are less electrons to reach the anode.
When the bias voltage is raised towards zero, the flow of electrons accelerates.
When it finally becomes zero or even positive, the grid current begins to flow
which considerably reduces the current flowing to the anode and can possibly
destroy the tube. Triodes are most commonly used in preamps, often in pairs
arranged in one tube (twin triode).
vacuum
anode
suppressor grid
screen grid
control grid
cathode
heating
Fig. 1.5: pentode
In general, the saturation (overdriving) of both transistor and tube-based circuits
results in various types of distortion. These phenomena are quite complex in the
real world, but for the sake of a straightforward mathematical description we
are going to classify them as linear and non-linear distortion. Linear distortion
is produced by frequency-dependent amplification or attenuation processes
such as they occur in all kinds of filters and equalizers. Linear-distortion signals
have the same frequency portions both on the input and output sides, but with
different phase positions and amplitudes. Non-linear distortions have additional
harmonics and distortion components that were not contained in the original
input signal.
For example, when the simplest of all oscillations, a sine wave with a fixed
frequency f, is overdriven, new oscillations with frequencies of 2*f, 3*f,
etc. (integral multiples of the original frequency) are produced. These new
frequencies are referred to as upper harmonics grouped as odd and
even harmonics.
Unlike the transistor, saturated tubes mostly produce even harmonics which
are perceived by the human ear as more pleasant in sound than odd harmonics.
Another important aspect lies in the fact that tubes produce distortion more
gradually than transistors, which is why we speak of the “saturation” of a tube
stage. When you overdrive a transistor you get a sudden square deformation
of the sine signal applied at the input, which produces an extreme harmonic
spectrum at the output.
Non-linear distortions are measured with a distortion factor that consists of the
total harmonic distortion [k] and partial harmonic distortions [kn]. The latter are
defined as the ratio between the voltage of a single harmonic and the voltage of
the distorted overall signal. Thus, the content of even harmonics is expressed as
k2, k4, ... and that of odd harmonics as k1, k3, ... .
kn =
Un
U
Formula for calculating partial harmonic distortion
The total harmonic distortion is the root of all squared distortion factors of the
second and third degrees. Since the higher harmonics have only little impact on
the measured results, they can be neglected.
k=
k22 + k23
Formula for calculating total harmonic distortion
In tube circuits the distortion factor k2 is used to describe an effect which the
human ear classifies as “pleasant”. Also the frequency bands in which distortion
occurs play an important role because the human ear differentiates very clearly,
in particular, in the frequency range of human speech.
7
ULTRAGAIN PRO MIC2200 User Manual
1.3.4 The best of both worlds
3. Installation
Despite many efforts neither manufacturers nor developers have succeeded
so far in simulating these positive properties of the tube by means of other
devices. Additionally, the natural capabilities of the tube to act as a soft limiter
can only be mimicked with highly sophisticated circuitry. Today’s studio
technology requirements are therefore met by a combination of both high-grade
semiconductor and tube technologies. In this context, tubes do not serve any
longer their original purpose as amplifiers, but are used for the detailed shaping
of the sound.
Your BEHRINGER ULTRAGAIN PRO was carefully packed in the factory and
the packaging was designed to protect the unit from rough handling.
Nevertheless, we recommend that you carefully examine the packaging and its
contents for any signs of physical damage, which may have occurred in transit.
1.3.5 Studio applications
3.1 Rack mounting
In a recording studio tubes have not the same task as they have in an overdriven
guitar amp, where the considerably higher saturation of the tube(s) leads to a full
and often deliberate modification of the input signal (in many cases combined
with a heavy increase in noise floor levels). In the studio more subtle effects are
needed. Here, tube circuits add life to the signal’s tonal character and increase
its power to make itself heard. Often, tubes also increase the signal’s perceived
loudness (in relation to the unprocessed signal), i.e. the perceived loudness goes
up although the volume level remains the same. This is because the dynamic
range of the applied audio signal is limited by the tube circuit, while the
amplitude of the signal with the lowest loudness is raised. Thus, increasing tube
saturation produces a slight compression effect over the entire dynamic range.
A similar effect can be perceived when analog tape is saturated. This saturation
effect also compresses the recorded audio material and produces
additional harmonics.
2. The Design Concept
2.1 High quality components and design
The philosophy behind BEHRINGER products guarantees a no-compromise circuit
design and employs the best choice of components. The operational amplifiers
NJM4580 which are used in the ULTRAGAIN PRO, are exceptional. They boast
extreme linearity and very low distortion characteristics. To complement this
design the choice of components includes high tolerance resistors and capacitors,
detent potentiometers and several other stringently selected elements.
For the first time, the ULTRAGAIN PRO MIC2200 uses SMD technology
(Surface Mounted Device). These sub-miniature components known from
aerospace technology allow for an extreme packing density, plus the unit’s
reliability could be improved. Additionally, the unit is manufactured in
compliance with a ISO9000 certified management system.
2.2 Inputs and outputs
◊ If the unit is damaged, please do not return it to us, but notify your
dealer and the shipping company immediately, otherwise claims for
damage or replacement may not be granted. Shipping claims must be
made by the consignee.
The BEHRINGER ULTRAGAIN PRO fits into one standard 19" rack unit of space
(1 3/4"). Please allow at least an additional 4" depth for the connectors on the
back panel. Be sure that there is enough air space around the unit for cooling
and please do not place the ULTRAGAIN PRO on high temperature devices such as
power amplifiers etc. to avoid overheating.
3.2 Mains voltage
Before you connect your ULTRAGAIN PRO to the mains, please make
sure that your local voltage matches the voltage required by the
unit! The fuse holder on the female mains connector has 3 triangular markers,
with two of these triangles opposing each other. Your ULTRAGAIN PRO is set
to the operating voltage printed next to these markers, and can be set to
another voltage by turning the fuse holder by 180°. CAUTION: this instruction
does not apply to export models exclusively designed, e.g. for
115 V operation!
◊ Please refer to the specifications for detailed information about
specific voltage supplies!
3.3 Audio connections
The audio inputs and outputs on the BEHRINGER ULTRAGAIN PRO are
fully balanced. If possible, connect the unit to other devices in a balanced
configuration to allow for maximum interference immunity.
◊ Please ensure that only qualified persons install and operate the
ULTRAGAIN PRO. During installation and operation the user must have
sufficient electrical contact to earth. Electrostatic charges might affect
the operation of the ULTRAGAIN PRO!
Unbalanced ¼" TS connector
strain relief clamp
sleeve
tip
2.2.1 Balanced inputs and outputs
As standard, the BEHRINGER ULTRAGAIN PRO is installed with electronically
servo-balanced inputs and outputs. The new circuit design features automatic
hum and noise reduction for balanced signals and thus allows for trouble-free
operation, even at high operating levels. Externally induced mains hum etc.
will be effectively suppressed. The automatic servo-function recognizes the
presence of unbalanced connectors and adjusts the nominal level internally to
avoid level differences between the input and output signals (correction 6 dB).
sleeve
(ground/shield)
tip
(signal)
8
ULTRAGAIN PRO MIC2200 User Manual
(2) Use the MIC/LINE switch to toggle between MIC and LINE modes. When the
switch is pressed, the unit works in MIC mode (now you can press the +48 V
switch if required; in LINE mode this function is disabled).
Balanced ¼" TRS connector
strain relief clamp
sleeve
ring
tip
◊ Please note that the input phone jack is disabled in MIC mode, i.e. you
must use the XLR connector to access the microphone amp.
(3) The MIC GAIN control is enabled in MIC mode only and allows for applying
gain from 10 to 60 dB to the input signal. In view of the extremely high gain
levels that can be applied, you should verify that the gain control is properly
set before you power up the unit. In case of doubt, set the control fully
counter-clockwise, and start from there slowly raising the gain. High gain
settings and the resulting levels can damage subsequent devices.
sleeve
ground/shield
ring
cold (-ve)
tip
hot (+ve)
(4) The CLIP LED signals that a level of at least +18 dBu is present after the
microphone amp stage. With too high a level the CLIP LED warns you to
reduce the gain with the MIC GAIN control, so as to avoid distortion caused
by overloading. During normal operation, the LED should not light up at all.
For connection of balanced and unbalanced plugs,
ring and sleeve have to be bridged at the stereo plug.
(5) With the PHASE REV. switch the input signal is reversed in phase by 180°.
This function is available both in MIC and LINE modes.
Balanced use with XLR connectors
(6) When the high-pass filter is switched on (LO CUT switch pressed),
the FREQUENCY control defines the filter’s cut-off frequency. With a setting
range from 12 to 320 Hz the filter’s main task is to eliminate bottom-end
rumble noise, etc.
2 1
3
input
1 = ground/shield
2 = hot (+ve)
3 = cold (-ve)
1
(7) The LO CUT switch activates/deactivates the high-pass filter.
The following 6 control elements refer to the parametric
equalizer only.
2
3
(8) The FREQUENCY control is used to select the frequency to be modified.
Please note that the frequency range can be lowered/raised with the
switches x0.1 and x10. In this way, you can process the entire audio range
between 10 Hz and 20 kHz. With both switches out, the FREQUENCY control
can be swept over a range from 100 Hz to 2 kHz.
output
For unbalanced use, pin 1 and pin 3
have to be bridged
Fig. 3.1: Different plug types
◊ Never use unbalanced XLR connections with microphone cables, as this
would short-circuit any phantom power transmitted over these cables!
(10) The x 10 switch raises the working range of the FREQUENCY control to
1 - 20 kHz, so that you can process the treble end of the audio spectrum.
4. Control Elements
(11) The BANDWIDTH control determines the slope or quality of the filter.
Bandwidth ranges from 0.03 (Q = 43) to 2 octaves (Q = 0,67).
4.1 Front panel control elements
(1) (4)
(9) The x 0.1 switch lowers the working range of the FREQUENCY control to
10 - 200 Hz, so that you can process the bass end of the audio spectrum.
(10)
(15)
(12) With the LEVEL control you can set the amount of level reduction/gain
applied to the filter. The setting range is from -15 to +15 dB.
(13) The EQ IN/OUT switch activates/deactivates the parametric EQ.
Please switch the EQ off unless you need it for your specific audio application.
(14) The OUTPUT control raises/lowers the output level of the device by a
maximum of 20 dB (±20 dB). With the control in mid-travel position,
no level change is applied. Available both in MIC and LINE modes.
(2) (3) (5) (6) (7) (8) (9) (11)
(12) (13) (14)
Fig. 4.1: Control elements on the front panel
(1) This +48 V switch activates the +48 V phantom power circuit that uses
the signal leads to supply condenser microphones with the required
operating voltage.
◊ Please check the connected signal source for matching specifications
before you switch phantom power on, so as to avoid damage to the
microphone, etc.
(15) The OUTPUT LEVEL LED chain displays the output level within a range from
-30 to +18 dB. The display is referenced to a level of +4 dBu.
9
ULTRAGAIN PRO MIC2200 User Manual
4.2 Rear panel control elements
(17)
5.1.1 Basic setting
(16)
(18)
(20)
(19)
Fig. 4.2: Rear panel elements of the ULTRAGAIN PRO
(16) SERIAL NUMBER. Please take the time to fill in and return the warranty card
within 14 days after the date of purchase, so as to benefit from our extended
warranty. Or use our online registration option available on the World Wide
Web at behringer.com.
(17) FUSE HOLDER / VOLTAGE SELECTOR. Please make sure that your local
voltage matches the voltage indicated on the unit, before you attempt to
connect and operate the ULTRAGAIN PRO. Blown fuses may only be replaced
by fuses of the same type and rating.
(18) MAINS CONNECTION. Use the enclosed power cord to connect the
unit to the mains. Please also note the instructions given in the
“Installation” chapter.
(19) AUDIO IN. These are the audio inputs of your ULTRAGAIN PRO. The XLR
connector is the common mic/line input. The line input is based on
jack connection.
(20) AUDIO OUT. These are the audio outputs of your ULTRAGAIN PRO.
Matching phone jack and XLR connectors are wired in parallel.
5. Applications
This section describes some typical applications of the BEHRINGER ULTRAGAIN
PRO. Starting from the following basic settings you can use it to solve the
majority of audio problems.
Please take your time to study the application examples, so as to be able to fully
exploit the ULTRAGAIN PRO and its variety of features.
Basically, the ULTRAGAIN PRO can be used in five areas of application:
1. Using the ULTRAGAIN PRO as a high-quality microphone preamp.
2. Using the ULTRAGAIN PRO to convert home recording to studio levels,
and vice versa.
3. Using the ULTRAGAIN PRO to balance unbalanced signals (DI box).
4. Using the ULTRAGAIN PRO as a parametric equalizer specifically “tweaking”
the frequency response.
5. Using the ULTRAGAIN PRO to enhance the sound of the program material by
adding “tube warmth”.
5.1 The ULTRAGAIN PRO as a
microphone preamplifier
Before you can use the BEHRINGER ULTRAGAIN PRO as a preamp, we recommend
that you study the various functions of the device. The high gain factors provided
by the microphone preamp can produce extreme levels on the output side,
which may damage subsequent devices. So, you should start with the following
basic setting:
Control elements
+48 V switch
MIC GAIN control
MIC/LINE switch
PHASE REV. Control
LO CUT switch
EQ IN/OUT switch
OUTPUT control
position
OUT
10 dB
LINE
OUT
OUT
OUT
0 dB
Tab. 5.1: Basic setting of the ULTRAGAIN PRO
Reduce the volume level of the subsequent audio system to a minimum,
and connect a microphone to the XLR input connector on the BEHRINGER
ULTRAGAIN PRO. Use either the jack or XLR output connectors to connect the
audio system. Owing to its output-side servo balancing circuit, the ULTRAGAIN
PRO detects whether you use a balanced or unbalanced configuration and adjusts
the level internally.
Now, power up the entire equipment and press the MIC/LINE switch to activate
the microphone preamp. If you wish to use a condenser mic requiring +48 V
phantom power, please press the +48 V switch (to avoid electrical damage,
please read chapter 5.1.5 “+48 V switch” below).
5.1.2 MIC GAIN control
Configure the equipment according to the application on hand, speak into
the microphone and turn the GAIN control clockwise until the 0 dB LED lights
up. If your DAT recorder, mixing console or other subsequent devices have
high-precision level meters, you can use these to verify the correct level setting.
The maximum output level depends on the device that follows next in the audio
chain, and must therefore be set specifically. The high-precision level meter on
the ULTRAGAIN PRO indicates the current operating level. The CLIP LED lights
up at a level of +18 dBu signaling that you have an additional headroom of
5 dB available, before the microphone preamp starts overloading. If distortion/
overloading occurs at high volume levels, you should reduce the gain with the
MIC GAIN control.
5.1.3 PHASE REV. switch
The PHASE REV. switch reverses the audio signal’s phase by 180°. Usually, you
won’t need this switch. However, in some cases, it might be necessary to reverse
the signal phase, for example, if a microphone cable has been connected
incorrectly (pins 2 and 3 interchanged), or if several microphones are used and
specific circumstances with regard to room acoustics are causing problems
(e.g. frequency cancellations are usually caused by phase problems). The phase
reverse function will help you locate and eliminate any such problem.
5.1.4 LO CUT function
When you pick up acoustic signals with microphones, it is usually necessary
to eliminate low-end signal portions, such as rumble or pop noise, or other
interference frequencies. Often, such frequencies have very high amplitudes and
do not only deteriorate the sound quality but can also damage the power amps
or speakers. Your ULTRAGAIN PRO features a tunable high-pass filter with a very
high slope. Press the LO CUT switch and adjust the FREQUENCY control, so that
any disturbing frequencies are faded out as much as possible, with the least
damage done to the actual audio signals. Press/release the LO CUT switch several
times to make an A/B comparison.
10
ULTRAGAIN PRO MIC2200 User Manual
microphone
preamplifier
+48 V
microphone
cable
microphone
amplifier
microphone
transformer
microphone
A
output
B
+48 V
Fig. 5.1: Functional diagram of phantom power supply
5.1.5 Phantom power
Condenser microphones need a specific supply voltage polarizing the condenser
diaphragm. This voltage can be furnished from an internal battery, or an external
power supply that is either connected directly to the microphone or supplies
the voltage through the microphone cable. In practice, this technique is usually
referred to as +48 V or phantom power supply, and uses the microphone cable to
carry both the audio signal and the supply voltage required for the microphone.
Please read this chapter thoroughly: phantom power can damage the
microphone, if used improperly.
We speak of phantom power when a microphone cable is used to carry several
signals, with a DC voltage “layered” on the actual audio signal. The typical
phantom DC voltage is +48 V, which is applied both to the positive (pin 2) and
negative inputs (pin 3) of the XLR connector, using current-limiting resistors.
As the phantom voltage is split up in a balanced configuration among the signal
leads, there is no need to apply it directly to the microphone transducer or the
microphone itself, where it could damage the transducer and/or capsule. In an
unbalanced configuration, DC voltage would be applied directly, which would
inevitably lead to disturbing noise or could even damage the electronics.
To eliminate this risk, the BEHRINGER ULTRAGAIN PRO automatically disables the
unbalanced phone jack in MIC mode. Microphones can thus only be connected to
the XLR connector.
◊ Please make sure that you are using an appropriate microphone before
you switch on the +48 V supply. Read the operating instructions
accompanying the microphone. Some condenser mics might need
another type of power supply, older dynamic microphones could be
damaged by the +48 V voltage, and unbalanced microphones should
never be operated in combination with a +48 V power supply.
5.2 The ULTRAGAIN PRO as a level translator
Semi-professional devices in hi-fi and home recording environments are usually
operated with a nominal level of -10 dBV (0.316 V), while the level used in studios
is 0 dBu (0.775 V) or +4 dBu (1.23 V). So, when you connect devices of both types
to each other, you should do this via some kind of level translator.
The BEHRINGER ULTRAGAIN PRO is excellently suited for this application. In LINE
mode, the OUTPUT control allows you to raise or lower the input signal level
by as much as 20 dB. The functions PHASE REV. and LO CUT are also enabled in
this mode.
5.3 The ULTRAGAIN PRO as a
direct-injection box
Never switch on the +48 V supply when you use unbalanced microphones,
as this could cause electrical damage.
When electrical signals delivered by instruments such as guitars, keyboards, etc.
are transported over long unbalanced lines, the transmission quality may be
affected by hum or other interference signals induced in the cable. This problem
is usually encountered in studio or stage environments, where long cable lengths
and magnetic fields of great magnitude may produce interference.
Some people hold that the sound of dynamic microphones is affected when the
+48 V supply is on, or that ribbon microphones cannot be operated from an input
equipped with +48 V phantom power. None of these statements is true. As a
matter of fact, problems of this kind are caused by one of the following reasons:
So-called direct-injection (DI) boxes are used to counter this effect: the DI box
converts the unbalanced signal coming from the instrument into a balanced
signal that is sent over the line. Interference induced in balanced cables is then
eliminated by a subsequent differential amplifier (as explained in chapter 3.3).
When the output transformer of the microphone suffers from a short circuit or
leakage current at any point, disturbing noise, clicks or hum can occur. In this
case, you should have the microphone repaired.
Using the ULTRAGAIN PRO for this kind of application is easy. Simply connect the
line output of your keyboard to the phone jack input on the ULTRAGAIN PRO.
Then use the ULTRAGAIN PRO’s balanced output to send the signal to a stage box
or other transmission chain. You can use both the XLR and phone jack connectors
of the ULTRAGAIN PRO. Set the unit to LINE mode, with any additional functions
switched off (an exception being the OUTPUT control which can be used to adjust
levels, if necessary).
When you connect a microphone while the +48 V supply is switched
on, it cannot be guaranteed that both signal leads of the XLR connectors
establish the electrical contact precisely at the same point of time. Therefore,
detrimental current could flow because the connection is temporarily
unbalanced. We recommend that you switch off the +48 V supply before you
attempt to connect a microphone.
11
ULTRAGAIN PRO MIC2200 User Manual
5.4 The ULTRAGAIN PRO’s parametric equalizer
In contrast to graphic equalizers with their fixed frequencies and qualities,
parametric EQs allow for setting all filter parameters, such as center frequency,
bandwidth and amplitude.
The possibility of determining both the bandwidth and center frequency as well
as frequency boost/cut adds a new dimension to your EQ applications. The high
precision of the state-variable filter used in the ULTRAGAIN PRO enables you to
fine-tune frequencies and process your audio material in such a creative way that
has been impossible up to now. The frequency-selection feature allows you to
process the entire audio range from 20 Hz to 20 kHz.
Parametric equalizers can be used both as separate signal processors and in
combination with conventional 1/3-oct. equalizers, for example, in a sound
reinforcement system: while the 1/3-oct. equalizer does the “rough” correction
of the overall frequency response, the ULTRAGAIN PRO could be used to fine-tune
the sound.
“Notching out” specific interference frequencies and narrow-band resonances
(uncontrolled frequency peaks) is one of the ULTRAGAIN PRO’s major tasks:
by tuning the EQ in to the precise trouble frequency, interference such as hum
and noise caused by air conditioners, etc. can be eliminated without affecting
adjacent frequency ranges. Basic acoustic problems usually encountered in
studios and stage systems can be solved elegantly with the ULTRAGAIN PRO.
It has proven useful in practice to start with all controls set to mid-travel position
and the EQ IN/OUT switch set to OUT, so as to avoid even before powering up
the system that applied input signals with high amplitudes are raised in level
by the ULTRAGAIN PRO and hence lead to distortion or damage in subsequent
devices or speakers, or to annoying feedback in P.A. systems caused by improper
basic settings.
Once the filter curve of your choice has been set, it can be necessary to correct
the overall level. If the filter setting used raises the overall level, you can use the
OUTPUT control to lower it again and avoid possible distortion.
When the overall level is lowered by the filter setting, the OUTPUT control
allows for raising it by a maximum amount of +20 dB. Use the EQ IN/OUT switch
for a direct A/B comparison, so that you can estimate the required amount of
level compensation.
5.5 The ULTRAGAIN PRO as a tube interface
In your daily studio work, the ULTRAGAIN PRO can be used for a variety of
applications that provide subtle sound enhancement. For example, it gives
percussion instruments more “punch”, or improves the transparency of other
instruments, particularly those rich in upper harmonics. The source material
is enriched in sound volume and brilliance. Enhanced “depth” makes it easier
to locate individual instruments. Vocal sounds gain in presence and volume,
without masking other instruments. Thus, voices become a more integral part of
the overall mix. Synthetic sound, especially MIDI guitar sounds become more real
and natural than without the ULTRAGAIN PRO. So, with the ULTRAGAIN PRO you
can adopt a more active approach during the mix-down process and work out
subtleties, while focusing particularly on the musical aspects of your recordings.
For this purpose, connect the device to the insert points on your mixing console
or recording/playback machine, and operate the ULTRAGAIN PRO in LINE mode.
If you wish to use the tube function only, make sure that all PHASE REV., LO CUT
and EQ IN/OUT switches are OUT. Set the OUTPUT control to mid-travel position
and enjoy the “warmth” of pure tube sound.
6. Specifications
Audio Input
Microphone
ConnectorsXLR
Type
transformerless, DC-decoupled input
Impedance
3 k Ohms balanced
Maximum input level
+10 dBu balanced and unbalanced
CMRR
typ. 40 dB, >55 dB @ 1 kHz
Line
Connectors
XLR and 1/4" jack
Type
transformerless, DC-decoupled input
Impedance
60 kOhms balanced
Maximum input level
+23 dBu balanced and unbalanced
CMRR
typ. 40 dB, >55 dB @ 1kHz
Audio Output
Connectors
XLR and 1/4" jack
Type electronically servo-balanced
output stage
Impedance 60 Ohms balanced,
30 Ohms unbalanced
Maximum output level
+21 dBu balanced and unbalanced
System Specifications
Frequency response
10 Hz to 200 kHz, ±3 dB
Noise
>94 dBu, unweighted, 22 Hz to 22 kHz
THD
0.011% typ. @ +4 dBu, 1 kHz, Gain 1
IMD
0.01% typ. SMPTE
Crosstalk
<-88 dB, 22 Hz to 22 kHz
Function Controls
Mic gain
variable (+10 dB to +60 dB)
Frequency (lo cut)
variable (12 to 320 Hz)
Frequency (PEQ)
variable (10 Hz to 20 kHz),
dependent on x10 and x0.1 switch
Bandwidth
variable (0.03 to 2 octaves)
Level
variable (-15 dB to +15 dB)
Output
variable (-20 dB to +20 dB)
12
ULTRAGAIN PRO MIC2200 User Manual
Function Switches
+48 V
activates phantom power
Mic/line
switches from line to mic preamplifier
Phase rev.
phase reverse (180°)
Lo cut
activates the high-pass filter
x0.1
switches the frequency control to
10 Hz - 200 Hz
x10
switches the frequency control to
1 kHz - 20 kHz
EQ in/out
activates the parametric filter
Indicators
Clip
clipping control LED
Output level
12-segment LED display:
-30/-24/-18/-12/-6/-3/0/+3/+6/
+9/+12/+18 dB
function switch
LED indicator of every switch
Power Supply
Mains voltages
USA/Canada
120 V~, 60 Hz
U.K./Australia
240 V~, 50 Hz
Europe
230 V~, 50 Hz
General Export Model
100 - 120 V~, 200 - 240 V~, 50 - 60 Hz
Power consumption
max. 20 Watts
Fuse
100 - 120 V~: T 500 mA H
200 - 240 V~: T 250 mA H
Mains connection
standard IEC receptacle
Physical
Dimensions (W x D x H)
approx. 8.5 x 1.8 x 19"
approx. 217 x 44.5 x 483 mm
Net weight
approx. 2.3 kg
Shipping weight
approx. 3.4 kg
BEHRINGER is constantly striving to maintain the highest professional standards. As a result of these efforts,
modifications may be made from time to time to existing products without prior notice. Specifications and
appearance may differ from those listed or illustrated.
We Hear You