1
Model PST-500
500 Amp Carbon Load Pile Tester
Instruction Manual
00-99-000767/0107
WARNING:
This unit is built with a beeper which will alarm during load test after 15 seconds.
When you hear the beep, you must read voltage quickly and then turn off load
immediately.
WARNING:
1. Working in the vicinity of lead acid and SLI batteries is dangerous. Batteries
generate explosive gases during normal battery operation. It is of the utmost
importance that each time before using your tester, you read these instructions
very carefully.
2. To reduce risk of battery explosion, follow these instructions and those published
by the battery manufacturer and manufacturer of any equipment you intend
to use in the vicinity of the battery. Observe cautionary markings on these
items.
3. Do not expose the tester to rain or snow.
4. Do not operate tester with damaged cables-replace them immediately.
5. Do not operate tester if it has been damaged in any way. Take it to a qualified
auto technician for repair.
6. CARBON PILE LOAD IS ‘ON’ TO PREVENT BREAKAGE OF CARBONS
DURING SHIPMENT. BE SURE TO TURN LOAD ‘OFF’ BEFORE
CONNECTING TESTER TO BATTERY.
PERSONAL SAFETY PRECAUTIONS:
1. Someone should be within range of your voice or close enough to come to your
aid when you work near a battery.
2. Have plenty of fresh water and soap nearby in case battery acid contacts skin,
clothing or eyes.
3. Wear safety glasses and clothing protection.
4. If battery acid contacts skin or clothing, wash immediately with soap and water.
If acid enters eye, immediately flood eye with running cold water for at least ten
minutes and get medical attention immediately.
5. NEVER smoke or allow a spark or flame in vicinity of battery or engine.
6. Be extra cautious to reduce risk of dropping a metal tool onto the battery. It
could spark or short-circuit the battery or other electrical parts and could cause
an explosion.
7. Remove personal metal items such as rings, bracelets, necklaces and watches
when working with a battery. It can produce a short circuit current high enough
to weld a ring or the like to metal causing a severe burn.
IMPORTANT:
BOTH JAWS OF EACH CLAMP MUST FIRMLY ENGAGE BATTERY
TERMINAL OR IT WILL NOT FUNCTION PROPERLY.
PREPARING TO TEST:
1. Be sure area around battery is well ventilated while battery is being tested. Gas
can be forcefully blown away by using a piece of cardboard or other non-metallic
material as a fan.
2. Clean battery terminals. Be careful to keep corrosion from coming in contact
with eyes.
3. Inspect the battery for cracked or broken case or cover. If so damaged, do not
use tester.
4. Add distilled water in each cell until battery acid reaches level specified by the
manufacturer. This helps purge excessive gas from cells. Do not overfill.
5. Make load tests only on battery above 60°F(16°C).
6. If necessary to remove battery from vehicle to test, always remove earth terminal
from battery first. Make sure all accessories in the vehicle are off to ensure you
do not cause an arc.
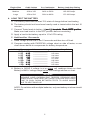
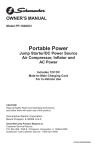
1. CALCULATE STATE OF CHARGE
A. Before a battery can be load tested, you MUST determine the state of
charge.
B. The hydrometer is a great tester to show condition of each cell, but on batteries with non-removable caps the voltmeter is your only choice to determine
state of charge.
C. The specific gravity readings of open vent batteries should not vary more
than 50 points between cells. If the variance is more than 50 points, replace
the battery. The specific gravity should be at least 1.230 in all cells. If not,
charge the battery until 1.230 is obtained. In case the battery is very low, a
longer period of time for charging may be required. After charging, remove
the surface charge from the battery. If charging the battery will not bring the
charge to 1.230 then the battery should be replaced.
D. Maintenance free and sealed batteries have an indicator built into the battery cover. The color of this indicator verifies the gravity condition of the
battery:
○� �����������������������������������������������������
If the green ball is visible, the battery is charged.
● If
���������������������������������������������������������������������������
the indicator is dark and the green ball is not visible, the battery is
partially discharged.
◎
If the indicator is light yellow, the battery is low on fluid and near the end
of its useful life. DO NOT ATTEMPT RECHARGING OR TESTING IF
THE INDICATOR IS YELLOW.
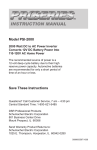
E. The battery must have a minimum 75% state of charge before being load
tested. If battery state of charge is below 75%, load test results will NOT be
accurate.
F. It is highly recommended that maintenance free batteries should be tested
with a voltmeter to determine state of charge.
{
DO Not
Load Test {
OKAY to
Load Test
Open Circuit
Voltage
12.60
12.40
12.20
12.00
11.80
Approximate
State-of Charge
100%
75%
50%
25%
0%
Average Cell
Specific Gravity
1.255
1.225
1.190
1.155
1.120
to
} OKAY
Load Test
Not
} DO
Load Test
OPEN CIRCUIT VOLTAGE TEST
A. Make sure load knob is in the OFF position.
B. Connect tester (+) Red lead to Battery (+) terminal.
C. Connect tester (-) Black lead to Battery (-) terminal.
D. If voltmeter reading is less than 12.4 volts, battery must be charged and
retested before continuing.
NOTE: If battery voltage is less than 12.4 volts after charging, replace the battery.
2. REMOVING THE SURFACE CHARGE
A. If your open circuit voltage reading is above 12.6 volts, remove the surface
charge before load testing. Failure to do so will result in inaccurate test
readings.
B. Three possible ways to remove a surface charge:
1. Turn headlights (high beam) on for 3 to 5 seconds.
2. Disable ignition: crank starter over for 10 to 15 seconds.
3. Using a variable carbon pile load tester, load battery for 10 to 15 seconds
at 150 amp load. Make sure load knob is in the OFF position before
connection is made or removed.
After removing surface charge, let battery stand for 10 minutes to stabilize.
3. CALCULATE THE LOAD
A. Look for either the “Cold Cranking Amps” CCA rating or the “Load Test
Amps” rating on the battery decal.
B. The load test amps rating should be one half (1/2) of the cold cranking amps
rating.
C. If the amp hour rating is provided, load test amps should be 3 times the hour
rating.
D. If the CCA rating and amp hour rating are not available, refer to battery
catalog for recommended CCA rating.
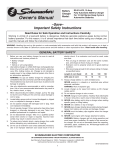
E. Sometimes the rating cannot be located, in that case the engine size may
be used as a guide to determine the battery’s ampere rating. However, it is
recommended to use the manufacturers recommendations, whenever they
can be located.
Engine Size
Small
Medium
Large
Cubic Inches
100 to 200
200 to 350
350 to 500
Cu. Centimeter
1600 to 2400
2400 to 5600
5600 to 8000
Battery load Amp Rating
100-150 Amps
125-200 Amps
175-300 Amps
4. LOAD TEST THE BATTERY
A. The battery must have at least 75% state of charge before load testing.
B. The battery should not have been heavily used or tested within the last 10
minutes.
C. Connect Tester leads to battery (������������������������������������������
+�����������������������������������������
) and (����������������������������������
–���������������������������������
) terminals. Read AMPS position.
Make sure load knob is in the OFF position before connecting.
D. Apply a load to the battery equal to 1/2 of CCA rating.
E. Hold load for 15 seconds.
F. Read voltage at the end of the 15 seconds and then turn off load.
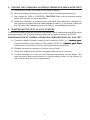
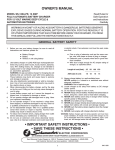
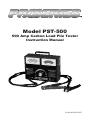
G.Compare reading with PASS/FAIL voltage chart on side of tester, or use
chart shown below to compensate for battery temperature.
At Battery Temperature
70���������
°F�������
(21°��
C�)
60���������
°F�������
( 16°��
C�)
50���������
°F�������
( 10°��
C�)
40���������
°F�������
( 5°��
C�)
30���������
°F�������
( 1°��
C�)
20����������
°F��������
(– 7°��
C�)
10����������
°F��������
(– 12°��
C�)
0����������
°F��������
(– 18°��
C�)
Of
Voltage
______________
______________
______________
______________
______________
______________
______________
______________
Should Not Drop Below
9.6 Volts
9.5 Volts
9.4 Volts
9.3 Volts
9.1 Volts
8.9 Volts
8.7 Volts
8.5 Volts
H. Battery is GOOD if voltage is at or above volt readings shown on chart.
Battery is BAD if voltage drops below volt readings shown on chart.
WARNING
VARIABLE LOAD CARBON PILE TESTERS PRODUCE HEAT
WHEN IN USE. CARE MUST BE TAKEN TO ALLOW SUFFICIENT
TIME TO COOL DOWN BETWEEN TESTS TO AVOID INJURY
DUE TO HEAT BUILD UP.
NOTE: On vehicles with multiple batteries, only one battery at a time should
be tested.
5. TESTING THE CHARGING SYSTEM (ALTERNATOR & REGULATOR TEST)
A. Connect the tester the same as for battery testing.
B. Start the engine and allow it to reach normal operating temperature.
C. Run engine at 1200 to 1500RPM. CAUTION: Stay clear of moving engine
parts. Do not turn on the load switch.
D. Read the voltmeter. A reading in the red band area indicates a problem in
the charging system that will undercharge a battery; if the meter is beyond
the OK area, the charging system is likely to overcharge the battery.
6. STARTER MOTOR TEST (12 VOLT SYSTEM)
This test identifies excessive starter current draw, which makes starting difficult and
shortens battery life. Perform battery load test-proceed if battery is GOOD.
ENGINE MUST BE AT NORMAL OPERATING TEMPERATURE FOR THIS TEST
A. Connect negative (black) clamp to the negative (NEG, N, �����������������
–����������������
) battery post.
Connect positive (red) clamp to the positive (POP, P, +���������������������
����������������������
) battery post. Rock
clamp back and forth to ensure a good electrical connection.
B. Disable the ignition system so the car will not start.
C. Crank the engine and note the voltage reading during cranking.
D. A meter reading of 9 volts or less indicates excessive current draw. This
may be due to bad connections or a failing starter motor; or the battery is
too small for the vehicle’s requirements.
LIMITED WARRANTY
SCHUMACHER ELECTRIC CORPORATION, 801 BUSINESS CENTER DRIVE,
MOUNT PROSPECT, IL 60056-2179, MAKES THIS LIMITED WARRANTY TO
THE ORIGINAL PURCHASER AT RETAIL OF THIS PRODUCT.
THIS WARRANTY IS NOT TRANSFERABLE.
Schumacher Electric Corporation warrants this battery charger for one year from
date of purchase at retail against defective material or workmanship. If such should
occur, the unit will be repaired or replaced at the option of the manufacturer. It is
the obligation of the purchaser to forward the unit together with proof of purchase,
transportation and /or mailing charges prepaid to the manufacturer or its authorized
representative. This limited warranty is void if the product is misused, subjected to
careless handling, or repaired by anyone other than the factory representative. The
manufacturer makes no warranty other than this limited warranty and expressly
excludes any implied warranty for consequential damages.
This is the only express limited warranty and the manufacturer neither assumes
nor authorizes anyone to assume or make any other obligation towards the product
other than this express limited warranty. The manufacturer makes no warranty of
merchantability or fitness for purpose of this product and expressly excludes such
from this limited warranty. Some states do not allow the exclusion or limitation of
incidental or consequential damages or length of implied warranty so the above
limitations or exclusions may not apply to you. This warranty gives you specific
legal rights and you may have other rights which vary from state to state.
DSR Professional Products
Schumacher Electric Corporation
801 Business Center Drive, Mount Prospect, IL 60056-2179
Send Warranty Product Repairs to:
Schumacher Electric Corporation, Warranty Service Department
1025 East Thompson, Hoopeston, IL 60942-0280
Phone: 1-800-607-3714 (Hours: 7 a.m. – 4:30 p.m. CST)
NOTES