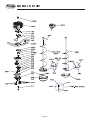
1
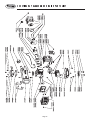
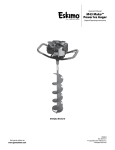
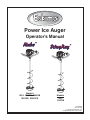
Power Ice Auger
Operator's Manual
Models
M43, M43T8, M43Q8
M43Q9, M43Q10
Models
S33
S33Q8
IB-S33/M43
Rev. 08/31/04
© Copyright 2004 Ardisam, Inc.
All Rights Reserved. Printed in USA.
Page 2
INTRODUCTION, REGISTRATION AND WARRANTY
REGISTRATION
THANK YOU ÷ ÷ ÷
for purchasing an Eskimo® Power Ice Auger from Ardisam,
Inc. We have worked to ensure that it meets high standards
for usability and durability. With proper care, your auger will
provide many years of service. Please take the time to read
this manual carefully to learn how to correctly operate and
maintain your auger. Congratulations on your investment in
quality.
Fill out and mail the registration card located in your parts
packet. Warranty is valid only if your completed registration
card is received by Ardisam, Inc., at time of purchase.
Model Number _________________________________
Serial Number _________________________________
Engine Serial Number ___________________________
Date of Purchase _______________________________
Place of Purchase ______________________________
WARRANTY
One Year Limited Warranty
The Ardisam, Inc., Manufacturing Company warrants this Eskimo® Ice Auger to be free from defects in material or
workmanship. Conditions of this warranty include:
What is covered under warranty:
Ardisam, Inc. will repair or replace any part defective in workmanship or material within one year after delivery of the
ice auger to the original purchaser.
What is not covered under warranty:
This warranty applies only to products which have not been repaired or altered outside our factory. It covers only
defects resulting from normal use, and does not cover defects arising from misuse, alteration, negligence,
commercial use, or accident. This warranty applies only to the original purchaser, and is not transferrable.
How to obtain service:
Return the product to us at the address below with transportation charges prepaid.
This warranty supersedes all other warranties either expressed or implied and all other obligations or liabilities on our
part. Ardisam, Inc., does not assume, and does not authorize any other person to assume for us, any liability in
connection with the sale of our products. This guarantee is void unless warranty card is properly filled out and
returned to Ardisam, Inc., Cumberland, Wisconsin, at time of purchase.
ARDISAM
Ardisam, Inc.
1690 Elm Street, Cumberland, WI 54829
Phone (715) 822-2415 Fax (715) 822-4180
1-800-345-6007
Email [email protected]
www.ardisam.com
Page 3
SAFETY
Owner's Responsibility
Important Safety Precautions
Accurate assembly and safe and effective use of the auger
is the owner's responsibility.
Please read this section carefully. Operate the auger
according to the safety instructions and recommendations
outlined here and inserted throughout the text. Anyone who
uses this auger must read the instructions and be familiar
with the controls.
• Read and follow all safety instructions.
• Carefully follow all assembly instructions.
• Maintain the auger according to directions and schedule
included in this Eskimo operator’s manual.
• Ensure that anyone who uses the auger is familiar with
all controls and safety precautions.
Special Messages
Your manual contains special messages to bring attention
to potential safety concerns, machine damage as well as
helpful operating and servicing information. Please read all
the information carefully to avoid injury and machine
damage.
CAUTION
Avoid injury! This symbol and text highlight potential
hazards or death to the operator or bystanders that
may occur if the hazards or procedures are ignored.
This symbol points out important safety instructions
which if not followed could endanger your personal safety.
Read and follow all instructions in this manual before
attempting to operate this equipment.
• The ice blades are very sharp. Use extreme caution
when drilling a hole or replacing the blades. Put blade guard
on after each use.
• Do not carry the auger powerhead between holes with
the engine running.
• The auger should not rotate when the engine is idling. If
it does rotate when engine is idling, contact Ardisam, Inc.
for instructions.
• Always keep hands, feet, hair and loose clothing away
from any moving parts on engine and auger.
• Do not allow children to operate this power auger. Do not
allow adults to operate the auger without proper instruction.
Avoid damage! This text is used to tell the operator of
actions or conditions that might result in damage to
the machine.
NOTE: General information is given throughout the
manual that may help the operator in the operation or
service of the machine.
WARNING
• Do not operate any power equipment under the influence
of alcohol or drugs.
• Keep all screws, nuts and bolts tight.
• Engine should be turned off and cool, spark plug wire
must be removed from spark plug before any repairs are
attempted.
• Temperature of muffler and nearby areas may exceed
150° F (65° C). Avoid these areas.
CALIFORNIA PROPOSITION 65 WARNING
• Never run engine indoors or in an enclosed area. Engine
exhaust contains carbon monoxide, an odorless and deadly
gas.
Engine exhaust from this product contains
chemicals known to the State of California to cause
cancer, birth defects, or other reproductive harm.
• If the ice auger becomes unturnable in a hole, turn
engine off and allow to cool before attempting to remove it
manually.
Page 4
SAFETY
Engine Safety Precautions
Warning Carbon Monoxide Poisoning
All engines contain carbon monoxide in their exhaust.
Carbon monoxide is a deadly, colorless, tasteless, odorless
gas which may be present even if you do not smell or see
any engine exhaust. Levels of carbon monoxide, which can
be deadly, can be present for days in an enclosed area that
has poor ventilation. Any level of carbon monoxide, if
inhaled, can cause headaches, drowsiness, nausea,
dizziness, confusion and eventually death. If you
experience any of these symptons, seek fresh air and
medical attention immediately.
Gasoline Fires or Handling Fuel Safely
Fuel and fuel vapors are highly flammable. Never use fuel
where a spark or flame may be present. Never use fuel
where a potential source of ignition could occur. (Examples
include: hotwater or space heaters, clothes dryer, electric
motors, etc.) Keep flames and sparks away from engine
and fuel to prevent fires. Fuel fires spread very quickly and
are highly explosive.
Prevention of Gasoline Fires
• Never fill your fuel tank with fuel indoors. (Examples
include: basement, garage, barn, shed, house, porch, ice
shelter, etc.)
Preventing Carbon Monoxide Poisoning
• Always fill fuel tank outside in a well ventilated area.
• Never run engine indoors.
• Never remove the fuel cap or add fuel with the engine
running. Stop engine and allow to cool before filling.
• Never try to ventilate engine exhaust indoors. Carbon
monoxide can reach dangerous levels very quickly.
• Never drain fuel from engine in an enclosed area.
• Never run engine outdoors where exhaust fumes may be
pulled into a building.
• Always wipe up excess (spilled) fuel from engine before
starting. Clean up spilled fuel immediately.
• Never run engine outdoors in a poorly ventilated area
where the exhaust fumes may be trapped and not easily
taken away. (Examples include: in a large hole or areas
where hills surround your working area.)
• Allow spilled fuel to dry, after wiping and before starting.
• Allow fuel fumes/vapors to escape from the area before
starting engine.
• Never run engine in an enclosed or partially enclosed
area. (Examples include: buildings that are enclosed on one
or more sides, under tents, car ports or basements.)
• Always run the engine with the exhaust and muffler
pointed in the direction away from the operator.
• Test the fuel cap for proper installation before starting
and using engine.
• Always run the engine with fuel cap properly installed on
the engine.
• Replace fuel cap that allows gas to spill or leak.
• Never point the exhaust muffler towards anyone. People
should always be many feet away from the operation of the
engine and its attachments.
• Never smoke while refilling engine fuel tank.
• Prevent fire and explosion caused by static electric
discharge. Use only non-metal, portable fuel containers
approved by the Underwriter’s Laboratory (U.L.) or the
American Society for Testing & Materials (ASTM).
• Do not store engine with fuel in fuel tank indoors. Fuel
and fuel vapors are highly explosive.
• Never pour fuel from engine fuel tank.
• Never siphon fuel by mouth to drain fuel tank.
• Always have an adult fill the fuel tank.
• Never allow an adult or anyone under the influence of
drugs or alcohol to fill engine.
• Never allow children to fill the engine.
Page 5
SAFETY
Burns and Fires
CAUTION
The muffler, muffler guard and other parts of the engine
become extremely hot during the operation of the engine.
These parts remain extremely hot after the engine has
stopped.
Avoid injury! Always wear hearing protection while
operating engine.
Prevention of Burns and Fires
• Never remove the muffler guard from the engine.
CAUTION
• Never touch the muffler guard because it is extremely
hot and will cause severe burns.
Avoid injury! Please do not start your auger until you
have read the previous section of this manual. If you
have read these, follow the steps below to start your
auger.
• Never touch parts of the engine that become hot after
operation.
• Always keep materials and debris away from muffler
guard and other hot parts of the engine to avoid fires.
Steps for Working on Engine or Attachment
CAUTION
Do Not Alter/Modify Engine or Attachments:
Avoid injury! Never alter or modify the engine from
the factory. Serious injury or death may occur if
engine is modified or altered.
CAUTION
Avoid injury! When working on or replacing parts for
the engine or attachments you must always disconnect
spark plug wire from the spark plug and keep it away
from the spark plug.
Preparing Engine for Starting
GAS AND OIL
Quality
To operate the engine you must use a high quality 2-cycle
oil to ensure that the engine operates correctly during the
break-in period and the life of the engine. Use unleaded
regular or unleaded premium gas only.
Mixture
Run ice auger with a 20:1 ratio for the first 20 hours of
operation. After 20 hours of use, mix at a ratio of 25:1. See
charts 1 & 2.
CHART 1
GAS
OIL
RATIO1
2. Disconnect the spark plug wire from the spark plug.
1 gallon
6 ounces
20:1
3. Securely place the disconnected spark plug wire away
from the spark plug and any metal parts. This must always
be done or arcing may occur between spark plug wire and
metal parts.
2 gallons
12 ounces
20:1
5 gallons
30 ounces
20:1
GAS
OIL
RATIO1
1 gallon
5 ounces
25:1
2 gallons
10 ounces
25:1
5 gallons
26 ounces
25:1
1. Turn off engine switch.
CHART 2
4. Replace or repair the part on the engine or attachment.
5. Check all parts that were repaired, or removed during
repair, that they are secure and fit correctly.
NOTE: All repair parts must come from the factory.
Never replace parts that are not specifically designed
for the engine or attachment.
6. Replace spark plug wire.
Page 6
OPERATION
Mixing Fuel and Filling Fuel Tank
Filling Fuel Tank
1. Shut-off engine and allow engine to completely cool
before refilling the fuel tank.
CAUTION
2. Move to a well ventilated area, outdoors, away from
flames and sparks.
Avoid injury! Never store engine with fuel in the tank
indoors. Fuel and fuel vapors are highly flammable.
3. Clean debris from area around the fuel cap.
4. Loosen fuel cap slowly. Place the cap on a clean, dry
surface.
CAUTION
5. Carefully add fuel without spilling.
Avoid injury! Never mix fuel and oil directly in engine
fuel tank. Use only non-metal, portable fuel containers
approved by the Underwriter’s Laboratory (U.L.) or the
American Society for Testing & Materials (ASTM).
6. Do not fill gas tank completely full, allow space for fuel
to expand.
7. Immediately replace fuel cap and tighten. Wipe off
spilled fuel and allow to dry before starting engine.
CAUTION
CAUTION
Avoid injury! DO NOT start engine if fuel is spilled.
Wipe off excess fuel and allow to dry. Remove engine
from area to avoid sparks.
Avoid injury! An adult must always handle and fill the
engine with fuel.
Mixing Fuel
1. Fuel must be mixed in a container outside in a well
ventilated area.
2. Fill certified fuel container 1/4 full of recommended fuel.
3. Add recommended amount of 2-cycle oil.
4. Screw container cap on straight and tight.
5. Shake the container to mix fuel and oil.
6. Unscrew cap slowly to vent, add the remainder of fuel
requirements.
7. Wipe away any spilled fuel or oil and allow to evaporate
before moving or transporting.
CAUTION
Avoid injury! Always handle gas in a well ventilated
area, outdoors, away from flames or sparks.
This engine uses a gas/oil mixture. DO NOT run on
straight gas only, engine damage will result.
Page 7
OPERATION
Starting and Stopping Engine
7. Grasp starter handle and pull out slowly, until it pulls
slightly harder. Without letting it retract, pull rope with a rapid
full arm stroke. Let it return to its original position very
slowly. Repeat this step everytime the starter rope is pulled.
To attach auger to powerhead if not done, align hole in at
top of shaft with output shaft hole. Insert bolt and secure
bolt with provided allen wrench.
8. Pull recoil until engine fires or runs.
NOTE: The ends of the bolt should be flush with auger
collar. Bolt head and thread end should never go
beyond ice collar.
NOTE: If engine fails to start after 5-6 pulls, push primer
1 time and pull starter rope again.
9. After engine starts running, move choke lever to HALF
CHOKE.
CAUTION
10. Run engine for 30 to 45 seconds at half choke position
until engine warms up.
Avoid injury! If auger is mounted to engine, all safety
guards must be securely on to avoid serious injury.
11. Move choke lever to OFF position and move throttle to
desired speed.
1. Move engine to a well ventilated area, outdoors, to
prevent carbon monoxide poisoning.
12. To stop, flip switch to OFF position.
2. Move to an area away from flames or sparks, to avoid
ignition of vapors if present.
CAUTION
3. Remove all debris from air cleaner holes and fuel cap to
ensure proper air flow.
Avoid injury! If engine fails to start after the above
operations, please contact Ardisam, Inc. at 1-800-3456007.
4. Turn switch to the ON position.
5. Priming:
DO NOT attempt to start engine in the following ways:
• When using the primer bulb, allow the bulb to return
completely to its original position between pushes.
· DO NOT use starting fluid.
• Choke must be in the OFF position when pushing or using
the primer bulb.
First Start: Starting new engine for first time or after running
out of gas, prime 3 times.
· DO NOT spray flammable liquids or vapors into air
cleaner, carburetor or spark plug chamber.
· DO NOT remove spark plug and pull on starter rope.
Flammable fuel can spray out & ignite from a spark
from spark plug.
Cold Start: Starting engine after it has been sitting or
stored briefly with fuel in the tank, prime 1 time above 55°
Farenheit or 2 times below 55° Farenheit.
CAUTION
Warm Start: Do not use primer or full choke if engine did
not run out of gas or has not cooled completely. Flooding of
engine will occur.
Avoid injury! Never leave engine running while
unattended. Turn off after every use.
6. Choke:
• Full choke position is defined by moving the choke lever
as far to the ON position as possible. Half choke is defined
when the choke lever is between ON and OFF.
First Start & Cold Start: After priming, move choke lever to
full choke.
Warm Start: No choke or half choke is needed.
CAUTION
Avoid injury! Starter rope can cause an unanticipated
jerk towards engine. Please follow instructions to avoid
injury.
Page 8
CAUTION
Avoid injury! Never carry powerhead and auger between
holes while engine is running.
OPERATION
Normal Operation
Transporting Your Ice Auger
1. The clutch will transfer maximum power after about two
hours of normal operation. During this break-in period clutch
slippage may occur. The clutch should be kept free of oil or
other moisture for efficient operation.
1. Never transport engine inside an enclosed space or
vehicle. Fuel or fuel vapors may ignite causing serious
injury or death.
2. Dig holes without placing excessive body weight on the
unit. The auger operates most efficiently with a shaving
action caused by the weight of the unit itself.
3. Never run engine indoors. Exhaust fumes are deadly.
4. Do not use an ice auger in the earth.
5. The ice auger blade protector should be attached to the
auger head when not in use. This will protect the cutting
edge of the ice auger blades.
2. If fuel is present in the fuel tank, transport in an open
vehicle in an upright position.
3. If an enclosed vehicle must be used, remove gas into
an approved red gasoline container. DO NOT siphon by
mouth.
4. Run engine to use up the fuel in the carburetor and fuel
tank. Always run engine in a well ventilated area.
5. Wipe away any spilled fuel from engine and ice auger.
Allow to dry.
Page 9
MAINTENANCE AND STORAGE
Cooling Fins
CAUTION
To prevent accidental starting:
Avoid injury! Engine must be turned off and cool, and
spark plug wire must be removed from spark plug
before checking and adjusting engine or equipment.
CAUTION
• Cooling fins, air inlets and linkages must be free from
any debris before each use.
Air Filters
• Never run engine without air cleaner properly installed.
Added wear and engine failure may occur if air cleaner is
not installed on engine.
• Service air cleaner every 3 months or after 20 hours of
operation. Clean and oil filter daily in extremely dusty
conditions.
Avoid injury! Temperature of muffler and nearby
areas may exceed 150° F (65° C). Avoid these areas.
Steps for Cleaning Air Filters
CAUTION
Avoid injury! Check auger often for loose nuts and
bolts. Keep these items tightened.
Never twist air filters when cleaning. Always press.
Auger Maintenance
1. The gear case has 4 oz. of grease installed at the factory.
It is recommended that once a year the gear case be split
and the grease level checked. Add grease only if level of
grease is below top of the gears. DO NOT OVERFILL.
2. Keep all screws, nuts, and bolts tight.
1. Wash in warm water with mild soap until dirt and debris
are removed. Press filter when washing, do not twist.
2. Rinse in warm water until soap and dirt are removed.
3. Dry filter by wrapping in a clean cloth and pressing filter
until it is dry.
4. Apply oil to the entire filter.
3. For cold weather operation, store the unit in a cool
environment. Transferring the unit from a warm to a cold
place can cause the build up of harmful condensation.
5. Remove excess oil.
6. Attach the filter and filter cover to the engine.
4. Always replace blade protector when power auger is not
in use.
Spark Plug
• Check spark plug every 50 operating hours.
Engine Maintenance
1. Remove dirt and debris around the spark plug before
removing.
CAUTION
Avoid injury! Never store engine with fuel in the tank
inside a building. Potential sparks may be present for
ignition of fuel and fuel vapors.
CAUTION
2. Remove spark plug and replace if any of the following
have occured: pitted electrodes, burned electrodes, cracked
porcelain, or deposits around the electrodes.
3. After analysis of the spark plug, install original or a new
spark plug and tighten securely.
NOTE: DO NOT OVERTIGHTEN!
Avoid injury! An adult must always do maintenance
and repair on engine and atachments.
Carburetor
• Never tamper with factory setting of the carburetor.
CAUTION
Avoid injury! Engine must be shut-off, cool, and spark
plug wire removed before any repair or maintenance
can be done.
Page 10
MAINTENANCE AND STORAGE
Long Term Storage
• If your ice auger will not be ran for more than one month,
prepare it for long term storage.
Steps for Long Term Storage
1. Add fuel stabilizer according to manufacturer’s
instructions.
2. Run engine for 10-15 minutes to ensure that the stabilizer
reaches the carburetor.
3. Remove the remainder of the fuel from the gas tank into
an approved fuel container.
CAUTION
Avoid injury! To avoid injury or death, never siphon
fuel by mouth.
CAUTION
Avoid injury! Never store ice auger with fuel in the fuel
tank inside an enclosed area or building.
4. Remove auger from powerhead and apply a thin layer of
grease to the output shaft (8913).
5. Store auger and powerhead (engine) in a vertical position.
6. Remove all debris from auger and powerhead (engine).
7. Attach blade protector to bottom of auger.
Page 11
SERVICE, TROUBLESHOOTING AND REPAIR
ICE POINT REPLACEMENT
SERVICE INFORMATION
1. Remove blade protector and both blades.
2. Remove nut and retaining bolt from point.
IN CASE OF A SERVICE PROBLEM, DO NOT SEND
UNIT BACK TO RETAILER. CONTACT ARDISAM, INC.
AT 1-800-345-6007.
At Ardisam, we build quality and durability into the design of
our products; but no amount of careful design by us, and
careful maintenance by you, can guarantee a repair-free life
for your auger. Most repairs will be minor, and easily fixed by
following the suggestions in the troubleshooting guide in this
section.
3. Using a locking pliers, grasp point and pull out. If holder
doesn’t come out with the point, remove with pliers.
4. With locking pliers, push in new point and holder aligning
bolt hole in point with holes in auger shaft. DO NOT
DAMAGE END OF POINT.
NOTE: When installing holder in auger shaft, edges of
holder may shave off.
5. Insert retaining bolt and tighten with nut.
6. Re-attach both blades and put blade protector back on.
CAUTION
The guide will help you pinpoint the causes of common
problems and identify remedies.
For more complicated repairs, you may want to rely on your
retailer, an authorized mechanic or Ardisam, Inc. (contact
your retailer for a list of authorized mechanics in your area).
A parts catalog is included in this section.
Avoid injury! Auger blades and point are extremely
sharp. Use caution when removing & replacing.
We will always be glad to answer any questions you have, or
help you find suitable assistance. To order parts or inquire
about warranty, call or write us at the address found in the
next column under the section ordering repair parts or check
out our website - www.ardisam.com
Page 12
SERVICE, TROUBLESHOOTING AND REPAIR
ORDERING REPAIR PARTS
Please include the following information with your order:
Parts can be obtained from the store where your auger was
purchased or direct from the factory. To order from the
factory, call or write to:
1. Part numbers
2. Part description
3. Quantity
4. Model number and serial number
Ardisam, Inc.
1690 Elm Street, Cumberland, WI 54829
Phone (715) 822-2415 Fax (715) 822-4180
1-800-345-6007
Email [email protected]
www.ardisam.com
CAUTION
Practice safety at all times. Engine must be turned off
and allowed to cool, and spark plug wire must be
disconnected before attempting any maintenance or
repair.
TROUBLESHOOTING
Problem
Possible cause
Remedy/Action
Engine will not start
1. Power switch off
2. Spark plug wire disconnected
1. Flip switch to on position
2. Connect spark plug wire to spark plug
Engine runs rough, floods during
operation
1. Dirty air cleaner
2. Choke partially engaged
3. Carburetor out of adjustment
1. Clean or replace air cleaner
2. Turn off choke
3. Call factory
Engine is hard to start
1. Stale fuel
1. Drain old fuel and replace with fresh.
Use gas stabilizer at end of season
2. Make sure spark wire is securely
attached to spark plug
3. Clean carburetor, use gas stabilizer,
new gas can
2. Spark plug wire loose
3. Dirty carburetor
Engine misses or lacks power
1. Clogged fuel tank
2. Clogged air cleaner
3. Improper carburetor adjustment
4. Spark plug dirty, improper gap, or
wrong type
1. Remove and clean
2. Clean or replace
3. Call factory
4. Replace spark plug and adjust gap
Auger turns at idle
1. Idle speed too high
2. Broken clutch spring
1. Adjust idle speed lower
2. Replace both springs
Auger turns, but has no power
1. Choke on
2. Carburetor out of adjustment
3. Broken transmission
4. Worn clutch shoes
5. Worn engine lower seal
1. Turn off choke after engine is running
2. Call factory
3. Call factory
4. Replace clutch shoes and springs
5. Call factory
Auger jumps on ice
1. Blades damaged or sharpened
incorrectly
1. Buy new blades, or have blades
sharpened at factory
Auger cuts slowly
1. Dull blades
2. Damaged point
1. Buy new blades, or have blades
sharpened at factory
2. File point, or replace point
1. Gas cap not venting
1. Check self venting gas cap
Engine runs, then quits
Page 13
S33 STINGRAY & M43 MAKO ENGINE PARTS LIST
Page 14
S33 STINGRAY & M43 MAKO ENGINE PARTS LIST
MINIMUM ORDER ........................................................................... $10.00
POWERHEAD PARTS
Part #
Description
1021
300401
300412
300428
300429
300430
300431
300432
300433
300434
300435
300436
300437
300438
300439
300440
300441
300442
300444
300445
300446
300449
300450
300451
300452
300454
300455
300456
300457
300458
300460
300461
Rocker Switch
Fuel Tank Cap
Clutch Spring
Carburetor, S33
Recoil Plate
Recoil Assembly
Engine Shroud, S33
Gasket, Carburetor, S33
Gasket, Muffler, S33
Gasket, Intake, S33
Air Filter
Ignition Coil, S33
Fuel Tank
Bolt w/washer, M5 x 25mm
Bolt w/washer, M5 x 18mm
Muffler, S33
Cover, Muffler, S33
Clutch Rotor Shoe
Support, Fuel Tank
Washer, M5
Air Deflector, S33
Spring Washer, Rotor Shoulder Bolt
Shoulder Bolt, Rotor Assembly
Heat Disk, S33
Intake Windpipe, S33
Cover, Intake
Adapter Plate, Intake Cover
Bolt, M5 x 50mm
Cover, Air Filter
Cover, Intake
Nut, M5, S33
Stud Bolt, M5 x 60mm, S33
Qty.
Part #
Description
1
1
1
1
1
1
1
1
1
2
1
1
1
6
9
1
1
2
2
2
1
2
2
1
1
1
1
2
1
1
2
2
300462
300463
300464
300465
300466
300467
300468
300470
300471
300472
300473
300474
300475
300476
300477
300478
300479
300480
300482
300483
300484
300485
300486
300487
300488
300489
300490
300491
300492
300493
BM6A
Rotor Washer
Grommet, Engine Shroud
Cover, Engine Shroud, S33
Flywheel, Magneto, S33
Grommet, Fuel Tank
Locating Pin
Cover, Engine Mounting, S33
Fuel Line Hose & Filter
Bolt, M5 x 12mm
Ignition Coil, M43
Cover, Muffler, M43
Muffler, M43
Gasket, Muffler, M43
Gasket, Intake, M43
Heat Disk, M43
Intake Windpipe, M43
Gasket, Carburetor, M43
Threaded Spacer, Fuel Tank
Engine Shroud, M43
Cover, Engine Shroud, M43
Flywheel, Magneto, M43
Air Deflector, M43
Carburetor, M43
Cover, Engine Mounting, M43
Choke
Choke Lever
Primer Line Hose
Recoil Clutch
Nut, M6, M43
Stud Bolt, M6 x 62mm, M43
Spark Plug
Page 15
Qty.
2
1
1
1
1
2
1
1
3
1
1
1
1
2
1
1
1
2
1
1
1
1
1
1
1
1
1
1
2
2
1
S33Q8 STINGRAY PARTS LIST
Page 16
S33Q8 STINGRAY PARTS LIST
MINIMUM ORDER ........................................................................... $10.00
POWERHEAD PARTS
Part #
Description
80
1022
48T Gear
Adapter Ring
(engine to handlebar plate)
Bolt, M6 x 1 x 16mm
(ring to engine)
HandleBar
Screw, Philips Pan Hd, #10 x 1-1/4”
Output Shaft, 7/8"
Dowel Pin, 1/4" x 1/2", hardened steel
Gasket
Ball Bearing
Snap Ring
Bolt-SHCS, 1/4-20 x 1-1/2"
(gear case bottom to gear case top)
Bolt-SHCS, 1/4-20 x 2"
(gear case to ring)
Gear Case Bottom
Throttle Control
Throttle Cable
Pinion Gear, 7 tooth threaded
Nut, #10, nyloc
Gear Case Top
Ball Bearing
Complete Transmission
Spacer-Drum
Clutch Drum
Gear, 7T
Gear, 48T left hand thread
Gas Engine, 33cc
Decal, StingRay, serialized
Decal, StingRay oval, handlebar plate
Decal, Blade Protector, Eskimo
Decal, Eskimo oval, auger stem
1023
1024
8904WC
8913
8915
8919
8922
8924
8929
8931F
8939
9012
9013
9814MM
53606
200131
300406
300407
300409
300414
300419
300421
300425
LBL33
LBL332
LBLBPE
LBLESKS
POWER AUGER PARTS
Qty.
1
1
4
1
1
1
1
1
3
2
2
Part #
Description
232A
Blade Protector, fits 6”-8" quantum auger
(includes 8651)
Strap, Blade Protector
Auger Bolt-SHCS, 3/8-16 x 1-1/4"
(auger to powerhead)
Nut, #10, nyloc
Point Replacement Assembly
(includes 53606, 90136, 90165, 90166)
Bolt, #10-24 x 1-1/4” stainless
Point Holder
Point
Bolt, 5mm x 0.8 x 16mm, (ice blade to auger)
Nut, 5mm x 0.8 nyloc, (ice blade to auger)
Ice Blades, 8" Quantum, set of two
(includes IB5816, IN58)
Ice Auger, 8" Quantum, complete
8651
8955
53606
90129
90136
90165
90166
IB5816
IN58
QB8
4
QT8N
1
1
1
1
1
1
2
1
1
1
1
1
1
1
1
1
1
ACCESSORIES
EXT6
EXT12
EXT18
Page 17
Depth Extension, 6"
Depth Extension, 12"
Depth Extension, 18"
Qty.
1
1
1
1
1
1
1
1
4
4
1
1
M43 MAKO PARTS LIST
Page 18
M43 MAKO PARTS LIST
MINIMUM ORDER ........................................................................... $10.00
POWERHEAD PARTS
Part #
Description
1022
Adapter Ring
(engine to handlebar plate)
Bolt, M6 x 1 x 16mm
(ring to engine)
HandleBar
Screw, Philips Pan Hd, #10 x 1-1/4”
44T Gear
Output Shaft, 7/8"
Dowel Pin, 1/4” x 1/2”, hardened steel
Gasket
Ball Bearing
Ball Bearing
Snap Ring
Bolt-SHCS, 1/4-20 x 1-1/2"
(gear case bottom to gear case top)
Bolt-SHCS, 1/4-20 x 2"
(gear case to ring)
Gear Case Bottom
Throttle Control
Throttle Cable
48T & 10T Pinion Gear Cluster, left hand thread
Pinion Gear, 7 tooth threaded
Nut, #10, nyloc
Gear Case Top
Spacer-Drum
Clutch Drum
Gas Engine, 43cc
Complete Transmission
Decal, Mako, serialized
Decal, Mako oval, handlebar plate
Decal, Blade Protector, Eskimo
Decal, Eskimo oval, auger stem
1023
1024
8904WC
8912
8913
8915
8919
8922
8923
8924
8929
8931F
8939
9012
9013
9214
9814MM
53606
200131
300409
300414
300443
300496
LBLM43
LBLM432
LBLBPE
LBLESKS
POWER AUGER PARTS
Qty.
Part #
Description
1
232A
4
233A
1
1
1
1
1
1
3
2
2
2
2320A
Blade Protector, fits 6”-8" quantum auger
(includes 8651)
Blade Protector, fits 9” & 10" quantum
(includes 8651)
Blade Protector, fits 6”-8” turbo auger
(includes 8651)
Strap, Blade Protector
Auger Bolt-SHCS, 3/8-16 x 1-1/4"
(auger to powerhead)
Nut, #10, nyloc
Lockwasher, 5mm
Point Replacement Assembly
(includes 53606, 90136, 90165, 90166)
Bolt, #10-24 x 1-1/4” stainless
Point Holder
Point
Ice Blades, 8" TurboCut
(includes 63387, IB5810)
Ice Auger, 8" Turbo
Bolt, 5mm x 0.8 x 10mm, (turbo ice blade to auger)
Bolt, 5mm x 0.8 x 16mm, (ice blade to auger)
Nut, 5mm x 0.8 nyloc, (ice blade to auger)
Ice Blades, 8" Quantum, set of two
(includes IB5816, IN58)
Ice Blades, 9" Quantum, set of two
(includes IB5816, IN58)
Ice Blades, 10" Quantum, set of two
(includes IB5816, IN58)
Ice Auger, 8" Quantum, complete
Ice Auger, 9" Quantum, complete
Ice Auger, 10" Quantum, complete
4
1
1
1
1
1
1
1
1
1
1
1
1
1
1
1
8651
8955
53606
63387
90129
90136
90165
90166
BB8
BR8N
IB5810
IB5816
IN58
QB8
QB9
QB10
QT8N
QT9N
QT10N
ACCESSORIES
EXT6
EXT12
EXT18
Page 19
Depth Extension, 6"
Depth Extension, 12"
Depth Extension, 18"
Qty.
1
1
1
1
1
1
4
1
1
1
1
2
1
4
4
4
1
1
1
1
1
1
Ardisam, Inc.
1690 Elm Street, Cumberland, Wisconsin 54829
Phone (715)822-2415 • Fax (715)822-4180
1-800-345-6007
Email [email protected]
www.ardisam.com