1
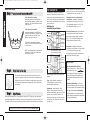
400-1139-1.qxp:two column layout for print
Remote Trainers
GS-7001
GS-6001
9/25/09
4:03 PM
Page 1
400-1139-1.qxp:two column layout for print
4:03 PM
Page 2
Quick Start Guide
FIRST THINGS FIRST
You will need to charge your Gun Dog®
Transmitter and Collar Receiver before you
can use them. While your Gun Dog®
Transmitter and Collar Receiver are charging,
read this manual to become familiar with the
devices.
GS-6001
Transmitter
Step 1
Charging the Batteries
1
Quick Start Guide
Kit Contents
Cabela’s® Gun Dog®
Remote Trainer Kit
9/25/09
AC Adapter
GS-7001
Transmitter
3
From AC Adapter to “Y” Cable
OR
to Charge Cradle
2
4
Receiver
Light
“Y” Cable
Back view of Transmitter
1. Plug the AC Adapter into a 120VAC
electric outlet.
Gun Dog® Charging System
3. Connect the “Y” cable
to the Charge Cradle.
Port
rge
Cha
4. Put the Receiver on the Charge Cradle as
shown in figure 4 (both logos are on the
same side).
Collar Receiver
5
er
mitt
rans
to T
2. Connect the AC Adapter to the “Y”
cable.
CHARGE CRADLE INDICATOR LIGHT
OPERATIONAL MODE
Charge Cradle
AC Adapter
Gun Dog® Hardware
includes Antenna,Test Light, Lanyard, Belt Clip, Long
Contacts, and Contact Wrench.
“Y” Cable
No Collar Receiver on
the Charge Cradle but
charger is connected
LIGHT COLOR
LIGHT FUNCTION
Green
Light is solid in color
Unit is charging
Red
Light is solid in color
while charging
Unit is fully charged
(Collar Receiver on
Charge Cradle)
Green
Light flashes once per
second once the battery
is completely charged
Charge Port Cover
5. On the Transmitter, move the Charge Port Cover away
from the Charge Port. Connect the remaining end of the
“Y” cable to the Transmitter’s Charge Port. Charge the
transmitter for at least 2 hours.
2
Cabela’s® Gun Dog® — Owner’s Manual
Cabela’s® Gun Dog® — Owner’s Manual
3
400-1139-1.qxp:two column layout for print
9/25/09
4:03 PM
Page 4
Quick Start Guide
Step 2
THE TRANSMITTER
Turning the Collar Receiver ON and OFF
Quick Start Guide
To Turn the Collar Receiver ON:
Press and release the On/Off Button
when the Collar Receiver Indicator Light
comes on. The Collar Receiver will emit
a start up tone.
To Turn the Collar Receiver OFF:
Press and release the On/Off Button
when the Collar Receiver Indicator Light
comes on solid (red) and the Collar
Receiver will emit an off tone.
To extend the life between charging
cycles, turn the Collar Receiver off when
it is not in use.
The waterproof Transmitter signals the
electronic Collar Receiver to produce a
harmless, yet effective stimulation and/or
tone. The no-slip grip feels comfortable in
your hand for extended periods of training
time or field time.
Explaining the
Transmitter Keypad Buttons:
Alternate
Stimulation
Momentary
Stimulation
Program/
Locate
Tone
Stimulation
Level Up
Stimulation
(Continuous)
GS-7001 keypad shown above,
GS-6001 keypad shown below.
Tone
Stimulation
Level Up
Step 3
Step 4
Begin Training
Read the information in the Training section on page 13. Though your dog may show
good initial response to the training, be sure to continue training for several weeks. The
convenience that your new remote training system offers is well worth the time invested.
Exclusive Feature: Hold either stim level
up or stim level down button for half a
second for the Rapid Ramp™ feature to
start — The Transmitter display scrolls
through stim levels more quickly.
Dog Select – Switches Transmitter
control from Dog (Collar) 1 to Dog (Collar)
2, for training two dogs. You can
purchase a second collar to expand the
system for training two dogs.
Stimulation
Level Down
Stimulation
GS-7001 ONLY:
Locate
Dog Select
Alternate Stimulation (Alt Stim)
– (top left red button) – When you press
Fit the Collar on Your Dog
Put the collar around your dog’s neck and adjust to find the
proper fit. Fasten the collar so the fit is snug, yet loose enough
to allow one finger to fit between the strap and the dog’s neck.
Fit is important because a loose collar may cause inconsistent
performance.
Stimulation Level Up & Stimulation
Level Down – adjusts the stimulation
intensity through a range of levels. GS7001 stimulation range is 1 to 20. GS6001 stimulation range is 1 to 15.
Stimulation
Level Down
Dog Select
NOTE: Approximate battery life between
charges is 40 to 60 hours, depending
on frequency of use.
Button features one raised bump to easily
locate by touch, even with gloves on! (See
“Program the Stim Type” on page 7.)
Above keypad buttons are explained as
follows:
Tone – When pressed, causes the
Collar Receiver to produce a tone.
No stimulation is delivered.
Stimulation – also called the “Stim
Button,” when pressed, this sends a
continuous stimulation signal to the Collar
Receiver at the intensity shown in the
display for as long as you hold down the
button (See “Over Stimulation Protection”
on page 13.)
the Alt Stim button, the
symbol displays. Program this preset
button to the desired stimulation level.
(See Alternate Stimulation (Alt Stim) on
page 8.)
Momentary Stimulation – When you
press the Momentary Stim button (large
gray button below the Stimulation button),
the
symbol displays. Momentary
pulse stimulation is one quick stim per
button press (also called Nick stimulation
or Brief-tap stimulation).
Throughout this manual, items in a bordered box apply to GS-7001 ONLY.
4
Cabela’s® Gun Dog® — Owner’s Manual
Cabela’s® Gun Dog® — Owner’s Manual
5
400-1139-1.qxp:two column layout for print
Explaining the Transmitter Keypad
Buttons (continued)
Prog/Loc (GS-7001 only) – Pressing and
holding this dual-function button until the
PROG symbol appears in the display puts
the Transmitter in programming mode.
Briefly pressing this button starts or stops
Locate Mode (explained on page 10).
Locate (GS-6001 only) – Press this
button to start or stop Locate mode
(explained on page 10).
9/25/09
4:03 PM
Page 6
– The left symbol displays
when the Transmitter is controlling Dog
Collar Receiver 1. You can purchase a
second collar to expand the system for
training two dogs. The right symbol
displays when controlling Dog Collar
Receiver 2. Switch between Collar
Receivers by pressing the Dog Select
button. Both symbols display when in
Dual Dog mode. (See Set Dual Dog mode
on page 7.)
USING THE TRANSMITTER
GS-7001 ONLY:
Turning ON the Transmitter
Program the Stim Type (Tone Option)
Power up the Transmitter by pressing any
button. You will see the display turn on
when you press any button.
Reset All Programmable Settings
Press
and
at the same time to
reset all programmable settings to the
default settings. The Transmitter Display
shows all symbols for two seconds during
reset.
Transmitter Default Settings
Transmitter Display Symbols:
The display stays on for 30 minutes after
a button press. After 30 minutes with no
button presses, the display shuts off.
Pressing any button will make the display
turn back on.
Various symbols you might see in the
Transmitter display are explained as
follows:
(Numeric readout) – Appears in
the middle of the display, this shows the
chosen stimulation level. Adjust with the
Stim level up / Stim level down (arrow)
buttons.
6
– This symbol appears whenever
Tone is part of the Stimulation type
chosen. (See Program the Stim Type on
page 7.)
GS-7001 ONLY:
– This symbol appears when
the Transmitter is in programming mode.
(See Programming Mode on page 7.)
– This symbol appears when
the Transmitter is in Locate mode.
– The battery indicator
provides constant awareness of your
battery’s power level. (See Battery
Indicator on page 9.)
Backlight – The Transmitter features a
backlit display. The display backlight
stays on for 5 seconds after a button
press.
Cabela’s® Gun Dog® — Owner’s Manual
GS-6001 Defaults
Dog 1&2 Primary Stim Level: 5
GS-7001 Defaults
Dog 1&2 Stim Type: Stim without Tone
Dog 1&2 Primary Stim Level: 7
Dog 1&2 Alt Stim Level: 14
Set Stim Button Intensity Level
For GS-7001 Transmitters, stimulation
may be delivered with or without a tone.
The Transmitter’s default setting is Stim
without Tone.
To choose:
1. Choose desired dog. Press
(Dog Select button).
2. Press the Prog/Loc button until the
PROG symbol shows in the Transmitter
display. Release Prog/Loc button.
3. Press and release TONE. If
you keep pressing the TONE
button,
the
selection
switches between these choices:
• Stim without Tone (no Tone symbol
displayed)
• Stim with Tone (Tone symbol displayed)
4. Press and release the Prog/Loc
button to save setting and exit.
For additional information regarding using
the Tone, see Training Tone Option on
page 14.
To change the intensity level for the Stim
button:
GS-7001 ONLY:
Press
or
until the desired
stimulation level is displayed. When the
Stim button is pressed, the Receiver will
deliver a stimulation at this setting.
In Dual Dog mode, the continuous
stimulation button (red) controls Dog 1
Collar Receiver, and the Momentary
Stimulation button (gray) controls Dog 2
Collar Receiver. You control two dogs
without using the Dog Select button to
switch between dogs. In this mode, Stim
type is stim without tone.
GS-7001 ONLY:
Programming Mode
To enter Programming Mode, press and
hold the Prog/Loc button until the PROG
symbol displays, then release the button.
The Transmitter is now in Programming
mode.
Set Dual Dog mode
To exit Programming Mode, press and
release the Prog/Loc button again. The
PROG symbol no longer displays.
Cabela’s® Gun Dog® — Owner’s Manual
7
400-1139-1.qxp:two column layout for print
continued from previous page
To use Dual Dog mode:
1. Turn on Collar Receiver 1.
2. Set the desired Dog 1 stim level with
the UP and DOWN arrow keys.
3. Press Dog Select button to
switch to Dog 2.
4. Turn on Collar Receiver 2.
5. Set the desired Dog 2 stim level with
the UP and DOWN arrow keys.
6. Press the Prog/Loc button until the
PROG symbol displays, then release
the button.
7. Press the Dog Select button to switch
between DOG 1 – 2 mode (displays
single dog head symbol and stim
number) and DUAL DOG
mode (displays both dog
head symbols and “2d” in
the display).
8. Repeatedly pressing the Dog Select
button switches between DOG 1 – 2
mode and DUAL DOG mode.
9. To save the chosen setting and exit
programming, press and release the
Prog/Loc button.
9/25/09
4:03 PM
Page 8
GS-7001 ONLY:
Alternate Stimulation (Alt Stim)
Some trainers depend upon instant
access to a higher stimulation setting for
circumstances where the dog may not
respond to lower levels, such as a high
distraction environment. Your GS-7001
Transmitter features a red, preset Alt Stim
button that you can use to deliver an
alternate (higher) level of stimulation.
Program the Alt Stim Button
To change the stimulation level of the
GS-7001 Alt Stim button:
1. Press the Prog/Loc button and hold
until the PROG symbol is displayed,
then release the button.
2. Press the Alt Stim button.
3. Press
or
until you get to the
desired stimulation level.
Battery Indicator
Battery is at 2/3 to Full capacity.
Transmitter is fully functional.
Battery is at 1/3 capacity.
Transmitter is still fully functional.
Battery is at 1/6 capacity.
Transmitter will operate the Collar
Receiver, but recharge Transmitter
battery as soon as possible.
Battery is almost dead.
Transmitter is unable to operate
the Collar Receiver. Fully recharge
to use again.
When the Battery Indicator shows the
low battery symbol (1/6 capacity),
recharge the Transmitter soon. When
only the battery outline is displayed, the
Transmitter’s battery is too low to send
transmissions to the Collar Receiver.
Transmitter must be recharged to
regain operation.
Battery Cautions
Do not charge batteries every night. To
maximize battery life, use the Transmitter
until the Low Battery symbol (1/6
capacity) displays and use the Collar
Receiver until the LED light blinks red.
• Do not disassemble batteries
• Do not short circuit batteries
• Do not expose to high temperature:
60°C/140°F
• Do not incinerate batteries
• Keep batteries out of reach of children
Batteries must be recycled or disposed of
properly. Batteries should NEVER be
discarded in municipal waste.
4. When finished, press and release the
Prog/Loc button.
Remember, the red stim button is for Dog
Collar Receiver 1, and the gray stim
button is for Dog Collar Receiver 2.
When using Dual Dog mode, the following
buttons are not functional:
• Tone
• Alt Stim
• stim level down
• stim level up
8
Cabela’s® Gun Dog® — Owner’s Manual
Cabela’s® Gun Dog® — Owner’s Manual
9
400-1139-1.qxp:two column layout for print
9/25/09
4:03 PM
Page 10
CABELA’S EXCLUSIVE!
TRANSMITTER LOCATOR
THE COLLAR RECEIVER
At Cabela’s, we listen to bird hunters, gun
dog owners, and our customer feedback.
This feedback provides us with a huge
source of information about remote
training systems and desired features.
You’ve made an investment in this deluxe
remote training system, so we decided to
develop a method for locating your
transmitter, should it become lost while in
the field.
The lightweight, comfortable electronic
Collar Receiver is integrated into a sleek
fashionable collar strap your dog wears.
The Collar Receiver produces a harmless,
yet effective stimulation and can emit a
training tone. The Collar Receiver is
waterproof and is safe for your dog to
wear even while swimming. The Collar
Receiver is rechargeable; the Charge
Cradle Indicator light glows red while
charging and glows green (flashing once
per second) when charging is complete.
To turn ON Locate Mode, press and
release the LOCATE button (GS-6001) or
PROG/LOC button (GS-7001); the LOC
symbol appears in the display. If the
transmitter is motionless for 10 minutes,
an alarm sounds from the transmitter. This
alarm is easily heard up to 30 yards away
in most outdoor conditions. The alarm
sounds until a Transmitter keypad button
is pressed, or the battery goes dead. On a
full charge, the alarm sounds for up to 24
hours. This Transmitter Locator alarm
helps you find a lost transmitter. To turn
off Locate Mode, press and release the
LOCATE button (GS-6001) or PROG/LOC
button (GS-7001) and the LOC symbol
goes off in the display.
Use the Lanyard: Attach the included
lanyard to the Transmitter. As shown in
the above graphics, slip the lanyard over
your head and shoulder (left) or position in
front of you (right) to carry your
Transmitter close to your body. Your
body’s warmth will improve cold-weather
operation.
Operating Range
For best results to achieve maximum
distance, keep your fingers away from the
Transmitter antenna. When in use, hold
the transmitter upright, at or above
shoulder level, and away from your body
as shown.
In cold temperatures (10°F or below), the
liquid crystal display (LCD) on your
Transmitter may be dim or slow to
respond. Wait until the display becomes
visible before selecting any training
commands.
The collar strap should fit snugly towards
the top of your dog’s neck with the
receiver on the bottom of the neck.
Check that the Cabela’s® logo is right side
up. You should be able to get one finger
between the collar strap and your dog’s
neck. The contacts must touch the dog’s
skin for proper operation. A little hair
thinning may be required. Do not shave
your dog’s neck.
Occasionally, check the tightness of the
contacts to ensure they will not be lost
from the Collar Receiver. Lost parts are
not covered under your warranty.
Your Transmitter communicates with the
Collar Receiver via a radio signal. The
system’s operating range, as stated on
packaging, is based upon line-of-sight.
Cold Weather Operation
Collar Receiver Light
(inside the case)
To Turn the Collar Receiver ON:
When turning ON, the Collar Receiver will
emit a start-up tone sequence, and the
Collar Receiver light will show battery
charge level (green, amber, or red).
To Turn the Collar Receiver OFF:
Press and release the On/Off Button when
the Collar Receiver Indicator Light comes
on solid (red) and the Collar Receiver will
emit an off tone.
Trim excess strap. You’ll want to leave
about 2 inches of excess strap. Note if
your dog is young and you expect it to
grow, you’ll want to leave extra strap to
allow for future collar fastening.
Replacement straps are available from
Cabela’s.
Note: Dogs’ coats are as unique as dogs
themselves. You may wish to try the
longer contacts if your dog has a very
heavy coat. Be certain your dog can feel
stimulation before training begins.
To extend the life between charging
cycles, turn the Collar Receiver off when it
is not in use.
Cold temperatures may lead to a
premature low battery signal, so keep the
transmitter close to your body (when not
in use) during cold weather.
10
The Collar Receiver uses the LED to let
you know its status.
Fitting the Collar Receiver
NOTE: Approximate battery life between
charges is 40 to 60 hours, depending on
frequency of use.
Cabela’s® Gun Dog® — Owner’s Manual
Cabela’s® Gun Dog® — Owner’s Manual
11
400-1139-1.qxp:two column layout for print
Match the Collar Receiver and
Remote Transmitter
To reset the Collar Receiver to work with a
new Remote Transmitter or to reprogram
a new Collar Receiver to work with your
existing Remote Transmitter:
1. Turn the Collar Receiver off
2. Press and hold the On/Off Button.
The Collar Receiver Indicator Light will
come on, then turn off after 5-6
seconds. If the On/Off Button is
released too early, the Collar Receiver
Indicator Light will begin flashing as
normal. If this occurs, start over and
repeat from 1.
3. After the Collar Receiver Indicator
Light has turned off, release the
On/Off Button.
4. Press and hold the Upper Button on
the Remote Transmitter until the
Collar Receiver Indicator Light flashes
5 times. You may need to hold both
units 2-3 feet from each other before
this occurs. Once the Receiver
Indicator Light has flashed 5 times, the
Collar Receiver has been reset and will
begin flashing as normal. If the
Receiver Indicator Light does not flash
5 times, start over and repeat from 1.
Two Dog Systems
If you wish to add another Collar Receiver
to the training system, accessory Collar
Receivers are available through Cabela’s
catalog, retail stores, or website.
1. Holding the second Collar Receiver,
set your Transmitter to Dog 2 (Dog
Select button), and repeat the above
steps 1-4.
12
9/25/09
4:03 PM
Page 12
The Transmitter sends signals to the
Collar Receiver of the dog symbol
appearing in the Transmitter display.
To switch between Collar Receivers, press
the Dog Select button until the desired
dog symbol displays.
For information on using Dual Dog mode
(controlling two dogs without using the
Dog Select button), see page 7.
Dog 1 symbol
Dog 2 symbol
Testing the Collar Receiver
In order to make sure the Collar Receiver
is getting signals from the Transmitter, you
may wish to test the Collar Receiver from
time to time.
To test:
1. Hold the included Test Light across the
Collar Receiver’s contacts. (The holes
in the Test Light go over the contact
tips; make sure the wire inside the hole
touches the contact tip.)
2. Press the Stimulation button on
the Transmitter.
3. The Test Light lights up. The intensity
of the Test Light depends on the
stimulation level. The light is dim for
low stimulation levels and is brighter
with higher stimulation levels.
Cabela’s® Gun Dog® — Owner’s Manual
TRAINING
Always start training your dog with the
lowest stimulation, and increase to a
higher level only if necessary. You will
know when you’ve reached the right level
when your dog responds by twitching his
head, neck, or shoulders, or by perking
up his ears. If the dog vocalizes, you need
to go to a lower level.
When using GS-7001’s Continuous
stimulation button, you control the
duration of the stimulation by the length
of time you press the stim button. For a
short stimulation, press and release the
button. For a longer stimulation, hold the
button down. A maximum of 10 seconds
of stimulation may be applied before the
safety lockout feature (over-stimulation
protection, see below) starts.
When using GS-7001’s Momentary
stimulation button, each Momentary stim
button press produces one short, quick
stim at the Collar Receiver (also called
Nick stimulation or Brief-tap stimulation).
Release the Momentary stim button and
press it again to deliver another
momentary stim.
Over-Stimulation Protection
The Transmitter can transmit continuously
(Tone or Stim) for up to 10 seconds. If you
attempt to transmit continuously for more
than 10 seconds, the transmitter enters a
10 second lockout mode during which
time no transmissions are allowed (hence,
no stimulation allowed).
Cabela’s® Gun Dog® — Owner’s Manual
Training Tone Option
The Tone button causes the collar to
produce a sound. No stimulation is
delivered when the Tone button is
pressed. The tone continues for as long
as the button is held down, up to 10
seconds. A tone can help strengthen a
dog’s response to training. The tone can
be used as a warning tone prior to
pressing the stimulation button; or can be
a reward tone when presented with
praise, play, or food for good behavior.
The use of a training tone is optional. Its
use varies among popular training
methods. Some trainers choose to use
the tone option as a warning tone prior to
stimulation, others prefer to use the tone
option as a reward tone, and still others
prefer to not use it at all. It is imperative
for successful dog training to use the tone
option consistently through-out the
training process. Whether the tone will
mean reward or warning to your dog is up
to the training method you choose.
Remember: the training tone
CANNOT be both a warning tone
and a reward tone. To learn more about
tone training, consult a qualified dog
training professional.
To program the GS-7001 Transmitter for
Tone operation, (see Program the Stim
Type (Tone Option) on page 7).
13
400-1139-1.qxp:two column layout for print
9/25/09
4:03 PM
Page 14
Training Tips
• We recommend your dog be at least six
months old before starting a remote
training system program.
• Always praise your dog for good
behavior!
• Teach him what the commands mean
before introducing the Collar Receiver
as a reinforcement tool.
• Keep training sessions brief, about ten
minutes of training and then a rest or
play period of at least equal length.
• Dogs learn through repetition. You may
have better training success if you can
elicit an undesired behavior when you
can anticipate it. For example, if the
dog misbehaves and jumps on visitors,
have someone come in and out of the
front door several times over a half-hour
period. You’ll be expecting it and will be
ready to teach your dog the right
behavior.
• Always end a training session on a
positive note. Let the dog have
success. This way he’ll look forward to
the next session.
• Training should be fun for both you and
your dog. Never train when you are
angry. If you get frustrated during
training, stop and come back to it later.
Your dog will learn better when you are
both relaxed.
• The goal of training is to condition your
dog to respond to your verbal
commands in all situations. You should
plan on using the Collar Receiver for at
least four months. A good rule is, once
started with a remote training system,
regularly have the Collar Receiver on
when you take the dog out. This will
ensure that he will always be imprinted
with the correct response to your
commands and that you are always in
control.
IMPORTANT ADVICE
1. Read the entire instruction manual
and follow all directions. If you have
any questions, please call 1-800-7320144.
2. This system is intended for use
only on dogs. Never attempt to use
it for any purpose not described in
this manual.
3. Keep out of the reach of children
4. Never perform set-up procedures
while the Collar Receiver is on
your dog.
5.
•
•
•
•
CLEANING & CARE
1. Use a soft damp cloth to clean the
Transmitter and Collar Receiver.
•
2. Do not use alcohol or cleaning
solutions to clean the Transmitter
and Collar Receiver.
•
3. Dry the Transmitter and Collar Receiver
with a dry, lint-free cloth should they
get wet.
Any collar worn for extended
periods can cause a condition
similar to bedsores, known as
Pressure Necrosis. To reduce the
possibility, you must do the following:
Never leave the collar on the dog for
more than 12 hours per day.
Examine the dog’s neck daily for any
signs of a rash or a sore.
Supervise your dog during the first 2
days of training.
Check the fit to prevent excessive
pressure; you should be able to insert
one finger between the collar strap
and your dog’s skin.
Wash the dog’s neck area and the
contacts of the collar weekly with a
washcloth and mild hand soap; rinse
thoroughly.
If the condition persists beyond 24
hours, consult your veterinarian.
8. Realize that because dogs have
unique temperament, there is no way
of knowing how your dog will react to
the introduction of a remote training
collar system. For the safety of your
dog, a long lead should be used
during initial training so you have
complete control of the situation.
9. If you have reason to believe that
your dog may pose a danger to
others, harm itself, or react adversely
to the collar, do not rely solely on this
product to train your dog. If your dog
shows signs of growling, snarling, or
biting while using the collar, stop
immediately. Aggression in dogs has
many causes. We recommend that
you consult a knowledgeable
professional dog trainer or animal
behaviorist who has experience with
aggressive dogs if your dog has
shown any of these characteristics.
10. Occasionally, a dog cannot be trained
to respond to a remote training collar.
Sometimes even a properly trained
dog may disobey a command.
Therefore, Cabela’s® cannot
guarantee that the system will ,in all
cases, keep the customer’s dog from
disobeying commands.
6. Metal tags and collars should be
removed when using the remote
training collar as they may interfere
with proper operation.
7. Do not attempt to dismantle or repair
any components of this system;
doing so will void the warranty in
full.
14
Cabela’s® Gun Dog® — Owner’s Manual
Cabela’s® Gun Dog® — Owner’s Manual
15
400-1139-1.qxp:two column layout for print
TROUBLESHOOTING
If the Transmitter and Collar Receiver
appear to be not working, try the
following:
• Adjust the collar strap to fit better.
• Test the Collar Receiver using the Test
Light. If no light, recharge the Collar
Receiver’s battery.
• If the Transmitter display is off, first try
pressing any button. If the display
remains off, recharge the Transmitter.
• Carefully turn on the components as
shown in the Quick Start Guide
(beginning of this manual).
• Check that the Collar Receiver contacts
are properly tightened.
• Ensure that the Collar Receiver
contacts are touching the dog’s skin.
• If necessary, trim the dog’s hair or use
the longer contacts to ensure proper
skin contact. Never shave the dog’s
neck.
9/25/09
4:03 PM
Page 16
This equipment has been tested and
found to comply with the limits for a Class
B digital device, pursuant to part 15 of the
FCC Rules. These limits are designed to
provide reasonable protection against
harmful interference in a residential
installation. This equipment generates,
uses and can radiate radio frequency
energy and, if not installed and used in
accordance with the instructions, may
cause harmful interference to radio
communications. However, there is no
guarantee that interference will not occur
in a specific installation. If interference
does occur to radio or television
reception, which can be determined by
turning the equipment off and on, the user
is encouraged to try to correct the
interference by one or more of the
following measures:
• Reorient or relocate the
receiving antenna.
• Increase the separation between the
equipment and the Collar Receiver.
• Try a stronger stimulation level.
• Connect the equipment to an outlet
on a circuit different from that to
which the Collar Receiver is connected.
If you cannot solve the problem by
following these steps, please call
1-800-732-0144.
• Contact the Customer Care Center at
1-800-732-0144 or an experienced
radio/TV technician for assistance.
COMPLIANCE WITH U.S. FCC
REGULATIONS
This Remote Training System is designed
to meet U.S. FCC requirements for
telecommunications compliance. This
system contains both Collar Receiver and
Transmitter devices. Each transmitter
device complies with Part 95 and/or Part
15 of the FCC rules; each receiver device
complies with Part 15 of the FCC rules.
16
This device complies with Part 15 of the
FCC Rules. Operation is subject to the
following two conditions: (1) this device
may not cause harmful interference, and
(2) this device must accept any
interference received, including
interference that may cause undesired
operation. Changes or modifications not
expressly approved by the manufacturer
could void the user's authority to operate
the equipment.
Cabela’s® Gun Dog® — Owner’s Manual
Each device may display indications as to
where this system is compliant
worldwide. Note that in some countries,
the use of this Remote Training System
may be limited due to national frequency
planning requirements, and the user is
always responsible for respecting national
and local rules before operating.
TWO YEAR WARRANTY
Cabela’s®, warrants to the original retail
purchaser, that your Cabela’s® Gun Dog®
Remote Training System will be free from
defects in material and workmanship,
under normal use, for a period of two
years from the date of the original retail
purchase (proof of purchase required).
This Limited Warranty excludes:
accidental damage due to dog chews,
lost parts, lightning damage, neglect,
alteration, or misuse.
REGISTER YOUR PRODUCT
To get the most protection out of your
warranty, please register your product
within 30 days at
www.sportdog.com/cabelasgundog. By
registering, and keeping your receipt you
will enjoy the product’s full warranty and
should you ever need to call the
Customer Care Center, we will be able to
help you faster. Most importantly, we will
never give or sell your valuable
information to anyone. Complete
warranty information is available online at
www.sportdog.com.
After two years from date of original retail
purchase, we will at our option, repair or
replace your product for a minimum
service charge based upon the
component.
Manufacturer is not liable or responsible
for any incidental or consequential
damages resulting from the use of the
product, or caused by any defect, failure,
or malfunction of the product, whether a
claim is based upon warranty, contract,
negligence, or otherwise.
PATENTS
This product may be covered by one or
more of the following patents:
U.S. Patent Numbers: 6,184,790;
6,327,999; 6,459,378 and 6,807,720.
Cabela’s® Gun Dog® — Owner’s Manual
17
400-1139-1.qxp:two column layout for print
9/25/09
4:03 PM
Page 18
INDEX
Symbols
D
2d 8
Default Settings 7
P
T
Dual Dog Mode 7, 8
Patents 17
Test Light 12
Port, Charge, Cover 3
Tone Option 7, 13
Programming 7
Training 13
Program Tone Option 7
Tips 14
Protection, Over-Stimulation 14
Transmitter 5
A
AC Adapter 2
Advice, Important 15
F
FCC Compliance 16
Alt Stim 8
G
Backlight 6
Display 6
Dog Select 5
Keypad Buttons 5
Prog/Loc 6
Programming 7
Stimulation 5
Guide, Quick Start 3, 4
B
Q
Batteries 3
Cautions 9
Indicator 9
Recycle 9
C
Quick Start Guide 3, 4
I
Important Advice 15
R
K
Range, Operating 10
Kit Contents 2
Receiver 11
Charge Port Cover 3
Cold Weather Operation 10
Collar Fit 4, 11
L
Lanyard 10
Locate Mode 10
Cleaning & Care 14
Contents, Kit 2
Cradle, Charge 2, 3
LED Indicator Light 11
Turn On/Off 11
Status Indicators 11
Test Light 12
M
Mode, Dual Dog 7
O
ON/OFF Command 4, 11
Operating Range 10
Troubleshooting 16
Two Collar Use 12
W
Receiver Cradle 2, 3
Warranty 17
Register Your Product 17
Weather, Cold Operation 10
Reset 7
Website 17
S
Y
Stim Intensity 7
Y Cable 2, 3
Stimulation, Alternate (Alt Stim) 8
Operation, Cold Weather 10
Over-Stimulation Protection 13
18
Cabela’s® Gun Dog® — Owner’s Manual
Cabela’s® Gun Dog® — Owner’s Manual
19
400-1139-1.qxp:two column layout for print
9/25/09
4:03 PM
Page 20
NOTES
20
NOTES
Cabela’s® Gun Dog® — Owner’s Manual
Cabela’s® Gun Dog® — Owner’s Manual
21
400-1139-1.qxp:two column layout for print
9/25/09
4:03 PM
Page 22
NOTES
22
NOTES
Cabela’s® Gun Dog® — Owner’s Manual
Cabela’s® Gun Dog® — Owner’s Manual
23
400-1139-1.qxp:two column layout for print
9/25/09
4:04 PM
Page 24
©2009 Radio Systems® Corporation
400-1139/1