1
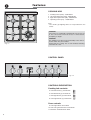
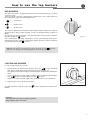
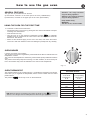
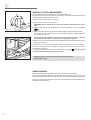
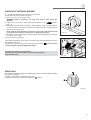
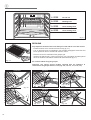
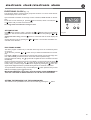
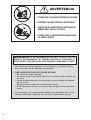
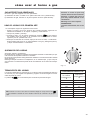
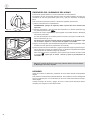
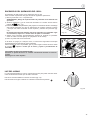
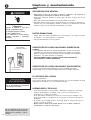
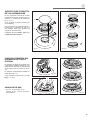
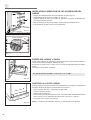
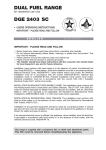
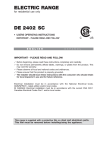
GAS RANGE
for residential use only
DG 2401 C
• USERS OPERATING INSTRUCTIONS
IMPORTANT - PLEASE READ AND FOLLOW
E N G L I S H
E S PA Ñ O L
IMPORTANT - PLEASE READ AND FOLLOW
✓ Before beginning, please read these instructions completely and carefully.
✓ Do not remove permanently affixed labels, warnings, or plates from the product. This
may void the warranty.
✓ Please observe all local and national codes and ordinances.
✓ Please ensure that this product is properly grounded.
✓ The installer should leave these instructions with the consumer who should retain
for local inspector's use and for future reference.
✓ The electrical plug should always be accessible
Installation must conform with local codes or in the absence of codes, the National Fuel
Gas Code ANSIZ223.1 - Iatest edition. Electrical installation must be in accordance with the
National Electrical Code, ANSI/NFPA70 - latest edition and/or local codes. IN CANADA:
Installation must be in accordance with the current CAN/CGA-B149.1 National Gas
Installation Code or CAN/CGA-B149.2, Propane Installation Code and/or local codes.
Electrical installation must be in accordance with the current CSA C22.1 Canadian
Electrical Codes Part 1 and/or local codes.
INSTALLATION IN MANUFACTURED (MOBILE) HOME: The installation must conform with
the Manufactured Home Construction and Safety Standard, Title 24 CFR, Part 3280 [formerly the Federal Standard for Mobile Home Construction and Safety, Title 24, HUD (Part
280)] or, when such standard is not applicable, the Standard for Manufactured Home
Installations, ANSI/NCSBCS A225.1, or with local codes where applicable.
INSTALLATION IN RECREATIONAL PARK TRAILERS: The installation must conform with
state or other codes or, in the absence of such codes, with the Standard for Recreational
Park Trailers, ANSI A119.5.
Installation of any gas-fired equipment should be made by a Iicensed plumber. A manual
gas shut-off valve must be installed in the gas supply line ahead of the appliance in the gas
stream for safety and ease of service.
If an external electrical source is utilized, the appliance, when installed, must be electrically grounded in accordance with local codes or, in the absence of local codes, with the
national Electrical Code, ANSI/NFPA 70.
This range is supplied with a protective film on steel and aluminium parts.
This film must be removed before installing/using the appliance.
WARNING
• ALL RANGES CAN TIP
• INJURY TO PERSON COULD RESULT
• INSTALL ANTI-TIP DEVICE PACKED
WITH RANGE
• SEE INSTALLATION INSTRUCTIONS
WARNING: IF THE INFORMATION IN THIS MANUAL IS NOT
FOLLOWED EXACTLY, A FIRE OR EXPLOSION MAY RESULT
CAUSING PROPERTY DAMAGE, PERSONAL INJURY, OR DEATH.
✓ Do not store or use gasoline or other flammable vapors and liquids
in the vicinity of this or any other appliance.
✓ WHAT TO DO IF YOU SMELL GAS:
• Do not try to light any appliance.
• Do not touch any electrical switch; do not use any phone in your
building.
• lmmediately call your gas supplier from a neighbor's phone.
Follow the gas supplier's instructions.
• lf you cannot reach your gas supplier, call the fire department.
✓ Installation and service must be performed by a qualified installer,
service agency, or the gas supplier.
2
Dear Customer,
Thank you for having purchased and given your preference to our
product.
The safety precautions and recommendations reported below are for
your own safety and that of others. They will also provide a means by
which to make full use of the features offered by your appliance.
Please preserve this booklet carefully. It may be useful in future, either
to yourself or to others in the event that doubts should arise relating to
its operation.
This appliance must be used only for the task it has explicitly been
designed for, that is for cooking foodstuffs. Any other form of usage is
to be considered as inappropriate and therefore dangerous.
The manufacturer declines all responsibility in the event of damage
caused by improper, incorrect or illogical use of the appliance.
3
USER INSTRUCTIONS
GENERAL INFORMATION
WARNING!!
1. This appliance shall not be used for space heating. This
information is based on safety considerations.
WARNING!!
ELECTRICAL GROUNDING INSTRUCTIONS
2. AlI openings in the wall behind the appliance and in the floor
under the appliance shall be sealed.
The range must be electrically grounded in accordance
with local codes or, in the absence of local codes, with the
National Electrical Code, ANSI/NFPA No. 70-latest edition.
Installation should be made by a Iicensed electrician.
3. Keep appliance area clear and free from combustible
materials, gasoline, and other flammable vapors.
FOR PERSONAL SAFETY, THIS APPLIANCE MUST BE
PROPERLY GROUNDED.
4. Do not obstruct the flow of combustion and ventilation air.
If an external electrical source is utilized, the installation must
be electrically grounded in accordance with local codes or, in
the absence of local codes, with the national Electrical Code,
ANSI/NFPA 70.
5. Disconnect the electrical supply to the appliance before
servicing.
6. When removing appliance for cleaning and/or service;
A. Shut off gas at main supply.
B. Disconnect AC power supply.
C. Disconnect gas line to the inlet pipe.
D. Carefully remove the range by pulling outward.
CAUTION: Range is heavy; use care in handling.
This appliance is equipped with a three-prong grounding plug
for your protection against shock hazard and should be
plugged directly into a properly grounded socket. Do not cut
or remove the grounding prong from the plug.
Do not under any circumstances cut or remove the third
(ground) prong from the power plug.
7. Electrical Requirement
Electrical installation should comply with national and local
codes.
REPLACEMENT PARTS
8. Air Supply and Ventilation
The installer must refers to local/national codes.
9. Gas Manifold Pressure
Natural gas - 4.0” W.C.P.
LP/Propane - 11.0” W.C.P.
10. The misuse of oven door (e.g. stepping, sitting, or leaning
on them) can result in potential hazards and/or injuries.
11. When installing or removing the range for service, a rolling
lift jack should be used. Do not push against any of the
edges of the range in an attempt to slide it into or out of
the installation. Pushing or pulling a range (rather than using
a lift jack) also increases the possibility of bending the leg
spindles or the internal coupling connectors.
4
Only authorized replacement parts may be used in performing
service on the range. Replacement parts are available from
factory authorized parts distributors. Contact the nearest
AVANTI parts distributor in your area.
IMPORTANT PRECAUTIONS AND RECOMMENDATIONS
After having unpacked the appliance, check to ensure that it is not damaged.
In case of doubt, do not use it and consult your supplier or a professionally qualified technician.
Packing elements (i.e. plastic bags, polystyrene foam, nails, packing straps, etc.) should not
be left around within easy reach of children, as these may cause serious injuries.
.
The packaging material is recyclable and is marked with the recycling symbol
✓ Do not attempt to modify the technical characteristics of the appliance as this may
become dangerous to use.
✓ Do not carry out cleaning or maintenance operations on the appliance without having previously disconnected it from the electric power supply.
✓ After use, ensure that the knobs are in OFF position.
✓ Do not allow children or other incapable people to use the appliance without supervision.
✓ During and after use of the range, certain parts will become very hot. Do not touch hot
parts.
✓ Keep children away from the range when it is in use.
✓ This range is supplied with a protective film on steel and aluminium parts. This film must
be removed before installing/using the appliance.
✓ Fire risk! Do not store flammable material in the oven, and in the drawer.
✓ Make sure that electrical cables connecting other appliances in the proximity of the range
cannot come into contact with the hob or become entrapped in the oven door.
✓ Do not line the oven walls with aluminium foil. Do not place shelves, grill-pan, pans or
other cooking utensils on the base of the oven chamber.
✓ The manufacturer declines all liability for injury to persons or damage to property caused
by incorrect or improper use of the appliance.
✓ To avoid any possible hazard, the appliance must be installed by qualified personnel only.
Any repairs by unqualified persons may result in electric shock or short circuit. In order to
avoid possible injuries to your body or to the appliance, do not attempt any repairs by
yourself. Such work should be carried out by qualified service personnel only.
✓ Danger of burns! The oven and cooking accessories may become very hot during operation. Make sure children are kept out of reach and warn them accordingly. To avoid burns
use kitchen clothes and gloves when handling hot parts or utensils.
✓ Stand away from the range when opening oven door. Hot air or steam which escapes can
cause burns to hands, face, and/or eyes.
✓ Never clean the oven with a high-pressure steam cleaning device, as it may provoke a
short circuit.
✓ This appliance is intended for use in your household. Never use the appliance for any
other purpose!
✓ If you should decide not to use this appliance any longer (or decide to substitute an older
model), before disposing of it, it is recommended that it be made inoperative in an appropriate manner in accordance to health and environmental protection regulations, ensuring in particular that all potentially hazardous parts be made harmless, especially in relation to children who could play with old appliances.
Remove the door before disposal to prevent entrapment.
IMPORTANT PRECAUTIONS AND RECOMMENDATIONS FOR
USE OF ELECTRICAL APPLIANCES
Use of any electrical appliance implies the necessity to follow a series of fundamental rules.
In particular:
✓ Never touch the appliance with wet hands or feet;
✓ Do not operate the appliance barefooted;
✓ Do not allow children or disabled people to use the appliance without your supervision.
The manufacturer cannot be held responsible for any damages caused by improper, incorrect
or unreasonable use of the appliance.
5
features
COOKING HOB
1.
2.
3.
4.
3
2
Auxiliary burner (AUX) - 3500 BTU/hr
Left semi-rapid burner (SR) - 6000 BTU/hr
Right semi-rapid burner (SR) - 6000 BTU/hr
Triple-ring burner (TR) - 12000 BTU/hr
Note:
- The electric gas-lighting device is incorporated into the
knobs.
CAUTION:
If the burner is accidentally extinguished, turn the gas off
at the control knob and wait at least 1 minute before
attempting to relight.
1
4
CAUTION:
Gas appliances produce heat and humidity in the environment in which they are installed.
Ensure that the cooking area is well ventilated following
national/local codes.
Fig. 1.1
CONTROL PANEL
Fig. 1.2
9
10
11
5
6
7
8
CONTROLS DESCRIPTION
Cooking hob controls:
5. Front left burner (1) control knob
6. Rear left burner (2) control knob
7. Rear right burner (3) control knob
8. Front right burner (4) control knob
Oven controls:
9. Oven light switch control knob
10. Gas oven / gas broil burner control knob
11. Electronic clock/electronic alarm
6
how to use the top burners
GAS BURNERS
Gas flow to the burners is adjusted by turning the knobs (illustrated in fig. 2.1) which
control the valves.
Turning the knob so that the symbol printed on itself points to the symbols printed on
the control panel achieves the following functions:
=
closed valve
=
maximum rate
=
minimum rate
The maximum aperture position permits rapid boiling of liquids, whereas the minimum
aperture position allows simmer warming of food or maintaining boiling conditions of
liquids.
To reduce the gas flow to minimum, rotate the knob further anti-clockwise to point the
indicator towards the
position.
Other intermediate operating adjustments can be achieved by positioning the
indicator between the maximum and minimum aperture positions, and never between
the maximum aperture and
positions.
Fig. 2.1
N.B. When the range is not being used, set the gas knobs to their
positions
and also close the gas shut-off valve placed on the main gas supply line.
LIGHTING GAS BURNERS
In order to light the burner, you must:
1 – Turn the knob in an anti-clockwise direction up to the
position (maximum
rate), push in and hold the knob until the flame has been lit (fig. 2.2).
The sparks produced by the lighter situated inside the relative burner will light the
flame.
In the event that the local gas supply conditions makes it difficult to light the burner in
position, try again with the knob in
position.
If there is no mains electrical supply, bring a lighted match close to the burner.
2 – Adjust the gas valve to the desired position.
Fig. 2.2
To re-light the burner, return the knob to the
lighting.
position and repeat the operations for
Caution!
The range becomes very hot during operation.
Keep children well out of reach.
7
CHOICE OF BURNER
(fig. 2.3)
The symbols printed on the panel beside the gas knobs indicate the correspondence
between the knob and the burner.
The most suitable burner is to be chosen according to the diameter and volume capacity of the container to be warmed.
It is important that the diameter of the pots or pans suitably match the heating potential of the burners in order not to jeopardise the efficiency of the burners, bringing about
a waste of gas fuel.
A small diameter pot or pan placed on a large burner does not necessarily mean that
boiling conditions are reached quicker.
Fig. 2.3
DIAMETERS OF PANS WHICH MAY BE USED ON THE HOB BURNERS
BURNER
MINIMUM
MAX.
Auxiliary
12 cm (4" 23/32 )
14 cm (5" 1/2)
Semirapid
16 cm (6" 19/64)
24 cm (9" 7/16)
Triple-ring
26 cm (10" 15/64)
28 cm (11" 1/64)
Wok pans max 36 cm (14" 11/64)
Do not use pans with concave or convex bases
WRONG
CORRECT USE OF TRIPLE-RING BURNER
(Fig. 2.4a - 2.4b)
The flat-bottomed pans are to be placed directly onto the pan-support.
Fig. 2.4a
When using a WOK you need to place the supplied stand in the burner to avoid any
faulty operation of the triple-ring burner (Fig. 2.4a - 2.4b).
IMPORTANT:
The special grille for wok pans (fig. 2.4b) MUST BE PLACED ONLY over the pan-rest
for the triple-ring burner.
CORRECT
Fig. 2.4b
Make sure that the handles of cookware
do not stick out over the edge of the
cooker, to avoid them being knocked
over by accident. This also makes it
more difficult for children to reach the
cooking vessels.
8
how to use the gas oven
GENERAL FEATURES
The gas oven is provided with two burners:
a) Oven burner, mounted on the lower part of the oven (13000 BTU/hr)
b) Broil burner, mounted on the upper part of the oven (8500 BTU/hr).
Attention: the range becomes
very hot during operation.
Attention: the oven door becomes
very hot during operation.
Keep children away.
WARNING:
The door is hot, use the handle.
USING THE OVEN FOR THE FIRST TIME
It is advised to follow these instructions:
– Furnish the interior of the oven by placing the wire racks as described at chapter
“Cleaning and maintenance”.
– Insert shelves and tray.
– Turn the oven on to the maximum temperature (position
) to eliminate
possible traces of grease from the oven burner. The same operation should be
followed for broil burner.
– Switch off the electrical supply, let the oven cool down, then clean the interior
of the oven with cloth soaked in water and detergent (neutral) then dry carefully.
OVEN BURNER
It carries out normal “oven cooking”.
The gas flow to the burner is regulated by a thermostat which allow to maintain the oven
temperature constant.
The control of the temperature is assured by a thermostatic probe positioned inside the
oven.
The probe must be always kept in its housing, in a clean condition, as an incorrect position or encrustment may cause an alteration in the control of the temperature.
Fig. 3.1
OVEN THERMOSTAT
The numbers printed on the control knob (fig. 3.1) indicate the increasing oven temperature value (°F). To regulate the temperature, set the chosen number onto the control
panel indicator.
The position
serves only to turn on the broil burner.
N.B. When the range is not being used, set the gas knobs to their
positions
and also close the gas shut-off valve placed on the main gas supply line.
GAS OVEN SETTING
Number printed
on the knob
Temperature
in °F
Corresponding
temperature
in °C
200
93
250
121
300
149
350
177
400
204
450
232
500
260
550
288
9
IGNITION OF THE OVEN BURNER
The thermostat allows the automatic control of the temperature.
The gas delivery to the oven burner is controlled by a two way thermostatic tap (oven
and broil burners) with flame-failure device.
To light the oven burner operate as follows:
1) Open the oven door to its full extent.
WARNING: Risk of explosion! The oven door must be open during this operation.
2) Lightly press and turn the thermostat knob anti-clockwise (fig. 3.2) to max position
.
Fig. 3.2
3) Press the knob right down to prime the electric ignition. Keep the knob pressed.
In case of power cut, press the knob and immediately approach a lighted match to
the opening “A” (fig. 3.3).
Never continue this operation for more than 15 seconds. If the burner has still
not ignited, wait for about 1 minute prior to repeating the ignition.
4) Wait about 10/15 seconds after the burner lighting before releasing the knob (time of
priming of the valve).
5) Close the oven door slowly and adjust the burner according to the power required.
If the flame extinguishes for any reason, the safety valve will automatically shut off the
gas supply to the burner.
To re-light the burner, first turn the oven control knob to position
, wait for at least
1 minute and then repeat the lighting procedure.
A
Fig. 3.3
Attention: the oven door becomes very hot during operation.
Keep children away.
OVEN COOKING
Before introducing the food, preheat the oven to the desired temperature.
For a correct preheating operation, it is advisable to remove the tray from the oven and
introduce it together with the food, when the oven has reached the desired temperature.
Check the cooking time and turn off the oven 5 minutes before the theoretical time to
recuperate the stored heat.
10
IGNITION OF THE BROIL BURNER
The broil burner generates the infra-red rays for broiling.
To light the broil burner operate as follow:
1) Open the oven door to the full extent.
WARNING: Risk of explosion! The oven door must be open during this
operation.
2) Lightly press and turn the thermostat knob clockwise to the
position
(fig. 3.4).
3) Press the knob right down to prime the electric ignition. Keep the knob pressed.
In case of power cut, press the knob and put a lighted match to the right and left
side of the burner (fig. 3.5).
Never continue this operation for more than 15 seconds. If the burner has still
not ignited, wait for about 1 minute prior to repeating the ignition.
4) Wait about 10/15 seconds after the burner lighting before releasing the knob (time
of priming of the valve).
5) Close the oven door slowly.
Fig. 3.4
If the flame extinguishes for any reason, the safety valve will automatically shut off the
gas supply to the burner.
To re-light the burner, first turn the oven control knob to position
, wait for at least
1 minute and then repeat the lighting procedure.
Do always broil with oven door closed.
Attention: the oven door becomes very hot during operation.
Keep children away.
Fig. 3.5
OVEN LIGHT
The range is equipped with a light that illuminates the oven to enable visually controlling
the food that is cooking.
This light is controlled by a switch knob (Fig. 3.6).
To light the oven lamp turn the knob clockwise to
position.
Fig. 3.6
11
1° STEP
Do not use
2° STEP
Broiling level
3° STEP
Oven cooking level
4° STEP
Oven cooking level
Fig. 3.7
BROILING
Very important: the broil burner must always be used with the oven door closed.
- Position the shelf on the second level from the top (fig. 3.7).
- Turn on the broil burner, as explained in the preceding paragraphs and let the broil
burner preheat for about 5 minutes with the door closed.
- Place the food to be cooked above the grill-pan grid.
- Introduce the grill-pan (tray + grid) in the oven (fig. 3.8). The grill-pan should be placed
above the shelf and it should be centered with the broil burner (fig. 3.7).
Fig. 3.8
Do not broil without using the grill pan.
Important: Use always special handles supplied with the appliance to
insert/remove the grill-pan from the oven (figs. 3.8, 3.9, 3.10, 3.11, 3.12, 3.13).
CORRECT
WRONG
WRONG
1
Fig. 3.12
Fig. 3.10
Fig. 3.9
WRONG
WRONG
2
Fig. 3.11
12
Fig. 3.13
electronic clock /electronic alarm
ELECTRONIC CLOCK (fig. 4.1)
The electronic alarm is a device which groups the functions of 12 hours clock with illuminated display and 10 hours alarm.
Upon immediate connection of the range or after a blackout, 12•00 will flash on the display.
To set the hour it is necessary to push the
button and then, within 7 seconds, the
or
button until you have set the exact hour.
An energy black-out makes the clock go to zero.
SET TIME OF DAY
Push
button and then, within 7 seconds, the
or
button until you have set the
exact hour. This function remains activated 7 seconds after the last pushing of
or
button.
Change the hours only: press the
button for 4 seconds until the hours display will
flash.
Change the hours only by pushing the
or
button. The minutes and hidden seconds will not be affected.
Fig. 4.1
ELECTRONIC ALARM
The alarm program consists only of a buzzer which may be set for a maximum period
of 10 hours.
To set the time, push the
or
button until you obtain the desired time in the display.
From 0•10 to 99•50 you read the time in minutes and seconds (10 seconds step); then
from 1•40 to 10•00 you read the time in hours and minutes (minutes step).
Having finished the setting, the
symbol will be lighted and the countdown will start
immediately.
During countdown the timer has priority in the display. To show the time of day press
button. At the end of the time, the
symbol will be switched off and an intermittent
buzzer, during 7 minutes, will go off; this can be stopped by pressing the
button. The
signal will be skipped if button is pressed during the last 15 seconds of the timer.
To stop the alarm countdown in any moment keep the
0•00 on the display (symbol
switches off).
button pressed until you read
IMPORTANT WARNING: THIS IS ONLY AN ELECTRONIC ALARM. REMEMBER TO
TURN OFF THE OVEN OR BROIL MANUALLY AT THE END OF COUNTDOWN.
SETTING THE FREQUENCY OF THE ALARM SOUND
The selection from 3 possibilities of sound can be made by pressing the
button.
13
cleaning and maintenance
WARNING
Electrical Shock Hazard
Plug into a grounded 3-prong
outlet.
Do not remove ground prong.
Do not use an adapter.
Failure to follow these instructions
can result in death, fire, or
electrical shock.
3-prong polarized
ground-type outlet
GENERAL RECOMANDATION
✓ Important: Before any operation of cleaning and maintenance disconnect the
appliance from the electrical supply.
✓ It is advisable to clean when the appliance is cold and especially for cleaning the
enamelled parts.
✓ Avoid leaving alkaline or acidic substances (lemon juice, vinegar, etc.) on the
surfaces.
✓ Avoid using cleaning products with a chlorine or acidic base.
The oven must always be cleaned after every use, using suitable products and
keeping in mind that its operation for 30 minutes on the highest temperature
eliminates most grime reducing it to ashes.
ENAMELLED PARTS
✓ All the enamelled parts must be cleaned with a sponge and soapy water only or
other non-abrasive products.
Dry preferably with a chamois leather.
STAINLESS STEEL SURFACES (COATED)
CAUTION
✓ The STAINLESS STEEL front surfaces used in this range are protected with a
Special Lacquer to reduce finger-print marks.
To avoid damaging this lacquer, do not clean the stainless steel with abrasive
cleaners or abrasive cloths or scouring pads.
ONLY SOAP/WARM WATER MUST BE USED TO CLEAN THE STAINLESS
STEEL SURFACES.
STAINLESS STEEL SURFACES (UNCOATED)
ground
prong
The hob + sides are made from uncoated stainless steel.
Can be cleaned with an appropriate stainless steel cleaner.
INSIDE OF OVEN
This must be cleaned regularly.
With the oven warm, wipe the inside walls with a cloth soaked in very hot soapy water
or another suitable product.
WARNING
VERY IMPORTANT
Before any operation of maintenance
disconnect the appliance from the
electrical mains supply.
14
Do not use steam jet cleaners
because the humidity could
infiltrate into the appliance making
it dangerous.
BURNERS AND GRIDS
✓ These parts can be removed and cleaned with appropriate products.
✓ After cleaning, the burners and their flame distributors must be well dried and
correctly replaced.
✓ It is very important to check that the burner flame distributor and the cap has
been correctly positioned - failure to do so can cause serious problems.
✓ In appliances with electric ignition keep the electrode clean so that the sparks
always strike.
✓ Note: To avoid damage to the electric ignition do not use it when the
burners are not in place.
CORRECT REPLACEMENT
OF THE BURNERS
It is very important to check that the
burner flame spreader “F” and the cap
“C” have been correctly positioned (see
figs. 5.1 and 5.2 ).
Failure to do so can cause serious
problems.
In appliances with electric ignition, check
that the electrode “S” (fig. 5.1) is always
clean to ensure trouble-free sparking.
C
F
The ignition plug must be very
carefully cleaned.
S
Fig. 5.1
Fig. 5.2
CORRECT POSITION OF
TRIPLE RING BURNER
The triple ring burner must be correctly
positioned (see fig. 5.3); the burner rib
must be fitted in their housing as shown
by the arrow.
The burner correctly positioned must not
rotate (fig. 5.4).
Then position the cap A and the ring B
(fig. 5.4 - 5.5).
Fig. 5.3
A
B
GAS VALVES
✓ In the event of operating faults in
the gas valves, call the Service
Department.
Fig. 5.4
Fig. 5.5
15
OVEN ACCESSORIES INSTALLATION AND REMOVAL
– Hang up the wire racks “G” on the oven walls (fig. 5.6).
G
– Slide in, on the guides, the shelf etc. (fig. 5.7).
The rack must be fitted so that the safety catch, which stops it sliding out, faces the
inside of the oven.
– Position the grill-pan (tray + grid) above the oven shelf.
– To dismantle, operate in reverse order.
Fig. 5.6
Do not use this step
Safety
catch
Fig. 5.7
OVEN DOOR AND DRAWER
The internal glass of the oven door can be easily removed for cleaning by unscrewing
the two lateral fixing screws (fig. 5.8).
The drawer (fig. 5.9) comes out like a normal drawer. A safety catch stops it from sliding
out.
To remove the drawer open and lift it.
Do not store flammable material in the oven or in the drawer.
Fig. 5.8
REPLACING THE OVEN LIGHT
Before any maintenance is started involving electrical parts of the appliance, it must be
disconnected from the power supply.
–
–
–
–
Let the oven cavity and the broil burner cool down;
Switch off the electrical supply;
Remove the protective cover;
Unscrew and replace the bulb with a new one suitable for high temperatures (300°C570°F) having the following specifications: 120V 60 Hz, 15W, E14
– Refit the protective cover
NOTE: Oven bulb replacement is not covered by your guarantee
Fig. 5.9
16
REMOVING THE OVEN DOOR
Type A
To facilitate oven cleaning, it is possible to remove the door.
Please follow the instructions carefully:
– Open the door completely.
– Push down the lever “L” and, keeping it in this position, slowly close the door in order
to block the hinge (fig. 5.10).
– Grip the door (as indicated in fig. 5.11) and, while closing it, release the two hinges
as shown in fig. 5.12.
– Rest the door on a soft surface.
L
Fig. 5.10
DOOR ASSEMBLY
– Grip the door with your hands placed near the hinges and raise the levers “H” with
your forefingers (fig. 5.12)
– Insert the hinges in their position until levers “H” are hooked.
– Open the door completely to obtain the release of levers “L”.
Fig. 5.11
H
Fig. 5.12
REMOVING THE OVEN DOOR
Fig. 5.13A
Type B
The oven door can easily be removed as follows:
– Open the door to the full extent (fig. 5.13A).
– Attach the retaining rings to the hooks on the left and right hinges (fig. 5.13B).
– Hold the door as shown in fig. 5.13.
– Gently close the door and withdraw the lower hinge pins from their location (fig.
5.13C).
Fig. 5.13B
– Withdraw the upper hinge pins from their location (fig. 5.13D).
– Rest the door on a soft surface.
– To replace the door, repeat the above steps in reverse order.
Fig. 5.13C
Fig. 5.13D
Fig. 5.13
17
DO’S AND DO NOT’S
• Do always broil with the oven door closed.
• Do read the user instructions carefully before using the range for first time.
• Do allow the oven to heat for one and a half hours, before using for the first time, in
order to expel any smell from the new oven insulation, without the introduction of
food.
• Do clean your oven regularly.
• Do remove spills as soon as they occur.
• Do always use oven gloves when removing food shelves and trays from the oven.
• Do not allow children near the range when in use.
• Do not allow fat or oils to build up in the oven base, or oven accessories.
• Do not place cooking utensils or plates directly onto the oven base.
• Do not broil without using the grill-pan.
• Do not place hot enamel parts in water. Leave them to cool first.
• Do not allow vinegar, coffee, milk, saltwater, lemon or tomato juice to remain in
contact with enamel parts (i.e. inside the oven).
• Do not use abrasive cleaners or powders that will scratch the surface of the
stainless steel and the enamel.
• Do not attempt to repair the internal workings of your range.
• Do remove the protective film before the first use.
• Fire risk! Do not store flammable material in the oven and in the drawer.
FOR YOUR SAFETY
Under no circumstances should any external covers be removed for servicing or
maintenance except by suitably qualified personnel
18
warranty
WARRANTY – GAS RANGE
LENGTH OF WARRANTY
WE WILL PAY FOR
FULL ONE-YEAR WARRANTY FROM
DATE OF PURCHASE ON ALL PARTS
EXCEPT GLASS PARTS
IN RENTAL OR COMMERCIAL USE,
THE WARRANTY PERIOD IS 90 DAYS.
REPLACEMENT PARTS AND REPAIR
LABOR TO CORRECT DEFECTS IN
MATERIALS OR WORKMANSHIP.
SERVICE MUST BE PROVIDED BY AN
AUTHORIZED SERVICE COMPANY.
FULL 30-DAY WARRANTY FROM DATE
OF PURCHASE ON GLASS PARTS AND
FINISH OF PORCELAIN ENAMEL,
PAINTED OR BRIGHT METAL FINISHED
PARTS.
REPLACEMENT PARTS AND REPAIR
LABOR TO CORRECT DEFECTS IN
MATERIAL OR WORKMANSHIP.
SERVICE MUST BE PROVIDED BY AN
AUTHORIZED SERVICE COMPANY.
WE WILL NOT PAY FOR
A. Service calls to:
1. Correct the installation of your range.
2. Instruct you how to use your range.
3. Replace house fuses or correct house wiring.
4. Replace owner-accessible light bulbs.
B. Pickup and delivery. Your range is designed to be repaired in the home.
C. Damage to your range caused by accident, misuse, fire, flood, acts of God, or
use of products not mentioned in this manual.
D. Repairs to parts or systems caused as a result of unauthorized modifications
made to the appliance.
E. Repairs when your range is used in other than normal, single-family household
use.
AVANTI PRODUCTS SHALL NOT BE LIABLE FOR INCIDENTAL OR
CONSEQUENTIAL DAMAGES.
Some states do not allow the exclusion or limitation of incidental or consequential damages, so this exclusion or limitation may not apply to you. This warranty gives you specific legal rights, and you may also have other rights that vary from state to state.
This warranty is not valid outside the Continental United States.
The manufacturer cannot be held responsible for possible inaccuracies due to printing or transcription errors in
the present booklet.
The manufacturer reserves the right to make all modifications to its products deemed necessary for manufacture
or commercial reasons at any moment and without prior notice, without jeopardising the essential functional and
safety characteristics of the appliances.
19
COCINA A GAS
para uso doméstico únicamente
DG 2401 C
• INSTRUCCIONES DE FUNCIONAMIENTO
PARA USUARIOS
IMPORTANTE – LE ROGAMOS LEER Y RESPETAR LO SIGUIENTE
E N G L I S H
E S PA Ñ O L
IMPORTANTE - LEER CUIDADOSAMENTE
✓ Antes de iniciar, lea cuidadosamente todas las instrucciones.
✓ No extraiga las etiquetas pegadas, advertencias o placas que han sido aplicadas al aparato, ya que puede invalidar la garantía.
✓ Respete todos los códigos locales y nacionales vigentes.
✓ El aparato debe estar dotado de un adecuada puesta a tierra.
✓ El instalador debe dejar estas instrucciones al usuario que las debe guardar para
el uso del inspector local y en caso de sucesivas consultas.
✓ La clavija de conexión debe estar siempre en una posición accesible.
La instalación debe ser conforme a los códigos locales o en ausencia de códigos, con la última edición de "National Fuel Gas Code ANSIZ223.1". La instalación eléctrica se debe efectuar
conforme con el "National Electrical Code", ANSI/NFPA70 - Última edición y/o demás códigos
locales. EN CANADÁ: La instalación se debe efectuar de acuerdo con el actual "CAN/CGAB149.1 National Gas Installation Code or CAN/CGA-B149.2" Código de instalación de propano y/o demás códigos locales. La instalación eléctrica se debe efectuar de acuerdo con el
actual "CSA C22.1 Canadian Electrical Codes Part 1" y/o demás códigos locales.
INSTALACIÓN EN CASAS PREFABRICADAS (MÓVILES): La instalación debe efectuarse en
conformidad con "Home Construction and Safety Standard, Title 24 CFR, Part 3280" [anteriormente "Federal Standard for Mobile Home Construction and Safety, Title 24, HUD (Part
280)"] o, cuando dicha norma no sea aplicable, en conformidad con "Standard for
Manufactured Home Installations, ANSI/NCSBCS A225.1", o con códigos locales cuando sea
aplicable.
INSTALACIÓN EN CARAVANAS DE PARQUES DE ATRACCIONES: la instalación debe efectuarse en conformidad con los códigos del estado u otros, en ausencia de dichos códigos, con
el "Standard for Recreational Park Trailers, ANSI A119.5".
La instalación de cualquier equipamiento alimentado con gas debe ser realizada por un plomero cualificado. Debe instalarse una válvula de cierre manual en la línea de suministro principal de gas situada antes del aparato en el flujo del gas para garantizar la seguridad y facilitar las operaciones de mantenimiento.
Si se utiliza una fuente eléctrica externa, el aparato, durante la instalación, debe contar con una
toma de tierra según establecen los códigos locales o, en ausencia de códigos locales, en conformidad con el "national Electrical Code, ANSI/NFPA 70".
La cocina se suministra con una película de protección aplicada en las partes
de acero y de aluminio. Quite la película antes de instalar/usar el aparato.
ADVERTENCIA
• TODAS LAS COCINAS PUEDEN VOLCARSE
• PUEDEN CAUSAR DAÑOS A PERSONAS
• INSTALAR EL DISPOSITIVO ANTIVUELCO
EMBALADO CON LA COCINA
• CONSULTAR LAS INSTRUCCIONES PARA
LA INSTALACIÓN
ADVERTENCIAS: SI LA INFORMACIÓN EN ESTE FOLLETO NO SE
RESPETA EXACTAMENTE, SE PUEDEN PROVOCAR INCENDIOS O
EXPLOSIONES CON DAÑOS, INCLUSIVE FATALES, A PERSONAS Y COSAS.
✓ No almacene o utilice gasolina u otros vapores y líquidos inflamables cerca de este o cualquier otro aparato.
✓ QUÉ HACER EN CASO DE FUGAS DE GAS:
• No encienda ningún aparato.
• No toque ningún interruptor eléctrico; no utilice ningún teléfono de
su casa.
• Llame inmediatamente a su proveedor de gas usando el teléfono
de un vecino.
Siga las instrucciones de su proveedor de gas.
• Si no consigue contactar a su proveedor de gas, llame a los bomberos.
✓ La instalación y el mantenimiento deben ser efectuadas por un instalador cualificado, agencias de servicio o el proveedor de gas.
22
Estimado Cliente,
Gracias por la confianza demostrada en la compra de nuestro
producto.
Las medidas de seguridad y consejos descritos están finalizados a
proteger su seguridad y la del próximo. Permitirán también aprovechar
al máximo las características de su aparato.
Por lo tanto guarde este folleto cuidadosamente. Le podrá servir un
futuro a Ud. o a los demás en caso de dudas relativas al funcionamiento
del aparato.
Este aparato se debe utilizar sólo para la finalidad expresa para la
cual ha sido diseñado, es decir cocinar comida. Cualquier otro uso se
debe considerar inapropiado y por lo tanto peligroso.
El fabricante declina toda responsabilidad en caso de daños
causados por uso impropio, incorrecto o irrazonable del aparato.
23
INSTRUCCIONES DE USO
INFORMACIÓN GENERAL
¡¡CUIDADO!!
1. El aparato no debe ser utilizado como estufa, por motivos
de seguridad.
INSTRUCCIONES DE LA PUESTA A TIERRA
2. Todas las aberturas en la pared detrás del aparato y en el
piso debajo del mismo se deberán sellar.
La cocina debe contar con una toma de tierra eléctrica
según los códigos locales o, en ausencia de códigos locales, en conformidad con el "National Electrical Code,
ANSI/NFPA No. 70" - última edición. Un electricista cualificado debe realizar la instalación.
3. Mantenga el área del aparato despejada y libre de combustibles, gasolina o vapores inflamables.
ESTE APARATO DEBE ESTAR DOTADO DE UNA ADECUADA
PUESTA A TIERRA POR RAZONAS DE SEGURIDAD.
4. No tape el flujo de la combustión y el aire de ventilación.
5. Desconecte el suministro eléctrico del aparato antes de efectuar el mantenimiento.
6. Al retirar el aparato para efectuar su limpieza y/o el mantenimiento:
A. Cierre el suministro de gas;
B. Desconecte la alimentación de CA
C. Desconecte el suministro de gas en la tubería de entrada.
D. Levante con cuidado el aparato del espacio previsto en
el mueble
CUIDADO: Preste atención durante la manipulación.
7. Requisito Eléctrico
La instalación eléctrica debe estar conforme con los códigos
nacionales y locales.
8. Suministro de Aire y Ventilación
El instalador debe atenerse a los códigos locales y nacionales.
9. Presión del Suministro de Gas
Gas natural - 4.0” W.C.P.
LP/Propano - 11.0” W.C.P.
10. El uso incorrecto de la puerta del horno (o sea pisarla, sentarse o apoyarse en ella) puede provocar riesgos potenciales y/o causar daños.
11. Durante la instalación o remoción de la cocina para repararla, use un gato elevador de rodillos. No empuje los bordes
de la cocina para intentar deslizarla dentro o fuera de la instalación. Empujando o tirando de la cocina (en lugar de usar
un gato elevador) aumentan también las posibilidades de
doblar los pivotes de los pies o los conectores de acoplamiento internos.
24
¡¡CUIDADO!!
Si se utiliza una fuente eléctrica externa, la instalación debe
contar con una toma de tierra según establecen los códigos
locales o, en ausencia de códigos locales, en conformidad con
el "national Electrical Code, ANSI/NFPA 70".
Este aparato está dotado de una clavija tripolar con puesta a
tierra y protección contra sacudidas y debe estar enchufada
directamente a una toma con puesta a tierra No corte o extraiga la puesta a tierra de la clavija.
Bajo ninguna razón corte o extraiga o corte el tercer terminal (tierra) de la clavija de conexión.
SUSTITUCIÓN DE PARTES
Se pueden usar únicamente recambios autorizados para la
reparación de la cocina. Puede localizar los recambios en distribuidores de recambios autorizados. Póngase en contacto con
el distribuidor de recambios AVANTI más cercano en su zona.
RECOMENDACIONES Y PRECAUCIONES IMPORTANTES
Tras haber desembalado el aparato, asegúrese de que no esté estropeado.
En caso de duda, no lo use y consulte a su distribuidor o a un técnico cualificado
profesional.
No deje los elementos que componen el embalaje (e.j: bolsas de plástico, espuma
de poliestireno, clavos, flejes, etc) al alcance de los niños ya que pueden causar
graves daños.
El material del embalaje es reciclable y está marcado con el símbolo de reciclaje
.
✓ No intente modificar las características técnicas del aparato ya que puede resultar
peligroso durante el uso.
✓ No efectúe operaciones de limpieza o mantenimiento en el aparato sin haberlo
previamente desenchufado de la corriente.
✓ Después del uso, asegúrese de que los mandos estén en la posición OFF.
✓ No permita a niños o a personas discapacitadas usar el aparato sin supervisión.
✓ Durante y después del uso de la cocina, algunas partes se calientan enormemente. No
toque las partes calientes.
✓ Mantenga a los niños alejados de la cocina cuando está funcionando.
✓ Esta cocina se suministra con una película de protección aplicada en las partes de
aluminio y acero. Quite la película antes de instalar/usar el aparato.
✓ ¡Riesgo de incendio! No almacene material inflamable en el horno ni en el cajón.
✓ Asegúrese de que los cables eléctricos que conectan otros aparatos en las
proximidades de la cocina no pueden entrar en contacto con la placa de la cocina o
quedar atrapados en la puerta del horno.
✓ No forre las paredes del horno con papel de aluminio. No sitúe parrillas, bandeja para
grasa, moldes u otros utensilios de cocina en la base de la cámara del horno.
✓ El fabricante declina cualquier responsabilidad por los daños causados a personas o
por los desperfectos causados a cosas por un uso incorrecto o impropio del aparato.
✓ Para evitar cualquier posible riesgo, el aparato debe ser instalado por personal
cualificado únicamente. Cualquier reparación realizada por personas no cualificadas
puede producir una descarga eléctrica o un cortocircuito. Para evitar cualquier posible
daño a su persona o al aparato, no intente efectuar reparaciones usted mismo. Dicho
trabajo debe ser realizado por personal de mantenimiento cualificado únicamente.
✓ ¡Peligro de quemaduras! El horno y los accesorios de cocina pueden calentarse
enormemente durante el funcionamiento. Asegúrese de que los niños permanezcan
alejados y adviértalos de ello consecuentemente. Para evitar quemaduras, use ropa de
cocina y guantes para tocar partes o utensilios calientes.
✓ Permanezca alejado de la cocina al abrir la puerta del horno. El aire caliente o vapor
que sale puede quemarle las manos, la cara y/o los ojos.
✓ No limpie nunca el horno con un dispositivo de limpieza de alta presión ya que puede
provocar un cortocircuito.
✓ Este aparato ha sido concebido para un uso doméstico. ¡No use nunca el aparato para
otros fines!
✓ Si decide no usar más este aparato (o decide sustituir un modelo antiguo), antes de
tirarlo, le aconsejamos hacer que sea inservible de forma adecuada en conformidad
con las normas de protección medio ambiental y de la salud, garantizando en particular
que todas las partes potencialmente peligrosas sean inocuas, especialmente en relación
a niños que podrían jugar con aparatos viejos.
Quite la puerta antes de la eliminación para evitar que alguien pueda quedar atrapado.
PRECAUCIONES Y RECOMENDACIONES IMPORTANTES
PARA USAR APARATOS ELÉCTRICOS
Usar un aparato eléctrico requiere seguir una serie de reglas fundamentales. En particular:
✓ No toque nunca el aparato con las manos o los pies mojados;
✓ No haga funcionar el aparato descalzo;
✓ No permita que niños o personas discapacitadas usen el aparato sin su supervisión.
El fabricante no puede ser considerado responsable por cualquier daño causado por un
uso impropio, incorrecto o irracional del aparato.
25
características
PLACA DE COCCIÓN
1.
2.
3.
4.
3
2
Quemador auxiliar (AUX) - 3500 BTU/hr
Quemador semirrápido izquierdo (SR) - 6000 BTU/hr
Quemador semirrápido derecho (SR) - 6000 BTU/hr
Quemador de tres filas (TR) - 12000 BTU/hr
Notas:
- El dispositivo de encendido eléctrico del está incorporado
en los botones.
CUIDADO:
Si el quemador se apaga accidentalmente, apague la
placa por medio del botón y espere almenos 1 minutos
antes de encenderla de nuevo.
1
4
CUIDADO:
Las placas de cocción a gas generan calor y humedad en
el ambiente en donde se han instalado.
Compruebe que la zona de cocción esté bien ventilada
conforme con los códigos nacionales y locales.
Fig. 1.1
PANEL DE CONTROL
Fig. 1.2
9
10
11
5
6
7
8
DESCRIPCIÓN DE LOS MANDOS
Mandos de la placa
5. Mando (1) quemador izquierdo delantero
6. Mando (2) quemador izquierdo trasero
7. Mando (3) quemador derecho trasero
8. Mando (4) quemador derecho delantero
Mandos del horno:
9. Mando botón luz del horno
10. Mando quemador grill gas/horno a gas
11. Alarma electrónica /reloj electrónico
26
cómo usar los quemadores de la placa
QUEMADORES DE GAS
El flujo de gas que llega a los quemadores se regula girando los mandos (ilustrados en
la fig. 2.1) que controlan las válvulas.
Al girar el mando para que el símbolo imprimido en el mismo mando coincida con el
símbolo imprimido en el panel de control se producen las siguientes funciones:
=
válvula cerrada
=
caudal máximo
=
caudal mínimo
La posición de máxima abertura permite hacer hervir rápidamente los líquidos;
mientras que la posición de abertura mínima permite calentar los alimentos o
mantener los líquidos hirviendo.
Para disminuir el caudal del gas al mínimo, gire el mando ulteriormente en el sentido
antihorario para situar el indicador orientado hacia la posición
.
Otras regulaciones intermedias de funcionamiento pueden realizarse situando el
indicador entre las posiciones de máxima y mínima abertura pero nunca entre las
aberturas de máxima y posiciones de
.
Fig. 2.1
N.B. Cuando no use la cocina, sitúe los mandos del gas en sus posiciones
y cierre también la válvula de cierre del gas situada en la línea de suministro del
gas principal.
ENCENDIDO DE LOS QUEMADORES DE GAS
Para encender un quemador, es necesario:
1 – Girar el botón en sentido antihorario en correspondencia de la posición
(potencia máxima), mantener presionando el botón hasta encender el fuego
(fig. 2.2).
Las chispas producidas por el mechero situado en el quemador correspondiente
encienda la llama.
En caso de que las condiciones del proveedor local de gas dificulten el encendido del quemador en la posición
, repita la operación con el botón en correspondencia de la posición
.
En caso de corte del suministro eléctrico, acerque un fósforo encendido al quemador.
Fig. 2.2
2 – Regule la válvula de gas a la posición deseada.
Para reencender el quemador, lleve el botón a la posición
de encendido.
y repita las operaciones
Cuidado!
La cocina se recalienta durante el funcionamiento.
Mantenga a los niños fuera del alcance
27
ELECCIÓN DEL QUEMADOR
Fig. 2.3
(fig. 2.3)
Los símbolos impresos en el panel al lado de los botones del gas indican la correspondencia entre el botón y el quemador.
El quemador más adecuado se debe seleccionar de acuerdo con el diámetro y la capacidad de la cacerola que calentará.
Es importante que el diámetro de las cacerolas o sartenes sean adecuadas a la potencia de calentamiento de los quemadores para no comprometer la eficiencia de los quemadores, produciendo un derroche de gas.
Una cacerola de diámetro pequeño o un sartén puesta sobre un quemador grande no
significa necesariamente que su contenido alcanzará la ebullición de manera más rápida.
DIÁMETROS DE CAZUELAS QUE PUEDEN USARSE
EN LOS QUEMADORES DE LA PLACA
QUEMADOR
MÍNIMO
MÁX..
Auxiliar
12 cm (4" 23/32 )
14 cm (5" 1/2)
Semirrápido
16 cm (6" 19/64)
24 cm (9" 7/16)
Tres filas
26 cm (10" 15/64)
28 cm (11" 1/64)
Cazuelas wok máx 36 cm (14" 11/64)
No use cazuelas con bases cóncavas o convexas.
INCORRECTO
USO CORRECTO DEL QUEMADOR DE TRES FILAS
(Fig. 2.4a - 2.4b)
Fig. 2.4a
Las cazuelas con fondo plano deben situarse directamente sobre el soporte-cazuela.
Si usa un WOK debe situar el soporte suministrado en el quemador para evitar cualquier
funcionamiento incorrecto del quemador de triple fila (Fig. 2.4a - 2.4b).
IMPORTANTE:
COLOQUE ÚNICAMENTE la rejilla especial para cazuela wok (fig. 2.4) sobre el apoyo
cazuela para el quemador de triple fila.
CORRECTO
Fig. 2.4b
Asegúrese de que los mangos de
los utensilios usados en la cocina
no sobresalgan del borde de
la cocina para evitar chocar contra
ellos accidentalmente. Lo cual
dificulta que los niños puedan
acceder a los recipientes de cocina.
28
cómo usar el horno a gas
CARACTERÍSTICAS GENERALES
El horno a gas está equipado con dos quemadores:
a) Quemador del horno, montado en la parte inferior del horno (13000 BTU/hr),
b) Quemador del grill, montado en la parte superior del horno (8500 BTU/hr).
Atención: la cocina se pone muy
caliente durante el funcionamiento.
Atención: la puerta del horno se
pone muy caliente durante el funcionamiento.
Mantenga a los niños alejados.
USAR EL HORNO POR PRIMERA VEZ
ADVERTENCIA:
La puerta está caliente, use el tirador.
Le aconsejamos seguir las siguientes instrucciones:
– Equipe el interior del horno situando las parrillas laterales siguiendo las
indicaciones facilitadas en el capítulo “Limpieza y mantenimiento”.
– Coloque las parrillas y bandeja.
– Encienda el horno con la máxima temperatura (posición
) para eliminar
los posibles restos de grasa en el quemador del horno. Efectúe la misma
operación para el quemador del horno.
– Interrumpa el suministro de corriente, deje que el horno se enfríe, a continuación
limpie el interior del horno con un paño embebido con agua y detergente (neutro)
y seque meticulosamente a continuación.
QUEMADOR DEL HORNO
Sirve para "hornear" normalmente.
El caudal del gas que llega al quemador está regulado mediante un termostato que permite mantener la temperatura del horno constante.
El control de la temperatura está garantizado mediante una sonda termostática situada
dentro del horno.
Mantenga siempre la sonda en su alojamiento, en un estado limpio, ya que una posición incorrecta o incrustaciones puede causar una alteración en el control de la temperatura.
Fig. 3.1
TERMOSTATO DEL HORNO
Los números imprimidos en el mando (fig. 3.1) indican el valor de temperatura del horno
en aumento (°F). Para regular la temperatura, programe el número elegido en el indicador del panel de control.
La posición
sirve únicamente para encender el quemador del grill.
N.B. Cuando no use la cocina, sitúe los mandos del gas en sus posiciones de
y cierre también la válvula de cierre situada en la línea de suministro de gas principal.
PROGRAMACIÓN HORNO A GAS
Número imprimido
Temperatura
en el mando
correspondiente en
Temperatura en
°C
°F
200
93
250
121
300
149
350
177
400
204
450
232
500
260
550
288
29
ENCENDIDO DEL QUEMADOR DEL HORNO
El termostato permite efectuar un control automático de la temperatura.
El suministro de gas al quemador del horno está controlado mediante dos grifos termostáticos de dos vías (quemadores para horno y grill) con dispositivo de apagado
llama.
Para encender el quemador del horno, efectúe las siguientes operaciones:
1) Abra la puerta del horno completamente.
ADVERTENCIA: ¡Riesgo de explosión! Abra la puerta del horno durante esta
operación.
2) Presione ligeramente y gire el mando del termostato en el sentido antihorario (fig.
3.2) hasta la posición máx.
.
Fig. 3.2
3) Presione el mando completamente para preparar el encendido eléctrico. Mantenga
este mando presionado.
En caso de interrupción de corriente, presione el mando y acerque una cerilla encendida a la abertura A (fig. 3.3).
No efectúe esta operación durante más de 15 segundos. Si el quemador sigue
sin encenderse, espere un 1 minuto antes de repetir el encendido.
4) Espere 10/15 segundos aproximadamente después de encender el quemador antes
de soltar el mando (tiempo de preparación de la válvula).
5) Cierre la puerta del horno lentamente y regule el quemador según la potencia requerida. Si la llama se apaga por cualquier razón, la válvula de seguridad interrumpirá
automáticamente el suministro del gas al quemador.
A
Para encender de nuevo el quemador, gire en primer lugar el mando del horno hasta
la posición
, espere por lo menos 1 minuto y repita el procedimiento de
encendido.
Fig. 3.3
Atención: la puerta del horno se pone muy caliente durante el funcionamiento. Mantenga a los niños alejados.
HORNEAR
Antes de introducir los alimentos, precaliente el horno hasta alcanzar la temperatura
elegida.
Para efectuar correctamente el precalentamiento, le aconsejamos sacar la bandeja del
horno e introducirla junto con los alimentos en el horno cuando éste alcanza la temperatura elegida.
Controle el tiempo de cocción y apague el horno 5 minutos antes del tiempo teórico
necesario para recuperar el calor almacenado.
30
ENCENDIDO DEL QUEMADOR DEL GRILL
El quemador del grill produce rayos infrarrojos para el grill.
Para encender el quemador del grill, efectúe las siguientes operaciones:
1) Abra la puerta del horno completamente.
ADVERTENCIA: ¡Riesgo de explosión! Abra la puerta del horno durante esta
operación.
2) Presione ligeramente y gire el mando del termostato en el sentido horario hasta la
posición
(fig. 3.4).
3) Presione el mando completamente para preparar el encendido eléctrico. Mantenga
este mando presionado. En caso de interrupción de corriente, presione el mando
y acerque una cerilla encendida al lado izquierdo y derecho del quemador (fig.
3.5).
No efectúe esta operación durante más de 15 segundos. Si el quemador sigue
sin encenderse, espere un 1 minuto antes de repetir el encendido.
4) Espere 10/15 segundos aproximadamente después de encender el quemador
antes de soltar el mando (tiempo de preparación de la válvula).
5) Cierre la puerta del horno lentamente.
Fig. 3.4
Si la llama se apaga por cualquier razón, la válvula de seguridad interrumpirá
automáticamente el suministro de gas al quemador.
Para encender de nuevo el quemador, gire en primer lugar el mando del horno hasta
la posición
, espere 1 minuto por lo menos y repita el procedimiento de
encendido.
Use siempre el grill con la puerta cerrada.
Atención: la puerta del horno se calienta enormemente durante el funcionamiento.
Mantenga a los niños alejados.
Fig. 3.5
LUZ DEL HORNO
La cocina está equipada con una luz que ilumina el horno para poder controlar visualmente los alimentos mientras que se están cocinando.
Esta luz se controla mediante un mando con botón (fig. 3.6).
Para encender la luz gire el mando en el sentido horario hasta la posición
.
Fig. 3.6
31
1° PASO
No lo use
2° PASO
Nivel de grill
3° PASO
Nivel para hornear
4° PASO
Nivel para hornear
Fig. 3.7
GRILL
Muy importante: use siempre el quemador del grill con la puerta del horno cerrada.
- Sitúe la parrilla en el segundo nivel empezando por arriba (fig. 3.7).
- Encienda el quemador del grill, siguiendo las instrucciones de los párrafos anteriores
y deje que el quemador del grill se precaliente durante 5 minutos aproximadamente
con la puerta cerrada.
- Sitúe los alimentos a cocinar sobre la parrilla de la bandeja para recoger la grasa.
- Introduzca la bandeja para recoger la grasa (bandeja + parrilla) en el horno (fig. 3.8).
Sitúe la bandeja para recoger la grasa sobre la parrilla y céntrela con el quemador del
grill (fig. 3.7).
Fig. 3.8
No use el grill sin usar la bandeja para recoger la grasa.
Importante: Use siempre los agarraderos especiales suministrados con el aparato para meter/sacar la bandeja para recoger la grasa (fig. 3.8, 3.9, 3.10, 3.11, 3.12,
3.13).
CORRECTO
INCORRECTO
INCORRECTO
1
Fig. 3.12
Fig. 3.10
Fig. 3.9
INCORRECTO
INCORRECTO
2
Fig. 3.11
32
Fig. 3.13
reloj electrónico / alarma electrónica
RELOJ ELECTRÓNICO
(fig. 4.1)
La alarma electrónica es un dispositivo que agrupa las funciones de un reloj de 12 horas
con una pantalla iluminada y alarma de 10 horas.
Inmediatamente después de conectar la cocina o después de un apagón, 12•00 parpadeará en la pantalla.
Para programar la hora, presione el botón
y a continuación, en los 7 segundos
siguientes, el botón
o
hasta programar la hora exacta.
Un corte de energía pone a cero el reloj.
PROGRAMAR LA HORA DEL DÍA
Pulse el botón
y a continuacón, en los 7 segundos siguientes, el botón
o
–
hasta programar la hora exacta. Esta función permanece activada durante 7 segundos
después de la última pulsación del botón
.
.
Cambie las horas únicamente: presione el botón
durante 4 segundos hasta que
las horas en la pantalla parpadeen.
Cambie las horas pulsando únicamente el botó
o
. Los minutos y segundos ocultos no se verán afectados.
Fig. 4.1
ALARMA ELECTRÓNICA
El programa de la alarma consiste en un buzzer que puede programarse para un período máximo de 10 horas.
Para programar el tiempo, pulse el botón
o
hasta ver la hora elegida en la pantalla.
De 0•10 a 99•50 se lee la hora en minutos y segundos (paso de 10 segundos); luego
de 1•40 a 10•00 se lee la hora en horas y en minutos (paso en minutos).
Cuando se acaba la programación, el símbolo
se encenderá y la cuenta atrás empezará inmediatamente.
Durante la cuenta atrás, el temporizador tiene prioridad en la pantalla. Para mostrar la
hora del día, presione el botón .
Al final de este tiempo, el símbolo
se apagará y un buzzer intermitente durante 7
minutos se disparará; puede detenerlo presionando el botón X. La señal saltará si presiona el botón . La señal saltará si presiona el botón durante los últimos 15 segundos
del temporizador.
Para detener la cuentra atrás de la alarma en cualquier momento, mantenga el botón
presionado hasta que lea 0•00 en la pantalla (el símbolo
se apaga).
ADVERTENCIA IMPORTANTE: ESTO ES ÚNICAMENTE UNA ALARMA
ELECTRÓNICA. RECUERDE QUE DEBE PARAR EL HORNO O EL GRILL MANUALMENTE AL FINAL DE LA CUENTA ATRÁS.
PROGRAMANDO LA FRECUENCIA DEL SONIDO DE LA ALARMA
Puede seleccionar 3 posibilidades de sonido pulsando el botón
.
33
limpieza y mantenimiento
CUIDADO
Riesgo de sacudidas
eléctricas
Conecte al aparato a una base
tripolar con puesta a tierra.
No extraiga la puesta a tierra.
No utilice adaptadores.
De lo contrario, se corren riesgos
mortales, incendios o sacudidas
eléctricas.
Base tripolar
con puesta a tierra
Terminal de
puesta a tierra
RECOMENDACIÓN GENERAL
✓ Importante: Antes de efectuar cualquier operación de limpieza y
mantenimiento, desenchufe el aparato de la corriente.
✓ Evite dejar sustancias alcalinas o ácidas (jugo de limón, vinagre, etc) en las
superficies.
✓ Evite usar productos de limpieza con una base ácida o con cloro.
✓ Mantenga siempre limpio el horno después del uso, use productos adecuados, y
recuerde que, su funcionamiento durante 30 minutos a la temperatura más alta
elimina la mayoría de la suciedad convirtiéndola en cenizas.
PARTES ESMALTADAS
✓ Limpie todas las partes esmaltadas con una esponja y con agua con jabón
únicamente o con otros productos no abrasivos.
✓ Seque preferentemente con una gamuza.
SUPERFICIES DE ACERO INOXIDABLE (REVESTIDAS)
CUIDADO
✓ Las superficies delanteras de ACERO INOXIDABLE en esta cocina están
protegidas con una laca especial para disminuir las huellas de los dedos.
Para no estropear esta laca, no limpie el acero inoxidable con limpiadores
abrasivos o con paños abrasivos o estropajos.
USE ÚNICAMENTE AGUA CALIENTE/JABÓN PARA LIMPIAR LAS
SUPERFICIES DE ACERO INOXIDABLE.
SUPERFICIES DE ACERO INOXIDABLE (SIN REVESTIR)
La placa + los laterales están realizados en acero inoxidable sin revestir.
Puede limpiarlos con un producto limpiador para acero inoxidable adecuado.
EL INTERIOR DEL HORNO
ADVERTENCIA
MUY IMPORTANTE
Límpielo regularmente.
Con el horno caliente, limpie las paredes internas con un paño embebido en agua
enjabonada muy caliente o con otro producto adecuado.
Antes de efectuar cualquier operación de mantenimiento, desenchufe
el aparato de la corriente.
QUEMADORES Y REJILLAS
✓ Estas piezas pueden ser desmontadas y limpiadas con productos adecuados.
✓ Después de la limpieza, se deberán secar y colocar correctamente los
quemadores y los difusores de llama.
✓ Es de importancia fundamental controlar la correcta posición del difusor de
llama del quemador y el capuchón, de lo contrario se pueden producir graves
problemas.
✓ En aparatos de encendido eléctrico, mantenga limpio el electrodo para que la
chispa se produzca siempre.
✓ Notas: Para no dañar el encendido eléctrico, no lo utilice cuando los
quemadores no están en su posición.
34
No use limpiadores de chorro de
vapor porque la humedad podría
infiltrarse en el aparato y causar
riesgos.
SUBSTITUCIÓN CORRECTA
DE LOS QUEMADORES
Es muy importante controlar la correcta
instalación del difusor de llama del quemador “F” y el capuchón "C" (véase las
fig. 5.1 y 5.2 ).
C
De lo contrario se pueden producir graves problemas.
En los aparatos con encendido eléctrico,
controle que el electrodo “S” (fig. 5.1)
esté siempre limpio para producir las
chispas sin inconvenientes.
F
La bujía de encendido debe ser
cuidadosamente limpiada
S
Fig. 5.1
Fig. 5.2
POSICIÓN CORRECTA DEL
QUEMADOR DE TRIPLA
CORONA
El quemador de triple corona debe estar
correctamente instalado (véase fig. 5.3);
el reborde del quemador se debe insertar
en el cuerpo como se indica con la flecha.
El quemador correctamente instalado no
puede girar (fig. 5.4).
Fig. 5.3
Luego coloque el capuchón A y el anillo
B (fig. 5.4 - 5.5).
A
B
VÁLVULAS DE GAS
✓ En caso de anomalías en las
válvulas de gas, contacte al Servicio
de Asistencia.
Fig. 5.4
Fig. 5.5
35
INSTALACIÓN Y REMOCIÓN DE LOS ACCESORIOS DEL
HORNO
– Cuelgue las parrillas laterales “G” en las paredes del horno (fig. 5.6).
G
– Haga deslizar sobre las guías, la parrilla, etc. (fig. 5.7).
Encaje la parrilla de forma que el retén de seguridad, que impide el deslizamiento,
mire hacia el interior del horno.
– Sitúe la bandeja para la grasa (bandeja + parrilla) sobre la parrilla del horno.
– Para desmontar, invertir el orden de las operaciones.
Fig. 5.6
No use este paso
Retén de
seguridad
Fig. 5.7
PUERTA DEL HORNO Y CAJÓN
Puede quitar fácilmente el cristal interno de la puerta del horno para limpiarlo desenroscando los dos tornillos de fijación laterales (fig. 5.8).
El cajón (fig. 5.9) sale como un cajón normal. Un retén de seguridad impide su deslizamiento.
Para quitar el cajón ábralo y levántelo.
No guarde material inflamable en el horno o en el cajón.
Fig. 5.8
SUSTITUIR LA LUZ DEL HORNO
Antes de empezar cualquier operación de mantenimiento que implique la manipulación
de partes eléctricas del aparato, desenchúfelo de la corriente.
–
–
–
–
Deje la cavidad del horno y el quemador del grill enfriar;
Corte el suministro eléctrico;
Quite la tapa de protección;
Desenrosque y sustituya la lámpara por una nueva adecuada para temperaturas altas
(300°C–570°F) con las siguientes especificaciones: 120V 60 Hz, 15W, E14.
– Coloque de nuevo la tapa de protección.
Fig. 5.9
36
NOTA: La sustitución de la lámpara del horno no está cubierta por su garantía.
QUITAR LA PUERTA DEL HORNO
Tipo A
Para facilitar la limpieza del horno, puede quitar la puerta:
Siga las instrucciones meticulosamente:
– Abra la puerta completamente.
– Presione la palanca "L", manteniéndola en su posición, cierre lentamente la puerta
para bloquear la bisagra (fig. 5.10).
– Aferre la puerta (según las indicaciones de la fig. 5.11) y, mientras que la está
cerrando, suelte las dos bisagras siguiendo las indicaciones de la fig. 5.12.
– Apoye la puerta sobre una superficie blanda.
L
Fig. 5.10
ENSAMBLAJE DE LA PUERTA
– Aferre la puerta con sus manos colocándolas cerca de las bisagras y suba las
palancas "H" con sus dedos índices (fig. 5.12).
– Coloque las bisagras en sus posiciones para que las palancas "H" se enganchen.
– Abra la puerta completamente para que las palancas “L” se suelten.
Fig. 5.11
H
Fig. 5.12
QUITAR LA PUERTA DEL HORNO
Fig. 5.13A
Tipo B
Puede quitar fácilmente la puerta del horno de la forma siguiente:
– Abra la puerta completamente (fig. 5.13A).
– Enganche los anillos de retención en los ganchos situados en las bisagras derecha e
izquierda (fig. 5.13B).
– Sujete la puerta siguiendo las indicaciones de la fig. 5.13.
– Cierre suavemente la puerta y retire los pernos de la bisagra inferior de su
alojamiento (fig. 5.13C).
Fig. 5.13B
– Retire los pernos de la bisagra superior de su alojamiento (fig. 5.13D).
– Apoye la puerta en una superficie blanda.
– Para sustituir la puerta, repita las secuencias anteriores pero invirtiendo el orden.
Fig. 5.13C
Fig. 5.13D
Fig. 5.13
37
LO QUE SE PUEDE HACER Y LO QUE NO
• Use siempre el grill con la puerta del horno cerrado.
• Lea detenidamente las instrucciones completamente antes de usar la cocina por
primera vez.
• Deje que el horno se caliente durante una hora y media antes de usarlo por primera
vez para eliminar cualquier olor del nuevo aislamiento del horno sin introducir en él
alimentos.
• Limpie su horno regularmente.
• Elimine los derrames en cuanto se produzcan.
• Use siempre guantes para sacar las parrillas con alimentos y bandejas del horno.
• No permita a niños permanecer cerca de la cocina durante el uso.
• No deje que se depositen grasa o aceites en la base del horno o en los accesorios
del horno.
• No coloque los utensilios de cocina o platos directamente sobre la base del horno.
• No use el grill sin usar la bandeja para grasa.
• No introduzca partes esmaltadas calientes en el agua. Deje que se enfríen antes.
• No deje vinagre, café, leche, agua salada o jugo de tomate en contacto con las
partes esmaltadas (o sea dentro del horno).
• No use limpiadores o polvos abrasivos que pueden rayar la superficie de acero
inoxidable y el esmalte.
• No intente reparar los mecanismos internos de su cocina.
• Quite la película de protección antes del primer uso.
• ¡Riesgo de incendio! No guarde material inflamable en el horno ni en el cajón.
PARA SU SEGURIDAD
Bajo ninguna circunstancia ninguna persona deberá retirar ninguna tapa externa para
efectuar operaciones de reparación o mantenimiento excepto en caso de personal
cualificado.
38
garantía
GARANTÍA – COCINA A GAS
DURACIÓN DE LA GARANTÍA
LA GARANTÍA ABARCA
GARANTÍA DE UN AÑO COMPLETA A
PARTIR DE LA FECHA DE COMPRA
PARA TODAS LAS PARTES A
EXCEPCIÓN DE LAS PARTES DE CRISTAL EN USO COMERCIAL O DE ALQUILER, QUE TIENEN UNA GARANTÍA DE
90 DÍAS
SUSTITUCIÓN DE PARTES Y TRABAJOS DE REPARACIÓN PARA CORREGIR DEFECTOS DE MATERIAL O
FABRICACIÓN.
EL SERVICIO DEBERÁ SER PROPORCIONADO POR UNA EMPRESA DE
SERVICIOS AUTORIZADA.
GARANTÍA DE 30 DÍAS COMPLETA A
PARTIR DE LA FECHA DE COMPRA
PARA PARTES DE CRISTAL Y ACABADO DE ESMALTE DE PORCELANA,
PARTES ACABADAS EN METAL BRILLANTE O PINTADAS.
SUSTITUCIÓN DE PARTES Y TRABAJOS DE REPARACIÓN PARA CORREGIR DEFECTOS DE MATERIAL O
FABRICACIÓN.
EL SERVICIO DEBERÁ SER PROPORCIONADO POR UNA EMPRESA DE
SERVICIOS AUTORIZADA.
LA GARANTÍA NO ABARCA
A. Llamadas al servicio para:
1. Corregir la instalación de su cocina.
2. Proporcionarle instrucciones sobre el uso de su cocina.
3. Sustituir fusibles domésticos o corregir el cableado doméstico.
4. Sustituir bombillas de luz que el propietario puede él mismo hacer.
B. Recogida y entrega. Su cocina ha sido diseñada para ser reparada en casa.
C. Daños provocados a la cocina por accidente, uso incorrecto, incendio, inundaciones, causas de fuerza mayor, o por el uso de productos no mencionados en
este manual.
D. Reparaciones de partes o sistemas causadas por modificaciones no autorizadas
realizadas en el aparato.
E. Reparaciones de la cocina cuando no ha sido usada normalmente, o sea para un
uso doméstico familiar-individual.
LOS PRODUCTOS AVANTI NO SON RESPONSABLES POR DAÑOS
ACCIDENTALES O CONSIGUIENTES
Algunos estados no permiten la exclusión o limitación de daños accidentales o consiguientes, por lo que esta exclusión o limitación puede no ser aplicable en su caso. Esta
garantía le otorga derechos legales específicos, aunque tal vez puede tener derechos
adicionales que varían en función del estado.
Esta garantía no es válida fuera de los Estados Unidos continentales.
El fabricante declina toda responsabilidad en caso de errores de impresión, transcripción del presente manual
de instrucciones.
El fabricante se reserva el derecho de aportar todas las modificaciones a sus productos que considere necesarias por razones de fabricación o comercialización, en cualquier momento, sin aviso previo, sin comprometer las
medidas de seguridad y las características esenciales del funcionamiento.
39
rif. 1656-U.7
Cod. 1102474-ß2