1
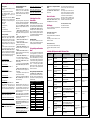
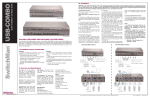
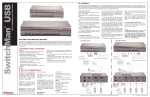
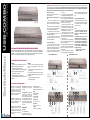
SwitchMan ® Quick Installation and Setup Guide USB-COMBO III. Installation Important: Before beginning installation, power OFF all devices and ensure that all devices are properly grounded. Failure to do so may result in damage to computers and/or to the SwitchMan unit. Note: Avoid placing cables near machines such as fluorescent lighting, air conditioning equipment, etc, that create electrical noise. For USB computers: USB signals are the strongest when transmitted up to 15 feet (4.5m) between the KVM and the CPU. Beyond 15 feet (4.5m), probability of signal degradation can occur, causing the device to fail. SW2-USB-COMBO SW4-USB-COMBO SwitchMan USB-COMBO (SW2-USB-COMBO, SW4-USB-COMBO) Your SwitchMan USB-COMBO shipment includes: (1) SwitchMan USB-COMBO unit (either the SW2-USB-COMBO 2-port switch unit or the SW4-USB-COMBO 4-port switch unit), (1) SwitchMan Stand, (1) Power Adapter, (2) CSWUSBPS218 USB cables, (1) USB Cable, (1) printed Quick Installation and Setup Guide, and Registration and Warranty papers. Please contact your local Raritan office right away if you do not receive all of these items. Connecting the Console These step numbers correspond with the diagram numbers, below. Please power OFF all computers before you start. 1. Connect your USB keyboard and mouse directly to the USB keyboard and mouse console ports on the front panel of the SwitchMan unit. 2. Connect the male VGA connector (HDDB-15 pin) from your monitor to the console VGA port on the rear panel of the SwitchMan unit. 3. If using speakers, connect the male 3.5mm plug to the SPEAKER (green) port on the rear panel of the SwitchMan unit. 4. If using a microphone, connect the male 3.5mm plug to the MIC (pink) port on the rear panel of the SwitchMan unit. Connecting the Computers 5. For USB computers, connect the B-type USB connector plug to the PC1 USB port on the rear panel of the SwitchMan unit. Connect the other end of the cable (the USB A-type connector plug) to an available port on your USB computer or to a USB hub that is attached to SW2-USB-COMBO Installation switch and automatically install the HID USB driver if it is not already installed on your computer. your computer. 6. Connect the VGA plug of the included KVM cable (PS2 Keyboard and PS2 Mouse connections are built into this VGA plug) to the monitor port in PC1 panel on the rear of the SwitchMan unit. Plug the connectors on the other end of this cable into the Video, PS2 Keyboard, and PS2 Mouse ports on your computer. 7. Connect the speaker plug of the same cable to the speaker port in the PC1 area panel on the rear panel of the SwitchMan unit. Plug the speaker plug at the other end of the cable into the speaker port on your computer. 8. Connect the MIC plug of the same cable to the microphone port in the PC1 area on the rear panel of the SwitchMan unit. Plug the MIC plug at the other end of the cable into the MIC port on your computer. 9. Repeat steps 5-8, connecting the remaining ports on the rear panel of the SwitchMan unit to the ports of your computers. 10. Plug the included power adapter into an AC power source, and then plug the power adapter cable into DC port on the rear panel of the SwitchMan unit. 11. Power ON your computers. Your operating system should recognize the SwitchMan KVM Connecting USB Peripheral Devices 12. Connect USB devices other than keyboard and mouse to the HUB ports on the front panel of the SwitchMan unit, such as USB printers, scanners, cameras, etc. Notes: > The keyboard and mouse must be connected to the "CONSOLE" USB ports. Otherwise, the SwitchMan unit utters the beep sound. > SwitchMan's default link is to the first computer powered ON in the installation. > You may have to enable USB support on your system BIOS for full support. Please refer to your computer's user guide for further details on how to enable USB support. > Only two models of Multimedia keyboard are supported. They are: • Microsoft -- Natural Keyboard Pro • Apple/Mac -- A1048 SW4-USB-COMBO Installation I. SwitchMan Features and Benefits Features: - Compliant with USB 2.0 specifications - delivers up to 480Mbps and supports USB hot Plug and Play - LED display for easy status monitoring - Supports high resolution video up to 1920X1440@75Hz - Supports VGA, SVGA and Multisync monitors - Easy installation - no software - Works with Windows 2000, XP, Vista and MAC - Supports audio (speaker/microphone) for multi-media applications Benefits: - Control up to four USB or PS2 computers and multiple USB (1.1 / 2.0) peripheral devices - all from one USB console - Switch from port to port easily using Hot keys or easyto-use push buttons - Asynchronously switch between USB / PS2 computers and multiple USB peripheral devices using Hot Keys and Push Buttons - AutoScan for fast monitoring of computers - Firmware Flash Upgrades 12 12 1 1 1 1 II. Overview and Specifications Hot Keys: Hot Key combinations allow you to use designated key commands to switch computers, connected USB devices, and microphone/speaker. Control multiple computers using a simple Hot Key sequence on your keyboard. AutoScan: The AutoScan function allows you to automatically scan and monitor all computers that are connected to your KVM Switch. Front-Panel PC and Hub Selectors: Push buttons conveniently located on the front face of the KVM Switch, which allow for simple, manual PC, USB Hub, and Audio port selection. LED Display: Front panel PC and HUB LEDs allow for easy status monitoring. Flash Upgrades: The upgrade ability allows you to obtain the latest firmware upgrades for your KVM Switch. These upgrades allow constant compatibility with the latest devices and computers. Please contact your dealer or Raritan Technical Support for the upgrade procedure and cable. Specifications Dimensions: SW2-USB-COMBO unit 7.24" (W) x 4.84" (D) x 1.73" (H) 184mm (W) x 123mm (D) x 45mm (H) SW4-USB-COMBO unit 9.25" (W) x 5.54" (D) x 1.73" (H) 235mm (W) x 142mm (D) x 45mm (H) Weight: SW2-USB-COMBO: 1.58 lbs (0.72 kg) SW4-USB-COMBO: 2.33 lbs (1.05 kg) Operating Temp: 32° to 104° F (0° to 40° C) Storage Temp: -4° to 140° F (-20° to 60° C) Humidity: 20-85% RH, non-condensing 2 2 5 10 3 6 7 4 To download the guide, please visit www.raritan.com 5 8 10 3 6 7 8 4 Rev. G July 2010 255-00-2100-00 RoHS IV. Selecting Ports: Hot Key Mode Selecting Ports There are two methods of selecting ports using SwitchMan: 1.Use preconfigured Hot Key Commands. 2.Use Manual Port Selectors - the PC and HUB push buttons on the front panel of the SwitchMan unit. SwitchMan’s default control mode is KVM and Audio only; but both port selection methods above allow you to control port switching in five different modes: > KVM only > USB Devices only > Audio only > KVM and Audio only > KVM and Audio and USB devices Hot Key Commands Activate Hot Key mode by pressing the SCROLL LOCK key twice rapidly. A beep will sound, indicating that you have entered Hot Key mode. The Hot Keys: Z, S, C, H, A, T, L, U, and M are not case sensitive. When an invalid Hot Key command is attempted, three short beeps will sound. You must complete a Hot Key command within five (5) seconds from the time you press the SCROLL LOCK + SCROLL LOCK combination. If you do not complete the command within this time, start the combination from the beginning. Three short beeps will sound if you must re-enter the Hot Key command from the beginning. Go to previous active port SCROLL LOCK + SCROLL LOCK + Go to next active port SCROLL LOCK + SCROLL LOCK + Activate AutoScan mode SCROLL LOCK + SCROLL LOCK + Z Turn buzzer ON or OFF SCROLL LOCK + SCROLL LOCK + S Go to a specific port SCROLL LOCK + SCROLL LOCK + C + X (where C indicates “select port” and X = port number 1,2,3, or 4 - When KVM switch and Audio switch are set to operate separately, this Hot Key command switches KVM devices only.) Toggle PC button to link/unlink KVM+Audio+USB SCROLL LOCK + SCROLL LOCK + T Link KVM switch and Audio to switch together SCROLL LOCK + SCROLL LOCK + L Separate KVM switch and Audio from switching together SCROLL LOCK + SCROLL LOCK + U Selecting USB Hub Devices and Connected Computers SwitchMan’s built-in 2-port or 4-port USB 2.0 hub allows you to connect additional shared peripherals. Please refer to the SwitchMan Operations Quick Reference Table, below right, for more information. Buzzer Alert During Hot Key operation, a beep sound indicates errors or mode changes. When SwitchMan is first powered ON, one short beep will sound. After you press SCROLL LOCK + SCROLL LOCK to start Hot Key combinations: one short beep sounds. 1. SCROLL LOCK + SCROLL LOCK + S - enabling / disabling buzzer: one short beep (buzzer enabled) / two short beeps (buzzer disabled). 2. SCROLL LOCK + SCROLL LOCK + - go to previous port: one short beep. 3. SCROLL LOCK + SCROLL LOCK + go to next port: one short beep. 4. SCROLL LOCK + SCROLL LOCK + T toggle PC button: one short beep. 5. SCROLL LOCK + SCROLL LOCK + L - link KVM switch and Audio to switch together: one short beep. 6. SCROLL LOCK + SCROLL LOCK + U separate KVM switch and Audio from switching together: one short beep. 7. SCROLL LOCK + SCROLL LOCK + 'C', 'H', 'A', or 'M', plus port number: one short beep. 8. If no Hot Key is pressed 5 seconds after SCROLL LOCK + SCROLL LOCK is pressed: three short beeps. 9. If a non-Hot Key is pressed after SCROLL LOCK + SCROLL LOCK is pressed: three short beeps. 10. SCROLL LOCK + SCROLL LOCK + Z + port - enable scan mode: one long beep, then two short beeps. 11. During AutoScan, when switching from one port to another: one short beep. 12. Pressing any keystroke except CTRL, ALT, SHIFT, and Window Key to abort from scan mode: one short beep. AutoScan SwitchMan’s AutoScan feature allows you to monitor the activity of your connected computers at regular intervals. Use AutoScan to scan through the computers without having to manually switch the channels or use Hot key combinations to view each port. Activate AutoScan mode by pressing SCROLL LOCK + SCROLL LOCK + Z. Only active channels will be scanned. The default scan time is three (3) seconds. Exit AutoScan by pressing any key (except CTRL, ALT, SHIFT, and Window Key). No other keyboard or mouse control will function until you exit AutoScan mode. SCROLL LOCK + SCROLL LOCK + Z: Starts to scan automatically after 5 seconds; scan rate is the scan rate set in the last AutoScan session. SCROLL LOCK + SCROLL LOCK + Z + 1: Sets scan rate of 3 seconds for each active port. SCROLL LOCK + SCROLL LOCK + Z + 2: Sets scan rate of 6 seconds for each active port. SCROLL LOCK + SCROLL LOCK + Z + 3: Sets scan rate of 9 seconds for each active port. SCROLL LOCK + SCROLL LOCK + Z + 4: Sets scan rate of 12 seconds for each active port. V. Selecting Ports: Push Button Mode Manual Port Selectors When the "link" between the KVM + Audio switch and the USB devices switch is disabled, KVM + Audio, and USB devices are switched independently (SCROLL LOCK + SCROLL LOCK + T). When using the PC or HUB buttons, only active ports can be switched; inactive ports will be skipped in the switching sequence. Please refer to the SwitchMan Operations Quick Reference Table, below, for more information. HUB Switch Button The HUB button is disabled when "link" is enabled. If you press the HUB button when “link” is enabled, you will hear three short beeps. VI. Apple Keyboard Emulation Mode You can use a regular Windows USB keyboard to control Apple servers if you don't have an Apple keyboard. To use this feature, you must enter the Apple keyboard emulation mode first. Note that all combination keys for the emulation mode must be pressed in sequence within 3 seconds instead of being pressed simultaneously. For example, "SCROLL LOCK + SCROLL LOCK + '-' + F2" means you press and release SCROLL LOCK twice, then '-' (minus) and finally press F2; "CTRL + 3" means you first press and release CTRL, and then 3. Exiting from the Keyboard Emulation Mode To quit the Apple keyboard emulation mode, press SCROLL LOCK + SCROLL LOCK + '-' (minus) + F10. Reset the Product To restore the product to factory defaults, press SCROLL LOCK + SCROLL LOCK + '-' (minus) + R + Enter (R is not case sensitive). LED Display The LEDs on SwitchMan’s front panel indicate the status of each PC channel: Blue LED (Audio selection) First you must unlink the KVM and Audio using the Hot Key command (Scroll Lock + Scroll Lock + U). SwitchMan USB Operations Quick Reference Table Switching Mode KVM+Audio+USB Devices Entering the Keyboard Emulation Mode Press SCROLL LOCK + SCROLL LOCK + '-' (minus) + F2 one after another to enter the emulation mode. Then press the following keys or key combinations for performing specific Apple keyboard functions. = Mute Volume down Volume up Eject Return Delete Help USB Keyboard Keys SHIFT (left or right) Ctrl (left or right) Window (left or right) Alt (left or right) Print Screen Scroll Lock Ctrl (left or right) + Window Application Ctrl (left or right) + 1 Ctrl (left or right) + 2 Ctrl (left or right) + 3 Ctrl (left or right) + 4 Enter Backspace Insert Green LED (USB devices selection) OFF: channel is not selected. ON (solid): channel is selected. Blue LED (KVM + Audio selection) OFF: channel is not selected. ON (solid): channel is selected, and this selected PC is active. ON (blinking): channel is selected, but this selected PC is inactive. KVM+Audio Only Apple Keyboard Function SHIFT (left or right) CTRL (left or right) Command Alt (left or right) F13 F14 F15 ON: Press and hold the PC Push Button for two seconds. The port to which Audio is connected will blink once. ON: To change the port to which Audio is connected, continue to hold the PC Push Button, and press the HUB Push Button. The new port to which Audio is connected will blink once. After these two buttons are released, the blue LED will return to its original state to indicate that KVM is connected to the PC channel. USB Devices Only KVM Only Audio Only Condition Hot Keys to enable Operation If KVM+Audio+USB switch are linked together No pre-operation If KVM, Audio and USB switch are separated Scroll Lock + Scroll Lock + T (to link KVM+Audio+USB) If KVM+Audio+USB switch are linked together Scroll Lock + Scroll Lock + T (to unlink KVM+Audio and USB) If KVM+Audio and USB switch are separated (default setting after power up) No pre-operation If KVM and Audio switch are separated Scroll Lock + Scroll Lock + L (to link KVM+Audio) If KVM+Audio+USB s witch are linked together Scroll Lock + Scroll Lock + T (to unlink KVM+Audio and USB) If KVM+Audio and USB switch are separated (default setting after power up) No pre-operation If KVM+Audio+USB switch are linked together Scroll Lock + Scroll Lock + T (to unlink KVM+Audio and USB). Scroll Lock + Scroll Lock + U (to unlink KVM and Audio) If KVM+Audio and USB switch are separated (default setting after power up) Scroll Lock + Scroll Lock + U (to unlink KVM and Audio) If KVM and Audio switch are separated No pre-operation If KVM+Audio+USB switch are linked together Scroll Lock + Scroll Lock + T (to unlink KVM+Audio and USB). Scroll Lock + Scroll Lock + U (to unlink KVM and Audio) If KVM+Audio and USB switch are separated (default setting after power up) Scroll Lock + Scroll Lock + U (to unlink KVM and Audio) If KVM and Audio switch are separated No pre-operation Push Button Operation Hot Key Operation Press PC to move to next port Scroll Lock + Scroll Lock + A + Port # Press PC to move to next port Scroll Lock+Scroll Lock +C + Port # Press HUB to move to next port Scroll Lock+Scroll Lock +H + Port # Press PC to move to next port Scroll Lock+Scroll Lock +C + Port # Press and hold PC Press HUB to move to next port Scroll Lock+Scroll Lock +M + Port #