1
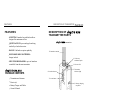
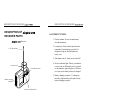
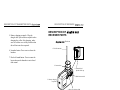
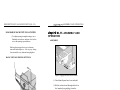
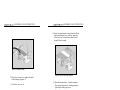
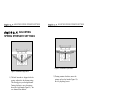
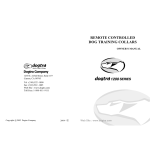
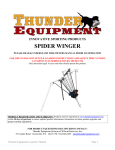
REMOTE RELEASE
BIRD LAUNCHERS
OWNER’S MANUAL
1250 E. 223rd Street, Suite 119
Carson, CA 90745
Tel :(310) 522 - 1800
Fax :(310) 522 -1805
Web Site : www.dogtra.com
Toll Free :1-888- 811-9111
Copyright c 2003 Dogtra Company
2004 -
Web Site : www.dogtra.com
TABLE OF CONTENTS
IMPORTANT SAFEGUARDS....................... 4
OVERVIEW OF BIRD LAUNCHERS........... 5
FEATURES ................................................... 6
PACKAGE
CONTENTS .................... 6
DESCRIPTION OF
TRANSMITTER PARTS ............................... 7
DESCRIPTION OF
RECEIVER PARTS ...................................... 10
DESCRIPTION OF
TRANSMITTER PARTS ............................... 12
DESCRIPTION OF
RECEIVER PARTS ...................................... 15
DESCRIPTION OF LAUNCHER PARTS ...... 17
ASSEMBLY AND
OPERATION........................ 21
ADJUSTING
SPRING STRENGTH SETTINGS ................. 26
RECHARGING
THE BATTERIES ......... 28
WARRANTY AND REPAIR...................... 32
3
IMPORTANT SAFEGUARDS
IMPORTANT SAFEGUARDS
DO NOT use the bird launcher until you have
read this manual.
Transport the launcher in a safe position. It
should either have the bird cradle open or if it is
closed, the safety pin must be inserted to lock
the release latch.
To store for long periods of time, place the bird
launcher in the open position to prevent the
springs from weakening.
To avoid danger, keep the bird launcher away
from children. Never leave a set bird launcher
unattended. The bird cradle pops open with
significant force.
Do not look down upon it or into it during the
launch process because you may be injured as
the bird cradle opens up.
OVERVIEW OF BIRD LAUNCHERS
OVERVIEW OF BIRD LAUNCHERS
Bird launchers help train
dogs to hold a point or stop to flush. They
also enable you to train a dog by yourself.
Remote Launcher system has
a remote controlled launcher that uses a
transmitter and receiver to release the
launcher. It also has a sound locator horn that
enables you to find a launcher in heavy cover.
Remote Launcher system
allows you to release up to six launchers by
turning the transmitter selector dial to the
number that corresponds with the number on
the launcher.
WARNING
Use caution when using a bird launcher. Keep
your head away from the top of the launcher
when it is loaded. You could be injured if
the dummy or bird is accidentally launched.
4
5
FEATURES
FEATURES
SCENTING: launcher box and bird cradle are
designed for maximum air flow
DESCRIPTION OF TRANSMITTER
DESCRIPTION OF
TRANSMITTER PARTS
transmitter
QUIET LAUNCH : prevents dogs from being
startled by a loud release noise
RANGE : half-mile reception capability
1.Transmitter antenna
RECHARGEABLE BATTERIES :
charger include.
4. Neck strap
attachment point
MULTIPLE RELEASERS : up to six launchers
controlled from the same transmitter
PACKAGE CONTENTS
Transmitter and Antenna
3. Selector dial
6. Launcher button
2. Transmitter
indicator light
7. Locate button
Receiver(s)
Battery Charger and Cables
5. Battery charging
receptacle
Owner's Manual
6
7
DESCRIPTION OF TRANSMITTER PARTS
DESCRIPTION OF TRANSMITTER PARTS
TRANSMITTER FUNCTIONS :
1. Transmitter antenna : Sends transmissions
from the transmitter to the receiver.
2. Transmitter indicator light : Shows you when
the transmitter is in use. When you press the
Locate or Launcher buttons, the indicator light
glows red. If it does not light up, the battery
needs to be recharged.
3. Selector dial : Turn the dial to select the
launcher you want to activate
(one to six).
5. Battery charging receptacle : Plug the
charger cable jack into this receptacle when
charging the collar. After charging, make
sure the rubber cover is fully seated so that
dirt will not enter the receptacle.
6. Launcher button : Press once to release the
launcher.
7. Locate button : Press to cause the locator
horn on the launcher to emit a loud sound.
NOTE : To select a launcher, check the
number printed on the front of the launcher's
receiver. You need to first obtain as many
launchers, up to six, as fits your need to use this
dial.
4. Neck strap attachment point : Clip neck strap
to the attachment point.
8
9
DESCRIPTION OF RECEIVER
DESCRIPTION OF RECEIVER
DESCRIPTION OF
RECEIVER PARTS
LAUNCHER FUNCTIONS :
1. Flexible antenna - Receives transmissions
from the transmitter.
Receiver
2. Locator horn - Emits a loud sound when the
transmitter's Locate button is pressed. It is
designed to help you find the launcher in
heavy cover.
1. Flexible antenna
3. Push button switch - Turns power on and off.
2. Locator horn
3. Push button switch
4. Receiver indicator light - Shows you when the
receiver is in use. When the receiver is turned
on, the indicator light will glow red. If it does
not come on, the battery needs to be charged.
5. Battery charging receptacle - To charge the
launcher, plug the battery cable jacks into the
battery charging receptacle.
5. Battery charging
receptacle
4. Receiver indicator light
10
11
DESCRIPTION OF TRANSMITTER PARTS
DESCRIPTION OF
TRANSMITTER PARTS
DESCRIPTION OF TRANSMITTER PARTS
TRANSMITTER FUNCTIONS :
1. Transmitter antenna : Sends transmissions
from the transmitter to the receiver.
transmitter
2. Transmitter indicator light : Shows you
when the transmitter is in use. When you
press the Locate or Launcher buttons, the
indicator light glows red. If it does not light
up, the battery needs to be recharged.
1.Transmitter antenna
4. Neck strap
attachment point
3. Selector dial
6. Launcher button
2. Transmitter
indicator light
7. Duck call sound
button
5. Battery charging
receptacle
12
3. Selector dial : Turn the dial to select the
launcher you want to activate
(one to six).
NOTE : To select a launcher, check the
number printed on the front of the
launcher's receiver. You need to first obtain as
many launchers, up to six, as fits your need to
use this dial.
4. Neck strap attachment point : Clip neck
strap to the attachment point.
13
DESCRIPTION OF TRANSMITTER PARTS
5. Battery charging receptacle : Plug the
charger cable jack into this receptacle when
charging the collar. After charging, make
sure the rubber cover is fully seated so that
dirt will not enter the receptacle.
6. Launcher button : Press once to release the
launcher.
DESCRIPTION OF RECEIVER
DESCRIPTION OF
RECEIVER PARTS
Receiver
1. Flexible antenna
7. Duck call sound button : Press to cause the
locator horn on the launcher to emit a loud
duck sound.
2. Locator horn
6. External loud
Speaker Jack cap
3. Push button switch
5. Battery charging
receptacle
4. Receiver indicator light
14
15
DESCRIPTION OF RECEIVER
LAUNCHER FUNCTIONS :
1. Flexible antenna - Receives transmissions from
the transmitter.
2. Locator horn - Emits a loud sound when the
transmitter's Locate button is pressed. It is
designed to help you find the launcher in heavy
cover.
DESCRIPTION OF LAUNCHER PARTS (QL, PL)
DESCRIPTION OF LAUNCHER
PARTS (QL, PL)
7. Bird cradle
3. Push button switch - Turns power on and off.
4. Receiver indicator light - Shows you when the
receiver is in use. When the receiver is turned on,
the indicator light will glow red. If it does not
come on, the battery needs to be charged.
5. Battery charging receptacle - To charge the
launcher, plug the battery cable jacks into the
battery charging receptacle.
External Speaker
16
6. An external speaker is sold
separately to increase longer
audio range.
Insert external speaker plug
in speaker jack on side of
receiver.
1. Cradle bar
6. Release
lever
5. Safety pin
4. Latch
3. Solenoid
2. Launcher box
17
DESCRIPTION OF LAUNCHER PARTS (QL, PL)
DESCRIPTION OF LAUNCHER PARTS (QL, PL)
LAUNCHER SIZE
LAUNCHER FUNCTIONS :
1. Cradle bar - Supports the bird cradle.
2. Launcher box - Frames the launcher and
contains large holes for maximum air flow
and scenting possibilities.
3. Solenoid - Activates the latch.
SIZE :
(Launcher) - for quail
- 8.6 4.5 4.3
- an excellent choice for quail and pigeons
(Launcher)- for pheasant
- 13.2 6.9 6.9
- handles large birds with ease
4. Latch - Holds the bird cradle closed when it is
set for launch.
5. Safety pin - When inserted, roller bearing
prevents the bird launcher from being
opened.
6. Release lever - Is held closed by the latch
when the launcher is set.
7. Bird cradle - Holds dummy or birds for
launching.
18
19
DESCRIPTION OF LAUNCHER PARTS (QL, PL)
ASSEMBLY AND OPERATION
DIAGRAM OF BACK VIEW TO LAUNCHER
To adjust spring strength settings, use a
flathead screwdriver and turn the bolt to
move the springs up and down.
ASSEMBLY AND
OPERATION
ASSEMBLY
Moving the springs from top to bottom
increases launch power : the very top being
lowest and the very bottom being highest.
BACK VIEW OF SPRING SETTINGS
Figure 4. Plugging Solenoid cord into receiver.
1) Check that all parts have been included.
2) Pull the solenoid cord through the hole in
the launcher box and plug it into the
receiver's outlet (Figure 4).
Spring Adjustment Bolt
20
21
ASSEMBLY AND OPERATION
ASSEMBLY AND OPERATION
OPERATION
First, test the launcher without any
dummy or bird inside.
WARNING
Keep your head away from the top of the launcher
when it is loaded. You could be injured if the dummy
or bird is launched accidentally.
Figure 5. Mounting the receiver.
3) To mount the receiver, attach the receiver
to the launcher box (1) and push down
gently so that it locks in place (2).
Check to see that the receiver is attached
securely by pulling the receiver.
4) Pull out the safety pin. Release the latch to
open the bird launcher.
22
Figure 6. Closing the launcher.
1) Close the bird cradle inside the
launcher box and hold it in place
(Figure 6).
23
ASSEMBLY AND OPERATION
ASSEMBLY AND OPERATION
4) Press the transmitter's Locate button. (Duck
call sound button) It is working properly
if the receiver Locator horn emits a loud
sound. (Duck sound)
Figure 7. Setting the latch.
2) Place the release lever under the latch
roller bearing (Figure 7).
3) Turn the receiver on.
24
Figure 8. Remote launcher released.
5) Press the transmitter's Launcher button.
The remote launcher is working properly
if the bird cradle pops open
(Figure 8).
25
ADJUSTING SPRING STRENGTH SETTINGS
ADJUSTING SPRING STRENGTH SETTINGS
ADJUSTING
SPRING STRENGTH SETTINGS
Figure 10. Positioned for quiet launch
Figure 9. Positioned for high launch
1) The bird launcher is shipped with the
springs adjusted in the bottom setting.
This setting gives you the high launch.
Turning clockwise, move the springs
down for a high launch (Figure 9). : the
very bottom being highest.
26
2) Turning counter-clockwise, move the
springs up for a low launch (Figure 10) :
the very top being lowest.
27
RECHARGING THE BATTERIES
RECHARGING
RECHARGING THE BATTERIES
WHEN TO CHARGE :
THE BATTERIES
PRECAUTIONS :
1) Charge the batteries indoors.
2) Do not charge near any flammable substances
or with the power on.
3) Keep the battery charger free of moisture.
4) Keep the battery charging receptacles on both
the transmitter and receiver free of dirt.
Should the battery charging receptacles
become wet, wipe them dry before charging.
5) Use only the battery charger included with
your launcher. Other chargers are not
compatible.
28
1) During frequent use, charge the transmitter
when the indicator light is blinking on and off
or the light does not come on when either the
Duck call sound button or Launcher button is
pressed.
2) Charge the receiver when the indicator light
does not come on when the Power ON/OFF
Button is turned on.
3) Fully charge the batteries for about 14 hours
once every month, even if the launcher is
being stored without use.
4) The battery comes fully charged from the
factory. However, since the battery can
gradually discharge during storage time, it is
recommended that you charge the battery for
about 14 hours before initial use.
29
RECHARGING THE BATTERIES
HOW TO CHARGE THE TRANSMITTER
AND RECEIVER :
1) Turn off the power to the receiver.
2) Plug the battery charger into a 110-volt
wall outlet.
3) Attach the double cable end of the battery
charging cables to the battery charging
receptacles on the transmitter and receiver.
(When charging the transmitter or receiver
separately, there is no need to use the battery
charging cables, just connect the battery
charger lead directly to the transmitter or
receiver).
RECHARGING THE BATTERIES
5) Charge the batteries for 14 hours.
6) After charging, disconnect the battery
charging cables from the battery charging
receptacles and fully seat the rubber covers
into the receptacles so that dirt will not enter
them.
7) Turn on the receiver's power switch and press
the transmitter launcher button to make sure
the indicator lights turn on, indicating that
the batteries are now charged.
4) Attach the other end of the battery charging
cables to the battery charger cord.The
indicator lights will turn on and glow red
when the battery is charging. They remain on
even when the battery is fully charged.
30
31
WARRANTY
WARRANTY AND
REPAIR INFORMATION
WARRANTY
Any expedited shipping service will be at the owner’s
expense.
Warranty Repair
A copy of the sales receipt showing purchase date
is required before warranty work is begun.
provides the original
purchaser a one-year limited warranty for repair for
the remote release/bird launchers on parts and labor
from the date of the original purchase.
Write a note briefly explaining the problem and
include your name, address, city/state/zip code,
daytime phone number and evening phone number.
Dogtra DOES NOT replace defective units or
refund after 30 days of purchase.
Dogtra’s warranty DOES NOT cover repairs or
replacement due to misuse, improper maintenance or
lost units. All replacement cost for either the
transmitter or receiver is the owner’s responsibility.
The warranty is void if the unit has been altered
or an unauthorized person has attempted repair work.
Send unit for repair to :
1250 E. 223rd Street, Suite 119
Carson, CA 90745
For any questions concerning your dogtra products
call us Toll Free at 1-888-811-9111.
Return shipping of warranty work is the owner’s
responsibility. The cost for shipping (via regular
ground service) back to the customer is covered by
Dogtra Co. within the continental United States.
32
33
REPAIR
Out of Warranty Repair
For repair work that is no longer covered by
warranty, the cost of repair will include parts, labor and
shipping. Write a note briefly explaining the problem.
Include your name, address, city/state/zip code,
daytime phone number and evening phone number.
Send unit for repair to :
1250 E. 223rd Street, Suite 119
Carson, CA 90745
Tel :(310) 522 -1800
Fax :(310) 522 - 1805
Toll Free :1-888- 811-9111
34