1
Aastra 142d
at the OpenCom 1000
Communications System
User Guide
Welcome to Aastra
Thank you for choosing this Aastra product. Our product meets the strictest
requirements with regard to quality and design.
The following User's Guide will assist you in using your Aastra 142d and provide
answers to all your most important questions. If you should require further technical support or information about other Aastra products, please contact the
person responsible for your system or get in touch with your local dealer.
You can also find information about this device and other products on our website
at http://www.aastra.de or http://www.aastra.com.
We hope you enjoy using your Aastra 142d DECT telephone.
Contents
Using the Aastra 142d Telephone . . . . . . . . . . . . . . . . . . . . . . . . . . . . . . . . . . . . . . . . 1
Appropriate Use . . . . . . . . . . . . . . . . . . . . . . . . . . . . . . . . . . . . . . . . . . . . . . . . . . . . . . . . . . . . 1
Power Supply / Power Failure / Batteries. . . . . . . . . . . . . . . . . . . . . . . . . . . . . . . . . . 2
Safety Information . . . . . . . . . . . . . . . . . . . . . . . . . . . . . . . . . . . . . . . . . . . . . . . . . . . . . . 2
Communications Regulation Information. . . . . . . . . . . . . . . . . . . . . . . . . . . . . . . . . . . . 3
FCC Notices (U.S. Only) . . . . . . . . . . . . . . . . . . . . . . . . . . . . . . . . . . . . . . . . . . . . . . . . . . 3
Health and Safety Information . . . . . . . . . . . . . . . . . . . . . . . . . . . . . . . . . . . . . . . . . . . 4
Industry Canada (Canada only) . . . . . . . . . . . . . . . . . . . . . . . . . . . . . . . . . . . . . . . . . . 4
Overview and Basic Information. . . . . . . . . . . . . . . . . . . . . . . . . . . . . . . . . . . . . . . . . . . . . 5
Authorisation is Required . . . . . . . . . . . . . . . . . . . . . . . . . . . . . . . . . . . . . . . . . . . . . . . . 5
DECT and GAP . . . . . . . . . . . . . . . . . . . . . . . . . . . . . . . . . . . . . . . . . . . . . . . . . . . . . . . . . . 5
MEM Card . . . . . . . . . . . . . . . . . . . . . . . . . . . . . . . . . . . . . . . . . . . . . . . . . . . . . . . . . . . . . . . 6
The Headset Socket . . . . . . . . . . . . . . . . . . . . . . . . . . . . . . . . . . . . . . . . . . . . . . . . . . . . . 6
Installation. . . . . . . . . . . . . . . . . . . . . . . . . . . . . . . . . . . . . . . . . . . . . . . . . . . . . . . . . . . . . 7
Unpacking and Setting up Telephone . . . . . . . . . . . . . . . . . . . . . . . . . . . . . . . . . . . . . . . 7
Scope of Delivery. . . . . . . . . . . . . . . . . . . . . . . . . . . . . . . . . . . . . . . . . . . . . . . . . . . . . . . . 7
Setting up Charging Station . . . . . . . . . . . . . . . . . . . . . . . . . . . . . . . . . . . . . . . . . . . . . 7
Activating Charging Station . . . . . . . . . . . . . . . . . . . . . . . . . . . . . . . . . . . . . . . . . . . . . . . . . 8
Activating Mobile Unit . . . . . . . . . . . . . . . . . . . . . . . . . . . . . . . . . . . . . . . . . . . . . . . . . . . . . . 9
Important Battery Information . . . . . . . . . . . . . . . . . . . . . . . . . . . . . . . . . . . . . . . . . . . 9
Charging and Discharging . . . . . . . . . . . . . . . . . . . . . . . . . . . . . . . . . . . . . . . . . . . . . . . 9
Commissioning . . . . . . . . . . . . . . . . . . . . . . . . . . . . . . . . . . . . . . . . . . . . . . . . . . . . . . . . . 9
Charging and Usage Times . . . . . . . . . . . . . . . . . . . . . . . . . . . . . . . . . . . . . . . . . . . . .10
Inserting/Removing Batteries . . . . . . . . . . . . . . . . . . . . . . . . . . . . . . . . . . . . . . . . . . .10
Charge Display . . . . . . . . . . . . . . . . . . . . . . . . . . . . . . . . . . . . . . . . . . . . . . . . . . . . . . . . .11
Charge Warning . . . . . . . . . . . . . . . . . . . . . . . . . . . . . . . . . . . . . . . . . . . . . . . . . . . . . . . .12
Aastra 142d with MEM Card . . . . . . . . . . . . . . . . . . . . . . . . . . . . . . . . . . . . . . . . . . . . . . . .12
General Information . . . . . . . . . . . . . . . . . . . . . . . . . . . . . . . . . . . . . . . . . . . . . . . . . . . .12
Operation with/without MEM Card. . . . . . . . . . . . . . . . . . . . . . . . . . . . . . . . . . . . . .12
Inserting MEM Card . . . . . . . . . . . . . . . . . . . . . . . . . . . . . . . . . . . . . . . . . . . . . . . . . . . .13
Removing MEM Card . . . . . . . . . . . . . . . . . . . . . . . . . . . . . . . . . . . . . . . . . . . . . . . . . . .14
Subscribing Mobile Unit . . . . . . . . . . . . . . . . . . . . . . . . . . . . . . . . . . . . . . . . . . . . . . . . . . .14
The “Subscriptions” Menu . . . . . . . . . . . . . . . . . . . . . . . . . . . . . . . . . . . . . . . . . . . . . .15
Creating New Subscription . . . . . . . . . . . . . . . . . . . . . . . . . . . . . . . . . . . . . . . . . . . . .17
Attaching/Removing Belt Clip . . . . . . . . . . . . . . . . . . . . . . . . . . . . . . . . . . . . . . . . . . . . . .19
Functions . . . . . . . . . . . . . . . . . . . . . . . . . . . . . . . . . . . . . . . . . . . . . . . . . . . . . . . . . . . . . 20
Operational Controls on the Mobile Unit. . . . . . . . . . . . . . . . . . . . . . . . . . . . . . . . . . . .20
Display Elements and Symbols . . . . . . . . . . . . . . . . . . . . . . . . . . . . . . . . . . . . . . . . . . . . .21
i
The Display . . . . . . . . . . . . . . . . . . . . . . . . . . . . . . . . . . . . . . . . . . . . . . . . . . . . . . . . . . . . 21
Symbols Shown on the Display . . . . . . . . . . . . . . . . . . . . . . . . . . . . . . . . . . . . . . . . . 21
Text Lines . . . . . . . . . . . . . . . . . . . . . . . . . . . . . . . . . . . . . . . . . . . . . . . . . . . . . . . . . . . . . . 22
Softkey Line . . . . . . . . . . . . . . . . . . . . . . . . . . . . . . . . . . . . . . . . . . . . . . . . . . . . . . . . . . . 22
Illumination. . . . . . . . . . . . . . . . . . . . . . . . . . . . . . . . . . . . . . . . . . . . . . . . . . . . . . . . . . . . 22
Softkeys and Other Keys . . . . . . . . . . . . . . . . . . . . . . . . . . . . . . . . . . . . . . . . . . . . . . . . . . . 22
Softkey: Arrow Keys . . . . . . . . . . . . . . . . . . . . . . . . . . . . . . . . . . . . . . . . . . . . . . . . . . . . 23
Softkey: OK . . . . . . . . . . . . . . . . . . . . . . . . . . . . . . . . . . . . . . . . . . . . . . . . . . . . . . . . . . . . 23
Softkey: Esc . . . . . . . . . . . . . . . . . . . . . . . . . . . . . . . . . . . . . . . . . . . . . . . . . . . . . . . . . . . . 23
Softkey: Redial . . . . . . . . . . . . . . . . . . . . . . . . . . . . . . . . . . . . . . . . . . . . . . . . . . . . . . . . . 23
Softkey: Menu . . . . . . . . . . . . . . . . . . . . . . . . . . . . . . . . . . . . . . . . . . . . . . . . . . . . . . . . . 24
Receiver Key . . . . . . . . . . . . . . . . . . . . . . . . . . . . . . . . . . . . . . . . . . . . . . . . . . . . . . . . . . . 24
Speaker/Handsfree Key. . . . . . . . . . . . . . . . . . . . . . . . . . . . . . . . . . . . . . . . . . . . . . . . . 24
Info Key. . . . . . . . . . . . . . . . . . . . . . . . . . . . . . . . . . . . . . . . . . . . . . . . . . . . . . . . . . . . . . . . 24
C Key . . . . . . . . . . . . . . . . . . . . . . . . . . . . . . . . . . . . . . . . . . . . . . . . . . . . . . . . . . . . . . . . . . 25
R Key (Signal Key) / Emergency Call Key . . . . . . . . . . . . . . . . . . . . . . . . . . . . . . . . . 26
Hash Key. . . . . . . . . . . . . . . . . . . . . . . . . . . . . . . . . . . . . . . . . . . . . . . . . . . . . . . . . . . . . . . 26
Star Key. . . . . . . . . . . . . . . . . . . . . . . . . . . . . . . . . . . . . . . . . . . . . . . . . . . . . . . . . . . . . . . . 26
Number Keys . . . . . . . . . . . . . . . . . . . . . . . . . . . . . . . . . . . . . . . . . . . . . . . . . . . . . . . . . . 26
Call Keys . . . . . . . . . . . . . . . . . . . . . . . . . . . . . . . . . . . . . . . . . . . . . . . . . . . . . . . . . . . . . . . 26
The Editor . . . . . . . . . . . . . . . . . . . . . . . . . . . . . . . . . . . . . . . . . . . . . . . . . . . . . . . . . . . . . . . . . 29
Menu Navigation . . . . . . . . . . . . . . . . . . . . . . . . . . . . . . . . . . . . . . . . . . . . . . . . . . . . . . . . . . 30
The Main Menu . . . . . . . . . . . . . . . . . . . . . . . . . . . . . . . . . . . . . . . . . . . . . . . . . . . . . . . . 30
Menus Hide Automatically . . . . . . . . . . . . . . . . . . . . . . . . . . . . . . . . . . . . . . . . . . . . . 32
Basic Functions . . . . . . . . . . . . . . . . . . . . . . . . . . . . . . . . . . . . . . . . . . . . . . . . . . . . . . . .33
Device Functions . . . . . . . . . . . . . . . . . . . . . . . . . . . . . . . . . . . . . . . . . . . . . . . . . . . . . . . . . . 33
Switching Device on/off . . . . . . . . . . . . . . . . . . . . . . . . . . . . . . . . . . . . . . . . . . . . . . . . 33
Key Lock . . . . . . . . . . . . . . . . . . . . . . . . . . . . . . . . . . . . . . . . . . . . . . . . . . . . . . . . . . . . . . . 34
Telephone Lock . . . . . . . . . . . . . . . . . . . . . . . . . . . . . . . . . . . . . . . . . . . . . . . . . . . . . . . . 34
Speaker/Handsfree Use . . . . . . . . . . . . . . . . . . . . . . . . . . . . . . . . . . . . . . . . . . . . . . . . 34
Adjusting Volume during a Call . . . . . . . . . . . . . . . . . . . . . . . . . . . . . . . . . . . . . . . . . 34
Switching off Ringer. . . . . . . . . . . . . . . . . . . . . . . . . . . . . . . . . . . . . . . . . . . . . . . . . . . . 35
Muting Mobile Unit . . . . . . . . . . . . . . . . . . . . . . . . . . . . . . . . . . . . . . . . . . . . . . . . . . . . 35
Changing Display Contrast . . . . . . . . . . . . . . . . . . . . . . . . . . . . . . . . . . . . . . . . . . . . . 36
Time / Alarm . . . . . . . . . . . . . . . . . . . . . . . . . . . . . . . . . . . . . . . . . . . . . . . . . . . . . . . . . . . 36
Message Display . . . . . . . . . . . . . . . . . . . . . . . . . . . . . . . . . . . . . . . . . . . . . . . . . . . . . . . 36
Emergency Call Key (SOS Number). . . . . . . . . . . . . . . . . . . . . . . . . . . . . . . . . . . . . . 36
Phone Book. . . . . . . . . . . . . . . . . . . . . . . . . . . . . . . . . . . . . . . . . . . . . . . . . . . . . . . . . . . . 36
Connections . . . . . . . . . . . . . . . . . . . . . . . . . . . . . . . . . . . . . . . . . . . . . . . . . . . . . . . . . . . . . . 37
Internal and External Call Numbers . . . . . . . . . . . . . . . . . . . . . . . . . . . . . . . . . . . . . 37
Multiple Connections . . . . . . . . . . . . . . . . . . . . . . . . . . . . . . . . . . . . . . . . . . . . . . . . . . 37
DTMF Postdial / VF Signalling. . . . . . . . . . . . . . . . . . . . . . . . . . . . . . . . . . . . . . . . . . . 38
ii
Charge Display (Charges) . . . . . . . . . . . . . . . . . . . . . . . . . . . . . . . . . . . . . . . . . . . . . . .38
Transmission of Call Numbers. . . . . . . . . . . . . . . . . . . . . . . . . . . . . . . . . . . . . . . . . . .38
Menus. . . . . . . . . . . . . . . . . . . . . . . . . . . . . . . . . . . . . . . . . . . . . . . . . . . . . . . . . . . . . . . . . . . . .39
Menu before and during a Call . . . . . . . . . . . . . . . . . . . . . . . . . . . . . . . . . . . . . . . . . .39
Menu when Idle . . . . . . . . . . . . . . . . . . . . . . . . . . . . . . . . . . . . . . . . . . . . . . . . . . . . . . . .39
Telephoning. . . . . . . . . . . . . . . . . . . . . . . . . . . . . . . . . . . . . . . . . . . . . . . . . . . . . . . . . . . 41
External/Internal Calling . . . . . . . . . . . . . . . . . . . . . . . . . . . . . . . . . . . . . . . . . . . . . . . . . . .41
Line Seizure . . . . . . . . . . . . . . . . . . . . . . . . . . . . . . . . . . . . . . . . . . . . . . . . . . . . . . . . . . . .41
Line Seizure via “Direct Call Key with Signalling” . . . . . . . . . . . . . . . . . . . . . . . . .41
Line Seizure via “Team Direct Call Key” . . . . . . . . . . . . . . . . . . . . . . . . . . . . . . . . . .41
Connection Set-up on a Device with Internal Preferred Key . . . . . . . . . . . . . .42
Making an External Call on a Phone with External Preferred Key . . . . . . . . .42
Making an Internal Call on a Phone with External Preferred Key . . . . . . . . . .42
Dialling / Pre-dialling . . . . . . . . . . . . . . . . . . . . . . . . . . . . . . . . . . . . . . . . . . . . . . . . . . .42
Redialling . . . . . . . . . . . . . . . . . . . . . . . . . . . . . . . . . . . . . . . . . . . . . . . . . . . . . . . . . . . . . .43
Calling from the Call Lists . . . . . . . . . . . . . . . . . . . . . . . . . . . . . . . . . . . . . . . . . . . . . . .43
Calling from the System's Central Phone Book . . . . . . . . . . . . . . . . . . . . . . . . . . .44
Calling from the Local Phone Book of Your Aastra 142d . . . . . . . . . . . . . . . . . .44
Using Routes to Make Calls . . . . . . . . . . . . . . . . . . . . . . . . . . . . . . . . . . . . . . . . . . . . .45
Menu during Conversation . . . . . . . . . . . . . . . . . . . . . . . . . . . . . . . . . . . . . . . . . . . . .45
Menu if Subscriber Busy . . . . . . . . . . . . . . . . . . . . . . . . . . . . . . . . . . . . . . . . . . . . . . . .46
Menu during the Call . . . . . . . . . . . . . . . . . . . . . . . . . . . . . . . . . . . . . . . . . . . . . . . . . . .46
Ending a Call . . . . . . . . . . . . . . . . . . . . . . . . . . . . . . . . . . . . . . . . . . . . . . . . . . . . . . . . . . . . . .47
Accepting Calls . . . . . . . . . . . . . . . . . . . . . . . . . . . . . . . . . . . . . . . . . . . . . . . . . . . . . . . . . . . .47
Optical Call Display . . . . . . . . . . . . . . . . . . . . . . . . . . . . . . . . . . . . . . . . . . . . . . . . . . . . .47
Normal Call . . . . . . . . . . . . . . . . . . . . . . . . . . . . . . . . . . . . . . . . . . . . . . . . . . . . . . . . . . . .47
Calls while Telephoning . . . . . . . . . . . . . . . . . . . . . . . . . . . . . . . . . . . . . . . . . . . . . . . .48
Incoming Call Menu . . . . . . . . . . . . . . . . . . . . . . . . . . . . . . . . . . . . . . . . . . . . . . . . . . . .49
Enquiry, Toggle, Transfer and Conference . . . . . . . . . . . . . . . . . . . . . . . . . . . . . . . . . . .49
Enquiry /Toggle via the R Key . . . . . . . . . . . . . . . . . . . . . . . . . . . . . . . . . . . . . . . . . . .49
Enquiry /Toggle via Another Call Key . . . . . . . . . . . . . . . . . . . . . . . . . . . . . . . . . . . .50
Transferring a Call to an Internal Subscriber . . . . . . . . . . . . . . . . . . . . . . . . . . . . .51
Transferring an External Call to an External Subscriber . . . . . . . . . . . . . . . . . . .51
Menu when Subscriber on Hold. . . . . . . . . . . . . . . . . . . . . . . . . . . . . . . . . . . . . . . . .52
Internal/External Three-Party-Conference . . . . . . . . . . . . . . . . . . . . . . . . . . . . . . .53
During the Conference . . . . . . . . . . . . . . . . . . . . . . . . . . . . . . . . . . . . . . . . . . . . . . . . .54
Menu during the Conference . . . . . . . . . . . . . . . . . . . . . . . . . . . . . . . . . . . . . . . . . . .55
Special Calls/Conversations . . . . . . . . . . . . . . . . . . . . . . . . . . . . . . . . . . . . . . . . . . . . . . . .55
Call Back . . . . . . . . . . . . . . . . . . . . . . . . . . . . . . . . . . . . . . . . . . . . . . . . . . . . . . . . . . . . . . .55
Querying Voicebox . . . . . . . . . . . . . . . . . . . . . . . . . . . . . . . . . . . . . . . . . . . . . . . . . . . . .56
Recording Calls. . . . . . . . . . . . . . . . . . . . . . . . . . . . . . . . . . . . . . . . . . . . . . . . . . . . . . . . .57
iii
Confirming Paging Messages . . . . . . . . . . . . . . . . . . . . . . . . . . . . . . . . . . . . . . . . . . . 58
Calls for ACD Group Members . . . . . . . . . . . . . . . . . . . . . . . . . . . . . . . . . . . . . . . . . . 58
Team Functions . . . . . . . . . . . . . . . . . . . . . . . . . . . . . . . . . . . . . . . . . . . . . . . . . . . . . . . .59
TOP TEAM Function . . . . . . . . . . . . . . . . . . . . . . . . . . . . . . . . . . . . . . . . . . . . . . . . . . . . . . . 59
BROKER TEAM Function . . . . . . . . . . . . . . . . . . . . . . . . . . . . . . . . . . . . . . . . . . . . . . . . . . . 60
PARALLEL TEAM Function. . . . . . . . . . . . . . . . . . . . . . . . . . . . . . . . . . . . . . . . . . . . . . . . . . 62
EXECUTIVE-/SECRETARY Team Function . . . . . . . . . . . . . . . . . . . . . . . . . . . . . . . . . . . . 64
Features and Menus . . . . . . . . . . . . . . . . . . . . . . . . . . . . . . . . . . . . . . . . . . . . . . . . . . . .66
How to Set Features . . . . . . . . . . . . . . . . . . . . . . . . . . . . . . . . . . . . . . . . . . . . . . . . . . . . . . . 66
The Main Menu. . . . . . . . . . . . . . . . . . . . . . . . . . . . . . . . . . . . . . . . . . . . . . . . . . . . . . . . . . . . 66
“Calls” Menu . . . . . . . . . . . . . . . . . . . . . . . . . . . . . . . . . . . . . . . . . . . . . . . . . . . . . . . . . . . 67
“Call diversions” Menu . . . . . . . . . . . . . . . . . . . . . . . . . . . . . . . . . . . . . . . . . . . . . . . . . 68
“Messages” Menu . . . . . . . . . . . . . . . . . . . . . . . . . . . . . . . . . . . . . . . . . . . . . . . . . . . . . . 69
“Settings” Menu. . . . . . . . . . . . . . . . . . . . . . . . . . . . . . . . . . . . . . . . . . . . . . . . . . . . . . . . 70
“Protection” Menu . . . . . . . . . . . . . . . . . . . . . . . . . . . . . . . . . . . . . . . . . . . . . . . . . . . . . 76
“Special features” Menu . . . . . . . . . . . . . . . . . . . . . . . . . . . . . . . . . . . . . . . . . . . . . . . . 77
“Central config.” (Central configurations) Menu . . . . . . . . . . . . . . . . . . . . . . . . . 78
Information Menus . . . . . . . . . . . . . . . . . . . . . . . . . . . . . . . . . . . . . . . . . . . . . . . . . . . . . . . . 81
“Info” Menu . . . . . . . . . . . . . . . . . . . . . . . . . . . . . . . . . . . . . . . . . . . . . . . . . . . . . . . . . . . . 81
“Active features” Menu . . . . . . . . . . . . . . . . . . . . . . . . . . . . . . . . . . . . . . . . . . . . . . . . . 82
Installing USB Drivers . . . . . . . . . . . . . . . . . . . . . . . . . . . . . . . . . . . . . . . . . . . . . . . . . .83
Updating Software . . . . . . . . . . . . . . . . . . . . . . . . . . . . . . . . . . . . . . . . . . . . . . . . . . . . . . . . 84
PC Tool for Managing the Phone Book . . . . . . . . . . . . . . . . . . . . . . . . . . . . . . . . . . . . . 85
Appendix . . . . . . . . . . . . . . . . . . . . . . . . . . . . . . . . . . . . . . . . . . . . . . . . . . . . . . . . . . . . . .86
Important Information on Battery Use. . . . . . . . . . . . . . . . . . . . . . . . . . . . . . . . . . . . . . 86
Care and Maintenance. . . . . . . . . . . . . . . . . . . . . . . . . . . . . . . . . . . . . . . . . . . . . . . . . . . . . 87
Environmental Properties and Disposal . . . . . . . . . . . . . . . . . . . . . . . . . . . . . . . . . . . . 88
Notes on Disposal . . . . . . . . . . . . . . . . . . . . . . . . . . . . . . . . . . . . . . . . . . . . . . . . . . . . . . 88
Declaration of Conformity . . . . . . . . . . . . . . . . . . . . . . . . . . . . . . . . . . . . . . . . . . . . . . . . . 89
Limited Warranty . . . . . . . . . . . . . . . . . . . . . . . . . . . . . . . . . . . . . . . . . . . . . . . . . . . . . . . . . . 89
Exclusions . . . . . . . . . . . . . . . . . . . . . . . . . . . . . . . . . . . . . . . . . . . . . . . . . . . . . . . . . . . . . 89
Warranty Repair Services . . . . . . . . . . . . . . . . . . . . . . . . . . . . . . . . . . . . . . . . . . . . . . . 90
After Warranty Service . . . . . . . . . . . . . . . . . . . . . . . . . . . . . . . . . . . . . . . . . . . . . . . . . 90
Technical Data . . . . . . . . . . . . . . . . . . . . . . . . . . . . . . . . . . . . . . . . . . . . . . . . . . . . . . . . . . . . 91
Menu Tree . . . . . . . . . . . . . . . . . . . . . . . . . . . . . . . . . . . . . . . . . . . . . . . . . . . . . . . . . . . . . . . . 93
Index . . . . . . . . . . . . . . . . . . . . . . . . . . . . . . . . . . . . . . . . . . . . . . . . . . . . . . . . . . . . . . . . . .94
iv
Using the Aastra 142d Telephone
Using the Aastra 142d Telephone
The Aastra 142d is a cordless telephone for operation on the OpenCom 1000 communications system. You can also operate your mobile unit on other communications systems and thus use the same mobile unit at different locations. Operation
on communications systems by other manufacturers is still possible when they
comply with the GAP standard.
The newly designed menus offer you easy handling of your telephone and speedy
access to the wide variety of functions and features of your system.
Make yourself acquainted with your telephone's capabilities. You will get to know
many new functions which make communication and organization easier for you.
Appropriate Use
This product can be operated on a DECT-GAP-compatible communications system
in all EU member countries. The telephone complies with radio-specific Europeanharmonised DECT standards.
The CE mark on the product confirms conformity with the technical regulations
regarding user safety and electromagnetic compatibility, valid as of the issue date
of the corresponding Declaration of Conformity according to European Directive
99/5/EC. The Declaration of Conformity can be viewed on the Aastra internet
homepage.
This device remains approved for use in North America (USA and Canada). Please
refer to the safety information under Communications Regulation Information
starting on page 3.
Please use the other included documentation on parts of your communications
system.
As is the case with any cordless telephone, this mobile unit uses radio signals
which do not guarantee a connection under all circumstances. This is why you
should never completely rely on cordless telephones for essential communication
(e.g. for medical emergencies).
1
Using the Aastra 142d Telephone
Power Supply / Power Failure / Batteries
This product requires a 100V to 240V alternating current power supply for operating the charging station. When you wish to disconnect the charging station from
the power supply, pull the power supply unit plug out of the mains socket.
If there is a power outage, all memory data (programme and user data) are saved
on the mobile unit without alteration.
Please refer to page 86 for important information on battery use.
Safety Information
The charging station may only be set up and operated within a closed building.
Place the charging station on an anti-slip mat.
Do not set up the charging station and mobile unit near:
■
water, moisture or damp places
■
heat sources, direct sunlight or unventilated places
■
devices which generate powerful magnetic fields
■
places where the device can be covered up or liquid can get in
■
dusty places and places subject to vibrations, shocks or extreme temperature
fluctuations.
Please be sure to note the following when setting up, connecting and operating
the telephone:
2
■
Position the connecting cable where it will not cause an accident!
■
Be sure to only connect the connecting cable into appropriate sockets.
■
Connect only approved accessories.
■
Use the supplied AC adapter (ID No.: 23-001071-00) only.
■
Do not use any power supply that is visibly damaged (ruptures, housing
cracks).
■
Research has demonstrated that in certain cases medical devices can be
affected by portable telephones (DECT) that are switched on. This is why when
within medical institutions you should be sure to comply with the regulations
of the respective institution when using portable telephones.
■
Do not hold the telephone in the hands-free mode next to your ear as the
volume can be very high.
Using the Aastra 142d Telephone
■
This product’s earcap region (at the front) and the loudspeaker region (at the
rear) is slightly magnetic and may pick up metallic objects, such as staples or
pins. Please check both regions for metallic objects before use.
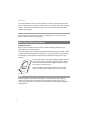
WARNING!
Never
– open the charging station or the mobile device (aside
from the battery compartment lid)!
– touch the plug contacts with sharp, metal objects!
– carry the charger by the connecting cable!
■
Only use a slightly damp or an anti-static cloth to clean your telephone. Never
use a dry cloth. Never use cleansing agents.
■
Do not use your telephone in areas at risk of explosion.
■
Set up and keep mobile device and accessories outside the reach of children.
Note for persons wearing hearing aids
Persons wearing hearing aids should keep in mind that when using the mobile
device at sufficient volume, the resulting radio signal interference produces an
unpleasant humming noise.
Communications Regulation Information
FCC Notices (U.S. Only)
This device complies with part 15 of the FCC Rules. Operation is subject to the following two conditions:
(1) This device may not cause harmful interference, and (2) this device must accept
any interference received, including interference that may cause undesired operation.
Modifications not expressly approved by this company could void the user’s
authority to operate the equipment.
NOTE: This equipment has been tested and found to comply with the limits for a
Class B digital device, pursuant to Part 15 of the FCC Rules. These limits are
designed to provide reasonable protection against harmful interference in a residential installation. This equipment generates, uses and can radiate radio frequency energy and, if not installed and used in accordance with the instructions,
may cause harmful interference to radio communications. However, there is no
guarantee that interference will not occur in a particular installation. If this
equipment does cause harmful interference to radio or television reception, which
3
Using the Aastra 142d Telephone
can be determined by turning the equipment off and on, the user is encouraged
to try to correct the interference by one or more of the following measures:
■
Reorient or relocate the receiving antenna.
■
Increase the separation between the equipment and receiver.
■
Connect the equipment into an outlet on a circuit different from that to which
the receiver is connected.
■
Consult the dealer or an experienced radio/TV technician for help.
Health and Safety Information
Exposure to Radio Frequency (RF) Signals:
The wireless phone is a radio transmitter and receiver. It is designed and manufactured not to exceed the emission limits for exposure to radio frequency (RF)
energy set by the Federal Communications Commission (FCC) of the U.S. Government. These limits are part of comprehensive guidelines and establish permitted levels of RF energy for the general population. The guidelines are based on
the safety standards previously set by both U.S. and international standards
bodies. These standards include a substantial safety margin designed to assure the
safety of all persons, regardless of age and health.
This device and its antenna must not be co-located or operating in conjunction
with any other antenna or transmitter.
This EUT has been shown to be capable of compliance for localized specific
absorption rate (SAR) for uncontrolled environment/general population exposure
limits specified in ANSI/IEEE Std. C95.1-1992 and had been tested in accordance
with the measurement procedures specified in FCC/OET Bulletin 65 Supplement C
(2001) and IEEE 1528-2003.
Industry Canada (Canada only)
Operation of this device is subject to the following two conditions: (1) this device
may not cause interference, and (2) this device must accept any interference,
including interference that may cause undesired operation of the device.
Privacy of communications may not be ensured when using this telephone.
Exposure to Radio Frequency (RF) Signals:
The wireless phone is a radio transmitter and receiver. It is designed and manufactured not to exceed the emission limits for exposure to radio frequency (RF)
energy set by the Federal Communications Commission (FCC) of the U.S. Government. These limits are part of comprehensive guidelines and establish permitted levels of RF energy for the general population. These guidelines are based
4
Using the Aastra 142d Telephone
on the safety standards previously set by international standard bodies. These
standards include a substantial safety margin designed to assure the safety of all
persons, regardless of age and health.
This device and its antenna must not be co-located or operating in conjunction
with any other antenna or transmitter.
This device has been shown to be capable of compliance for localized specific
absorption rate (SAR) for uncontrolled environment / general public exposure
limits specific in ANSI/IEEE C95.1-1992 and had been tested in accordance with the
measurement procedures specified in IEEE 1528-2003.
Overview and Basic Information
Authorisation is Required
Most of the features mentioned in this manual can only be used when you have
the corresponding user authorisation. Your system administrator configures
authorisations when configuring the communications system.
Contact the system administrator when you have questions on specific features or
are not able to use a feature satisfactorily.
DECT and GAP
A digital radio connection is established between the mobile unit and the base
station (Radio Fixed Part, RFP) in accordance with the DECT standard (DECT =
Digital Enhanced Cordless Telecommunications). The digital channel ensures the
best voice quality without static or background noise. The Generic Access Profile
(GAP) is used for signalling between the communications system and the mobile
unit.
The Generic Access Profile (GAP) and the DECT standard define procedures
according to which digital cordless telephones can establish connections. The
GAP standard applies independent of manufacturer, meaning that communications systems and mobile units of various manufacturers can be combined. The
basic functions (telephoning, accepting calls) are always available in these combinations; other functions (e.g. displaying the call number on the display, displaying
connection charges) which your OpenCom 1000 communications system provides along with your mobile unit, may not be available with other manufacturers’
communications systems. Please consult the corresponding manufacturer’s user
guide or contact your system administrator.
5
Using the Aastra 142d Telephone
Information on transmission quality
■
Due to digital transmission within the frequency range used – even within
range depending on the structural environment – dead spots can result. In this
case, transmission quality can be lessened by increased and brief transmission
gaps. A slight movement outside the dead spot will re-establish the usual
transmission quality. When a caller goes out of range, the connection is
disconnected.
■
In order to avoid radio-related interference with other electronic devices, we
recommend as great a distance as possible (minimum of 1 m) between the
charger or mobile unit and other devices (e.g. radios, loudspeakers, etc).
MEM Card
The Aastra 142d is equipped with a memory card (MEM card). The MEM card stores
the check-in data of the device, the user name, the display language, a local
directory and the device identification (IPEI = International Portable Equipment
Identity). This means that when switching devices by inserting the MEM card into
another device, this data is available on the other device and calls can be made
immediately (without checking in again).
The MEM card is inserted into the battery compartment below the battery. For
safety reasons, the device has an additional battery compartment lock. If the
MEM card is enclosed separately, you have to insert it in the battery compartment
below the battery. Please refer to the chapter Aastra 142d with MEM Card starting
on page 12 for information on how to insert the MEM card into the Aastra 142d.
The Headset Socket
The mobile unit has a 2.5 mm socket for connecting a headset. The Aastra headset
accessory only must be used in order to comply with the electrical values.
6
Installation
Installation
There are several steps involved when commissioning for the first time, described
in detail in the following sections. These steps comprise these key words:
1. Unpacking telephone, checking scope of delivery and setting up charging
station
– described under Unpacking and Setting up Telephone starting on page 7.
2. Open telephone, insert MEM card (optional), insert batteries and charge
batteries – described under Activating Mobile Unit starting on page 9 and
Aastra 142d with MEM Card starting on page 12.
3. Switch on telephone and subscribe it on a communications system or on a GAP
base station – described under Subscribing Mobile Unit starting on page 14.
Please read the following sections first before beginning with first-time commissioning.
Unpacking and Setting up Telephone
Scope of Delivery
The packaging contains:
■
Aastra 142d mobile unit
■
Charging station
■
AC adapter (ID No.: 23-001071-00)
■
three batteries
■
MEM card (please refer to Aastra 142d with MEM Card starting on page 12 also)
■
Belt clip
■
short user guide
Setting up Charging Station
Your telephone is made for normal usage conditions. Today’s furniture is coated
with a sheer myriad of lacquers and plastics and treated with various lacquer care
products. It is possible that some of these materials contain components which
can attack and deteriorate the plastic feet of the charging station. The device feet
altered by these foreign substances may leave undesirable marks on furniture
surfaces.
7
Installation
For understandable reasons, the manufacturer cannot assume liability for these
types of damage. This is why you should use an anti-slip mat under your charging
station – particularly with furniture that is new or has been freshened up with
lacquer care products.
Note:
Please make sure you do not set up the charging station in the space where
doors or windows open: Damage Risk!
Activating Charging Station
Safety precaution
Only use the AC adapter with the ID No.: 23-001071-00 type designation as
intended for the charging station!
The power supply unit is suitable for 100V to 240V alternating current (50 - 60 Hz).
It comes with 4 interchangeable adapters so it can be used practically anywhere
worldwide. As needed, put the connector onto the power supply used in your
country.
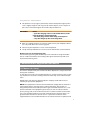
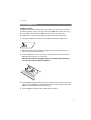
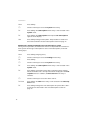
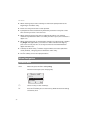
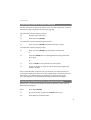
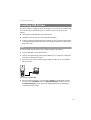
Position the switch on the power supply at OPEN and slide
the connector in place upwards and off. Stick the desired
new connector into the power supply and push it downwards until it clicks into place.
Insert the power cable into the socket on the charging
station and then the AC adapter into a mains socket.
Power Supply
Note:
If the AC adapter is not connected or there is a power failure your charging
station is not operable. A mobile unit on the charging station which is not
connected to the mains socket remains switched on and discharges during the
stand-by time.
8
Installation
Activating Mobile Unit
Important Battery Information
Use batteries only as intended. Never use a battery that is damaged or used.
Heat or cold reduce the battery performance and life span. A mobile unit with hot
or cold batteries may be temporarily inoperable even though they are fully
charged.
Dispose of used batteries in accordance with local government requirements. Be
sure to recycle them!
Never throw batteries into a fire.
Charging and Discharging
A battery can be charged and discharged hundreds of times but is used up at
some point. If the operation time (i.e. calling and stand-by time) becomes significantly shorter than normal, it is time to replace the batteries.
In order to attain long operation times, batteries should be discharged from time
to time by removing the mobile unit from the charging station and leaving it
switched on until it switches itself off. Only use this method for discharging batteries.
Extreme temperatures affect the charging capacity of the battery.
Commissioning
Load the battery ca. 5 to 6 hours before using the mobile unit for the first time.
This precautionary measure helps extend the battery life span. Maximum battery
performance is achieved only after three to five charge and discharge cycles. Place
the mobile unit regularly onto the charger to charge the battery optimally.
Observe the correct polarity when replacing the batteries (see page 10).
Note:
It is strictly mandatory to use only those battery types approved by the
manufacturer. If other battery types are used, the manufacturer assumes no
liability for any defective functioning or damages occurring.
The batteries have to be charged first for your mobile unit to be operational. Now
you can subscribe the mobile unit (see Subscribing Mobile Unit starting on
page 14). Then you can use your mobile unit to make a call.
9
Installation
Charging and Usage Times
■
Charging time: (fully discharged batteries) to full capacity in 5 to 6 hours
■
Talk Time:
up to 18 hours (fully charged) for North America
up to 15 hours (fully charged) for other countries
■
Stand-by Time:
up to 125 hours (fully charged) for North America
up to 140 hours (fully charged) for other countries
Note:
Batteries whose charge level is unknown take ca. 14 hours to fully charge.
Poor radio connections (large distance from system radio station) reduce the
stand-by and talk time of the mobile unit. High speaker or ringer signal volume,
frequently activated key and display lighting as well as activated vibration alarm
are also features decisive in reducing stand-by and talk times.
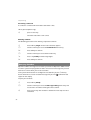
Inserting/Removing Batteries
There is a battery compartment on the lower side of the mobile unit for the three
included AAA batteries. The appendix contains important information on battery
use (see page 86).
Proceed as follows to insert and remove the battery pack:
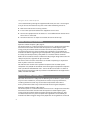
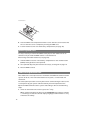
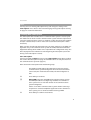
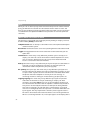
Opening the battery compartment
To unlock the battery compartment cover, use a pointed object (e.g. a ballpoint
pen) and push it into the hole at the bottom of the handset (1). Lift away the cover
at the same time as illustrated (2).
2
1
Inserting the three batteries (note polarity)
Observe the correct polarity of the batteries. The + - marking in the battery compartment must be aligned with the + - marking on the batteries. Batteries can be
inserted without force. If batteries are inserted with incorrect polarity, this may
damage the device.
10
Installation
Closing the battery compartment
After inserting the MEM card (please refer to page 12), position the battery compartment cover slightly diagonally as shown (1) and flip it downwards (2) until it
has clearly clicked into place.
1
2
Note:
Switch off the mobile unit before removing the batteries as there may be a loss of
data otherwise.
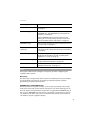
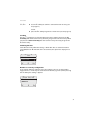
Charge Display
The charging status of the battery is shown on the display. The following means:
81 - 100 % charged
61 - 80 % charged
41 - 60 % charged
21 - 40 % charged
0 - 20 % charged
(Frame flashes) Battery nearly discharged,
warning tone issued
Your handset has a “battery management system” that must determine the limits
of the battery charging status before it can display an accurate charge level.
When the battery has been replaced, the charge level is not correctly displayed until a whole charge and discharge cycle has been completed.
11
Installation
Charge Warning
When the battery capacity is nearly exhausted, the battery symbol will flash in the
display and you hear a “3-beep” acoustic warning signal every minute. If you are
making a call at the time, you have 5 minutes to complete the call before the
mobile unit shuts itself off. If you are not making a call and the handset is not in the
charging station, “Battery Alarm” appears on the display. You can no longer make
a telephone call now.
NiMH batteries only, never use common batteries / primary cells (see
page 86).
Note:
You can replace your mobile unit back onto the charging station after each call.
The charging process is controlled electronically so that batteries at whatever
charge level are optimally and carefully charged. Avoid removing the batteries for
no particular reason from the mobile unit as this impairs the optimal charging
process. The capacity of the batteries used can be improved when after more
lengthy usage periods the batteries are fully discharged and then fully recharged
(see also page 9).
Aastra 142d with MEM Card
General Information
The Aastra 142d can be equipped with a memory card (MEM card). The MEM card
stores the local directory, the display language, the user name and the check-in
data as well as the device identification (IPEI = International Portable Equipment
Identity). This means that when switching devices by inserting the MEM card into
another device, this data is available on the other device and calls can be made
immediately (without checking in again).
Operation with/without MEM Card
The Aastra 142d when commissioning for the first time, without a MEM card, is
also fully operational (without the above mentioned advantages). However, if you
have inserted a MEM card (which also already adopted the telephone’s data), then
removing it causes the Aastra 142d to become non-functional until a programmed
MEM card is inserted.
Programmed MEM card means: a MEM card that has been inserted in another
device or a MEM card that has been especially prepared by the service department
(e.g. as replacement).
12
Installation
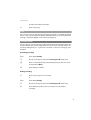
Inserting MEM Card
Safety precaution!
The MEM card must be handled with a great deal of care. The contacts must be
free of dust, moisture, grease, etc. Do not store the MEM card in warm areas (e.g.
direct sunlight). Do not bend the MEM card; the contacts can be broken.
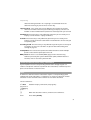
The MEM card is inserted into the battery compartment below the battery.
1. Using your finger, first remove the small MEM card from the larger frame.
2. Open the battery compartment (see page 10) and remove the batteries (if
these have already been inserted).
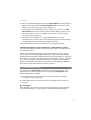
3. Slide the MEM card cover in the battery compartment in the arrow direction
(OPEN). Gently pivot the cover upwards.
Note: Never touch the shiny gold contacts now visible! Static discharge
can cause the device to become defective.
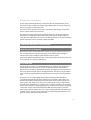
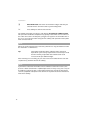
4. Slide the MEM card (with the contacts facing downwards) under the half-moon
holders (a) in the MEM card compartment. Ensure that the bevelled edge of the
MEM card is to the bottom left while doing so.
5. Press the MEM card down until it audibly locks into place.
13
Installation
a
2
1
b
6. Close the MEM card compartment with the cover. Slide the cover notches into
the case until the cover is completely covering the MEM card.
7. Insert the batteries and close the battery compartment (see page 10).
Removing MEM Card
It is only necessary to remove the MEM card if you pass the mobile unit on to
someone or if you need the MEM card for a new mobile unit.
After having removed the batteries (see page 10):
1. Slide the MEM card cover in the battery compartment in the arrow direction
(OPEN). Gently pivot the cover upwards.
2. Use a pointed object to push onto the release (b), see diagram on page 14.
3. Take the MEM card out.
Subscribing Mobile Unit
Your mobile unit can be operated on a maximum of 10 different communications
systems. To do so, it has to be subscribed to each system, i.e. subscribed and
checked in.
The subscription procedure is usually done when commissioning the device. This
is usually done by your system administrator for you when operated on the
OpenCom 1000 communications system. Subscribing is done via the following
steps:
1. Switch on the mobile unit. To do so, press the C key.
When commissioning for the first time, the Language menu appears. Use the
F arrow keys to select the desired display language. Confirm with the D key
or with the OK softkey.
14
Installation
2. When commissioning for the first time, the Subscriptions menu automatically
appears on the display with the No Subscription notification. Press the New
softkey to start subscription (please refer to page 17).
If you do not wish to immediately start checking in, after a few seconds No
Subscription appears on the mobile unit on the idle display. In this case, call
the “Subscriptions” menu on the mobile unit to create a new subscription
entry (please refer to page 15).
3. Subscription if the mobile unit is already subscribed to one or more
communications systems: select a subscription entry to be used for checking in
(see Managing existing subscription starting on page 72).
After completion of this process, the mobile unit is ready for operation.
The following applies to other manufacturers’ communications systems:
Subscribe your mobile unit with the communications system as described in the
manufacturer manual.
If you wish to subscribe your mobile unit to another communications system,
please consult the corresponding documentation. If you wish to subscribe the
mobile unit to another GAP-compatible system, the system, however, is refusing to
do so, please activate the “GAP only” feature in the “Settings > System > Subscriptions” menu (see page 73). GAP-protocol compliant features only are available
with this setting. When operating a system terminal on the OpenCom 1000 communications system, this feature must not be activated!
The “Subscriptions” Menu
The content of the Subscriptions menu and the position of this menu entry
depend on the current subscription state. Access to the Subscriptions menu
differs and depends on whether
■
the mobile unit has no subscription yet, such that the device cannot be
checked in either (see page 15),
■
or the mobile unit is already checked in on a communications system (see
page 16).
No subscription
When doing first-time commissioning or if all subscriptions have been deleted,
start the subscription to a communications system with the following steps:
15
Installation
Menu
Press softkey.
F
Use the arrow keys to select the System menu entry.
OK
Press softkey. The Subscriptions menu entry is now selected in the
System menu.
OK
Press softkey. The Subscriptions menu opens. No Subscriptions
appears on the display.
New
Press softkey to begin subscription. The procedure is identical to
the one described in the Start subscription section on page 17.
Mobile unit is already checked in to the communications system
During normal operation, the mobile unit menus are adapted to the communications system. To manage a subscription or start a new subscription, use the following steps:
Menu
Press softkey (long key press).
F
Use the arrow keys to select the Settings menu entry.
OK
Press softkey.
F
Use the arrow keys to select the System menu entry.
OK
Press softkey. The Subscriptions menu entry is now selected in the
System menu.
OK
Press softkey. A list of the names of the communications systems
where the mobile unit is already subscribed is displayed in the Subscriptions menu. In addition, the Auto.Search menu entry is
available.
F
16
Use the arrow keys to select one of the entries.
Options
Press softkey. The New menu entry is now selected in the Subscriptions menu.
OK
Press softkey to begin the new subscription. The procedure is identical to the one described in the Start subscription section on
page 17.
Installation
Note:
You may select an existing subscription entry and change its settings in the
Subscriptions menu. Please refer to the Managing existing subscription starting
on page 72 section for information.
Creating New Subscription
The subscription of the mobile unit to a communications system is necessary for
the mobile unit to check in to the communications system. A further requirement
is that the communications system can establish a radio connection to the mobile
unit (PP = Portable Part) via one or more connected radio stations (RFP = Radio
Fixed Part).
When you wish to subscribe the mobile unit, you must configure a new DECT configuration entry in the communications system. The IPEI (International Portable
Equipment Identity) of the mobile unit is required for this configuration entry. The
IPEI is displayed on the mobile unit at the beginning of subscription (see the following “Start subscription” section).
Start subscription
You have selected the New menu entry in the Subscriptions menu (please refer to
the sections No subscription on page 15 and Mobile unit is already checked in to
the communications system on page 16).
Now conduct the subscription with the following steps:
The mobile unit IPEI appears. Read the IPEI and enter it into the
communications system Configurator. Enter the desired authentication code (AC = Authentication Code) into the Configurator as
well.
OK
Z
Press softkey to continue.
Enter PARK: now enter the PARK of the communications system.
The PARK (Portable Access Right Key) identifies the communications system. You can view this number in the communications
system Configurator.
If there are no other communications systems within radio range
and you have activated simplified registration on the communications system, you can continue without entering a PARK.
OK
Press softkey to confirm and continue.
17
Installation
Z
OK
Enter Auth.Code: now enter the maximum 8-digit code that you
entered into the communications system Configurator.
Press softkey to confirm and continue.
The mobile unit begins checking in and displays Searching for a DECT System.
This procedure should be completed very quickly. If the entries are not correct or
the radio connection is inadequate, a progress bar appears on the mobile unit. In
this case, cancel the procedure using the Esc softkey and repeat the subscription
with corrected entries.
Note:
When you prefix authentication code entry with the star key, the mobile unit will
be checked in as a GAP device.
Tip:
The length and quality of the authentication code used
depends on your security requirements. Please keep in mind
that the memory required for the authentication code
increases 4 bits per additional digit.
After checking in successfully, you can enter name and number for the new subscription entry. Confirm with the OK softkey.
Note:
If you wish to subscribe the mobile unit to a GAP base station for instance, the
process is often started with a simplified procedure. In many cases, press a key on
the GAP base station to open a subscription time frame. During the time frame,
start the simplified subscription and confirm all requirements on the mobile unit
with the OK softkey.
18
Installation
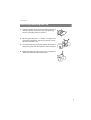
Attaching/Removing Belt Clip
1. Slide the adapter clip over the back of the mobile unit
until the clip snaps into place in the side openings.
Pull the clip slightly apart to remove it.
1
2. Attaching belt clip: press – as shown – the upper end
of the belt clip together, slide it over the belt, and let
go of the end of the clip.
2
2
3. Securing mobile unit: slide your mobile unit with the
adapter ring into the belt clip until it clicks into place.
3
4. Removing mobile unit: press the release and pull the
mobile unit upwards out of the belt clip.
4
19
Functions
Functions
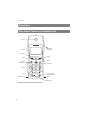
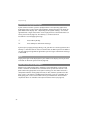
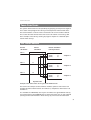
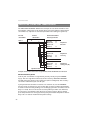
Operational Controls on the Mobile Unit
Receiver
on the back:
Loudspeaker
Display
Arrow keys
Softkey
Softkey
Info key
Speaker/
Handsfree Key
Receiver key
Keypad
C key
SOS
Headset socket
R key (Signal key)
Emergency call key
USB port
Microphone
Operational Controls on the Aastra 142d
20
Functions
Display Elements and Symbols
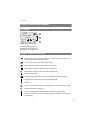
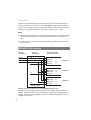
The Display
œ ¢
OpenCom 1000 125
Peters
25.10.
10:00
Menu ¬
¤
1
2
3
Display on the Aastra 142d
1 symbol line (see page 21)
2 symbol lines (see page 22)
3 symbol lines (see page 22)
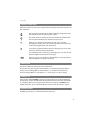
Symbols Shown on the Display
Quality of the radio connection (four bars: reliable radio connection; only
one bar: unreliable radio connection)
Connection status (receiver key was pressed)
Connection status (speaker/handsfree is activated)
Microphone is switched off and can be switched on
Microphone is switched on and can be switched off
Ringer switched off
Charging status of batteries (see Charge Display starting on page 11)
Keypad lock is switched on and can be switched off
Redial list
You have received messages (short messages, e-mail, voicebox messages).
Telephone book (see page 36)
You have programmed and activated a local alarm (see page 70).
You have activated a feature that impairs your reachability: Call diversion,
Call blocking
21
Functions
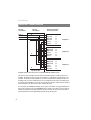
Text Lines
The three middle lines of the five-line display shows information on the current
connection state or menu lists and texts.
In the idle state you see the name of the communications system, the internal call
number of the mobile unit, the programmed user name and the current time. Activated features and a programmed alarm are still shown. In the call state, you see
the call number or the name of the caller/called subscriber on the display.
Pick-lists (e.g. phone book) and the menu for the features are displayed in three
line extracts on the display. Use the arrow keys to scroll up or down. A selectable
entry appears with a dark background.
OpenCom 1000
Calls
Call diversions
Messages
‘
OK
Esc
Text Lines on the Aastra 142d
Softkey Line
The texts and symbols in this line refer to the keys underneath. The contents of the
line change according to the operating status.
Illumination
The display is automatically illuminated when calls are received or when you press
a key. The illumination is automatically switched off again ten seconds after the
last key was pressed.
Softkeys and Other Keys
Both keys below the display as well as the arrow keys are called softkeys. The functions assigned to the keys are shown in the lowest line of the display. The key
function automatically changes depending on the respective operation state of
the mobile unit.
22
Functions
Softkey: Arrow Keys
Above the arrow keys you will see symbols that identify the individual functions of
the arrow keys:
The up arrow key allows you to select telephone numbers from the
phone book of your communications system.
The down arrow key allows you to select telephone numbers from
the local phone book of your communications system.
When you are entering call numbers or texts, you can make
changes by moving a cursor. The arrow keys allow you to move the
cursor to the beginning or end of the entry.
If a pick-list (e.g. phone book or menu) is displayed, you can use the
arrow keys to scroll to the desired entry.
If a continuous text is shown (e.g. a message), you can scroll up and
down through the text with the arrow keys.
During a call you can change the volume of the receiver/headset or
of the loudspeaker using the arrow keys.
Softkey: OK
Use the OK softkey to confirm the selected function.
If a function only has one quick-switch option, it is operated by this key. On the
display, active settings (ON) are indicated by a “ ” next to the relevant item;
inactive settings (OFF) are indicated by a “–” or this space in a line is empty.
Softkey: Esc
Press the Esc softkey briefly to exit the section of the menu currently displayed.
You will then see the selection from the previous menu branch or the current idle
or call display. When you navigate within the menu and press and hold the Esc
softkey the menu closes and the telephone returns to the idle state once again.
Softkey: Redial
¤ Allows you to select a call number from the redial list.
23
Functions
Softkey: Menu
A long key press of the Menu softkey in the idle state: the main menu is displayed.
This menu is where you can make all desired phone settings. The individual menus
are explained in the chapter The Main Menu starting on page 66.
A short key press to the Menu softkey: depending on the mobile unit state, displays a menu with only relevant operations, i.e. ones that can currently be executed.
Receiver Key
A The receiver key has multiple functions. There is a distinction depending on the
current state of the telephone, e.g. idle state, on a call, in the edit mode etc. The
following functions are available:
… when idle:
The first line designated for outgoing connections is seized.
… during an incoming call:
The call is accepted.
… during a call:
The call is ended or the connection is disconnected.
… if you are in the lists (e.g. call list, redial list) or if numbers have been
entered:
The first line designated for outgoing connections is seized and the call number
dialled.
Speaker/Handsfree Key
L Activates/deactivates the Speaker/Handsfree mode. When Speaker /Handsfree
is activated, this key is lit. This key flashes when there is a call. You can accept the
call using the loudspeaker key and conduct the call in the handsfree mode.
Info Key
B Use the Info key to access the various lists (e.g. call list) as well as view and
change currently activated features (e.g. call blocking, call diversion).
If there are new calls, e-mails, short messages or voicebox messages the Info key
flashes. The
symbol will also appear on the display.
24
Functions
C Key
C The C key has multiple functions. It depends on the current state of the telephone, e.g. idle state, on a call, in the edit mode etc. and there is a distinction
between a short or long key press. The following functions are available:
… if the device is switched off:
short or long key press: The device is switched on.
… when idle:
■
short key press: All function keys and call keys configured for the telephone
are displayed – independent of the call state (idle, calling, talking).
■
long key press: The device is switched off.
… during an incoming call:
■
short key press: A key menu shows a list of the call keys (please refer to
page 26) to which incoming calls are assigned.
■
long key press until audio signal: A key menu shows the list of all call keys of
the telephone.
■
long key press after audio signal: The device s switched off.
… during the call:
■
short key press: A key menu shows a list of the call keys (please refer to
page 26) to which incoming calls are assigned. If only one call key is configured
on your telephone, the idle display appears.
■
long key press until audio signal: A key menu shows the list of all call keys of
the telephone.
■
long key press after audio signal: The device is switched off.
… while editing list entries:
■
short key press: deletes a single character to the left of the cursor
■
long key press: deletes (after a short notification tone) the entire line content
… when in the lists (e.g. call or redial list):
short key press: deletes the selected entry
25
Functions
R Key (Signal Key) / Emergency Call Key
Short key press of the R key during a call: an enquiry is initiated.
Long key press when idle: the previously configured emergency call number (SOS)
is dialled. You can enter the emergency call number in the “Telephone Option>
Emergency call” menu (see page 74).
Hash Key
Long key press of the # key when idle: switches the keypad lock on. An active
keypad lock is displayed with the symbol in the softkey line. To unlock the
keypad, press the softkey under this symbol and then the # key.
Star Key
Long key press of the * key when idle: switches the buzzer/ringer on and off.
Short key press while entering text (e.g. name for phone book entry): switch back
and forth between upper and lower case.
Number Keys
The 0 to 9 number keys are for entering call numbers, names and vanity call
numbers. For information on entering text using the number keys, please refer to
the chapter The Editor starting on page 29.
Long key press in call state: opens the local phone book and you can search for a
call number, see Editing local phone book entries of your Aastra 142d starting on
page 37.
Call Keys
The term “call keys” is taken from corded system phones, which have individual
keys for making calls. On the Aastra 142d they are represented in the “key menu”
as virtual keys on a list. If configured, these are the “keys” you use to make calls and
be called with. Open the key menu with a short or long key press on the C key
C – independent of the device state (see also page 25).
Distinctions are made for a call key – depending on its function:
26
Functions
Key designation
Function
Device key
This key is assigned your internal device call number;
see page 27.
INTERNAL key(s)
For each terminal there is at least one internal call key
(INTERNAL key). This INTERNAL key corresponds to
the device call number.
If other INTERNAL keys have been set up on your
phone, you can use these keys to make and receive
calls to and from internal subscribers, see page 27.
EXTERNAL key(s)
You can use these key(s) to seize an external line and
to receive calls, see page 27.
Direct call key with
signalling
Call key that only allows a connection to be set up
with one particular destination (internal call number),
see page 28.
MULTIPLE key
A MULTIPLE key is a call key programmed on the
telephones of multiple users and is used by them
together (in a team), see page 28.
Team direct call key
Use this key to call a (certain) team member and to
accept calls for that member, see page 28.
Partner direct call key
Use this key exclusively for calls with precisely one
(specific) internal user, see page 29.
Note:
Your system administrator configures call keys for you when configuring the
communications system.
Device key
The device key is assigned your internal device call number (primary call number).
It is labelled with your internal call number (or alternatively with a text programmed by the system administrator).
INTERNAL keys and EXTERNAL keys
Besides your device key other call keys can be set up on your phone. These keys
allow you to make and receive internal and external calls. Each of the keys has its
own call number. Calls from internal subscribers are signalled on INTERNAL keys. In
the case of an EXTERNAL key your internal call number is assigned to an external
call number under which you can be reached from the outside. Several external
call numbers may be assigned to the key.
27
Functions
To make a call, seize one of your INTERNAL/EXTERNAL keys by pressing the
A receiver key; you can then make an external or internal call immediately
(depending on the system setting), see the chapter External/Internal Calling
starting on page 41.
Direct call key with signalling
“Direct call keys with signalling” are special call keys that allow a connection to be
set up to one destination partner only. When you are making a call using a “direct
call key with signalling” your phone’s other call keys remain free. This means other
callers can reach you.
MULTIPLE key
A MULTIPLE key is a call key (device key or INTERNAL/EXTERNAL key) programmed
on several phones. This means that MULTIPLE keys have the same (internal) call
number. The phones involved represent a team; calls to one team member are signalled to all the MULTIPLE keys on the phones of the other team members.
A MULTIPLE key is operated in the following way:
■
When a call is made to a team member you can use the key to answer the call in
his/her place.
■
You can use the key to make calls yourself. In this case you will be occupying
the team member’s call number.
■
Depending on whether your MULTIPLE key is a team member’s INTERNAL or
EXTERNAL key you can set up internal or external connections using the
MULTIPLE key.
Please refer to the Team Functions starting on page 59 chapter for further information.
Team direct call key
A “team direct call key” is used to program the internal call number of another
team member. Selecting this key allows you to answer a call on behalf of the other
team member or to make a call to the other team member. Please refer to the
Team Functions starting on page 59 chapter for further information.
Note:
A team direct call key is usually set up in a team configuration. Your system
administrator can also set up a team direct call key for you without it being
assigned to a team.
28
Functions
Partner direct call key
A “partner direct call key” allows two subscribers to be connected with each other
by a private line, i.e. the line is used exclusively for connections between the two
partners. Both partners then have a corresponding “partner direct call key” on
their respective phones. Any partner can use the key to call the other partner
directly, even if the called partner is in a call (busy) using a different call key on his
phone. Please refer to the Team Functions starting on page 59 chapter for further
information.
The Editor
Using the editor, you can enter or change call numbers and names within lists (e.g.
in the phone book). The maximum length when entering characters (call
numbers) is 32 characters and when entering letters (names) 16 characters.
In input lines for entering text, the numeric keyboard automatically switches to
entry of letters. The following characters can be entered using multiple key press
of number keys:
Key
Upper-case letter
Lower-case letter
1
!?1-+*/=&()%¿¡
!?1-+*/=&()%¿¡
2
ABC2ÄÅÀÁÃÆÇ
abc2äåàáãæç
3
DEF3ÈÉÊË
def3èéêë
4
GHI4ÌÍÎÏ
ghi4ìíîï
5
JKL5
jkl5
6
MNO6ÑÖÒÓÔÕØ
mno6ñöòóôõø
7
PQRS7ß
pqrs7ß
8
TUV8ÜÙÚÛ
tuv8üùúû
9
WXYZ9
wxyz9
0
space , . 0 : ; _ ” ‘ ˆ ˜
space , . 0 : ; _ ” ‘ ˆ ˜
*
Switching upper/lower case
Switching upper/lower case
#
#@
#@
$£¥§<>{|}[\]
$£¥§<>{|}[\]
29
Functions
■
When entering text, use the arrow keys to move text input position to the
beginning or end of the entry.
■
Entries are always made at the cursor position.
■
Input position moves automatically forward if you make no entry for a short
time or when you enter a new character.
■
When entering text, the first letter is automatically upper case and then
automatically switched to lower case. After you enter a space, the next letter is
upper case.
■
When entering text you can switch upper and lower case by pressing a number
key longer. The upper/lower case remains in effect until the next long key
press. You can also press the * star key to switch back and forth between
upper and lower case.
■
A short press of the C-Key C deletes single numbers/characters (left of the
cursor position), a long key press to delete the entire entry.
■
The Esc softkey cancels the input procedure.
Menu Navigation
The Main Menu
menu
When idle, press the Menu softkey long.
The main menu opens (see also page 66).
OpenCom 1000
Calls
Call diversions
Messages
‘
OK
Esc
F
OK
30
Select an entry via the arrow keys.
Press the OK softkey to call a menu entry. Make the desired settings
and entries, then:
Functions
■
OK / Esc
use the OK softkey to confirm a selected function or entry (see
also page 23)
and/or
■
press the Esc softkey to go back a menu level (see also page 23).
Scrolling
Use the F arrow keys to scroll through menu entries. When you press the up
arrow key with the first menu entry selected, you go to the last menu entry. When
you press the down arrow key with the last menu entry selected, you go to the
first menu entry.
Switching function
Some functions only offer two settings – ON or OFF. You can tell the function is
active (ON) due to . If the function is deactivated, this spot in the display line is
blank.
Type
Repeat
Play once
OK
‘
Esc
Number or arrow key configuration
In the “Ringer settings> Volume” menu, for example, you can use the number
keypad or the F arrow keys to set the desired volume (e.g. level 4). After pressing
the OK softkey the setting is applied.
Volume Settings
Earpiece: 4
]]]]||||
OK
‘
Esc
31
Functions
Menus Hide Automatically
Menus hide automatically under the following conditions:
■
In the idle or call state when you receive a call.
■
In the call state when you make entries that require calling up a new calldependent menu (e.g. the R key was pressed for an enquiry call).
■
When pressing a softkey that calls up other menus than the one displayed.
■
Any open menu closes automatically after 60 seconds if you do not make any
further entries. Exception: Playing back a voicebox message which is longer
than 1 minute. Unsaved changes are lost.
■
If you are in a menu and a caller tries to reach you, you exit the menu
automatically.
Any saved entries made in menus remain saved when you exit the menu.
32
Basic Functions
Basic Functions
Device Functions
Switching Device on/off
You can switch off your mobile unit to make your battery charge last longer. If your
mobile unit is switched off, no ringer or info tones are emitted (for example, for an
appointment call).
Switching off mobile unit
C Press the C key – long key press
Switching on mobile unit
C Press the C key – long key press or place the mobile unit on the charging
station.
The display now looks like this, e.g.:
œ
OpenCom 1000 125
Peters
25.10.08
10:00
Menu ¬
¤
The communications system is called “OpenCom 1000” and the (internal) call
number of the mobile unit is “125”. This information refers to the mobile unit of
the communications system. The mobile unit is named “Peters”. You can change
this information in the “Telephone Option > User Name” menu (see page 73).
The current date and time settings are usually provided by the system when
checking in.
Note:
When No Subscription appears on the display the mobile unit has to be checked
in; please refer to Subscribing Mobile Unit starting on page 14.
33
Basic Functions
Key Lock
Activate the key lock before carrying a mobile unit in your pocket. This prevents a
call number from being dialled accidentally. When you receive a call, the key lock is
deactivated for the duration of the call. Use the A receiver key to accept the call.
Activating key lock
# When idle, press the hash key – long key press
When the key lock is activated the display shows: Key Lock.
Deactivating key lock
Press the softkey and then the # hash key.
Telephone Lock
Via the “Settings > Protection > Lock Handset” menu (see page 76) you can switch
the telephone lock for the mobile unit on or off after entering your user PIN. Outgoing calls are no longer possible. You may still accept incoming calls. The emergency call key (R key) programmed with a call number can still be used. When the
key lock is activated the display shows PIN Lock. Deactivate the telephone lock by
pressing the softkey and entering your PIN (see page 76).
Speaker/Handsfree Use
Press the L loudspeaker key before or during a call to allow multiple persons to
participate in the call. Repeat the process to switch it off. For optimal quality, make
sure the mobile unit is upright such that neither the speaker nor the microphone
are covered up.
The L key flashes when there is an incoming call. When speaker/handsfree is activated, this key is lit.
Note:
When placing the mobile unit into the charging station during a call, handsfree is
automatically activated.
Adjusting Volume during a Call
During a call you have 8 levels to adjust the volume of the receiver/headset or the
loudspeaker. The setting is shown on the display.
34
Basic Functions
To adjust the volume of the receiver/headset press the F arrow keys. To adjust
the volume of the loudspeaker switch the loudspeaker on first and then press the
F arrow keys.
Set volume via the F arrow keys or the number keys. Pressing the F arrow keys
once raises or lowers the volume by one level.
Note:
When the device is idle once again, it reverts to the default setting. You can
change this information in the “Settings” menu (see page 72).
Switching off Ringer
If you wish to be sure you are not disturbed (e.g. during a meeting) you can switch
off the ringer. Incoming calls are then signalled noiselessly via the built-in
vibration signal generator (if activated) instead of the ringer. When the acoustical
ringer is activated, the symbol appears on the display.
Switching off Ringer
* When idle, press the star key – long key press.
Switching on ringer
* When idle, press the star key – long key press.
Alternatively you can switch the ringer on/off via the “Settings > Ringer Settings >
Device > Buzzer” menu (see page 71).
Muting Mobile Unit
If you do not want the caller to hear, e.g. what you are discussing with someone
else in the room, you can temporarily mute your mobile unit.
Muting
Press the softkey. The person you are speaking with on the telephone can no
longer hear you.
Cancel muting
When you wish to talk to the caller again, press the
caller on the telephone can hear you again.
softkey once again. The
35
Basic Functions
Changing Display Contrast
To adjust the display to current lighting/brightness conditions, you can change
the contrast. You can enter the emergency call number in the “Settings > Telephone Option > Disp. contrast” menu (see page 75).
Time / Alarm
When idle the display shows the current communications system time. The time is
automatically updated after an external call. After commissioning or after
changing the battery it may take a moment until the current time is transmitted
from the OpenCom 1000.
If you have set an alarm (see page 70) the
symbol appears on the display.
Message Display
The B info key flashes when you have messages (e.g. short messages, e-mail, voicebox messages). The
symbol will also appear on the display.
To query these messages, press the B info key briefly when idle. For information
on how to proceed, please consult the chapter “Info” Menu starting on page 81.
Emergency Call Key (SOS Number)
An emergency call is triggered by a long key press of the R emergency call key.
You can configure the emergency call number in the “Telephone Option> Emergency Call” menu (see page 74). Dialling is immediately executed – i.e. no other
key presses necessary.
Phone Book
Up to 10,000 entries can be saved in the central phone book of your communications system. These phone book entries are available to all system users. Entries in
this phone book can only be changed by the system administrator.
In addition, you can save further personal entries in the local phone book of your
mobile unit. When using a MEM card (see Aastra 142d with MEM Card starting on
page 12), these are saved on the card.
36
Basic Functions
Editing local phone book entries of your Aastra 142d
F
Z
F
Options
Press down arrow key briefly when idle. Select the Search menu
entry and if necessary
enter letter/name you are searching for (see The Editor starting on
page 29).
Use the arrow keys to select the desired entry.
Press softkey. The local phone book menu appears (see following
section).
Local phone book menu
New: You create a new entry. Enter the call number first and then the name. Use OK
to save.
Edit: You edit a selected entry. Use OK to save.
Add To: The entry is added to pre-dialling. This is where you can edit the entry, e.g.
to add additional digits when re-dialling an extension.
Delete: You delete a selected entry (after a confirmation query).
Quick Call: Selected phone book entries can be assigned speed-dialling (1…9).
The programmed speed dial is displayed to the right of the phone book
entry. When the mobile unit is idle, the local phone book entry can be
displayed as pre-dialling by pressing and holding the speed-dialling
number (key 1...key 9) and then dialled with the A receiver key.
Connections
Internal and External Call Numbers
Internal and external call numbers for reaching you are assigned during configuration of the OpenCom 1000 communications system.
Multiple Connections
There can be multiple simultaneous connections on your telephone – depending
on the number of call keys configured (see page 26). Additional callers then hear
the busy signal or are directed to the exchange (depending on the configuration
of your communications system OpenCom 1000).
37
Basic Functions
DTMF Postdial / VF Signalling
When in the connection state, your telephone is automatically switched to VF signalling. Use VF signalling, e.g. to query a voice message or voicebox.
Charge Display (Charges)
If your network operator transmits charge information – even for external calls you
dial yourself – you will see the charge amount for the call during and after the call.
Transmission of Call Numbers
There are various ISDN services which either allow or prevent transmission of call
numbers between subscribers.
“CLIP” feature
CLIP is an abbreviation which stands for “Calling Line Identification Presentation”.
The call number of the caller is displayed (if transmitted). If the call number has
also been entered into the directory of the OpenCom 1000, the name is displayed.
“CNIP” feature
CNIP is an abbreviation which stands for “Calling Name Identification Presentation”. In addition to the call number of a caller, the name provided by the caller is
transmitted and displayed. This requires that the network operator transmits this
information with the connection.
“CLIR” feature
CLIR is an abbreviation which stands for “Calling Line Identification Restriction”.
Before dialling a call number, you can determine from case to case whether the
transmission of your call number is to be suppressed to the person you are calling.
Select the “suppress tel no.” function to do so (see Menu when Idle starting on
page 39). If the feature is not available, depending on the system configuration,
your call number will either be always transmitted, or never transmitted. For more
information, consult your system administrator.
38
Basic Functions
Menus
Menu before and during a Call
When the handset is in the idle or call state, state-dependent menus are displayed
when you briefly press the Menu softkey. Frequently used features are shown
which you can activate.
Examples:
1. Another telephone in your pick-up group rings and you want to accept the call.
Press the Menu softkey briefly, select Pick-up and confirm your choice with OK.
You will be connected with the caller.
2. Or a subscriber is busy and you want to be called back. When you hear the busy
signal, press the Menu softkey and confirm Call back with OK.
The state-dependent menus are individually described at the end of the following
chapters.
Menu when Idle
When idle, press the Menu softkey briefly and then dial …
Pick-up: You pick up the call intended for another telephone in your pick-up
group.
Dir. pick-up (direct pick-up): You accept a call for any other internal caller. Enter
the call number of the other telephone. If the other telephone is already in
the call state (e.g. an answering machine is making an announcement), you
pick up the call. Regarding the subscriber whose call you wish to pick up,
authorisation must be activated such that calls with “Dir. pick-up” may be
picked up from his/her terminal.
Note: you cannot use the “Dir. pick-up” function to pick up calls to “Partner
direct call keys”. Within the team you can pick up these calls with the
corresponding “Partner direct call key” – if configured correspondingly.
Tapping ongoing: After entering a call number (Dest.:) you can use your
telephone to listen in to the call of another subscriber. Your microphone is
automatically muted so that you are not heard by the subscriber and the
person being talked to who you are listening in on. This function is
convenient for, e.g. training exercises in a ACD group where the supervisor
can monitor individual calls by the agents. The only requirement is that the
“protect against listen-in” function is deactivated at the subscriber whose
calls are being monitored. When a call is being listened in on, “Intercept”
39
Basic Functions
appears on the display of the subscriber being listened in on. Listening in is
terminated when the subscriber listening in presses the A receiver key.
suppress tel no. (suppress telephone number): Your call number is not
transmitted to the (external) person you call next.
Last call costs: You see the charges for the last call.
WAP portal: You have access to WAP (WML) pages on the internet using
addresses preset by the system administrator (URLs, Uniform Resource
Locators) and can also enter your own URL.
40
Telephoning
Telephoning
External/Internal Calling
Line Seizure
When dialling internal or external call numbers, it is critical whether your system
administrator has configured an internal or external preferred key for your telephone.
■
Internal preferred key: the internal preferred key (standard configuration)
requires entering a code for seizing external lines when dialling an external call
number. The system administrator will inform you what the code is.
For enquiries and call diversions to external call numbers, you must also prefix
the external call number with a line seizure code.
■
External preferred key: you can immediately dial an external call number
(without entering a line seizure code) by pressing the A receiver key. This
preferred key is primarily configured if you have to carry out many external
calls.
Line Seizure via “Direct Call Key with Signalling”
“Direct call keys with signalling” can be configured on your telephone. Dialling via
“direct call keys with signalling” is done the same way as entering a call number.
For all procedures described in this chapter, you can select “direct call key with signalling” from the key menu instead of entering a call number. Open the key menu
with a short or long key press on the C key C (see also page 25).
Line Seizure via “Team Direct Call Key”
“Team direct call keys” can be configured on your telephone. You can use a “team
direct call key” from the key menu to directly call the programmed destination.
Open the key menu with a short or long key press on the C key C (see also
page 25).
41
Telephoning
Connection Set-up on a Device with Internal Preferred Key
A
Press the receiver key (your INTERNAL key is seized)
or
C
Z
briefly press and select the desired call key or INTERNAL key with
the F arrow keys via the key menu.
Enter internal call number or external call number (preceded by the
line seizure code).
Making an External Call on a Phone with External Preferred Key
A
Press the receiver key (your EXTERNAL key is seized)
or
C
Z
briefly press and select the desired call key or EXTERNAL key with
the F arrow keys via the key menu.
Enter internal call number or external call number (without preceding it with the line seizure code).
Making an Internal Call on a Phone with External Preferred Key
A
Press the receiver key (your INTERNAL key is seized)
or
C
Z
briefly press and select the desired call key or INTERNAL key with
the F arrow keys via the key menu.
Enter internal call number.
Dialling / Pre-dialling
Dialling:
Press A receiver key and enter call number.
Pre-dialling:
Enter entire call number and then press A receiver key.
42
Telephoning
Correcting pre-dialling entry:
C
F
short key press: deletes single characters
move cursor to input position
Redialling
The 10 call numbers you last dialled are saved in the redial list (the last entry is first
on the list). If the call number is also entered into the communications system
phone book, the name appears as well.
Dialling a call number
¤
F
A
Press softkey (when device is idle).
Use the arrow keys to select an entry.
Press receiver key. The call number is dialled.
Calling from the Call Lists
Your mobile unit saves the call numbers of the last 10 callers to the call list of the
users that either did not reach you (calls in absence) or callers that you most
recently spoke with (received calls). This requires that the call number was transmitted during the call, please refer to Transmission of Call Numbers on page 38
also. A missed call entry is deleted from the “call list in absence” when a caller
reaches you on a subsequent call. If a caller is saved in your phone book, the name
is displayed.
Call lists are activated in the Main menu, in the Calls menu group (see page 67).
Dialling call number from call list
B
F
Press Info key briefly when idle.
Select Call list or Received calls menu entry.
OK
Use the F arrow keys to press the softkey and select an entry.
A
Press receiver key. The call number is dialled.
43
Telephoning
Calling from the System's Central Phone Book
F
Z
OK
Press up arrow key briefly when idle. Select the Name: menu
entry.
Enter letter/name you are searching for (see The Editor starting on
page 29).
Press softkey.
You see the phone book list beginning with the characters entered.
If you do not enter any characters and press the OK softkey, the list
will begin with the first entry.
F
Use the arrow keys to select the desired name.
If there is more than one call number under this name (e.g. an office
number and a mobile number), the list contains correspondingly
designated entries (O: for office, M: for mobile, P: for private).
A
Press receiver key. The call number is dialled.
Calling from the Local Phone Book of Your Aastra 142d
F
Z
F
A
Press down arrow key briefly when idle. Select the Search menu
entry.
Enter letter/name you are searching for (see The Editor starting on
page 29).
Use the arrow keys to select the desired name.
Press receiver key. The call number is dialled.
Note:
The Phone Book starting on page 36 chapter contains information on how to edit
local phone book entries.
44
Telephoning
Using Routes to Make Calls
The OpenCom 1000 establishes calls to a desired subscriber either automatically
or via specific routes. Your system administrator configures these routes in the
OpenCom 1000 and specifies how each route is seized. In order to manually seize a
specific route for a desired call, dial the routing code before dialling the (internal or
external) call number. By making specific calls via routes, you can e.g. contact subscribers in the branches of a large company network. It is also possible to use a
manually-entered routing code to record your call-charge data for external private
and business calls separately.
AZ
enter routing code, dial call number
for enquiry:
GRZ
enter routing code, dial call number
Your system administrator can provide you information on current routes and your
codes.
Menu during Conversation
You are making a call. Press the Menu softkey briefly and then dial …
Telephone book: You can look up a call number in the central phone book of your
communications system.
Disconnect: you disconnect the connection. The current call is ended and you can
dial once again.
Team hold: If the call is to be continued on another telephone of a team, you can
activate “Team hold”. The call is held, and an “Automatic hold recall” is
carried out to the team members.
recording on/off: You can record the call, please refer to Recording Calls starting
on page 57.
Loudspeaker: This activates the speaker/handsfree function to allow multiple
persons in the room to participate in the call.
WAP portal: You have access to WAP (WML) pages on the internet using
addresses preset by the system administrator (URLs, Uniform Resource
Locators) and can also enter your own URL.
45
Telephoning
Menu if Subscriber Busy
You have dialled a call number and the subscriber is busy. Press the Menu softkey
briefly and then dial …
Telephone book: You can look up a call number in the central phone book of your
communications system.
Disconnect: You disconnect the call and can make another call.
Call waiting: Your call is signalled to the called internal subscriber using the call
waiting tone. This requires that the call number was transmitted during the
call (please refer to page 76 also).
Override blocking: Your call is signalled on the internal subscriber's telephone
although he/she has activated call blocking. This menu entry only appears
when call blocking is activated (see also page 76).
Call back: You leave your call back request with a busy subscriber (please refer to
the Call Back starting on page 55 section also).
Dir. pick-up (direct pick-up): You pick up the call of a busy subscriber (e.g. an
answering machine is making an announcement).
Intrusion: Allows you to intrude in an internal subscriber's existing call; however,
only the called subscriber hears you. The called party remains connected
with his/her calling partner. This requires that the called subscriber has
block intrusion deactivated (please refer to page 76 also).
Loudspeaker: This activates the speaker/handsfree function to allow multiple
persons in the room to participate in the call.
WAP portal: You have access to WAP (WML) pages on the internet using
addresses preset by the system administrator (URLs, Uniform Resource
Locators) and can also enter your own URL.
Menu during the Call
You have dialled a number. Your call is signalled to the subscriber called. The subscriber called has not yet accepted the call. Press the Menu softkey briefly and then
dial …
Telephone book: You can look up a call number in the central phone book of your
communications system.
Disconnect: You disconnect the call and can make another call.
Call back: You leave your call back request with the subscriber you called (please
refer to the Call Back starting on page 55 section also).
46
Telephoning
Loudspeaker: This activates the speaker/handsfree function to allow multiple
persons in the room to participate in the call.
WAP portal: You have access to WAP (WML) pages on the internet using
addresses preset by the system administrator (URLs, Uniform Resource
Locators) and can also enter your own URL.
Ending a Call
End a call as follows:
A
Press receiver key briefly or
Menu
press softkey briefly.
F
Use the arrow keys to select the Disconnect menu entry.
Accepting Calls
Optical Call Display
When there is an incoming call, the ¢ receiver symbol flashes on the display and
the display illumination is switched on.
Normal Call
A
Press the receiver key (your INTERNAL/EXTERNAL key is seized)
or – if multiple call keys have been configured for your telephone –
C
F
Press C key briefly. The key menu opens.
Use the arrow keys to select the call key desired.
Temporarily switching off call signalling
While a call is being signalled on your telephone via ringer and/or vibrator, you can
switch off signalling temporarily. Press the Silence softkey. You can still accept
the call as described on page 47.
47
Telephoning
Calls while Telephoning
While you are making a call, any incoming calls are signalled acoustically as well as
visually on the display.
Accepting call on same call key
The following procedure can only be done with external calls if your system
administrator has configured your telephone accordingly.
G
h or R
You are making a call, hear the discreet ringer and see “Further
calls” appear on the display.
You can only pick up the waiting caller by ending the first connection (by putting down the receiver or forwarding, please refer to
the Enquiry, Toggle, Transfer and Conference starting on page 49
chapter).
After ending the first connection, the next waiting call is signalled.
A
Press receiver key to accept the call.
Accepting call on different call key
G
C
F
G
A
C
F
G
48
You are making a call, hear the discreet ringer and see the call on
the display.
Press C key briefly. The key menu opens.
Use the arrow keys to select the call key desired.
Your first call is placed on hold. You are speaking with the caller.
Press the receiver key to end the current call.
Press C key briefly. The key menu opens.
Use the arrow keys to select the call key of the waiting subscriber.
You are speaking with the first subscriber once again.
Telephoning
Call waiting while telephoning
G
A
You are making a call, hear the call waiting tone and see “Call
waiting” appear on the display.
Press the receiver key to end the current call. The call waiting call is
now signalled to you just like a normal call.
or
R
Press softkey briefly to accept the call waiting call. Your first call is
placed on hold. You are speaking with the call waiting caller.
For further information, please refer to the chapter Enquiry, Toggle,
Transfer and Conference starting on page 49.
Incoming Call Menu
You receive a call. Press the Menu softkey briefly and then dial …
Deflect call: You do not accept the call yourself, rather deflect it to another
subscriber. Enter the call number of this subscriber under Dest.: and then
press the OK softkey.
WAP portal: You have access to WAP (WML) pages on the internet using
addresses preset by the system administrator (URLs, Uniform Resource
Locators) and can also enter your own URL.
Enquiry, Toggle, Transfer and Conference
During a call you can consult another subscriber.
Enquiry /Toggle via the R Key
G
You are making a call.
Initiate enquiry:
R
Z
G
Press R key briefly. Your first call is placed on hold.
Enter internal or external call number. Note the type of line seizure
(see page 41).
You are speaking with the subscriber called.
49
Telephoning
For toggling (switching back and forth between callers):
R
Press R key briefly.
Ending toggling / enquiry:
Menu
F
R
Press softkey briefly.
Use the arrow keys to select the Disconnect menu entry. The
current call is ended.
Press R key briefly. You are speaking with the waiting subscriber
once again.
Enquiry /Toggle via Another Call Key
G
C
F
Z
G
You are making a call.
Press and hold the C key until the key menu opens.
Use the arrow keys to select the call key desired. Your first call is
placed on hold.
Enter internal or external call number. Note the type of line seizure
(see page 41).
You are speaking with the subscriber called.
For toggling (switching back and forth between callers):
C
F
Press and hold the C key until the key menu opens.
Use the arrow keys to select the call key of the waiting subscriber.
Ending toggling / enquiry:
Menu
F
C
F
G
50
Press softkey briefly.
Use the arrow keys to select the Disconnect menu entry. The
current call is ended.
Press and hold the C key until the key menu opens.
Use the arrow keys to select the call key of the still waiting subscriber.
You are speaking with the waiting subscriber once again.
Telephoning
Transferring a Call to an Internal Subscriber
You wish to transfer an internal or external call to an internal subscriber and have
selected an enquiry connection to do so (see page 49;).
The subscriber called via enquiry answers:
G
A
Announce the call transfer.
Press receiver key briefly.
The subscriber called via enquiry does not answer:
A
Press receiver key briefly. The other subscriber is called.
The subscriber called via enquiry is busy:
A
Press receiver key briefly. The connection is transferred.
or
R
Press R key briefly. You are speaking with the waiting subscriber
once again.
or
C
F
Press and hold the C key until the key menu opens.
Use the arrow keys to select the call key where your original subscriber is waiting.
If the called subscriber accepts the call or ends his/her call, he/she will be connected to the waiting call. If the call is not accepted within a certain time interval
(45 seconds is the default) you get an automatic recall. After pressing the
A receiver key you are connected with the original subscriber once again.
Transferring an External Call to an External Subscriber
External calls can only be transferred to an external subscriber via the caller on
hold menu (see page 52).
Menu
Press softkey briefly.
F
Use the arrow keys to select the Transfer menu entry.
OK
Press softkey to confirm transfer.
51
Telephoning
Note:
When you call an external party and then transfer this person to another external
party, you will bear the costs for the call between the two external callers. You
have no way of influencing how long the transferred call will last. The connection
is established via the OpenCom 1000 and occupies two call channels (ISDN user
channels).
Menu when Subscriber on Hold
You have put a call on hold and are possibly already making an enquiry call. Press
the Menu softkey briefly and then dial …
Telephone book: You can look up a call number in the central phone book of your
communications system.
Disconnect: You disconnect the call and are speaking with the subscriber on hold.
Toggle: You toggle between the current subscriber and the subscriber you last
spoke with.
Team hold: This menu entry is only offered to you when you are already on an
enquiry call. If the call is to be continued on another telephone of a team,
you can activate “Team hold”. The call is held, and an “Automatic hold
recall” is carried out to the team members.
Pick-up: This menu entry is only offered to you if you have placed a subscriber on
hold and are not yet conducting an enquiry call. You pick up the call
intended for another telephone in your pick-up group.
Dir. pick-up (direct pick-up): This menu entry is only offered to you if you have
placed a subscriber on hold and are not yet conducting an enquiry call. You
accept a call for any other internal caller. Enter the call number of the other
telephone. If the other telephone is already in the call state (e.g. an
answering machine is making an announcement), you pick up the call.
Tapping ongoing: This menu entry is only offered to you if you have placed a
subscriber on hold and are not yet conducting an enquiry call. After
entering a call number (Dest.:) you can use your telephone to listen in to
the call of another subscriber. Your microphone is automatically muted so
that you are not heard by the subscriber and the person being talked to
who you are listening in on. This function is convenient for, e.g. training
exercises in a ACD group where the supervisor can monitor individual calls
by the agents. The only requirement is that the “protect against listen-in”
function is deactivated at the subscriber whose calls are being monitored.
When a call is being listened in on, “Intercept” appears on the display of the
52
Telephoning
subscriber being listened in on. Listening in is terminated when the
subscriber listening in presses the A receiver key.
suppress tel no. : This menu entry is only offered to you if you have placed a
subscriber on hold and are not yet conducting an enquiry call. Your call
number is not transmitted to the (external or external) person you call next.
Conference: This menu entry is only offered to you when you are already on an
enquiry call. You initiate a 3-party conference.
Transfer: This menu entry is only offered to you when you are already on an
enquiry call. You connect the subscriber on hold with the current caller you
are speaking with.
recording on/off: This menu entry is only offered to you when you are already on
an enquiry call. You can record the call, please refer to Recording Calls
starting on page 57.
Loudspeaker: This activates the speaker/handsfree function to allow multiple
persons in the room to participate in the call.
WAP portal: You have access to WAP (WML) pages on the internet using
addresses preset by the system administrator (URLs, Uniform Resource
Locators) and can also enter your own URL.
Internal/External Three-Party-Conference
If your telephone has the corresponding authorisation configured, you can
conduct a telephone conference (maximum of 3 subscribers). Conference participants can be internal or external callers.
Note:
A conference with two external subscribers requires a corresponding system
configuration. Each subscriber in a conference can make an enquiry to another
subscriber and/or also forward the conference to another subscriber.
Initiate conference:
R short Establish enquiry connection (see page 49;).
key press or
C long key
press
G
When the subscriber answers, announce the conference.
Menu
Press softkey briefly.
53
Telephoning
F
Use the arrow keys to select the Conference menu entry. The conference is initiated.
Ending conference:
A
Press receiver key briefly. You are now switched out of the conference. The two other subscribers can continue their call without
you.
During the Conference
Exiting the conference
Menu
Press softkey briefly.
F
Use the arrow keys to select the Disconnect menu entry.
OK
Press softkey to confirm disconnecting. You can dial once more.
Enquiry and/or transfer during the conference
During a conference, each subscriber can make an enquiry to another subscriber
and/or also forward the conference to another subscriber.
Making an enquiry call to another subscriber (during the conference) is as
follows:
R
Z
Press R key briefly.
Enter internal or external call number. Note the type of line seizure
(see page 41).
or
C
F
Press and hold the C key until the key menu opens.
Use the arrow keys to select the desired call key (INTERNAL/
EXTERNAL key, Team direct call key or Partner direct call key).
If you would like to transfer the conference call:
A
54
Press receiver key.
Telephoning
If you wish to switch back into the conference:
C
F
Press and hold the C key until the key menu opens.
Select the key of conference on hold.
Menu during the Conference
You are in a three-way conference. Press the Menu softkey briefly and then dial …
Telephone book: You can look up a call number in the central phone book of your
communications system.
Disconnect: You exit the conference and can make another call.
recording on/off: You can record the call, please refer to Recording Calls starting
on page 57.
Loudspeaker: This activates the speaker/handsfree function to allow multiple
persons in the room to participate in the call.
WAP portal: You have access to WAP (WML) pages on the internet using
addresses preset by the system administrator (URLs, Uniform Resource
Locators) and can also enter your own URL.
Special Calls/Conversations
Call Back
If you call another subscriber of your OpenCom 1000 communications system and
the line is busy, you can initiate automatic call back. You must have authorisation
for this feature to be able to use it.
Initiate call back
Menu
Press softkey briefly.
F
Use the arrow keys to select the Call back menu entry.
OK
Press softkey to confirm.
If you are not able to leave a call back request, this may be because the subscriber
called already has multiple call back requests stored or you have already left
several call back requests to other subscribers.
55
Telephoning
Answering a call back
A call back is carried out when the other subscriber is free.
When your telephone rings,
A
press receiver key.
The other subscriber is now called.
Deleting call back
The following procedure is for deleting a requested call back:
B
F
OK
F
C
OK
Press Info key longer. A list of active features appears.
Use the arrow keys to select the Call back list menu entry.
Press softkey to confirm.
Use the arrow keys to select the desired entry.
Press C key briefly to delete single digits.
Press softkey to confirm.
Querying Voicebox
OpenVoice 500 is the integrated voicebox system for the OpenCom 1000 communications system. This programme enables callers to leave messages for you even
for those occasions when you are not reachable.
If the system administrator has configured a voicebox for you, the B Info key
flashes when there are new voicebox messages for you. The
symbol will also
appear on the display.
To query the voicebox:
B
F
A
56
Press Info key briefly.
Use the arrow keys to select the Message waiting menu entry and
to select the call number among the entries shown.
Press receiver key. The voicebox is dialled. The next steps are voicecontrolled.
Telephoning
To end the voicebox connection:
A
Press receiver key.
Note:
You can also access the voicebox by a long key press of the 1 number key (when
device is idle). The voicebox call number (“Voice Box No.”) can be saved under the
“Settings > Telephone Option” menu entry (see page 74).
Recording Calls
You can record a call. You must have authorisation for this feature to be able to use
it. Depending on the system configuration, the call is either recorded using a connected recording device or – if you have a voicebox – stored as a message in your
voicebox.
Activating recording
Menu
F
Z
OK
Press softkey briefly.
Use the arrow keys to select the recording on/off menu entry.
Enter a call number of the recording feature where the call is to be
recorded under Dest:..
Press softkey to confirm.
Ending recording
A
Press receiver key. The call is ended.
or
Menu
Press softkey briefly.
F
Use the arrow keys to select the recording on/off menu entry.
OK
Press softkey to confirm. You can continue the call without
recording.
57
Telephoning
Confirming Paging Messages
If your communications system is equipped with a corresponding application,
paging messages can be sent to your telephone. Paging messages are shown on
your mobile unit’s display and – depending on the system setting – can also be
signalled with a ringer and/or vibra call alarm (if you have activated the vibra call
alarm, please refer to page 72). The Info key B continues to flash.
To confirm a received paging message:
B
Press Info key briefly.
OK
Press softkey to confirm the message.
If you receive a paging message during a call, you will hear a short signal tone. The
Info key B continues to flash. You can continue the call. When you have ended the
call, the paging message will be signalled to you once again. Confirm the message
as described.
Note:
Paging messages will be displayed on your mobile unit’s display even if you have
activated call diversion (please refer to page 68).
Calls for ACD Group Members
Members of an ACD group (ACD= Automatic Call Distribution) can be reached
under a common call number. The communications system searches for a telephone within the group that is free upon incoming calls. The “ACD” function is
comparable with the “hunt group” function; it does, however, provide more features, such as call statistics and follow-up work times. If you are a member of an
ACD group, you can also receive ACD calls on your mobile unit. The functions
required to do so are available in the Special features menu (see page 77).
58
Team Functions
Team Functions
The system administrator has the possibility of grouping several phones together
into a team and to program the call keys on these phones with team functions.
The team members can then answer and transfer calls on one another’s behalf.
This section describes how to make and receive calls within a team using a few
basic examples. The Call Keys starting on page 26 chapter has a detailed explanation of the call keys.
TOP TEAM Function
External
call numbers
4701 10
4701 11
4701 12
Internal
call numbers
10
11
12
Internal call numbers
in the key menu list
I(nternal)
T(eam)
T(eam)
10
11
12
Telephone 1
I(nternal)
T(eam)
T(eam)
11
10
12
Telephone 2
I(nternal)
T(eam)
T(eam)
12
11
10
Telephone 3
OpenCom 1000
Example of how call numbers are assigned: TOP TEAM function
The team in the example consists of three members: phone 1 with internal call
number 10; phone 2 with internal call number 11; and phone 3 with internal call
number 12.
As a member of a TOP TEAM, calls to your call number are signalled both visually
and acoustically on your INTERNAL key (I). At the same time calls are also signalled
(visually) on the team members’ direct call keys (T). This means the other team
59
Team Functions
members have the possibility of answering calls for you. If you yourself want to
make an internal or an external call, use the INTERNAL key (I) to seize an internal
line; you can then dial an internal number immediately or seize an external line by
dialling a line code digit (your own call number is then busy as a result).
Notes
■
Activated features (such as a call diversion) for your phone's call number(s) also
affect the way in which calls are signalled on the team members’ direct call
keys.
■
If you wish to reach another team member directly, simply dial his/her team
direct call key.
BROKER TEAM Function
External
call numbers
4701 20
4701 21
4701 21
Internal
call numbers
20
21
21
10
11
12
Internal call numbers
in the key menu list
E(xternal)
E(xternal)
E(xternal)
I(nternal)
20
21
22
10
Telephone 1
ME(xternal)
ME(xternal)
ME(xternal)
I(nternal)
20
21
22
11
Telephone 2
ME(xternal)
ME(xternal)
ME(xternal)
I(nternal)
20
21
22
12
Telephone 3
OpenCom 1000
Example of how call numbers are assigned: BROKER TEAM function
The team in the example consists of three members: phone 1 with internal call
number 10; phone 2 with internal call number 11; and phone 3 with internal call
number 12. All three team members can be reached from the outside under call
numbers 20, 21 and 22.
60
Team Functions
As a member of a BROKER TEAM, calls to your call number are signalled both visually and acoustically on your INTERNAL key (I). External calls are signalled on the
EXTERNAL keys (E). At the same time calls are also signalled (visually) on the team
members’ MULTIPLE-EXTERNAL keys (ME). This means the other team members
have the possibility of answering calls on the lines.
“Team hold” optional function
The system administrator can also optionally activate the following function: calls
that were answered on the lines can be held if you press a call key (current line or
another EXTERNAL key (E) or MULTIPLE-EXTERNAL key (ME)). A held call can then
be accepted by any team member by pressing the key once again. If a held call is
not answered within 20 seconds, there is a callback to the team member who put
the call on hold.
Notes
■
Activated features (e.g. such as a call diversion) for your phone's call number(s)
also affect the way in which calls are signalled on the team members’ ME keys.
■
If you yourself want to make an internal or an external call, use the INTERNAL
key (I) to seize an internal line; you can then dial an internal number
immediately or seize an external line by dialling a line code digit (your own call
number is then busy as a result). You can also use an EXTERNAL key or a
MULTIPLE-EXTERNAL key (ME) to make external calls. However, the line’s call
number is then busy.
61
Team Functions
PARALLEL TEAM Function
External
call numbers
4701 20
4701 21
4701 21
Internal
call numbers
20
21
22
10
11
12
Internal call numbers
in the key menu list
E(xternal)
E(xternal)
E(xternal)
I(nternal)
T(eam)
T(eam)
20
21
22
10
11
12
Telephone 1
ME(xternal)
ME(xternal)
ME(xtern)al
T(eam)
I(nternal)
T(eam)
20
21
22
10
11
12
Telephone 2
ME(xternal)
ME(xternal)
ME(xternal)
T(eam)
T(eam)
I(nternal)
20
21
22
10
11
12
Telephone 3
OpenCom 1000
Example of how call numbers are assigned: PARALLEL TEAM function
The team in the example consists of three members: phone 1 with internal call
number 10; phone 2 with internal call number 11; and phone 3 with internal call
number 12. All three team members can be reached from the outside under call
numbers 20, 21 and 22. Furthermore, on each phone the internal call numbers of
the other team members are set up as team direct call keys, which means that the
team members are able to reach one another directly.
As a member of a PARALLEL TEAM, calls to your call number are signalled both visually and acoustically on your INTERNAL key (I). At the same time calls are also signalled (visually) on the team members’ direct call keys (T). This means the other
team members have the possibility of answering calls for you.
62
Team Functions
Line calls are signalled on the EXTERNAL keys (E). At the same time calls are also
signalled on the team members’ MULTIPLE-EXTERNAL keys (ME). This means the
other team members have the possibility of answering calls on the lines.
“Team hold” optional function
The system administrator can also optionally activate the following function: calls
that were answered on the lines can be held if you press a call key (current line or
another EXTERNAL key (E) or MULTIPLE-EXTERNAL key (ME) or another team direct
call key (T)). A held call can then be accepted by any team member by pressing the
key once again. If a held call is not answered within 20 seconds, there is a callback
to the team member who put the call on hold.
Notes
■
Activated features (e.g. such as a call diversion) for your phone's call number(s)
also affect the way in which calls are signalled on the team members’ ME keys.
■
If you yourself want to make an internal or an external call, use the INTERNAL
key (I) to seize an internal line; you can then dial an internal number
immediately or seize an external line by dialling a line code digit (your own call
number is then busy as a result). You can also use an EXTERNAL key (E) or a
MULTIPLE-EXTERNAL key (ME) to make calls. However, the line’s call number is
then busy. If you wish to reach another team member directly, simply dial his/
her team direct call key.
63
Team Functions
EXECUTIVE-/SECRETARY Team Function
The EXECUTIVE-SECRETARY TEAM in the example consists of two members: Executive (phone 1 with internal call number 10) and secretary (phone 2 with internal
call number 11). A phone has also been provided in the seating area (phone 3).
External
call numbers
4701 10
4701 11
Internal
call numbers
10
11
Internal call numbers
in the key menu list
I(nternal)
MI(nternal)
P(artner) SE
P(artner)
10
11
Telephone 1
Executive
11
MI(nternal)
P(artner) SE
P(artner)
I(nternal)
10
10
11
MI(nternal)
MI(nternal)
P(artner)
P(artner)
10
11
11
10
Telephone 2
Secretary
Telephone 3
Seating area (SE)
OpenCom 1000
Example of how call numbers are assigned: EXECUTIVE-SECRETARY team function
On the executive’s phone
Calls on your call number are signalled to you only visually on your INTERNAL
key (I). The call is signalled acoustically on the secretary's MULTIPLE-INTERNAL
key (MI) and on the phone in the seating area (where configured). The secretary
can answer and forward your calls for you.
If you yourself want to make an internal or an external call, use the INTERNAL
key (I) to seize an internal line; you can then dial an internal number immediately
or seize an external line by dialling a line code digit (your own call number is then
busy as a result). You can also use the secretary’s MI key to make calls. However,
the secretary's call number is then busy. To reach the secretary directly, simply
press the partner direct call key (P). The key tells you whether the phone is free or
busy. Calls can also be made when the phone is busy.
64
Team Functions
On the secretary’s phone
Calls on your call number are signalled to you only visually and acoustically on
your INTERNAL key (I). Calls for the executive’s phone are still signalled to you visually and acoustically on the MULTIPLE-INTERNAL key (MI).
If you yourself want to make an internal or an external call, use the INTERNAL
key (I) to seize an internal line; you can then dial an internal number immediately
or seize an external line by dialling a line code digit (your own call number is then
busy as a result). You can also use the executive’s MI key to make calls. However,
the executive’s call number is then busy. To reach the executive directly, simply
press the partner direct call key (P). The key tells you whether the phone is free or
busy. Calls can also be made when the phone is busy.
On phone in the seating area
On the phone in the seating area calls for the executive and for the secretary are
signalled on their MULTIPLE-INTERNAL key (MI) (MI key with call number 10 for the
executive, MI key with call number 11 for the secretary).
The executive and the secretary can be reached directly from the phone in the
seating area using the partner keys (P) (the executive using the P key with call
number 10; the secretary using the P key with call number 11).
Both the executive and the secretary can reach the phone in the seating area from
their own phones using the corresponding partner key (P-SE).
65
Features and Menus
Features and Menus
How to Set Features
There are different ways to set the features of your telephone and of the system:
Using menus
Use the mobile unit menus to conveniently make settings on the desired features
(please refer to Menu Navigation starting on page 30 also).
Some menu entries are only shown on your mobile unit when you are authorised
to use the corresponding feature. Contact the system administrator when you
have questions on specific features or are not able to use a feature satisfactorily.
Using programmed keys
The key menu contains a list of the call and function keys programmed by the
system administrator. Use the function keys to configure the features of your telephone and of the system.
Using code number procedures
Many features can also be configured by entering code numbers. Code numbers
are entered via the * and # keys respectively and in combination with a specific
series of numbers (0 to 9 keys).
Code number input is especially intended for analogue terminals on your system.
Code numbers can also be used on your mobile unit. They are described in the
user guide on the analogue terminals. Ask your system administrator about it.
The Main Menu
The Main menu contains all available features. Some of the menu items can be
found in other state-dependent menus as well. For example, received e-mails are
available in the Main menu under Messages and also available via the B Info key.
Features which affect your telephone’s reachability (e.g. call blocking activated)
are located in the Main menu and also in the Active features menu which you can
access via long key press of the B Info key.
Press Menu softkey briefly. This displays the primary menu groups …
Calls: This contains the most important features relevant to a call.
Call diversions: This menu groups offers all types of call diversions.
66
Features and Menus
Messages: This menu group provides information about short messages and emails that you have received and sent.
Settings: In this menu group you can configure the mobile unit to meet your
personal requirements (e.g. volume, ringer settings, key lock and display
language).
Protection: Among other things, you can activate call protection, restrict dialling
options or change the device PIN.
Special features: This menu is where the communications system's special
features are. The entries in this menu depend on which (additional)
functions have been configured for the system.
Central config. (Central configurations): This is where central settings for the
communications system and other subscribers are configured. This menu is
password protected.
“Calls” Menu
Select Call lists and then select …
In absence: This list is where the internal and/or external call numbers of
subscribers you have called but not reached are listed. A maximum
of 10 entries can be saved in the list. Additional entries delete the
oldest respective entry; the current entry is always in the first line.
Answer: Select an entry. Press the OK softkey briefly to receive
information on this call. You can call back the caller directly by
selecting an entry and pressing the A receiver key. To delete
an entry, press the C key. An entry is automatically deleted
when you have called the caller back.
Activate: Use this menu entry to switch the list on/off. If the list is
switched off, no calls in absence are saved.
Busy: While telephoning, other calls can be added to your call list.
Use this menu entry to switch this function on or off.
Received calls: You see the internal/external call numbers of the callers
with whom you last spoke. You can edit this list in the same way
(Answer) as the “calls in absence” list (see previous section). Use the
Activate menu entry to switch the list on/off. If the list is switched
off, no answered calls are saved.
Type of call: Use this menu entry to configure whether all calls, only
internal, or only external calls are recorded in the activated call lists.
67
Features and Menus
External call numbers are only recorded if a call number of the caller
is transmitted.
Deflect call: If your mobile unit signalises a call, you can deflect it to another
terminal without having spoken to the caller. Enter the call number of the
subscriber to whom you wish to deflect the call under Dest.: and then press
the OK softkey.
Call back list: You see the list with the numbers of the subscribers where you have
left a call back request. You can delete individual call back requests by
selecting a number and pressing the C key.
Hunt group: If your telephone is a member of one or more hunt group(s), a picklist of the corresponding hunt group call numbers is shown you. Use the
On/Off options to switch signalling of hunt group calls to your mobile unit
on or off (for individual hunt groups or for all hunt groups if your telephone
is a member of multiple hunt groups). Activated hunt group calls have a “+”
prefixing the hunt group call number; deactivated ones have a “-”.
Note: If you are the last reachable member of the hunt group and you log
out then any further callers will hear a busy signal.
“Call diversions” Menu
For certain calls, you can divert to another internal or external call number. For
external call numbers, you must always enter the code digit for seizing an external
line as the first digit.
Call diversions can be conducted immediately, after time (if the call was not picked
up on your mobile unit) or when the terminal is busy. In addition, call diversions
can be activated for internal, external or all (internal and external) calls. You can
configure more than one call diversion mode at the same time (Immediately,
After time or Busy). You can, e.g. configure call forwarding Immediately for
external calls to one call number, and call diversion After time for internal calls to
a different call number. If more than one diversion mode has been activated,
Immediately call diversion is always given priority.
When “OpenVoice 500”, the integrated Voice-Mail-System is installed on the
OpenCom 1000 communications system, you can also divert calls to your voicebox
call number.
Divert phone: Select Immediately, After time or Busy for the diversion type.
Then enter the Dest.: (destination).
Note: All calls for the call numbers of your device are diverted, i.e. all call
keys (INTERNAL/EXTERNAL keys). If some of these call keys are configured
68
Features and Menus
as MULTIPLE keys on other devices, then this diversion automatically
applies to these keys also.
Divert key: Select the call key you wish to divert from the list. Then select the
desired forwarding type: Immediately, After time or Busy. Then enter the
Dest.: (destination).
Note: All calls to this key are diverted. If this INTERNAL/EXTERNAL call key is
configured as a MULTIPLE key on other devices, then this diversion
automatically applies to these keys also.
Divert hunt grp. (divert hunt group): First enter the number of the hunt group
then enter the Dest.: (destination).
Note: The Immediately and Busy diversion types can be configured for a
hunt group. In addition, the telephone where the call diversion is
configured has to be a member of the hunt group which is to be diverted.
Cancel diversion: You can delete all active call diversions from your mobile unit.
Confirm with the OK softkey; the display shows [pos] as a confirmation.
“Messages” Menu
Message waiting: Short messages can be exchanged between yourself and other
internal subscribers.
Answer msg. (answer message): You see a list of received messages. A
maximum of 10 entries can be saved in your list. A brief ringer
signalises each new entry. Additional entries delete the oldest
respective entry; the current entry is always in the first line. When
querying the list, you can call back directly from the list by selecting
an entry and pressing the A receiver key. Use the C key to delete a
specific entry. Press the OK softkey to see the entire message text and
the date it arrived.
Send msg. (send message): This menu entry is where you can send
messages with a length up to 24 characters to other subscribers.
Upon receiving a message 16 characters are shown.
Reset msg. (reset message): You can recall messages already sent to other
subscribers. The message is deleted on the recipient's device.
Silent: You can deactivate the ringer for incoming messages.
E-Mail: The system administrator configures whether you can receive and send emails with your telephone in the communications system. Access to your email account is protected by your e-mail password. New e-mails are
signalled by the flashing B info key.
69
Features and Menus
login: Use this menu entry to open the list of received e-mails – after
entering your e-mail password (INBOX). Use the F arrow keys to
select the e-mail you wish to read and confirm with the OK softkey.
You can also answer or forward the message. If you press the Esc
softkey – while having the INBOX list open – you open a submenu
where you can send e-mails. Select the send e-mail menu entry. This
opens the display window where you write and send e-mails (please
refer to the The Editor starting on page 29 chapter also).
Note: When you send an e-mail to an internal subscriber of the
OpenCom 1000, you can also enter the internal call number of the
subscriber instead of the recipient's name. The call number of the
subscriber is linked to the e-mail account user name on the
OpenCom 1000; this saves you the tedium of entering the e-mail
user name which is usually a fairly lengthy string of characters.
rlogin: Use this menu entry to access your e-mail account on another
telephone (“remote login”). First enter your subscriber number (your
internal call number). Then enter your e-mail password. Then select
the OK menu entry. The INBOX list opens. To continue, follow the
same procedure as described in the “login” section (see page 70).
admin: Use this menu entry to activate or de-activate the e-mail function
(e-mail check in, e-mail check out). If the function is de-activated,
received e-mails are not (any longer) signalled on the telephone. In
addition, this is where you configure or change the password as
needed for querying your e-mail account (PW setup).
Note: If you forget your password, the system administrator can
delete it using the configuration programme of the communications
system. Then you have to enter the new password on your
telephone (after you have received a new e-mail password from
either your provider or from your system administrator).
“Settings” Menu
Key Lock: You can protect your telephone keypad from unauthorised access. An
active keypad lock is displayed with the symbol in the softkey line. To
unlock the keypad, press the softkey under this symbol and then the #
key. Alternatively you can hold down the # key for ca. 2 seconds to
activate the keypad lock when idle.
Alarm: You can enter a time ranging from 00:00 to 23:59 when the telephone is to
issue a signal. The alarm lasts ca. 1 minute and can be switched off by
pressing any key. After each signalling of an alarm, you must activate any
subsequent alarm once again.
70
Features and Menus
Alarm active: This setting activates (“) or deactivates the alarm. The
symbol appearing on the display indicates an alarm is activated.
Set: When the 24 hour time format is set, enter the alarm time between
00:00 and 23:59. The time can be selected between 00:00 and 11:59
for the 12 hour format. Enter “am” with key 2 (a on display), “pm”
with key 7 (p on display). You can configure the signalling melody as
described below. The alarm signalling lasts ca. 1 minute and can be
switched off by pressing any number key. After each signalling of an
alarm, you must activate any subsequent alarm once again.
Date/Time: If the date and/or time is transmitted by the system, this menu
entry cannot be changed. If the system where the mobile unit is
currently checked into does not transmit date and time you can
enter the current date and the current time. For 12-hour format:
After entering the time use the number 2 to switch to “am” or
number 7 to “pm”. You can set the date and time display format in
the “Telephone Option” menu (see page 75).
Melody: Select a melody for signalling the alarm. To do so, press one of the
number keys or select the melody with the arrow keys. You can also
change this melody under “Ringer Settings> Melody” (see the
following section).
Ringer Settings: This menu is for setting ringer volume and signalling for your
telephone.
Melody: Different call types can be signalled using different melodies.
There are 60 different melodies available respectively. Select the call
type. Select the call type. Enter a number (1 … 9 or for two-digit
entry, 10 … 60, pressing the numbers quickly one after another) or
change the number displayed with the arrow keys.
Type: This setting determines how selected melodies are signalled.
Repeat: The melody is played (repeatedly) as long as the call is
signalled.
Play once: The melody selected is played just once when there is a
call.
Device: You can select the combination of signal generators with which the
call will be signalled.
Buzzer: Activates or deactivates the acoustic ringer tone. If you
deactivate the signal generator then this is shown in the
display with the symbol.
71
Features and Menus
Vibrator: Activates or deactivates the vibration signal generator.
Note: If you switch off all signal generators, a call is only signalled
optically on the display with the flashing
symbol.
Headset: Signals the call on the headset if this is connected to the
mobile unit.
Volume Settings: Select the buzzer volume signalling (1 … 8) via entering
a number or with the arrow keys.
Volume Settings: Select the volume at which you wish to hear the person calling
you (via Earpiece, Hands-free and Headset). Enter a number (1 … 8) or
select the volume with the arrow keys. In addition, you can also set the
volume for the Buzzer here.
System: This menu offers you settings for subscribing and checking in the mobile
unit on a communications system. Please note the information in the
chapter Subscribing Mobile Unit starting on page 14 also.
Note: The System menu entry is possibly displayed in the main menu
directly. This is the case when the mobile unit is not yet checked in or if the
mobile unit, for example, is simply checked into a GAP base station.
Subscriptions: Use this menu to subscribe the handset to one or more
communications systems and administer the subscription records
necessary for checking in. Please refer to the The “Subscriptions”
Menu on page 15 section for further information.
IPEI: The international mobile unit code is displayed (IPEI = International
Portable Equipment Identity).
Version Number: The software and hardware version number of the
mobile unit are displayed. Depending on the software version, you
can also view the internal memory usage and memory usage of an
inserted MEM card.
Managing existing subscription
The following menu entries are available when there is at least one existing
subscription entry.
Navigate to the System > Subscriptions menu entry. Select the desired
subscription entry or select the menu entry Auto.Search (Automatic
Search). Confirm with the Options softkey.
New: Begin a new subscription with this menu entry. For details, please
refer to Creating New Subscription starting on page 17.
72
Features and Menus
Select:
– when you select Auto. Search: If you have subscribed the mobile
unit to multiple communications systems, the mobile unit (when
idle) will automatically select and check itself in to one of the
reachable and subscribed communications systems. Your mobile
unit will thus be automatically checked in to another
communications system as soon as you are out of range of the
current communications system.
– when selecting an existing subscription entry: Use this menu
entry to select a specific communications system. Even if there
are also other existing subscription entries, only the manually
selected entry is used for checking in.
Edit (only when selecting a subscription entry): You can change the name
and call number display of the subscription selected (usually the
internal/local call number of the mobile unit). This information
appears on the display in the idle state when the mobile unit is
checked into a communications system and no priority status
information is displayed.
Entering an internal call number for the mobile unit is irrelevant on
the OpenCom 1000 as the internal call numbers are managed by the
communications system.
GAP only (only when selecting a subscription entry): Activate or deactivate
this mode with the OK softkey.
– Not activated (recommended): The mobile unit uses extended
system telephony functions. Use this mode for operation on a
communications system.
– Activated: The mobile unit acts like a standard GAP telephone.
Use this mode when the GAP base station subscription is not
successful.
Delete (only when selecting a subscription entry): This menu entry deletes
the subscription entry on the mobile unit. The mobile unit can only
be operated on this communications system again after resubscription.
Telephone Option: This menu contains device settings for the mobile unit.
Language: Select one of the languages listed for the display.
User Name: Enter a name for your mobile unit. This appears when idle. Your
system administrator may already have entered a name. For
information on text entry refer to page 29.
73
Features and Menus
Attention Tones: You can configure tones that the mobile unit uses to
notify you of various “events”.
Key Click: Each key press is confirmed.
Coverage Warn (coverage warning): Notification tone every 10
seconds when you are at the edge of the RFP coverage area
and there is a risk the connection will be interrupted.
Battery Alarm: Notification tone every 30 seconds when battery
charge capacity gets too low. There are ca. 5 minutes
remaining before the connection is disconnected.
Confirm Tones: Tone when procedure successfully completed.
End of Menu: Tone indicating end of a list/of a menu.
Emergency Call: The emergency call number is the call number dialled
upon a long key press of the SOS key (R key).
SOS number: Before entering the emergency call number, press the
R key R. This ensures that the emergency call numbers can
also be dialled during a call. You can enter any internal or
external call number. When you programme an external call
number for the SOS destination you may have to – depending
on the configuration of the communications system – prefix
the call number with the code for external line seizure.
SOS beep: Configure whether an emergency call is also signalled
with a loud beep on the mobile unit (so that the device/
person that triggered the emergency call can be located).
Hands-free: You can configure whether your mobile unit switches
to the handsfree mode during an emergency call. This means
that the person receiving the emergency call can listen and
speak throughout the room.
Melody: If your mobile unit is one receiving emergency calls, you
can configure the melody signalling the emergency call.
Select a melody via the arrow keys. You can also change this
melody under “Ringer Settings> Melody” (see page 71).
Voice Box No.: Enter the call number of your voicebox (see also page 56).
Loud Environm. (loud environment): It may be useful to activate this
function in a loud environment. The mobile unit then tries to
enhance voice transmission.
Auto Answer: If this function is activated the mobile unit automatically
answers a call after the first ring (useful when using a headset). Note:
74
Features and Menus
If you are not using the headset, then please deactivate this function
as a caller may listen in unnoticed otherwise.
Silent Charging: As long as the mobile unit is in the charging station no
calls are signalled. This applies to both acoustical signalling as well as
optical signalling or to the vibration signal generator.
Charger Answer (automatic answer): If this feature is activated, the mobile
unit automatically answers a call when it is removed from the
charging station (this means the A receiver key does not have to be
pressed). When the mobile unit is replaced into the charging station,
the call is switched to the handsfree mode.
Auto.Quick Hook (automatic speed dialling): If this feature is activated, a
local phone book entry designated for speed dialling is dialled
immediately (see page 37). Dialling additional single digits after
dialling has taken place is not possible. If it is deactivated, the
corresponding call number goes to pre-dialling first and digits can
be added.
Auto.Key Lock (automatic key lock): If this feature is activated, the key lock
is automatically activated 60 seconds after the last key press when
the device is idle.
Charging LED: After removing the mobile unit from the charging station
the display illumination goes on. Switch this function off if you wish
to save energy.
Disp.Contrast (display contrast): Select the level of display contrast by
entering a number (1 … 8) or with the arrow keys.
Date/Time: You can select the time and date format customary in your
country here. If the time is not transmitted by the communications
system, you can set it in the “Settings” menu (see page 71).
Date Format: Select the date format dd.mm.yy (e.g. 31.12.08) or
mm/dd/yy (e.g. 12/31/08).
Time Format: Select the 24 hour or 12 hour (am/pm) format.
Call time: If this feature is activated the call duration appears on the
display during a call.
Display Time: You can switch display of the current time on/off.
Reset: Use the following menu entries to reset settings:
Handset: After a confirmation query, the mobile unit is reset to the
factory settings. This means that all settings and entries are
deleted, excepting system subscriptions and the PIN.
75
Features and Menus
Telephone Option: This resets the settings in the “Telephone
Option” menu only.
Telephone Book: Only entries in the local telephone book of the
mobile unit are deleted.
Note: When resetting the mobile unit and the telephone options
any saved emergency call number is also deleted.
Security: This menu entry allows you to prevent unauthorised use of your
telephone keypad. To do so, you require a PIN (Personal Identification
Number). The default is “0000” (4 digits of 0 (zero)).
Lock Handset: Confirm with the OK softkey, the mobile unit is now locked.
PIN Lock appears on the display. Outgoing calls are no longer
possible. You may still accept incoming calls. The emergency call key
(R key) programmed with a call number can still be used.
Change PIN: You can change your PIN (4-digit) here. Enter your current
device PIN (default: “0000”) and then the new PIN twice. You require
the PIN for access to the “Security” menu entry described here where
you can lock the telephone keypad.
“Protection” Menu
Call blocking: Switches signalling of calls to your terminal for all INTERNAL/
EXTERNAL keys (call keys) on or off. If some of your call numbers are
configured as MULTIPLE keys on other devices, then this call blocking
automatically applies to these keys also. Depending on the system
configuration, an internal caller hears a busy signal or a special dialling tone
with a notification of activated call blocking. An external caller hears either
a busy signal or is switched to the exchange.
Block call key(s): Switches signalling of calls to your terminal for an individual
INTERNAL/EXTERNAL key (call keys) on or off. If this call number is
configured as a MULTIPLE key on other devices, then this call blocking
automatically applies to these keys also. Select the key for which you wish
to configure call blocking. The next steps are identical with programming
call blocking (see previous section).
Call waiting on/off: During a telephone conversation and are thus busy,
authorised internal subscribers can signal call waiting to you to gain your
attention. If you wish to prevent this, activate call waiting on/off.
Block intrusion: When this feature is activated, an authorised subscriber cannot
intrude on an ongoing call. This function is useful when you wish to
conduct a call without interruption. When this function is not activated,
76
Features and Menus
authorised subscribers can intrude on ongoing calls and send you a
message.
Restrict dial: You can switch the dialling authorisation for your telephone, e.g. to
prevent unauthorised generation of telephone costs. Depending on the
basic configuration, the authorisation level is switched to outward
restricted trunk access, i.e. only incoming external and outgoing internal
calls are possible. Enter your device PIN (default: “0000”) and then activate
the function with the On option (or de-activate the restricted dialling
authorisation with the Off option). When the restriction is active, a
corresponding notice appears on the mobile unit display. Dialling
authorisation can also be switched for the entire system (for entire user
groups), please refer to page 79.
Note: If certain call numbers (emergency call numbers) should still be
available for dialling despite restricted dialling authorisation, this can be
configured by the system administrator.
Change PIN: Do not mix up this PIN with the PIN for locking the device (telephone
lock, see also page 76). The PIN mentioned here is required for system
settings (e.g. for the “Restrict dial” feature). Enter your current device PIN
(default: “0000”) and then the new PIN twice. If you have mislaid your
device PIN, your system administrator can configure a new PIN for you (see
the “Alter indiv. PIN (alter individual PIN)” on page 80).
Cancel features: All active features that hinder your availability are cleared (call
blocking, call diversion, call-waiting on/off ).
“Special features” Menu
This menu is for storing system-specific functions. Terminal mode is, e.g. where a
series of terminal mode applications are available whose function and operation
are described in the documentation on the respective applications. Please contact
your system administrator for more information.
ACD: This menu entry is offered when you are a member (agent) of an ACD group
(ACD = Automatic Call Distribution). It is possible that you are a member of
multiple ACD groups. Select the desired ACD group from the list. Use the OK
softkey to switch the call signalling on your telephone for the ACD group
On or Off. Use the Off option to switch yourself out of an ACD group
temporarily. Upon the next ACD group call you will not be included. If you
have switched yourself out of an ACD group, you are still reachable under
your personal internal call number. Use the On option to switch yourself
back into the group and waiting calls are once again allocated to you.
77
Features and Menus
Note: The system administrator can configure that the ACD group is
automatically closed when the last agent switches out of it. In this case
further callers receive a busy signal or are directed to a substitute
destination (e.g. to an attendant console) – depending on the
communications system configuration. If the group remains open, even
when all agents have switched out of it, a call for the ACD group is initially
shown on the telephone displays of all agents (and can be picked up there).
Then the caller is either diverted to a substitute destination or hears a busy
signal.
Tip: If the call number of the ACD group has been programmed to a
function key, you can switch in and out simply by pressing the key. Press the
C key briefly and select the desired “ACD group” function from the key
menu.
finish work time: After ending an ACD call, you remain busy for the duration of
the finish work time configured for the group for all calls (a value between 0
and 300 seconds is possible). Use this menu entry to manually end finish
work time early. You are now once again reachable for new calls to the ACD
group.
Once the finish work time has expired, the next call is allocated, if callers are
waiting. Outgoing calls can be made during the finish work time and also
end the finish work time.
extend work time: During the ongoing finish work time you can extend
the finish work time by a specific value (0 – 900 seconds can be
selected). This additional finish work time applies to all ACD group
agents.
“Central config.” (Central configurations) Menu
This menu is where you can execute central settings via your telephone for the
communications system and for other subscribers.
System service: The settings in this menu require entering the system password.
Note: It is recommended to the system administrator to restrict access to
the system password to prevent unauthorised changes to system settings.
Date+time: This menu entry is for setting the system date and the system
time. Select the desired entry (time with hhmm, date with
ddmmyyyy). Select Save now to have the setting saved into the
system.
DDI barring: This function is for block or allow direct incoming calls for 2
user groups. If access is barred, all incoming calls are signalled at the
78
Features and Menus
exchange telephone. They are then transferred to the respective
terminal from there. Contact your system administrator if necessary
to find out for which user groups the “DDI barring” feature was
configured.
Call variant: call variants define at which times calls to certain terminals are
signalled (e.g. to an exchange telephone). The system administrator
can individually define call variants, simplifying operation. Select the
desired variant from the list. If your communications system has
been configured for multiple companies, first select the company for
which you wish to configure the call variant. Call variants are
configured according to customer wishes and requirements; a
maximum of 10 call variants per company are possible.
Sample call variants
Variant 1: During normal office hours calls, (direct calls, call backs,
and calls returned to the operator) are signalled on the attendant
terminal.
Variant 2: If the exchange telephone is not occupied, calls are
signalled to one (or more) telephone(s) (e.g. night shift).
Variant 3: All calls are signalled to the security person/doorman at
the weekend.
Alter password: The PIN of the system service (= system password) can be
changed here.
Unblock password: If you have to access system service settings more
frequently, you can have this access generally unblocked. When you
call the menu, you are no longer requested to enter the PIN. To
prevent unauthorised settings, you should reset menu group access
when you do not have your mobile unit with you.
Change Barring: This function is for “switching down” the dialling
authorisation for 2 user groups (= partial trunk access or local trunk
access). If dialling authorisation is switched down, the terminals of
the corresponding user group can still be reached by incoming
external calls; the outgoing calling is, however, restricted (partial
trunk access = no outgoing calls; local trunk access = only local
calling possible). Contact your system administrator if necessary to
find out for which user groups the “Change barring” feature was
configured and what authorisation level it is in conjunction with.
Subscriber serv. (subscriber service): The settings in this menu require entering
the subscriber service password.
79
Features and Menus
Call diversions: Use this function to configure call diversions for the call
numbers of other internal subscribers (individual INTERNAL/
EXTERNAL keys or for the device generally). A call diversion for hunt
groups can also be programmed. External call diversions can be
programmed to any subscribers on the public network. Enter the
internal phone number you wish to divert. The next steps are
identical with programming Divert phone (see page 68).
Hunt group: Use this menu entry to switch a call number in and out again
of an existing hunt group. You can execute this switch for any
internal subscriber of a hunt group. Enter the internal call number
you wish to switch in or out of the hunt group (On/Off options).
Call blocking: Use this function to switch call blocking on or off for the call
numbers of other internal subscribers (individual INTERNAL/
EXTERNAL keys or for the device generally) as well as for hunt group
call numbers. Enter the internal phone number you wish to switch
call blocking on/off. The next steps are identical with configuring the
call blocking function (see page 76).
Trunk acc. level (trunk access level): The basic setting of trunk access level
for each telephone can be changed with the following setting. Enter
the internal phone number for which you wish to change dialling
authorisation. Select the authorisation level and activate it with the
On option. There are 8 levels configurable which have the following
dialling authorisation as a default, however, can be individually
configured by the system administrator:
0 = internal calls
1 = outward restricted
2 = local calls
3 = regional access
4 = national calls
5 = international calls
6 = reserved
7 = reserved
Restrict dial: Dialling authorisation can be switched from the default to
“outward restricted” authorisation level at each telephone (see
previous “trunk access level” section) Enter the internal phone
number for which you wish to change dialling authorisation and
activate this with the On option.
Alter indiv. PIN (alter individual PIN): You can alter the individual PIN of
another internal subscriber (e.g. if this person has forgotten his/her
80
Features and Menus
PIN). Enter the call number of the subscriber and the new PIN and
confirm the entry with the Save now menu entry.
Alter sub.pass (alter subscriber password): You can change the PIN
(= subscriber password) the subscriber service has given you. Make
sure to remember the PIN well and do not let unauthorised persons
have access to it! If you have forgotten the PIN, customer service will
help you.
Unblock password: If you have to access subscriber service settings more
frequently, you can have this access generally unblocked. When you
call the menu, you are no longer requested to enter the PIN. To
prevent unauthorised settings, you should reset menu group access
when you do not have your mobile unit with you.
ACD: Use this function to query how full a queue is for individual
subscribers (agents) of an ACD group (ACD = Automatic Call
Distribution). Enter the internal call number of the subscriber. The
number of waiting calls for this subscriber and the call numbers of
the respective ACD group are shown.
Information Menus
Use the B info key to access other menus with information on received, calls, messages, etc. as well as current settings of your telephone.
“Info” Menu
This menu is for quickly locating received or saved messages. The same menu
entries are also in the main menu. If there are new entries on the info list, the Info
key flashes. The following menu entries described are only offered if corresponding announcements (calls, notifications) are there.
Press the B Info key briefly when idle. You see one or more entries …
Call list: Information on missed calls (please refer to the section “Call Lists” on
page 67)
Received calls: Information on accepted calls (please refer to the section “Call
Lists” on page 67)
Call back list: List of requested call backs (please refer to Call Back starting on
page 55)
81
Features and Menus
Message waiting: List of received short messages (please refer to the “Message
waiting” section on page 69) and voicebox messages (please refer to
Querying Voicebox starting on page 56)
E-mail: E-mail information (please refer to the section “E-mail” on page 69)
Active features: Displays active features which restrict reachability (see next
chapter on page page 82).
“Active features” Menu
This menu provides an overview of active features which impair your reachability.
The same menu entries are also in the main menu. You can deactivate features
here. The features are then removed from this menu. If there are no active features,
the idle display menu appears and no entry is shown.
When idle, press the B Info key longer or select Active features in the “Info”
menu (see page 82). You see one or more entries …
Call blocking: Call blocking is activated; see the section “Call blocking” on page 76
Block call key: Call blocking is activated for individual INTERNAL/EXTERNAL key;
see the section “Block call key” on page 76
Call-waiting on/off: Call waiting on/off is activated; see the section “Call waiting
on/off” on page 76
Block intrusion: Block intrusion is activated; see the section “Block intrusion” on
page 76
Call diversion: For every activated call diversion, a menu entry is offered, e.g.
Divert key after time for the call diversion after time for a device key;
please refer to “Call diversions” Menu starting on page 68.
82
Installing USB Drivers
Installing USB Drivers
The Aastra 142d has a USB port for connecting to a PC. You have to install the USB
driver for the Aastra 142d before you can use this connection. To do so you
require:
■
a PC with Microsoft Windows and USB interface,
■
a USB data cable for your Aastra 142d (ID No. 4514346)
■
and the installation programme for the USB driver. The installation programme
is available for download on the Internet under http://www.aastra.de or http://
www.aastra.com.
Note:
The Aastra 142d may not yet be connected during driver installation.
1. Log in to Windows as the administrator.
2. Start the installation programme for the USB driver via “Setup.exe”. Follow the
steps of the installation assistant.
3. Then connect the Aastra 142d using the USB data cable. Use an unused USB
port on your PC.
Connecting USB data cable
4. Check the USB connection. Start the Applet System in the Windows Control
Panel. Select the Hardware tab in the System Properties dialogue. Click on
the Device Manager button. The entries highlighted blue in the following
screenshot must be shown.
83
Installing USB Drivers
Windows Device Manager: USB driver components
Updating Software
The software for your Aastra 142d can be updated using a USB data cable.
Carry out the following steps to update the software for your Aastra 142d:
1. Install the USB driver (see Installing USB Drivers starting on page 83) and
connect the Aastra 142d to your PC.
2. Start the programme for updating the software of your Aastra 142d.
3. Follow the instructions of the PC programme to carry out the software update.
After the programme has determined the configuration, your telephone is
switched off.
4. Switch the device on again while holding down the F arrow key and then
pressing the R key. Now your telephone software is updated.
84
Installing USB Drivers
PC Tool for Managing the Phone Book
There is a “PC Tool” programme available for managing the local phone book of
the Aastra 142d. This enables you to transfer phone book data saved on your
Aastra 142d to your PC and vice versa.
This PC tool as well as detailed information on installation and operation are
available on the Internet at http://www.aastra.de and / or
http://www.aastra.com for downloading.
85
Appendix
Appendix
Important Information on Battery Use
Switch off the mobile unit before removing the batteries as there may be a
loss of data otherwise.
1. Use nickel metal hydride (NiMH) batteries only!
The listed mobile unit operation times (ready for operation / calling) and
charge times (see Technical Data starting on page 91) only apply with a battery
capacity of 800 mAh.
The scope of delivery of the mobile unit includes 3 re-chargeable AAA NiMH
cells.
Note:
Using other battery types or non-re-chargeable batteries / primary cells can be
hazardous and may also result in functional impairment or damage to the device.
For understandable reasons, the manufacturer cannot accept any liability in
such cases.
2. Batteries get warm while charging; this is a normal and non-hazardous process.
3. Do not use any third-party charging devices. This may damage the batteries.
4. Observe the correct polarity when inserting the batteries! Please refer to:
Inserting/Removing Batteries starting on page 10.
5. Never submerge a battery under water nor throw a battery into a fire.
6. Do not take batteries apart. This could result in leakage of corrosive
electrolytes.
7. After inserting new batteries the battery status display takes a few charge
cycles to be ready to display accurate charge status information.
8. New batteries only reach their full capacity after a few charge/discharge
processes.
9. You can replace your mobile unit back onto the charging station after each call.
The charging process is controlled electronically so that batteries at whatever
charge level are optimally and carefully charged. Avoid removing the batteries
for no particular reason from the mobile unit as this impairs the optimal
charging process.
86
Appendix
The capacity of the batteries used can be improved when after more lengthy
usage periods the batteries are fully discharged and then fully recharged.
10.Do not short circuit the batteries (dangerous). Especially avoid accidental short
circuiting during storage and transport due to, e.g. key ring and keys, metal
plates or similar items and make sure that batteries do not come into contact
with substances containing fats, oil or grease.
This is why batteries are stored outside the mobile unit in insulated packaging
only. Make sure contacts to not come into contact with greasy parts either.
11.Recycling of all used batteries is legally stipulated; they cannot be disposed of
in domestic refuse. Dispose of used batteries in accordance with local
government requirements. Be sure to recycle them. Batteries are recycled
because they may contain, e.g. nickel cadmium (Ni-Cd), lead (Pb), cadmium
(Cd) or mercury (Hg).
Care and Maintenance
Your telephone is a product that meets the highest standards of design and manufacture. It should therefore be treated with care. Follow the advice below, and you
will be able to enjoy using this product for a long time.
Please follow all the Safety Precautions in the chapter Safety Information starting
on page 2. These precautions apply to the mobile unit, the charging station, the
batteries (the entire telephone), as well as the accessories.
Note:
To clean the telephone, first remove the charger adapter plug from the mains
socket. Wipe the equipment with an anti-static cloth or a soft, damp leather cloth.
Never spray your telephone with cleaning fluid or solvents.
Clean the contacts of the mobile unit and charging station with a lint-free cloth. If
your telephone or one of the accessories fails to function correctly, contact your
supplier's customer service.
87
Appendix
Environmental Properties and Disposal
(valid for the European Union)
The product was manufactured in line with the legal specifications and 2002 manufacturing directive and is recycling and environmentally compatible. It was
developed with low energy usage, long service life span and user-friendliness in
mind, using a limited amount of environmentally compatible materials and
components. Help to extend the lifetime of your devices by following the safety
precautions, information on battery lifetime and the care and maintenance precautions.
Notes on Disposal
In order to avoid any possible consequences resulting from the disposal of electrical and electronic equipment containing substances damaging to the environment and human health, the European Parliament and Council directives
■
Directive 2002/96/EC on “waste electrical and electronic equipment” (WEEE)
and
■
directive 2002/95/EC on the “restriction of the use of certain hazardous
substances in electrical and electronic equipment” (RoHS)
have been transferred into national law in all EU member states.
The primary aim of the legislation is the prevention of waste electrical and electronic equipment, and also the recycling, material recovery and any other form of
recovery of such waste in order to reduce the quantities of waste to be disposed of
and the amount of hazardous substances from electrical and electronic
equipment becoming waste.
The product that you have purchased was developed in line with current, state of
the art technology in an environmentally friendly manner and with a view to recycling, thus complying with requirements of European directives.
The product is labelled with the symbol shown. If you wish to dispose
of this product, this symbol obliges you to do so separately from
unsorted domestic waste. For this reason suitable facilities have been
set up for the return of waste electrical and electronic equipment.
Waste equipment can be handed in at these return centres free of
charge. To find out where these return centres are located, please
consult the information provided by the department of your local
authority responsible for waste disposal.
88
Appendix
Attention!
Electrical equipment does not belong in domestic waste.
Deposit it free of charge at a return centre.
Declaration of Conformity
(valid for the European Union)
CE mark
This device complies with the requirements set down in the EU directive:
EU directive 1999/5/EC on radio equipment and telecommunications terminal
equipment and the mutual recognition of their conformity. The conformity with
the above-mentioned directive is confirmed by the CE mark on the device.
Limited Warranty
(valid for sale in USA, Canada)
Aastra warrants this product against defects and malfunctions during a one (1)
year period from the date of original purchase. If there is a defect or malfunction,
Aastra shall, at its option, and as the exclusive remedy, either repair or replace the
telephone set at no charge, if returned within the warranty period. If replacement
parts are used in making repairs, these parts may be refurbished, or may contain
refurbished materials. If it is necessary to replace the telephone set, it may be
replaced with a refurbished telephone of the same design and colour.
If it should become necessary to repair or replace a defective or malfunctioning
telephone set under this warranty, the provisions of this warranty shall apply to
the repaired or replaced telephone set until the expiration of ninety (90) days from
the date of pick up, or the date of shipment to you, of the repaired or replacement
set, or until the end of the original warranty period, whichever is later. Proof of the
original purchase date is to be provided with all telephone sets returned for warranty repairs.
Exclusions
Aastra does not warrant its telephone sets to be compatible with the equipment
of any particular telephone company. This warranty does not extend to damage to
products resulting from improper installation or operation, alteration, accident,
neglect, abuse, misuse, fire or natural causes such as storms or floods, after the telephone is in your possession.
Aastra shall not be liable for any incidental or consequential damages, including,
but not limited to, loss, damage or expense directly or indirectly arising from the
89
Appendix
customers use of or inability to use this telephone, either separately or in combination with other equipment. This paragraph, however, shall not apply to consequential damages for injury to the person in the case of telephones used or
bought for use primarily for personal, family or household purposes.
This warranty sets forth the entire liability and obligations of Aastra with respect to
breach of warranty, and the warranties set forth or limited herein are the sole warranties and are in lieu of all other warranties, expressed or implied, including warranties or fitness for particular purpose and merchantability.
Warranty Repair Services
Should the set fail during the warranty period;
In North America, please call 1-800-574-1611 for further information.
Outside North America, contact your sales representative for return instructions.
You will be responsible for shipping charges, if any. When you return this telephone for warranty service, you must present proof of purchase.
After Warranty Service
Aastra offers ongoing repair and support for this product. This service provides
repair or replacement of your Aastra product, at Aastra’s option, for a fixed charge.
You are responsible for all shipping charges. For further information and shipping
instructions;
In North America, contact our service information number: 1-800-574-1611.
Outside North America, contact your sales representative.
Note: Repairs to this product may be made only by the manufacturer and its
authorized agents, or by others who are legally authorized. This restriction applies
during and after the warranty period.
Unauthorized repair will void the warranty.
90
Appendix
Technical Data
valid for …
USA, Canada
All other countries
Standards:
DECT, GAP
DECT, GAP
Number of channels:
60 duplex channels
120 duplex channels
Frequencies:
1920 MHz to 1930 MHz
(UPCS)
1880 MHz to 1900 MHz
Duplexing:
Time-division multiplex,
10 ms frame length
Time-division multiplex,
10 ms frame length
Channel spacing:
1728 kHz
1728 kHz
Bit rate:
1152 kbps
1152 kBit/s
Modulation:
GFSK
GFSK
Speech coding:
G.726 (ADPCM) with
32 kbps
G.726 (ADPCM) with
32 kbps
Transmission power:
5 mW (average output
per active channel)
10 mW (average output
per active channel)
Range:
up to 985 ft outdoors,
165 ft indoors
up to 300 m outdoors,
in buildings up to 50 m
Charger power supply:
AC 100 V - 240 V /
50 - 60 Hz
AC 100 to 240 V /
50 - 60 Hz
Display:
5-line graphic display
5-line graphic display
Mobile unit weight:
3.67 oz without batteries, 104 g without batteries,
4.90 oz with batteries
139 g with batteries
Mobile unit dimensions:
5.75 x 2.09 x 1.10 in
146 x 53 x 28 mm
(Length / Width / Height) (Length / Width / Height)
Charging station weight:
1.73 oz
Charging station
dimensions:
4.76 x 2.09 x 1.10 in
121 x 107 x 70 mm
(Length / Width / Height) (Length / Width / Height)
Length of power supply
cable:
10 ft
3m
Battery:
3 x AAA batteries
(NiMh / 1.2 V / 800 mAh)
3 x AAA batteries
(NiMh / 1.2 V / 800 mAh)
Stand-by Time:
up to 125 hours
up to 140 hours
49 g
91
Appendix
92
valid for …
USA, Canada
All other countries
Talk time:
up to 18 hours
up to 15 hours
Charge Time:
up to 6 hours
5 to 6 hours
Permissible ambient
temperatures for mobile
unit operation:
41° F to 104° F
5° C to 40° C
Permissible ambient
41° F to 104° F
temperatures for charger 20% to 70% relative
operation:
humidity
5° C to 40° C
20% to 70% relative
humidity
Permissible storage
temperature:
-10° C to +60° C
14° F to 140° F
Appendix
Menu Tree
Calls
Call lists
Deflect call
Call back list
Hunt group
Call diversions
Divert phone
Divert key
Divert hunt grp.
Cancel diversion
Messages
Message waiting
E-Mail
Softkey:
Menu
“Long”
Main menu
Calls
Call diversions
Messages
Settings
Protection
Special features
Central config.
Message waiting
Answer msg.
Send msg.
Reset msg.
Silent
Settings
Key Lock
Alarm
Ringer Settings
Volume Settings
System
Telephone Option
Security
Protection
Call blocking
Block call key
Call waiting on/off
Block intrusion
Restrict dial
Change PIN
Cancel features
Call lists
In absence
Received calls
Type of call
Answer
Activate
Busy
Divert phone / key
Immediately
After time
Busy
Type of call
Int. & ext. calls
External calls
Int. Anrufe
Divert hunt grp.
internal
external
int. + ext.
Melody
All int. Calls
All ext. Calls
Internal key 2
External key 2
Unknown Number
VIP, Call back
Recall, Emergency Call
Alarm, Messages
Alarm
Alarm active
Set
Date/Time
Melody
Ringer Settings
Melody
Type
Device
Volume Settings
Volume Settings
Earpiece, Hands-free,
Headset, Buzzer
System
Subscriptions
IPEI
Version Number
Telephone Option
Language
User Name
Attention Tones
Emergency Call
Voice Box No.
Loud Environm.
Auto Answer
Silent Charging
Charger Answer
Auto.Quick Hook
Auto.Key Lock
Charging LED
Disp.Contrast
Date/Time
Reset
Security
Lock Handset
Change PIN
Central config.
System service
Subscriber serv.
System service
Date+time
DDI barring
Call variant
Alter password
Unblock password
Change Barring
Subscriber serv.
Call diversions
Hunt group
Call blocking
Trunk acc. level
Restrict dial
Alter indiv. PIN
Alter sub.pass
Unblock password
ACD
[List]
Type
Repeat
Play once
Device
Buzzer
Vibrator
Headset
Subscriptions
[List]
Auto.Search
[Station]
New
Select
[Edit]
[GAP only]
[Delete]
Attention Tones
Key Click
Coverage Warn
Battery Alarm
Confirm Tones
End of Menu
Emergency Call
SOS number
SOS beep
Hands-free
Melody
Date/Time
Date Format
Time Format
Call time
Display Time
Reset
Handset
Telephone Option
Telephone Book
[List]
Trunk acc. level
0: internal calls
1: outward restricted
2: local calls
3: regional access
4: national calls
5: international calls
6: reserved
7: reserved
93
Index
Index
A
ACD group 58
follow-up work time 77
query subscriber 81
switch out 77
Active features (menu) 82
Alarm 36, 70
Arrow keys 23
Attention tones 74
Authentication code 17, 18
Auto answer 74
Automatic call answering 75
Automatic key lock 75
Automatic quick hook 75
B
Base station
automatic search 73
select 73
Batteries 2
charging and usage times 10
charging, discharging 9
commissioning 9
empty (set notification tone) 74
inserting, removing 10
safety information 86
Belt clip 19
Block intrusion 76, 82
Buzzer 71
C
C key 25
Call
end 47
recording 45, 53, 55, 57
tapping 39, 52
transfer to external subscriber 51
transfer to internal subscriber 51
Call back 46, 55
Call back list 68, 81
94
Call blocking
configuring for other
subscribers 80
device 76, 82
key 76, 82
override 46
Call display 47
Call diversion
active features 82
configuring for other
subscribers 80
delete 69
device 68
hunt group 69
key 69
menu 68
to voicebox 68
Call list
answered calls 67
call type 67
calling from 43
in absence 67
Call numbers (internal, external) 37
Call tapping 39, 52
Call variants (system service) 79
Call waiting 46
Calling 42
external 42
from call lists 43
from the central phone book 44
from the local phone book 44
internal 42
Calls
deflect 49, 68
incoming (state-dependent
menu) 49
menu 67
outgoing (state-dependent
menu) 46
Index
Call-waiting on/off 76, 82
Cancel features 77
Care and maintenance 87
Central configurations (menu) 78
Change barring (system service) 79
Change device PIN 76, 77
Charge display 11, 38, 40
Charge time 10
Charging LED 75
Charging station 8
CLIP 38
CLIR 38
CNIP 38
Code number procedures 66
Conference 49, 53
enquiry and transfer 54
exiting from 54
initiate 53
state-dependent menu 55
Confirmation tones 74
Conversation (state-dependent
menu) 45
Coverage warning 74
D
Date
set 71
system service 78
Date format 75
DDI barring (system service) 78
Declaration of conformity 89
DECT 5
Dialling authorisation
altering for individual
subscribers 80
Direct call key with signalling 28
Disconnect
call 45, 46, 52
conference participant 55
Display
contrast 75
display 21
language 73
lines 21
symbols 21
DTMF 38
E
E-mail 24, 69
Emergency call 36, 74
Emergency call key 26
Enquiry 49, 50
EXTERNAL key 27
External seizure
manual 41
spontaneous 41
F
Finish work time (ACD group) 78
G
GAP 5
H
Handsfree 34
Hash key 26
Headset 6, 72
Hearing aids 3
Hunt group
call for 68
switch other subscribers in/out 80
I
Illumination 22
Info
active features 82
call list in absence 81
call list of received calls 81
e-mail 82
menu 81
message waiting 82
voicebox messages 82
Info key 24
INTERNAL key 27
Intrusion 46
IPEI 17, 72
95
Index
K
Key click 74
Key lock 34, 70
Keys 22
L
Line seizure 41
Lock 76
Loud environment 74
Loudspeaker 45, 46, 47, 53, 55
Loudspeaker key 24
M
Main menu 66
Making a call 42
Melody
alarm 71
call type 71
MEM card 12
Menu
active features 82
before and during a call 39
call diversions 68
calls 67
central configurations 78
hide automatically 32
info 81
main menu 66
messages 69
protection 76
settings 70
special functions 77
subscriber service 79
system service 78
when idle 39
Menu (state-dependent)
busy subscriber 46
conference 55
during conversation 45
during the call 46
for incoming call 49
subscriber on hold 52
Menu tree 93
96
Message waiting 69
Messages (menu) 69
Mobile unit
lock handset (telephone lock) 76
subscribe 15
MULTIPLE key 28
Muting 35
N
Number keys 26
O
Operational controls 20
Optical call display 47
P
Paging messages 58
PARK 17
Partner direct call key 29
Phone book
central 44
local 44
Pick-up 39, 52
direct 39, 46, 52
PIN
altering for other subscriber 80
change 76, 77
telephone lock 76
Portable part 17
Postdial (DTMF) 38
Power failure 2
Power supply 2
Pre-dialling 42
Preferred key
external 41
internal 41
Protection (menu) 76
R
R key 26
Radio connection
dead spots 6
quality 21
Index
Radio fixed part 17
Recall 51
Receiver key 24
Recording (call) 45, 53, 55, 57
Redialling 43
Reset (settings) 75
Ringer
device 71
for incoming calls 71
setting 71
switch off 35, 47
type 71
S
Safety information 2
Setting language (display) 73
Settings (menu) 70
Short messages 24, 69
Signal key 26
Silent charging 75
Softkey
arrow keys 23
Esc 23
menu 24
OK 23
redial 23
Softkey line 22
Softkeys 22
SOS number 36
Speaker 34
Special features (menu) 77
Star key 26
Subscriber busy (state-dependent
menu) 46
Subscriber on hold (state-dependent
menu) 52
Subscriber password
alter (subscriber service) 81
unblock (subscriber service) 81
Subscriber service (menu) 79
Subscription 15
Subscriptions 72
Suppress telephone number 40, 53
Switching device on/off 33
Symbols (on the display) 21
System (subscription to) 72
System password
alter (system service) 79
unblock (system service) 79
System service
date/time 78
menu 78
T
Team direct call key 28
Team hold 45, 52
Technical data 91
Telephone book 45, 46, 52, 55
Telephone lock 34
Telephone option 73
Text lines 22
Time 36
set 71
system service 78
Time format 75
Toggle 49, 50, 52
Transfer 49, 53
to external subscriber 51
to internal subscriber 51
Transmission of call numbers 38
Trunk access
change/restrict own 77
Trunk access level
change/restrict 77
configuring for other
subscribers 80
U
Updating software 84
Usage time 10
USB port 83
User 73
V
Version number 72
Vibration signal generator 72
97
Index
Voicebox
displaying messages 24
enter call number 74
query 56
Volume
adjust during call 34
for call 72
for ringer signalling 72
W
WAP portal 40, 45, 46, 47, 49, 53, 55
98
Index
Notes
99
Index
Notes
100
Copyright 2010 www.aastra.com
All rights reserved
As of 27.02.2010 • Subject to changes