1
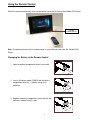
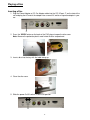
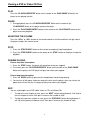
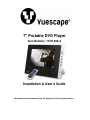
7” Portable DVD Player
Item Number: 11011225-A
Installation & User’s Guide
All brand names and trademarks are the property of their respective owners
Contents
Precautions...................................................................................................................................... 3
Overview .......................................................................................................................................... 4
Attaching the Frame Stand to the DVD Player .............................................................................. 5
Package Contents ........................................................................................................................... 6
7” Portable DVD Player Diagram.................................................................................................6-7
Installation Setup............................................................................................................................. 8
Menu Control Buttons..................................................................................................................... 9
Remote Control Buttons ............................................................................................................... 10
Using the Remote Control ............................................................................................................ 11
Playing a Disc ................................................................................................................................ 12
Viewing a DVD or Video CD Disc ............................................................................................13-16
Playing a MP3 and Audio CD........................................................................................................ 17
Viewing a Picture CD................................................................................................................17-18
Using the Built-in Card Reader .................................................................................................... 19
Using the Power Adaptor.............................................................................................................. 19
Using the Battery........................................................................................................................... 20
Setup Menu Instructions..........................................................................................................21-22
Connecting the DVD Player to a TV ............................................................................................. 23
Connecting Earphones ................................................................................................................. 23
Installing the Carrying case in the car......................................................................................... 24
Specifications ................................................................................................................................ 25
Troubleshooting ............................................................................................................................ 26
Maintenance................................................................................................................................... 27
FCC Norm....................................................................................................................................... 28
Service Procedure ......................................................................................................................... 29
Warranty ......................................................................................................................................... 30
2
Precautions
1. Read all of these instructions and save this manual for later use.
2. Follow all warnings and instructions on the product.
3. Do not insert sharp objects or spill liquid into the Portable DVD player through the cabinet slots;
this may cause accidental fire, electric shock or failure.
4. Unplug the unit when not in use for an extended period of time.
5. Unplug the unit from power outlet before cleaning.
6. Do not attempt to service this product yourself, as opening or removing the cover may expose
you to potential electric shock. Only a qualified technician should service this product.
7. Do not apply pressure to the screen, the LCD screen is very delicate.
8. Keep the portable DVD player away from extreme heat, excessive moisture, rain, sand, cold
or humid places.
9. Do not place directly under sunlight, dusty surroundings or near equipment which may
generate strong magnetic fields.
10. Do not place any object on the power cord.
11. Place the DVD player on a firm, flat surface.
12. When placing the DVD player in a cabinet, allow about one inch of space all around the DVD
player for ventilation.
13. The DVD player should be connected to a power supply only of the type described in the
operating instructions or as marked on the DVD player.
3
Overview
•
The 7” Portable DVD Player enables you to view your DVD movies, digital photos and play
music files from DVDs / CDs and different types of memory cards simply and quickly. You can
enjoy your favorite DVDs anytime and anywhere.
•
The Portable DVD Player does not require a direct connection to a computer. The built-in
memory card reader can read a wide assortment of the most popular memory cards.
•
The unit supports DVD, DVD-R, DVD+R, DVD-RW, DVD+RW, VCD, CD, HDCD, Picture CD,
CD-R, CD-RW, MPEG4, MP3, and WMA.
•
The Portable DVD Player supports SD, MS and MMC memory cards via the built-in card
reader.
•
You can play a picture SLIDESHOW with background music, provided you have the MP3 or
WMA files saved on the media card, along with your picture files.
•
Built-in rechargeable battery can power the unit up to 2 hours.
•
The Portable DVD Player can be operated from a distance with the remote control.
•
Carry case to transport the unit or use to mount on back of a car seat.
•
Built-in Stereo speakers and earphone jack recreate quality sound from your video and music
files.
4
Attaching the Frame Stand to the DVD Player
1. Clear a flat clean area to set your portable DVD player
down upon in order to attach the easel stand to the
back of the portable DVD. Make sure there are no
sharp objects in the area that can make contact with
the LCD screen of the portable DVD that may cause
damage to the screen.
2. Align the frame stand to the back of the portable DVD
so that the mounting hole lines up correctly. Locate the
securing screw packed with the unit and insert it
through the stand and tighten the knob to securely hold
the frame stand to the portable DVD player.
3. You may set the Portable DVD Player in a horizontal or vertical position as shown below.
Horizontal Position
Vertical Position
Note: When setting the Portable DVD in the vertical position, connect the DC power adapter to the
“DC IN” input on the side as illustrated below.
5
Package Contents
7” Portable DVD
Remote Control
Frame Stand
Power Adapter
DC Car Adapter
User’s Manual
Carry Case
7” Portable DVD Player – Front View
LCD Screen
Power LED Indicator
Remote Control Sensor
6
7” Portable DVD Player – Back & Bottom View
Open
Button
Easel
Stand
Disc Tray
Cover
Power Adapter
Input
7” Portable DVD Player – Left & Right Side View
Volume
Control
Speakers
Headphones
Audio
Output
Video
Output
3 in 1
SD/MMC/MS
Card Slot
On/Off
Switch
Power Adapter
Input
Left Side View
Right Side View
7” Portable DVD Player – Top View
Menu
Control
Buttons
7
Installation and Setup
1. Carefully position your Portable DVD Player so that you can see all of the connection ports
on the side of the frame.
on the side of the
2. Plug the Power Adapter or DC Car Adapter cable into the “DC IN” port
unit and plug the AC end of the adapter into a normal AC outlet or cigarette adapter in your
car.
3. Slide the power On/Off switch
to the ON position.
4. Insert a disc into the disc tray on the back of the Portable DVD Player.
5. Insert your MS, SD or MMC memory cards into the built-in card reader on the left side panel
of the DVD player.
8
Menu Control Buttons
No.
Button
Function
PLAY /
PAUSE
SOURCE
Play or Pauses the video, music or slideshow
on the disc or memory card.
Switches between DVD and Card Mode.
STOP
REWIND
FAST
FORWARD
Stops the video, music or slideshow.
Rewinds the video or music file.
PREVIOUS
Skips to the previous chapter or track.
NEXT
Fast forwards the video or music file
Skips to the next chapter or track.
JOYSTICK
Moves the cursor Up / Down / Left / Right when
making a selection.
MENU/PBC
Displays the DVD Menu.
9
Remote Control Buttons
1. SOURCE: Switches between DVD and Card Mode.
2. MENU / PBC: Displays the DVD Menu.
3. DISPLAY: Displays the disc playback information.
4. MUTE: Mutes the Volume of the player.
5. P/N: Selects the TV System from PAL / NTSC / AUTO.
6. L/R: Selects the Left Mono, Right Mono and Stereo sound.
7. ANGLE: Access various camera angles available on a DVD.
8. LANGUAGE: Selects the voice language available on a DVD.
9. SUBTITLE: Selects the subtitle’s language available on a DVD.
10. TITLE: Displays the Title.
11. Number Buttons (1 - 0): Allows you to change the chapter or
track of the DVD/CD.
12. UP: Moves the cursor upward when making a selection.
13. SETUP: Displays the system’s Setup Menu.
14. SLOW: Sets the DVD in Slow motion.
15. LEFT: Moves the cursor to the left when making a selection.
16. PLAY/PAUSE/ENTER: Play or Pauses the video, music and
slideshow. Enters the function selected.
17. RIGHT: Moves the cursor to the right when making a selection.
18. VOL-: Decreases the Volume control.
19. VOL+: Increases the Volume control.
20. DOWN: Moves the cursor downward when making a selection.
21. STOP/CLEAR: Stops the video, music or slideshow.
22. REWIND: Rewinds the video or music file.
23. FAST FORWARD: Fast forwards the video or music file.
24. PREVIOUS: Skips to the previous chapter or track.
25. NEXT: Skips to the next chapter or track.
26. REPEAT: Allows you to repeat a title, chapter, track or disc.
27. MARK: Marks a point where the playback starts each time
when the MARK button is pressed later on.
28. GOTO: Goes to the specific chapter, track or time to playback.
29. ZOOM: Zooms in on the video or photo.
10
Using the Remote Control
Point the remote control directly at the remote control sensor on the front of the Portable DVD Player.
Remote
Control Sensor
Note: The working distance for the remote control is up to 6.56 feet away from the Portable DVD
Player.
Changing the Battery in the Remote Control
1. Open the battery compartment cover using a coin.
2. Insert a 3V battery model CR2025 into the battery
compartment with the “+” polarity facing up as
indicated.
3. Replace the battery compartment cover with the coin
and turn it clockwise until it stops.
11
Playing a Disc
Inserting a Disc
1. Plug the Power Adapter or DC Car Adapter cable into the “DC IN” port
on the side of the
unit and plug the AC end of the adapter into a normal AC outlet or cigarette adapter in your
car.
2. Press the “OPEN” button on the back of the DVD player to open the disc cover.
Note: Remove the protection plastic card inside the disc compartment.
3. Insert a disc into the tray with the label facing up.
4. Close the disc cover.
5. Slide the power On/Off switch
to the ON position.
12
Viewing a DVD or Video CD Disc
PLAY
Press the “PLAY/PAUSE/ENTER” button on the remote or the “PLAY/PAUSE” button on the
player to start playing the disc.
PAUSE
1. During playback, press the “PLAY/PAUSE/ENTER” button on the remote or the
“PLAY/PAUSE” button on the player to pause the player.
2. Press the “PLAY/PAUSE/ENTER” button on the remote or the “PLAY/PAUSE” button on the
player to resume playback.
ADJUSTING THE VOLUME
Press the “VOL+” or “VOL-” button on the remote control or the Volume dial on the right side of
the player to adjust the volume sound.
STOP
1. Press the “STOP/CLEAR” button on the remote to temporarily stop the playback.
2. Press the “STOP/CLEAR” button on the remote or the “STOP” button on the player to stop the
playback.
RESUME PLAYING
From a short time interruption:
1. Press the “STOP” button, the player will remember where you stopped.
2. To resume, press the “PLAY/PAUSE/ENTER” button on the remote or the “PLAY/PAUSE”
button on the player, the DVD player will play from where you stopped.
From a long time interruption:
1. Press the “OPEN” button to open the disc compartment cover during playing.
2. You can turn off the power, and even remove the disc from the player, when you turn on the
power and re-insert the disc, the player will play from where you stopped.
SKIP
You can skip chapters on a DVD-Video, tracks on CDs and Video CDs.
1.
To skip to the next chapter or track, press the “NEXT” button during playback, it will skip to
the next chapter or track. Each press increases the number of skips.
2.
To skip to the previous chapter or track, press the “PREVIOUS” button during playback, it
will skip to the previous chapter or track. Each press increases the number of skips.
13
Viewing a DVD or Video CD Disc (Continued)
FAST FORWARD and REWIND
1. During playback, press the “FAST FORWARD” button to fast forward the chapter or track.
Each press increases the speed by 2x, 4x, 8x, 16x and 32x.
2. During playback, press the “REWIND” button to rewind the chapter or track. Each press
increases the speed by 2x, 4x, 8x, 16x and 32x.
3. To resume normal playback press the “PLAY/PAUSE/ENTER” button on the remote or the
“PLAY/PAUSE” button on the player.
SLOW MOTION
1. During playback, press the “SLOW” button and it will play the video in slow motion at 1/2, 1/4,
1/8, 1/16 speeds.
2. To resume normal playback press the “PLAY/PAUSE/ENTER” button on the remote or the
“PLAY/PAUSE” button on the player.
NOTE: You can only perform slow motion playing in forward playback.
REPEAT PLAYBACK
You can repeat a chapter, a track, a title, a file or the entire disc.
1. During playback, press the “REPEAT” button on the remote control repeatedly to choose a
Repeat option.
Note: The Repeat option may vary depending on the type of disc.
2. To cancel repeat playback, press the “REPEAT” button on the remote control repeatedly until
no option appears on the screen.
MARK (BOOKMARK)
The Mark function lets you “bookmark” points on the disc for playback at a later time. You can
store up to 12 bookmark locations. To set the bookmark, please follow these steps:
1.
2.
During playback, press the “MARK” button on the remote control.
Use the “UP / DOWN / LEFT / RIGHT” buttons on the remote control to select a bookmark
location.
3.
When you reach the scene you want to mark, press the “PLAY/PAUSE/ENTER” button on
the remote or the “PLAY/PAUSE” button on the player to confirm.
Repeat the above procedure for a new chapter. You can have up to 12 bookmarks.
To clear the bookmark already set up, select the desired bookmark and press the
4.
5.
6.
7.
“STOP/CLEAR” button on the remote control.
You can playback a mark at anytime by pressing the “MARK” button and using the “UP /
DOWN / LEFT / RIGHT” buttons on the remote to select one of the bookmarks, then press
“PLAY/PAUSE/ENTER” button on the remote to start playing the bookmarked chapter.
Repeat step 6 to play another marked chapter.
14
Viewing a DVD or Video CD Disc (Continued)
GOTO
You can go directly to a desired chapter and play, or play at a desired point of time.
Follow these steps:
(A)To play a specific chapter
1. Press GOTO, use the “LEFT” or ”RIGHT” buttons to select the title (TT) and chapter (CH)
and enter the desired number.
2. Press ENTER to confirm and start play.
(B)To play from a specific point of time.
1. Press GOTO twice to move to the time display and it changes 0:00:00.
2. Fill in the time (hour: minute: second).
3. Press ENTER to confirm and start play.
ZOOM
The ZOOM function allows you to enlarge the video image during playback and pan
through the enlarged image.
1.
Press the “ZOOM” button repeatedly during video playback to enlarge the image to
x2, x3, x4, x1/2, x1/3, x1/4 times of the normal size.
2.
Press ZOOM and repeatedly press “LEFT” or ”RIGHT” while displaying JPEG file
from the memory card and Picture CD disc to zoom in the picture at 125%, 150% or
200% and zoom out the picture at 50% or 75%.
Use the “UP / DOWN / LEFT / RIGHT” buttons on the remote to move around (pan and
scan) the enlarged video or picture.
MUTE
Press the “MUTE” button on the remote to silence the audio, press “MUTE” button again to
restore it.
Displaying the disc’s MENU / PBC
During DVD playback, press MENU/PBC to return to the disc'
s Start Menu. If the disc does
not have the Start Menu, or discs that refuse MENU function,
appears.
For VCD playback, press MENU/PBC to turn on/off PBC (Playback Control). If PBC is
enabled, a menu of scene'
s thumbnails will appear, you can make selection for playback.
15
Viewing a DVD or Video CD Disc (Continued)
LANGUAGE
During DVD playback, press the “LANGUAGE” button on the remote control repeatedly to
change the language of the DVD if the disc has multiple languages.
NOTE: This function is only available on DVDs.
SUBTITLE
During DVD playback, press the “SUTBTILE” button on the remote control repeatedly to change
the subtitle of the DVD if the disc has multiple subtitles.
NOTE: This function is only available on DVDs.
ANGLE
During DVD playback, press the “ANGLE” button on the remote control repeatedly to change
the camera angle of the DVD if the disc has camera angles.
NOTE: This function is only available on DVDs.
TITLE
Press the “TITLE” button on the remote control and will skip to the beginning of the title and
playback, or to the MENU if it has a title menu.
DISPLAY
During playback, press the “DISPLAY” button on the remote control repeatedly and it will display
various playback information such as: Current Title, Chapter, and Elapsed Time.
L/R
This function is mostly used for karaoke (sing along) discs, by repeatedly pressing L/R,
you can select STEREO, MONO (Left), MONO (Right), MIX MONO etc.
P/N
This is used when you connect the Player to a TV and watch video on the TV.
Press the “P/N” button on the remote control repeatedly to select NTSC, PAL and AUTO
to match the system of your TV.
This DVD player may be set as NTSC or PAL color system, it is recommended to set it to
NTSC which will give a better video quality. The DVD player will play both NTSC or PAL
DVD'
s titles even when the Player is set to NTSC.
Note: NTSC is the system setting used in the US and Canada, PAL is the system setting
used in Europe and China.
16
Playing an MP3 and an Audio CD
PLAY
When playing an MP3 or an Audio CD, by default the first music file of the folder will start playing.
However, the file manager may appear on the screen.
Using the “UP / DOWN / LEFT / RIGHT” buttons on the remote control or the “JOYSTICK” on the
player select the song and press the “PLAY/PAUSE/ENTER” button on the remote or the
“PLAY/PAUSE” button on the player to start playing the disc.
Viewing a Picture CD
The player can play both a Kodak Picture CD that you order from photo processing store, and a
home-made CD by burning JPEG files onto a CD-R or CD-RW disc.
PLAY
In most cases, after the disc is placed into the player, the first file will be shown.
In other cases, the file manager appears. Using the “UP / DOWN / LEFT / RIGHT” buttons on the
remote control or the “JOYSTICK” on the player select the picture and press the “PLAY/PAUSE”
button on the player or the “PLAY/PAUSE/ENTER” button on the remote start the slide show
(plays photos automatically).
•
To return to file list, press “MENU/PBC” button. To return to directory, press the “TITLE”
button.
•
To view a thumbnail, press the “STOP” button while viewing the pictures.
•
To start the slide show, press the “PLAY/PAUSE” button on the player or the
“PLAY/PAUSE/ENTER” button on the remote control.
ZOOM
1. Press ZOOM and repeatedly press “LEFT” or ”RIGHT” while displaying JPEG file from
the memory card or Picture CD disc to zoom in the picture at 125%, 150% or 200% and
zoom out the picture at 50% or 75%.
2. Use the “UP / DOWN / LEFT / RIGHT” buttons on the remote to move around (pan and
scan) the enlarged video or picture.
17
Viewing a Picture CD (Continued)
NEXT / PREVIOUS
You can manually skip to the next picture by pressing the “NEXT” button, and to skip to the
previous picture by pressing the “PREVIOUS” button.
ROTATE
Allows you to rotate and flip the picture.
1. During playback, use the “UP / DOWN / LEFT / RIGHT” buttons to rotate the picture 90
degrees clockwise or counter clockwise or flip vertically and horizontally respectively.
Original
Rotated 90 degrees clockwise
Flipped Vertically
Flipped Horizontally
18
Using the Built-in Card Reader
This Portable DVD Player supports SD™ Card, Memory Stick™ (MS) Card, and Multi Media Card
(MMC) memory cards through the built-in a 3-in-1 card reader.
1. Insert the memory card into the built-in card reader on the left side of the DVD player.
2. Press the “SOURCE” button on the remote control repeatedly to select card mode, and
the Player will start playing the first file in the first directory, if there is more than one
directory.
Removing the memory card
You can remove the memory card anytime even if it is playing. To remove the memory card,
simply grasp the end of the card and remove it from the slot.
Using the Power Adaptor
Plug the Power Adapter cable into the “DC IN” port
the adapter into a normal AC outlet.
on the side of the unit and plug the AC end of
Note: There are two “DC IN” ports on this DVD player for your convenience.
Important!
•
•
•
Always turn off the DVD Player before connecting or disconnecting the power adaptor.
Only use the AC adaptor supplied with this Player. Using a different type of adaptor may
cause malfunction or damage to the product.
When the AC adaptor is used for prolonged period of time, the adaptor may heat up, this
is normal and is not a cause for concern.
19
Using the Battery
This Portable DVD Player can also be powered by its built-in rechargeable battery.
Charging the battery
1. Plug in the Power Adaptor (included) to charge the battery.
2. Slide the “On/Off” power switch to the Off position.
Note: The DVD Player must be turned off in order to charge the battery.
3. When the battery is fully charged, it will automatically stop charging the battery.
Power LED Indicator
•
While the battery is charging, the power LED will blink red
and green alternatively.
•
When the battery is fully charged, the power LED will stay
lit green.
•
When using the Player with the battery, the power LED
will stay lit green, if the battery power is low the LED will
start blinking.
Power LED
Indicator
Precaution!
1. Keep the player free from smoke, steam, moisture, and dust.
2. Using the player under 0°C (32° F) or over 40°C (104° F) can reduce the battery lifetime.
3. Never disassemble or modify the battery in any way. Do not touch the terminal of the
battery with a metal object.
4. Always use the AC Power Adaptor included with the player to charge the battery.
5. This battery is designed exclusively for your portable DVD player. Do not use it with other
devices.
20
Setup Menu Instructions
1. Press the “SETUP” button on the remote control and the Setup Menu will appear on the
screen.
2. Select the desired function menu, by pressing “Left “or “Right“ button and press the
“
/ENTER” button on the remote to enter the function.
TV Display
Set the screen display aspect ratio.
Angle Mark
Set Camera angle mark on/off
OSD Lang
Set the OSD (On Screen Display) language.
Captions
Displays the Closed Captions available on the DVD.
Screen Saver
Enables or disables the screen saver.
Last Memory
When enabled the DVD player will resume to play from
the last place where the DVD player was interrupted
when opening the DVD compartment door.
21
Setup Menu Instructions (Continued)
Video Setup Page
Panel Quality
Set the Sharpness, Brightness, Contrast, Hue and
Color Saturation of the screen.
Panel Inverse
Turn the image 180 degrees.
Password Setup Page
Password
Mode
Enables or disable the password.
Password
Change the Password.
Note: 136900 is the default password if this is the first use.
22
Connecting the DVD Player to a TV
You can enjoy DVD quality video on your TV screen.
1. Turn off DVD player and TV.
2. Connect the AV cable (included) as illustrated below.
3. Turn on DVD player and TV.
4. Press the press the TV/Video button on your TV repeatedly to select the input from the DVD
player.
Audio (Left): White
Audio (Right): Red
Video Out: Yellow
Connecting Earphones
You can attach an earphone (not included) with a stereo mini-jack plug to the phone jack (
)
of the DVD player for private listening. The volume can be adjusted using VOL + and VOL – buttons
on the remote control or using the VOLUME control dial on the Player.
Note: Listening with earphones for many hours at maximum volume may damage your
hearing.
23
Installing the Carrying case in the car
You can install the Carry case to a car seat to enjoy the movie in the car.
Please follow these steps:
1. Unzip the zipper
and open the case.
5. Press the left
adhesive tape to
avoid the unit being
damaged from falling
off.
2. Fold the top and
3. Zip close the case;
4. Insert the DVD
bottom covers
backwards.
you have to reverse
player into the case.
6. Press the
adhesive tape
underneath the unit
to avoid any
damages from
swinging when the
car is moving.
7. Attach the case to
the car seat by the two
straps. Adjust the
angle of the screen for
a comfortable viewing.
the flap to zip the
case close.
24
Specifications
Portable DVD LCD Panel
Built-in Card Reader
Type
7” TFT LCD Display
Resolution
480 X 234
Aspect Ratio
16 : 9
Type
SD, MMC, and MS memory card
Supported Media
DVD, DVD-R, DVD+R, DVD-RW, DVD+RW,
VCD, CD, HDCD, Picture CD, CD-R, CD-RW,
MPEG4, MP3 and WMA
AC Power
Built-in Battery
Voltage
100-240V AC 12V 50~60Hz
Consumption
Active < 12 Watt Max
Voltage
7.4V
Current
1A
Charging time to Full
Capacity
2. hours
Slideshow
Standard JPEG with MP3 / WMA Background
music.
Video Output
Composite Video
1 Channel: 1.0 Vp-p
Audio Output
Channels
2 channels: Left (1/L) and Right (2/R)
Frequency
20Hz – 20kHz +2.5dB -2.5dB
S/N Ratio
>85dB
Dynamic Range
>80dB
Pictures
File Format
Standard JPEG
Operating Condition
Temperature
10°C~40°C
Air Humidity
20% ~ 80% R.H.
Physical
8 / ” (W) 6” (H) 1 1/ ” (D)
Dimensions
Net Weight
.76 lbs
Regulation (Certifications)
FCC
Accessories
Power Adaptor, Frame Stand, AV Cable, DC
Car Adaptor, Carry Case, Remote Control
and User‘s Manual.
25
Troubleshooting
Problem
Solution
Power does not turn on or suddenly
turns off.
Make sure the AC Power cord is securely plugged into
an AC outlet.
Turn the power off and then back on.
Remote control does not work.
1. Check that the battery is inserted in the "+" and "-"
directions properly.
2. Check if the battery has power, if not, replace them
with new batteries.
3. Check that the signal transmission is pointing
directly at the remote control sensor on the DVD
player.
1. Make sure the disc is a DVD / DVD-RW / Video CD /
an Audio CD.
Disc does not play
(Note: Do not use a disc that has scratches or dirt.)
2. Check that the label-side of the disc is facing up.
3. The pick-up lens of the DVD player might be dirty.
4. Contact the service center for lens cleaning.
No Sound
1. Check the volume setting. If set to zero, turn up
volume level.
2. Check if the headphones are plugged into the Audio
jack. Speakers cannot be used with the headphones.
No Image
1. Verify the power adapter is connected properly to the
power outlet and DC input on the player; ensure the
battery is charged (power LED indicator should be on).
2. Make sure to remove the plastic protection card of the
DVD cover before inserting a disc.
3. Remove and re-insert the memory card.
Battery doesn'
t charge
Check if the DVD player is turned off.
Note: The Player must be turned off in order to charge
the battery.
Power LED indicator does not light Check that the AC adaptor is securely plugged in.
Note: If the player is overheated, you will not be able to
charge the battery.
26
Maintenance
To clean your digital photo frame, please refer to the instructions below:
NOTE: To prevent electrical shock, do not open the Portable DVD Player casing. Leave repair
of the frame to qualified personnel, please see the tech support information in the warranty.
1. Unplug the power
Unplug the Portable DVD power adapter from the AC socket before cleaning the monitor.
2. Check the cover
Check to see if the frame and accessories are damaged, broken, or strained. If so, please consult
the warranty card for Tech Support information.
3. Clean
Never spray or pour any liquid directly onto the screen or frame. Avoid allowing any water or liquid
from entering the Portable DVD Player or accessories.
4. Cleaner
Use water or non-ammonia/non-alcohol based glass cleaner. Do not use harsh or abrasive
cleaners such as ketene (such as acetone), ethanol, toluene, acetic acid, methane, chloride, or other
detergents to clean the portable DVD, these chemicals can damage the LCD screen or the portable
DVD player.
5. Screen
To clean your LCD screen or case, use water or a mild cleaner, as listed above. Moisten a soft,
clean cloth or if possible, use a special screen cleaner sheet or a solution suitable for static electricity
application. Using any cleaner other than water or a mild cleaner may damage your portable DVD
player and will not be covered under the warranty.
6. Storage of Unit
If the Portable DVD Player is not in use for a long time, please unplug it and store it in its original box
in order to avoid any damage.
7. Disclaimer
Any damage resulting from use of any cleaner that is not mentioned above is not covered under the
terms of the warranty on this product.
27
FCC Norm
FCC
This equipment has been tested and complies with limits for Class B digital devices pursuant to Part
15 of Federal Communications Commission (FCC) rules.
FCC Compliance Statement
These limits are designed to provide reasonable protection against frequency interference in
residential installations. This equipment generates, and radiates radio frequency energy, and if not
installed properly or used in accordance with the instructions, may cause harmful interference to
radio communication. However, there is no guarantee that interference will not occur in television
reception, which can be determined by turning the equipment on and off. Interference may be
corrected by one or more of the following measures:
Reorient or relocate the receiving antenna
Increase the separation between the equipment and the receiver
Plug the equipment into an outlet on a circuit different from that to which the
receiver is connected.
CAUTION!
The Federal Communications Commission warns the user that changes or modifications to the unit
not expressly approved by the party responsible for compliance could void the user’s authority to
operate the equipment.
Fourstar Group (FSG) encourages consumers to recycle their used Portable DVD Players.
Please visit www.fourstari.com/recycle for additional information on recycling.
28
Service Procedure
For information regarding the return or exchange of this item within 14 days of purchase,
please visit your Inkstop store location or go to www.inkstop.net to read the instructions
regarding customer service returns procedures. Click on the Satisfaction Guaranteed icon
on the website.
For technical support in regards to operation and installation of this item please call the toll free
number below to obtain assistance. A customer service representative will assist you and provide
operating information on the product.
Please have the following information available when you call the service center:
Your Name and Address
Date of Purchase
Model Number
Serial Number
Store Name and Address
Type of problem with the unit
To contact the technical support facility, please call
508-435-4830 or 800-639-3803.
Email Support: [email protected]
29
Warranty
90 Days Limited Warranty
This product is warranted to be free from defects in material and workmanship for a period of 90 days.
Warranty obligations are limited to replacement or repair of defective parts and components, at the
option of the manufacturer. If the original model is no longer available, we will substitute with a model
of equal or better value than the original item. The warranty of this product is null and void if the
product is subjected to negligence, abuse, modification, misuse, accident or if the customer uses the
product for a function it was not intended for. This warranty is only valid for the original purchaser of
this product and will not be honored if the product is resold. This warranty gives you specific legal
rights, and you may also have other rights which vary from state to state.
The manufacturer will not be liable for incidental or consequential damages caused by the use of this
product. The manufacture will not be liable for any costs such as lost profits or revenues, cost of
temporary replacements, loss of data, loss of equipment or use of equipment or any claims by third
parties.
After 14 days from the purchase date of this product, please call the phone number mentioned below
to obtain service. A customer representative will give you a return authorization (RA number) allowing
you to ship the product to the service center. The purchaser must have a copy of the original receipt
for proof of purchase within 90 days. The purchaser of this product is responsible for any shipping
charges to the repair facility. The manufacturer service center will repair or replace the unit in
question and send it back to the purchaser.
In order to contact the service facility, please call 508-435-4830 or 800-639-3803.
The address for this facility is:
Fourstar Group
26840 Fargo Ave. Suite C
Bedford Heights, OH 44146
E-mail Support: [email protected]
30