1
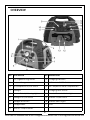
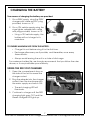
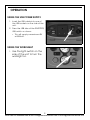
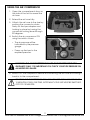
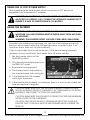
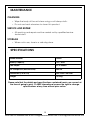
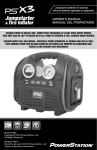
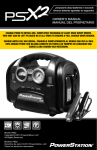
5 IN 1 JUMP START
MODEL NO: JS5IN1
PART NO: 6240005
OPERATION & MAINTENANCE
INSTRUCTIONS
LS0810
INTRODUCTION
Thank you for purchasing this CLARKE product.
Before attempting to use this product, please read this manual thoroughly and
follow the instructions carefully. In doing so you will ensure the safety of yourself
and that of others around you, and you can look forward to your purchase
giving you long and satisfactory service.
GUARANTEE
This product is guaranteed against faulty manufacture for a period of 12
months from the date of purchase. Please keep your receipt which will be
required as proof of purchase.
This guarantee is invalid if the product is found to have been abused or
tampered with in any way, or not used for the purpose for which it was
intended.
Faulty goods should be returned to their place of purchase, no product can
be returned to us without prior permission.
This guarantee does not effect your statutory rights.
ENVIRONMENTAL PROTECTION
Do not dispose of this product with general household waste. All
tools, accessories and packaging should be sorted, taken to a
recycling centre and disposed of according to the laws governing
Waste Electrical and Electronic Equipment.
2
Parts & Service: 020 8988 7400 / E-mail: [email protected] or [email protected]
GENERAL SAFETY RULES
WARNING: ALL LEAD ACID BATTERIES GENERATE HYDROGEN GAS
DURING NORMAL OPERATION. THIS PROCESS INCREASES DURING A
PERIOD OF RAPID DISCHARGE, SUCH AS WHEN USING FOR
JUMPSTARTING.
WARNING: HYDROGEN GAS AND BATTERY ACID (SULPHURIC ACID) CAN
BE EXPLOSIVE, CORROSIVE TO SKIN, EYES AND HAIR, DAMAGING TO
CLOTHING AND METALS, FLAMMABLE, POISONOUS TO BREATHE.
1.
Although the unit is water resistant and may be used outdoors, DO NOT
leave it exposed to the elements. Avoid direct sunlight, direct heat, rain/
moisture etc. The inverter feature must only be used indoors or completely
protected from the rain. This also applies to the device being powered by
the inverter.
2.
The unit is primarily designed for use with 12V systems. However, the
inverter feature provides a 230Va.c. supply to be used with mains
powered appliances up to 300 watts
3.
Do not operate the jumpstart if any of the cables are damaged. Consult
your Clarke dealer for repair or replacement of the parts.
4.
Do not operate the unit if the case is damaged. Consult your Clarke
dealer or a qualified person for inspection and repair.
5.
To prevent battery overheating and consequent damage, do not
exceed our recommendations for duration of jump starting.
6.
The unit is NOT designed to be used as a replacement for a vehicle
battery.
7.
NEVER allow the battery to become completely discharged.
8.
NEVER jump start the engine whilst the unit is being charged.
9.
NEVER attempt any repairs yourself. If you have a problem with the unit
contact your local CLARKE dealer.
10. Always keep body and clothing dry. Never work in damp area without
adequate insulation against electric shock.
11. Always store the unit out of reach of children.
12. Always wear safety glasses when working with lead acid batteries.
13. If splashed by battery acid, immediately flush the area of the splash with
clean water. If a burning sensation is felt or any blistering occurs, seek
medical help.
3
Parts & Service: 020 8988 7400 / E-mail: [email protected] or [email protected]
14. If battery acid comes into contact with the eyes, flush the eyes with clean
water continuously and seek medical help.
15. Always ensure that there is air circulating around the unit when in use.
16. Never allow the negative and positive leads on this unit, to touch each
other or to touch the same metal object.
17. Ensure the vehicle battery posts and battery clamps are perfectly clean
before use.
18. When connecting the jumpstart leads to a battery, ensure the ON/OFF
switch is OFF, and always connect the RED, (positive’+’) output conductor
to the unearthed (+) battery terminal first, then connect the BLACK,
(negative) conductor to a suitable earthing point on the chassis, well
away from any fuel lines.
19. ALWAYS wear suitable protective clothing and eye protection when
working with lead acid batteries.
20. DO NOT attempt to BOOST CHARGE the jumpstarts’ sealed battery.
21. NEVER allow the cables to become wrapped around the operator or any
other person.
ELECTRICAL CONNECTIONS
This product is provided with a 13 amp, 230 volt (50Hz), charging adaptor for
connection to a standard, domestic electrical supply. and also a 12V
charging lead is also supplied
This appliance is of double insulated design. No earth conductor is provided.
If in any doubt, consult a qualified electrician. DO NOT attempt any electrical
repairs yourself.
4
Parts & Service: 020 8988 7400 / E-mail: [email protected] or [email protected]
SAFETY SYMBOLS
Class II appliance
Always read instructions before use
Electrical Hazard due to exposed live terminals
Chemical Hazard from battery acid
USB Port
-
+
Live centre pin
Suitable for indoor use only (refers to mains adaptor only)
Subject to Waste Electrical & Electronic Directive
5
Parts & Service: 020 8988 7400 / E-mail: [email protected] or [email protected]
OVERVIEW
NO
DESCRIPTION
NO DESCRIPTION
1
12V Cigarette Plug Socket
10
Charging Indicators
2
Pressure Gauge
11
USB Sockets 5V DC Outlet
3
Air Compressor On/Off Switch
12
Air Compressor Hose Compartment
4
Worklight
13
Charging Jack Socket
5
Reverse Polarity Warning Light
14
Inverter Power Indicator Light
6
Worklight On/Off Switch
15
Inverter On/off Switch
7
Voltage Test Button
16
Inverter Status Lights
8
Voltage Meter
17
Fuse
9
230V AC Output Socket
6
Parts & Service: 020 8988 7400 / E-mail: [email protected] or [email protected]
CHARGING THE BATTERY
Two means of charging the battery are provided.
1. Via a 230V supply, using the 230V
charger with cable and DC plug
provided, shown as ‘A’.
2. Via a 12V vehicle supply using the
cigar lighter adapter with cable
and plug provided, shown as ‘B’.
• Using a 12V vehicle supply, the
battery will not charge to its
maximum.
TO ENSURE MAXIMUM LIFE FROM THE BATTERY.
• Charge this unit before using it for the first time.
• Recharge after every use if possible, and thereafter, once every
three months.
• Always avoid leaving the unit in a state of discharge.
For maximum battery life, we strongly recommend that you follow the rules
above, or it may invalidate your warranty.
USING THE 230 VOLT CHARGER
1. Open the compartment door on
the side of the unit to reveal the
charger socket.
2. Plug the adapter into the charger
socket, then the transformer into
the mains supply and switch ON.
• The red charging LED will
illuminate.
3. Continue to charge until the RED
charging light goes OUT and the
Green charged LED lights up.
7
Parts & Service: 020 8988 7400 / E-mail: [email protected] or [email protected]
USING THE 12V ADAPTOR
WARNING: BEFORE USING THE DC POWER SOURCE FROM THE CAR
CIGARETTE SOCKET CHECK THAT ITS FUSE RATING IS RATED AT 15A OR
HIGHER.
1. Ensure the vehicle is not running.
2. One end of the twelve volt lighter plug lead should be plugged into one of
the two cigarette lighter sockets.
3. The other end should be inserted into the vehicle lighter socket.
4. The engine should then be started.
• The state of charge of the internal battery can be checked by
disconnecting the lighter plug lead and then depressing the battery
status button.
• This method will only partially charge the battery. The 230 volt
adaptor option is the preferred option.
BATTERY CHARGE STATUS
1. Remove any charging devices
from the unit.
2. Press the battery test button,
• The battery level will be shown
on the gauge.
8
Parts & Service: 020 8988 7400 / E-mail: [email protected] or [email protected]
OPERATION
USING THE USB POWER SUPPLY
1. Insert the USB cable into one of
the USB sockets on the side of the
unit.
2. Press the USB side of the INVERTER/
USB switch as shown.
• This will supply a maximum 5V
at 500mA.
USING THE WORKLIGHT
1.
Use the light switch on the
side of the unit to turn the
worklight on.
9
Parts & Service: 020 8988 7400 / E-mail: [email protected] or [email protected]
JUMP STARTING
WARNING: IT IS POSSIBLE THAT SOME ELECTRONIC EQUIPMENT COULD BE
DAMAGED BY JUMP STARTING. ALWAYS CHECK WITH THE CAR
MANUFACTURER’S HANDBOOK TO DETERMINE WHAT PRECAUTIONS IF
ANY SHOULD BE TAKEN.
ALWAYS carry out the following preliminary checks before connecting the
Jumpstart to the battery:
• Switch off the vehicle ignition and ALL ancillary equipment - lighting,
radio etc.
• Ensure the vehicle battery is rated at 12V and is not damaged in any
way.
• Ensure the area is well ventilated.
• Ensure the battery terminals are clean and the clamps are firm and
secure.
• Remove vehicle battery filler plugs and check electrolyte level. If
necessary, top up with distilled water.
When completely satisfied, proceed as follows:
1. Connect the red clamp to the unearthed battery terminal first, (this is
usually the positive (+ve) terminal and painted RED), then the black clamp
to the chassis or engine bolt, well away from the fuel lines or moving parts,
ensuring the connections are firm and secure.
• Do not allow the two leads to touch each other.
• If you connect the leads the wrong way round the reverse polarity
warning light will illuminate.
2. Switch the vehicle ignition ON, and leave in this condition FOR APPROX
TWO MINUTES. (This will provide the vehicle battery with a short ‘boost’
charge to allow for easier starting).
3. Switch the ignition to ‘start’, for NO MORE than 6 seconds. If the engine
does not start, within this time, SWITCH OFF the ignition and wait for at least
3 minutes before trying again.
4. Once the engine is running, disconnect the BLACK clamp FIRST i.e. that
connected to the chassis or engine bolt etc., and return it to its storage
position, then disconnect the RED clamp, from the battery terminal, and
restore to its storage position.
10
Parts & Service: 020 8988 7400 / E-mail: [email protected] or [email protected]
USING THE AIR COMPRESSOR
1. Open the compartment door on
the side of the unit to reveal the
air hose.
2. Extend the air hose fully.
3. Attach the air hose to the tyre by
pushing the connector down
firmly on the tyre adapter and
locking in place by turning the
connector locking lever through
90 degrees.
4. Switch the air compressor ON
using the switch shown.
• The air pressure will be
indicated by the pressure
gauge.
• Pump up the tyre to the
required pressure.
WARNING: THE AIR COMPRESSOR GAUGE ON THIS PRODUCT IS FOR
GUIDANCE ONLY. IT IS IMPORTANT YOU CHECK YOUR TYRE PRESSURE ON
AN APPROVED GAUGE.
5. Switch OFF the compressor before disconnecting the air hose and coiling it
back in to the compartment.
CAUTION: THE COMPRESSOR CAN ONLY BE USED FOR A MAXIMUM OF
10 MINUTES AT ANY ONE TIME, AFTER WHICH THE UNIT MUST BE SWITCHED
OFF FOR 10 MINUTES.
11
Parts & Service: 020 8988 7400 / E-mail: [email protected] or [email protected]
USING THE 12 VOLT POWER SUPPLY
Two cigarette lighter type sockets allow connection to DC electrical
equipment via a standard DC adapter.
WARNING: BE AWARE THAT A FULLY CHARGED 12V BATTERY CAN HAVE
AN OUTPUT OF APPROX.13.5V. CONSULT THE APPLIANCE HANDBOOK TO
ENSURE IT IS SAFE TO OPERATE FROM A 12V BATTERY.
USING THE INVERTER
WARNING: WHEN USING THE INVERTER FUNCTION THE JS5IN1 AND
WHATEVER YOU ARE POWERING MUST BE INSIDE AWAY FROM ANY RAIN
OR MOISTURE.
WARNING: THE INVERTER OUTPUT VOLTAGE IS 230V 50HZ, (MAX 300W).
To protect the battery from damage, this unit has a low-voltage protection
function which means when the voltage falls below a certain value, it will
sound an alarm, then turn off automatically.
It also incorporates short-circuit protection, if the device being powered
develops a short-circuit fault, the inverter turns off automatically.
1. Set the inverter switch to the
INVERTER position.
2. Plug the electrical equipment into
the 230V AC outlet.
3. Start electrical equipment.
4. The battery level is indicated by
the inverter power indicator lights.
5. If the inverter fails, the inverter
status light illuminates.
6. If the inverter fails suddenly, for example, there is a short circuit, check the
fuse and replace if required.
CAUTION: MAKE SURE THAT THE APPLIANCE BEING CONNECTED IS IN
GOOD WORKING ORDER. IF IT BEGINS TO ACT ABNORMALLY OR STOPS
SUDDENLY, DISCONNECT IT FROM THE JUMPSTART.
CAUTION: MAKE SURE THE APPLIANCE DOES NOT EXCEED THE MAXIMUM
RATED LOAD FOR THE JUMPSTART.
CAUTION: ANY DEVICE WHICH CONTAINS AN INDUCTIVE LOAD E.G.
DEVICES THAT CONTAIN A MOTOR MAY REQUIRE MORE CURRENT ON
START UP.
12
Parts & Service: 020 8988 7400 / E-mail: [email protected] or [email protected]
MAINTENANCE
CLEANING
• Wipe the body of the unit clean using a soft damp cloth.
• Do not use harsh abrasives to clean this product.
SERVICE AND REPAIR
• All servicing and repair must be carried out by qualified service
technicians.
STORAGE
• When not in use, store in a safe dry place.
SPECIFICATIONS
Model Number
JS5IN1
Battery Capacity
12V, 18AH
USB Output
5V @ 500mA
Air Compressor (Max Pressure)
260 PSI
Dimensions (L X W X H)
345 x 253 x 267 mm
Weight
10.2 kg
Please note that the details and specifications contained herein, are correct at
the time of going to print. CLARKE International reserve the right to change
specifications at any time without prior notice.
14
Parts & Service: 020 8988 7400 / E-mail: [email protected] or [email protected]
DECLARATION OF CONFORMITY
15
Parts & Service: 020 8988 7400 / E-mail: [email protected] or [email protected]