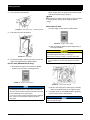
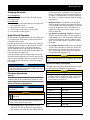
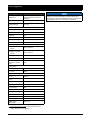
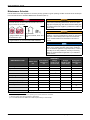
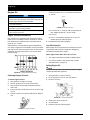
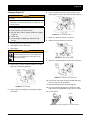
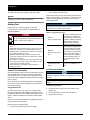
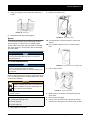
1
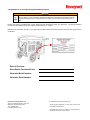
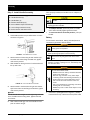
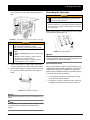
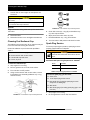
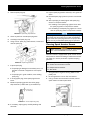
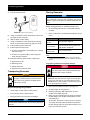
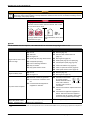
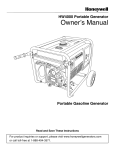
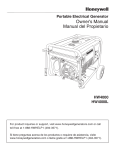
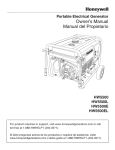
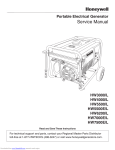
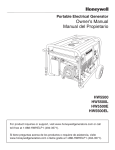
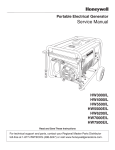
HW5500/HW5500E Portable Generator Owner’s Manual Portable Gasoline Generator Electric Start Read and Save These Instructions For product inquiries or support, please visit www.honeywellgenerators.com or call toll-free at 1-888-494-3571. Congratulations on owning a Honeywell portable generator This manual contains important instructions for operating this generator. For your safety, and the safety of others, be sure to read this manual thoroughly before operating the generator. Failure to properly follow all instructions and precautions can cause you and others to be seriously hurt or killed. Please use spaces provided below to write down important information about your generator. You may be asked to provide this information should you require product service or support. Identification information specific to your generator (model number and serial number) can be found on generator’s nameplate. Date of Purchase: Store/Dealer Purchased From: Generator Model Number: Generator Serial Number: Northshore Power Systems, LLC 4425 N. Port Washington Rd., Suite 105 Milwaukee, WI 53212-1082 USA TEL 1-888-494-3571 honeywellgenerators.com © 2008 Northshore Power Systems LLC The Honeywell Trademark is used under license from Honeywell International Inc. Honeywell International Inc. makes no representations or warranties with respect to this product. PRODUCT REGISTRATION To register your product, please complete the information below and mail to the mailing address at the end of form, or register online at www.honeywellgenerators.com 1 – PERSONAL INFORMATION FIRST NAME INITIAL LAST NAME CHECK HERE TO RECEIVE PRODUCT REMINDERS AND OFFERS VIA EMAIL CHECK HERE TO RECEIVE INFORMATION FROM OTHER COMPANIES VIA EMAIL, UNDERSTANDING YOUR EMAIL ADDRESS MAY BE SHARED OR COMBINED WITH INFORMATION FROM OTHER SOURCES 2 – PRODUCT INFORMATION DATE OF PURCHASE / MM / DD OTHER BRANDS CONSIDERED WHEN SHOPPING FOR THIS PRODUCT: YYYY MODEL NUMBER*: PRIMARY USE FOR PRODUCT: SERIAL NUMBER*: *Found on nameplate of generator PURCHASE LOCATION: IN-STORE ONLINE TOOL POWER RECREATION POWER EMERGENCY POWER PRIMARY LOCATION FOR PRODUCT USE: STORE NAME______________________________ PURCHASE PRICE HOME WORK $__________.00 TYPE OF WORK, IF PRODUCT BEING USED FOR PROFESSION: FEATURES INFLUENCING PRODUCT PURCHASE BRAND EASE OF USE PORTABILITY POWER RATING PRICE SIZE/WEIGHT STYLE/APPEARANCE WARRANTY REPUTATION HOW DID YOU BECOME AWARE OF THIS PRODUCT? IN-STORE INTERNET PRINT RADIO/TV STORE CIRCULAR WORD OF MOUTH WHAT OTHER TYPE OF POWER EQUIPMENT ARE INTERESTED IN PURCHASING IN THE FUTURE? WHO DECIDED TO PURCHASE THIS PRODUCT? 3 – DEMOGRAPHIC INFORMATION GENDER: MALE HOUSEHOLD INCOME LESS THAN $15,000 FEMALE MARITAL STATUS: MARRIED SINGLE / / DD $30,000 - $49,999 $50,000 - $79,999 $80,000 - $99,999 $100,000 - $124,999 $125,000 - $149,000 $150,000 – $174,999 $175,000 – $199,999 $200,000 OR OVER PRIMARY METHOD OF PURCHASING HOUSEHOLD ITEMS: DATE OF BIRTH: MM $15,000 - $29,999 YYYY INCLUDING YOUR SELF, HOW MANY PEOPLE LIVE IN YOUR HOUSEHOLD? IN-STORE ONLINE TV MAIL ORDER TYPES OF CREDIT CARDS HELD BY HOUSEHOLD MEMBERS: NUMBER OF CHILDREN UNDER 18 LIVING IN YOUR HOUSEHOLD: OWN RENT EDUCATION HOUSEHOLD INTERESTS: PRIMARY RESIDENCE: SOME HIGH SCHOOL HIGH SCHOOL DIPLOMA COLLEGE DEGREE GRADUATE DEGREE VISA/MASTER CARD DISCOVER AMERICAN EXPRESS GAS/RETAIL OTHER NONE HOME IMPROVEMENT AUTOMOTIVE WORK CAMPING OTHER: _________________________________________ THANK YOU FOR REGISTERING YOUR PRODUCT. THE INFORMATION YOU PROVIDED MAY BE USED FOR MARKETING PURPOSES IN ORDER TO OFFER YOU VARIOUS PRODUCT INFORMATION AND OFFERS. CHECK HERE IF YOU DO NOT WISH TO BE CONTACTED ABOUT SPECIAL OFFERS. PLEASE RETURN THIS FORM TO THE FOLLOWING ADDRESS: Northshore Power Systems, LLC 4425 N Port Washington Road Suite 105 Milwaukee WI 53212-1082 PLEASE MAIL THIS FORM IN A SEALED ENVELOPE. DO NOT STAPLE. CONTENTS IMPORTANT SAFETY RULES............................................................................................ 1 Safety Messages ............................................................................................................................................1 Location of Important Labels ..........................................................................................................................3 GETTING STARTED ............................................................................................................ 5 Unpacking Guidelines .....................................................................................................................................5 Record Generator Information ........................................................................................................................6 Assembly ........................................................................................................................................................7 Grounding the Generator ..............................................................................................................................11 Using Generator for Backup Power ..............................................................................................................12 COMPONENTS .................................................................................................................. 13 OPERATION ...................................................................................................................... 15 Preparing for Operation ................................................................................................................................15 Generator Location .......................................................................................................................................15 Starting Generator ........................................................................................................................................15 Stopping Generator ......................................................................................................................................17 High Altitude Operation ................................................................................................................................17 Powering Appliances ....................................................................................................................................17 MAINTENANCE ................................................................................................................. 19 Maintenance Schedule .................................................................................................................................19 Engine Oil .....................................................................................................................................................20 Adding Fuel ..................................................................................................................................................22 Air Filter Maintenance ...................................................................................................................................23 Cleaning Fuel Sediment Cup ........................................................................................................................24 Spark Plug Service .......................................................................................................................................24 Cleaning Spark Arrestor Screen ...................................................................................................................25 Transporting Generator ................................................................................................................................26 Storing Generator .........................................................................................................................................26 TROUBLESHOOTING ....................................................................................................... 29 SPECIFICATIONS ............................................................................................................. 31 WARRANTIES ................................................................................................................... 33 NORTHSHORE POWER SYSTEMS EMISSIONS CONTROL WARRANTY ..............................................33 NORTHSHORE POWER SYSTEMS LIMITED WARRANTY ......................................................................35 INDEX ................................................................................................................................. 37 HW5500/5500E MAINTENANCE PARTS ......................................................................... 39 HW5500/5500E Portable Generator Owner’s Manual www.honeywellgenerators.com i THIS PAGE INTENTIONALLY LEFT BLANK ii www.honeywellgenerators.com HW5500/5500E Portable Generator Owner’s Manual SAVE THESE INSTRUCTIONS IMPORTANT SAFETY RULES ANYONE using or servicing generator must read, understand, and follow all safety and operation instructions provided in product manual. Failure to closely follow these instructions can result in circumstances leading to death, serious injury, and property damage. i NOTE: Since there are many variations in the circumstances surrounding the installation, operation, and maintenance of this generator unit, we cannot possibly anticipate or provide advice or safety messages to cover every situation. Hazard Symbols and Meanings In addition to the signal words described above, the following symbols may be used to draw your attention to specific types of hazards. Safety Messages Signal Words Explosion Toxic fumes Fire Safety messages are provided throughout this manual to help prevent personal injury and equipment damage. All safety messages are introduced by a signal word indicating the hazard level. Indicates an imminently hazardous situation which, if not avoided, will result in death or serious injury to the operator or to bystanders. Indicates a potentially hazardous situation which, if not avoided, could result in death or serious injury to the operator or to bystanders. Indicates a potentially hazardous situation which, if not avoided, may result in moderate or minor injury to the operator or to bystanders. Indicates a situation which, if not avoided, may result in damage to generator components. HW5500/5500E Portable Generator Owner’s Manual Chemical burn Hot surface Electrical shock Using a generator indoors CAN KILL YOU IN MINUTES. Generator exhaust contains carbon monoxide. This is a poison you cannot see or smell. NEVER use inside a home Only use OUTSIDE and far or garage, EVEN IF doors away from windows, doors, and vents. and windows are open. www.honeywellgenerators.com 1 Safety Messages Electric Shock Hazards Generator produces powerful voltage that can cause death or great physical harm. • When using generator for backup power, notify utility company. Use approved transfer equipment to isolate generator from electric utility. • NEVER connect to a building's electrical system unless a transfer switch has been installed by a qualified electrician. Generator Damage Hazards Improper treatment or misuse of generator can cause permanent damage. • NEVER tamper with governed speed. Generator supplies correct rated frequency and voltage when running at governed speed. • NEVER modify generator in any way. • Damage to generator caused by misuse or modification is not covered under Warranty. • NEVER touch bare wires or receptacles. • NEVER use generator with electrical cords that are worn, frayed, bare, or otherwise damaged. • NEVER operate generator in rain or snow, or when the generator is set on wet surface. Fire and Burn Hazards Fuel and its vapors are extremely flammable and explosive under certain conditions. • Refuel generator only outdoors, in a well-ventilated area. • NEVER enclose the generator in any structure. • Keep generator at least 3 feet (1 meter) away from buildings and other equipment during operation. • NEVER fill fuel tank while the engine is running. Turn generator OFF and allow to cool before filling with fuel. • NEVER smoke or allow flames or sparks near the generator or where gasoline is stored. • NEVER overfill the fuel tank (there should be no fuel in the filler neck). After refueling, make sure the tank cap is closed properly and securely. • Be careful not to spill fuel when refueling. Spilled fuel or fuel vapor may ignite. If any fuel is spilled, be sure the area is dry before starting the engine. • Avoid repeated or prolonged contact with skin or breathing of vapor. The muffler becomes very hot during operation and remains hot for a while after stopping the engine. • NEVER touch hot surfaces and avoid hot gases. • Let engine cool before storing the generator indoors. 2 www.honeywellgenerators.com HW5500/5500E Portable Generator Owner’s Manual Location of Important Labels Location of Important Labels Your generator is packaged with several labels which provide important safety and maintenance information. Samples of these labels are provided below. Should any of these labels become illegible or damaged, contact Customer Hotline at 1-888-4943571 to request replacements. NOTE: Illustration below shows battery, which is available only with HW5500E models. H B A A C G D E F PRODUCT LABEL PART NUMBER A 100884A B 100886A C 100887A D 100883A E 100879A F 100882A G 100885A H 100881A HW5500/5500E Portable Generator Owner’s Manual www.honeywellgenerators.com 3 THIS PAGE INTENTIONALLY LEFT BLANK 4 www.honeywellgenerators.com HW5500/5500E Portable Generator Owner’s Manual GETTING STARTED Use the information in this section to get your generator ready for operation. ANYONE using the generator must read, understand, and follow all safety and operation instructions provided in the product manual. Failure to closely follow these instructions can result in circumstances leading to death, serious injury, and property damage. Unpacking Guidelines Generator is heavy! Lifting generator can cause back or other bodily injury. NEVER lift generator without assistance. 1. Set carton on a rigid, flat surface. 2. Remove all contents, except generator unit. 3. Open carton completely by using a utility knife to cut each corner (from top to bottom). Package Checklist Verify that all of the following items are included in the generator package: HW5500/5500E Portable Generator Wheel Kit (including handle assembly and assembly hardware) Battery (HW5500E models only) 20’ 30 amp 4-in-1 Power Cord 1 L Engine Oil Paper Funnel Smart Start Instruction Card The Smart Start instruction card is NOT intended to replace information provided in this Owner’s Manual. Be sure to thoroughly read and understand all information provided in Owner’s Manual before operating generator. Failure to properly follow all instructions and precautions can cause you and others to be seriously hurt or killed. Owner’s Manual Inspect for Damage Carefully inspect generator for any damage that may have occurred during shipment. If loss or damage is noted after delivery, separate damaged materials and call Customer Hotline at 1-888-494-3571. HW5500/5500E Portable Generator Owner’s Manual www.honeywellgenerators.com 5 Record Generator Information Record Generator Information It is recommended that you take a moment to write down the identification information specific to your generator in the spaces provided on the inside cover of this Owner’s Manual. You can find this information on generator’s name plate, located on rear side of generator (see illustration below). FIGURE 1: Generator Name Plate Location 6 www.honeywellgenerators.com HW5500/5500E Portable Generator Owner’s Manual Assembly Assembly Generator must be empty of engine oil and fuel. Drain engine oil and fuel, if necessary. Generator is heavy! Lifting generator can cause back or other bodily injury. NEVER lift generator without assistance. Wheel Kit FIGURE 2: Wheel Assembly Components i NOTE: Illustration above shows battery, which is available only with HW5500E models. i NOTE: In order to install support legs and wheel assembly, you will need to either tilt generator on its side or elevate generator by placing solid wood pieces underneath unit. • NEVER USE wheel kit on-road. • Wheel kit is intended to be used specifically with this generator. NEVER use wheel kit for any other purpose. HW5500/5500E Portable Generator Owner’s Manual www.honeywellgenerators.com 7 Assembly Step 1: Install Support Legs 5. To install support legs, you will need: Attach a rubber stopper to bottom of each support leg using a 25 mm full-thread hex bolt and 13 mm flange serrated nut; tighten until securely seated. 25 mm full-thread hex bolts (2) 5/16" washers (2) 13 mm flange serrated nuts (6) 16 mm full-thread hex bolts (4) Socket Wrench with 10 mm Socket* * Not included FIGURE 4: Rubber Stopper Attachment to Support Leg 6. Generator must be empty of engine oil and fuel. Drain engine oil and fuel, if necessary. Attach each support leg to pre-drilled holes on bottom of generator frame, using 16 mm full-thread hex bolts and 13 mm flange serrated nuts; tighten until securely seated. Generator is heavy! Lifting generator can cause back or other bodily injury. NEVER lift generator without assistance. 1. Be sure generator is set on flat, level surface. 2. Stand at side of generator opposite recoil starter handle. Grip frame; carefully pull up and push to tilt generator backward. FIGURE 5: Support Leg Attachment to Generator FIGURE 3: Tip onto Generator Recoil Side 3. Gently set generator onto recoil side. 4. Place 5/16" washer in center of each rubber stopper. 8 www.honeywellgenerators.com HW5500/5500E Portable Generator Owner’s Manual Assembly 4. Slide second 9/16" washer onto axle. To install wheel assembly, you will need: 5. Slide cotter pin into pre-drilled hole until fully seated. Socket wrench with 10 mm socket* 6. Using needlenose pliers, bend each end of cotter pin in opposing directions to secure wheel to axle. Step 2: Install Wheel Axle and Wheels Needlenose Pliers* Wheel Axle (1) 16 mm full-thread hex bolts (4) 13 mm flange serrated nuts (4) Axle Bracket† (1) Wheels (2) 9/16" Washers (4) Cotter Pins (2) * Not included. † Two brackets are needed to install wheel axle. One bracket comes already attached to wheel axle; other bracket is included in wheel kit hardware bag. 1. Install wheel axle brackets to frame using 16 mm fullthread hex bolts and 13 mm flange serrated nuts. FIGURE 8: Cotter Pin Installation 7. Return generator in upright position (so that wheels and leg supports are touching ground). 1A. Install pre-attached bracket to frame first. 1B. Install other bracket (included in hardware bag) to frame. FIGURE 6: Wheel Axle Attached to Generator On each end of axle: 2. Slide 9/16" washer onto axle. 3. Slide and push wheel onto axle until it fits snug against washer. FIGURE 7: Slide Wheel onto Wheel Axle HW5500/5500E Portable Generator Owner’s Manual www.honeywellgenerators.com 9 Assembly Step 3: Install Handle Assembly To install handle assembly, you will need: Once properly installed, the handles can be collapsed, if desired. Handle Brackets (2) Hands and fingers can be pinched from collapsible handles. Handle Bars (2) Rubber Handle Grips (2) 40 mm Washer Style Hex Bolts (6) 10 mm flange serrated nuts (6) Socket wrench with 8mm socket* * Not included 1. Hold handle bracket over pre-drilled holes on frame as shown in Figure 9. • Keep hands and fingers clear from hinges when collapsing generator handles. • To collapse handles, push firmly down on handle until it rests vertically against generator frame. • To return handles to horizontal position, pull up on handle. Battery To use electric start feature, battery (included) must be connected to generator’s electric starter. Battery gases are explosive. • NEVER allow open flames, lit cigarettes, sparks, or spark-producing equipment near the battery. FIGURE 9: Handle Bracket to Frame 2. 3. Attach bracket to frame using 40 mm washer style hex bolts and 10 mm flange serrated nuts; tighten until securely seated. Slide handle bar through center of each bracket and line up bolt holes. Battery electrolyte fluid is comprised of sulfuric acid, which can be very dangerous and cause severe burns. • NEVER allow battery fluid to contact eyes, skin, or clothing. If contact or spillage occurs, immediately flush the area with water. Exposed terminals, even on disconnected batteries, can cause electric shock. • NEVER touch both battery terminals with bare hands at the same time. • Remove rings, watches or any other object containing metal when working with battery. If metal comes into contact with battery terminals, electric shock and serious burns can result. • Only use insulated/non-conducting tools when working with or near battery. • NEVER lay tools or other metal objects on top of battery. FIGURE 10: Insert Handle Bar to Bracket 4. Attach handle to each bracket using 40 mm washer style hex bolt and 10 mm flange serrated nut; tighten until securely seated. i NOTE: Handle should stick straight out after tightening bolts and nuts. If handle seems to hang down, tighten bolts and nuts further. 5. 10 1. Generator is packaged with the negative (-) battery lead attached to top of alternator with a plastic cable Slide rubber handle grip onto each handle bar and push to achieve snug fit. www.honeywellgenerators.com HW5500/5500E Portable Generator Owner’s Manual Grounding the Generator strap. Carefully cut cable strap to disengage battery lead. Grounding the Generator Generator must be grounded to prevent electrical shock from faulty appliances. • Before using generator, consult a qualified electrician, electrical inspector, or local agency having jurisdiction for local codes or ordinances that apply to the intended use of generator. Before using generator, a ground wire must be connected to the ground terminal (Figure 13). FIGURE 11: Negative Battery Lead Attached to Alternator for Shipping To avoid electric arcing, which can result in electric shock, follow these instructions exactly. When connecting or disconnecting battery leads: • ALWAYS connect negative (-) battery lead last. • ALWAYS disconnect negative (-) battery lead first. • NEVER connect negative (-) battery lead to red positive (+) post on battery. • NEVER connect positive (+) battery lead to black negative (-) post on battery. 2. 3. Connect red positive (+) battery lead to red positive (+) post on battery; fasten with nut and bolt provided. Connect black negative (-) battery lead to black negative (-) post on battery; fasten with nut and bolt provided. – FIGURE 13: Ground Terminal i NOTE: The system ground is not connected to AC neutral wire. If using a receptacle tester, it will not show same ground circuit condition as for a home receptacle. Special Requirements There may be Federal or State Occupational Safety and Health Administration (OSHA) regulations, local codes, or ordinances that apply to the intended use of generator. Please consult a qualified electrician, electrical inspector, or the local agency having jurisdiction. • In some areas, generators are required to be registered with local utility companies. • If generator is used at a construction site, there may be additional regulations which must be observed. + FIGURE 12: Electric Starter Battery i NOTE: Actual battery appearance may vary from illustration provided. i NOTE: While engine is running, a small “trickle” charge is applied to starting battery.This keeps an adequate battery charge. HW5500/5500E Portable Generator Owner’s Manual www.honeywellgenerators.com 11 Using Generator for Backup Power Using Generator for Backup Power Before connecting to building’s electrical system, consult your local utility company or a qualified electrician. Improper connections to a building's electrical system can be deadly. Electrical current from generator to feedback into utility lines. Such feedback may electrocute utility company workers or others who contact utility lines during a power outage. Electrical current can feedback into generator. When utility power is restored, generator may explode, burn, or cause fires in building's electrical system. If you will be using generator for backup power, generator must be connected to building’s electrical system through a transfer switch installed by a licensed electrician. What is a transfer switch? A transfer switch is a device that allows switching from utility power to emergency generator power. Transfer switch is either a manual switch, an automatic switch or a combination of manual and automatic. During a power outage, transfer switch isolates emergency circuits from utility line, allowing for efficient operation of generator without backfeeding onto utility. 12 www.honeywellgenerators.com HW5500/5500E Portable Generator Owner’s Manual COMPONENTS Use information provided in this section to become familiar with your generator’s components. Information below is provided for reference only. Refer to Operation section (page 15) for instructions on operating generator. K J L A E M I B H G C F D FIGURE 14: HW5500/5500E Portable Generator (Illustration shows battery, which is available only with HW5500E models) A—Power Control Center Household Outlets 120V 20 Amp Duplex outlets to connect 120V appliances to generator for power. Power Cord/ Transfer Switch 120/240V 30 Amp Twist-Lok outlet can be used to: • • • Power 120V appliances using 4-in-1 power cord (included with generator). Power 240V appliances using appropriate (L14-30) power cord (not included). Connect a transfer switch to building’s main electrical system for backup power (see page 12). Breakers Protects circuits from damage caused by overload or short-circuit by stopping flow of electricity between generator and appliance. Master circuit Set Tripped breaker controls power to all outlets. If there is no power at outlets, see Troubleshooting. Ground Terminal Connects generator to ground wire for grounding protection. Generator must be grounded to prevent electrical shock from faulty appliances. See page 11. B—Battery Tray and Battery (HW5500E Only) Provides power for electric start feature. C—Engine Oil Fill Cap/Dipstick Seals off engine oil fill hole and provides indicator for engine oil level. D—Engine Oil Plug When loosened, allows engine oil to drain from generator. HW5500/5500E Portable Generator Owner’s Manual E—Engine Control Switch Control used to run and stop the engine. • • • START—Starts generator engine (HW5500E) RUN—Prepares engine for starting (HW5500); Indicates engine is currently running (HW5500E) STOP—Stops generator engine F—Recoil Starter Grip Handle Starts engine (HW5500). Provides means to manually start engine, if needed (HW5500E). G—Fuel Valve Controls flow of fuel from fuel tank to carburetor. H—Air Cleaner Assembly Removes dust from engine intake air. I— Choke Control Controls choke valve. Choke control must be pulled out to ON position when starting a cold engine. J—Fuel Gauge Indicates level of fuel currently in fuel tank. K—Fuel Tank Cap Provides a secure seal on fuel tank. L—Muffler Equipped with Spark Arrester Provides outlet for engine exhaust. Prevents sparks and other combustible materials from escaping generator. Muffler reaches temperatures that can cause serious burns if touched. NEVER touch hot surfaces. M—Spark Plug Cap (Wire) Delivers volts to spark plug. When spark plug needs service, cap must be removed. www.honeywellgenerators.com 13 THIS PAGE INTENTIONALLY LEFT BLANK 14 www.honeywellgenerators.com HW5500/5500E Portable Generator Owner’s Manual OPERATION Preparing for Operation Using a generator indoors CAN KILL YOU IN MINUTES. Generator exhaust contains carbon monoxide. This is a poison you cannot see or smell. NEVER use inside a home Only use OUTSIDE and far or garage, EVEN IF doors away from windows, doors, and vents. and windows are open. Before starting generator, complete the following preparation tasks: Generator Location When deciding on the location to place your generator, keep in mind the following safety rules: Depressed areas such as construction foundations, pools, or any low-lying areas, can cause carbon monoxide to accumulate. Inhalation of carbon monoxide can kill you in minutes. • NEVER use generator inside homes, garages, crawl spaces, sheds, or similar enclosed spaces. Use generator only outdoors and far away from windows, doors, and vents. Be sure generator is placed outdoors in a well ventilated area. See “Generator Location”. If generator is placed on an uneven or flexible surface, generator could tilt or overturn, causing fuel to spill from gas tank. Spilled fuel could ignite. Consult a licensed electrician or utility company if you will be using your generator for backup power. The generator must be connected to building’s electrical system via a transfer switch. See “Using Generator for Backup Power” on page 12. • Place generator on firm, level surface and avoid loose sand or snow. If generator is tilted or overturned, fuel spillage may result. Also, if generator is overturned or sinks into a soft surface, sand, dirt, or water may enter generator. Before connecting to a building’s electrical system, consult utility company or qualified electrician. • Connecting to a building's electrical system without using a transfer switch can cause electrical current from generator to feed back into utility lines, resulting in death or serious injury to utility company workers or others who contact utility lines during a power outage. Check/add engine oil— See “Engine Oil” on page 20. For initial start-up, follow instructions on oil container provided with generator. Check/add fuel*—See “Adding Fuel” on page 22. Be sure ground terminal is properly connected to earth ground—See “Grounding the Generator” on page 11. Check extension cords—be sure cords are: * In good condition. Rated for outdoor use and match amp and voltage ratings of generator outlet. Equipped with proper plugs that contain grounding blades. NEVER operate generator in rain or snow, or when the generator is set on wet surface. Starting Generator Before starting generator, be sure to thoroughly read all information provided in this Owner’s Manual. It is very important to maintain proper level of engine oil to keep engine in good running condition. • Check engine oil level prior to each use. Starting generator with appliances connected can cause permanent damage to appliances. • NEVER start generator with electrical appliances plugged in and turned on. To start generator: 1. Be sure generator is placed outside, in well-ventilated area. You must add fuel before using the generator for the first time. See “Adding Fuel” on page 22. HW5500/5500E Portable Generator Owner’s Manual www.honeywellgenerators.com 15 Starting Generator 2. Turn fuel valve to ON position. When engine starts, the engine control switch gradually settles at RUN (center) position. i NOTE: While engine is running, a small “trickle” charge is applied to starting battery.This keeps an adequate battery charge. Manual (Recoil) Start: FIGURE 15: Fuel Valve Lever — ON/OFF position 3. Press engine control switch to RUN position. Pull choke control to ON position. FIGURE 18: Engine Control Switch Grip recoil starter handle and pull slowly until you feel slight resistance. Kickback (rapid retraction) of starter cord will pull hand and arm toward engine faster than you can let go. FIGURE 16: Choke Rod 4. Proceed according to method you want to use to start engine (see Electric Start or Manual Start). Broken bones, fractures, bruises, or sprains could result. • When using recoil starter, pull cord firmly and slowly until you feel resistance and then pull rapidly to avoid kickback. Electric Start (HW5500E Model Only): Press and hold engine control switch in START position for 5 seconds or until engine starts. FIGURE 17: Engine Control Switch FIGURE 19: Recoil Starter Handle • Holding engine control switch for more than 5 seconds can damage starter motor. If engine fails to start after 5 seconds, release engine start switch and wait 10 seconds before attempting to start engine again. • If you notice engine cranking speed drop after a period of time, it may be an indication that battery should be recharged. 16 www.honeywellgenerators.com 5. Apply a swift, single pull to start engine. Carefully return recoil starter handle to its original position. As engine warms up, and RPM stabilizes, gradually push in choke control to OFF position. To prevent damage to generator, do not allow starter grip to snap back against engine. HW5500/5500E Portable Generator Owner’s Manual Stopping Generator exceed rated output of generator. Power rating information can usually be found on an appliance’s product label, or stamped inside or on back of appliance. See Table 1 for a listing of average appliance wattage requirements. Stopping Generator In an emergency: Press and hold engine control switch to STOP position until engine stops. In normal use: 1. Turn OFF any connected appliances and unplug any connected power cords. 2. Allow generator to run for 2-3 minutes. 3. Press engine control switch to STOP position. 4. Turn fuel valve to OFF position. High Altitude Operation • NEVER overload: Circuit breakers will stop flow of electricity between generator and appliance if generator is overloaded. This will be indicated by a “tripped” breaker. If this happens, power off and disconnect appliance(s), wait a few minutes, and then push to reset circuit breaker. • Pay attention to appliance operation: If appliance begins to operate abnormally, becomes sluggish, or stops suddenly, turn it OFF immediately. Disconnect appliance and determine whether problem is appliance, or if rated load capacity of generator has been exceeded. • Use suitable extension cords: If using an extension cord to connect appliance to generator, use only ULlisted, three-prong extension cords. Be sure extension cord is proper size (wire-gauge) to handle electric load that will be plugged into it. At high altitudes, standard carburetor air-fuel mixture will be excessively rich. Performance will decrease and fuel consumption will increase. High altitude performance can be improved by installing a smaller diameter main fuel jet in the carburetor and then readjusting the pilot screw. If you always operate the engine at altitudes higher than 5000 feet (1500 meters) above sea level, have an authorized generator dealer perform this carburetor modification. Even with suitable carburetor jetting, engine horsepower will decrease approximately 3.5% for each 1000 foot (300 meter) increase in altitude. The effect of altitude on horsepower will be greater than this if no carburetor modification is made. Do not run power cords under carpet, rugs, or other materials where heat might build up or cord damage may go unnoticed. Appliance Wattage Information If engine jetted for high altitude is used at lower altitude, lean air fuel mixture will reduce performance and may over-heat and seriously damage the engine. Use table below as a guide to determine how much power you will need to run appliances using generator. Powering Appliances The values provided in following table are estimates only. • ALWAYS verify actual wattage requirements for appliance you will be powering. Check labels inside or on the back of appliance, refer to appliance operating manuals, or contact appliance manufacturer. i NOTE: In this manual, the term “appliance” refers to any electrical device that can be connected to generator for power. Appliance Rules for Powering Appliances Typical Running Watts Air Conditioner* NEVER start generator with electrical appliances plugged in and turned on. Faulty appliances and power cords can result in electrical shock. • Before attempting to power an appliance, be sure generator has been properly grounded, and that appliance and power cord are in good working order. • Plan carefully: Before using generator to power appliances, take time to add power rating (watts) of each appliance and verify that total wattage does not HW5500/5500E Portable Generator Owner’s Manual • • Central 3500 Window 500-1440 Aquarium 50-1210 Clock radio 10 Coffee maker 900-1200 Washing machine 350-500 Electric dryer 1800-5000 Iron 1000-1800 TABLE 1. Typical Appliance Running Wattages www.honeywellgenerators.com 17 Powering Appliances Appliance Typical Running Watts Dishwasher* 1200-2400 (using drying feature greatly increases energy consumption) Dehumidifier* 785 Electric blanket (Single/Double) 60 / 100 Starting appliances that have motors requires more power. Examples of motorized appliances include refrigerators, water pumps, and furnace blowers. Be sure that power rating of appliance does not exceed that of generator. Fans* • • Ceiling 65-175 Window 55-250 Furnace* 750* Hair dryer 1200-1875 Heater (portable) 750-1500 Microwave oven 750-1100 Personal computer • CPU - awake / asleep 120 / 30 or less • Monitor - awake / asleep 150 / 30 or less • Laptop 50 Radio (stereo) 70-400 Refrigerator* (frost-free, 16 cubic feet) 725 Sump pump* • • 1/2 hp 2150 1/3 hp 2300 Television (color) • • • • • 19" 65-110 27" 113 36" 133 53"-61" Projection 170 Flat screen 120 Toaster 800-1400 Toaster oven 1225 VCR/DVD 17-21 / 20-25 Vacuum cleaner* 1000-1440 Water heater (40 gal) 4500-5500 Water pump* (deep well) 250-1100 TABLE 1. Typical Appliance Running Wattages * Allow up to three times normal running watts for starting or cycling compressor of this appliance. 18 www.honeywellgenerators.com HW5500/5500E Portable Generator Owner’s Manual MAINTENANCE Maintenance Schedule Periodic maintenance and adjustment is necessary to keep generator in good operating condition. Perform service and inspection at intervals shown in Generator Maintenance Schedule (Table 2). Using a generator indoors CAN KILL YOU IN MINUTES. Generator exhaust contains carbon monoxide. This is a poison you cannot see or smell. Accidental starting of generator can cause severe injury or death. Before performing maintenance, disconnect spark plug cap from spark plug. Also disconnect both starting battery cables. Remove the negative (-) cable first to reduce the risk of arcing. NEVER use inside a home Only use OUTSIDE and far or garage, EVEN IF doors away from windows, doors, and vents. and windows are open. • Shut off engine before performing any maintenance. If engine must be run, be sure area is well ventilated. Improper maintenance, or failure to correct a problem before operation, can cause a malfunction in which you can be seriously hurt or killed. Always follow inspection and maintenance recommendations and schedules in this owner's manual. The maintenance schedule applies to normal operating conditions. If you operate generator under severe conditions, such as sustained high-load or high-temperature, or use it in unusually wet or dusty conditions, consult your servicing dealer for recommendations applicable to your individual needs and use. FREQUENCY* MAINTENANCE TASK Before each use Check engine oil level X Inspect for/clean debris X Check air cleaner X First month or 20 hours of use Every 3 months or 50 hours of use Every 6 months or 100 hours of use Every year or 200 hours of use X† Clean air cleaner Change engine oil X X Clean fuel sediment cup X Check/clean spark plug X Clean spark arrestor X Check/adjust valve clearance X‡ Clean fuel tank and strainer X‡ Check fuel line Every 2 years (replace if necessary)‡ TABLE 2. Generator Maintenance Schedule * Perform at every indicated month or operating hour interval, whichever comes first. † Clean more often when using generator in dusty areas. ‡ It is recommended that this maintenance task be performed by a service dealer. HW5500/5500E Portable Generator Owner’s Manual www.honeywellgenerators.com 19 Engine Oil Oil level should be at “H” or somewhere between the “L” and “H”. Engine Oil Engine oil is a major factor affecting engine performance and service life. Non-detergent and 2-stroke engine oils will damage engine and are not recommended. • Be sure to use engine oils specified under “Engine Oil Recommendations.” It is very important to maintain proper level of engine oil to keep engine in good running condition. • Check engine oil level prior to each use. Refill engine oil if oil level is too low. FIGURE 22: Engine Oil Level Engine Oil Recommendations Use 4-stroke oil, or equivalent high detergent, premium quality motor oil certified to meet or exceed U.S. automobile manufacturer's requirements for API Performance Class SL, SJ, or better. SAE 10W-30 is recommended for general temperature use. Refer to Figure 20 for information on other viscosities that may be used. Other viscosities shown in chart may be used when average temperature in your area is within indicated range. 6. If oil level is at “L” or below, add recommended oil (see “Adding Engine Oil”). Do not overfill. If oil level is at “H” or somewhere between the “L” and “H”, reinstall oil fill cap and fully tighten. Reinstall oil fill cap and fully tighten. Low Oil Protection When engine oil level approaches an unsafe level, the low oil protection feature prevents equipment damage by automatically shutting down engine. When engine shuts down due to low oil level: • The engine start switch will remain in RUN position. • You will not be able to start engine until you add required amount of engine oil. Adding Engine Oil FIGURE 20: Recommended Oil Viscosity Checking Engine Oil Level To check engine oil level: 1. Stop generator if engine is running. 2. Be sure generator is set on flat, level surface. 3. Remove oil fill cap and wipe off dipstick end with clean cloth. 4. Insert oil fill cap to oil fill hole but do not screw in (Figure 21). 5. Pull out to read current oil level indicated on dipstick end. i NOTE: For initial start-up, follow instructions provided on engine oil bottle provided with generator. 1. Stop generator if engine is running. 2. Be sure generator is set on flat, level surface. 3. Remove oil fill cap. FIGURE 23: Oil Fill Cap Removal 4. Slowly pour oil into oil fill hole. 5. Check oil level. 6. Replace oil fill cap and fully tighten. FIGURE 21: Engine Oil Level 20 www.honeywellgenerators.com HW5500/5500E Portable Generator Owner’s Manual Engine Oil Changing Engine Oil 6. Using a socket wrench with 12 mm socket, loosen drain plug bolt; remove drain bolt and sealing washer. Frequent or prolonged contact with engine oil may cause skin cancer. • Immediately after handling engine oil, thoroughly wash hands and any areas of skin exposed to engine oil, with soap and water. To change engine oil, you will need: Socket wrench with 12 mm socket Oil drain pan or other container suitable for holding engine oil Clean cloth Unused engine oil (SAE type indicated in Figure 20) 1. Be sure generator is placed on flat, level surface. 2. Start engine and run until warm. 3. Stop engine. FIGURE 25: Loosen Oil Drain Bolt 7. Allow oil to drain into oil pan or container. 8. Slowly unscrew and remove oil fill cap. Crankcase pressure can cause hot engine oil to spray out of engine fill hole. Hot engine oil can cause severe burns. • ALWAYS stop engine before removing oil fill cap. 4. FIGURE 26: Remove Oil Fill Cap 9. Allow oil to completely drain into oil pan or container. Place oil pan, or other container suitable for holding engine oil, underneath generator. FIGURE 27: Oil Draining from Generator 10. Using clean cloth, wipe around oil fill and drain plug areas to clean any dirt and debris. 11. Reinstall sealing washer and drain plug bolt. FIGURE 24: Oil Drain Bolt 5. Keep oil fill cap on initially to avoid having oil spray out too fast. 12. Pour new (unused) engine oil into oil fill hole. (See Figure 20 for recommended oil type). Do not overfill. 13. Check oil level. FIGURE 28: Engine Oil Dipstick—Oil Level Indicator HW5500/5500E Portable Generator Owner’s Manual www.honeywellgenerators.com 21 Adding Fuel 14. Reinstall oil fill cap and tighten until fully seated. • i NOTE: Dispose of used motor oil according to guidelines established by your local or state government. Some states (and provinces in Canada) require this information to be posted on the fuel pump. If you notice undesirable operating symptoms, switch to a conventional unleaded gasoline. Adding Fuel Before each use, check fuel gauge on fuel tank. If fuel level is low, refill tank with recommended fuel. NEVER OVERFILL. Try to confirm contents of fuel. Oxygenated fuels can damage paint and plastic. Be careful not to spill fuel when filling fuel tank. Damage caused by spilled fuel is not covered under warranty. TABLE 3. Oxygenated Fuel Types Fuel and fuel vapors are extremely flammable and explosive under certain conditions. • Refuel generator only outdoors, in a well-ventilated area. • NEVER fill fuel tank while engine is running. Turn generator OFF and allow to cool before filling with fuel. • NEVER smoke or allow flames or sparks near generator or where gasoline is stored. • NEVER overfill fuel tank (no fuel should be in filler neck). After refueling, be sure fuel tank cap is closed properly and securely. • Be careful not to spill fuel when refueling. Spilled fuel or fuel vapor may ignite. If any fuel is spilled, be sure area is dry before starting engine. • Avoid repeated or prolonged contact with skin or breathing of vapor. General Fuel Information Check fuel gauge located on the top of generator near fuel tank and refill tank if fuel level is low. Refuel carefully to avoid spilling fuel. Do not fill above the shoulder of fuel strainer. Use unleaded gasoline with a pump octane rating of 87 or higher. Ethanol (ethyl or grain alcohol) Gasoline containing more than 10% ethanol by volume may cause starting or performance problems. Gasoline containing ethanol may be marketed under the name "Gasohol". Methanol (methyl or wood alcohol) Gasoline containing methanol must contain co-solvents and corrosion inhibitors to protect fuel system. Gasoline containing more than 5% methanol by volume may cause starting and/or performance problems and may damage metal, rubber and plastic parts of fuel system. MTBE (methyl tertiary butyl ether) You can use gasoline containing up to 15% MTBE by volume. Fuel Recommendations To avoid damage to engine, never use stale or contaminated gasoline or oil/gasoline mixture. Avoid getting dirt or water in fuel tank. Use fresh gasoline with a pump octane rating of 87 or higher. Never use stale or contaminated gasoline. Avoid getting dirt or water in the fuel tank. Always keep fuel strainer in place while refueling. To add fuel to generator: Oxygenated Fuels 1. Stop generator if engine is running. Allow to completely cool. 2. Be sure generator is set on flat, level surface. 3. Remove fuel tank cap. At certain times of the year, some U.S. locations may have only oxygenated fuel available. Oxygenated fuel is blended with alcohol or ether additives to increase octane quality, enhance combustion, and reduce exhaust emissions. Some areas of the United States use oxygenated fuels to help meet clean air standards. Before using an oxygenated fuel: • 22 Be sure pump octane rating is 87 or higher. www.honeywellgenerators.com HW5500/5500E Portable Generator Owner’s Manual Air Filter Maintenance 4. Slowly pour gasoline into fuel tank. Be careful not to overfill. 2. Remove air cleaner cover. FIGURE 29: Fuel Level 5. Reinstall fuel tank cap and fully tighten. i NOTE: Occasional, light spark knock, "pinging", or rattling noise is normal while operating under heavy loads. If spark knock, pinging, or rattling occurs at a steady engine speed, under normal load, drain fuel (page 27) and refill with fresh gasoline. If noise persists, see an authorized generator dealer. FIGURE 30: Air Cleaner Cover 2A. Turn thumbscrew counterclock wise to loosen and remove. 2B. Push upward at bottom of cover to release plastic tabs. Running engine with persistent spark knock or pinging can cause engine damage. Warranty does not cover parts damaged by misuse. Air Filter Maintenance A dirty air filter will restrict air flow to carburetor, which may cause poor engine performance or damage. Never run the generator without air cleaner assembly properly attached. FIGURE 31: Air Cleaner Cover—Release Tabs 3. Pull out foam air filter. Clean air cleaner filter every 50 hours of generator operation. If operating generator in extremely dusty areas, clean air filter more frequently. Gasoline and flammable solvents can cause fire or explosion. NEVER use gasoline or flammable solvent to clean air cleaner element. • Use only household soap and water to clean air cleaner element. FIGURE 32: Air Filter Removal 4. Wash air filter in a solution of household soap and warm water. To clean air filter, you will need: 5. Rinse air filter thoroughly. Household soap and water 6. Using a clean, absorbent cloth, squeeze air cleaner element dry, being careful not to twist or tear the filter. Clean, dry cloth Clean engine oil 1. Stop engine if it is running. HW5500/5500E Portable Generator Owner’s Manual www.honeywellgenerators.com 23 Cleaning Fuel Sediment Cup Soak air filter in clean engine oil and squeeze out excess oil. 7. A Frequent or prolonged contact with engine oil may cause skin cancer. • Thoroughly wash hands and any areas of skin exposed to used oil with soap and water. i NOTE: Engine will smoke during initial start-up if too much oil is left in filter. B C FIGURE 34: Fuel Sediment Cup Assembly Pieces 5. Clean fuel screen (A), o-ring (B), and sediment cup (C), with soap and water. 8. Reinstall air filter. 6. Wipe pieces clean with clean, dry cloth. 9. Reinstall air cleaner cover and tighten thumbscrew. 7. Reinstall sediment cup, o-ring, and fuel filter. 8. Turn fuel valve to ON position and check for leaks. Cleaning Fuel Sediment Cup The sediment cup prevents any dirt or water that may be in the fuel tank from entering the carburetor. Clean fuel sediment cup at the intervals specified in Table 2. Spark Plug Service To ensure proper engine operation, spark plug must be properly gapped and free of deposits. If engine has been running, muffler will reach temperatures that could cause severe burns. Do not touch. To clean fuel sediment cup, you will need: Socket wrench with 10 mm socket Household soap and water Clean, dry cloth Recommended Spark Plug Replacement: 100842A* To clean fuel sediment cup: 1. Stop engine if it is running. 2. Be sure generator is set on flat, level surface. 3. Turn fuel valve to OFF position. 4. Using a socket wrench with 10 mm socket, remove fuel sediment cup assembly (sediment cup, o-ring, and fuel screen). Bosch W20EPR Champion RN9YC Denso WR7DC TABLE 4. Spark Plug Equivalents to 100842A To service spark plug, you will need: Clean cloth 13/16” Spark plug socket wrench New spark plug (if existing spark plug is excessively worn or damaged) Wire brush Wire feeler gauge (for setting spark plug gap to correct size) FIGURE 33: Fuel Sediment Cup Assembly Removal 1. Stop engine if it is running. 2. Be sure generator is set on flat, level surface. * 24 www.honeywellgenerators.com See Maintenance Parts at end of this manual. HW5500/5500E Portable Generator Owner’s Manual Cleaning Spark Arrestor Screen 3. Remove spark plug cap. 11. Inspect spark plug washer and verify it is in good con- dition. 12. Reinstall spark plug by hand to prevent cross-thread- ing. 13. After spark plug is seated, tighten with spark plug wrench to compress washer. If installing a new spark plug, tighten l/2 turn after the spark plug seats to compress the washer. If reinstalling a used spark plug, tighten l/8 - l/4 turn after the spark plug seats to compress the washer. FIGURE 35: Spark Plug Cap Removal 4. Clean any dirt from around spark plug base. 5. Carefully pull off spark plug cap. 6. Using a 13/16” spark plug socket wrench, loosen and remove spark plug. Spark plug must be securely tightened. An improperly tightened spark plug can become very hot and could damage engine. Never use spark plugs that have an improper heat range. Use only recommended spark plugs or equivalent. Cleaning Spark Arrestor Screen Muffler reaches temperatures that can cause serious burns if touched. NEVER touch hot surfaces. Generator muffler is equipped with spark arrestor screen, which must be cleaned according to maintenance schedule (Table 2) to ensure prevention of sparks escaping generator. FIGURE 36: Spark Plug Removal 7. To clean spark arrestor screen, you will need: Socket wrench with 8 mm socket Inspect spark plug. Phillips head screwdriver If spark plug is damaged or excessively worn, or if insulator is cracked or chipped use a new spark plug. 1. If spark plug is in good condition, reuse existing spark plug. Stop generator if engine is running. Allow to completely cool. 2. Be sure generator is set on flat, level surface. 3. Using a socket wrench with 8 mm socket, remove spark arrestor enclosure panel bolts. 8. If reusing spark plug, clean spark plug with wire brush. 9. Measure spark plug gap with wire feeler gauge. Wire brush Gap should be: (0.028-0.031 in) (0.70-0.80 mm). FIGURE 37: Correct Spark Plug Gap 10. If necessary, adjust gap by carefully bending side electrode. HW5500/5500E Portable Generator Owner’s Manual FIGURE 38: Remove Spark Arrestor Enclosure Panel www.honeywellgenerators.com 25 Transporting Generator 4. Pull off enclosure panel. C A Storing Generator Follow service procedures for preparing generator for storage. Inadequate or improper care of generator can result in damage to generator components and will void limited warranty. Before storing generator for extended period of time: B FIGURE 39: Spark Arrestor Assembly 5. Using a screwdriver, loosen and remove screw holding spark arrestor clamp (A). 6. Slide off spark arrestor clamp. 7. Using a screwdriver, loosen and remove retaining screw on park arrestor screen cap (B); pull off cap. 8. Pull out spark arrestor screen (C). 9. Inspect spark arrestor screen. If screen is damaged or excessively worn, replace with new screen. If screen is in good condition, clean using wire brush and then reinstall. 10. Reinstall remaining spark arrestor components. Spark arrestor cap Retaining screw Clamp and screw Spark arrestor enclosure panel • Be sure storage area is free of excessive humidity and dust. • Refer to Table 5 for recommended preparation procedures. Storage Time Less than 1 month No preparation required. 1 to 2 months Fill fuel tank with fresh gasoline and add gasoline conditioner*. 2 months to 1 year or more See procedure below. TABLE 5. Recommended Service Procedures Based on Storage Time * Use gasoline conditioners formulated to extend storage life. Contact authorized generator dealer for conditioner recommendations. To prepare generator for long-term storage:. Fuel and its vapors are extremely flammable and explosive under certain conditions. Transporting Generator Hot engine or exhaust system can cause serious burns or fires. Cool generator completely before transporting or storing. When transporting the generator: • Press engine control switch to OFF position. • Turn fuel valve lever to OFF position. • Keep generator level to prevent fuel spillage. To avoid damage to generator, take care not to drop or strike generator when transporting. Do not place heavy objects on generator. 26 www.honeywellgenerators.com Recommended Preparation • Refuel generator only outdoors, in well-ventilated area. • NEVER fill fuel tank while the engine is running. Shut engine OFF and allow to cool before filling with fuel. • NEVER smoke or allow flames or sparks near generator or where gasoline is stored. 1. Drain fuel into suitable container (see page 27). 2. Change engine oil (see page 21). 3. Remove spark plug. Add a tablespoon of clean engine oil into spark plug hole. 4. Place rag over spark plug hole and pull recoil starter handle slowly to turn engine and distribute oil. Reinstall spark plug. At this point, the piston is coming up on its compression stroke and both intake and exhaust valves are closed. Storing engine in this position will help to protect it from internal corrosion. HW5500/5500E Portable Generator Owner’s Manual Storing Generator Draining Fuel 1. Turn fuel lever to OFF position. 2. Run engine until it stops due to lack of fuel. 3. Place suitable container underneath drain hole to catch fuel. 4. Loosen bolt (underneath fuel sediment cup). FIGURE 40: Loosen Bolt to Drain Fuel 5. Turn fuel lever to ON position. FIGURE 41: Fuel Valve Lever — ON/OFF position 6. Allow fuel to drain into container. 7. To ensure all fuel is drained, carefully tip generator by pulling up on frame at side opposite of recoil starter handle. FIGURE 42: Tip Generator to Completely Drain Fuel 8. Allow fuel to completely drain into container. 9. When ready to put generator back into operation, refill with fresh fuel (see page 22). HW5500/5500E Portable Generator Owner’s Manual www.honeywellgenerators.com 27 THIS PAGE INTENTIONALLY LEFT BLANK 28 www.honeywellgenerators.com HW5500/5500E Portable Generator Owner’s Manual TROUBLESHOOTING ANYONE using or servicing generator must read, understand, and follow all safety and operation instructions provided in the product manual. Failure to closely follow these instructions can result in circumstances leading to death, serious injury, and property damage. Using a generator indoors CAN KILL YOU IN MINUTES. Generator exhaust contains carbon monoxide. This is a poison you cannot see or smell. NEVER use inside a home Only use OUTSIDE and far or garage, EVEN IF doors away from windows, doors, and vents. and windows are open. i NOTE: For all customer service inquiries, call 1-888-494-3571 or visit www.honeywellgenerators.com. PROBLEM Engine will not start or starts and runs rough. Engine suddenly stops. PROBABLE CAUSE 1 2 3 4 5 6 7 8 No fuel. Stale fuel. SOLUTION 1 Add fuel (page 22). 2 Drain fuel tank; fill with fresh fuel (page 27). No engine oil. Spark plug wire (cap) disconnected. Faulty/bad spark plug. Fuel not reaching carburetor. Dirty air cleaner. Dirty spark arrestor screen. 3 4 5 6 7 8 Add engine oil (page 20). Install spark plug cap over spark plug. Check/replace spark plug (page 24). Clean fuel sediment cup (page 24). Clean or replace air cleaner (page 23). Clean spark arrestor screen (page 25) 1 No fuel. 2 No engine oil. 1 Add fuel (page 22). 2 Add engine oil (page 20). 1 Electrical overload on generator. 2 Poor connection or defective cord 1 Check all circuit breakers* set. 3 Connected electrical appliance/ equipment is defective. No power at AC receptacle for “tripped’ position. Reduce electrical load on circuit, wait 3 minutes, Set and then push to reset circuit breaker. Tripped 2 Check cord connection. Replace defective cord set. 3 Check electrical appliance/equipment for defects. Disconnect defective appliance/ equipment from the generator. Have appliance serviced by qualified repair facility. Speed of starter motor drops after period of time. 1 Battery is losing charge. 1 Recharge battery. TABLE 6. Troubleshooting — Probable Causes and Solutions * Master circuit breaker controls power to all receptacles. Be sure to check master breaker even if you are trying to power from a duplex outlet. HW5500/5500E Portable Generator Owner’s Manual www.honeywellgenerators.com 29 THIS PAGE INTENTIONALLY LEFT BLANK 30 www.honeywellgenerators.com HW5500/5500E Portable Generator Owner’s Manual SPECIFICATIONS HW5500 HW5500E Length 27 inches (685.8 mm) 27 inches (685.8 mm) Width 21.5 inches (546.1 mm) 21.5 inches (546.1 mm) Height 21.5 inches (546.1 mm) 21.5 inches (546.1 mm) 185 lb (83.9 kg) 195 lb (88.4 kg) Continuous (Rated) Power 5500 Watts 5500 Watts Maximum Power 6875 Watts 6875 Watts Surge Power 8250 Watts 8250 Watts 60 Hz 60 Hz 120/240 Volts 120/240 Volts Maximum 104° F (40° C) 104° F (40° C) Minimum -10° F (-23° C) -10° F (-23° C) 3600 3600 OHV 4-Cycle OHV 4-Cycle 337 cc 337 cc Fuel Tank Capacity 6.5 Gallons (24.6 L) 6.5 Gallons (24.6 L) Engine Oil Capacity 1.2 qt (1.1 L) 1.2 qt (1.1 L) Spark Plug Type 100842A 100842A Spark Plug Gap 0.028-0.031 inches (0.70-0.80 millimeters) 0.028-0.031 inches (0.70-0.80 millimeters) GENERATOR Dimensions* Dry Weight AC Output Frequency Voltage Operating Temperature ENGINE Engine Speed (RPM) Type Displacement TABLE 7. HW5500/5500E Portable Generator Specifications * Measurements given do not reflect dimensions with wheel kit installed to generator. HW5500/5500E Portable Generator Owner’s Manual www.honeywellgenerators.com 31 THIS PAGE INTENTIONALLY LEFT BLANK 32 www.honeywellgenerators.com HW5500/5500E Portable Generator Owner’s Manual WARRANTIES E. Fuel tank, cap and screen F. Carbon Canister (if equipped) NORTHSHORE POWER SYSTEMS EMISSIONS CONTROL WARRANTY Honeywell Portable Generator 2. A. Air cleaner B. Vent lines C. Intake manifold WARRANTY STATEMENT US Environmental Protection Agency (EPA) requires manufacturers of small off-road engines (SORE) to warranty their products with a 2 year warranty for those components that are specified as being part of the emission control system. Northshore Power Systems, LLC (NSP), the California Air Resources Board (CARB) and the EPA offer the following explanation of the Emission Control Warranty. In the United States and California, new small off-road engines must be designed, built, and equipped to meet stringent anti-smog standards. NSP must warrant the emission control system on your small off-road engine for the periods of time listed below provided there has been no abuse, neglect or improper maintenance of your small off-road engine. The emissions warranty is a defects warranty and is not related to an in-use emissions test. Your emission control system may include parts such as the carburetor or fuel injection system, the ignition system, and the catalytic converter. Also included may be hoses, belts, connectors and other emission-related assemblies. 3. 4. 5. EMISSIONS CONTROL SYSTEMS PARTS Coverage under this warranty extends only to the emissions control parts listed below. 1. Fuel metering system A. Choke system B. Carburetor C. Fuel Pump (if equipped) D. Fuel line, clamps, control valve HW5500/5500E Portable Generator Owner’s Manual Miscellaneous Items used in above systems A. Connectors and assemblies B. Regulating valves and switches for vacuum, temperature, or position sensing (if equipped) WARRANTY PROVISIONS 1. Claims. Warranty claims shall be filed in accordance with provisions of the NSP warranty and policies established with the authorized dealer network. 2. Exclusions. Warranty coverage shall be denied for failure of an emissions control part caused by abuse, neglect, improper maintenance as described in the Honeywell Generator Owner's Manual, use of add-on parts, modified parts, or parts that are not equivalent to original Honeywell generator parts in performance and durability. 3. Length of Coverage. NSP warrants to the original retail purchaser and each subsequent owner that the emissions control part shall be free from defects in materials and workmanship for a period of two years from the date the generator is delivered to the original retail customer. 4. Repair or Replacement Cost. Repair or Replacement Cost. Repair or replacement of any emissions control part will be performed at no charge to the owner, including diagnostic labor which leads to the determination that an emissions control part is defective, if the diagnostic work is performed at an authorized NSP Honeywell generator dealer. 5. Consequential Coverage. Coverage noted hereunder will extend to the failure of any engine components caused by the failure of any emissions control part still under warranty. 6. Maintenance. The emissions control parts are warranted only for defects during the warranty period. The warranty does not cover an emission control part that is replaced or repaired as required by the maintenance schedule defined in the Honeywell Generator Owner's Manual. Any replacement part that is equivalent in performance and durability may be used for maintenance or repairs. OWNER’S RESPONSIBILITIES You are responsible to bring your portable generator to an authorized NSP Honeywell generator dealer for repairs as soon as a problem exists. Do not return your generator to place of purchase for service. For emissions warranty service, contact your nearest dealer; a listing is available at www.honeywellgenerators.com or by calling 1-888-494-3571. Exhaust System A. Catalytic converter (if equipped) B. Exhaust manifold C. Air injection system (if equipped) COVERAGE You are responsible to maintain the engine as defined in your Honeywell Generator Owner's Manual. NSP recommends that you retain all records/receipts covering maintenance on your engine, but NSP cannot deny warranty claims based on the lack of receipts or for your failure to perform all scheduled maintenance. You may be denied warranty coverage if a part has failed due to abuse, neglect, improper maintenance or unapproved modifications. Ignition System A. Spark Plug B. Ignition coil Where a warrantable condition exists, NSP will repair your small off-road engine at no cost to you, including diagnosis, parts, and labor. Emissions control parts on the engine are warranted for a period of two years, subject to provisions set below. If any covered part on your engine is defective, the part will be repaired or replaced by NSP. Air Induction System www.honeywellgenerators.com 33 NORTHSHORE POWER SYSTEMS EMISSIONS CONTROL WARRANTY QUESTIONS If you have questions regarding your emissions warranty rights and responsibilities, you should contact the Warranty and Service department at NSP. By phone: (414) 332-2375 Via web: www.honeywellgenerators.com By US mail: Northshore Power Systems, LLC Attention: Product Warranty and Service Dept. 4425 N Port Washington Road Suite 105 Milwaukee WI 53212-1082 34 www.honeywellgenerators.com HW5500/5500E Portable Generator Owner’s Manual NORTHSHORE POWER SYSTEMS LIMITED WARRANTY NORTHSHORE POWER SYSTEMS LIMITED WARRANTY Honeywell Portable Generator Effective April 1, 2008 LIMITED WARRANTY Northshore Power Systems, LLC, (NSP) will repair or replace, free of charge, to the original retail customer, in North America, any parts of the portable generator found by NSP or an authorized service center to be defective in material or workmanship. This limited warranty covers the cost of the replacement parts and labor for defects. Transportation charges are the responsibility of the customer. This limited warranty has time period conditions, operating conditions and disclaimers, limitations of remedies & exclusions as stated below. For warranty service, customer should locate an authorized Honeywell Generator Dealer from www.honeywellgenerators.com or by calling 1-888-494-3571. LIMITED WARRANTY PERIODS Consumer Use: 3 Years Limited. 1st year, parts and labor. 2nd & 3rd years, parts only. Commercial Use: 1 Year Limited. No warranty for rental use. Commencement and Definitions.The limited warranty period begins on the date of retail purchase by the original purchaser. The limited warranty is not transferable. "Consumer use" is personal use by a retail customer. "Commercial use" is any usage for income producing, business related use. CUSTOMER, FOR ANY OTHER OBLIGATIONS OR LIABILITIES, INCLUDING, BUT NOT LIMITED TO, OBLIGATIONS OR LIABILITIES ARISING OUT OF BREACH OF CONTRACT OR WARRANTY, NEGLIGENCE OR OTHER TORT OR ANY THEORY OF STRICT LIABILITY, WITH RESPECT TO THE GENERATOR OR NSP'S ACTS OR OMISSIONS OR OTHERWISE. TO THE FULLEST EXTENT PERMITTED BY APPLICABLE LAW, NSP SHALL NOT, IN ANY EVENT, BE LIABLE FOR INCIDENTAL, COMPENSATORY, PUNITIVE, CONSEQUENTIAL, INDIRECT, SPECIAL OR OTHER DAMAGES, INCLUDING BUT NOT LIMITED TO LOSS OF USE, LOSS OF INCOME, LOSS OF TIME, LOSS OF SALES, INJURY TO PERSONAL PROPERTY, OR LIABILITY CUSTOMER INCURS WITH RESPECT TO ANY OTHER PERSON, OR ANY OTHER TYPE OR FORM OF CONSEQUENTIAL DAMAGE OR ECONOMIC LOSS. EXCLUSIONS. In addition to the foregoing disclaimers, limitations and terms, this limited warranty shall not apply to and does not cover accessories, nor does it cover products that are in any way subjected to: (i) improper setup, installation or storage; (ii) lack of proper maintenance and service; (iii) accident, damage, abuse or misuse; (iv) abnormal operating conditions or applications; (v) repair or modification by customer or any third party without prior written consent of NSP; (vi) use under operating conditions or in applications not made known to or contemplated by NSP; or (viii) acts of God. The application of these exclusions will be determined at NSP's sole discretion. REGISTRATION No Extension of Warranty. Repair or replacement pursuant to this limited warranty shall not renew or extend the original warranty period, and any repaired product shall be warranted for the remaining original warranty period only. Warranty registration with the Company is required on all products. You may send in the enclosed warranty card, or register your product on-line at www.honeywellgenerators.com. DISCLAIMERS, LIMITATIONS OF REMEDIES & EXCLUSIONS Warranty is also available by keeping and showing your original receipt from date of purchase to an authorized Honeywell Generator Dealer. This warranty gives you specific legal rights, and you may also have other rights which vary from state to state. DISCLAIMER OF OTHER WARRANTIES. TO THE FULLEST EXTENT PERMITTED BY APPLICABLE LAW, THIS LIMITED WARRANTY IS EXCLUSIVE AND EXPRESSLY IN LIEU OF ANY AND ALL OTHER WARRANTIES, INCLUDING, WITHOUT LIMITATION, ANY IMPLIED WARRANTIES OF MERCHANTABILITY OR FITNESS FOR A PARTICULAR PURPOSE OR ANY OTHER IMPLIED WARRANTIES THAT MAY ARISE FROM A COURSE OF DEALING OR USAGE OF TRADE. NSP HEREBY DISCLAIMS AND EXCLUDES ALL OTHER WARRANTIES. To the extent that NSP's products are consumer products under applicable federal or state law with respect to any customer, the duration of any implied warranties (including, but not limited to, implied warranties of merchantability or fitness for a particular purpose) are limited to the shortest duration permitted by applicable law or the limited warranty period provided herein, whichever is longer. GENERATOR SERVICE Do not return your generator to place of purchase for service. For all customer service inquiries, call 1-888-494-3571 or visit www.honeywellgenerators.com. Warranty inquiries can be addressed to: Northshore Power Systems, LLC Attention: Product Warranty and Service Dept. 4425 N Port Washington Road Suite 105 Milwaukee WI 53212-1082 LIMITATIONS OF REMEDIES. NSP SHALL NOT BE LIABLE TO CUSTOMER, OR TO ANYONE CLAIMING UNDER HW5500/5500E Portable Generator Owner’s Manual www.honeywellgenerators.com 35 THIS PAGE INTENTIONALLY LEFT BLANK 36 www.honeywellgenerators.com HW5500/5500E Portable Generator Owner’s Manual INDEX INDEX stopping 17 storing 26 transporting 26 unpacking guidelines 5 warranty 35 Ground 11 special requirements 11 terminal 13 A Air Filter maintenance 23 Appliances powering 17 rules for powering 17 wattage information 17 Assembly battery 10 handle 10 wheels 9 H Handles installing 10 High Altitude operation 17 C Checklist generator shipment 5 Components and Controls breakers 13 choke control 13 engine switch 13 fuel valve 13 outlets Household 13 Transfer Switch 13 recoil starter grip 13 spark plug cap 13 M Maintenance 19 air filter 23 changing engine oil 21 cleaning spark arrestor 25 fuel sediment cup 24 parts listing 39 schedule 19 spark plug 24 Manual (Recoil) Start 16 O D Operation high altitude 17 preparing for 15 Outlets Household 13 Transfer Switch 13 Damage inspecting for 5 Draining Fuel 27 E Electric Start 16 Engine Oil changing 21 Engine Switch 13 P Power Control Center 13 ground terminal 13 Household Outlets 13 Power Cord/Transfer Switch 13 F Fuel adding 22 draining 27 oxygenated types 22 recommendations 22 Fuel Sediment Cup cleaning 24 Fuel Valve 13 S Safety labels 3 Spark Arrestor cleaning 25 Spark Plug servicing 24 Specifications 31 Stopping Generator 17 Storage recommendations 26 G Generator location 15 nameplate information 6 operation 15 outlets 13 safety labels 3 specifications 31 starting 15 HW5500/5500E Portable Generator Owner’s Manual T Transfer Switch for backup power 12 outlet 13 Troubleshooting 29 www.honeywellgenerators.com 37 INDEX U Unpacking guidelines 5 W Warranty emissions control 33 limited product 35 Wattage typical appliance 17 Wheels installing 9 38 www.honeywellgenerators.com HW5500/5500E Portable Generator Owner’s Manual HW5500/5500E MAINTENANCE PARTS To order maintenance parts, visit www.honeywellgenerators.com or call Customer Hotline at 1-888-494-3571. Part Name Part Number Air Cleaner Assembly 100832A Air Filter 100833A Fuel Cap 100834A Fuel Shut-Off Valve 100835A Fuel Strainer 100836A Ignition Coil 100838A Recoil Assembly 100839A Recoil Rope and Handle 100840A Oil Fill Cap/Dipstick 100841A Spark Plug 100842A Spark Arrestor 100843A Wheel 100844A Wheel Handle Pivot Bracket 100845A Wheel Kit Hardware 100852A Handle Bar 100846A Rubber Handle Grip 100847A Smart Start Card 100848A (HW5500) 100849A (HW5500E) HW5500/5500E Maintenance Parts List For part numbers of replacement product labels, see page 3. HW5500/5500E Portable Generator Owner’s Manual www.honeywellgenerators.com 39 Northshore Power Systems, LLC 4425 N. Port Washington Rd., Suite 105 Milwaukee, WI 53212-1082 USA HW5500/5500E – P/N: 100900A March 2008 © 2008 Northshore Power Systems, LLC TEL 1-888-494-3571 The Honeywell Trademark is used under license from Honeywell International Inc. www.honeywellgenerators.com Honeywell International Inc. makes no representation or warranties with respect to this product