1
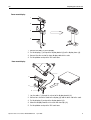
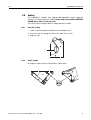
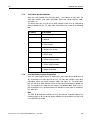
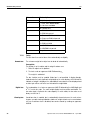
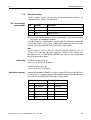
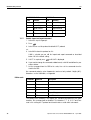
Operation and Service Manual
METTLER TOLEDO
XRV Checkout Scale
www.mt.com/xpress
About this manual and METTLER TOLEDO Xpress
Thank you for purchasing a METTLER TOLEDO Xpress product.
All of our equipment is assembled and packed with great care. If you should find any incorrect or missing item,
please contact your METTLER TOLEDO Xpress dealer immediately.
The XRV Checkout Scale is a Weights & Measures approved precision weighing instrument. However, you may
want to obtain official certification through your supplier or local Weights & Measures office.
This METTLER TOLEDO Xpress product was developed, produced, and tested in a METTLER TOLEDO facility that
has been audited and registered according to international ISO 9001 quality standards and ISO 14000 environment control program. Properly used and maintained, this product will provide years of accurate weighing.
Handle it as you would do with any piece of fine electronic equipment. Please read this manual before operating
or servicing this equipment. Follow the instructions carefully and save this manual for future reference. We at
METTLER TOLEDO Xpress want to make sure you received the product you expected. It is important for us that you
are satisfied with your purchase. If there is anything we can help you with, or if you are not satisfied with either your
product or the services received from the METTLER TOLEDO Xpress representative, let us know.
How can you reach us?
Xpress Customer Care Center, USA
24/7 Information and Support
www.mt.com/xpress
[email protected]
8 AM to 8 PM EST Toll Free
1-866-MTXPRESS
Xpress
Mettler-Toledo, Inc.
1150 Dearborn Drive
Worthington, OH 43085
Contents
XRT
Contents
Page
1
Safety notice ...............................................................................
5
2
2.1
2.2
2.3
2.4
2.5
2.6
Preparing your scale for use ........................................................
Unpacking ...................................................................................
Selecting or changing the location ..................................................
Assembling ..................................................................................
Power supply ...............................................................................
Switching scale on and off .............................................................
Sealing ........................................................................................
6
6
6
6
8
8
9
3
3.1
3.2
3.3
The XRV scale at a glance ............................................................
Display........................................................................................
Cursors .......................................................................................
Keyboard .....................................................................................
10
10
10
10
4
4.1
4.2
4.3
4.4
4.5
4.6
Operating your scale....................................................................
Zeroing ........................................................................................
Taring .........................................................................................
Weighing .....................................................................................
Remote commands.......................................................................
Backlight function .........................................................................
Cleaning......................................................................................
11
11
11
12
12
12
12
5
5.1
5.2
Setup mode................................................................................. 13
Operating the setup mode .............................................................. 13
Setup mode functions.................................................................... 13
6
6.1
6.2
6.3
6.4
Servicing your scale ....................................................................
Switching calibration switch to ON ..................................................
Scale configuration service mode....................................................
Geo values ..................................................................................
Calibration service mode ...............................................................
15
15
16
19
23
7
7.1
7.2
7.3
7.4
7.5
7.6
Communication protocols ............................................................
8217 Mettler Toledo......................................................................
Berkel..........................................................................................
NCI Weightronix ...........................................................................
Epelsa .........................................................................................
CAS.............................................................................................
ICL/Fujitsu....................................................................................
25
25
32
34
38
40
42
Operation and Service Manual MTX06-OM072.0E
April 2006
3
XRT
8
8.1
8.2
8.3
8.4
8.5
8.6
4
Appendix ....................................................................................
Error messages ............................................................................
Technical data .............................................................................
Communication cable ...................................................................
ASCII table ...................................................................................
FCC notice ...................................................................................
Notes on Weights & Measures .......................................................
Operation and Service Manual MTX06-OM072.0E
44
44
45
47
47
48
48
April 2006
Safety notice
XRV
1
Safety notice
▲ Read this manual before operating or servicing the scale. Save this manual for
future reference.
▲ Do not allow untrained personnel to operate, clean, inspect, maintain, service or
tamper with the scale.
▲ Observe safety warnings located throughout this manual.
DANGER!
Electric shock hazard!
➜ Always disconnect all power before commencing any work on the scale.
CAUTION!
The scale may only be opened by qualified personnel, otherwise the warranty is void.
➜ Exercise care when moving, testing or adjusting the scale.
CAUTION!
Handle the scale with care. It is a precision instrument.
➜ When the platform has been removed, never clean the area under the platform
with a solid object!
➜ Do not put excessive loads on the scale.
➜ Avoid banging the platform.
Disposal
➜ Observe the valid environmental regulations when disposing of the scale.
➜ Observe the local regulations for disposing of environmentally hazardous materials.
Operation and Service Manual MTX06-OM072.0E
April 2006
5
Preparing your scale for use
2
XRV
Preparing your scale for use
2.1
Unpacking
➜ Ensure that all parts are accounted for:
Contents
• XRV scale base
• Platform
• AC-DC power adapter
• Display cables (a short and a long one)
• Tower and attachment equipment (the optional display may be packed separately)
• Base bracket (with round corner platform)
• Quick Start Guide
• Installation Instructions
• CD-ROM with Operation and Service Manual
2.2
Selecting or changing the location
The correct location is crucial to the accuracy of the weighing results.
➜ Select a stable, vibration-free and, if possible, a horizontal location.
The ground must be able to safely bear the weight of the fully loaded scale.
Observe the following environmental conditions:
• No direct sunlight
• No strong drafts
• No excessive temperature fluctuations
2.3
Assembling
➜ Open the box, carefully remove the packing material, and take all the items out of
the carton.
➜ Attach the display as described below.
Mounting options
There are two different options for mounting the display of the XRV scale.
➜ Choose either the tower mount or the base mount display and follow the illustrations.
6
Operation and Service Manual MTX06-OM072.0E
April 2006
Preparing your scale for use
XRV
Tower mount display
1
2
3
4
1. Connect the cable (2) to the display.
2. Put the display (1) on top of the display bracket (3) of the display tower (4).
3. Connect the other end of the tower display cable to the scale.
4. Put the platform on top of the XRV scale base.
Base mount display
.
1
2
3
4
1. Lay the cable (1) through the cut-out of the display bracket (3).
2. Connect one end of the cable to the display (2) and the other end to the scale.
3. Put the display (2) on top of the display bracket (3).
4. Mount the display bracket on the scale with two clips (4).
5. Put the platform on top of the XRV scale base.
Operation and Service Manual MTX06-OM072.0E
April 2006
7
Preparing your scale for use
XRV
Aligning the scale
Only scales that have been aligned precisely horizontally provide accurate weighing
results. The scales have a spirit level to simplify alignment.
➜ Turn the adjustable feet of the scale until the spirit level’s air bubble is inside the
inner circle.
Major geographical
location changes
2.4
The manufacturer adjusts each scale to the local gravity conditions (Geo value). In
the event of major geographical location changes, this setting must be readjusted.
Certified scales must also be recertified observing the national certification regulations.
Power supply
The scale can be operated with the AC adapter provided.
CAUTION!
Damage to the scale.
➜ Allow the scale to adjust to room temperature before connecting the power supply.
2.5
2.5.1
Switching scale on and off
Switching on
Prerequisite
Before switching on the scale always make sure that there is no weight on the platform.
➜ Connect the scale to the power outlet using the external AC adapter provided.
The scale goes through a series of self-tests.
Power-up Sequence
• All segments of the display characters light up. This verifies the proper operation of
all segments.
• The scale displays the country code, the Geo code, the software part number and
the revision.
When the display shows 0 the scale is ready for operation.
Notes
• The scale should be running for about 15 minutes before operation.
• If the scale does not automatically zero upon power-up, ensure that the platform is
properly aligned and/or recalibrate the scale, see page 21.
2.5.2
Switching off
➜ Disconnect the scale from the power outlet.
8
Operation and Service Manual MTX06-OM072.0E
April 2006
Preparing your scale for use
XRV
2.6
Sealing
After installation is complete, most legal-for-trade applications require sealing the
enclosure so settings cannot be changed. Please contact your authorized METTLER
TOLEDO Xpress dealer to seal your scale.
There are 2 kinds of sealing: lead wire sealing and sticker sealing.
2.6.1
Lead wire sealing
1. Install 2 special through-hole sealing screws and tighten them.
2. Run a wire seal (1) through the holes in the heads of the screws.
3. Apply the seal.
1
2.6.2
Sticker sealing
➜ Apply the sealing stickers to the positions shown below
Operation and Service Manual MTX06-OM072.0E
April 2006
9
The XRV scale at a glance
3
XRV
The XRV scale at a glance
3.1
Display
3.2
Cursors
3.3
Cursor
The cursor lights when...
Zero
the weight is gross zero
NET
tare exists
Keyboard
Key
T
10
Name
Function
Zero key
Setting scale to gross zero
Tare key
Taring the container weight
Operation and Service Manual MTX06-OM072.0E
April 2006
Operating your scale
XRV
4
Operating your scale
4.1
Zeroing
For best weighing results set the empty scale to zero before weighing.
4.1.1
Zeroing when switching on
The scale is automatically set to zero when it is switched on.
The zero setting range is +/–10 % of the scale capacity.
If there is a weight on the scale more than +10 % or less than –10 %, the scale will
not be set to zero and the weight display shows "-----".
➜ Remove the weight and/or make sure that the platform is free.
The scale is zeroed.
4.1.2
Pushbutton zero
Setting to zero with
is only possible if:
• the displayed weight value is within +/–2 % of the scale capacity,
• the scale is in gross weighing mode, i.e. the NET cursor must be off,
• the scale is not in motion, i.e. the motion cursor must be off.
➜ Press
.
The weight display is set to zero.
4.2
Taring
Taring subtracts the weight of the container or wrapping material.
Pushbutton tare
1. Place the empty container or wrapping material on the platform.
2. Press
T
.
The weight display is set to zero and the NET cursor is lit.
Remote tare
A remote tare command can be sent from a POS system through the serial connection of the XRV scale.
1. Place the empty container or wrapping material on the platform.
2. Wait until the display is set to zero before weighing.
Note
The pushbutton tare and the remote tare command do not work simultaneously.
Operation and Service Manual MTX06-OM072.0E
April 2006
11
Operating your scale
XRV
4.3
Weighing
1. Place the item to be weighed on the platform.
The weight of the item is displayed.
2. Remove the item from the platform.
0 is shown.
4.4
Remote commands
Remote ASCII commands can control all functions including data transfer, zeroing
and taring, depending on the protocol.
4.5
Backlight function
The scale is equipped with a backlight for the display when the light of the environment is not bright enough to read the display.
Enabling backlight function
➜ Press and hold
until a long beep is heard.
When the scale is not used for 1 minute, the backlight will automatically switch off.
When a weight is placed on the platform or when a key is pressed, the backlight will
switch on again.
Disabling backlight function
➜ Press and hold
until a long beep is heard.
2 more beeps will be heard to indicate the backlight has been switched off.
– or –
➜ Switch the scale off and on.
4.6
Cleaning
CAUTION!
Damage to the scale.
➜ Do not use any type of industrial solvents or chemicals.
➜ Do not attempt to remove the cover or to perform service or maintenance on the
internal parts of the scale.
Cleaning
➜ Clean the keybord and the display with a soft cloth that has been dampened with
a mild window type cleaner or detergent.
12
Operation and Service Manual MTX06-OM072.0E
April 2006
Setup mode
XRV
5
Setup mode
In the setup mode you can modify parameters directly from the keyboard to suit your
specific needs.
5.1
5.1.1
Operating the setup mode
Entering the setup mode
➜ When switching on the scale, press and hold
5.1.2
Keys and their function in the setup mode
T
5.2
5.2.1
until "grP 1" is displayed.
Confirm the choice and go to next step
Step through the setup groups and select the parameter settings once a group
is accepted
Setup mode functions
Setup parameters
The parameters of the setup mode are combined in groups. The groups and parameters are numbered.
No.
Function
Explanation
1.3
Beeper
ON
OFF
Scale will beep when a key is pressed
No sound when a key is pressed
1.5
Decimal point
OFF
ON
Decimal point in all weight and price data, e.g. 3.54
Decimal comma in all weight and price data, e.g. 3,54
1.7
Automatic clearing of ON
tare
OFF
2.4
Digital filter
The digital filter stabilizes the weight display when the load is moving or vibrating
0
Minimal filter
1
Low filter
2
Medium filter
3
High filter
3.1
Baud rate
0
1
2
3
1200
2400
4800
9600
3.2
Parity
0
1
2
None
Even
Odd
Automatic clearing of tare weight when the weight is removed from the platform
Manual clearing of tare weight
Operation and Service Manual MTX06-OM072.0E
April 2006
13
Setup mode
XRV
No.
Function
Explanation
3.3
Data
0
1
7 data bit
8 data bit
3.4
Bit stop
0
1
2
None
1 stop bit
2 stop bit
3.5
Choosing protocol
6
7
8
9
10
11
8217 Mettler Toledo
Berkel
NCI Weightronix
Epelsa
CAS
ICL/Fujitsu
refer to page 25 for customizing
refer to page 32 for further information
refer to page 34 for further information
refer to page 38 for further information
refer to page 40 for further information
refer to page 42 for further information
Note
When selecting the 8217 protocol, press
Save Saving or aborting
setting
5.2.2
14
several times until "Save" appears
Save Save all settings and return to weighing mode
Abort Reject all changes and return to weighing mode
Country default settings
No.
Function
EN (USA)
DE (Germany) FR (France)
1.3
Beeper
On
On
On
1.5
Decimal point
Off (.)
Off (.)
Off (.)
1.7
Automatic clearing of tare On
On
On
2.4
Digital filter
1
1
1
3.1
Baud rate
3
3
3
3.2
Parity
1
2
1
3.3
Data
0
0
0
3.4
Bit stop
1
1
1
3.5
Choosing protocol
6
6
6
Operation and Service Manual MTX06-OM072.0E
April 2006
Servicing your scale
XRV
6
Servicing your scale
CAUTION!
The scale may only be serviced by qualified personnel, otherwise the warranty is
void.
➜ For the following services, please contact your METTLER TOLEDO Xpress dealer.
The scale has 2 different modes for service functions:
• Scale configuration service mode – to adjust the scale to each country’s requirements
• Calibration service mode – to enter Geo value and to perform calibration
Notes
• These functions are directly related to the Weights & Measures regulations in each
country. Therefore they are protected by the calibration switch, which is protected
by a sealing sticker or sealing lead.
• Operation in the service mode is the same as in setup mode.
WARNING!
Damage to the scale or bodily harm!
➜ Before connecting or disconnecting any internal electronic components or interconnecting wiring between electronic equipment, always remove power and wait
at least 30 seconds before any connections or disconnections are made.
6.1
Switching calibration switch to ON
1. Insert a thin rod through the calibration hole.
2. Press the switch on the main PCB.
3. Connect the scale to the power outlet.
The setup procedure is finished when GrP1 is displayed.
4. Press
Operation and Service Manual MTX06-OM072.0E
to enter the service mode
April 2006
15
Servicing your scale
XRV
6.2
Scale configuration service mode
6.2.1
Entering scale configuration service mode
➜ With the calibration switch set to ON, press
6.2.2
T
.
Scale configuration service mode functions
The parameters of the scale configuration service mode are numbered.
Parameters in bold type are also accessible in the setup mode.
Step Function
Settings / Explanation
1.1
Country selection
With the country selection the following parameters are set automatically:
Geo value, weight unit, zero cursor, chain tare, decimal point or decimal comma,
baud rate, parity, data, bit stop, protocol.
DE Germany
FR
France
US
United States
AT
Austria, Croatia, Slovenia
ES
Portugal, Spain
BE
Belgium, Netherlands, Great Britain, Poland
IT
Italy
CH Kazachstan and Switzerland
UA
Ukraine
RU Russia
SK
Slovakia
HU Hungary
SK
Slovakia
CZ
Czechia
Ejport Other countries
CN China
1.2
Resetting
YES
NO
Reset scale configuration parameters to default settings.
These settings meet the Weights & Measures requirements of the selected
country.
If other settings are made, the scale can no longer be used in commercial
environments.
Do not reset parameters
1.3
Beeper
ON
OFF
Scale will beep when a key is pressed
No sound when a key is pressed
1.4
Zero cursor
ON
OFF
Zero cursor enabled
Zero cursor disabled
1.5
Decimal point
OFF
ON
Decimal point in all weight and price data, e.g. 3.54
Decimal comma in all weight and price data, e.g. 3,54
1.7
Automatic clearing of ON
tare
OFF
16
Automatic clearing of tare weight when the weight is removed from the platform
Manual clearing of tare weight
Operation and Service Manual MTX06-OM072.0E
April 2006
Servicing your scale
XRV
Step Function
Settings / Explanation
1.8
Weight unit
kg
lb
1.9
Expanded weight
display
ON
OFF
Division quantity is displayed, maximum is 30,000
Weight is displayed in normal display increments
2.1
Tare
ON
OFF
Tare function enabled
Tare function disabled
2.2
Chain tare
ON
OFF
Chain tare or multiple tares enabled
Only 1 tare per transaction allowed
2.4
Digital filter
The digital filter stabilizes the weight display when the load is moving or vibrating
0
Minimal filter
1
Low filter
2
Medium filter
3
High filter
2.5
Geo value
To adjust the scale to your geographical location
Possible settings: 0 ...31
see page 19 and following for Geo value tables
2.6
Calibration
YES
No
Calibrate scale, see page 23
Do not enter calibration mode
3.1
Baud rate
0
1
2
3
1200
2400
4800
9600
3.2
Parity
0
1
2
None
Even
Odd
3.3
Data
0
1
7 data bits
8 data bits
3.4
Bit stop
0
1
2
None
1 stop bit
2 stop bits
3.5
Choosing protocol
6
7
8
9
10
11
8217 Mettler Toledo
Berkel
NCI Weightronix
Epelsa
CAS
ICL/Fujitsu
refer to page 25 for customizing
refer to page 32 for further information
refer to page 34 for further information
refer to page 38 for further information
refer to page 40 for further information
refer to page 42 for further information
Note
When selecting the 8217 protocol, press
Save Saving or aborting
setting
several times until "Save" appears
Save Save all settings and return to weighing mode
Abort Reject all changes and return to weighing mode
Operation and Service Manual MTX06-OM072.0E
April 2006
17
Servicing your scale
XRV
6.2.3
18
Country default settings
No.
Function
DE (Germany) FR (France)
EN (USA)
1.2
Reset
No
No
No
1.3
Beeper
On
On
On
1.4
Zero cursor
Off
Off
Off
1.5
Decimal point
On (,)
On (,)
Off (.)
1.6
Decimal places for price
N/A
N/A
N/A
1.7
Automatic clearing of tare On
On
On
1.8
Weight unit
kg
kg
lb
1.9
Expanded weight display
Off
Off
Off
2.1
Tare
On
On
On
2.2
Chain tare
On
On
Off
2.3
Round total price
Off
Off
Off
2.4
Digital filter
1
1
1
2.5
Geo value
20
19
15
2.6
Calibration
No
No
No
3.1
Baud rate
3
3
3
3.2
Parity
2
1
1
3.3
Data
0
0
0
3.4
Bit stop
1
1
1
3.5
Choosing protocol
6
6
6
Operation and Service Manual MTX06-OM072.0E
April 2006
Servicing your scale
XRV
6.3
6.3.1
Geo values
GeoCal® country codes
Country
Geo value
Country
Geo value
Country
Geo value
Austria
18
Ireland
22
Romania
18
Belgium
21
Iceland
26
Russia
23
Bulgaria
16
Italy
17
Sweden
24* / 26
Croatia
18
Kazakhstan
18
Switzerland
18
Czechia
20
Latvia
23
Slovakia
19
Denmark
23
Luxemburg
20
Slovenia
18
Estonia
24
Liechtenstein
18
Spain
15
Finland
25* / 26
Lithuania
22
Turkey
16
France
17 / 19*
Netherlands
21
United Kingdom
21* / 23
Germany
20
Norway
24* / 26
Ukraine
21
Greece
15
Poland
21
Hungary
19
Portugal
15
* factory default
Operation and Service Manual MTX06-OM072.0E
April 2006
19
Servicing your scale
XRV
6.3.2
State
Alabama
Birmingham & North
South of Birmingham
Alaska
GeoCal® USA state locations codes
Geo
value
13
12
Geo
value
State
Geo
value
Kansas
14
North Dakota
18
Kentucky
14
Lousiana
12
Ohio
Akron & North
South of Akron
16
15
13
See map Maine
Arizona
Phoenix & North
South of Phoenix
12
11
Arkansas
13
California
State
Maryland
15
Oklahoma
Massachusetts
17
18
17
Oregon
Salem & North
18
Between Oakridge & Salem 17
South of Oakridge
16
18
Pennsylvania
16
Rhode Island
16
South Carolina
13
South Dakota
17
Tennessee
13
Michigan
Northwest of Lake
See map Southeast of Lake
Colorado
Denver & North
South of Denver
13
12
Connecticut
16
Delaware
15
18
Minnesota
Mississippi
Kosciusko & North
South of Kosciusko
13
12
Missouri
North of Springfield
Springfield & South
15
14
Montana
Helena & North
South of Helena
Texas
Northeast of Colorado River 12
Southwest of Colorado R. 11
18
17
Utah
13
Vermont
17
Idaho
North of Salmon River Mtns 17
South of Salmon River Mtns 16
Nebraska
15
Virginia
14
Nevada
13
Washington, DC
15
New Hampshire
17
Washington State
18
Illinois
Bloomington & North
South of Bloomington
New Jersey
16
West Virginia
15
16
15
New Mexico
11
Indiana
North of Indianapolis
Indianapolis & South
Wisconsin
Green Bay & North
South of Green Bay
18
17
16
15
Iowa
North of Des Moines
Des Moines & South
Wyoming
North of Casper
Casper & South
15
14
17
16
Florida
West Palm Beach & North 11
South of West Palm Beach 10
Georgia
12
Hawaii
9
20
New York
Albany & North
South of Albany
North Carolina
Raleigh & North
South of Raleigh
17
16
14
13
Operation and Service Manual MTX06-OM072.0E
April 2006
Servicing your scale
XRV
6.3.3
Maps for residents of Alaska and California
Alaska
27
26
23
California
16
15
14
13
Note
Locations near a boundary may enter either code.
Operation and Service Manual MTX06-OM072.0E
April 2006
21
Servicing your scale
XRV
6.3.4
Global Geo value table
Note
Geo values on this chart are accurate up to an altitude of 2000 m.
Height above sea-level in meters
Northern and southern
latitude in degrees
and minutes
0
325
325
650
650
975
975
1300
1300
1625
1625
1950
1950
2275
2275
2600
2600
2925
2925
3250
3250
3575
9600
10660
10660
11730
Height above sea-level in feet
0
1060
1060
2130
2130
3200
3200
4260
4260
5330
5330
6400
6400
7460
7460
8530
8530
9600
0° 0’ – 5° 46’
5
4
4
3
3
2
2
1
1
0
0
5° 46’ – 9° 52’
5
5
4
4
3
3
2
2
1
1
0
9° 52’ – 12° 44’
6
5
5
4
4
3
3
2
2
1
1
12° 44’ – 15° 6’
6
6
5
5
4
4
3
3
2
2
1
15° 6’ – 17° 10’
7
6
6
5
5
4
4
3
3
2
2
17° 10’ – 19° 2’
7
7
6
6
5
5
4
4
3
3
2
19° 2’ – 20° 45’
8
7
7
6
6
5
5
4
4
3
3
20° 45’ – 22° 22’
8
8
7
7
6
6
5
5
4
4
3
22° 22’ – 23° 54’
9
8
8
7
7
6
6
5
5
4
4
23° 54’ – 25° 21’
9
9
8
8
7
7
6
6
5
5
4
25° 21’ – 26° 45’
10
9
9
8
8
7
7
6
6
5
5
26° 45’ – 28° 6’
10
10
9
9
8
8
7
7
6
6
5
28° 6’ – 29° 25’
11
10
10
9
9
8
8
7
7
6
6
29° 25’ – 30° 41’
11
11
10
10
9
9
8
8
7
7
6
30° 41’ – 31° 56’
12
11
11
10
10
9
9
8
8
7
7
31° 56’ – 33° 9’
12
12
11
11
10
10
9
9
8
8
7
33° 9’ – 34° 21’
13
12
12
11
11
10
10
9
9
8
8
34° 21’ – 35° 31’
13
13
12
12
11
11
10
10
9
9
8
35° 31’ – 36° 41’
14
13
13
12
12
11
11
10
10
9
9
36° 41’ – 37° 50’
14
14
13
13
12
12
11
11
10
10
9
37° 50’ – 38° 58’
15
14
14
13
13
12
12
11
11
10
10
38° 58’ – 40° 5’
15
15
14
14
13
13
12
12
11
11
10
40° 5’ – 41° 12’
16
15
15
14
14
13
13
12
12
11
11
41° 12’ – 42° 19’
16
16
15
15
14
14
13
13
12
12
11
42° 19’ – 43° 26’
17
16
16
15
15
14
14
13
13
12
12
43° 26’ – 44° 32’
17
17
16
16
15
15
14
14
13
13
12
44° 32’ – 45° 38’
18
17
17
16
16
15
15
14
14
13
13
45° 38’ – 46° 45’
18
18
17
17
16
16
15
15
14
14
13
46° 45’ – 47° 51’
19
18
18
17
17
16
16
15
15
14
14
47° 51’ – 48° 58’
19
19
18
18
17
17
16
16
15
15
14
48° 58’ – 50° 6’
20
19
19
18
18
17
17
16
16
15
15
50° 6’ – 51° 13’
20
20
19
19
18
18
17
17
16
16
15
51° 13’ – 52° 22’
21
20
20
19
19
18
18
17
17
16
16
52° 22’ – 53° 31’
21
21
20
20
19
19
18
18
17
17
16
53° 31’ – 54° 41’
22
21
21
20
20
19
19
18
18
17
17
54° 41’ – 55° 52’
22
22
21
21
20
20
19
19
18
18
17
55° 52’ – 57° 4’
23
22
22
21
21
20
20
19
19
18
18
57° 4’ – 58° 17’
23
23
22
22
21
21
20
20
19
19
18
58° 17’ – 59° 32’
24
23
23
22
22
21
21
20
20
19
19
59° 32’ – 60° 49’
24
24
23
23
22
22
21
21
20
20
19
60° 49’ – 62° 9’
25
24
24
23
23
22
22
21
21
20
20
62° 9’ – 63° 30’
25
25
24
24
23
23
22
22
21
21
20
63° 30’ – 64° 55’
26
25
25
24
24
23
23
22
22
21
21
64° 55’ – 66° 24’
26
26
25
25
24
24
23
23
22
22
21
66° 24’ – 67° 57’
27
26
26
25
25
24
24
23
23
22
22
67° 57’ – 69° 35’
27
27
26
26
25
25
24
24
23
23
22
69° 35’ – 71° 21’
28
27
27
26
26
25
25
24
24
23
23
71° 21’ – 73° 16’
28
28
27
27
26
26
25
25
24
24
23
73° 16’ – 75° 24’
29
28
28
27
27
26
26
25
25
24
24
75° 24’ – 77° 52’
29
29
28
28
27
27
26
26
25
25
24
77° 52’ – 80° 56’
30
29
29
28
28
27
27
26
26
25
25
80° 56’ – 85° 45’
30
30
29
29
28
28
27
27
26
26
25
85° 45’ – 90° 00’
31
30
30
29
29
28
28
27
27
26
26
22
Operation and Service Manual MTX06-OM072.0E
April 2006
Servicing your scale
XRV
6.4
6.4.1
Calibration service mode
Entering calibration service mode
➜ With the calibration switch set to ON, press
T
.
YES is shown in the weight display.
6.4.2
Calibration procedure
Display
Press key
YES
CAL, then
kg – or –
lb
Confirm calibration mode
T
kg – or –
lb
CAP, then
number
Description
Select kg
– or –
lb
Confirm selection
T
Select weight capacity, e.g. CAP 6 for 6 kg
Number
Confirm calibration
----
Make sure that the platform is empty
Confirm that the platform is empty
5
...
0
2/3 load
value
Zero reading is being taken
If motion is detected, the count resets to 5 and
resumes counting until a stable weight value is found
T
Number
Select calibration value
Confirm calibration value
Load the appropriate test weight
Confirm the appropriate test weight
5
...
0
If motion is detected, the count resets to 5 and
resumes counting until a stable weight value is found
GrP 3
Confirm calibration
SAVE
T
SAVE
– or –
ABORT selection
Confirm selection and leave calibration service mode
Verify calibration in normal weighing mode
If applicable, remove power from scale and apply
appropriate calibration seal
Operation and Service Manual MTX06-OM072.0E
April 2006
23
Servicing your scale
XRV
Calibration quick reference guide
1. Break the calibration seal.
2. Press the calibration button on the main PCB.
3. Select YES.
4. Select kg or lb.
5. Select the capacity.
6. Make sure that the platform is empty and take the zero reading.
7. Place desired weight on scale and take the reading.
8. Save the settings and verify calibration in normal weighing mode.
24
Operation and Service Manual MTX06-OM072.0E
April 2006
Communication protocols
XRV
7
Communication protocols
7.1
7.1.1
8217 Mettler Toledo
Host communications
The 8217 scale acts as a peripheral device when connected to a host computer.
When the host requests weight data by sending an uppercase W, the scale will
respond with the weight data or a status byte if the scale is in motion or an invalid
state. The host can also request a scale zero operation. In this case the scale will
respond with the scale status, so the host can determine if the scale is in zeroing
range and/or if the scale is at zero. A scale confidence test can also be initiated by
the host to cause the scale to perform RAM, ROM, and NOVRAM tests and put the
results in a status byte for later interrogation by the host.
Data is transmitted and received by the scale using an RS-232 voltage level interface
in the following ASCII format: 7 bit even parity and one stop bit. Data transmission
rates are 1200, 2400, 9600, or 19200 baud asynchronous. The host computer
must send requests to the scale as specified single uppercase ASCII characters to
have it perform various functions. The scale will send a response back to the host
computer as a string of ASCII numeric digits or as an ASCII ? followed by a status
byte. There must be at least a 200 ms delay between commands to allow for
response time at the scale for processing data.
The following table shows the standard commands and responses between the scale
and the host. If a confidence test results in an error, the scale will not respond to the
W or Z commands until the error condition is corrected. An error will also cause the
scale to halt any weighing operation until cleared.
Operation and Service Manual MTX06-OM072.0E
April 2006
25
Communication protocols
7.1.2
ASCII
Command
from Host
XRV
Command descriptions
Scale response
W
STX WW.WW C R
STX WW.WWW C R
STX WW.WWN C R
STX WW.WWWN C R
STX?status byte C R
Description
Instructs scale to send weight data (W=Weight Digit 0-9). SW1-1 in setup
mode determines whether the decimal point is transmitted or not. The scale
will respond as follows according to setup and status:
Gross Weight Pounds.
Gross Weight KG.
Net Weight Pounds. ASCII N added after weight.
Net Weight KG. ASCII N added after weight.
Status byte is sent if scale is in motion, or if net/gross weight is negative or
over capacity. See page 27 to determine status byte results.
Z
STX?status byte C R
Zero scale command. On the next A/D reading, zero will be captured if the
weight is stable, within capture range, and no tare is taken (gross weight
mode.)
T CR
STX?status byte C R
Tare item on platform command. The scale must be at gross zero before
placing the item on the platform. Tare will be taken if weight is stable and
non-zero. After 150 ms delay, the scale will respond with a status byte.
Note
Tare must be enabled in calibration mode or scale will not respond.
TWWWWWcR
STX?status byte C R
Digital Tare Command. Known tare value can be sent to scale and must be
transmitted as five digits. The scale assumes a decimal point of WWW.WW
LB, or WW.WWW KG.
Note
Tare must be enabled in calibration mode or scale will not respond.)
C
STX?status byte C R
Clear Tare Command (ignored if weight is not stable.) Scale status byte is
sent after 150 ms delay.
A
STX C R
Initiate Confidence Test Command. STX C R is sent indicating command was
received.
B
STX?status byte C R
Send Confidence Test Results Command. A must be sent prior to the Send
Result command B. Results of the test are contained in a status byte. See
page 27 to determine the scale confidence test byte bit definitions. If all tests
have passed, the ASCII @ character will be returned.
E
STXEC R
Start Echo Mode Serial Port Test Command. Scale will respond with an E
indicating command received. Characters except F will be echoed back to the
host.
F
STXF
End Echo Mode Command. The scale will respond with an ASCII F indicating
the command was received.
Note
ASCII commands must be uppercase characters only.
26
Operation and Service Manual MTX06-OM072.0E
April 2006
Communication protocols
XRV
7.1.3
Scale Status Byte Bit Definitions
When the scale responds with STX?status byteCR , this indicates a status byte. The
status byte contains scale status information, which can include net/gross mode,
zero status, etc.
The actual status byte sent will be an ASCII character which must be converted to
binary to decode the bits. The scale status bit definitions are shown in the following
table.
7.1.4
Bit number
Bit description
7
7 Parity bit (even)
6
1 = Bad command from host
0 = Normal
5
1 = Net weight
0 = Gross weight
4
1 = Center of zero
0 = Not at center of zero
3
1 = Outside zero capture range
0 = Within range
2
1 = Under zero
0 = Within weighing range
1
1 = Over capacity
0 = Within weighing range
0
1 = Scale in motion
0 = Stable weight data
Scale Confidence Test Byte Bit definitions
When the scale responds with STX? status byteCR after requesting a confidence test
(B), a confidence test status byte will be sent. The status byte contains scale status
information, which can include net/gross mode, zero status, etc. The actual status
byte sent will be an ASCII character which must be converted to binary to decode the
bits. The confidence test status bits are shown in the following table. Bit 6 is set to 1
after a confidence test is performed and reset to 0 after the host reads the confidence
test status byte.
Note
The ASCII @ (decimal 64) indicates all tests were passed. Repeated reads of the
confidence byte for all test passed without initiating a new confidence test will result
in an ASCII NULL (hex 00).
Operation and Service Manual MTX06-OM072.0E
April 2006
27
Communication protocols
XRV
Bit number
Bit description
7
Parity bit (even)
6
1 = New status data available
0 = Host has read data
5
Bit is always a 0
4
1 = ROM test failed
0 = ROM test passed
3
1 = Processor RAM test failed
0 = Processor RAM test passed
2
1 = RAM test passed
0 = RAM test failed
1
1 = NOVROM test failed
0 = NOVROM test passed
0
Always 0
7.1.5
Taring
The tare of an item can be taken either automatically or digitally.
Remote tare
The unknown weight of an object can be tared off automatically:
Prerequisite
The display is not in motion and the weight is above zero.
1. Place the object on the platform.
2. The host sends an uppercase ASCII T followed by CR.
The weight is subtracted.
The tare function must be enabled. Chain tare is not permitted. A display triangle,
located under the least significant weight digit on the scale display, will illuminate to
indicate net weight is displayed. An underload will cause dashes to be displayed and
a status byte will be sent to the host instead of the weight data.
Digital tare
The keyboard tare is set when an uppercase ASCII T, followed by five ASCII digits and
a CR is sent to the scale. The scale weight display must be positive and stable. The
tare value input is limited to the scale capacity. In metric mode, the tare value must
always end in 0 or 5.
Clearing tare
28
If auto tare clear is enabled, tare is automatically cleared whenever the scale returns
to gross zero after having indicated a stable net weight at least one increment above
net zero. If auto tare clear is disabled, tare can be cleared by sending an uppercase
ASCII C.
Operation and Service Manual MTX06-OM072.0E
April 2006
Communication protocols
XRV
7.1.6
8217 serial interface
connector DB9-F
I/O connector wiring
The 8217 provides a female, DB-9 connector for connecting to a host computer. The
serial port wiring is shown in the table below.
Pin#
Function
Description
2
RxD
Receiving Data
3
TxD
Transmitting Data
5
SGnd
Signal Ground
➜ Verify the pin configuration on the host serial connector, since certain computers
may not use the standard pin locations.
A shielded 20 gauge, stranded cable is recommended. The maximum recommended
RS-232 cable length is 50 ft. (15 m). If cable lengths greater than 50 ft. (15 m) are
required, consult your local METTLER TOLEDO Xpress representative.
Note
Do not connect the DTR line unless the software specifically controls the line. The
DTR line on the scale does not require connection in order to use the interface. Certain programs such as dBASE@ and FOXPRO@ may require the PC's handshaking
lines to be jumpered as follows:
Handshaking
PC DB25 serial port connector:
Jumper 4 to 5, and 6, 8 & 20 together
PC DB9 serial port connector:
Jumper 4 to 6, and 7 to 8 together
Standard PC connectors
Standard PC compatible computers use either a female DB-25 or a female DB-9 connector for RS-232 serial ports. Cables to PC compatible computers are available from
your local authorized METTLER TOLEDO Xpress representative.
DB25-F RS-232
XRV DB9-M
Pin#
Function
Pin#
Function
2
Transmitting
2
Receiving
3
Receiving
3
Transmitting
7
Signal Ground
5
Signal Ground
4
RTS
5
CTS
Operation and Service Manual MTX06-OM072.0E
April 2006
29
Communication protocols
7.1.7
XRV
PC DB9-F RS-232
XRV DB9-M
Pin#
Function
Pin#
Function
2
Receiving
3
Transmitting
3
Transmitting
2
Receiving
5
Signal Ground
5
Signal Ground
7
RTS
8
CTS
Flexible import and export command
1. Select 6 in step 3 of group 3.
2. Press
.
3. Select YES to reset the protocol to default 8217 protocol
-or4. Select NO to leave the protocol as it is.
If NO is selected you can edit the import and export command as described
below. NO is the default setting.
5. If 8217 is required, press
until SAVE is displayed.
6. If you want to change the command or data format, select NO and follow the procedures below.
7. Set the command from the ECR to the scale, then set the command from the
scale to the ECR.
One command contains up to 6 parameters and must only contain 2 digits (0-F).
Characters use the ASCII table, see Appendix
ECR to scale
Parameter Command
P
STX
Q
ETX
R
CR
L
LF
T
0-F
Description
Stops editing process
HEX
Two HEX stand for one character*
*The priority of this character is the highest one. If another command uses the same
character, this command will be disabled. The characters Z, T, C, A, B, E and F are
used in the existing 8217 protocol and should not be used for other commands.
30
Operation and Service Manual MTX06-OM072.0E
April 2006
Communication protocols
XRV
Scale to ECR
Parameter Command
P
STX
Q
ETX
R
CR
L
LF
E
WW.WWW
F
WW.WW
Description
T
Stops editing process
Example
7.1.8
Command
Parameters
ECR to scale
STX W ETX CR LF
p57qrL
Scale to ECR
STX WW.WWW ETX CR LF
pEqrL
Setting commands between ECR and scale
1. Select 6 in step 3 of group 3.
2. Set the commands between ECR and scale using the following steps.
Display
Key operation
3.6 d
Press
3.6 d
Press
3.6 C 0
Press T until desired CO is the first digit of the command
digit is displayed
3.6 C O
Press
p57qrL
Press
to accept and Show the command parameter p57qrL
save setting
3.6 r 0
Press
3.6 r 0
T
to select
d = default, y = 8217 protocol
to accept
d = default, n = enable edit command and
data format
to accept
T
Remark
P is the first digit of the command p57qrL
Repeat the steps until all digits of the
command are entered.
to select
Begin to set data format from scale to ECR
Press
to accept
Proceed as described above until all digits of
the command pEqrL are entered
pEqrL
Press
to accept
Show the command parameter pEqrL
SAVE
Press
to accept
Save all settings and go to normal weighing
mode
Operation and Service Manual MTX06-OM072.0E
April 2006
31
Communication protocols
7.2
7.2.1
XRV
Berkel
Data format
• 9600 Baud (select 2400, 4800 or 9600)
• Even parity (select Even, None or Odd parity)
• 7 data bits (select 7 or 8)
• 1 stop bit (select 1 or 2 stop bits)
7.2.2
Command descriptions
ECR
Time out
Scale
Comments
STX (02h)
250 ms
ACK (06h)
ECR sends STX. Scale answers ACK.
If there is no answer, ACR can be sent 15 times. Error if
more than 15 retransmissions are sent. Time out between
STX and ACK is 250 ms.
Error if no response is sent after 250 ms.
3.2 ms
4 (34h)
0 (30h)
CR (0Dh)
LF (0Ah)
680-5400 ms
STX (02h)
ECR sends request for weight from scale if no notion.
3.2 ms delay before each character.
STX is sent again if NAK is received. Error if another
character is received.
Error if another character is received.
Scale answers STX. Time out between LF and STX is 6805400 ms.
ACK (06h)
680-5400 ms
W4 (30h to 39h)
W3 " "
W2 " "
W2 " "
W1" "
W0 " "
CR (0Dh)
LF (0Ah)
ECR sends ACK.
Scale sends weight in gram.
Time out between ACK and first digit of weight is 6805400 ms.
Time out between each character is 250 ms.
Error if the 7th character is not LF.
Scale sends NAK if it is unloaded, in motion or if the
weight has not changed since the previous
retransmission.
STX (02h)
32
250 ms
ACK (06h)
Error if there is no response after 250 ms.
If no ACK is received, STX is sent again.
Error if more than 15 transmissions are sent incl. previous
ones.
Operation and Service Manual MTX06-OM072.0E
April 2006
Communication protocols
XRV
ECR
Time out
Scale
Comments
3.2 ms
5 (34h)
0 (30h)
CR (0Dh)
LF (0Ah)
680-5400 ms
STX (02h)
ECR sends request for price.
3.2 ms delay before each character.
STX is sent again if NAK is received.
Error if another character is received.
Error if no STX is received after 6 s (minus 0.4 s for every
previous retransmission).
Error if another character than STX or digit is received. If a
digit is received, no ACK is sent and P5 is assumed.
ACK (06h)
680-5400 ms
P5 (30h to 39h)
P4 " "
P3 " "
P2 " "
P2" "
P1 " "
CR (0Dh)
LF (0Ah)
Scale sends total price to ECR.
P5 is most significant digit.
Error if more than 6 s (minus 0.4 s for every previous
retransmission) pass before P5 is received.
Error if the time between the other characters is more than
250 ms.
Error if the 7th character is not CR.
Time out between each character is 250 ms.
Error if the 7th character is not LF.
Scale sends NAK if it is unloaded, in motion or if the
weight has not changed since the previous
retransmission.
Operation and Service Manual MTX06-OM072.0E
April 2006
33
Communication protocols
7.3
7.3.1
XRV
NCI Weightronix
General information
The serial communications protocol is used to interface Weigh-Tronix/NCI POS
(Point-of-Sale) scales to ECR (Electronic Cash Registers), or other computing equipment (e.g. personal computers).
Responses to serial commands will be immediate, or within one weight meter cycle
of the scale. The time-out value used by the remote (controlling) device should be
1 second.
• There are two types of serial commands: mandatory and optional. Mandatory
commands must be supported by all products.
• Status bytes are prefaced by the letter S.
• Units of measure abbreviations are always upper case.
• The weight is always positive, therefore there is no polarity byte.
The following symbols are used:
• <ETX> End of Text character (03 hexadecimal)
• <LF> Line Feed character (0A hex)
• <CR> Carriage Return character (0D hex)
• <SP> Space (20 hex)
• x Weight characters from display including minus sign and out-of-range characters
• hh Two status bytes
• UU Units of measure (LB, KG, OZ, G, etc., all upper case)
7.3.2
Data format
• 1200, 2400, 4800, 9600, and 19200 Baud, adjustable
• 7 data bits
• Parity, adjustable
• 1 stop bit
• 1 start bit
34
Operation and Service Manual MTX06-OM072.0E
April 2006
Communication protocols
XRV
7.3.3
Mandatory commands
Name
Command
Response
Request weight
W<CR>
Returns decimal weight, units and status.
<LF>xx.xxxUU<CR><LF>Shh<CR><ETX>
Returns lb-oz weight with units plus scale status.
<LF>xLB<SP>xx.xOZ<CR><LF>Shh<CR><ETX>
Scale status only if wt < 0, initial zero error, in motion or out of capacity.
<LF>Shh<CR><ETX>
Note
The weight field is always six characters (5 for weight, 1 for decimal
point), regardless of the display size. Leading zeroes are not suppressed.
Request status
S<CR>
Returns scale status.
<LF>Shh<CR><ETX>
Zero the scale
Z<CR>
Scale is zeroed, returns scale status (see note 4).
<LF>Shh<CR><ETX>
Note
If the scale is outside zero range or in motion, the Z command is
ignored and the scale status is returned without zero status flag set,
i.e., the scale is not at zero.
7.3.4
Optional commands
Name
Command
Response
Request highresolution weight
H<CR>
Returns decimal wt in 10x with units plus scale status.
<LF>xxx.xxxUU<CR><LF>Shh<CR><ETX>
Returns lb-oz wt in10x with units plus scale status.
<LF>xLB<SP>xx.xxOZ<CR><LF>Shh<CR><ETX>
Scale status only if wt < 0, initial zero error, in motion or out of capacity.
<LF>Shh<CR><ETX>
Note
The high resolution weight field is seven characters (6 for weight, 1 for
decimal point), regardless of display size. Leading zeroes are not suppressed.
Change units of
measure
U<CR>
Changes units of measure, returns new units and scale status.
<LF>uu<CR><LF>Shh<CR><ETX>
Request metrology
raw counts
M<CR>
Returns normalized raw counts and scale status.
<LF>xxxxxxMM<CR><LF>Shh<CR><ETX>
Unrecognized
command
all others
Unrecognized command
<LF>?<CR><ETX>
Operation and Service Manual MTX06-OM072.0E
April 2006
35
Communication protocols
7.3.5
Weight Command: W
Zero Command: Z
36
XRV
Command description
This command causes the scale to return the displayed weight string in ECR format.
The scale will usually return the displayed weight with leading zeroes, i.e. no leading
zero suppression. If the weight is negative, in motion, over capacity or under capacity, or if a zero error exists, the ECR protocol causes only the scale's status to be
returned in response to a weight (W) command.
The returned weight string will include decimal point plus units of measure. The
length of the weight field will be equal to the length of the scale's display plus three
(one for the decimal point, and two for the units, e.g., "LB"). For pounds-ounce
weight, the length of the weight field will be equal to the length of the scale's display
plus five (one for the decimal point, two for the "LB" and two for the "OZ"). Units of
measure will appear in their ANSI standard abbreviated form ("LB" for pounds, "KG"
for kilograms, etc.) in uppercase characters.
If zeroing criteria are met, the scale is zeroed. In any case, scale status is returned.
High-Resolution
Command: H
This is the same as the W command, except that the weight is returned with ten
times the scale's displayed resolution.
Change Units
Command: U
This command causes the scale to change its units of measure. In response, the
scale will return the new units of measure and the scale status.
Metro Command: M
This command is optional. It will cause the scale to return the normalized raw counts
used for metrology verification. The count value is the same number which is displayed in the scale's division test in its diagnostics mode. For example, this number
can range up to 120,000 for the 67xx, 100,000 for the 78xx and 1,000,000 for
QDT scales.
Scale Status
Command: S
There will be at least two status bytes. If bit 6 of the second status byte is set, there
will be a third byte. Bit 6 of each successive byte indicates whether another status
byte follows. The bit will be clear (0) in the last status byte. At this time only the first
three bytes are defined. Others may be added later. Bit 0 is the least significant bit in
the byte while bit 7 is the most significant bit.
Operation and Service Manual MTX06-OM072.0E
April 2006
Communication protocols
XRV
7.3.6
Definition of status bits
Bit
Status Byte 1
Status Byte 2
Status Byte 3 (opt)
0
1 = scale in motion
0 = stable
1 = under capacity
0 = not under capacity
00 = low range
01 = undefined
10 = undefined
1
1 = scale at zero
0 = not at zero
1 = over capacity
0 = not over capacity
11 = high range
2
1 = RAM error
0 = RAM okay
1 = ROM error
0 = ROM okay
1 = net weight
0 = gross weight
3
1 = EEPROM error
0 = EEPROM okay
1 = faulty calibration
0 = calibration okay
Initial zero error
4
Always 1
Always 1
Always 1
5
Always 1
Always 1
Always 1
6
Always 0
1 = byte follows
0 = last byte
1 = byte follows
0 = last byte
7
Parity
Parity
Parity
Operation and Service Manual MTX06-OM072.0E
April 2006
37
Communication protocols
XRV
7.4
Epelsa
7.4.1
Data format
2400 Baud, adjustable
7 data bits, adjustable
Even parity, adjustable
2 stop bits
1 start bit
Asynchronous transmission
Data in ASCII code
7.4.2
Command descriptions
The functions of the protocol are implemented by using a single character for each
command.
ASCII
Decimal
character
HEX
Function
Comments
#
35
23
Resetting scale
The reset command can be sent at any moment. This
function cancels the cyclic test status. When the scale is
stable and at 0, it will send "0000000<CR>"
$
36
24
Demand weight
External weight demand
%
37
25
Zeroing
When the scale answers "AAAAAAA<CR>" it is out of
range or not in weighing mode.
After sending this character when the scale has recovered
a centered zero, the "0"s string is sent.
If the scale is not in weighing mode or if the zero is not
centered, the "A"s string is sent.
Waiting time between transmission and reception must
be less than 10 seconds, otherwise more "$" characters
will be sent until the scale sends back the "0"s string.
&
38
26
Opening cash drawer No response from the scale
’
39
27
Activating beep
Turned off by default.
Sending this character activates the beeper. The beeper
stays ON until the command is sent again.
The scale always responds with an ASCII 8 byte string, consisting of 7 data bytes +
1 "carriage return" byte (13 Decimal = 0D HEX).
38
Operation and Service Manual MTX06-OM072.0E
April 2006
Communication protocols
XRV
Scale response
Comments
<Data><CR>
<xxx.xxx><CR>
7 bytes of data + 1 byte "CR" (13 decimal, OD hex)
Example: 001.000<CR>
Weight reading, meaning 001.000 kg
Example: 0000000 <CR>
Weight is zero
AAAAAAA<CR>
Weight out of range, scale in motion, scale in initial
test, or no response between 2 consecutive
demands ["$"]
TTTTTTT<CR>
Scale is in a cyclic test.
The scale enters the cyclic test after it is switched
on. The display goes through 99999 and sends a
string of "T"s indicating the scale is in the cyclic test
status.
To exit this status, send two consecutive "#"
characters with 1s interval.
When the scale recovers the zero weight, it will
send a "0"s string. The response time of the scale
is aprox. 25 s.
Operation and Service Manual MTX06-OM072.0E
April 2006
39
Communication protocols
7.5
7.5.1
XRV
CAS
Data format
• 9600 Baud (select 2400, 4800 or 9600)
• Even parity (select Even, None or Odd parity)
• 7 data bits (select 7 or 8)
• 1 stop bit (select 1 or 2 stop bits)
7.5.2
Handshaking
PC DB25 serial port connector:
Jumper 4 to 5, and 6, 8 & 20 together
PC DB9 serial port connector:
Jumper 4 to 6, and 7 to 8 together
7.5.3
40
Command descriptions
Command
Comments
ENQ (05h)
Starts the communication sequence
ACK (06h)
Data available
NAK (15h)
No acknowledgement
DC1 (11h)
Data request format 1: weight only
DC2 (12h)
Data request format 2: total price, weight and unit price
STX (02h)
Start of text
STA
Status: S – stable, U – unstable
Sign
Space (20h) – zero or positive
- (2dh) – negative
F (46h) – overflow
Weight
6 bytes with MSD first and including decimal: W4W3.W2W1W0
Weight units
2 bytes for weight units (i.e. kg) following weight data
Price
8 bytes with MSD first and including decimal: P6P5P4P3P2.P1P0
Spaces are used for leading non-significant digits, i.e. a price of
15.00 would be transmitted as " 15.00" with 4 leading spaces
Unit price
8 bytes with MSD first and including decimal: U6U5U4U3U2.U1U0
Spaces are used for leading non-significant digits, i.e. a price of
15.00 would be transmitted as " 15.00" with 4 leading spaces
BCC
Block Check Character calculated as the even column parity
(Longitudinal Redundancy Check) of all characters except the STX
and ETX.
ETX (03h)
End of text
EOT (04h)
End of transmission
Operation and Service Manual MTX06-OM072.0E
April 2006
Communication protocols
XRV
7.5.4
Command flow
Format 1
ECR
Scale
Comments
Possible errors
ACK (06h)
Data available
NAK - no acknowledgement
Data request
NAK - no acknowledgement
ENQ (05h)
DC1 (11h)
SOH STX STA SIGN W4W3.W2W1W0 kg BCC ETX EOT Transmitted data
Format 2
ECR
Scale
Comments
Possible errors
ACK (06h)
Data available
NAK - no acknowledgement
Data request
NAK - no acknowledgement
ENQ (05h)
DC2 (11h)
SOH STX P6P5P4P3P2.P1P0 BCC ETX STX STA SIGN Transmitted data
W4W3.W2W1W0 kg BCC ETX STX U6U5U4U3U2.U1U0
BCC ETX EOT
Note
Spaces depicted in the descriptions above are only used for ease of reading.
Operation and Service Manual MTX06-OM072.0E
April 2006
41
Communication protocols
7.6
7.6.1
XRV
ICL/Fujitsu
Data format
• 9600 Baud (select 2400, 4800, 9600)
• 7 data bits (select 7 or 8)
• Even parity (select Even, None or Odd parity)
• 1 stop bit (select 1 or 2 stop bit)
7.6.2
Handshaking
PC DB25 serial port connector:
Jumper 4 to 5, and 6, 8 & 20 together
PC DB9 serial port connector:
Jumper 4 to 6, and 7 to 8 together
7.6.3
Command descriptions
Command
Comments
ENQ (05h)
Starts the communication sequence
ACK (06h)
Data available
CAN (18h)
Repeat weighing
NAK (15h)
No acknowledgement
NUL (00h)
No data available
DC1 (11h)
Data request
STX (02h)
Start of text
ID
Information byte, broken into the following bits
Bit
2
0
0
0
Capacity
1
0
1
1
0
1
0
1
15 kg x 0.005 kg
30 lb x 0.01 kg
6 kg x 0.002 kg
Bit 3 - Logic 1
Bit 4 - Logic 1 means under/over range
Bit 5 - Logic 1
Bit 6 - Logic 1 indicates non-AVR
VR capacities
Weight
42
5 bytes with MSD first. If the scale registers underweight or
overweight, a data string with data of zero (00) will be transmitted
with bit 4 (X) of the ID bit set to 1. In cases where MSD or LSD are
not required, a "Nul" character will be transmitted in the unused
position.
Operation and Service Manual MTX06-OM072.0E
April 2006
Communication protocols
XRV
7.6.4
Command
Comments
BCC
Block Check Character calculated as the even column parity
(Longitudinal Redundancy Check) of all characters except the STX
and ETX.
ETX (03h)
End of text
CR (0dh)
Data received and compared correctly
Command flow
ECR
Scale
Comments
Possible errors
ENQ (05h)
ACK (06h)
Data available
CAN - repeat weighing
NAK - no acknowledgement
NUL - no data available
Data Request
NAK - no acknowledgement
DC1 (00h)
STX ID W5W4W3W2W1
BCC ETX
STX ID W5W4W3W2W1
BCC ETX
Transmitted Data
Confirm Data
CR (0dh)
ACK - Data not confirmed
NAK - receive error or scale
error detected
Data confirmed
CAN response to ENQ is
activated until current
transaction is cleared
Notes
• The POS can request and receive additional weight data from the scale before
returning the verification weight. However, the verification weight must equal the
last weight sent by the scale.
• Spaces depicted in the table above are only used for ease of reading. No space
characters are used unless the BCC result yields the space character.
Operation and Service Manual MTX06-OM072.0E
April 2006
43
Appendix
8
XRV
Appendix
8.1
Error messages
Error Code
Fault
Remedy
E10
Transmission error
➜ Reset scale
E11
RAM error
➜ Call METTLER TOLEDO Xpress service
E16
ROM error
➜ Call METTLER TOLEDO Xpress service
E18
EEPROM error
➜ Call METTLER TOLEDO Xpress service
Weight display:
Underload, i.e. weight below zero limit
➜ Set the scale to zero
➜ Load scale
➜ Switch scale off and then on again
➜ If message is still on, call METTLER
TOLEDO Xpress service
Weight display:
Overlaod
➜ Decrease load
➜ Switch scale off and then on again
➜ If message is still on, call METTLER
TOLEDO Xpress service
Price display:
Price > 9999.99
➜ Decrease load
➜ Switch scale off and then on again
➜ If message is still on, call METTLER
TOLEDO Xpress service
44
Operation and Service Manual MTX06-OM072.0E
April 2006
Appendix
XRV
8.2
8.2.1
Technical data
General technical data
Basic functions
• Tare, Zero
Communication
• RS-232 interface
Display
• LCD with 13.5 mm high characters and backlighting
• 5 characters for weight
• Base mount display (with rounded platform)
Keyboard
• 2 keys
• Tactile and tone feedback upon pressing the key
Enclosure
• Plastic top and bottom covers
• Die-casting spiders
Platform
• Stainless steel
Power consumption
• Approx. 18 mA without backlighting
• Approx. 50 mA with backlighting
Power supply
• External 9 VDC / 500 mA power supply (120 VAC, 60 Hz, 23 W)
Operating conditions
• –10 °C ... +40 °C / 14 °F ... 104 °F
• Relative humidity 10 % ... 85 %, non-condensing
Options
• Remote display bracket
• Dual display
Setup function
• 1 sealable setup and calibration software switch
Storage temperature
• –25 °C ... +50 °C / –13 °F ... 122 °F
• Relative humidity 10 % ... 85 %, non-condensing
(Shipping) weight
• Gross weight: 5.6 kg (12.3 lb)
• Net weight: 4.5 kg (9.9 lb)
Weights & measures
approvals
• OIML 3000e: Certificate N°R76/1992-NL 1-03.21
• T6294 EC Type approval certificate
• NTEP 3000: Certificate of Conformance Number 04-037
Operation and Service Manual MTX06-OM072.0E
April 2006
45
Appendix
XRV
Dimensions
Dimensions in mm
127
27
108
145
137
VIVA
VIVA
424
267
25
41
ø92
114
55
280
316
46
Operation and Service Manual MTX06-OM072.0E
April 2006
Appendix
XRV
8.2.2
8.3
Weighing data
Capacity
6 kg
15 lb
15 kg
30 lb
Verified resolution
0.002 kg
0.005 lb
0.005 kg
0.01 lb
Display resolution
0.002 kg
0.005 lb
0.005 kg
0.01 lb
Communication cable
A null modem cable is required when connecting the XRV scale to a PC or a standard
RS-232 port.
PC DB9-M
XRV DB9-F
Pin#
Function
Description
Pin#
Function
Description
2
RxD
Receive Data
2
TxD
Transmit Data
3
TxD
Transmit Data
3
RxD
Receive Data
5
SGnd
Signal Ground
5
SGnd
Signal Ground
8.4
ASCII table
hex
dec
ASCII
US
hex
dec
ASCII
US
hex
dec
ASCII
US
hex
dec
ASCII
US
hex
dec
ASCII
US
20
21
22
23
24
25
26
27
28
29
2A
2B
2C
2D
2E
2F
30
31
32
32
33
34
35
36
37
38
39
40
41
42
43
44
45
46
47
48
49
50
SP
!
"
#
$
%
&
´
(
)
*
+
,
.
/
0
1
2
33
34
35
36
37
38
39
3A
3B
3C
3D
3E
3F
40
41
42
43
44
45
51
52
53
54
55
56
57
58
59
60
61
62
63
64
65
66
67
68
69
3
4
5
6
7
8
9
:
;
<
=
>
?
@
A
B
C
D
E
46
47
48
49
4A
4B
4C
4D
4E
4F
50
51
52
53
54
55
56
57
58
70
71
72
73
74
75
76
77
78
79
80
81
82
83
84
85
86
87
88
F
G
H
I
J
K
L
M
N
O
P
Q
R
S
T
U
V
W
X
59
5A
5B
5C
5D
5E
5F
60
61
62
63
64
65
66
67
68
69
6A
6B
89
90
91
92
93
94
95
96
97
98
99
100
101
102
103
104
105
106
107
Y
Z
[
\
]
^
_
‘
a
b
c
d
e
f
g
h
i
j
k
6C
6D
6E
6F
70
71
72
73
74
75
76
77
78
79
7A
7B
7C
7D
7E
108
109
110
111
112
113
114
115
116
117
118
119
120
121
122
123
124
125
126
l
m
n
o
p
q
r
s
t
u
v
w
x
y
z
{
|
}
~
Operation and Service Manual MTX06-OM072.0E
April 2006
47
Appendix
XRV
8.5
FCC notice
This device complies with Part 15 of the FCC Rules and the Radio Interference
Requirements of the Canadian Department of Communications. Operation is subject
to the following conditions:
• This device may not cause harmful interference, and
• This device must accept any interference received, including interference that may
cause undesired operation.
WARNING
This equipment generates, uses and can radiate radio frequency energy and if not
installed and used properly, i.e., in accordance with the user manual, may cause
harmful interference to radio communications. It has been tested and found to comply with the limits for a Class A digital device, pursuant to Part 15 of the FCC Rules.
These limits are designed to provide reasonable protection against harmful interference when the equipment is operated in a commercial environment. Operation of
this equipment in a residential area is likely to cause harmful interference to radio
communications in which case the user will be required to correct the interference at
his or her own expense.
8.6
Notes on Weights & Measures
The METTLER TOLEDO Xpress XRV checkout scale meets the requirements of the
National Institute of Standards and Technology, Handbook 44.
Local Weights and Measures authorities may have regulations regarding the use of
weighing devices in commercial applications. In all cases, Weights and Measures
require that a scale be approved and sealed prior to commercial use.
Contact your local Weights and Measures authorities prior to use.
48
Operation and Service Manual MTX06-OM072.0E
April 2006
*MTX06-OM0*MT00*
MTX06-OM072.0E
Subject to technical changes © Mettler Toledo (Chang Zhou) Scale and Systems Ltd. April 2006 Printed in China MTX06-OM072.0E
Xpress
Mettler-Toledo, Inc.
1150 Dearborn Drive
Worthington, OH 43085
http://www.mt.com/xpress
[email protected]