1
LaserWriter II NT User’s Manual
__________________________________________________________________
Chapter 1: Setting Up
__________________________________________________________________
Do you have what you need?
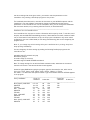
In addition to this manual, the accessory kit inside the LaserWriter II shipping carton should
contain the LaserWriter II Installation Disk, the LaserWriter IInt/ntx Fonts Disk, a product
registra-tion card, and a power cord. You should also find
a U.S. letter-size paper cassette (for 110V printers)
an A-4 paper cassette (for 220V printers)
a cassette top with sliding guides for manual feed
You should also have obtained a toner cartridge from your authorized Apple dealer
If you’re connecting to a Macintosh, Apple IIgs, or Apple IIe computer, you’ll need a LocalTalk™
Locking Connector Kit to connect the printer to a LocalTalk cable system. For the Apple IIe
connection, you’ll also need an Apple II Workstation Card.
You can connect the LaserWriter II to an IBM PC or compatible computer either serially or via
LocalTalk. Your authorized Apple dealer can supply the appropriate serial connectors.
Your Apple dealer has already installed the LaserWriter II controller board. For this reason the
shipping carton has been opened, and the protective plastic bag around the printer has either
been removed or is no longer sealed. All the packing material should have been replaced,
however.
___________________________________________________________
Choosing a place for the LaserWriter II
Before you set up, choose a work area that’s efficient for you and that meets the physical
requirements of the printer.
The LaserWriter II runs on ordinary household current. If you haven’t experienced electrical
problems, such as lights flickering when you use a photocopier or turn on an air conditioner,
your electrical service is probably adequate.
Choose a well-ventilated area away from direct sunlight and ob-vious sources of heat, cold, or
humidity. The temperature should be between 50 and 90 degrees Fahrenheit (10 and 32
degrees Celsius) and the relative humidity between 20 and 80 percent.
Don’t use devices that produce open flames, such as Bunsen burners or welding torches, near
the LaserWriter II. Don’t use ammonia-based cleaners, which can react chemically with the
toner, on or around the LaserWriter II.
Choose a flat, stable surface for the printer. Be sure to leave adequate room to load and unload
the paper cassette and to open the face-up tray.
___________________________________________________________
Setting up the LaserWriter II to prepare it for printing is simple and straightforward.
___________________________________________________________
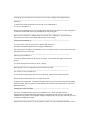
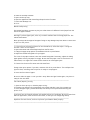
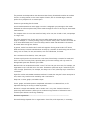
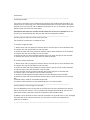
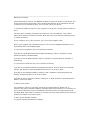
Unpacking
1. Remove the packing material from the top of the LaserWriter II.
2. Lift the LaserWriter II.
Reach into the shipping carton. Get a good grip on the base of the printer, lift it out, and place it
on the work surface with the front (the Apple logo side) facing out.
___________________________________________________________
Warning-The LaserWriter II weighs about 45 pounds (20.5 kilograms). To prevent back
injury, bend your knees when lifting, and get help if you need it.
___________________________________________________________
Lifting the LaserWriter II
3. If the printer is still in its protective plastic bag, remove it.
4. Remove the packing material from the paper cassette slot.
The safest way to transport the LaserWriter II is in its original carton, so store the box and the
packing material for future use.
___________________________________________________________
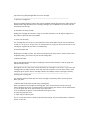
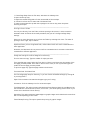
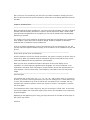
Opening the LaserWriter II
1. Press the release button on the top of the printer. This releases the upper section of the
printer.
2. Lift the top up and to the left as far as it will go.
___________________________________________________________
Warning-Don’t touch the exposed electrical contacts or gears.
___________________________________________________________
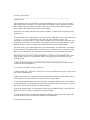
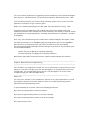
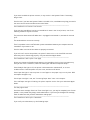
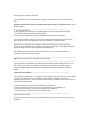
The interior of the LaserWriter II
3. Peel off the filament tape and remove the packing material from inside the printer.
Removing the packing material from inside the printer
4. Remove the orange tabs. Toward the left side of the unit you’ll see two orange tabs extending
back from either side of a green felt cover. Remove the tabs and store them with the rest of the
packing material.
___________________________________________________________
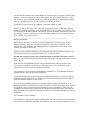
Installing the toner cartridge
The toner cartridge contains the printer’s powdered "ink." Each cartridge lasts for
approximately four thousand pages, depending on the kind of printing you do. If you use the
LaserWriter II to produce a lot of graphic images, as opposed to text, you may find that you need
to change cartridges more often.
___________________________________________________________
Important-Follow the steps for this procedure in order. For more detailed information, refer to
the instruction guide packaged with the toner cartridge.
___________________________________________________________
1. Open the cartridge box.
Open the cartridge shipping carton, take out the wrapped cleaning pad, and put it aside. Open the
sealed metallic bag and remove the cartridge, holding it by the indentation at its wide end (the
end without the writing).
2. Distribute the toner powder.
Holding the cartridge horizontally, slowly rock it back and forth to a 45-degree angle four or
five times to distribute the toner powder.
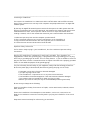
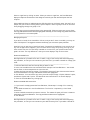
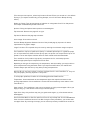
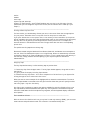
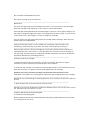
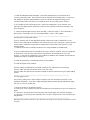
3. Insert the cartridge.
The cartridge fits into the slot on the underside of the raised upper section of the LaserWriter
II. Slide it in as far as it will go. Insert it narrow end first, using the directional arrows on the
cartridge as a guide. Be sure that it is seated firmly.
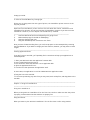
4. Loosen the tape tab.
Holding the cartridge in place, flex the black tab gently but firmly until it loosens. Don’t tear it
completely away; you’ll need it to pull out the sealing tape.
5. Remove the tape.
Pull the tab outward until the tape is completely removed. If the tab does come off, grasp the
tape itself and pull out.
___________________________________________________________
Warning-Be sure to remove the sealing tape with the cartridge in the printer. If you insert the
cartridge with the tape removed, toner may spill into the printer. For the same reason, avoid
transporting the printer with a cartridge installed, and always remove cartridges carefully.
___________________________________________________________
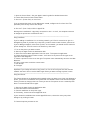
Installing the cleaning pad
The cleaning pad that comes with the toner cartridge continuously cleans the fixing rollers
while you print.
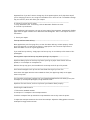
1. Remove the felt tip from the end of the cleaning pad.
When you change the cartridge and cleaning pad, you’ll use the felt tip to clean the fixing
rollers. Because the printer is new and doesn’t need cleaning, just remove the tip and discard it.
2. Lift the green felt cover that protects the fixing rollers.
3. Fit the pad into the groove on the underside of the green cover.
4. Close the green felt cover.
5. Check the print density dial.
This is a convenient time to check the print density setting. The print density dial is inside the
printer on the left.
The dial should be set to 5. Position it there if necessary. (You’ll use this dial later if your
prints are too light or too dark.)
6. Close the printer.
Lower the top gently, pushing in its center to close. You’ll hear a click when it’s secure.
___________________________________________________________
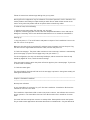
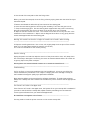
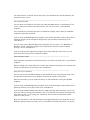
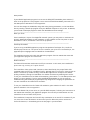
Loading the paper cassette
The 110V LaserWriter II comes with one U.S. letter-size paper cassette. The 220V
LaserWriter II comes with one A-4 paper cassette. You can order additional letter-size, as well
as legal-size, international-size, or envelope cassettes, from your authorized Apple dealer.
1. Remove the packing material from the cassette.
Peel the filament tape off the cassette, take the top off, and remove the packing material.
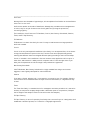
2. Prepare a stack of paper for insertion.
You can load up to 200 sheets of 20-pound photocopier or typewriter paper. Even the edges on
all sides before inserting.
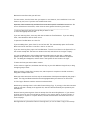
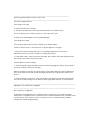
3. With the rear of the cassette toward you, slide the stack into the cassette from the right.
The rear of the cassette is wider and solid. The front is narrower and has a cutaway.
4. Slide the paper beneath the clip at the left front of the cassette.
Push the paper down if necessary, but don’t overload the cassette.
Load three-hole paper with the holes toward the front (the Apple logo side) of the printer. Use
the directional arrows on the cassette as a guide.
Load letterhead paper face up, with the letterhead toward the front of the cassette.
You can expect excellent printing results if you use photocopier paper or most standard
typewriter stocks.
___________________________________________________________
Installing the manual feed guide
The top of the paper cassette is also the manual feed guide.
1. Align the sliding paper guides on the manual feed guide with the cassette.
2. Position the manual feed guide in the slots on the paper cassette.
___________________________________________________________
Installing the paper cassette
1. Slide the front of the cassette into the slot on the right side of the LaserWriter II.
2. Push the cassette in until it locks into place.
___________________________________________________________
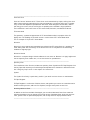
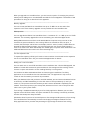
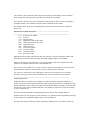
Connecting to a Macintosh
You connect the LaserWriter II to a Macintosh with LocalTalk cables and LocalTalk connector
boxes. These connectors are one way to link computers and peripheral devices in an AppleTalk
network system.
By the way: An AppleTalk network system consists of three parts: the cable system that links
devices; the software, built into every Macintosh, that supports the network; and services that
networked devices share, such as printers and file servers. For more information about
creating a network, refer to the manual that came with your LocalTalk cables and connectors.
1. Make sure both the printer and the computer are switched off.
2. Plug a LocalTalk connector box into the LocalTalk port on the LaserWriter II.
3. Plug a second LocalTalk connector box into the printer port on the Macintosh.
4. Connect the two connector boxes with a LocalTalk cable.
___________________________________________________________
Important safety instructions
You’re almost ready to plug in your LaserWriter II, but first read these important safety
instructions.
__________________________________________________________________
Warning-This equipment is intended to be electrically grounded. The LaserWriter II is
equipped with a three-wire grounding plug—a plug that has a third (grounding) pin. This plug
will fit only a grounding-type AC outlet. This is a safety feature. If you are unable to insert the
plug into the outlet, contact a licensed electrician to replace the outlet with a properly grounded
outlet. Do not defeat the purpose of the grounding plug!
__________________________________________________________________
For your own safety and the safety of your equipment, always take the following precautions.
Be sure the power plug is disconnected (disconnect by pulling the plug, not the cord):
if the power cord or plug is frayed or otherwise damaged
if you spill anything into the case
if the LaserWriter II is exposed to rain or any other excess moisture
if the LaserWriter II has been dropped or if the case has been otherwise damaged
if you suspect that the LaserWriter II needs servicing or repair
whenever you clean the case (use only the recommended procedure given below)
Be sure that you always do the following:
Keep the LaserWriter II away from sources of liquids, such as wash basins, bathtubs, shower
stalls, and so on.
Protect the LaserWriter II from dampness or wet weather, such as rain, snow, and so on.
Read all the installation instructions carefully before you plug the LaserWriter II into a wall
socket.
Keep these instructions handy for reference by you and others.
Follow all instructions and warnings dealing with your system.
__________________________________________________________________
Warning-Electrical equipment may be hazardous if misused. Operation of the LaserWriter II or
similar products must always be supervised by an adult. Do not allow children access to the
interior of any electrical product and do not permit them to handle any cables.
__________________________________________________________________
To clean the case, do the following:
1. Disconnect the power plug. (Pull the plug, not the cord.)
2. Wipe the surfaces lightly with a clean, soft cloth dampened with water. Use a mild soap or
detergent if necessary. Do not use ammonia-based cleaners on or around the LaserWriter II.
___________________________________________________________
Starting up
1. Plug the printer in. The on/off switch and power cord port of the LaserWriter II are on the
left rear corner of the printer.
Make sure that the printer is switched off, and then insert the power cord into the port. Plug
the other end into a grounded three-hole AC outlet, and turn the printer on.
2. Check the test page. The printer takes a minute or two to warm up, and then it automatically
prints a test page. (It prints the test page every time you restart it.)
For this configuration, the top icon should say PostScript, and the second icon from the top
should say AppleTalk. If not, check the switch settings.
If the test page is spotty, switch the printer off and on again to print a second page. Try this two
or three times if necessary.
3. Check the status lights
The green Ready/In Use light will flash until the test page is printed. It then glows steadily. All
other lights should be off.
__________________________________________________________________
Chapter 2: Software Installation
__________________________________________________________________
About printer software
In your LaserWriter II accessory kit you’ll find the LaserWriter II Installation Disk and the
LaserWriter IInt/ntx Fonts Disk.
The LaserWriter II Installation Disk contains the printer resource, the software that controls
printer operation. The LaserWriter IInt/ntx Fonts Disk contains the LaserWriter II screen
fonts.
You install the fonts and printer resource on startup disks. Startup disks contain the System
file you need to start applications and create documents on the Macintosh. See your Macintosh
owner’s guide if you have any questions about creating a startup disk.
___________________________________________________________
Important-Be sure to make copies of the LaserWriter II Installation Disk and the LaserWriter
IInt/ntx Fonts Disk to use in the installation process. Store the originals in a safe place. Your
Macintosh owner’s guide has instructions on copying disks.
___________________________________________________________
Installing the printer resource
You can install the printer resource on as many startup disks as you need. It’s a good idea to
update all disks at the same time, to avoid having some disks with outdated software. If you’re
installing on a hard disk, you’ll follow the same procedure, but you should have to do it only
once.
___________________________________________________________
Important-Your startup disks should all contain the latest available version of the Macintosh
system software. To verify that you have the most recent version, or to update software,
contact your authorized Apple dealer.
___________________________________________________________
1. Start the Macintosh with a startup disk.
2. Insert the LaserWriter II Installation Disk and open the disk icon.
Select the icon and choose Open from the File menu, or double-click the icon.
You’ll use the LaserWriter icon along with the Laser Prep icon to install the printer resource
for both the LaserWriter IInt and the LaserWriter IIntx. The Font/DA Mover and the Namer are
discussed later in this chapter. The TeachText and Read Me icons open files containing
supplemental information. You can disregard the LaserWriter IIsc icon.
3. Drag the LaserWriter and Laser Prep icons to the startup disk icon. See your Macintosh
owner’s guide if you need information about dragging icons from one disk to another.
4. Open the startup disk icon. You’ll see the LaserWriter and Laser Prep icons on the desktop.
5. Drag the LaserWriter and Laser Prep icons to the System Folder. This completes the
installation procedure. You can now repeat it with another startup disk or proceed to install
fonts.
___________________________________________________________
Naming the LaserWriter II
If your AppleTalk network system includes more than one LaserWriter II, you’ll find it
convenient to give each one a distinguishing name. These names appear in the Chooser desk
accessory whenever you choose LaserWriter II as the printer type.
1. Start the Macintosh with a startup disk.
2. Insert the LaserWriter II Installation Disk.
3. Open the Namer. You’ll see the LaserWriter II listed (as LaserWriter IInt or IIntx) in the
Namer dialog box.
4. Select the name LaserWriter IInt or IIntx.
5. Type in the new name, and click Rename.
You can use this procedure to name (or rename) all LaserWriter II printers on the network. Be
sure to tell everyone who uses the network what the new names are, so that they can find the
printers in the Chooser.
___________________________________________________________
Installing fonts
The LaserWriter IInt/ntx Fonts Disk contains the LaserWriter II font file. The file includes
eight widely used font families—ITC Avant Garde, ITC Bookman, Courier, Helvetica, Helvetica
Narrow, New Century Schoolbook, Palatino, and Times—as well as three special-purpose
fonts—Symbol, ITC Zapf Chancery, and ITC Zapf Dingbats.
These fonts are already installed in the printer’s memory, so what you’ll be installing are the
screen fonts.
You install these fonts in the System file on each of your startup disks. The font file contains the
9-, 10-, 12-, 14-, 18-, and 24-point sizes, but you aren’t limited to these. The
LaserWriter II can scale fonts in a range of sizes limited only by its resolution and by the size
of the paper, with no loss of print quality. The installed screen fonts do produce better screen
displays, as well as better line spacing in the printed output with some applications.
You install fonts on your startup disks using the Font/DA Mover. This application is contained
on the LaserWriter II Installation Disk. The easiest way to install fonts is to copy the Font/DA
Mover to your startup disk. The instructions below assume that you follow this procedure.
___________________________________________________________
Warning-Use only the version of the Font/DA Mover contained on the installation disk. If you
have an earlier version on a startup disk, replace it by copying the new version from the
installation disk.
___________________________________________________________
1. Start the Macintosh with a startup disk that includes the LaserWriter II printer resource
and the current Font/DA Mover.
2. Insert the LaserWriter IInt/ntx Fonts Disk.
3. Open the disk icon. You’ll see a "suitcase" icon for the LaserWriter II font file, as well as the
icon for the Font/DA Mover.
4. Open the font file icon. Opening the font file automatically opens the Font/DA Mover. All the
fonts in that file are listed on the left, and the list on the right is blank.
5. Click the Open button below the list on the right. A dialog box appears with a list of folders
on the startup disk. You should see the name of the startup disk in top-right corner. If you see
the name of the fonts disk instead, click the Drive button.
6. Open the System Folder. The System file (rather than the System Folder) is now listed. The
fonts are in this file, which is contained in the System Folder.
7. Open the System file. The dialog box disappears, and the fonts currently in the System file
are now listed in the column on the right side of the Font/DA Mover.
8. Select the fonts you want.
Select a single font by clicking its name. When you select a single font, the Font/DA Mover
displays a sample at the bottom of the dialog box and tells you how much disk space the font
occupies.
Select additional fonts by holding down the Shift key while you click each name. You won’t see a
sample, but you will see a running total of space required. Select a group of fonts or the entire
file by dragging through the group or file.
9. Click Copy to copy the selected fonts to the startup disk. When you select one or more fonts,
the Copy and Remove buttons become highlighted and ready to use. Clicking Copy adds these fonts
to the System file on the startup disk.
___________________________________________________________
Managing disk space
If you wish to install all the LaserWriter II fonts, and you don’t have a hard disk, you may run
short of disk space. The suggestions below should help you solve most space problems.
Install only one or two sizes of each font family. Because the LaserWriter II can scale fonts to
any size an appli-cation supports, you’ll still have the full range for printing. As long as you
have at least one size of a font family installed as a screen font, your printed results will be
good in all sizes. The only difference is that your screen displays may not be as clear.
Remove unneeded fonts.
___________________________________________________________
Warning-Removal is permanent. Be sure to make a copy of the startup disk before beginning
this procedure, so that you can reconstruct your font files if you make a mistake or change your
mind.
___________________________________________________________
1. Start the Macintosh with the startup disk you want to alter.
2. Insert the LaserWriter IInt/ntx Installation Disk and open the Font/DA Mover. You should
see the fonts on the startup disk in the list on the left.
3. Select the fonts you want to remove. The amount of space you’ll save is shown at the bottom
of the Font/DA Mover. The Copy and Remove buttons are highlighted.
4. Click Remove. You can remove any fonts you wish except Chicago 12-point, Monaco 9-point,
and Geneva 9-point and 12-point. The Macintosh uses these fonts for its screen displays.
5. Close the Font/DA Mover by clicking Quit.
Remove unneeded desk accessories.
1. If you haven’t already opened the Font/DA Mover, follow steps 1 through 3 for removing
fonts.
2. Click Desk Accessories in the Font/DA Mover. The font list is replaced by a list of desk
accessories.
3. Select the desk accessories you want to remove. The amount of space you’ll save is shown at
the bottom of the Font/DA Mover. The Copy and Remove buttons are highlighted.
4. Click Remove.
___________________________________________________________
Warning-Removal is permanent. Be sure to make a copy of the startup disk before beginning
this procedure, so that you can reconstruct your desk accessory files if you make a mistake or
change your mind.
___________________________________________________________
5. Close the Font/DA Mover by clicking Quit.
Unless you are using more than one type of printer, the LaserWriter printer resource is the
only one you need.
___________________________________________________________
Important-The LaserWriter printer resource will also work with earlier LaserWriter and
LaserWriter Plus printers. You do not need the old LaserWriter resource if you have the new
LaserWriter resource (its icon depicts the LaserWriter II) installed.
___________________________________________________________
1.
Start the Macintosh with the startup disk you’re going to use.
2.
Make a backup copy of the disk for safekeeping.
3.
Open the System Folder icon.
4.
Drag the unneeded printer resources to the Trash.
Once you have finished installing fonts, you can free up space on the startup disk by removing
the Font/DA Mover. If you want to change your font selection, however, you may have to install
it again.
___________________________________________________________
Creating application disks
If you don’t have a hard disk, you’ll probably find it convenient to keep your applications on
nonstartup disks.
1.
2.
3.
4.
5.
Start your Macintosh with the application’s master disk.
Insert a blank disk and initialize it.
Give the disk a name that identifies it as an application disk.
Open the application disk’s icon.
Find the icon that represents the application itself.
In most cases, the application icon will be labeled with the application name.
6. Drag the icon to the new disk.
7. Find icons representing any other files you may need, such as help files, and drag them to the
new disk.
__________________________________________________________________
Chapter 3: Using the LaserWriter II
__________________________________________________________________
Using the LaserWriter II
Before printing with the LaserWriter II for the first time, check to make sure that the printer
is properly connected and that the switches are properly set.
___________________________________________________________
Using the Chooser
When you want to print with the LaserWriter II for the first time or after using another
printer, you have to use the Chooser. You can do so either directly from the desktop or after
opening a document. The following directions assume that you are starting from the desktop.
With most applications, the basic procedure is the same if you have a document open, except
that you will usually be directed to choose Page Setup after closing the Chooser.
1. Start the Macintosh with a startup disk that includes the LaserWriter II printer resource.
2. Choose Chooser from the Apple menu.
You’ll see an icon representing the LaserWriter II, as well as icons for any other printer
resources on the current startup disk.
3. Click the LaserWriter II icon.
4. If necessary, activate the AppleTalk software.
If the AppleTalk software is not activated, you’ll see a dialog box that asks you if you want to
activate it. Click OK.
A few seconds later, you’ll see your LaserWriter II listed by the name you gave it.
5. Click the appropriate name in the printer list.
6. Type your name in the space after User Name.
Your name will automatically appear in the Chooser from now on, unless you change startup
disks.
7. Close the Chooser.
___________________________________________________________
Automatic feed printing
You’ll need a startup disk that includes the LaserWriter II printer resource and the appropriate
fonts, along with an application disk. The document to be printed can be on either disk.
1. Start the Macintosh with the startup disk.
2. Insert the application disk.
3. Open the document you want to print.
4. If necessary, choose Page Setup from the File menu.
Choose Page Setup for either of the following reasons:
You’re changing printers or are using the LaserWriter II for the first time.
You’re changing paper sizes, amount of reduction or en-largement, or page orientation. See
"About Page Setup" later in this chapter for more information. (This example presumes that
you are not going to change the preset options.
5. Click OK or press Return.
This confirms the preset options.
___________________________________________________________
Important-Even if you don’t want to change any of the preset options, don’t skip these steps if
you’re changing printers or are using the LaserWriter II for the first time. The default settings
may be incorrect, which will affect your output.
___________________________________________________________
6. Choose Print from the File menu.
7. Verify Automatic Feed. If necessary, click the Automatic Feed box to reset.
8. Click OK or press Return.
The LaserWriter II will now print one copy of every page of the document, automatically feeding
paper from the paper cassette. See "About the Print Dialog Box" later in this chapter for more
information.
9. Check your output.
___________________________________________________________
Face-up and face-down delivery
Most applications print first page first, so that face-down delivery collates properly. Some
print first page last, so that face-up delivery is appropriate. You’ll need to experiment to
determine which is true for a given application.
If you need face-up delivery, simply open the face-up tray. It can hold up to 20 sheets of 20pound paper.
___________________________________________________________
Warning-Never open the face-up tray when printing is in progress.
___________________________________________________________
Important-Always open the face-up tray before printing on paper stock heavier than 20
pounds, or on envelopes or transparencies.
With the face-up tray open, the LaserWriter II can accept stock of up to 36 pounds.
___________________________________________________________
Insert letterhead paper face up with the letterhead entering the printer first.
Insert three-hole paper with the holes toward the front (the Apple logo side) as the paper
enters the printer.
___________________________________________________________
You can obtain an envelope cassette from your authorized Apple dealer that allows you to print
envelopes (or envelope-shaped paper) using automatic feed.
___________________________________________________________
Important-For best results, be sure to position your address block properly.
___________________________________________________________
Positioning the address block
1. Take out the standard cassette.
2. Load up to 15 envelopes in the envelope cassette.
Stack the envelopes face up and with the top toward the rear as they enter the printer.
3. Adjust the envelope cassette to the size of the envelope. Adjust the sliding guides so that the
envelopes fit snugly but do not bow.
4. Insert the envelope cassette.
5. Open the face-up tray.
6. Open the application and choose Page Setup from the File menu.
7. Select the sideways icon.
8. Print.
___________________________________________________________
Manual feed printing
Use manual feed when you want to print just a few sheets of a different kind of paper from the
kind in the paper cassette.
___________________________________________________________
Warning-To prevent paper jams, never try to load a cassette with the wrong paper size. Use
manual feed instead.
Never print beyond the edges of the paper. Doing so may damage the printer drum or cause toner
to spill into the printer.
___________________________________________________________
1. If you have not set up the Chooser for the LaserWriter II, follow the steps in "Using the
Chooser" earlier in this chapter.
2. Open a document and choose Page Setup from the File menu.
3. Change the page setup options as needed and click OK or press Return.
4. Adjust the manual feed guide to fit your paper.
The cover of the paper cassette is also the manual feed guide. If necessary, adjust the sliding
paper guides so that your paper fits snugly. Be sure that the paper is not so loose that it can
slide around, or so tight that it bows. Either situation can cause paper jams.
5. Choose Print from the File menu and click Hand Feed.
Change other print options if you wish, and then click OK or press Return. The red Paper Out
light will flash, indicating that the printer is ready to accept paper.
6. Insert the first sheet of paper.
Be sure to slide the paper in until you feel it stop. When the light flashes again, the printer is
ready for the next sheet.
___________________________________________________________
Two-sided (duplex) printing
1. Open the face-up tray to minimize paper curling.
2. Following the directions for manual feed, print a page and take it out of the output tray.
3. Insert the paper again, printed side down, with the top of the printed side entering the
printer first.
___________________________________________________________
If you don’t have an envelope cassette, use manual feed to print envelopes. Be sure to start from
within an application, rather than from the Finder, so that you can change Page Setup.
___________________________________________________________
Important-For best results, be sure to position your address block properly.
___________________________________________________________
1. Choose Page Setup from the File menu, and select the sideways icon.
2. Open the face-up tray.
3. Adjust the manual feed guide to fit the narrow width of the envelope.
4. Choose Print from the File menu and click Manual Feed.
5. Insert the envelopes face up with the top edge to the rear as they enter the printer.
Inserting envelopes
___________________________________________________________
Printing from the Finder
You can print directly from the Finder, without opening a docu-ment, in either manual or
automatic mode. You follow all the same procedures, but you can’t change the Page Setup
settings.
Select one or more documents to print from the Finder by selecting their icons. The order of
printing is left to right, top to bottom.
___________________________________________________________
Important-Unless you are using MultiFinder, all documents must have been created with the
same application.
Otherwise, the Macintosh will not process the Print command when it encounters a document
created with a different application.
___________________________________________________________
Change the settings in the Print dialog box as necessary.
For more than one copy: Type the number of copies you want.
For a specified page range: Select the From box by clicking it, and then type the number of the
first page you want printed. Press Tab to move to the To box (or click it), and then type the
number of the last page you want printed.
To print one page only: Type that page number in both boxes.
For manual feed: Click Hand Feed.
___________________________________________________________
You can change page setup as necessary, or you can confirm the default settings by clicking OK
or pressing Return.
Paper: Click the button that matches the paper type you’re using.
Orientation: Click the sideways icon for horizontal output.
Font Substitution: This option converts the Macintosh fonts Geneva, New York, and Monaco into
the LaserWriter II fonts Helvetica,Times, and Courier. (The word spacing will be better if you
choose the LaserWriter II fonts directly.
Smoothing: This option minimizes jagged edges on graphic images and on Macintosh screen fonts
with no corresponding printer fonts.
Faster Bitmap Printing: This option speeds the printing of graphic images.
(The three previous options, collectively known as Printer Effects, are turned on in the default
setting. If you experience difficulty printing bitmaps, turn off the Faster Bitmap Printing
effect.)
Reduce or Enlarge: Type any percentage of reduction or enlargement from 25 to 400 percent.
Your output is automatically scaled to that size.
Options: Clicking the Options button presents a new dialog box.
Flip Horizontal: Reverses the page left to right.
Flip Vertical: Reverses the page top to bottom.
Invert Image: Prints white on black.
Precision Bitmap Alignment: Reduces the size of the printed page by 4 percent for better
representation of graphic images.
Larger Print Area: This expands the print area by reducing the minimum margins required.
___________________________________________________________
The LaserWriter II prints at publication quality on standard photocopier or typewriter paper
(l6- to 20-pound stock). With the face-up tray open, the printer can accept stock of up to 36
pounds. You can also expect excellent results on most colored stocks and letterheads.
The LaserWriter II will produce high-quality transparencies for overhead projection.
Medium-weight photocopier transparencies work best.
Depending on the type of transparency, the temperature, and the humidity, you may be able to
print transparencies using automatic feed. If you experience difficulties, use manual feed
instead. Always open the face-up tray when printing transparencies.
___________________________________________________________
Warning-Do not use heat-transfer (thermal) transparencies in the LaserWriter II. They will
not print properly and may separate in the printer.
___________________________________________________________
To avoid paper problems, be aware of the following potential trouble sources:
Temperature. Some letterheads use low-temperature dyes that vaporize and smear at the
printing temperatures of the LaserWriter II. Some slick letterheads may come undone in the
LaserWriter II.
Paper texture. The LaserWriter II may not print sharply on highly textured paper. When you
begin printing, try a few sheets to see how you like the quality.
Paper finish. Very shiny surfaces may not give good results. Again, try a few sheets and see
what happens.
___________________________________________________________
Use the Font/DA Mover to alter the selection of fonts on any startup disk. You can add additional
fonts from the LaserWriter IInt/ntx Fonts Disk. Using the same procedures, you can also add
non-Apple fonts. By reversing the steps, you can remove previously installed fonts as well as
Macintosh screen fonts that you don’t use.
For best results, install all sizes that you expect to use. However, the LaserWriter II can scale
fonts to any size, even if you have not installed those sizes.
___________________________________________________________
Important -Most commercially available fonts come with specific installation instructions. Be
sure to follow those instructions, rather than the more general directions given below.
___________________________________________________________
1. Start the Macintosh with the startup disk you want to alter.
2. Insert the appropriate font disk.
If you are removing fonts, insert any disk that includes the Font/DA Mover. If you are adding
fonts, insert whatever disk the fonts are on.
3. Open the Font/DA Mover or a font file.
If you are adding fonts, open a font file on the font disk. This automatically opens the Font/DA
Mover and lists all the fonts in that file in the list on the left.
If you are removing fonts, open the Font/DA Mover. This will list all fonts in the System file on
the current startup disk. The fonts are shown on the left, and the box on the right is empty.
4. If you are adding fonts, click the Open button beneath the box on the right. A dialog box
appears listing all folders on the startup disk. Open the System Folder and then the System
file. The dialog box disappears, and the fonts in the System file are listed on the right.
5. Select the fonts you want to add or remove.
Click to select a single font; hold down the Shift key as you click additional single fonts; or drag
through a group of fonts.
When you select a single font, its name, size, and the space it occupies on the disk are shown,
along with a sample of the font.
When you select more than one font, only the total amount of disk space occupied by the group is
shown. The Copy and Remove buttons become highlighted when you select one or more fonts.
6. Click Copy or Remove to add or remove the selected fonts.
Add fonts by selecting them in a font disk file and clicking Copy. If you copy a font with the same
name as one that is already in the opposite list, that font will automatically be replaced by the
selected font.
Remove fonts by selecting them from the startup font file and clicking Remove. If you remove
all fonts from a file, the file itself will be removed. You cannot remove 12-point Chicago, 9point Monaco, or 9-point or 12-point Geneva, because the Macintosh uses these fonts for its
screen displays.
___________________________________________________________
Warning-Removal is permanent. Before removing fonts, be sure to make a copy of the startup
disk, so that you can reconstruct your font files if you make a mistake or change your mind.
Also, be sure that the fonts you’ve selected for removal are on the startup disk rather than the
font disk.
__________________________________________________________________
Chapter 4: All About Fonts
__________________________________________________________________
With your Macintosh and a LaserWriter II, you have all the basic hardware you need to produce
finished, publication-quality documents or superior proofs and layouts. What it used to take
paste-up artists and typesetters to accomplish, you can now do yourself. That’s what desktop
publishing is all about.
This chapter covers some essentials of Macintosh typography and introduces the LaserWriter II
fonts. Chapter 5 gives some rules of thumb for design, as well as examples of documents
produced with a LaserWriter IInt and a Macintosh.
If you’re an experienced designer, much of this material will be too elementary for you, but
you may find these chapters valuable anyway, as an introduction to the capabilities of your new
printer.
___________________________________________________________
Screen fonts, printer fonts, and PostScript
All the LaserWriter II fonts are already installed in your printer’s memory as printer fonts or
outline fonts. What you installed using the LaserWriter IInt/ntx Fonts Disk were the screen
fonts that the Macintosh uses to produce the screen displays.
When you click Print, the Macintosh sends a description of the screen display to the
LaserWriter II in the PostScript page-description language. The internal computer in the
LaserWriter II interprets these commands to create bitmaps—dot-by-dot representations of
each character—from its outline fonts. The bitmaps are then used to form the final printed
output.
___________________________________________________________
Sizes and styles
You installed the screen fonts in 9-, 10-, 12-, 14-, 18-, and 24-point sizes (or a selection
of these, if you were conserving disk space), but you can actually print in a much wider range
of sizes. The LaserWriter II can scale an outline font into whatever size is needed. The only
limitations are resolution (below a certain size all parts of a letter "run together"), and the
size of the paper.
You installed the fonts in plain style only, but you can also print in bold, italic, or bold italic.
Just as the computer can create these styles on the screen, the LaserWriter II can create them
for printed output.
Depending on the application you’re using, you may have access to a number of other styles as
well. These may include
underline
outline
shadow
small caps
superscript and subscript
Symbol, ITC Zapf Chancery, and ITC Zapf Dingbats may not print in the full range of styles.
(Sometimes you can change the style on the screen, but the variation won’t show up in your
output.)
___________________________________________________________
Printing without a printer font
For best results, you should always format your text in the screen fonts that are appropriate
for your printer. Otherwise there’s no printer font for the printer to work with.
If you print without the correct printer font in the memory of the LaserWriter II, the printer
will still reproduce the screen font. With the Smoothing option on the results may be quite good,
but they won’t be as good as you would get with the correct printer font. For example, the
sentence below is in the Macintosh screen font Chicago, which does not have a corresponding
printer font.
The quick brown fox jumped over the lazy dog.
Documents created using the Macintosh fonts Geneva, New York, and Monaco are an exception to
this rule. If the Font Substitution option is on in Page Setup, Geneva is automatically converted
to Helvetica, New York to Times, and Monaco to Courier. It’s still a good idea to work directly in
the final font, though, because the word spacing in your output may be too wide with a
substituted font.
___________________________________________________________
Using Key Caps
The Key Caps desk accessory is a fast and easy way to preview fonts.
1. Choose Key Caps from the Apple menu. The Key Caps window appears, along with its title in
the title bar.
2. Type a phrase for display in the Key Caps window.
3. Pull down the Key Caps menu. You’ll see a complete list of all the fonts in your System file.
4. Drag through the list to select each font in turn.
When you want to see an example of the highlighted font, release the mouse button. The text in
the Key Caps window is converted to the font you’ve chosen. Note that you can’t specify the font
size in Key Caps—only the font family.
Key Caps is also a good way to explore the options available for each font. Display a font in the
Key Caps window, and then hold down the Option key. The keyboard is converted to the option
characters. Hold down the Shift and Option keys together, and the keyboard displays a different
set of options.
___________________________________________________________
The LaserWriter II fonts
With the eleven font families built into your printer’s read-only memory (ROM), you can meet
most business and professional needs. The collection is introduced briefly here.
___________________________________________________________
Serif fonts
Although there are thousands of type designs, all Latin alphabet font families can be classified as
either serif or sans serif.
Serifs are the strokes at the ends of letterforms. Although they can add much to the appearance
of a font, they’re not just for decora-tion. Serifs guide the eye along the printed line,
increasing legibility.
The LaserWriter II serif fonts are ITC Bookman, Courier, New Century Schoolbook, Palatino,
Times, and ITC Zapf Chancery.
ITC Bookman
ITC Bookman is a classic font family for text. It’s easy to read because even large quantities
don’t look crowded.
Courier
Courier is the only monospaced LaserWriter II font family. In a monospaced font, all the letters
occupy the same amount of space on the line. The other fonts are all proportionally spaced,
meaning that different letters are assigned different spacing according to their size and shape.
Courier is included in the LaserWriter II font set because some applications will not print in
other fonts, and because it is widely used for computer code. It’s also the right choice if you
want your correspondence to look as though it was produced on a typewriter.
New Century Schoolbook
Like ITC Bookman, New Century Schoolbook is a highly readable font design. As the name
suggests, it was originally developed for school textbooks.
Palatino
If you want a formal, weighty look—in a proposal or an annual re-port, for example—Palatino
is an excellent choice. Patterned after the style of ancient stonecutters, it is dignified but easy
to read.
Times
The Times font family is a standard choice for newspapers and other periodicals. It is attractive
and easy to read, and its compact design makes it ideal when space is at a premium. (Compare
the line length of the sample of Times to that of the other font samples.)
ITC Zapf Chancery
ITC Zapf Chancery is more of a specialty font family than a true serif style. It is designed to look
handwritten instead of printed, so it’s ideal for a calligraphic appearance.
___________________________________________________________
Sans serif fonts
Sans serif means "without serifs." These fonts are characterized by simple, striking lines that
make them particularly appropriate for titles and headings, or wherever large type is needed.
They are also well adapted to spreadsheets and charts. Some designers like the clean, modern
look they give to text, but the serif styles are probably more readable in large quantities.
The LaserWriter II sans serif fonts are ITC Avant Garde, Helvetica, and Helvetica Narrow.
ITC Avant Garde
The geometric, symmetrical appearance of ITC Avant Garde makes it a popular choice for
display text. The headings in this book are set in various sizes of ITC Avant Garde bold.
This is a sample of 12-point ITC Avant Garde.
Helvetica
Helvetica is more compact and somewhat less stylized than ITC Avant Garde. It is probably the
most widely used sans serif design in the world. You’ll see it everywhere from advertising
headlines to highway signs.
Helvetica Narrow
Helvetica is a compact design. Helvetica Narrow is even more so. Because it is highly legible and
has an especially clear number set, it is an ideal choice for spreadsheets.
___________________________________________________________
Specialty fonts
The LaserWriter II font file also includes two specialty fonts: Symbol and ITC Zapf Dingbats. Use
the Key Caps desk accessory to find the keyboard equivalents for characters in both these fonts.
See "Using Key Caps" earlier in this chapter for instructions.
Symbol
The Symbol font family is particularly useful if your work involves science or mathematics.
ITC Zapf Dingbats
ITC Zapf Dingbats is a collection of bullets, boxes, and symbols you can use to create decorative
borders around your text, add icons for emphasis, and give extra punch to text lists.
___________________________________________________________
Obtaining additional fonts
In addition to the fonts available from Apple, you can obtain Macintosh fonts from numerous
software developers. You can choose from a wide variety of alphabet fonts, both Latin and nonLatin, symbol fonts for specialized purposes, and novelty fonts for display and decoration.
___________________________________________________________
Commercial sources, shareware, and freeware
You can obtain new fonts from a wide variety of commercial sources. You can also choose from a
huge array of public domain fonts. Some of these are freeware. You can use them with no
obligation to anyone. Others are shareware. There is no purchase price, but if you continue to
use a font, you’re honor-bound to pay the developer either a stipulated fee or a donation.
___________________________________________________________
Installation
For best results, all fonts you install should be designed for LaserWriter II compatibility. Most
such fonts come with specific installation instructions.
__________________________________________________________________
Chapter 5: Designing With the LaserWriter II
__________________________________________________________________
Designing With the LaserWriter II
With the LaserWriter II you can print high quality camera ready masters for publishing
projects such as letters, memos, presentations, reports, newsletters, and multipage documents
such as bro-chures or even books. This manual, for example, was produced using a
LaserWriter IInt. You can also develop accurate layouts and proofs of documents that will
eventually be typeset. You can take the work from rough concept to near final form with your
in-house desktop publishing system, going to an outside supplier only for the finished product.
This chapter introduces some basic guidelines for font selection and page organization, followed
by examples of documents created for a hypothetical company. The examples were developed
with a LaserWriter IInt and a Macintosh Plus, using a variety of page layout, word processing,
and spreadsheet applications. The illustrations featured in the examples are either images
produced with a scanner or original art developed with representative graphics applications.
The guidelines, examples, and accompanying notes should give you an idea of the kinds of
decisions you need to make to see a document from preliminary layout to final production. At the
end of the chapter you’ll find some suggestions for further reading.
___________________________________________________________
Font selection
With the built-in fonts of the LaserWriter II, you have a wide range of choices to make any
document look its best.
Pick a text font that’s easy to read.
Readability is probably the most important consideration in choosing a text font. In addition, the
font should look attractive and balanced even in lengthy passages, and it should be reasonably
compact.
Although some designers would choose a sans serif font, most would probably opt for a serif
design such as Times or ITC Bookman. Serifs enhance readability by guiding the reader along the
line. Also, many people find large quantities of sans serif type harsh on the eyes.
The particular choice depends on the document. New Century Schoolbook would be an excellent
face for a training manual, as the name implies. Palatino, with its chiseled edges, could be
perfect for a prospectus or an annual report.
Choose an eye-catching font for heads.
A main head summarizes an entire page or section. It telegraphs your message to the reader.
Subheads are reference points that pull the reader through the text. To do their job, these heads
must stand out.
The simplest choice is to use the same font family as for text, but in bold or italic, and perhaps
in a larger size.
The clean, geometric lines of sans serif type can make heads stand out even more. Helvetica
bold, for example, is a visually striking, easy-to-read font family that’s excellent for heads. So
is ITC Avant Garde bold, which is the font family used for heads and subheads in this manual.
Be careful when mixing font families.
In general, similar font families don’t work well together. Setting some heads in ITC Avant
Garde and others in Helvetica would almost certainly be a mistake. So would using one serif font
family, such as Times, for text, and another, such as ITC Bookman, for heads.
Use a minimum of font families, sizes, and styles.
It’s best to pick one font for text and one or two sizes of that family or another for heads, and
leave it at that. Too many fonts, especially when you’re new to design, will only result in a
disorganized layout that distracts your reader.
Bold and italic can sometimes be useful in text. The first time you use a term, for example, you
might want to set it off with one or the other. Sometimes a particular style is called for by the
rules of usage. (Book titles, for example, are always set in italic.) But keep style variations to
a minimum.
Styles like outline and shadow sometimes work well in heads, but they don’t have much place in
text, where they interfere with readability and visual balance.
Keep text in charts, graphs, and tables simple.
Charts, graphs, and tables present complicated information in condensed form, so it’s
important that they be as easy to follow as possible.
Helvetica is simple and readable, and its number set is very clear. Helvetica Narrow is
particularly useful because it allows you to condense a large amount of information into a
minimal space without sacrificing readability.
___________________________________________________________
Document organization
Successful design depends first on organization. Visual flair, while important, is secondary.
Make a plan.
Decide which elements are the most important, and develop a layout plan that reflects that
ranking. You may find it easiest to make a rough layout on paper before you start work at the
computer.
Think visually.
Design should communicate your message, not distract from it. All design elements, including
illustrations, should be chosen because they reinforce your ideas, rather than for appearance
alone.
Keep it simple.
A simple layout is not only easier for you to handle, it’s also easier for the reader to take in.
Design the parts with the whole in mind.
You want everything the reader sees at one time to work together, and you want all parts of the
document to coordinate. A successful design integrates all elements, so that each contributes to
communication. Think at least in terms of a page, and better yet, in terms of two-page spreads,
and use those basic units to build the whole.
Don’t be afraid to borrow ideas.
Look at layouts you like, think through what you like about them, and then put what you’ve
learned to use.
Get help if you can.
If possible, find someone who knows about design to give you feedback on your preliminary
layout. Then incorporate that feedback into your final version.
Experiment.
Try different fonts and different layouts until you arrive at the combination that works best.
You can preview your work on the screen, and of course you can also print samples to see how
your choices actually look.
___________________________________________________________
Suggestions for further reading
Books on design would fill a library, but here are a few suggestions for further reading.
Bove, Tony, Cheryl Rhodes, and Wes Thomas. The Art of Desktop Publishing. New York: Bantam,
1986.
This is a good general overview of desktop publishing, although some of its specific hardware
and software coverage either doesn’t pertain to the Macintosh world or is out of date.
Carter, Rob, Ben Day, and Philip Meggs. Typographic Design: Form and Communication. New
York: Van Nostrand Reinhold, 1985.
This is an excellent introduction to typography from the standpoint of the professional designer.
Kater, David A., and Richard Kater. The Printed Word. Bellevue, WA: Microsoft Press, 1985.
If you use Microsoft Word, you’ll find this book extremely helpful. Even if you don’t use the
application, the chapter on type is worth a glance.
Rardin, Kevin. Desktop Publishing on the Mac. New York: New American Library, 1986.
This book focuses on the Macintosh and on Apple laser printing. Even though some of the
hardware and software have changed, most of the discussion is still relevant. The author follows
the development of a single large project—the design and production of a newsletter—from idea
to completion.
Ulick, Terry. Personal Publishing with the Macintosh. Hasbrouck Heights, NJ: Hayden, 1986.
This book concentrates on the PageMaker page-layout application, but even non-PageMaker
users will find it an exceptionally clear and concise introduction to layout and design.
The fast-growing desktop publishing field has also begun to generate its own periodicals. Here
are two notable examples:
Publish! The How-to Magazine of Desktop Publishing
Personal Publishing: The Magazine for Desktop Publishers
Both feature new product reviews and articles on specific design problems and solutions.
__________________________________________________________________
Chapter 6: Maintenance and Troubleshooting
__________________________________________________________________
The LaserWriter II is designed for trouble-free service. Maintenance requires little more than
putting in a new toner cartridge every four thousand pages or so and performing a few minor
cleaning tasks. The recommended service interval is 100,000 pages. This service can be
arranged through your authorized Apple dealer.
___________________________________________________________
Safety first
The fixing roller assembly in the LaserWriter II operates at very high temperatures—around
400 degrees Fahrenheit. If possible, allow the rollers to cool before performing routine
maintenance and troubleshooting chores.
To prevent damage to the printer, observe the following precautions:
Don’t touch the exposed gears or electrical contacts.
Don’t open the light-blocking shutters on the toner cartridge.
Don’t open the drum protection shutter on the toner cartridge.
Don’t lubricate the printer.
Don’t attempt to disassemble the printer.
Don’t place anything on top of the printer.
___________________________________________________________
Maintenance
The toner cartridge holds the toner powder the printer’s "ink" that forms the printed images.
When the cartridge needs replacing, it’s also time for routine maintenance.
Each cartridge should yield about four thousand pages. If you print a lot of graphic designs, you
may need to change cartridges more often. If your pages start to look too light, or if you see thin
vertical white lines in dark images, it’s time to change the cartridge.
The Low Toner Level light glows orange when the cartridge needs replacing or when the toner
powder needs to be redistributed.
___________________________________________________________
Important-If the light comes on in the middle of a printing job, and the output is still
satisfactory, continue printing if you wish. You won’t harm the printer by doing so.
___________________________________________________________
When the light comes on, take the cartridge out, rock it gently back and forth a few times to
redistribute the toner, and reinsert it. If the light goes out, continue to use the cartridge for
the time being. If the light stays on, change the cartridge and perform the routine maintenance
procedures described in the following sections.
___________________________________________________________
Installing a new toner cartridge
1. Remove and discard the used cartridge. Pull out the cartridge. Be careful to keep it
horizontal so that no remaining toner powder spills into the printer.
2. Install the new cartridge. You install the new cartridge exactly as you installed the one supplied with the printer. For details read the guide supplied with the cartridge.
___________________________________________________________
Whenever you install a new toner cartridge, you should also clean the interior of the
LaserWriter II and replace the cleaning pad. A replacement pad is supplied with each cartridge.
___________________________________________________________
Warning-Be very careful during all cleaning operations not to break any of the wires inside the
printer.
___________________________________________________________
1. Open the green felt cover that protects the fixing rollers.
___________________________________________________________
Warning-If you have not allowed the LaserWriter II adequate time to cool, the felt cover may be
hot, and the fixing rollers will be very hot.
___________________________________________________________
2. Remove and discard the used cleaning pad.
3. Unwrap the new cleaning pad.
Remove and put aside the cotton swab attached to the pad by a rubber band. You’ll use the swab
for cleaning the printer wires.
4. Use the end of the new pad to clean the fixing rollers.
Before you install the new pad, clean the fixing rollers by wiping them with the white felt tip at
the end of the pad.
5. Remove and discard the white felt tip from the end of the cleaning pad.
6. Insert the new cleaning pad into the fixing roller assembly. Then close the green cover.
7. Clean the discharging pins. Use the cleaning brush supplied with the printer to brush any
dust off the discharging pins. Store the brush in the printer when you’re finished.
8. Wipe the transfer corona wire clean. The transfer corona wire is the very thin wire in the
midsection of the LaserWriter II. Wipe it and the diagonal wires above it very gently with the
cotton swab supplied with the new cleaning pad.
___________________________________________________________
Warning-The transfer corona wire is fragile. Be careful not to break it when cleaning.
___________________________________________________________
9. Wipe the transfer guide clean. Use a clean, soft, slightly damp cloth to wipe off the transfer
guide. (It’s the metal plate behind the transfer corona wire)
10. Close the LaserWriter II and resume printing.
___________________________________________________________
Exterior cleaning
Unplug the power cord and then wipe the exterior of the printer with a clean, soft, damp cloth.
Use a mild soap or detergent if necessary, but never an ammonia-based cleaner. Be careful not
to get any liquid in the power cord port.
___________________________________________________________
Warning-Never use ammonia-based cleaners on or around the LaserWriter II.
___________________________________________________________
Troubleshooting
You’re not likely to have many problems with the LaserWriter II, as long as you follow the
routine maintenance procedures in this chapter. Changing the toner cartridge is usually all
that’s needed to keep print quality up to publication standards.
Most operating pitfalls can be traced back to software installation. To avoid these problems,
always use a startup disk that includes the LaserWriter II printer resource and the appropriate
fonts.
___________________________________________________________
The Chooser isn’t listed in the Apple menu
If the Chooser isn’t listed in the Apple menu, the System file on your startup disk is outdated. If
you want to use this disk as a startup disk, update it before proceeding. You can obtain the
current system software from your authorized Apple dealer.
___________________________________________________________
No LaserWriter icon appears in the Chooser
You may need to install the printer resource on the current startup disk.
If you have installed the printer resource, it may not be in the System Folder. If necessary,
drag it there.
Check to see if you have two System Folders on the disk. If so, consolidate everything you need in
the more current version and discard the other folder.
___________________________________________________________
The LaserWriter isn’t listed in the Chooser
If you see the LaserWriter icon but no LaserWriter II name in the list of printers, one of the
following situations may be the cause.
The printer has been turned off. Make sure it is plugged in and turned on, and wait for the test
print.
The mode switches are not set correctly.
There’s a problem in the LocalTalk cable system somewhere between your computer and the
LaserWriter II you want to use.
Check to make sure that all the cables are properly connected.
If you still can’t resolve the problem, the printer’s electronics or the LocalTalk connector
boxes may not be functioning properly. Call your authorized Apple dealer.
___________________________________________________________
The LaserWriter II won’t print a test page
Unless you change the PostScript parameters, the LaserWriter II will print a test page every
time you turn it on. If it doesn’t, check the status lights and take the requisite steps.
If the Ready/In Use light is off, the printer is disconnected or switched off, or an error
condition exists. Check the power cord, the cover, and the on/off switch.
If the Paper Out light is red, the printer is out of paper or the paper tray is not in place. Refill
and replace the paper tray.
If the Paper Jam light is red, see "Correcting Paper Jams" later in this chapter.
If the red Paper Jam light is flashing, the printer requires service. See your authorized Apple
dealer.
___________________________________________________________
The test page is blank
Check the toner cartridge. If the Low Toner Level light is on, you may be completely out of toner
powder, or the powder may simply need redistribution. If you have just changed the cartridge,
check to make sure that you have removed the sealing tape.
___________________________________________________________
The LaserWriter II won’t print a document
If you can’t print a document, try the following steps.
1. Check the Macintosh status messages. The status messages tell you if someone else is
currently using the printer. They also alert you to problems such as paper jams. If anyone on
the network is using the wrong software, you’ll see a status message instructing you to
reinitialize the printer. Everyone on the network must use the same printer resource.
2. Go through the entire printing process. Select the LaserWriter II in the Chooser, and
respond to any dialog boxes; choose Print from the File menu and confirm the settings in the
Print dialog box.
3. Check the status lights and the toner cartridge. Follow the steps in "The LaserWriter II
Won’t Print A Test Page" and "The Test Page Is Blank" earlier in this chapter.
___________________________________________________________
Checking the LocalTalk cable system
If you or someone else on the AppleTalk network system can’t find a LaserWriter II in the
Chooser after selecting the LaserWriter II as the printer type, and if everyone is using the most
current printer software, the problem is usually with the LocalTalk cable system. Try the
following steps:
1. Check to see that the LocalTalk connector box is firmly attached to the Macintosh.
2. Using a startup disk with the LaserWriter II printer resource installed, start the computers
on either side of the one with the problem, and check for the LaserWriter II icon in the
Chooser. If you find the LaserWriter II, the problem lies between the computer that shows the
LaserWriter II and the computer that does not.
3. Check all connections in the affected section of the network.
4. Check the layout of the network.
Check for cables not attached to a LocalTalk connector box, and reconnect as necessary.
Check to make sure that the network forms a line, not a loop.
Check to make sure that the first and last LocalTalk connector boxes have only one cable leading
to each.
___________________________________________________________
Correcting paper jams
The printer’s paper path is quite straight, so paper jams are uncommon, especially in the
automatic feed mode. If you don’t adjust the paper guide accurately during manual feed, paper
may jam. To correct a paper jam:
1. Open the printer to see where the jam is.
2. If the jam is in the cassette area, pull the cassette out of the printer until you can release the
paper.
3. If the jam is around the print feed area, open the transfer paper lock and free the paper.
4. If the jam is in the fixing roller assembly unit, first open the green felt cover and then pull
the paper out.
___________________________________________________________
Warning-If the printer has been in use, the felt cover may be hot, and the fixing rollers will be
very hot.
___________________________________________________________
Removing jammed paper from the fixing rollers
___________________________________________________________
Correcting image problems
If the image is too light:
1. Check the Low Toner Level light.
2. Turn the print density dial one step counterclockwise (one number lower).
The print density dial is inside the printer, in the lower-left corner.
3. Check to see that the paper is of a recommended type.
If the image is too dark:
Turn the print density dial one step clockwise (one number higher).
If white or dark vertical or horizontal lines or stripes appear on the page:
1. Remove the toner cartridge and rock it to a 45-degree angle four or five times to
redistribute the toner. Be sure to hold the cartridge horizontally.
2. If this doesn’t work, install a new toner cartridge. Also install a new cleaning pad and clean
the transfer corona wire and transfer guide.
If stains appear on printer output:
1. Clean the transfer guide, transfer corona wire, and discharging pins exactly as you would if
you were installing a new toner cartridge.
Wipe the transfer corona wire very gently with a cotton swab. Wipe the transfer guide with a
soft, clean, damp cloth. Brush off the discharging pins with the cleaning brush stored in the
printer.
2. Clean the primary corona wire. Take out the toner cartridge and insert the cleaning brush
into the slot at the cartridge’s front. Work the brush gently back and forth to clean the wire.
__________________________________________________________________
Appendix A: The LaserWriter II Upgrades
__________________________________________________________________
The LaserWriter II Upgrades
To upgrade a LaserWriter IInt to a LaserWriter IIntx, simply have your authorized Apple
dealer install a LaserWriter IIntx controller board. The used LaserWriter IInt controller board
is your property. If you choose to store it, be sure to do so in a static-free bag, available
through your authorized Apple dealer.
When you upgrade to a LaserWriter IIntx, you also have the option of increasing the printer's
memory and of adding one or more dedicated hard disks for font management. The benefits of and
procedures for doing so are described in this appendix.
___________________________________________________________
Memory upgrades
You can increase the RAM of the LaserWriter IIntx up to 12 MB. You can also add a font
expansion card. These memory upgrades are not possible with the LaserWriter IInt.
___________________________________________________________
RAM expansion
You can upgrade the RAM of the LaserWriter IIntx in increments of 1 or 4 MB, up to the 12 MB
maximum. The necessary upgrade kits can be installed by your authorized Apple dealer.
Adding RAM means that more fonts can be downloaded to the printer at any one time. It also
increases the space available for font caching. Before the LaserWriter IIntx can print, it
converts the PostScript outline fonts into bitmaps, which it stores (caches) in RAM. When the
demand for RAM exceeds the supply, the printer discards the less recently used bitmaps in
favor of the newer ones. When the bitmaps are needed again, the printer must rebuild them. The
additional RAM lessens the need for this time-consuming step.
___________________________________________________________
The font expansion card
To expand font capacity in ROM, you'll need to insert an add-on circuit board into the expansion
slot of the LaserWriter IIntx. See your authorized Apple dealer for details.
___________________________________________________________
Adding one or more hard disks
You can attach one or more SCSI hard disks to the LaserWriter IIntx. Like the RAM upgrade, the
addition of a hard disk increases the space available for font storage and font caching, but the
increase in space and therefore in font handling flexibility is much greater.
You initialize the disks and download fonts to them using the LaserWriter Font Utility
application on the LaserWriter IInt/ntx Installation Disk. The application's help screens
contain all the information you need for all procedures.
When you download a font and you have a hard disk attached, you can choose to download it either
to the disk or to RAM. Downloading it to the disk stores it there permanently (or until you
remove it). This process saves time because you won't have to download it repeatedly over the
network. It also saves space on your startup disk, because the font is now on the printer disk
rather than in your System Folder.
Font caching is handled automatically by the Font Utility application. Because you can chain
together several SCSI hard disks, the space available for font caching is essentially unlimited,
and thus the bitmaps are always available.
Initialization allots 20 percent of total disk space to font storage and 80 percent to font caching.
The LaserWriter IIntx automatically increases the storage percentage as needed. The Font
Utility application warns you when the percentage is high enough to threaten font caching
performance.
___________________________________________________________
Connecting the disks
You connect hard disks to the LaserWriter IIntx following the standard SCSI procedures. For
each disk you're connecting, you'll need a SCSI peripheral cable. You'll also need a SCSI cable
terminator for the first disk, and an additional terminator for two or more disks. (No system
should include more than two terminators.)
___________________________________________________________
Warning-Each disk must have a unique SCSI ID number. Do not turn on or attempt to use the
printer or any attached hard disk until each disk has been assigned its number.
___________________________________________________________
A SCSI peripheral cable and a SCSI cable terminator
Two hard disks connected to a LaserWriter IIntx
To connect a single hard disk:
1.
2.
3.
4.
5.
6.
Attach either end of a peripheral interface cable to the SCSI port on the LaserWriter IIntx.
Snap the wire clips on the SCSI port onto the cable.
Attach the other end of the peripheral interface cable to either SCSI port on the hard disk.
Snap the wire clips on the SCSI port onto the cable.
Attach the end of a cable terminator without clips to the other SCSI port on the hard disk.
Snap the wire clips on the SCSI port onto the cable terminator.
To connect multiple hard disks:
1. Attach either end of a peripheral interface cable to the SCSI port on the LaserWriter IIntx.
2. Snap the wire clips on the SCSI port onto the cable.
3. Attach the other end of the peripheral interface cable to the clip end of a cable terminator
4. Snap the clips on the cable terminator onto the cable.
5. Insert the other end of the cable terminator onto either SCSI port on the hard disk.
6. Snap the clips on the SCSI port onto the cable terminator.
7. Attach a second peripheral interface cable to the other SCSI port on the hard disk.
8. Attach the other end of the peripheral interface cable to either SCSI port on the next hard
disk.
9. Repeat steps 7 and 8 for each additional hard disk.
10. Attach a cable terminator to the unused SCSI port on the last hard disk.
___________________________________________________________
Chaining different sizes and types of hard disk
You can add different sizes of hard disk to the SCSI chain, but the LaserWriter IIntx must be
able to tell what size a disk is. This is possible with all Apple SCSI hard disks, but not with
some other brands. These disks cannot be connected to the LaserWriter IIntx.
In addition, there should be no more than two terminators in any SCSI chain. If your non-Apple
SCSI hard disk has an internal terminator, you may have to follow the manufacturer's
guidelines to disable it.
___________________________________________________________
Identifying and initializing hard disks
You assign each disk a SCSI ID number by setting the SCSI ID switch on the back panel of the
disk.
___________________________________________________________
Important-All SCSI devices must be assigned an ID number from 0 to 7. Each device must have a
unique number.
___________________________________________________________
1. Turn the hard disk off.
2. Insert the point of a pushpin or an unwound paper clip into the hole below the switch.
3. Push gently until the number you want appears.
4. If you go past the number you want, keep pushing until it comes around again.
You initialize the disks simply by choosing the Initialize Disk command from the File menu
while using the Font Utility application on the LaserWriter II Installation Disk.
___________________________________________________________
Important-The LaserWriter IIntx regards all attached hard disks as a single logical unit.
Therefore, if you add a disk to the system, you'll have to reinitialize all your disks and rebuild
your font storage. The font cache rebuilds itself automatically.
Also, all disks must be turned on when you want to use any one of them. Otherwise the
LaserWriter IIntx won't recognize them.
__________________________________________________________________
Appendix B: Connecting the LaserWriter II to an Apple II
__________________________________________________________________
You can connect a LaserWriter II to an Apple IIgs using thep LocalTalk cable system. You can
also connect your printer to an Apple IIe in exactly the same fashion, provided you have
installed an Apple II Workstation Card. See the Apple II Workstation Card User's Guide for
details.
___________________________________________________________
Connecting to the computer
You connect the LaserWriter II to an Apple II using LocalTalk connector boxes, just as you would
connect it to a Macintosh. These connectors link computers and peripheral devices in a
LocalTalk cable system. For more information about creating a network, refer to the LocalTalk
Cable System Owner's Guide.
1. Make sure both the printer and the computer are switched off.
2. Plug a LocalTalk connector box into the LocalTalk port on the LaserWriter II.
3. Plug a second connector box into the printer port on the Apple II.
4. Connect the two connector boxes with a LocalTalk cable.
___________________________________________________________
Setting the Control Panel
In order for the computer to use the LocalTalk cable system, the Control Panel must be set for
AppleTalk.
1. Open the Control Panel. See your Apple II owner's guide for detailed instructions.
2. Choose Slots from the Control Panel menu.
3. Set slot 1 (Printer Port) to Your Card.
If you connected the printer to the modem port instead, configure slot 2 to Your Card. This
procedure prevents any conflict with step 4.
4. Set slot 7 (Your Card) to Built-in AppleTalk.
Although the LaserWriter II is physically connected to slot 1 or slot 2, the computer now acts
as though the printer were connected to slot 7.
___________________________________________________________
Using the Namer
If you're adding a LaserWriter II to an existing network, you'll find it convenient to give it a
distinguishing name. If you have only one printer, you don't need to name it unless you want to.
If you're adding an Apple II, rather than a printer, to the network, you should use the name the
printer already has. It will be listed in the Chooser by that name.
1. Turn on the printer you want to name.
2. Start up the Apple II with the workstation disk.
3. Select the Printer Namer application from the menu. This opens the application.
4. Choose the printer type you want to name. You'll see a list of printers of this type on the
right side of the dialog box.
5. Choose a printer from the list on the right. The printer name automatically moves to the New
Name box.
6. Type in a new name or edit the current name.
7. Click Accept.
8. Click Quit.
___________________________________________________________
Important-If you change the name of any printer, be sure to tell everyone else who uses the
network. You won't have to use the Namer again unless you want to change a printer's name.
___________________________________________________________
Using the Chooser
The Chooser allows you to designate which network printer you want to use. Once you designate a
printer, your choice is recorded on the system disk. You shouldn't have to use the Chooser again
unless you want to change printers or unless you are the first person to use a network printer
after it is turned off and then on again.
1. Start up the Apple II with the workstation disk.
2. Select Chooser from the Main Menu.
3. Choose LaserWriter as the printer type.
4. If necessary, choose the correct AppleTalk zone.
If your network is subdivided into several AppleTalk zones, choose the zone your printer
belongs to by clicking its name.
5. Choose the printer you want to use.
All LaserWriter printers on the network will be listed on the right. Click the name of the
printer you want. You'll see a message saying "Checking for presence of ImageWriter
emulator." If no one has printed with that LaserWriter II since it was turned on, you'll also see
the message "Downloading ImageWriter emulator."
The ImageWriter emulator is software that allows the Apple II to communicate with the
LaserWriter II as if it were an ImageWriter.
6. Click the User Name box and type your name if it has not already been entered.
7. Quit.
___________________________________________________________
Printing
Different applications have different procedures for printing and different ways of asking for
information about the printer. If your application asks for the printer's slot number, choose
slot 7. The owner's guide for the application should provide full details. The fonts you can print
with will also depend on the application.
__________________________________________________________________
Appendix C: Connecting To and Printing With an MS-DOS Computer
__________________________________________________________________
With the right hardware and software, you can use the LaserWriter IInt or LaserWriter IIntx
printer to print a document you've created or stored on an MS-DOS computer-that is, any
version of the IBM PC or any compatible computer. There are two ways to connect your
LaserWriter II to an MS-DOS computer:
Install a LocalTalk peripheral card in one of the expansion slots of your MS-DOS computer,
connect the computer to an AppleTalk network system, and connect the printer to the same
network.
Connect a serial port on your MS-DOS computer to the 25-pin socket on your printer.
___________________________________________________________
Using LocalTalk
You can connect an MS-DOS computer to your LaserWriter II through a LocalTalk cable system
by following these steps:
1. Install a peripheral card that adds a LocalTalk port, along with supporting circuitry, to the
MS-DOS computer.
2. Insert a LocalTalk connector box into that port.
3. Plug another connector, from the same network, into the 8-pin socket on the left side of your
printer.
You can use a LocalTalk connector box to connect your MS-DOS computer directly to your
printer. In that case, the com-puter and the printer are the only two devices on the network.
4. To activate the AppleTalk software of the LaserWriter II, set switches 1 and 2 in the up
position.
The switch panel is on the left side of the printer. The LaserWriter IInt has two switches; the
LaserWriter IIntx has six.
___________________________________________________________
The LocalTalk PC Card
You can obtain a LocalTalk PC Card from your authorized Apple dealer or representative. This
card is a half-size printed-circuit board that fits into one of the slots in your MS-DOS
computer.
The LocalTalk PC Card comes with the PC LaserWriter Program, which allows your MS-DOS
computer to work with LocalTalk.
If you're using an MS-DOS application program, such as Microsoft Word, that produces files in
PostScript format, the PC LaserWriter Program lets you send those files directly to the
LaserWriter II.
If you're using certain MS-DOS application programs, such as Lotus 1-2-3, MultiMate, or
WordStar, the PC LaserWriter Program lets you specify the format for each file before
printing it on the LaserWriter II.
If you're using any other application program that creates ASCII files (text files), you can
print those files using the PC LaserWriter Program.
___________________________________________________________
Other peripheral cards
Other suppliers sell peripheral cards that allow you to install a LocalTalk port in your MS-DOS
computer.
Before installing such a card, make sure it comes with software that allows you to translate and
format your documents for printing on the LaserWriter II.
___________________________________________________________
Using the 25-pin connector
You can connect your MS-DOS computer to the LaserWriter II by connecting the 9-pin or 25pin serial port on the back of your computer to the 25-pin socket on the printer.
With this connection, you can send files directly to the LaserWriter II from your MS-DOS
computer.
If you're using an MS-DOS application program, such as Microsoft Word, that produces files in
PostScript format, you can print them on the LaserWriter II.
If you're using MS-DOS software that does not support printing with PostScript, you can still
print your files by having your LaserWriter IInt or LaserWriter IIntx emulate the Diablo 630
daisy-wheel printer, or by having your LaserWriter IIntx emulate the Hewlett-Packard
LaserJet+ laser printer.
Note: The information in this and following sections applies generally to any computer not just
MS-DOS computers-that you connect to your LaserWriter II through the printer's serial port.
___________________________________________________________
Making the connection
Follow these steps to connect your MS-DOS computer to the 25-pin socket on your printer. The
25-pin socket and the switch panel, which contains two switches on the LaserWriter IInt and
six switches on the LaserWriter IIntx, are on the left side of your printer.
1. Connect the COM1 serial port on your computer to the printer's 25-pin socket (the RS-232
port).
If another device is already connected to the COM1 port, use the COM2 port. Your cable or
cables should include one modem eliminator. Note that some serial extension cables have builtin modem eliminators.
If your computer has a 9-pin serial port, use a 9-to-25-pin adapter cable.
Note: If your computer has a standard serial port, such as those supplied with IBM PCs, then
you should be able to use standard cables.
2. If you have a LaserWriter IInt, set its switches as follows.
If you plan to use MS-DOS software that supports PostScript, switch 1 should be in the up
position and switch 2 should be down.
If you plan to use the Diablo emulator, switch 1 should be in the down position and switch 2
should be up.
3. If you have a LaserWriter IIntx, set its switches as follows.
If you plan to use MS-DOS software that supports PostScript, switch 2 should be in the down
position, and switches 3 and 4 should both be up. Switch 1 can be up or down.
If you plan to use the Diablo emulator, switches 2 and 3 should be in the down position and
switch 4 should be up. Switch 1 can be up or down.
If you plan to use the LaserJet+ emulator, switches 2, 3, and 4 should be in the down position.
Switch 1 can be up or down.
4. Switch on the printer.
The LaserWriter II prints a test page, indicating the mode-PostScript, Diablo 630, or
LaserJet+-that you've selected. In addition, the page reports which connector or connectors are
set to receive information. If you've followed the instructions above, the page should say RS232 9600 Baud. If the mode or connector is not what you want, switch off the printer, reset the
switches, and switch on the printer again.
5. Start up your MS-DOS computer.
6. Type the following two MS-DOS commands.
This sets the data transfer rate at 9600 Baud with no parity check. It specifies 7 data bits and 1
stop bit. If you later change the printer's data transfer rate, parity check, data bits, or stop
bits be sure to type a new Mode command to change the parameters on your MS-DOS computer.
(See your MS-DOS manual for a full description of the Mode command.)
If your printer is connected to the COM2 port, substitute COM2: for COM1:.
Note: If you plan to use your printer often to print documents from your MS-DOS computer,
include the two Mode commands in your AUTOEXEC.BAT file, the program that runs every time
you start up your MS-DOS computer. This sets the printing parameters automatically each time
you start up. (For more information about the AUTOEXEC capability, see the owner's guide for
your computer or operating system.)
___________________________________________________________
Matching handshakes
Whenever you use a serial connection to send information from one device, such as your
MS-DOS computer, to another, such as the LaserWriter II, both devices must be set to
recognize the same handshake. The handshake tells the computer how to know when to start
sending information to the printer.
___________________________________________________________
Important-If the handshake settings on your computer and printer are different, portions of
your document may not be printed, particularly if it is a long document.
___________________________________________________________
Your MS-DOS computer normally uses a handshake known as DSR/DTR (also known as DSR or
DTR ), but your MS-DOS application program may automatically change the handshake or allow
you to reset it.
Note: If you're using DSR/DTR but aren't using a standard cable, make sure that the cable
connects pins 6 (DSR) and 20 (DTR) on the RS-232 port of the LaserWriter II to their
counterparts on the serial port of the MS-DOS computer.
The LaserWriter IInt is preset with the XON/XOFF handshake, so if your MS-DOS application
program permits, select the XON/XOFF handshake.
If your MS-DOS application program requires the DSR/DTR handshake, you need to change the
handshake on the LaserWriter IInt to DSR/DTR by sending the following PostScript program
from your MS-DOS computer to the printer.
Note: To set the handshake for use with the Diablo emulation mode, described later in this
appendix, substitute the characters interactive for batch in the two words where batch appears.
This program retains the default printing parameters of the LaserWriter II, other than the
handshake. You matched those settings on your MS-DOS computer earlier when you typed the
Mode commands. To reset the other parameters, change to the ETX/ACK handshake, or check the
handshake.
The LaserWriter IIntx handshake
The handshake on the LaserWriter IIntx is determined by switches 5 and 6 on the left side of the
printer. To set the DSR/DTR handshake, place switch 5 in the up position and switch 6 in the
down position.
If your MS-DOS application program is set to use the XON/XOFF handshake, place switches 5
and 6 in the up position. If the program is set to use the ETX/ACK handshake, place switch 5 in
the down position and switch 6 in the up position.
You can also change the handshake, along with other printing parameters, on the LaserWriter
IIntx by sending a PostScript program from your MS-DOS computer to the printer. In addition,
you can send a PostScript program to check the handshake and other settings.
___________________________________________________________
When you finish
If the LaserWriter II is part of an AppleTalk network system, you may wish to reactivate the
printer's AppleTalk software so that computers on that network can use the printer to print
documents. To do so, set switches 1 and 2 in the up position.
___________________________________________________________
PostScript documents
If you're using an MS-DOS application program that produces PostScript files, install the
PostScript printer driver. The printer driver translates your print files into PostScript, the
page-description language that the LaserWriter II understands.
The installation process varies with the application program. See the manual that came with
your application program for instructions.
___________________________________________________________
Diablo emulation
The Diablo 630 emulation mode uses the 25-pin connector. In this mode, the LaserWriter II
prints text only, entirely in 12-point Courier.
The LaserWriter II also prints bold characters, when identified by the proper Diablo 630
command sequence (Esc-O), in boldface Courier. Although there is no way for a laser printer to
darken a character by double-striking, some MS-DOS applications reinterpret the doublestriking command, causing the LaserWriter II to darken characters by widening each stroke.
To set your LaserWriter IInt for Diablo 630 emulation, place switch 1 in the down position and
switch 2 in the up position. If you're using the DSR/DTR handshake, be sure to reset the
handshake using the PostScript program specifically designed for changing the parameters for
use with LaserWriter IInt Diablo 630 emulation.
To set your LaserWriter IIntx for Diablo 630 emulation, place switches 2 and 3 in the down
position and switch 4 in the up position.
Install the Diablo 630 printer driver on your MS-DOS computer, following the instructions in
the manual that came with your application program. You can then print documents as if the
LaserWriter II were a Diablo 630 printer.
The LaserWriter II interprets the Control-D key combination as an end of file command. If you
can, insert the Control-D character at the end of your file. When the printer receives the
Control-D character, it immediately prints the last page in your document.
If your MS-DOS application program does not allow you to insert the Control-D character at the
end of your file, the LaserWriter II does not immediately print the last page of a document
unless the page is full or ends with a form feed (end-of-page) character. Instead, the page is
printed as part of the next document (at the top of the first page). When you're printing
documents in close succession, make sure that each one has a final form feed, so they won't run
together. If no other document is ready to print, the LaserWriter IIntx waits for thirty
seconds-after last receiving data-before it prints the last page.
The following Diablo 630 features are not recognized by the LaserWriter II:
print suppression
HY-plot
extended character set
the ability to download information for print wheels, including program mode
the ability to override print wheel spacing (for proportional spacing), although the
offset between characters can be changed
page lengths other than 11 inches
paper feeder control
hammer energy control
remote diagnostic
reverse printing
___________________________________________________________
LaserJet+ emulation
The Hewlett-Packard LaserJet+ emulation mode of the LaserWriter IIntx uses the 25-pin
connector. In this mode you can print text and bitmapped graphics, using the LaserJet's font
selection and positioning commands.
To set your LaserWriter IIntx for LaserJet+ emulation, place switches 2, 3, and 4 in the down
position.
Install the LaserJet+ printer driver on your MS-DOS computer, following the instructions in
the manual that came with your application program. You can then print documents as if the
LaserWriter IIntx were a LaserJet+ printer.
The LaserWriter IIntx interprets the Control-D key combination as an end-of-file command. If
you can, insert the Control-D character at the end of your file. When the printer receives the
Control-D character, it immediately prints the last page in your document.
If your MS-DOS application program does not allow you to insert the Control-D character at the
end of your file, the LaserWriter IIntx does not immediately print the last page of a document
unless the page is full or ends with a form feed (end-of-page) character. Instead, the page is
printed as part of the next document (at the top of the first page). When you're printing
documents in close succession, make sure that each one has a final form feed, so they won't run
together. If no other document is ready to print, the LaserWriter IIntx waits for 30 secondsafter last receiving data-before it prints the last page.
The LaserJet+ emulator of the LaserWriter IIntx allows you to print just about anything you
could print on the LaserJet+, but there are a few minor differences:
The LaserJet+ omits characters that overlap the left margin of the paper, but the emulator
prints that portion of the character that does not extend into the margin.
The LaserJet+ allows you to insert commands to halt printing so that you can insert paper or
envelopes manually. The emulator interprets those commands as form feeds.
The emulator does not print the following eleven characters from the LaserJet+ Roman-8
symbol set:
___________________________________________________________
Decimal code Symbol description
___________________________________________________________
127
gray patch for rubout
176
overline
179
degree symbol
227
uppercase D with stroke (Eth)
228
lowercase D with stroke (eth)
240
uppercase Thorn
241
lowercase thorn
247
one-fourth symbol
248
one-half symbol
252
solid black square
254
plus/minus sign
Applications that produce justified text with the LaserJet+ versions of Helvetica (Helv) and
Times Roman (Tms Rmn) fonts may generate slightly ragged output on the emulator.
While the LaserJet+ prints characters in the closest available point size and pitch for each
typeface, the emulator scales the font to the specified size.
The line printer font, which is 16.67 pitch Courier, appears with a height of 7.2 points when
printed with the emulator, rather than 8.5 points as printed by the LaserJet+.
The Control-C and Control-T key combinations, which you can normally use to interrupt
printing or query the status of the LaserWriter IIntx, cannot be used with the emulator.
___________________________________________________________
Changing parameters
Frequently, when you prepare your computer to send information to another computer or a
printer, you need to set several parameters to make sure that information is not garbled or lost
during transmission. Earlier, when you typed the first MS-DOS Mode command, you set the data
transfer rate, parity check, number of data bits, and number of stop bits to match the settings
on your LaserWriter II.
You don't need to know what all those parameters mean. In fact, few computer users do.
However, when you are using the 25-pin connector, it is important that the parameter settings
be the same on your MS-DOS computer and on the LaserWriter II.
You may never need to reset any of those parameters. However, if for any reason you wish to
use other settings than those given earlier, you need to reset the parameters on the
LaserWriter II by sending a PostScript program to the printer.
The handshake, described earlier, must also be the same on your MS-DOS computer and the
LaserWriter II. You use software commands to change the handshake and the printing
parameters on the LaserWriter IInt. On the LaserWriter IIntx, you can change the handshake
with the same method, or by resetting switches 5 and 6, as described earlier.
___________________________________________________________
Parameters for the LaserWriter IInt
Your LaserWriter IInt is preset to receive information with no parity check, 7 data bits, and 1
stop bit, with the XON/XOFF handshaking protocol. If both switches are down, the data transfer
rate is 1200 baud. If both switches are up, the 25-pin port is disabled. In any other switch
configuration, the rate is 9600 baud (as set during manufacturing) but can be changed by the
program below.
Note: If you change any switch setting while your LaserWriter IInt is printing, the printer
stops printing immediately.
You can change any of those settings by sending the following PostScript program to the
LaserWriter IInt:
statusdict begin 25 sccbatch exch pop
OPTIONS eq {stop} if
serverdict begin 0 exitserver
statusdict begin 25 BAUD OPTIONS setsccbatch
Note: To change settings for use with the Diablo emulation mode, substitute the characters
interactive for batch in the two words where batch appears.
Instead of typing BAUD when typing the program, type the data transfer rate, which can be
300, 600, 1200, 2400, 3600, 4800, 9600, 19200, 38400, or 57600.
Use Table C-1 to determine the Options number. Type that number wherever OPTIONS appears
in the program.
__________________________________________________________________
Parity Handshake
1 stop bit
2 stop bits
7 data bits
8 data bits
7 data bits
8 data bits
__________________________________________________________________
None (Space) XON/XOFF
0 or 32
64
160
192
DSR/DTR
4 or 36
68
164
196
ETX/ACK
8 or 40
72
168
200
Odd
XON/XOFF
33
65
161
193
DSR/DTR
37
69
165
197
ETX/ACK
41
73
169
201
Even XON/XOFF
34
66
162
194
DSR/DTR
38
70
166
198
ETX/ACK
42
74
170
202
None (Mark) XON/XOFF
35
67
163
195
DSR/DTR
39
71
167
199
ETX/ACK
43
75
171
203
Note: Because the LaserWriter IInt component that registers the options can wear out with
excessive use (several thousand changes), change the options only when necessary. The first
two lines in the PostScript program for resetting the LaserWriter IInt help protect that
component by stopping the process if the Options number is already set the way you want it.
___________________________________________________________
Parameters for the LaserWriter IIntx
Your LaserWriter IIntx is preset to receive information with no parity check, 7 data bits, and
1 stop bit. If switch 2 is in the down position, the data transfer rate is 9600 Baud. If it's up,
the rate is 1200 Baud, unless you have disabled the 25-pin port by placing switches 1 and 2 in
the up position.
To set the XON/XOFF handshake, place both switches 5 and 6 in the up position. For DSR/DTR,
place switch 5 in the up position and switch 6 in the down position. For ETX/ACK, set switch 5
down and switch 6 up.
Note: If you change any switch setting while your LaserWriter IIntx is printing, the printer
stops printing immediately.
You can change any of those settings by sending the following PostScript program to the
LaserWriter IIntx:
serverdict begin 0 exitserver
statusdict begin 25 BAUD OPTIONS setsccbatch
Instead of typing BAUD when entering the program, type the data transfer rate, which can be
300, 600, 1200, 2400, 3600, 4800, 9600, 19200, 38400, or 57600.
Use Table C-1 to determine the Options number. Type that number where OPTIONS appears in
the program.
Note: The LaserWriter IIntx component that registers the options, unlike its counterpart on the
LaserWriter IInt, does not wear out with excessive use, so you can change the settings as often
as you like.
___________________________________________________________
Sending the program
To send the PostScript program, follow these steps:
1. Use any text editor to type, check, and if necessary correct the program.
If you don't have a word-processing application program, you can use EDLIN, a simple text
editor built into the MS-DOS operating system and described in your MS-DOS manual.
2. Instruct the computer to print the file that contains the program.
If you created an EDLIN file, use the MS-DOS Print command. Instead of printing, the
LaserWriter II resets its parameters. The changes take effect at the end of the current job, and
they remain in effect until you change them again, even if you restart your printer.
You can override the PostScript-specified data transfer rate and, on the LaserWriter IIntx, the
handshake setting, by resetting the LaserWriter II switches that normally govern those
settings. This returns control over those printer settings to the switches, unless you reset them
again by sending a PostScript program. To reset a switch, move it to the opposite position, wait
30 seconds, and then return it to the desired position.
___________________________________________________________
Checking the parameters
There are two methods of determining the current parameter settings for the LaserWriter II by
sending a PostScript program.
Short program
You can have the LaserWriter II print the Options number, as defined earlier, by sending this
program.
/Helvetica findfont 14 scalefont setfont
30 500 moveto
(The Options number for the 25-pin port is )show
statusdict begin 25 sccbatch 10 string cvs show
pop showpage
Note: To check the settings to be used in the Diablo emulation mode on the LaserWriter IInt,
substitute the word sccinteractive for sccbatch.
Long program
You can have the LaserWriter II print the data transfer rate, parity, handshake, data bits, and
stop bits by sending this program. If you have never changed the settings, it reports standard on
the line for data bits. In this case, standard means 7 data bits.
/Helvetica findfont 14 scalefont setfont
/cr{show 182 currentpoint 20 sub exch pop moveto}def
/tb{show 300 currentpoint exch pop moveto}def
/Which{5 -1 roll 4 exch sub -1 roll cr
3{pop}repeat}def
statusdict begin 25 sccbatch end 182 650 moveto
exch (Baud :)tb 10 string cvs cr
(Parity:)tb dup 30 bitshift -30 bitshift
(none-space)(odd)(even)(none-mark) Which
(Handshake:)tb dup 27 bitshift -29 bitshift
(XON/XOFF)(DSR/DTR)(ETX/ACK)(bad value) Which
(Data bits:)tb dup 25 bitshift -30 bitshift
(standard)(7)(8)(bad value) Which
(Stop bits:)tb -7 bitshift 0 eq{(1)}{(2)}ifelse
show showpage
Note: To check the settings to be used in the Diablo emulation mode on the LaserWriter IInt,
substitute the word sccinteractive for sccbatch on the fifth line of the program.
___________________________________________________________
Troubleshooting
If, after following the above instructions, you still can't get the LaserWriter II to print
properly, try the following techniques:
1. Reset the printer. Turning the printer off and on resets its memory.
2. Reset each of the switches by moving it to the opposite position, waiting 30 seconds, and then
returning it to the desired position. If you've used any PostScript program, such as those
shown above, to change the printer settings, this returns control to the switches.
3. Check the version number of your software. If you're using an MS-DOS application program
that's supposed to work with PostScript, make sure you have a version that supports PostScript
and that you have the correct version of the printer driver.
___________________________________________________________
Pin assignments
Use the table to find or make a cable to connect the serial port on your MS-DOS computer to the
LaserWriter II.
___________________________________________________________
Pin
CircuitDescription
___________________________________________________________
1 or 7*
SGnd Signal ground
2*
Txd
Transmit data
3*
Rxd
Receive data
4
Rts
Request to send
5
Cts
Clear to send
6
DSR
Data set ready
8
DCD
Data carrier detect
20
DTR
Data terminal ready
22
Ring
Ring indicator
*
Your LaserWriter II needs only pins 1 (or 7), 2, and 3, but a connected device may
require the others. For example, to exchange information with an MS-DOS computer using the
DSR/DTR handshake, pins 6 (DSR) and 20 (DTR) on the RS-232 port of the LaserWriter II
must be connected to their counterparts on the serial port of the MS-DOS computer.
__________________________________________________________________
Appendix D: How the LaserWriter II Works
__________________________________________________________________
The LaserWriter II is a laser printer. It uses laser light, electric charges, and plastic toner
powder to produce each finished page of text and graphics.
When you give the Print command on your Macintosh, the computer sends a description of the
page through the LocalTalk cable system to the printer. It is sent in PostScript, the language the
printer uses to recreate the page.
The internal computer in the LaserWriter II uses these commands to create a full-page bitmap,
a dot-by-dot "guide" to each letter or image. The LaserWriter II then activates the laser, and
the pulses of the beam match the map dot for dot.
Through a series of mirrors, the laser light is reflected onto a rotating photosensitive drum.
The drum has a negative charge. When the laser light scans the drum, it gives what will turn
out to be printed areas a neutral charge, leaving the surrounding areas negative.
The toner is also negatively charged. The drum rotates through it, and the toner particles stick
to the neutral (black) areas but avoid the negative (white) areas.
Paper acquires a positive charge when it enters the printer. Opposites attract, so the negatively
charged toner jumps onto the paper when the drum rotates over it.
The paper then passes through the fixing rollers, which generate a temperature of about 400
degrees Fahrenheit to fuse the dots onto the paper.
The LaserWriter II forms 300 dots per inch (90,000 dots per square inch), or about 7.4
million dots per page. That's why your finished copy looks as good as it does. And once the
printer has the bitmaps in its memory, it can produce page after page at a rate of about eight
per minute.
__________________________________________________________________
Appendix E: Specifications and Parts List
__________________________________________________________________
Specifications
Marking engine
Canon LBP-SX laser-xerographic.
Controller
LaserWriter IInt controller hardware contains an 11.5 MHz 68000 CPU, 1 MB of ROM, 2 MB
of RAM, LocalTalk interface, RS-232 serial interface, and Apple Desktop Bus(tm) (ADB).
LaserWriter IIntx controller hardware contains a 16.7 MHz 68020 CPU, 1 MB of ROM, 2 MB
of RAM (expandable to 12 MB), LocalTalk interface, SCSI interface, RS-232 serial interface,
Apple Desktop Bus (ADB), and one slot for ROM expansion.
Print quality
300 dots per inch for text and graphics.
Apple fonts
ITC Avant Garde, ITC Bookman, Courier, Helvetica, Helvetica Narrow, New Century Schoolbook,
Palatino, Symbol, Times, ITC Zapf Chancery, and ITC Zapf Dingbats.
The LaserWriter II supports printing in plain, bold, italic, and bold italic, with additional
styles depending on the application.
Font sizes are limited only by the resolution of the printer and the size of the paper.
The LaserWriter II can support additional PostScript fonts, whether from Apple or from other
suppliers.
Eight pages per minute maximum. Actual speed depends on the images printed.
LocalTalk, RS-232, and RS-422.
Minimum life expectancy is 300,000 pages, with no monthly page limit. Recommended service
interval is 100,000 pages.
Automatic with 200-sheet paper cassette. Manual with single-sheet feeder.
16-lb. to 20-lb. photocopy or typewriter bond (60 to 80 g/m2) in normal mode; up to 36-lb.
(135 g/m2) stock in manual mode with face-up tray open. Accepts most letterhead and colored
stock. Accepts medium-weight photocopier transparencies. Envelopes can be printed with
manual feed or from the envelope cassette. Labels can be printed using manual feed.
Supports U.S. letter, U.S. legal, A4, B5, and envelope cassettes. Each paper cassette holds 200
sheets of 20-lb. (80 g/m2) paper. Envelope cassette holds 15 envelopes.
Maximum printable line: 205.9 mm (8.1 in.).
Minimum top and bottom margins: 5.0 mm (0.197 in.).
Minimum left margin: 5.0 mm (0.197 in.).
Minimum right margin: 5.0 mm (0.197 in.).
The printer senses cassette size and adjusts to maintain these margins. In the manual feed or
envelope cassette mode, the operator must prevent printing beyond the margin to avoid
depositing toner on the transfer corona or scraping toner from the drum.
Actual imageable area may vary depending on the application.
Dimensions
Height
Width
Width with letter-size cassette
Depth
Weight
20.5 kg (45 lbs.)
Operating environment
Temperature
Humidity
Toner cartridge transit environment
Voltage requirements
U.S./Japan
Europe/Australia
Power consumption
Standby
Operating
22 cm (8.6 in.)
51.3 cm (20 in.)
67.8 cm (26.4 in.)
47.5 cm (18.5 in.)
10 to 32o C
(50 to 90o F)
20 to 80 percent
-20 to +40oC
(-4 to +104oF)
90V to 126V AC
50 to 60 Hz
198V to 264V AC
50 Hz
170 W average
900 W maximum at 115V
780 W maximum at 220V
880 W maximum at 240V
__________________________________________________________________
Parts list (including options)
__________________________________________________________________
LaserWriter IInt
LaserWriter IIntx
LaserWriter II toner cartridge
LaserWriter II letter cassette
LaserWriter II legal cassette
LaserWriter II A4 cassette
LaserWriter II B5 cassette
LaserWriter II envelope cassette
1 Megabyte LaserWriter IIntx RAM Upgrade Kit
4 Megabyte LaserWriter IIntx RAM Upgrade Kit
LocalTalk Locking Connector Kit
LocalTalk Locking Cable Kit
LocalTalk Custom Wiring Kit
SCSI peripheral cable
SCSI cable terminator
__________________________________________________________________
Appendix F: Status Lights, Ports, Expansion Slot, and Switches
__________________________________________________________________
Status lights
The four LED status lights on the front panel of the LaserWriter II supply the following
information:
-green Ready/In Use light-Flashes during warmup and operation. Steady when warmed up and
ready to print.
-orange Low Toner Level light-Steady when toner powder needs to be redistributed or when
toner cartridge needs replacement. Flashes when cartridge is incorrectly installed.
-red Paper Out light-Flashes when printer is ready to accept manually fed paper. Steady when
the printer is out of paper or paper cassette is not in place.
-red Paper Jam light-Steady until jam is cleared.
-red Paper Jam light -Flashes when printer needs service.
Ports
The LaserWriter IInt and LaserWriter IIntx connector panels have three ports in common.
The Apple Desktop Bus port may be used for future expansion.
The 25-pin serial port is for non-LocalTalk serial connections.
The LocalTalk port is for connecting to any computer in a LocalTalk cable system.
In addition, the LaserWriter IIntx connector panel includes a 50-pin SCSI port for attaching a
dedicated hard disk. This port is not to be used for connecting to a Macintosh.
The LaserWriter IIntx has one expansion slot for ROM expansion.
___________________________________________________________
Switch 1
Switch 2
Meaning
___________________________________________________________
Up
Up
LocalTalk (RS-232 port disabled)
Down
Down
Serial ports (RS-232 and RS-422) 1200 baud only
Up
Down
Serial ports (RS-232 and RS-422) 9600 baud (can be
changed by software)
Down
Up
Special Diablo 630 emulation RS-232
Downloading a PostScript program can change the switch con-figuration. If any switches are
subsequently changed, the configuration changes to match the new switch settings. If the
LaserWriter IInt will not print, check the switch settings and change them as required. If the
settings are correct, reverse the switch 1 setting, wait 30 seconds, and switch it back. Then
turn the power off and on again. The test page should show the correct choice of either
PostScript or emulation, and the correct port-either LocalTalk or serial. Do not connect
LocalTalk if using serial port configuration.
LaserWriter IIntx switch configurations
___________________________________________________________
Switch 1
Switch 2
Meaning
___________________________________________________________
Up
Up
LocalTalk (RS-232 port disabled)
Down
Up
Serial ports (RS-232 and RS-422)1200 baud
Up
Down
Serial ports (RS-232 and RS-422) 9600 baud
Down
Down
RS-232 serial port 9600 baud; RS-422 serial port 0baud
Switches 3 through 6 are used only for non-LocalTalk configurations.
___________________________________________________________
Switch 3
Switch 4
Meaning
___________________________________________________________
Up
Up
PostScript batch
Down
Up
Diablo 630
Down
Down
HP LaserJet
Up
Down
PostScript interactive
___________________________________________________________
Switch 5
Switch 6
Meaning
___________________________________________________________
Down
Down
XON/XOFF
Up
Up
XON/XOFF
Down
Up
Etx/Ack
Up
Down
DSR
Downloading a PostScript program can change the switch configuration. If any switches are
subsequently changed, the configuration changes to match the new switch settings. If the
LaserWriter IIntx will not print, check the switch settings and change them as required. If the
settings are correct, reverse the switch 1 setting, wait 30 seconds, and switch it back. Then
turn the power off and on again. The test page should show the correct choice of either
PostScript or emulation, and the correct port-either LocalTalk or serial.
__________________________________________________________________
Appendix G: The LaserWriter II Fonts
__________________________________________________________________
All fonts can be scaled to any size compatible with the resolution of the printer and the size of
the paper.
ITC Avant Garde
ITC Bookman
Courier
Helvetica
Helvetica Narrow
New Century Schoolbook
Palatino
Symbol
Times
ITC Zapf Chancery
ITC Zapf Dingbats
_____________________________________________________________________________
Appendix H: Service and Support
_____________________________________________________________________________
To help you get the best performance from your system, Apple Computer, Inc. has established a
worldwide network of full support authorized Apple dealers. If you need answers to technical
questions or information about product updates, your authorized Apple dealer can help you.
Your dealer has the latest information on new hardware and software products as well as
product updates. If you wish to upgrade your system, your dealer can help you select compatible
components.
If your product requires service, your local authorized Apple dealer is trained and ready to
support you. Apple provides factory-quality parts and the latest available diagnostic equipment
to the more than three thousand authorized Apple service centers throughout the world. Apple
guarantees parts and warranty labor. (Regulations in each country determine the length of
warranty. Some restrictions may apply, depending on the country of original purchase.)
If for some reason you cannot return to the authorized dealer from whom you purchased your
system, go to the nearest service location. For the location nearest you, in the United States,
call (800) 538-9696; in Canada, call (800) 268-7796 or (800) 268-7637.