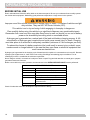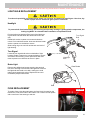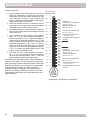
1
Owner’s Guide
TXT Freedom Electric
633138
ISSUED JULY 2013
REVISED FEBRUARY 2014
WELCOME
Thank you for purchasing this vehicle. Before driving the vehicle, we ask you to spend some time reading this
Owner’s Guide. This guide contains the information that will assist you in maintaining this highly reliable vehicle.
Some illustrations may show items that are optional for your vehicle. This guide covers the operation of several
vehicles; therefore, some illustrations may not represent your vehicle. Physical differences in controls will be illustrated.
Most of the service procedures in this guide can be accomplished using common, automotive hand tools. Contact
your service representative on servicing the vehicle in accordance with the Periodic Service Schedule.
Repair or replacement parts are available through your E-Z-GO retailer or Genuine E-Z-GO Service Parts Department.
The following information is needed when contacting E-Z-GO concerning service or parts for your vehicle:
Vehicle Model ____________________________________________________________________________
VIN or Serial Number ______________________________________________________________________
FOREWORD
Read all of this manual to become thoroughly familiar with this vehicle. Pay particular attention to all Notices, Cautions, Warnings, and Dangers.
OWNER’S GUIDE
ELECTRIC POWERED VEHICLE
TXT FREEDOM
STARTING MODEL YEAR 2014
Never modify the vehicle in any way that will alter the weight distribution of the vehicle, decrease its stability or increase the speed
beyond the factory specifications. Such modifications can cause serious personal injury or death. E-Z-GO Division of Textron Inc. prohibits and disclaims responsibility for any such modifications or any other alteration which would adversely affect the safety of the vehicle.
E-Z-GO Division of Textron Inc. reserves the right to incorporate engineering and design changes to products in this manual, without
obligation to include these changes on units sold previously.
The information contained in this manual may be revised periodically by E-Z-GO, and therefore is subject to change without notice.
E-Z-GO DISCLAIMS LIABILITY FOR ERRORS IN THIS MANUAL, and SPECIFICALLY DISCLAIMS LIABILITY FOR INCIDENTAL AND CONSEQUENTIAL DAMAGES resulting from the use of the information and materials in this Manual.
These are the original instructions as defined by 2006/42/EC.
CONTACT US:
E-Z-GO Division of Textron Inc.
1451 Marvin Griffin Road.
Augusta, Georgia, USA 30906-3852
North America:
Technical Assistance & Warranty PHONE: 1-800-774-3946 FAX: 1-800-448-8124
Service Parts PHONE: 1-888-GET-EZGO (1-888-438-3946) FAX: 1-800-752-6175
International:
PHONE: 001-706-798-4311 FAX: 001-706-771-4609
Page i
FOREWORD
Read all of this manual to become thoroughly familiar with this vehicle. Pay particular attention to all Notices, Cautions, Warnings, and Dangers.
This vehicle has been designed and manufactured in the United States of America (USA).
The Standards and Specifications listed in the following text originate in the USA unless otherwise indicated.
The use of non-Original Equipment Manufacturer (OEM) approved parts may void the warranty.
Failure to properly maintain batteries may void the warranty. Refer to the battery manual for
instructions on the proper maintenance and care of the batteries.
BATTERY PROLONGED STORAGE
All batteries will self-discharge over time. The rate of self-discharge varies depending on the
ambient temperature, the age and condition of the batteries.
A fully charged battery will not freeze in winter temperatures unless the temperature falls
below -75°F (- 60°C).
For winter storage, the batteries must be clean, fully charged and disconnected from any
source of electrical drain.
The battery charger may be left connected to the vehicle to maintain a full charge on the batteries, provided the charger is plugged into an active electrical source. If power to the electrical source is disconnected or interrupted the battery charger will continue to check the
charge on the battery pack, this will draw power from the battery pack and eventually drain
the batteries if power is not restored in a timely manner.
As with all electric vehicles, the batteries must be checked and recharged as required or at a
minimum of 30 day intervals.
Remember to check and maintain the proper fluid level in all battery cells during the storage
period; proper fluid level is required for maximum battery performance.
BATTERY DISPOSAL
Lead-acid batteries are recyclable. Return whole scrap batteries to distributor, manufacturer
or lead smelter for recycling. For neutralized spills, place residue in acid-resistant containers with absorbent material, sand or earth and dispose of in accordance with local, state and
federal regulations for acid and lead compounds. Contact local and/or state environmental
officials regarding disposal information.
Page ii
TABLE OF CONTENTS
Read all of this manual to become thoroughly familiar with this vehicle. Pay particular attention to all Notices, Cautions, Warnings, and Dangers.
SAFETY
GENERAL ......................................................................................................................... 1
NOTICES, CAUTIONS, WARNINGS, AND DANGERS .................................................... 1
GENERAL OPERATION ................................................................................................... 3
MAINTENANCE ................................................................................................................ 4
VENTILATION ................................................................................................................... 5
LABELS AND PICTOGRAMS ........................................................................................... 6
GENERAL SPECIFICATIONS
SPECIFICATIONS SHEET................................................................................................ 7
VEHICLE DIMENSIONS ................................................................................................... 8
TURNING DIAMETER AND INCLINE INFORMATION..................................................... 9
INTRODUCTION
FEATURES ..................................................................................................................... 11
General Information ............................................................................................ 11
Steering Wheel ................................................................................................... 11
Brake Pedal ........................................................................................................ 11
Park Brake .......................................................................................................... 11
Accelerator Pedal ............................................................................................... 11
Horn .................................................................................................................... 11
Key / Light Switch .............................................................................................. 12
State of Charge Meter ........................................................................................ 12
Direction Selector ............................................................................................... 12
Fuse Block .......................................................................................................... 12
Charger Receptacle............................................................................................ 13
Run - Tow/Maintenance/Storage Switch ............................................................ 13
Seat .................................................................................................................... 14
Hip Restraints ..................................................................................................... 14
Turn Signal Switch.............................................................................................. 14
Brake and Taillights ............................................................................................ 14
Sweater Basket .................................................................................................. 14
Bag Well ............................................................................................................. 14
Glove Box Compartments and Ball Holders ....................................................... 14
Headlights / Turn Signals ................................................................................... 14
Cup Holder ......................................................................................................... 14
Battery Compartment ......................................................................................... 15
iii
TABLE OF CONTENTS
Read all of this manual to become thoroughly familiar with this vehicle. Pay particular attention to all Notices, Cautions, Warnings, and Dangers.
OPERATING PROCEDURES
SERIAL NUMBER LOCATION........................................................................................ 17
BEFORE INITIAL USE .................................................................................................... 18
PORTABLE CHARGER INSTALLATION........................................................................ 19
UNDERSTANDING THE CHARGER.............................................................................. 20
LED Operation Codes ........................................................................................ 20
LED Fault Codes ................................................................................................ 20
USING THE CHARGER.................................................................................................. 21
CHARGER MAINTENANCE ........................................................................................... 21
OPERATING THE VEHICLE........................................................................................... 21
Performance ....................................................................................................... 22
Speed Control .................................................................................................... 22
Pedal-Up Braking ............................................................................................... 23
Terrain ................................................................................................................ 23
Walk-Away Feature ............................................................................................ 23
Anti-Roll Back Feature ....................................................................................... 23
Anti-Stall Feature ................................................................................................ 23
High Pedal Disable Feature ............................................................................... 24
Diagnostic Mode Feature ................................................................................... 24
STARTING AND DRIVING.............................................................................................. 24
Starting Vehicle On A Hill ................................................................................... 24
Coasting ............................................................................................................. 25
LABELS AND PICTOGRAMS ......................................................................................... 25
SUN TOP AND WINDSHIELD (IF EQUIPPED) .............................................................. 25
MAINTENANCE
VEHICLE CLEANING AND CARE .................................................................................. 27
COMMON SENSE OPERATION .................................................................................... 27
ENVIRONMENTAL CONCERNS.................................................................................... 28
Battery Disposal ................................................................................................. 28
LIFTING THE VEHICLE .................................................................................................. 28
WHEELS AND TIRES ..................................................................................................... 29
Tire Repair .......................................................................................................... 30
Wheel Installation ............................................................................................... 30
LIGHT BULB REPLACEMENT ....................................................................................... 31
Headlight ............................................................................................................ 31
Turn Signal ......................................................................................................... 31
iv
TABLE OF CONTENTS
Read all of this manual to become thoroughly familiar with this vehicle. Pay particular attention to all Notices, Cautions, Warnings, and Dangers.
Brake Light ......................................................................................................... 31
FUSE REPLACEMENT ................................................................................................... 31
TRANSPORTING VEHICLE............................................................................................ 32
Towing ................................................................................................................ 32
Hauling ............................................................................................................... 32
SERVICE AND MAINTENANCE ..................................................................................... 32
ROUTINE MAINTENANCE ............................................................................................. 33
TIRE INSPECTION ......................................................................................................... 33
BRAKES ......................................................................................................................... 34
Periodic Brake Test ............................................................................................ 34
SYSTEM TEST................................................................................................................ 34
REAR AXLE .................................................................................................................... 35
Checking the Lubricant Level ............................................................................. 35
LUBRICATION ................................................................................................................ 35
CAPACITIES AND REPLACEMENT PARTS.................................................................. 35
HARDWARE.................................................................................................................... 36
BATTERY CHARGING AND MAINTENANCE ................................................................ 36
Safety ................................................................................................................. 36
Battery Disposal ................................................................................................. 37
Battery ................................................................................................................ 37
Battery Maintenance ........................................................................................... 37
At Each Charging Cycle ..................................................................................... 38
Monthly ............................................................................................................... 38
Electrolyte Level and Water ................................................................................ 38
Battery Cleaning ................................................................................................. 40
Battery Replacement .......................................................................................... 41
Prolonged Storage .............................................................................................. 41
Battery Charging ................................................................................................. 42
AC Voltage ......................................................................................................... 43
Troubleshooting .................................................................................................. 43
Hydrometer ......................................................................................................... 43
PERIODIC SERVICE SCHEDULE
PERIODIC SERVICE SCHEDULE .................................................................................. 47
APPENDIX A
DECLARATION OF CONFORMITY ................................................................................. A
v
TABLE OF CONTENTS
Read all of this manual to become thoroughly familiar with this vehicle. Pay particular attention to all Notices, Cautions, Warnings, and Dangers.
Notes:
vi
SAFETY
Read all of this manual to become thoroughly familiar with this vehicle. Pay particular attention to all Notices, Cautions, Warnings, and Dangers.
SAFETY
GENERAL
For any questions on material contained in this manual, contact an authorized representative for clarification.
Read all labels located on the vehicle. Always replace any damaged or missing labels.
On steep hills it is possible for vehicles to coast at greater speeds. To prevent loss of vehicle control and possible serious injury, speeds should be limited to no more than the maximum speed on level ground. See GENERAL SPECIFICATIONS. Limit speed by applying the service brake.
Catastrophic damage to the drivetrain components due to excessive speed may result from driving the vehicle above
specified speed. Damage caused by excessive speed may cause a loss of vehicle control, is costly, is considered
abuse and will not be covered under warranty.
Use extra caution when towing vehicle(s). Do not tow a single vehicle at speeds in excess of 12 mph (19 kph). Do not
tow more than three vehicles at a time. Do not exceed 5 mph (8 kph) while towing multiple vehicles. Towing the vehicle
at above the recommended speed may result in personal injury and/or damage to the vehicle and other property.
If the vehicle is to be used in a commercial environment, signs similar to the ones illustrated should be used to warn of
situations that could result in an unsafe condition.
NOTICES, CAUTIONS, WARNINGS, AND DANGERS
Throughout this guide NOTICE, CAUTION, WARNING, and DANGER will be used. Please observe these NOTICES,
CAUTIONS, WARNINGS, and DANGERS; be aware that servicing a vehicle requires mechanical skill and a regard for
conditions that could be hazardous. Improper service or repair may damage the vehicle or render it unsafe.
NOTICE
Address practices not related to personal injury.
Indicates a hazardous situation which, if not avoided, could result in minor or moderate injury.
Indicates a hazardous situation which, if not avoided, could result in death or serious injury.
DANGER
Indicates a hazardous situation which, if not avoided, will result in death or serious injury.
1
SAFETY
Read all of this manual to become thoroughly familiar with this vehicle. Pay particular attention to all Notices, Cautions, Warnings, and Dangers.
This manual has been designed to assist in maintaining the vehicle in accordance with procedures developed by the
manufacturer. Adherence to these procedures and troubleshooting tips will ensure the best possible service from the
product. To reduce the chance of personal injury or property damage, the following must be carefully observed:
Certain replacement parts can be used independently and/or in combination with other accessories to modify an E-Z-GO-manufactured vehicle to permit the vehicle to operate at or in excess of 20 mph. When an E-ZGO-manufactured vehicle is modified in any way by the Distributor, Dealer or customer to operate at or in
excess of 20mph, UNDER FEDERAL LAW the modified product will be a Low Speed Vehicle (LSV) subject to
the strictures and requirements of Federal Motor Vehicle Safety Standard 571.500. In these instances, pursuant to Federal law the Distributor or Dealer MUST equip the product with headlights, rear lights, turn signals, seat belts, top, horn and all other modifications for LSV’s mandated in FMVSS 571.500, and affix a
Vehicle Identification Number to the product in accordance with the requirements of FMVSS 571.565. Pursuant to FMVSS 571.500, and in accordance with the State laws applicable in the places of sale and use of the
product, the Distributor, Dealer or customer modifying the vehicle also will be the Final Vehicle Manufacturer for the LSV, and required to title or register the vehicle as mandated by State law.
E-Z-GO will NOT approve Distributor, Dealer or customer modifications converting E-Z-GO products into LSV’s.
The Company recommends that all E-Z-GO products sold as personal transportation vehicles BE OPERATED ONLY
BY PERSONS WITH VALID DRIVERS LICENSES, AND IN ACCORDANCE WITH APPLICABLE STATE REQUIREMENTS. This restriction is important to the SAFE USE AND OPERATION of the product.
All customers should adhere to this SAFETY RESTRICTION, in connection with the use of all E-Z-GO products, new
and used, the Distributor or Dealer has reason to believe may be operated in personal transportation applications.
Information on FMVSS 571.500 can be obtained at Title 49 of the Code of Federal Regulations, section 571.500, or
through the Internet at the web site for the U.S. Department of Transportation - at Dockets and Regulation, then to Title
49 of the Code of Federal Regulations (Transportation).
All vehicles can be used for a variety of tasks beyond the original intended use of the vehicle; therefore, it is impossible
to anticipate and warn against every possible combination of circumstances that may occur. No warning can replace
good common sense and prudent driving practices.
Good common sense and prudent driving practices do more to prevent accidents and injury than all of the warnings
and instructions combined. E-Z-GO strongly suggests that all users and maintenance personnel read this entire manual
paying particular attention to the CAUTIONS, WARNINGS and DANGERS contained therein.
If you have any questions regarding this vehicle, contact your E-Z-GO/CUSHMAN dealer or write to the address on the
back cover of this publication, Attention: Customer Care Department.
E-Z-GO reserves the right to make design changes without obligation to make these changes on units previously sold.
The information contained in this manual is subject to change without notice.
E-Z-GO IS NOT LIABLE FOR ERRORS IN THIS MANUAL. E-Z-GO IS NOT LIABLE FOR INCIDENTAL OR CONSEQUENTIAL DAMAGES THAT RESULT FROM THE USE OF THE MATERIAL IN THIS MANUAL.
This vehicle conforms to the current applicable standard(s) for safety and performance requirements.
These vehicles are designed and manufactured for off-road use. They DO NOT conform to Federal Motor Vehicle
Safety Standards of the United States of America (USA) and are not equipped for operation on public streets. Some
communities may permit these vehicles to be operated on their streets on a limited basis and in accordance with local
ordinances.
With electric powered vehicles, be sure that all electrical accessories are grounded directly to the battery (-) post.
Never use the chassis or body as a ground connection.
Refer to GENERAL SPECIFICATIONS for vehicle seating capacity.
Never modify the vehicle in any way that will alter the weight distribution of the vehicle, decrease
it’s stability, or increase the speed or extend the stopping distance beyond the factory specification. Such modifications can result in serious personal injury or death.
2
SAFETY
Read all of this manual to become thoroughly familiar with this vehicle. Pay particular attention to all Notices, Cautions, Warnings, and Dangers.
Never modify the vehicle in any way that will alter the weight distribution of the vehicle, decrease it’s stability, or
increase the speed or extent the stopping distance beyond the factory specification. E-Z-GO prohibits and disclaims
responsibility for all such modifications which would adversely affect the safety of the vehicle.
Vehicles that are capable of higher speeds must limit their speed to no more than the speed of other vehicles when
used in a golf course environment. Additionally, speed should be further moderated by the environmental conditions,
terrain and common sense.
Operation of the vehicle is limited to persons above the height of 59 inches (150 cm).
GENERAL OPERATION
Read the following warnings before attempting to operate the vehicle.
To prevent personal injury or death, observe the following:
When vehicle is to be left unattended, turn key to OFF position AND REMOVE KEY.
Drive vehicle only as fast as terrain and safety considerations allow. Consider the terrain and
traffic conditions. Consider environmental factors which affect the terrain and the ability to
control the vehicle.
Avoid driving fast downhill. Sudden stops or change of direction may result in a loss of control. Use brake to control speed when traveling down an incline.
Use extra care and reduced speed when driving in poor conditions or on poor surfaces.
Stay in designated areas where provided and avoid steep slopes.
Keep feet, legs, hands, and arms inside vehicle at all times.
Avoid extremely rough terrain.
Check area behind the vehicle before operating in reverse.
Make sure the direction selector is in correct position before depressing the
accelerator pedal.
Slow down before and during turns.
Always bring vehicle to a complete stop before shifting the direction selector.
See GENERAL SPECIFICATIONS for vehicle load and seating capacity.
NOTICE
Read the following text and warnings before attempting to service vehicle.
In any product, components may eventually fail to perform properly as the result of normal use, age, wear, or abuse.
It is impossible to anticipate all possible component failures or the manner in which each component may fail.
A vehicle requiring repair is no longer functioning as designed and therefore could be potentially hazardous. Therefore,
use extreme care when working on any vehicle. When diagnosing, removing, or replacing any components that are not
operating correctly, take time to consider the safety of yourself and others around you.
Some components are heavy, spring-loaded, highly corrosive, explosive, may produce high amperage, or reach high
temperatures. Exposure to battery acid and hydrogen gas could result in serious bodily injury. Be careful to protect
hands, face, feet, and body from injury.
Always use the appropriate tools listed in the tool list and wear approved safety equipment.
3
SAFETY
Read all of this manual to become thoroughly familiar with this vehicle. Pay particular attention to all Notices, Cautions, Warnings, and Dangers.
Before working on the vehicle, remove all jewelry.
Be sure no loose clothing or hair can contact moving parts.
Use care not to touch hot objects.
Wear eye protection when working on or around the vehicle. In particular, use care when working
around batteries, using solvents or compressed air.
Hydrogen gas is formed when charging batteries. Do not charge batteries without adequate
ventilation.
Do not permit open flame or anyone to smoke in an area that is being used for charging
batteries.
ALWAYS:
• Use the vehicle in a responsible manner and maintain the vehicle in safe operating condition.
• Read and observe all warnings and operation instruction labels affixed to the vehicle.
• Follow all safety rules established in the area where the vehicle is being operated.
• Leave the vehicle and seek shelter when there is a risk of lightning.
• Reduce speed to compensate for poor terrain or conditions.
• Apply service brake to control speed on steep grades.
• Maintain adequate distance between vehicles.
• Reduce speed in wet areas.
• Use extreme caution when approaching sharp or blind turns.
• Use extreme caution when driving over loose terrain.
• Use extreme caution in areas where pedestrians are present.
MAINTENANCE
ALWAYS:
• Replace damaged or missing warning, caution or information labels.
• Maintain the vehicle in accordance with the manufacturer’s periodic service schedule.
• Ensure that repairs are performed by trained and qualified personnel.
• Follow the manufacturer’s maintenance procedures.
• Insulate any tools used within the battery area in order to prevent sparks or battery explosion.
• Check the polarity of each battery terminal and be sure to rewire the batteries correctly.
• Use specified replacement parts, NEVER use replacement parts of lesser quality.
• Use recommended tools.
• Determine that tools and procedures not specifically recommended by the manufacturer will not com-
promise the safety of personnel nor jeopardize the safe operation of the vehicle.
• Support the vehicle using wheel chocks and jack stands. NEVER get under a vehicle that is supported
by a jack. Lift the vehicle in accordance with the manufacturer’s instructions.
• Maintain the vehicle in an area away from exposed flame or persons who are smoking.
4
SAFETY
Read all of this manual to become thoroughly familiar with this vehicle. Pay particular attention to all Notices, Cautions, Warnings, and Dangers.
• Be aware that a vehicle that is not performing as designed is a potential hazard and must not be oper-
ated.
• Test drive the vehicle after any repairs or maintenance in a safe area that is free of both vehicular and
pedestrian traffic.
• Keep complete records of the maintenance history of the vehicle.
VENTILATION
ALWAYS:
• Charge the vehicle in a well ventilated area.
• Charge in an area free of flammable liquids and items.
• Charge a vehicle in an area that is free from flame or spark. Pay particular attention to natural gas or
propane water heaters and furnaces.
• Use a dedicated 15-amp circuit for each battery charger. DO NOT permit other appliances to be
plugged into the receptacle when the charger is in operation.
• Operate the charger in accordance with manufacturers recommendations or applicable electrical code.
5
SAFETY
Read all of this manual to become thoroughly familiar with this vehicle. Pay particular attention to all Notices, Cautions, Warnings, and Dangers.
LABELS AND PICTOGRAMS
WARNING Failure to follow these instructions can result in SERIOUS INJURY or DEATH
Operation by persons with valid drivers license, in accordance with state requirements. Operate from Driver’s side only. For non-road use, and in designated areas only. Do not operate
under the influence of drugs or alcohol. All occupants must be fully seated, keep entire body inside vehicle and hold on while vehicle is in motion, move direction selector to desired position,
apply service brake, turn key to “ON” and accelerate smoothly. Maximum vehicle payload is 800 lbs. (363 kg) including a maximum of 2 persons, options, and accessories. Drive slowly
straight up and down slopes and in turns. Use care in reverse, in congested areas or wet or loose terrain. To release parking (PARK) brake, depress service (lower) brake pedal. To stop,
release accelerator pedal and apply service brake. Before leaving vehicle, turn key ‘OFF’, move the direction selector to ‘forward’ (Gas vehicle) or ‘neutral’ (Electric vehicle) and engage
parking (PARK) brake.
625240
RUN
TOW
MAINTENANCE
STORAGE
TOWING - Always select
‘TOW MAINTENANCE’
position before towing
DO NOT alter or tamper with this unit. Unauthorized
modifications can result in SERIOUS INJURY or damage
to the vehicle and will void the warranty.
To disable electrical system, turn key switch to ‘OFF’ and
remove battery wires.
ALWAYS turn key to ‘OFF’ before
disconnecting or reconnecting battery wires.
ELECTRICAL ARC or BATTERY EXPLOSION
can occur if key is not in the ‘OFF’ position.
WAIT 30 seconds after reconnecting batteries BEFORE
turning key switch to ‘REVERSE’, ‘FORWARD’ or
‘NEUTRAL’ positions.
613048
OPERATING INSTRUCTIONS
BEFORE OPERATING
READ all warning labels and the owner’s manual. Contact an authorized E-Z-GO dealer or visit
www.ezgo.com for a replacement manual.
This vehicle is equipped for personal use in most communities. However, state law or local rules may
require additional equipment in your community.
SAFE OPERATION
Turn key to “ON” - select “forward” or “reverse” - release the parking brake (Gas vehicle only) - then slowly
depress accelerator pedal.
Always bring the vehicle to a complete stop BEFORE shifting the direction selector.
Operate from the driver’s seat ONLY.
PARKING
ALWAYS fully engage the parking brake and remove the key BEFORE leaving the vehicle. In an electric
vehicle set the direction selector to “neutral” and in a gasoline vehicle set the selector to “forward”.
MAINTENANCE
This vehicle requires regularly scheduled maintenance (see owner’s manual). ONLY qualified
personnel should service this vehicle.
6
608529
GENERAL SPECIFICATIONS
Read all of this manual to become thoroughly familiar with this vehicle. Pay particular attention to all Notices, Cautions, Warnings, and Dangers.
GENERAL SPECIFICATIONS
SPECIFICATIONS SHEET
MODEL: TXT 48 FREEDOM GOLF CAR
TYPE: ELECTRIC 48V FREEDOM GOLF CAR
MODEL YEAR: 2014
Part No:. 625112
PRODUCT SPECIFICATION
CONFIGURATION HIGHLIGHTS
TrueCourse Technology: Programmable to any golf course terrain, with expanded regenerative braking function, and vehicle charger lockout
z Solid State continuously variable separately excited speed controller
z Six, 8 Volt Deep Cycle Batteries
z Body mounted direction selector switch (Forward-Neutral-Reverse)
z Full torque, reduced speed reverse
z Anti-roll back, walkaway braking and alarm
z Inductive throttle sensor
z Programmable regenerative braking, acceleration and speed
z Handheld vehicle diagnostics and rounds tracking
Battery Charger:
48VDC High Frequency, fully line compensating. 10 ft (3 m) DC Cord. Underwriters Lab. (U.L.) Listed, (C.S.A. Certified)
z Output: 48 Volts DC at 13 amps
z Input: 120 Volts AC, 50/60 Hz, 8 amps
Motor:
Drive Train:
Electrical System:
Transaxle:
Brakes:
48 Volt DC shunt wound, brazed armature, solid copper windings
Direct motor shaft connected to transaxle pinion shaft
48 Volt DC, six, 8 volt deep cycle batteries (117 minute minimum, 170 amp-hour @ 20 hr. discharge rate)
Differential with helical gears
Dual rear wheel mechanical self-adjusting drum brakes. Automatic single point park brake release with self-compensating system
PRODUCT OVERVIEW
Dimensions
Overall Length
93.5 in (237 cm)
Overall Width
47.0 in (119 cm)
Overall Height (No Canopy)
46.5 in (118 cm) (Top of Steering Wheel)
67.5 in (1(171 cm) (Top of Sun Canopy)
Overall Height (With Canopy)
Wheel Base
66.0 in (168 cm)
Front Wheel Track
34.0 in (86 cm)
Rear Wheel Track
38.5 in (98 cm)
Ground Clearance (at Differential) 4.5 in (11 cm)
Vehicle Power
Power Source
48 Volts DC
Motor Type
Shunt Wound
Horsepower (kW)
3.0 HP (2.2 kW) Continuous
Electrical System
48 Volt
Batteries (Qty, Type)
Six, 8 Volt Deep Cycle
Key or Pedal Start
Pedal Start
Battery Charger
48 VDC, 120 VAC, UL/CSA
Speed Controller
250 Amp Solid State Controller
Drive Train
Motor Shaft Direct Drive
Transaxle
Differential with helical gears
Gear Selection
Body mounted Forward-Neutral-Reverse
Rear Axle Ratio
12.44:1
Some items shown may be optional equipment
Performance
Seating Capacity
Dry Weight
Curb Weight
Vehicle load capacity
Outside Clearance Circle
Speed (Level Ground)
Towing Capacity
Steering & Suspension
Steering
Front Suspension
Rear Suspension
Service Brake
Parking Brake
Front Tires
Rear Tires
Body & Chassis
Frame
Body & Finish
Standard Color
Bumper
2 Person
573 lb (260 kg) (Without Batteries)
951 lb (431 kg) (With Trojan T-875 Batteries)
800 lb (360 kg)
19.0 ft (5.8 m)
14.5-19.5 mph (23.3-31.4 kph)
3 Golf Cars with Approved Permanent Tow Bar
Self-compensating rack and pinion
Leaf springs with hydraulic shock absorbers
Leaf springs with hydraulic shock absorbers
Rear wheel mechanical self-adjusting drum
Self-compensating, single point engagement
Links 18 x 8.50 - 8 (4 Ply Rated)
Links 18 x 8.50 - 8 (4 Ply Rated)
Welded steel. DuraShield™ powder coat
Injection molded TPO
Ivory
Injection molded PP with powder coated steel
structure
CE Noise, Vibration & Harshness
Noise
Sound pressure; continued A-weighted ≤ 70 dB(a)
Vibration, WBV Highest value of weighted acceleration less than 2.5 m/s
Vibration, HAV Highest value of weighted acceleration less than 2.5 m/s
Uncertainty of measurement is 0.56 m/s^2. Measurement methods were applied
per ISO 2631 & ISO 5349 standards on typical vehicle surfaces.
7
GENERAL SPECIFICATIONS
Read all of this manual to become thoroughly familiar with this vehicle. Pay particular attention to all Notices, Cautions, Warnings, and Dangers.
VEHICLE DIMENSIONS
67.5 in.
(171 cm)
46.5 in
(118 cm
Front
34.0 in. (86 cm)
4.5 in.
(11.0 cm)
Ground
Clearance
Rear
38.5 in. (97 cm)
66.0 in. (168 cm)
91.0 in. (231 cm)
93.5 in. (238 cm)
47.0 in.
(119 cm)
8
GENERAL SPECIFICATIONS
Read all of this manual to become thoroughly familiar with this vehicle. Pay particular attention to all Notices, Cautions, Warnings, and Dangers.
TURNING DIAMETER AND INCLINE INFORMATION
RECOMMENDED MAX RAMP
25% GRADE or 14o MAX
RECOMMENDED MAX SIDE TILT
25% GRADE or 14o MAX
TURNING CLEARANCE
DIAMETER
19 ft. (5.8 m)
9
GENERAL SPECIFICATIONS
Read all of this manual to become thoroughly familiar with this vehicle. Pay particular attention to all Notices, Cautions, Warnings, and Dangers.
Notes:
10
INTRODUCTION
Read all of this manual to become thoroughly familiar with this vehicle. Pay particular attention to all Notices, Cautions, Warnings, and Dangers.
INTRODUCTION
FEATURES
General Information
NOTICE
If the vehicle is equipped with factory installed custom accessories, some accessories remain operational with the
key switch in the ‘OFF’ position.
ALL accessories that do NOT use the accessory wiring harness MUST be connected to draw from the entire
48 Volt battery pack. A DC to DC converter is required for accessories that require voltage other than 48
volts to operate properly.
Accessories connected to this vehicle that do not use the accessory harness must be connected to the DC to DC converter.
1. Steering Wheel
The steering wheel located in front of the driver seat is used to steer the
vehicle.
2. Brake Pedal
The brake pedal is located on the floor to the left of the accelerator pedal.
The brake pedal is a combination brake and park brake; to activate the
brake, depress the lower part of the pedal to slow or stop the vehicle.
3. Park Brake
The foot operated park brake is located along the top of the brake pedal. To
engage the park brake, push down on the upper section of the pedal until it
locks in place. The park brake will release when the lower part of the brake
pedal is depressed.
1
5
3
4
2
4. Accelerator Pedal
Unintentional movement of the accelerator pedal may cause the vehicle to move which could
result in severe injury or death.
With the key switch ‘ON’, depressing the accelerator pedal starts the motor. When the pedal is released, the motor will
stop. To stop the vehicle more quickly, depress the brake pedal.
5. Horn
The horn button is located on the driver side floorboard; depressing the button will sound the vehicle’s horn.
11
INTRODUCTION
Read all of this manual to become thoroughly familiar with this vehicle. Pay particular attention to all Notices, Cautions, Warnings, and Dangers.
6. Key / Light Switch
6
7
To reduce the possibility of component damage, the vehicle must be stopped
before moving the key switch or the direction selector.
Located on the dash panel, this switch controls the basic electrical system of the vehicle
as well as the front and rear lights. The switch has three positions, OFF, ON, and
LIGHTS. To prevent inadvertent operation of the vehicle when left unattended, the key
should be turned to the ‘OFF’ position and removed.
NOTICE
If the vehicle is equipped with factory installed custom accessories, some accessories remain operational with the
key switch in the ‘OFF’ position.
7. State of Charge Meter
The state of charge meter is located on the dash panel beside the key switch. It indicates the amount of usable power
in the batteries, with ‘F’ indicating a full charge on the battery pack and ‘E’ indicating the battery pack needs to be
charged.
8. Direction Selector
8
To prevent loss of control, do not move vehicle direction selector while the vehicle is in motion. Moving the selector will
result in sudden slowing of the vehicle and the beeping of a
warning device.
Located on the seat wrap panel, the direction selector switch permits the
selection of either ‘F’ (forward), ‘R’ (reverse) or ‘N’ (neutral). When left unattended, the vehicle should be placed in neutral, the parking brake engaged,
and the key removed.
When moved to into the “R” position, a reverse warnming buzzer will sound.
9. Fuse Block
The fuse block is used to provide electrical protection to some of the electrical components and vehicle accessories. The fuse block is located under the
seat on the driver side fender liner.
12
9
INTRODUCTION
Read all of this manual to become thoroughly familiar with this vehicle. Pay particular attention to all Notices, Cautions, Warnings, and Dangers.
10. Charger Receptacle
The polarized charger receptacle is located on the panel below the driver
seat. Always check to be sure the receptacle is free from dirt and debris
before connecting the charger cord.
10
11. Run - Tow/Maintenance/Storage Switch
The Run - Tow/Maintenance/Storage switch is used when the vehicle has
become stalled, inoperative or removed from service. The switch is located
under the seat on the passenger side of the vehicle.
11
To reduce the possibility of severe injury or death resulting
from loss of vehicle control, consider the grade of the terrain
the vehicle is on and set vehicle’s park brake accordingly
before switching the Run - Tow/Maintenance/Storage switch
to the ‘Tow/Maintenance/Storage’ position. When in the ‘Tow/
Maintenance/Storage’ position, the Anti-Roll Back and WalkAway safety features of the system no longer function.
Before attempting to tow vehicle, move the Run-Tow/Maintenance/
Storage switch to the ‘Tow/Maintenance/Storage’ position. Failure to
do so will damage the controller or motor.
Before disconnecting or connecting a battery, or any other wiring, move the Run-Tow/Maintenance/Storage
switch to the ‘Tow/Maintenance/Storage’ position.
After connecting a battery, or any other wiring, wait a minimum of 30 seconds before moving the Run-Tow/
Maintenance/Storage switch to the ‘Run’ position.
NOTICE
The Run - Tow/Maintenance/Storage switch should always be returned to the ’Tow/Maintenace/Storage’ position
after moving a stalled vehicle. If the switch is left in the ’RUN’ position for an extended period of time, it will drain the
batteries.
The Run - Tow/Maintenace/Storage switch is located under the seat on the passenger side of the vehicle.
With the switch in ‘TOW/MAINTENANCE/STORAGE’ position:
• the controller is deactivated
• the electronic braking system is deactivated which allows the vehicle to be towed or roll freely
• the warning beeper is deactivated
With the switch in ‘RUN’ position:
• the controller is activated
• the electronic braking system and warning beeper features are activated
13
INTRODUCTION
Read all of this manual to become thoroughly familiar with this vehicle. Pay particular attention to all Notices, Cautions, Warnings, and Dangers.
12. Seat
The bench seat is designed for two occupants.
13. Hip Restraints
14
16
The hip restraints are designed to help keep the
occupants properly positioned in the event of sudden
vehicle position changes.
14. Turn Signal Switch
17
The turn signal switch is located on the steering column and activates the turn signals when moved up or
down.
15. Brake and Taillights
The brake and taillights are located on the rear fenders.
16. Sweater Basket
Open basket behind the seat back for carrying sweaters, jackets or small packages.
17. Bag Well
17
13
12
15
Large bag well with straps to secure golf bags.
18. Glove Box Compartments and Ball Holders
Glove box compartments with golf ball holders, one on each side of the instrument panel provide storage space for
small items.
19. Headlights / Turn Signals
The combination headlight/turn signal assemblies are located on the front
cowl.
19
20. Cup Holder
A cup holder is provided for convenience of both the driver and passenger.
20
14
INTRODUCTION
Read all of this manual to become thoroughly familiar with this vehicle. Pay particular attention to all Notices, Cautions, Warnings, and Dangers.
21. Battery Compartment
The battery compartment can be accessed by raising the front seat to perform battery maintenance and access the run - tow/maintenance/storage
switch.
21
15
INTRODUCTION
Read all of this manual to become thoroughly familiar with this vehicle. Pay particular attention to all Notices, Cautions, Warnings, and Dangers.
Notes:
16
OPERATING PROCEDURES
Read all of this manual to become thoroughly familiar with this vehicle. Pay particular attention to all Notices, Cautions, Warnings, and Dangers.
OPERATING PROCEDURES
SERIAL NUMBER LOCATION
Two serial number and manufacture date code plates are on the vehicle. One (PART C) is placed on the body below
the front, driver side of the seat, PART D is placed on the frame weld tube. The other (PART A and PART B) is located
on the crossmember section of the chassis on the driver side (seat back support). To access it, raise the seat and lift up
the flap on the access panel.
Design changes take place on an ongoing basis. In order to obtain correct components for the vehicle, the manufacture
date code, serial number and vehicle model manufacture date code, and vehicle model must be provided when ordering service parts.
PART B
PART A
V
PART C/D
V
Lift Flap on Access Panel
Part A
Part B
Part D
Serial Number
Labels
Part C
17
OPERATING PROCEDURES
Read all of this manual to become thoroughly familiar with this vehicle. Pay particular attention to all Notices, Cautions, Warnings, and Dangers.
BEFORE INITIAL USE
Read, understand and follow the safety label on the instrument panel. Be sure you understand how to safely operate
the vehicle and its equipment. Maintaining good performance depends to a large extent on the operator.
Improper use of this vehicle could result in severe injury or death. This series of vehicles are light
duty vehicles. They are NOT All Terrain Vehicles (ATV).
This vehicle is not a toy and using it while engaging in horseplay is dangerous.
Plan carefully before using the vehicle to go significant distances over questionable terrain.
Remember that a one hour drive may take many hours to walk out should you run out of battery
power or be stranded by becoming stuck on unsuitable terrain.
Hydrogen gas is generated as a natural part of the lead acid battery charging process. A 4%
concentration of hydrogen gas is explosive and could cause severe injury or death. Charging
must take place in an area that is adequately ventilated (minimum of 5 air exchanges per hour).
To reduce the chance of a battery explosion that could result in severe injury or death, never
smoke around or charge batteries in an area that has open flame or electrical equipment that
could cause an electrical arc.
Hydrogen gas is generated in the charging cycle of batteries and is explosive in concentrations as low as 4%. Because
hydrogen gas is lighter than air, it will collect in the ceiling of buildings necessitating proper ventilation. Five air
exchanges per hour is considered the minimum requirement.
Never charge a vehicle in an area that is subject to flame or spark. Pay particular attention to natural gas or propane
gas water heaters and furnaces.
Before a new vehicle is put into operation, the items shown in the INITIAL SERVICE CHART must be performed.
INITIAL SERVICE CHART
Item
Service Operation
Portable Charger
Remove from vehicle and properly mount
Batteries
Charge batteries
Seats
Remove protective plastic covering
Brakes
Check operation
Establish acceptable stopping distance for brake
performance test
Tires
Check air pressure (see specifications)
Check for leaks that could have developed in shipment from the factory.
18
OPERATING PROCEDURES
Read all of this manual to become thoroughly familiar with this vehicle. Pay particular attention to all Notices, Cautions, Warnings, and Dangers.
PORTABLE CHARGER INSTALLATION
Risk of electric shock. Connect charger power cord to an outlet that has been properly
installed and grounded in accordance with all local codes and ordinances. A grounded
outlet is required to reduce risk of electric shock – do not use ground adapters or modify
plug. Do not touch uninsulated portion of output connector or uninsulated battery
terminal.
Disconnect the DC supply before making or breaking the connections to the battery while
charging. Do not open or disassemble charger. Do not operate charger if the AC supply
cord is damaged or if the charger has received a sharp blow, been dropped, or otherwise
damaged in any way – refer all repair work to qualified personnel. Not for use by children.
To reduce the possibility of overheating that may cause serious damage to the charger and create the potential for fire, do not block or obstruct the airways. Portable chargers must be
mounted on a platform above the ground or in such a manner as to permit the maximum air flow
underneath and around the charger.
Use charger ONLY on 48 volt battery systems. Other usage may cause personal injury and damage. Lead acid batteries may generate explosive hydrogen gas during normal operation. Keep
sparks, flames, and smoking materials away from batteries. Provide adequate ventilation during
charging. Never charge a frozen battery. Study all battery manufacturers’ specific precautions
such as recommended rates of charge and removing or not removing cell caps while charging.
Portable chargers must be mounted on a platform above the ground or in such a manner as to permit the maximum air flow underneath and around the charger.
Portable chargers are shipped with the vehicles. Prior to vehicle or charger operation, the charger must be removed
and mounted on a platform or wall above the ground to permit maximum air flow around and underneath the charger. A
dedicated circuit is required for the charger. Refer to the charger manual for appropriate circuit protection. For optimum performance and shortest charge times, place the charger in an area with adequate ventilation. The charger
should also be placed in an area that will be relatively free of dirt, mud, or dust since accumulations within the fins of the
charger will reduce their heat-dissipating qualities. Optimal cooling also occurs when the charger is placed on a horizontal surface with the fins vertical. More airflow from below the charger will help cool the fins, so placement above
open areas or areas with cut-outs for airflow is desirable. If the charger is operated in an outdoor location, rain and sun
protection must be provided. The charger may get hot during operation and must be placed such that risk of contact by
people is reduced. The charger may be mounted on a wall or shelf using #10-M5 screws. The charger’s status display
must be visible to the user.
NOTICE
Looping the DC cord through the steering wheel when charging serves as a good reminder to store the cord out of
the way when finished with charging. The DC plug can be damaged by driving over or catching the cord on the vehicle when driving away.
To reduce the possibility of a physical hazard that could result in an electrical shock or electrocution, be sure that the charger plug is not damaged and is inserted into a grounded receptacle.
The power (AC) cord is equipped with a grounded plug; do not attempt to pull out, cut or bend
the ground post.
19
OPERATING PROCEDURES
Read all of this manual to become thoroughly familiar with this vehicle. Pay particular attention to all Notices, Cautions, Warnings, and Dangers.
The charging (DC) cord is equipped with a polarized connector which fits into a matching receptacle on the vehicle.
NOTICE
If vehicle it to be charged with a non E-Z-GO charger, refer to the instructions supplied with the charger.
UNDERSTANDING THE CHARGER
Plugging the charger into the vehicle’s charger receptacle will lock the vehicle out of operation. When the charger is
plugged into the vehicle’s charger receptacle, the charger will automatically turn on and the charger’s LED and the vehicle receptacle’s LED will start flashing GREEN to indicate the batteries are charging.
Once a minimum battery voltage of 2 volts per cell (Vpc) is reached, the charger’s output current will change from a full
current charge to the trickle rated charging current. The length of charge time will vary by how depleted the batteries
are, the input AC voltage, and/or charger ambient temperatures. The charger’s LED will give a SHORT flash if the
charge is less than 80% and a LONG flash if the charge is greater than 80%. If the charger’s LED is a steady GREEN
the batteries are fully charged and the charger may be unplugged, although not necessary. The charger may be left
plugged in for long periods of time to maintain the batteries charge level.
If a fault occurred anytime during the charging the charger’s LED will quickly flash RED. The specific fault is indicated
by the number of RED flashes that occur, there will be a pause and then the flashes will repeat again. There are several
possible conditions that will generate errors. Some errors will require human intervention to first resolve the problem
and then reset the charger by unplugging the DC cord from the vehicle.
If the AC voltage is interrupted and restored, the charger will turn back on automatically.
LED Operation Codes
• SHORT GREEN FLASH = less than 80% charged
• LONG GREEN FLASH = more than 80% charged
• SOLID GREEN = 100% charged
• RED FLASH = fault code
LED Fault Codes
• RED FLASH: Light turns on briefly, but does not flash after that - check for valid AC voltage.
• ONE RED FLASH: One flash, a pause and then again one flash and a pause - Charge Enable Fault: poor con•
•
•
•
20
tact in the DC connector or dirty contacts or Battery Temperature Fault: battery temperature is greater than 122°
F (50° C) or less than 14° F (-10° C).
TWO RED FLASHES: Two flashes, a pause and then again two flashes and a pause - Battery Voltage Fault:
Battery pack is less than 48.0 Volts or more than 67.2 Volts. Battery pack is too discharged or over charged for
the charger to work.
THREE RED FLASHES: Three flashes, a pause and then again three flashes and a pause - Battery Charge
Time-out: Charge time exceeded 24 hours. This may indicate a problem with the battery pack or that the charger
output current was severely reduced due to high ambient temperatures.
FOUR RED FLASHES: Four flashes, a pause and then again four flashes and a pause - Battery Fault: Charge
time exceeded. This indicates a problem with the battery pack voltage not reaching the required nominal level
within the maximum time allowed.
SIX RED FLASHES: Six flashes, a pause and then again six flashes and a pause - Charger Fault: An internal
fault has been detected. If this fault is displayed again after unplugging the charger’s DC power cord and plugging it back in, the charger must be taken to a qualified service center.
OPERATING PROCEDURES
Read all of this manual to become thoroughly familiar with this vehicle. Pay particular attention to all Notices, Cautions, Warnings, and Dangers.
To prevent a physical hazard that could result in an electrical shock or electrocution, be sure that
the charger plug is not damaged and is inserted fully into a grounded receptacle.
The power (AC) cord is equipped with a grounded plug. Do not attempt to pull out, cut or bend
the ground post.
The charging (DC) cord is equipped with a polarized connector that fits into a
matching receptacle on the vehicle. The receptacle is located on the driver
side of the vehicle just below the seat bottom.
Charger Receptacle
USING THE CHARGER
The charger may remain plugged into the AC outlet when not in use. To
charge the vehicle, refer to the instruction labels on the charger. Insert the
polarized DC plug completely into the vehicle receptacle. The charger will
automatically start a few seconds after the plug is in place. The charger will
automatically stop when the batteries are fully charged and the DC plug can
be removed to permit use of the vehicle.
CHARGER MAINTENANCE
1. For flooded lead-acid batteries, regularly check the water levels of each battery cell after charging and add distilled water as required to the level specified by the battery manufacturer. Follow the safety instructions recommended by the battery manufacturer.
2. Make sure the charger connections to the battery terminals are tight and clean. Check for any deformations or
cracks in the plastic parts. Check the charger harness for chaffing and rubbing. Inspect all wiring for fraying,
loose terminals, chaffing, corrosion or deterioration of the insulation.
3. Keep the cooling fins free of dirt and debris, do not expose the charger to oil, dirt, mud or to direct heavy water
spray when cleaning equipment.
4. Inspect the plug of the battery charger and the vehicle receptacle housing for dirt or debris. Clean the DC connector monthly or more often if needed.
OPERATING THE VEHICLE
Improper use of the vehicle or the lack of proper maintenance may result in damage or decreased
performance.
Read the following warnings before attempting to operate the vehicle.
To reduce the possibility of severe injury or death resulting from loss of vehicle control, the following warnings must be observed:
When driving vehicle, consider the terrain, traffic conditions and the environmental factors which
effect the terrain and the ability to control the vehicle.
Use extra care and reduced speed when driving on poor surfaces, such as loose dirt, wet grass,
gravel, etc.
21
OPERATING PROCEDURES
Read all of this manual to become thoroughly familiar with this vehicle. Pay particular attention to all Notices, Cautions, Warnings, and Dangers.
Stay in designated areas and avoid extremely rough terrain.
Maintain a safe speed when driving down hill. Use service brake to control speed when traveling
down an incline. A sudden stop or change of direction may result in loss of control.
To prevent loss of control, do not move the direction selector of a vehicle while the vehicle is in
motion. Moving the selector will result in a sudden slowing of the vehicle and the beeping of a
warning device.
Slow down before and during turns. All turns should be made at reduced speed.
Never drive vehicle up, down, or across an incline that exceeds 14° (25% grade).
Refer to GENERAL SPECIFICATIONS for seating capacity.
Depressing accelerator pedal will release foot operated park brake and may cause inadvertent
vehicle movement. Turn the key to the ‘OFF’ position whenever the vehicle is parked.
To prevent inadvertent movement when the vehicle is to be left unattended, engage the park
brake, move direction selector to forward position, turn key to ‘OFF’ position and remove key.
Make sure that the direction selector is in correct position before attempting to start the vehicle.
Always bring the vehicle to a complete stop before shifting the direction selector.
Do not take vehicle out of ‘gear’ while in motion (coast).
Check the area behind the vehicle before operating in reverse.
All occupants must be seated. Keep entire body inside vehicle and hold on while vehicle is in
motion.
Performance
NOTICE
Vehicles operate only when the Run - Tow/Maintenance/Storage switch is in the ’RUN’ position.
The vehicle’s top speed is sensed and regulated directly by the controller.
Speed Control
To prevent the possibility of loss of control that could cause severe injury or death, use service
brake to control speed. The Speed control system is not a substitute for the service brake.
Speed control system vehicles are equipped with a regenerative motor control system.
Example: If all of the following events occur:
• the vehicle is being driven down a slope
• the vehicle attempts to exceed the specified top speed with the accelerator pedal depressed or released
the regenerative braking will limit the speed of the vehicle to the specified top speed (the warning beeper will not
sound). When the regenerative braking system is activated by this sequence of events, the motor generates power
which is returned to the batteries.
22
OPERATING PROCEDURES
Read all of this manual to become thoroughly familiar with this vehicle. Pay particular attention to all Notices, Cautions, Warnings, and Dangers.
If the operator attempts to override the regenerative braking feature by moving the direction selector or key switch to
another position, the warning beeper will sound and the vehicle will brake rapidly until it reaches the speed of approximately 2 mph (3 kph).
Pedal-Up Braking
Pedal-up braking is regenerative braking that occurs when the accelerator pedal is released while the vehicle is moving
between 8 mph (13 kph) and the vehicle’s top speed.
Example: If all of the following events occur:
• the vehicle is being driven down a slope
• the accelerator pedal is released for more than one second
the pedal-up braking will slow the vehicle (the warning beeper will not sound) until either the vehicle speed is reduced
to 8 mph (13 kph), at which it freely coasts between 8 and 3 mph (5 kph), or the accelerator pedal is applied. When
pedal-up braking system is activated by this sequence of events, the motor generates power which is returned to the
batteries.
Terrain
The vehicle is designed for use on improved roads (but not on public highways). The vehicle may also be used on
established trails or open terrain that is free from stumps, large rocks or holes.
The vehicle should not be used to cross water.
Walk-Away Feature
Walk-Away limits vehicle movement without driver input, slowing the vehicle to 2 mph (3 kph) and sounding an audible
alarm (reverse beeper).
Example: If all of the following events occur:
• the vehicle has been stopped for more than 1.5 seconds
• the accelerator pedal has been released for more than one second
• the vehicle begins to roll above 2 mph (3 kph)
the Walk-Away feature will limit speed to approximately 2 mph (3 kph) and the warning beeper will sound. When the
accelerator pedal is depressed, the Walk-Away feature and warning beeper will be overridden and normal vehicle operation resumes. Any unusual situation sensed by the TruCourse Technology system will cause a similar response. The
system functions in all key switch positions.
Anti-Roll Back Feature
Anti-Roll Back, like Walk-Away, limits backward motion of the vehicle down an incline to less than 2 mph (3 kph). See
‘Walk-Away Feature’ above.
Anti-Stall Feature
Anti-Stall protection prevents motor damage from stalling the vehicle against an object or on a hill.
Example: If all of the following events occur:
• the system senses that the accelerator pedal is depressed (power applied to motor)
• the motor is stalled long enough that any more time may cause motor damage
the Anti-Stall feature will momentarily interrupt power to the motor. This brief interruption will permit the car to roll backwards slightly before again stopping in the stalled condition. This process will repeat itself periodically until the car is
moved from the stalled condition.
Example: If all of the following events occur:
• the system senses that the accelerator pedal is depressed (power applied to motor)
• the brake is engaged so as to prevent vehicle motion
the Anti-Stall feature will sense a stalled motor condition and remove power from the motor. When the brake pedal is
released, the car will roll backwards slightly before power is returned to the motor.
23
OPERATING PROCEDURES
Read all of this manual to become thoroughly familiar with this vehicle. Pay particular attention to all Notices, Cautions, Warnings, and Dangers.
High Pedal Disable Feature
High pedal disable prevents undesired acceleration if the direction selector lever is changed, or the key is turned on
while the accelerator is depressed.
Diagnostic Mode Feature
Diagnostic mode eases troubleshooting.
In the unlikely event of certain electrical system failures, the Diagnostic Mode feature will default to a mode that will permit the vehicle to operate, but at a very reduced speed.
This feature allows the vehicle to be driven back to its storage facility where the problem can be diagnosed.
The controller can be put in diagnostic mode by the technician and the controller will report the failure mode.
STARTING AND DRIVING
To reduce the possibility of roll-back which could result in severe injury or vehicle damage, do not
release the service brake until motor has started.
All vehicles are equipped with an interlock system that disables the controller and prevents the vehicle from being operated or towed while the charger is connected. Remove the charger plug from the vehicle receptacle and properly store
the cable prior to moving the vehicle.
To operate the vehicle:
•
•
•
•
•
Apply the service brake, place the key in the key switch and turn it to the ‘ON’/’N’ position.
Move the direction selector to the direction desired.
Release the park brake by depressing the service brake pedal until the park brake releases.
Slowly depress the accelerator pedal to start the motor.
When the accelerator pedal is released, the motor controls the deceleration. To stop the vehicle more quickly,
depress the service brake pedal.
NOTICE
When the direction selector is in the reverse position, a warning signal will sound to indicate that the vehicle is ready
to run in reverse.
Starting Vehicle On A Hill
To reduce the possibility of roll-back which could result in severe injury or vehicle damage, do not
release the service brake until motor has started
.
Do not hold vehicle on hill by using accelerator and motor. Leaving motor in a stalled condition for more
than 3 - 4 seconds will cause permanent damage to motor.
To reduce the possibility of permanent damage to the drive system, it is important to prevent excessive roll-back when
starting the vehicle on a hill.
Place left foot on service brake and release the park brake. Depress accelerator with right foot and release the service
brake by lifting the left foot.
24
OPERATING PROCEDURES
Read all of this manual to become thoroughly familiar with this vehicle. Pay particular attention to all Notices, Cautions, Warnings, and Dangers.
Coasting
To reduce the possibility of severe injury or death from coasting at above recommended speeds,
limit speed with service brake.
Uncontrolled coasting does not occur with this model. However, this is not a substitute for the service brake which
should be used to slow the speed of the vehicle quickly.
NOTICE
This model is equipped with a feature (pedal-up braking) that slows the vehicle’s speed when the accelerator pedal
is released until the vehicle stops.
LABELS AND PICTOGRAMS
Vehicles may be labeled with pictograms as a method of conveying information or warnings. The SAFETY Section of
this manual explains the labels that are used on this vehicle.
SUN TOP AND WINDSHIELD (IF EQUIPPED)
The sun top does not provide protection from roll-over or falling objects.
The windshield does not provide protection from tree limbs or flying objects.
The sun top and windshield provide some protection from the elements; however, they will not keep the operator and
passenger dry in a downpour. This vehicle is not equipped with seat belts and the sun top has not been designed to
provide roll-over protection. In addition, the sun top does not protect against falling objects nor does the windshield protect against flying objects and tree limbs. Keep arms and legs inside of the vehicle while it is moving.
25
OPERATING PROCEDURES
Read all of this manual to become thoroughly familiar with this vehicle. Pay particular attention to all Notices, Cautions, Warnings, and Dangers.
Notes:
26
MAINTENANCE
Read all of this manual to become thoroughly familiar with this vehicle. Pay particular attention to all Notices, Cautions, Warnings, and Dangers.
MAINTENANCE
VEHICLE CLEANING AND CARE
To reduce the possibility of severe injury or vehicle damage, read and understand all instructions
supplied by manufacturer of pressure washer.
When pressure washing exterior of vehicle, do not use pressure in excess of 700 psi and maintain a 12”
minimum distance from spray nozzle to painted surface. To reduce the possibility of cosmetic damage, do
not use any abrasive or reactive solvents to clean plastic parts.
It is important that proper techniques and cleaning materials be used. Using excessive water pressure may cause
severe injury to operator or bystander, damage to seals, plastics, seat material, body finish or electrical system. Do not
use pressure in excess of 700 psi to wash exterior of vehicle.
Clean windshield with lots of water and a clean cloth. Minor scratches may be removed using a commercial plastic polish or Plexus® plastic cleaner available from the service parts department.
Normal cleaning of vinyl seats and plastic or rubber trim requires the use of a mild soap solution applied with a sponge
or soft brush and wipe with a damp cloth.
Removal of oil, tar, asphalt, shoe polish, etc. will require the use of a commercially available vinyl/rubber cleaner.
The painted surfaces of the vehicle provide attractive appearance and durable protection. Frequent washing with lukewarm or cold water and mild detergent is required to preserve the painted surfaces.
Occasional cleaning and waxing with non-abrasive products designed for ‘clear coat’ automotive finishes will enhance
the appearance and durability of the painted surfaces.
Corrosive materials used as fertilizers or for dust control can collect on the underbody of the vehicle. These materials
will cause corrosion of underbody parts unless flushed occasionally with plain water. Thoroughly clean any areas where
mud or other debris can collect. Sediment packed in closed areas should be loosened to ease it’s removal, taking care
not to chip or otherwise damage paint.
COMMON SENSE OPERATION
This vehicle is not a toy. If not operated properly and responsibly, it can cause severe injury or death to the operator,
passengers or bystanders. All operators should possess a valid driver’s license. Children should not be permitted to
operate the vehicle. Children may not have the skill, judgement or strength to operate this or similar vehicles.
Alcohol, drugs and many over the counter medications reduce the ability of the driver to operate the vehicle safely.
Always review side effects of any medication with a doctor or pharmacist before operating vehicle.
When driving at full speed on an unpaved road, loose surfaces or wet grass, vehicle stopping distance will increase. If
the vehicle is fully loaded, it will take longer to stop than with no load. When operating vehicle in wet weather conditions, remember that the brakes may need to be lightly applied in order to provide enough friction to dry the brake unit.
If wet, the brakes will lose much of their effect.
Slow down when in unfamiliar terrain. Slow down when cresting a hill in an area that you are unfamiliar with.
Some hills are too steep to climb. If you attempt to climb a hill that is too steep or if you are unable to achieve adequate
traction, do not attempt to turn around on the hill. Slowly back straight down the hill using the service brake to
control speed.
27
MAINTENANCE
Read all of this manual to become thoroughly familiar with this vehicle. Pay particular attention to all Notices, Cautions, Warnings, and Dangers.
ENVIRONMENTAL CONCERNS
As a responsible user, practice respect for all wildlife and their habitat. Respect private property
and comply with all local laws and regulations.
Be aware of the danger of fire when vehicle is operated over dry, combustible material.
When operating vehicle, be aware of environmental hazards such as steep slopes, overhanging
limbs, etc.
Battery Disposal
Lead-acid batteries are recyclable. Return whole scrap batteries to distributor, manufacturer or lead smelter for recycling. For neutralized spills, place residue in acid-resistant containers with absorbent material, sand or earth and dispose of in accordance with local, state and federal regulations for acid and lead compounds. Contact local and/or state
environmental officials regarding disposal information.
LIFTING THE VEHICLE
Some servicing operations may require the front wheels, the rear wheels, or the entire vehicle to be raised.
Use extreme care since the vehicle is extremely unstable during the lifting process.
Be sure the vehicle is on a firm and level surface.
Never get under a vehicle while it is supported by a jack.
Use jack stands and test the stability of the vehicle on the stands.
Place chocks in front and behind the wheels not being raised.
When lifting the vehicle, position the jacks and jack stands at the areas indicated only.
Tool List
Qty.
Floor Jack ....................................................................1
Wheel Chocks..............................................................4
28
Tool List
Qty.
Jack Stands ................................................................. 4
MAINTENANCE
Read all of this manual to become thoroughly familiar with this vehicle. Pay particular attention to all Notices, Cautions, Warnings, and Dangers.
No person(s) should be in or on the vehicle while lifting.
To raise the entire vehicle, install chocks in front and behind each
front wheel. Center the jack under the rear frame crossmember.
Raise the vehicle enough to place a jack stand under the outer ends
of the rear axle.
Lower the jack and test the stability of the vehicle on the two jack
stands.
Place the jack at the center of the front axle. Raise the vehicle
enough to place jack stands under the frame crossmember as indicated.
Lower the jack and test the stability of the vehicle on all four jack
stands.
If only the front or rear of the vehicle is to be raised, place the
chocks in front and behind each wheel not being raised to stabilize
the vehicle.
Lower the vehicle by reversing the lifting sequence.
View from Underside of Vehicle
WHEELS AND TIRES
A tire explosion can cause severe injury or death. Never exceed the inflation pressure rating on
the tire sidewall.
To reduce the possibility of tire explosion, pressurize tire with small amounts of air applied intermittently to seat beads. Due to the low volume of the small tires, overinflation can occur in seconds. Never exceed the tire manufacturer’s recommendation when seating a bead. Protect face
and eyes from escaping air when removing a valve core.
To reduce the possibility of severe injury caused by a broken socket when removing wheels, use
only sockets designed for impact wrench use.
DO NOT use low inflation tires on any E-Z-GO vehicle. DO NOT use any tire which has a recommended inflation pressure less than the inflation pressure recommended in the owner’s guide.
Use caution when inflating tires. Overinflation could cause the tire to separate from the wheel or
cause the tire to explode, either of which could cause severe injury.
29
MAINTENANCE
Read all of this manual to become thoroughly familiar with this vehicle. Pay particular attention to all Notices, Cautions, Warnings, and Dangers.
Tire Repair
Tool List
Qty.
Lug Wrench, 3/4” .........................................................1
Impact Wrench.............................................................1
Tool List
Qty.
Impact Socket, 3/4”...................................................... 1
Torque Wrench, ft. lbs.................................................. 1
Use caution when inflating tires. Due to the low volume of the small tires, overinflation can occur in seconds. Overinflation could cause the tire to separate from the wheel or cause the tire to explode.
Tire inflation should be determined by the condition of the terrain. See GENERAL SPECIFICATIONS section for recommended tire inflation pressure. For outdoor applications with major use on grassy areas, the following should be considered. On hard turf, it is desirable to have a slightly higher inflation pressure. On very soft turf, a lower pressure reduces
the possibility of tires cutting into the turf. For vehicles being used on paved or hard surfaces, tire inflation pressure
should be in the higher allowable range, but under no condition should inflation pressure be higher than recommended
on tire sidewall. All four tires should have the same pressure for optimum handling characteristics. Be sure to install
the valve stem dust cap after checking or inflating.
The vehicle is fitted with low pressure tubeless tires mounted on one piece rims; therefore, the most cost effective way
to repair a puncture in the tread is to use a commercial tire plug.
NOTICE
Tire plug tools and plugs are available at most automotive parts outlets and have the advantage of not requiring the
tire be removed from the wheel.
If the tire is flat, remove the wheel and inflate the tire to the maximum recommended pressure for the tire. Immerse the
tire in water to locate the leak and mark with chalk. Insert tire plug in accordance with manufacturer’s instructions.
To reduce the possibility of severe injury, be sure the mounting/demounting machine is anchored
to floor. Wear OSHA approved safety equipment when mounting/demounting tires.
If the tire is to be removed or mounted, the tire changing machine manufacturer’s recommendations must be followed
in order to reduce possibility of severe injury.
Wheel Installation
To reduce the possibility of component damage, do not tighten lug nuts to more than 85 ft. lbs. (115 Nm)
torque.
NOTICE
It is important to follow the ‘cross sequence’ pattern when installing lug nuts. This will assure even seating of the
wheel against the hub.
With the valve stem to the outside, mount the wheel onto the
hub with lug nuts. Finger tighten the lug nuts (1) in a ‘cross
sequence’ pattern. Tighten the lug nuts to 50 to 85 ft. lbs. (68
to 115 Nm) torque in 20 ft. lbs. (27 Nm) increments following
the ‘cross sequence’ pattern.
30
'Cross Sequence'
1
3
4
2
MAINTENANCE
Read all of this manual to become thoroughly familiar with this vehicle. Pay particular attention to all Notices, Cautions, Warnings, and Dangers.
LIGHT BULB REPLACEMENT
To reduce the possibility of premature bulb failure, do not touch new bulbs with bare fingers. Use clean, dry
tissue or paper towel to handle the glass portion of the bulb.
Headlight
To prevent bulb from inadvertantly disconnecting and possibly melting or igniting plastic components, the
locking ring MUST be reinstalled after installation of replacement bulb.
Pull the locking ring straight off the back of the light housing and allow it to slide down the harness and out of the
way.
Turn Signal
Bulb
Rotate bulb socket a quarter turn counterclockwise to
unlock. Pull out bulb and socket. Insert new bulb and rotate
socket a quarter turn clockwise to secure.
Slide locking ring over new bulb socket and onto back of
light housing.
Turn Signal
Locate the turn signal bulb socket on backside of light
housing. Rotate a quarter turn counterclockwise to unlock
and remove from housing. Insert replacement bulb and
rotate a quarter turn clockwise to secure in place.
Headlight
Bulb
Brake Light
Rear Fender
Remove two phillips head screws securing lens and pull
lens out of housing to access the brake light bulb. Remove
the light bulb and install a new bulb, making sure bulb
makes good contact with socket. Replace the lens and
reinstall the phillips head screws.
Lens
Bulb
FUSE REPLACEMENT
To replace fuses, raise the seat bottom, the fuse block is located on the
fender liner on the driver side of the vehicle. Pull out old fuse and replace
with a new fuse of the same type and size.
Fuse Block
31
MAINTENANCE
Read all of this manual to become thoroughly familiar with this vehicle. Pay particular attention to all Notices, Cautions, Warnings, and Dangers.
TRANSPORTING VEHICLE
Towing
Use extra caution when towing a vehicle.
DO NOT ride on the vehicle being towed.
DO NOT attempt to tow the vehicle with ropes, chains or any device other than a factory
approved tow bar.
DO NOT tow the vehicle on highways.
DO NOT tow a single vehicle at speeds in excess of 12 mph (19 kph).
DO NOT tow more than three vehicles at a time.
DO NOT exceed 5 mph (8 kph) while towing multiple vehicles.
Hauling
Be sure vehicle and all contents are secure before transporting a vehicle.
Never ride on the vehicle being transported.
Always remove the windshield (if equipped) before transporting.
Maximum speed with sun top installed is 50mph (80 kph).
If the vehicle is to be transported at highway speeds, the sun top must be removed and the seat bottom secured. When
transporting vehicle below highway speeds, check for tightness of hardware and cracks in sun top at mounting points.
The rated capacity of the trailer or truck must exceed the weight of the vehicle (see GENERAL SPECIFICATIONS for
vehicle weight) and load plus 1000 lbs. (454 kg).
Secure the vehicle using ratchet tie downs.
SERVICE AND MAINTENANCE
DO NOT attempt any type of servicing operations before reading all notes, cautions and warnings in this manual.
Any servicing requiring adjustments to be made to the powertrain while the motor is running must
be made with both drive wheels raised and vehicle properly supported on jack stands.
To reduce the possibility of motor damage, never operate vehicle at full throttle for more than 4 5 seconds while vehicle is in a ‘no load’ condition.
Reduce the possibility of accidental starting by disconnecting battery at negative terminal before
servicing.
32
MAINTENANCE
Read all of this manual to become thoroughly familiar with this vehicle. Pay particular attention to all Notices, Cautions, Warnings, and Dangers.
Wear eye protection when working on the vehicle. Use extra care when working around batteries, or using solvents or compressed air.
To reduce the possibility of causing an electrical arc, which could result in a
battery explosion, turn off all electrical loads from the battery before removing
battery wires.
Wrap wrenches with vinyl tape to reduce the possibility of a dropped wrench
‘shorting out’ a battery, which could result in an explosion.
The electrolyte in a battery is an acid solution which can cause severe burns to
the skin and eyes. Treat all electrolyte spills to the body and eyes with
extended flushing with clear water. Contact a physician immediately.
Any electrolyte spills should be neutralized with a solution of 2 teaspoons (10 ml) sodium bicarbonate (baking soda) dissolved in 1 quart (1 liter) of water and flushed with water.
Aerosol containers of battery terminal protectant must be used with extreme care. Insulate metal
container to reduce the possibility of can contacting battery terminals which could result in an
explosion.
It is in the best interest of both vehicle owner and service technician to carefully follow the procedures recommended in
this manual. Preventative maintenance, applied at recommended intervals, is the best guarantee for keeping the vehicle both dependable and economical.
Before any electrical service is performed, the ‘Run-Tow/Maintenance/Storage’ switch must be placed in the
‘Tow/Maintenance/Storage’ position.
If a power wire (battery, motor or controller) is disconnected for any reason, the ‘Run-Tow/Maintenance/Storage’ switch
must be left in the ‘Tow/Maintenance/Storage’ position for at least 30 seconds after the circuit is restored.
This vehicle will give years of satisfactory service, providing it receives regular maintenance. Refer to the Periodic Service Schedule for appropriate service intervals. Refer to Lubrication Points for appropriate lubrication locations.
ROUTINE MAINTENANCE
To prolong vehicle life, some maintenance items must be serviced more frequently on vehicles used under
severe driving conditions such as extreme temperatures, extreme dust/debris conditions, or frequent use
with maximum load.
To access the powertrain for routine maintenance, lift or remove the seat and remove the rear access panel. For major
repair, refer to the appropriate Technician’s Repair and Service Manual.
Some service procedures may require the vehicle to be lifted. Refer to LIFTING THE VEHICLE for proper lifting procedure and safety information.
TIRE INSPECTION
Tire condition should be inspected per the Periodic Service Schedule. Inflation pressures should be checked when the
tires are cool. Be sure to install the valve dust cap after checking or inflating.
33
MAINTENANCE
Read all of this manual to become thoroughly familiar with this vehicle. Pay particular attention to all Notices, Cautions, Warnings, and Dangers.
BRAKES
Dry, Level, Clean, Paved Surface
Accelerate To
Maximum Speed
To reduce the possibility of severe injury or death,
always evaluate pedal travel before operating a
vehicle to verify some braking function is present.
All driving brake tests must be done in a safe location with regard for the safety of all personnel.
Latch
Parking Brake
and Take Foot
Off Pedal
Line or Marker
Line or Marker
NOTICE
Over time, a subtle loss of performance may take place; therefore, it is important to establish the standard with a new vehicle.
The Periodic Brake Performance Test should be performed regularly as an evaluation of braking system performance. It is useful
as a method of identifying subtle loss of performance over time.
Periodic Brake Test
Acceptable
Stopping 4 ft. (1.2 m)
Distance
Normal Range of
Stopping Distance
Any vehicles that stop
more than 4 ft. (1.2 m)
beyond the Acceptable
Stopping Distance or
pulls to one side should
be removed from service
and inspected by a
qualified mechanic
The purpose of this test is to compare the braking performance
of the vehicle to the braking performance of new or ‘known to be good’ vehicles or to an established acceptable stopping distance. Actual stopping distances will be influenced by weather conditions, terrain, road surface condition, actual
vehicle weight (accessories installed) and vehicle speed. No specific braking distance can be reliably specified. The
test is conducted by latching the park brake to eliminate different pedal pressures and to include the affects of linkage
mis-adjustment.
Establish the acceptable stopping distance by testing a new or ‘known to be good’ vehicle and recording the stopping
location or stopping distance. For fleet vehicles, several vehicles should be tested when new and the range of stopping
locations or distances recorded.
NOTICE
Over time, a subtle loss of performance may take place; therefore, it is important to establish the standard with a
new vehicle.
Drive the vehicle at maximum speed on a flat, dry, clean, paved surface. Quickly depress the brake pedal to latch the
parking brake at the line or marker in the test area and remove foot from pedal. The vehicle should stop aggressively.
The wheel brakes may or may not lock. Observe the vehicle stopping location or measure the vehicle stopping distance
from the point at which the brakes were latched. The vehicle should stop within the ‘normal’ range of stopping distances. If the vehicle stops more than 4 ft. (1.2 m) beyond the acceptable stopping distance or pulls to one side, the
vehicle has failed the test and should be tested again.
If the vehicle fails the second test, it should immediately be removed from service. The vehicle must be inspected by
a qualified mechanic who should refer to the TROUBLESHOOTING section in the Technician’s Repair and Service
Manual.
SYSTEM TEST
At monthly intervals, test the controller by allowing the vehicle to roll down an incline with the accelerator pedal
released. Braking force should be felt at approximately 2 mph (3 kph) indicating that the system is functioning. If vehicle
speed continues to rise, apply the service brake and have vehicle inspected by a trained mechanic.
34
MAINTENANCE
Read all of this manual to become thoroughly familiar with this vehicle. Pay particular attention to all Notices, Cautions, Warnings, and Dangers.
REAR AXLE
The only maintenance required for the first five years is the periodic inspection of
the rear axle for lubricant leakage. Unless leakage is evident, the lubricant need
only be replaced after five years. Refer to the Service and Repair Manual for the
fluid replacement procedure.
Checking the Lubricant Level
Clean the area around the check/fill plug and remove plug. The correct lubricant
level is just below the bottom of the threaded hole. If lubricant is low, add lubricant
as required. Add lubricant slowly until lubricant starts to seep from the hole. Install
the check/fill plug. In the event that the lubricant is to be replaced, the oil pan
must be removed or the oil siphoned through the check/fill hole.
Check/Fill Plug
LUBRICATION
Lubrication Points
Do not use more than three (3) pumps of grease in any grease
fitting at any one time. Excess grease may cause grease seals
to fail or grease migration into areas that could damage components.
Putting more than three pumps of grease in a grease fitting could
damage grease seals and cause premature bearing failure.
Rack Ball Joint
View from Underside of Vehicle
CAPACITIES AND REPLACEMENT PARTS
Rear Axle Oil
12 oz (1.2 liters) 30 WT Engine Oil
Fuse
15 amp (P/N 18392-G1)
Headlight Bulb
P/N 74004-G01
Turn Signal Bulb
P/N 604539
Tail Light Bulb
#1157 (P/N 21759-G1)
35
MAINTENANCE
Read all of this manual to become thoroughly familiar with this vehicle. Pay particular attention to all Notices, Cautions, Warnings, and Dangers.
HARDWARE
Generally, three classes of standard hardware and three classes of metric hardware are used in the vehicle. Grade 5
hardware can be identified by the three marks on the hexagonal head; grade 8 hardware is identified by six marks on
the head; grade 2 hardware is unmarked. The class specifiction is marked on metric hardware.
Periodically, the vehicle should be inspected for loose fasteners. Fasteners should be tightened with care and in accordance with the Torque Specifications table or as specified in the Repair and Service Manual for this vehicle.
ALL TORQUE FIGURES ARE IN FT. LBS. (Nm)
Unless otherwise noted in text, tighten all hardware in accordance with this chart.
This chart specifies 'lubricated' torque figures. Fasteners that are plated or lubricated when
installed are considered 'wet' and require approximately 80% of the torque required for 'dry' fasteners.
BOLT SIZE
1/4"
5/16"
3/8"
7/16"
1/2"
9/16"
5/8"
3/4"
7/8"
1"
Grade 2
4
(5)
8
(11)
15
(20)
24
(33)
35
(47)
55
(75)
75
(102)
130
(176)
125
(169)
190
(258)
Grade 5
6
(8)
13
(18)
23
(31)
35
(47)
55
(75)
80
(108)
110
(149)
200
(271)
320
(434)
480
(651)
Grade 8
6
(8)
18
(24)
35
(47)
55
(75)
80
(108)
110
(149)
170
(230)
280
(380)
460
(624)
680
(922)
BOLT SIZE
M4
M5
M6
M8
M10
M12
M14
Class 5.8
(Grade 2)
5.8
1
(2)
2
(3)
4
(6)
10
(14)
20
(27)
35
(47)
55
(76.4)
Class 8.8
(Grade 5)
8.8
2
(3)
4
(6)
7
(10)
18
(24)
35
(47)
61
(83)
97
(131)
Class 10.9
(Grade 8) 10.9
3
(4)
6
(8)
10
(14)
25
(34)
49
(66)
86
(117)
136
(184)
Torque Specifications and Bolt Grades
BATTERY CHARGING AND MAINTENANCE
Safety
Always observe the following warnings when working on or near batteries.
To prevent battery explosion that could result in severe personal injury or death, keep all smoking materials, open flames or sparks away from the batteries.
Hydrogen gas is formed when charging batteries. Do not charge batteries without adequate ventilation. A 4% concentration of hydrogen gas is explosive.
Be sure that the key switch is off and all electrical accessories are turned off before starting work
on the vehicle.
Never disconnect a circuit under load at a battery terminal.
36
MAINTENANCE
Read all of this manual to become thoroughly familiar with this vehicle. Pay particular attention to all Notices, Cautions, Warnings, and Dangers.
Batteries are heavy. Use proper lifting techniques when moving them.
Always lift the battery with a commercially available battery lifting device.
Use care not to tip batteries when removing or installing them; spilled
electrolyte can cause burns and damage.
The electrolyte in a storage battery is an acid solution which can cause
severe burns to the skin and eyes. Treat all electrolyte spills to the body
and eyes with extended flushing with clear water. Contact a physician
immediately.
Always wear a safety shield or approved safety goggles when adding
water or charging batteries.
Any electrolyte spills should be neutralized with a solution of 1/4 cup (60
ml) sodium bicarbonate (baking soda) dissolved in 1 1/2 gallons (6 liters)
of water and flushed with water.
Overfilling batteries may result in electrolyte being spilled from the battery during the charge
cycle. Expelled electrolyte may cause damage to the vehicle and storage facility.
Aerosol containers of battery terminal protectant must be used with extreme care. Insulate metal
container to prevent can from contacting battery terminals which could result in an explosion.
Wrap wrenches with vinyl tape to prevent the possibility of a dropped wrench
from ’shorting out’ a battery, which could result in an explosion and severe personal injury or death.
Battery Disposal
Lead-acid batteries are recyclable. Return whole scrap batteries to distributor, manufacturer or lead smelter for recycling. For neutralized spills, place residue in acid-resistant containers with absorbent material, sand or earth and dispose of in accordance with local, state and federal regulations for acid and lead compounds. Contact local and/or state
environmental officials regarding disposal information.
Battery
A battery is defined as two dissimilar metals immersed in an acid. If the acid is absent or if the metals are not dissimilar,
a battery has not been created. The batteries most commonly used in these vehicles are lead acid.
A battery does not store electricity, but is able to produce electricity as the result of a chemical reaction which releases
stored chemical energy in the form of electrical energy. The chemical reaction takes place faster in warm conditions
and slower in cold conditions. Temperature is important when conducting tests on a battery and test results must be
corrected to compensate for temperature differences.
As a battery ages, it still performs adequately except that its capacity is diminished. Capacity describes the time that a
battery can continue to provide its design amperes from a full charge.
A battery has a maximum life, therefore good maintenance is designed to maximize the available life and reduce the
factors that can reduce the life of the battery.
Battery Maintenance
Tool List
Qty.
Insulated Wrench, 9/16" .............................................. 1
Hydrometer ................................................................. 1
Battery Protective Spray ............................................. 1
Tool List
Qty.
Battery Carrier..............................................................1
Battery Maintenance Kit P/N 25587-G01.....................1
37
MAINTENANCE
Read all of this manual to become thoroughly familiar with this vehicle. Pay particular attention to all Notices, Cautions, Warnings, and Dangers.
At Each Charging Cycle
To reduce the possibility of fire, never attach a battery charger to a vehicle that is to be unattended beyond the normal charging cycle. Overcharging could cause damage to the vehicle batteries and result in extreme overheating. The charger should be checked after 24 hours and
unplugged after the charge cycle is complete.
• Before charging the batteries, inspect the plug of the battery charger and vehicle receptacle housing for dirt or
•
debris.
Charge the batteries after each day’s use.
Monthly
• Inspect all wiring for fraying, loose terminations, corrosion or deterioration of insulation.
• Check that the electrolyte level is correct and add suitable water as required.
• Clean the batteries and wire terminations.
• Coat battery terminals with commercially available protectant.
Electrolyte Level and Water
The correct level of the electrolyte is 1/2" (13 mm) above the plates in each cell.
This level will leave approximately 1/4" - 3/8" (6 - 10 mm) of space between the electrolyte and the vent tube. The electrolyte level is important since any portion of the plates exposed to air will be ruined beyond repair. Also avoid filling with
too much water, which will result in electrolyte being forced out of the battery due to gassing and a decrease in volume
of the electrolyte that results from the charging cycle.
DO NOT overfill batteries. The charging cycle will expel electrolyte and result in component damage.
A battery being charged will ’gas’ with the majority of the
gassing taking place at the end of the charging cycle. This
gas is hydrogen which is lighter than air. Water and sulphuric acid droplets will be carried out of the battery vents by
the hydrogen gas, however, this loss is minimal. If the battery electrolyte level is too high, the electrolyte will block the
vent tube and the gas will force it out of the vent tube and
battery cap. The water will evaporate but the sulphuric acid
will remain where it can damage vehicle components and
the storage facility floor. Sulphuric acid loss will weaken the
concentration of acid within the electrolyte and reduce the
life of the battery.
Over the life of the battery, a considerable amount of water
is consumed. It is important that the water used be pure and
free of contaminants that could reduce the life of the battery
by reducing the chemical reaction. The water must be distilled or purified by an efficient filtration system. Water that is
not distilled should be analyzed and, if required, filtration
installed to permit the water to meet the requirements of the
water purity table.
Vent Cap
Gas Vent
Expansion
Space
Vent
1/4” to 3/8”
(6 mm to 10mm)
1/2” (13 mm)
Plates
Electrolyte level should be at least 1/2” (13mm) above the
plates and 1/4” to 3/8” (6 to 10 mm) below vent
Correct Electrolyte Level
38
MAINTENANCE
Read all of this manual to become thoroughly familiar with this vehicle. Pay particular attention to all Notices, Cautions, Warnings, and Dangers.
Even if the water is colorless, odorless, tasteless and fit for
drinking, the water should be analyzed to see that it does
not exceed the impurity levels specified in the table.
Impurity
Parts Per
Million
Color
Suspended
Total Solids
Calcium & Magnesium Oxides
Iton
Ammonia
Organic & Volatile Matter
Nitrites
Nitrates
Chloride
Clear
Trace
100
40
5
8
50
5
10
5
Water Purity Table
Hand held watering devices available at an automotive parts store, or automatic watering devices such as the one
included in the E-Z-GO Battery Maintenance Kit (P/N 25587-G01) can be used with an approved water source. These
watering devices are accurate, easy to use and allow for rapid filling. They also maintain the correct electrolyte level
within the battery cells.
Watering gun similar to the type included in the E-Z-GO
Battery Maintenance Kit
Distilled Water
Valve consistently
fills to a predetermined
level
Dispensing valve consistently
fills to a predetermined level
Electrolyte Level
Pure Water
Electrolyte Level
Single Battery Cell
Single Battery Cell
Automatic Watering Gun
Hand Held Watering Device
NOTICE
The watering device should only be used if the electrolyte level is less than 1/2” (13 mm) above top of plates.
39
MAINTENANCE
Read all of this manual to become thoroughly familiar with this vehicle. Pay particular attention to all Notices, Cautions, Warnings, and Dangers.
The electrolyte in a storage battery is an acid solution which can cause severe burns to the skin
and eyes. Treat all electrolyte spills to the body and eyes with extended flushing with clear water.
Contact a physician immediately.
Any electrolyte spills should be neutralized with a solution of 1/4 cup (60 ml)
sodium bicarbonate (baking soda) dissolved in 1 1/2 gallons (6 liters) of water
and flushed with water.
Always wear a safety shield or approved safety goggles when adding water or
charging batteries.
Battery Cleaning
To prevent battery damage, be sure that all battery caps are tightly installed.
To reduce the possibility of damage to vehicle or floor, neutralize acid before rinsing battery.
To reduce the possibility of damage to electrical components while cleaning, do not use a pressure washer.
Cleaning should occur per the Periodic Service Schedule.
When cleaning the outside of the batteries and terminals, do not use a water hose without first spraying the batteries
with a solution of baking soda (sodium bicarbonate) and water to neutralize any acid deposits. Use of a water hose
without first neutralizing the acid will move the acid from the top of the batteries to another area of the vehicle or storage
facility, where it will attack the metal structure or the concrete/asphalt floor. After hosing down the batteries, a residue
will be left on the batteries, which is conductive and will contribute to the discharge of the batteries
The correct cleaning technique is to spray the top and sides
of the batteries with a solution of baking soda and water. This
solution can be applied with a plastic spray bottle. The solution should consist of 2 teaspoons (10 ml) sodium bicarbonate (baking soda) dissolved in 1 quart (1 liter) of water. In
addition to the batteries, special attention should be paid to
metallic components adjacent to the batteries, these should
also be sprayed with the baking soda solution.
Allow the solution to set for at least three minutes. Use a soft
bristle brush or cloth to wipe the tops of the batteries in order
to remove any residue that could cause the self-discharge of
the battery. Rinse the entire area with low pressure clear
water.
Cleaning should take place once a month or more often under
harsh conditions. After batteries are clean and dry, the terminals should be coated with a commercially available protectant. Aerosol containers of battery terminal protectant must be
used with extreme care. Insulate the metal container to prevent the can from contacting the battery terminals.
1 quart
(1 liter)
Clear Water
2 Teaspoons
(10 ml)
Sodium
Bicarbonate
(Baking Soda)
Plastic
Spray
Bottle
Preparing Acid Neutralizing Solution
40
MAINTENANCE
Read all of this manual to become thoroughly familiar with this vehicle. Pay particular attention to all Notices, Cautions, Warnings, and Dangers.
Battery Replacement
Before any electrical service is performed on TruCourse technology model vehicles, the Run-Tow/Maintenance/Storage switch must be placed in the ‘Tow/Maintenance/Storage’ position.
If a power wire (battery, motor or controller) is disconnected for any reason, the Run-Tow/Maintenance/Storage switch must be left in the ‘Tow/Maintenance/Storage’ position for at least 30 seconds after the circuit is
restored.
Remove battery hold downs and cables. Lift out batteries with a commercially available lifting device.
If the batteries have been cleaned and any acid in the battery rack area neutralized as recommended, no corrosion to
the battery racks or surrounding area should be present. Any corrosion found should be immediately removed with a
putty knife and a wire brush. The area should be washed with a solution of sodium bicarbonate (baking soda) and water
and thoroughly dried before priming and painting with a corrosion resistant paint.
The batteries should be placed into the battery racks and the battery hold downs tightened to 45 - 55 in. lbs. (5 - 6 Nm)
torque, to prevent movement but not tight enough to cause distortion of the battery cases.
Inspect all wires and terminals. Clean any corrosion from the battery terminals or the wire terminals with a solution of
sodium bicarbonate (baking soda) and brush clean if required.
To prevent battery explosion that could result in severe personal injury or death, extreme care
must be used with aerosol containers of battery terminal protectant. Insulate the metal container
to prevent the metal can from contacting battery terminals which could result in an explosion.
Use care to connect the battery wires as shown.
Tighten the battery post hardware to 90 - 100 in. lbs. (6 -8
Nm) torque. Do not over-torque the terminal stud nut, this
will cause a “mushroom” effect on the battery post which will
prevent the terminal nut from being properly tightened.Protect the battery terminals and battery wire terminals with a
commercially available coating.
Protect the battery terminals and battery wire terminals with
a commercially available coating.
BL+ to
Solenoid
Front of Vehicle
+
+
-
To
Charger
BL- to Bon ESC
+
-
-
+
-
-
+
+
Battery Connections
Prolonged Storage
Battery charger, controller and other electronic devices need to be disconnected for prolonged storage, as
they will contribute to the premature discharge of batteries.
NOTICE
The ’RUN-TOW/MAINTENANCE/STORAGE’ switch, located under the passenger seat is set to ‘TOW/MAINTENANCE/STORAGE’ position for long term storage of the vehicle to avoid draining of the batteries.
During periods of storage, the batteries will need attention to keep them maintained and prevent discharge. In high temperatures the chemical reaction is faster, while low temperatures cause the chemical reaction to slow down. A vehicle
41
MAINTENANCE
Read all of this manual to become thoroughly familiar with this vehicle. Pay particular attention to all Notices, Cautions, Warnings, and Dangers.
that is stored at 90° F (32° C) will lose.002 of specific gravity each day. If a fully charged battery has a specific gravity of
1.275, and the battery is allowed to sit unused, it will become partially discharged. When it reaches 1.240, which it will
do in less than twenty days, it should be recharged. If a battery is left in a discharged state, sulfating takes place on and
within the plates. This condition is not reversible and will cause permanent damage to the battery. In order to prevent
damage, the battery should be recharged. A hydrometer can be used to determine the specific gravity and therefore the
state of charge of a battery.
In winter conditions, the battery must be fully charged to prevent the possibility of freezing. A fully charged battery will
not freeze in temperatures above -75° F (-60° C). Although
the chemical reaction is slowed in cold temperatures, the
battery must be stored fully charged, and disconnected from
any circuit that could discharge the battery. The controller
should be disconnected from the batteries by setting the
Run-Tow/Maintenance/Storage switch, located under the
passenger seat, to the ‘TOW/MAINTENANCE/STORAGE’
position. For portable chargers, disconnect the charging
plug from the vehicle receptacle. For on-board chargers, disconnect the charging harness from the batteries. The batteries must be cleaned and all deposits neutralized and
removed from the battery case to prevent self discharge.
The batteries should be tested or recharged at thirty day
minimum intervals.
OF
OC
E +15 -9
L
E +5 -15
C
-5 -21
T
R
O -15 -26
L
Y -25 -32
T
E -35 -37
T
E
M
P
E
R
A
T
U
R
E
-45 -43
-55 -48
-65 -54
-75 -60
-85 -65
-95 -71
1.100
1.140
1.120
1.180
1.160
1.220
1.200
1.260
1.240
1.300
1.280
SPECIFIC GRAVITY ELECTROLYTE FREEZING POINT
Battery Charging
The battery charger is designed to fully charge the battery set. If the batteries are severely deep cycled, some automatic battery chargers contain an electronic module that may not activate and the battery charger will not function.
Automatic chargers will determine the correct duration of charge to the battery set and will shut off when the battery set
is fully charged. Always refer to the instructions of the specific charger used.
Do not overfill batteries. The charging cycle will expel electrolyte and result in component damage.
Before charging, the following should be observed:
• The electrolyte level in all cells must be at the recommended level and cover the plates.
• The charging must take place in an area that is well ventilated and capable of removing the hydrogen gas that is
•
•
•
•
generated by the charging process. A minimum of five air exchanges per hour is recommended.
The charging connector components must be in good condition and free from dirt or debris.
The charger connector must be fully inserted into the vehicle receptacle.
The charger connector/cord set is protected from damage and is located in an area to prevent injury that may
result from personnel running over or tripping over the cord set.
The charger is automatically turned off during the connect/disconnect cycle and therefore no electrical arc is
generated at the DC plug/receptacle contacts.
NOTICE
In some portable chargers, there will be a rattle present in the body of the charger DC plug. This rattle is caused by
an internal magnet contained within the charger plug. The magnet is part of the interlock system that prevents the
vehicle from being driven when the charger plug is inserted in the vehicle charging receptacle.
42
MAINTENANCE
Read all of this manual to become thoroughly familiar with this vehicle. Pay particular attention to all Notices, Cautions, Warnings, and Dangers.
AC Voltage
Battery charger output is directly related to the input voltage. If multiple vehicles are receiving an incomplete charge in
a normally adequate time period, low AC voltage could be the cause and the power company should be consulted.
Troubleshooting
In general, troubleshooting will be done for two distinct reasons. First, a battery that performs poorly and is outside of
the manufacturers specification should be identified in order to replace it under the terms of the manufacturer’s warranty. Different manufacturers have different requirements. Consult the battery manufacturer or the manufacturer’s representative for specific requirements.
The second reason is to determine why a particular vehicle does not perform adequately. Performance problems may
result in a vehicle that runs slowly or in a vehicle that is unable to operate for the time required.
A new battery must mature before it will develop its maximum capacity. Maturing may take up to 100 charge/discharge
cycles. After the maturing phase, the older a battery gets, the lower the capacity. The only way to determine the capacity of a battery is to perform a load test using a discharge machine following manufacturer’s recommendations.
A cost effective way to identify a poorly performing battery is to use a hydrometer to identify a battery in a set with a
lower than normal specific gravity. Once the particular cell or cells that are the problem are identified, the suspect battery can be removed and replaced. At this point there is nothing that can be done to salvage the battery; however, the
individual battery should be replaced with a good battery of the same brand, type and approximate age.
Hydrometer
A hydrometer (P/N 50900-G1) is used to test the state of
charge of a battery cell. This is performed by measuring the
density of the electrolyte, which is accomplished by measuring the specific gravity of the electrolyte. The greater the
concentration of sulfuric acid, the more dense the electrolyte
becomes. The higher the density, the higher the state of
charge.
To prevent battery explosion that could result in
severe personal injury or death, never insert a
metal thermometer into a battery. Use a hydrometer with a built in thermometer that is designed
for testing batteries.
Cylinder
Bulb
Float
Thermometer
Add to Float
Reading
Subtract
from Float
Reading
Weight
Specific gravity is the measurement of a liquid that is compared to a baseline. The baseline is water which is assigned
a base number of 1.000. The concentration of sulfuric acid
to water in a new golf car battery is 1.280 which means that
Hydrometer
the electrolyte weighs 1.280 times the weight of the same
volume of water. A fully charged battery will test at 1.275 - 1.280 while a discharged battery will read in the 1.140 range.
NOTICE
Do not perform a hydrometer test on a battery that has just been watered. The battery must go through at least one
charge and discharge cycle in order to permit the water to adequately mix with the electrolyte.
The temperature of the electrolyte is important since the hydrometer reading must be corrected to 80° F (27° C). High
quality hydrometers are equipped with an internal thermometer that will measure the temperature of the electrolyte and
will include a conversion scale to correct the float reading. It is important to recognize that the electrolyte temperature is
significantly different from the ambient temperature if the vehicle has been operated.
43
MAINTENANCE
Read all of this manual to become thoroughly familiar with this vehicle. Pay particular attention to all Notices, Cautions, Warnings, and Dangers.
Using A Hydrometer
ELECTROLYTE
1. Draw electrolyte into the hydrometer several times to TEMPERATURE
permit the thermometer to adjust to the electrolyte °F °C
temperature and note the reading. Examine the color
of the electrolyte. A brown or gray coloration indi- 160
71
cates a problem with the battery and is a sign that the
battery is nearing the end of its life.
150
65
2. Draw the minimum quantity of electrolyte into the
hydrometer to permit the float to float freely without 140
contacting the top or bottom of the cylinder.
60
3. Hold the hydrometer in a vertical position at eye level
and note the reading where the electrolyte meets the 120
scale on the float.
54
49
4. Add or subtract four points (.004) to the reading for 110
every 10° F (6° C) the electrolyte temperature is
above or below 80° F (27° C). Adjust the reading to 100
conform with the electrolyte temperature, e.g., if the
reading indicates a specific gravity of 1.250 and the 90
electrolyte temperature is 90° F (32° C), add four 80
points (.004) to the 1.250 which gives a corrected
reading of 1.254. Similarly if the temperature was 70° 70
F (21° C), subtract four points (.004) from the 1.250
to give a corrected reading of 1.246.
60
43
130
5. Test each cell and note the readings (corrected to
80° F or 27° C). A variation of fifty points between
any two cell readings (example 1.250 - 1.200) indicates a problem with the low reading cell(s).
As a battery ages the specific gravity of the electrolyte will
decrease at full charge. This is not a reason to replace the
battery providing all cells are within fifty points of each other.
Since the hydrometer test is in response to a vehicle exhibiting a performance problem, the vehicle should be
recharged and the test repeated. If the results indicate a
weak cell, the battery or batteries should be removed and
replaced with a good battery of the same brand, type and
approximate age.
37
32
26
21
15
50
10
40
4
30
-1
20
-6
10
-12
+.032
+.030
+.028
+.026
+.024
+.022
+.020
+.018
+.016
+.014
+.012
+.010
+.008
+.006
+.004
+.002
0
-.002
-.004
-.006
-.008
-.010
-.012
-.014
-.016
-.018
-.020
-.022
-.024
-.026
-.028
EXAMPLE #1
ELECTROLYTE TEMPERATURE
Above 80 °F (27 °C)
AMBIENT TEMPERATURE
Above 80 °F (27 °C)
ELECTROLYTE TEMPERATURE
Above 90 °F (32 °C)
HYDROMETER READING 1.250
1.250 + .004 = 1.254
CORRECTED SPECIFIC GRAVITY
READING
EXAMPLE #2
ELECTROLYTE TEMPERATURE
Above 80 °F (27 °C)
AMBIENT TEMPERATURE
Above 80 °F (27 °C)
ELECTROLYTE TEMPERATURE
Above 70 °F (21 °C)
HYDROMETER READING 1.250
1.250 - .004 = 1.246
CORRECTED SPECIFIC GRAVITY
READING
Hydrometer Temperature Correction
44
MAINTENANCE
Read all of this manual to become thoroughly familiar with this vehicle. Pay particular attention to all Notices, Cautions, Warnings, and Dangers.
Notes:
45
MAINTENANCE
Read all of this manual to become thoroughly familiar with this vehicle. Pay particular attention to all Notices, Cautions, Warnings, and Dangers.
Notes:
46
PERIODIC SERVICE SCHEDULE
Read all of this manual to become thoroughly familiar with this vehicle. Pay particular attention to all Notices, Cautions, Warnings, and Dangers.
PERIODIC SERVICE SCHEDULE
PERIODIC SERVICE SCHEDULE
125 rnds/125 hrs
600miles/1000 kms
SEMI-ANNUAL
250 rnds/250 hrs
1200miles/2000 kms
ANNUAL
*
*
*
*
*
*
*
*
*
*
*
*
*
*
CL
*
*
*
*
CL
*
*
*
*
CL
*
*
*
*
CL
*
*
*
*
*
*
*
*
*
C&A
C&A
*
*
*
C&A
C&A
*
*
*
C&A
C&A
*
*
*
C&A
C&A
*
*
*
C&A
*
*
C&A
*
*
C&A
*
*
C&A
*
*
*
*
*
*
*
*
*
*
*
*
*
*
*
C&A
C&A
C&A
5 YEARS
60 rnds/60 hrs
300 miles/500 kms
QUARTERLY
Tires - pressure, condition of tires & rims
Hardware - loose or missing
Reverse Warning Indicator
Overall Vehicle Condition
Battery Pack - state of charge, condition, loose terminals,
corrosion, hold down & hardware
Batteries* - check electrolyte level, fill if required
Brake Pedal - smooth operation
Brakes - aggressive stop test
Park Brake - operation, does it hold on a hill
Accelerator - smooth operation
Charger / Receptacle - inspect charger connector and
receptacle at each charge
Wiring - loose connections, broken or missing insulation
Direction Selector - attachment and mechanism
Steering Assembly - excessive play, loose or missing hardware
Tie Rods - excessive play, bent rods, loose or missing hardware
Rear Axle - fluid level, oil leakage, noise, loose or missing
hardware
Rear Axle - drain & replace fluid
Rear Suspension - shock oil leakage, worn bushings, loose
or missing hardware
Front Suspension - strut oil leakage, excessive play in hubs
or kingpins, worn bushings, loose or missing hardware
Front Wheel Alignment - unusual tire wear
R - REPLACE
20 rnds/20 hrs
100 miles/160 kms
MONTHLY
REMARKS
CL - CLEAN
WEEKLY
C&A - CHECK & ADJUST
Before each use
DAILY
* - CHECK
R
*
* Use only distilled or purified water that is free from contaminates to fill batteries.
NOTE: Some maintenance items must be serviced more frequently on vehicles used under severe driving conditions.
47
PERIODIC SERVICE SCHEDULE
Read all of this manual to become thoroughly familiar with this vehicle. Pay particular attention to all Notices, Cautions, Warnings, and Dangers.
Notes:
48
APPENDIX A
Read all of this manual to become thoroughly familiar with this vehicle. Pay particular attention to all Notices, Cautions, Warnings, and Dangers.
APPENDIX A
DECLARATION OF CONFORMITY
A
APPENDIX A
Read all of this manual to become thoroughly familiar with this vehicle. Pay particular attention to all Notices, Cautions, Warnings, and Dangers.
B
APPENDIX A
Read all of this manual to become thoroughly familiar with this vehicle. Pay particular attention to all Notices, Cautions, Warnings, and Dangers.
C
APPENDIX A
Read all of this manual to become thoroughly familiar with this vehicle. Pay particular attention to all Notices, Cautions, Warnings, and Dangers.
Notes:
D
E-Z-GO Division of Textron Inc.
1451 Marvin Griffin Road, Augusta, Georgia 30906-3852 USA
CONTACT US:
North America:
Technical Assistance & Warranty
Service Parts
Phone: 1-800-774-3946, FAX: 1-800-448-8124
Phone: 1-888-GETEZGO (1-888-438-3946, FAX: 1-800-752-6175
International:
Phone: 001-706-798-4311, FAX: 001-706-771-4609
Service Parts Manuals, as well as Repair and Service Manuals
are available from a local Distributor, an authorized Branch,
Genuine E-Z-GO Parts & Accessories Department or at www.shopezgo.com.
Copyrighted Material
This manual may not be reproduced in whole
or in part without the express permission of
E-Z-GO Division of Textron Inc.,
Technical Communications Department