1
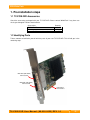
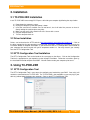
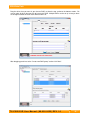
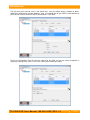
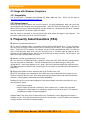
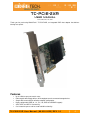
TC-PCIE-2XR
USER MANUAL
Revised December 16, 2008
Thank you for purchasing WiebeTech’s TC-PCIE-2XR, an integrated RAID host adapter that delivers
blazing fast speeds.
Features
•
•
•
•
•
•
Up to 3-Gb/sec per port transfer rates.
Point-to-point technology delivers full throughput to each connected storage device.
Simple GUI based utility for effortless adapter configuration.
Highly configurable RAID (0, 1, 4, 5, 6, 10, JBOD and DVRAID support).
SAS, SATA and SATA II connectivity.
Can create hot spares and has auto-rebuild functionality.
T C - P C I E - 2 X R U s e r M a n u a l ( A9 - 0 0 0 - 0 0 2 3 ) R E V 1 . 0
-1-
CRU-WiebeTech
Table of Contents
1. Pre-installation steps
3
1.1 TC-PCIE-2XR Accessories
1.2 Identifying Parts
3
3
2. Installation
4
2.1 TC-PCIE-2XR Installation
2.2 Driver Installation
2.3 ATTO Configuration Tool Installation
4
4
4
3. Using TC-PCIE-2XR
4
3.1 ATTO Configuration Tool
4
3.1.1 RAID Configuration
3.1.2 Hot Spares
5
9
4. Usage with Mac and Windows Operating Systems
9
4.1 Usage with Macintosh Computers
9
4.1.1 Compatibility
4.1.2 Using Volumes
4.2 Usage with Windows Computers
4.2.1 Compatibility
4.2.2 Using Volumes
5. Frequently Asked Questions (FAQ)
6. Technical Specifications
T C - P C I E - 2 X R U s e r M a n u a l ( A9 - 0 0 0 - 0 0 2 3 ) R E V 1 . 0
9
9
10
10
10
10
11
-2-
CRU-WiebeTech
1. Pre-installation steps
1.1 TC-PCIE-2XR Accessories
Check the accessories packaged with your TC-PCIE-2XR. Please contact WiebeTech if any items are
missing or damaged. The box should contain:
Accessories
TC-PCIE-2XR
Mounting bracket
Manual and Warranty information
Quantity
1
1
(on CD)
1.2 Identifying Parts
Take a moment to familiarize yourself with the parts of your new TC-PCIE-2XR. This will aid you in the
remaining steps.
Mini SAS (SFF-8088)
Connection A
Mini SAS (SFF-8088)
Connection B
PCI Express
host interface
T C - P C I E - 2 X R U s e r M a n u a l ( A9 - 0 0 0 - 0 0 2 3 ) R E V 1 . 0
-3-
CRU-WiebeTech
2. Installation
2.1 TC-PCIE-2XR Installation
Install TC-PCIE-2XR into an empty PCI Express slot inside your computer by following the steps below.
a) Power down the computer system.
b) Unplug the computer system after power is down.
c) Insert the card into an available slot. Do not force it, but it will take firm pressure to insert it.
Gently rocking the card into place may help.
d) Make sure the card is fully seated in the slot. Secure with a screw.
e) Plug the computer back in.
f) Turn the computer back on.
2.2 Driver Installation
Drivers can be found on the ATTO website (http://www.attotech.com/product.php?model=15). Click on
the driver appropriate for your operating system to begin installation. Follow the instructions given by the
installation wizard to complete installation. If you do not have the ATTO Configuration Tool installed on
your computer then wait to restart until you’ve completed section 2.3. You may restart if you currently
have the ATTO Configuration Tool.
2.3 ATTO Configuration Tool Installation
The ATTO Configuration Tool can be found on the same page as the drivers. Click on the Configuration
Tool that is appropriate for your operating system to begin installation. Follow the instructions given by
the installation wizard to complete installation. You will need to restart your computer prior to use.
3. Using TC-PCIE-2XR
3.1 ATTO Configuration Tool
The ATTO Configuration Tool is your source for configuring and maintaining your RAID. Your unit(s) will
need to be connected to the TC-PCIE-2XR. The TC-PCIE-2XR is hot-swappable so you can plug in your
device(s) without powering down your computer. Open up the ATTO Configuration Tool.
T C - P C I E - 2 X R U s e r M a n u a l ( A9 - 0 0 0 - 0 0 2 3 ) R E V 1 . 0
-4-
CRU-WiebeTech
3.1.1 RAID Configuration
Connect the enclosure(s) you are going to use then power them up. The drives installed in the
enclosure(s) should appear in the ATTO Configuration Tool “RAID” tab. If the RAID setup does not
appear at first then right click on the empty space underneath the “Groups” tab. Select “New Group”.
Select the RAID Group Name, RAID Group Level, RAID Group Interleave and RAID Group Mirror Count
that you wish to create. Then click “Next”.
T C - P C I E - 2 X R U s e r M a n u a l ( A9 - 0 0 0 - 0 0 2 3 ) R E V 1 . 0
-5-
CRU-WiebeTech
Drag the drives that you want in your chosen RAID set from the top section to the bottom section. Be
sure to select all drives that you wish to have in this RAID. Multiple RAIDs can be set up so long as there
are enough available drives for each different RAID set.
After dragging your drives to the “Create new RAID group” section click “Next”.
T C - P C I E - 2 X R U s e r M a n u a l ( A9 - 0 0 0 - 0 0 2 3 ) R E V 1 . 0
-6-
CRU-WiebeTech
The next thing you’ll need to select is the speed read. You can choose Always, Adaptive or Never.
WiebeTech recommends selecting Adaptive. Also, if you would like for your RAID to auto-rebuild then
you’ll need to click the check-box next to “Auto Rebuild”. Click “Next”.
Finally, the Configuration Tool will verify the capacity of the RAID and you can select the partition in
Single, By Capacity or By Count. Click “Finish” when you’ve made your choice.
T C - P C I E - 2 X R U s e r M a n u a l ( A9 - 0 0 0 - 0 0 2 3 ) R E V 1 . 0
-7-
CRU-WiebeTech
A confirmation box will appear verifying all of the settings you selected. Look over each selection and if it
is correct then click “Yes”. If there is something incorrect click “No” and click “Back” until you get to the
option you want to correct.
The RAID set that you created will appear on the bottom section of the RAID tab. If you would like to
create another RAID set then repeat these steps with available drives.
The RAID will need time to build before it can be used. You can double click on the volume located in the
bottom section of the RAID tab. A separate tab should appear next to the “Hot Spares” tab. This will
show you how far along the RAID setup is.
T C - P C I E - 2 X R U s e r M a n u a l ( A9 - 0 0 0 - 0 0 2 3 ) R E V 1 . 0
-8-
CRU-WiebeTech
3.1.2 Hot Spares
Hot Spares can be setup so that if your RAID fails the hot spare will automatically be rebuilt into your
RAID. If you can spare the capacity, WiebeTech recommends creating a hot spare for data backup. To
create a hot spare select the “Hot Spares” tab on the ATTO Configuration Tool. Right click in the empty
section on the bottom of the tool. Select “New Hot Spare”. Now simply drag the drive you want to use as
a hot spare into the empty area.
4. Usage with Mac and Windows Operating Systems
4.1 Usage with Macintosh Computers
4.1.1 Compatibility
The TC-PCIE-2XR is compatible with Mac OS X 10.4.x and newer.
http://www.attotech.com/product.php?model=15.
Drivers can be found at
4.1.2 Using Volumes
When you connect the unit to the Mac for the first time and turn on the power, you’ll
probably see a message saying that the disk is unreadable. This is because you
must format the volume before using it. The easiest way to do this is to use Mac OS
X’s Disk Utility. If you plan to use the unit on both Macs and PCs, select “MS DOS
File System” as the format type. If you only plan to use the unit on Macs, then select
“Mac OS Extended”. After the volume is formatted, an icon representing the drive
volume will appear (“mount”) on the desktop. You can now use the volume just like
an internal hard drive.
Eject the volume before powering down the unit by dragging the volume’s icon to the trash bin, or by
selecting the volume then pressing Command-E. Shutting down the unit without first ejecting the volume
can result in data loss.
T C - P C I E - 2 X R U s e r M a n u a l ( A9 - 0 0 0 - 0 0 2 3 ) R E V 1 . 0
-9-
CRU-WiebeTech
4.2 Usage with Windows Computers
4.2.1 Compatibility
The TC-PCIE-2XR is compatible with Windows XP, 2003, 2008 and Vista. Drivers can be found at
http://www.attotech.com/product.php?model=15.
4.2.2 Using Volumes
Before you can use your volume, you must first format it. Use Disk Management, which you can find by
right-clicking on My Computer then selecting Manage. Select NTFS for the format type. If you wish to
format FAT-32 for cross-platform compatibility, you will need to use a third-party utility to do so. Windows
XP will not create FAT-32 volumes larger than 32GB.
After the volume is formatted, an icon representing the drive volume will appear in My Computer. You
can now use the volume just like an internal hard drive.
5. Frequently Asked Questions (FAQ)
Q: Will this card work with SAS drives?
A: This Host Bus Adapter (HBA) is compatible with both SAS and SATA hard drives. To use SAS drives,
you must also ensure the drive enclosure you are attaching to the HBA is also compatible with SAS
drives. TrayFree™ RTX™ products, for example, are not currently compatible with SAS. The HBA can
also be used with bare SAS drives, but you will need to use a converter cable to adapt the drive’s
interface to a SFF-8088 connector, which is the connection type used by this HBA. For bare drives, you
would also need to provide power to the drive.
Q: How do I connect my storage device to this card?
A: This card uses SFF-8088 connectors, sometimes called “mini-SAS”. SAS and SATA storage devices
may use many kinds of connections. You will need to determine the connection type used by your
storage device – consult your product’s user’s guide – then find a cable that adapts that connector to the
SFF-8088 connector used by the card. Several types of such cables are available from CRU-DataPort or
WiebeTech.
Q: What brands/models of drives work best with the ATTO RAID host card?
A: ATTO Technologies, the manufacturer of this RAID host card, recommends using enterprise class
SATA or SAS drives with this card. Such drives generally have higher tolerance for command timeouts
and retries, which improves RAID performance and compatibility.
Desktop class drives are not recommended, but some brands/models have been tested with this card
with no problems found:
• Hitachi Deskstar drives
• Western Digital 2TB Sparta+ and Mantis+ drives (though non-"+" models may need to be
configured in 1.5GHz mode via a small plastic jumper on the rear of the drive. This improves
compatibility and does not affect throughput.)
Seagate 7200.11 AS series drives should not be used. (Performance varies depending on the drive’s
firmware revision – they work best with firmware version sd1a or newer – but ATTO does not recommend
using these drives even with the firmware update).
T C - P C I E - 2 X R U s e r M a n u a l ( A9 - 0 0 0 - 0 0 2 3 ) R E V 1 . 0
- 10 -
CRU-WiebeTech
6. Technical Specifications
Product name/code:
Raid Levels Supported:
Host Interfaces:
Data Interface Speeds:
Hot-Swappable:
Operating System
Requirements:
Operating Temperature:
Operating Humidity:
Shipping Weights:
Dimensions:
Warranty:
TC-PCIE-2XR (30310-1100-0101)
0, 1, 4, 5, 10, JBOD and DVRAID
Mini SAS (SFF-8088)
Up to 3GB/sec per port
Yes
Windows XP and Vista
Mac OS X
50 – 85° Fahrenheit (10 – 30° Celsius)
5% to 95%, noncondensing
1lb
168mm (L) x 69mm (H)
1-year limited warranty. See warranty statement for details and limitations.
WiebeTech offers free phone support for 90 days after purchase (1-866744-8722).
After
90
days,
email
support
is
available
at
[email protected].
TC-PCIE-2XR is a trademark of CRU-DataPort. Other marks are the property of their respective owners.
© 2008 CRU-DataPort. All rights reserved.
FCC Compliance Statement: “This device complies with Part 15 of the FCC rules. Operation is subject to the following two conditions: (1) This
device may not cause harmful interference, and (2) this device must accept any interference received, including interference that may cause undesired
operation.”
In the event that you experience Radio Frequency Interference, you should take the following steps to resolve the problem:
1)
Ensure that your unit is plugged into a grounded electrical outlet.
2)
Use a data cable with RFI reducing ferrites on each end.
3)
Use a power supply with an RFI reducing ferrite approximately 5 inches from the DC plug.
If you have any questions or problems, please contact [email protected] for technical support. If you are
interested in purchasing more WiebeTech products, check our website or contact [email protected]. We
appreciate being able to serve you!
T C - P C I E - 2 X R U s e r M a n u a l ( A9 - 0 0 0 - 0 0 2 3 ) R E V 1 . 0
- 11 -