1
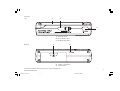
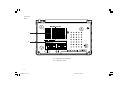
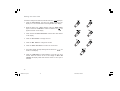
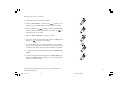
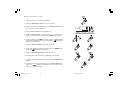
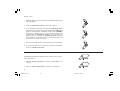
ROBERTS
R9968
Sound for Generations
Analogue World Radio
R9968 Issue 2.pmd
Please read this manual before use
1
10/21/2005, 2:03 PM
Contents
Contents .............................................................................. 2
Setting the alarm to buzzer ............................................. 13
Controls ........................................................................... 3-6
Setting the alarm to radio ................................................ 14
Batteries .............................................................................. 7
Checking the alarm time .................................................. 15
Disabling the buttons ......................................................... 8
Snooze control .................................................................. 15
Switching on and setting the time zone ............................ 8
Sleep timer ........................................................................ 16
Setting the local time ......................................................... 9
Backlight ........................................................................... 16
Setting Summer Time ........................................................ 9
Reset ................................................................................. 17
Switching between local time and GMT .......................... 10
Headphones ...................................................................... 17
Shortwave radio reception ................................................ 10
Stereo/Mono reception ..................................................... 17
Listening to the radio ........................................................ 11
Specifications ................................................................... 18
Setting the alarm time ...................................................... 12
Guarantee .......................................................................... 19
2
R9968 Issue 2.pmd
2
10/21/2005, 2:03 PM
1
OVERVIEW
Controls - Front
2
3 4
5
6
7
8
9
10
11
13
12
1. Display
6. On/Off Sleep
11. Time Zone Dial
2. Time Set
7. Alarm
12. Summer Time
3. Alarm Set
8. Hour Set
13. Lock
4. 12/24 Hour
9. Minute Set
5. H/W Summer
10. H.T.Z.
If you need any further advice, please call our Technical Helpline on :-
3
020 8758 0338 (Mon-Fri)
R9968 Issue 2.pmd
3
10/21/2005, 2:03 PM
Controls
Right side
Left side
14
16
17
15
18
14. Tuning dial
16. Volume control
15. Mono/Stereo switch
17. Headphones socket
18. DC 3-6V Power Input socket
4
R9968 Issue 2.pmd
4
10/21/2005, 2:03 PM
Controls
Top
20
19
21
19. Telescopic aerial
20. Band selection switch
21. Snooze & light button
Bottom
23
22
22.
Battery compartment
23.
Reset button
If you need any further advice, please call our Technical Helpline on :-
5
020 8758 0338 (Mon-Fri)
R9968 Issue 2.pmd
5
10/21/2005, 2:03 PM
Controls
Back
24
25
24.
Map of World Time Zones
25.
Frequency Scale
6
R9968 Issue 2.pmd
6
10/21/2005, 2:03 PM
Batteries
1. Batteries should be replaced when the Battery Level icon
shows low.
2. Press the On/Off Sleep button to switch the radio off before
replacing the batteries.
3. Open the battery cover located on the underside of your receiver
by pressing down and lifting the battery cover.
2
4. Insert 2 x AA batteries into the compartment. Make sure that the (+)
and (-) ends of the batteries are positioned as shown on the rear
of the receiver.
Note: 2 beep sounds will be heard to signify correct battery insertion.
5. Close the battery cover.
6
6. Press the On/Off Sleep button to switch the receiver on after the
batteries have been replaced.
7. If the receiver is not to be used for an extended period of time it is
recommended that the batteries are removed from the receiver.
8. When the power is too low for the receiver to operate the Battery
Level icon
will flash and the unit will shut down automatically.
If you need any further advice, please call our Technical Helpline on :-
7
020 8758 0338 (Mon-Fri)
R9968 Issue 2.pmd
7
10/21/2005, 2:03 PM
Disabling the buttons
The Lock button is used to prevent unintentional operation of your
receiver.
1. Press the Lock button to disable the buttons on the receiver. The
will be shown in the top display panel. This will prevent
Key icon
accidental operation when your receiver is packed in a suitcase or
travel bag.
1
This does not affect the Volume control, the Stereo/Mono
switch or the Waveband switch.
2. To enable the receiver buttons, press the Lock button again, this will
cause the Key icon
to be extinguished from the top display panel.
1
Switching on and setting the time zone
1. Place the unit on a flat surface. Make sure that the batteries have
been inserted correctly, or if using mains power, plug the mains lead
into a wall socket and switch on at the wall socket. The unit will beep
twice.
2. The display will flash the Home icon
current time zone.
and the number of the
3
3. Rotate the Zone control to select the city in your time zone. This
will change the time zone code displayed on the top screen. The time
zone codes are displayed with a world map on the rear of the unit.
4. Press the H.T.Z. button to confirm the time zone.
5. The display on the top screen will show the World icon
.
4
8
R9968 Issue 2.pmd
8
10/21/2005, 2:03 PM
Setting the local time
1. After setting the time zone the bottom screen will flash the default
time setting, 12:00 and the Home icon
. If you want to change
the local time later, press and hold the Time Set button until the time
flashes in the bottom display.
2
1
2. Press the Hour button to change the hour.
3. Press the Min. button to change the minutes.
3
4
4. Press the 12/24 button to switch between 12 and 24 hour clock formats.
When the clock is set to 12 hour display an AM or PM indicator will
be displayed. Make sure that the correct 12 hour cycle is selected.
5
5. Press the Time Set button to confirm the correct time.
6. The bottom display will stop flashing.
Setting summer time
1. Press and hold the Time Set button until the time flashes in the
bottom display.
1
2
3
4
2. Press the H/W Summer button to put the clock forward by one
hour. The Summer time icon
will appear in the display.
3. Press the H/W Summer button again to remove the Summer Time
icon
and return the time to its original setting.
4. Press the Time Set button to confirm the change.
5. The bottom display will stop flashing.
If you need any further advice, please call our Technical Helpline on :-
9
020 8758 0338 (Mon-Fri)
R9968 Issue 2.pmd
9
10/21/2005, 2:03 PM
Switching between local time and GMT
1. Press the H/W Summer button to switch between local time and
GMT.
1
2. The displays will swap over the time settings.
3. Press the H/W Summer button again to return the displays.
3
Short wave radio reception
Your World Receiver can receive signals in a number of wavebands.
FM and MW stations are always set at the same position on the tuning
scale because they are broadcast at fixed wavelengths and frequencies.
Due to atmospheric conditions, short wave stations must frequently be
broadcast on different wavelengths. Most short wave bands are
available all over the world and can be used by international broadcasters.
At present these are the only wavelengths which provide listeners with
direct reception over long distances. For this reason, short wave
frequencies are not only used by radio stations, but also by other users
such as amateur radio enthusiasts, shipping, aircraft and radio navigation
systems.
If you want to listen to a particular SW station, you need to know the
precise frequency and wavelength. Many short wave stations will send
you broadcasting schedules which give you the information you need.
You can also download the information from the Internet.
10
R9968 Issue 2.pmd
10
10/21/2005, 2:03 PM
Listening to the radio
1. Switch on your receiver by pressing the ON/OFF Sleep button.
1
2. The receiver will automatically tune in to the last radio station
selected.
3. The radio frequency and waveband information will show in the top
display.
4
4. Slide the Waveband switch to the required waveband. The
selected band is indicated in the top display.
5. Tune in to the desired station by rotating the Tuning control. The
station frequency is shown in the top display.
6. When the radio is tuned in correctly to a station, the Tuning icon
will appear in the top display.
5
The Telescopic antenna located on the top of your receiver is for
FM and short wave (SW) reception.
Extend and tilt the Telescopic antenna to obtain the best reception
for FM stations.
For short wave (SW) reception, adjust the Telescopic antenna
to an upright position.
7
For MW reception there is a built in ferrite aerial. Rotate the receiver
to the position giving the best reception.
7. Adjust the volume by rotating the Volume control.
If you need any further advice, please call our Technical Helpline on :-
11
020 8758 0338 (Mon-Fri)
R9968 Issue 2.pmd
11
10/21/2005, 2:03 PM
Setting the alarm time
The alarm is always set in local time, with the Home icon
displayed.
will flash in the
1. Press the Alarm button. The Alarm icon
display for a few seconds before returning to the clock display.
1
2
is flashing, press the Alarm button
2. While the Alarm icon
again to select the buzzer alarm mode. The Buzzer icon
will
appear and flash in the display.
3. Press and hold the Alarm Set button until the alarm time flashes
in the display.
4
3
4. Press the Hour button to change the hour.
5. Press the Min. button to change the minutes.
5
6
6. Press the Alarm Set button to confirm the correct time.
7. The bottom display will stop flashing and the Alarm icon
remain on the display.
will
7
8. Press the 12/24 button to switch between 12 and 24 hour clock
formats. When the clock is set to 12 hour display an AM or PM
indicator will display. Make sure that the correct 12 hour cycle is
selected.
12
R9968 Issue 2.pmd
12
10/21/2005, 2:03 PM
Setting the alarm to buzzer
1. Set the alarm time as previously described.
2
2. Press the Alarm button. The Alarm icon
will flash in the
display for a few seconds before returning to the clock display.
3. While the Alarm icon
is flashing, press the Alarm button
will
again to select the buzzer alarm mode. The Buzzer icon
appear and flash in the display.
3
4. Press the Alarm Set button to confirm the alarm.
5. The bottom display will stop flashing, the Alarm icon
Buzzer icon
will remain on the display.
and the
4
6. The buzzer alarm will sound at the preset time. It will increase in
volume, tone and frequency, over the period of one minute, and then
fall silent for one minute. This cycle will be repeated for 60 minutes.
2
7. To switch off the alarm until the next day, press the On/Off Sleep
button.
8. To switch the alarm off permanently, press the Alarm button. The
will flash in the display for a few seconds before
Alarm icon
reverting to the clock display.
2
If you need any further advice, please call our Technical Helpline on :-
13
020 8758 0338 (Mon-Fri)
R9968 Issue 2.pmd
13
10/21/2005, 2:03 PM
Setting the alarm to radio
1. Set the alarm time as previously described.
2
2. Press the On/Off Sleep button to turn the radio on.
3. Select the required waveband using the Waveband switch and
make sure that a station is tuned in.
3
4. Set the Volume control to the desired level.
will flash in the
5. Press the Alarm button. The Alarm icon
display for a few seconds before returning to the clock display.
6. While the Alarm icon
is flashing, press the Alarm button
twice to select the radio alarm mode. The Radio icon
will appear
and flash in the display.
5
4
7. Press the Alarm Set button to confirm the alarm.
8. The bottom display will stop flashing, the Alarm icon
Radio icon
will remain on the display.
and the
7
6
9. Press the On/Off Sleep button to turn the radio off.
10. The radio alarm will sound at the preset time for 60 minutes.
11. To switch off the alarm until the next day press the On/Off Sleep
button.
9
12. To switch the alarm off permanently, press the Alarm button. The
Alarm icon
will flash in the display for a few seconds before
reverting to the clock display.
6
14
R9968 Issue 2.pmd
14
11
10/21/2005, 2:03 PM
Checking the alarm time
1. Press the Alarm Set button.
1
2. The alarm time will appear in the bottom display for a few seconds,
before reverting to the clock display.
Snooze control
1. The buzzer or radio alarm can be silenced for five minutes by
pressing the Snooze Light button. This sequence can be repeated
during the 60 minute alarm period.
1
If you need any further advice, please call our Technical Helpline on :-
15
020 8758 0338 (Mon-Fri)
R9968 Issue 2.pmd
15
10/21/2005, 2:03 PM
Sleep timer
1. Radio playback can be set to switch off automatically after a preset
time has elapsed.
2
2. Press the On/Off Sleep button to switch the radio on.
3. To set the Sleep Timer press and hold the On/Off Sleep button.
After a few seconds the first sleep time and the Sleep icon
will
appear on the top display. The display will then show the available
sleep times in sequence, 60, 45, 30, 15, and 90 minutes, this will
continue while the On/Off Sleep button is held. To select your
preferred sleep time, release the On/Off Sleep button when the
time is displayed. The display will revert to clock display after a few
seconds with the sleep icon shown.
3
4. The radio will switch off after the selected sleep time has elapsed.
5. To cancel the sleep function before the preset time has expired,
press the On/Off Sleep button.
5
Backlight
The Backlight illuminates the display screens, making it easy to view in
a dark environment.
1
1. Press the Snooze Light button to switch on the Backlight for 12
seconds.
2
2. Press the Snooze Light button to switch the Backlight off.
16
R9968 Issue 2.pmd
16
10/21/2005, 2:03 PM
Reset
The Reset function will erase all settings and return the receiver to its
original state.
1. Press the Reset button on the underside of the receiver using an
implement such as a paperclip.
1
Headphones
A 3.5 mm Headphone Socket located on the left side of the unit is
provided for use with either headphones or an earpiece. Inserting a plug
into the socket automatically mutes the internal loudspeaker.
1
Stereo/Mono reception (headphone use only)
If the FM station reception is weak it can be improved by switching to
mono reception. This only works when listening to the receiver with
headphones.
1
1. Slide the Stereo/Mono switch to the mono position. The Stereo
Headphone icon disappears from the display.
2. Slide the Stereo/Mono switch back to the stereo position to return
to stereo listening. The Stereo Headphone icon will show in the
display.
2
If you need any further advice, please call our Technical Helpline on :-
17
020 8758 0338 (Mon-Fri)
R9968 Issue 2.pmd
17
10/21/2005, 2:03 PM
Specifications
Circuit Features
Power Requirements
Adapter Output
DC 3-6 volts, 200mA
Loudspeaker
4 ohms
Battery
2 x LR6 (AA Size) alkaline
Output power
100 mW
Antennas
Frequency Coverage
FM
87.5 - 108MHz
Telescopic antenna
FM and SW
MW
526 - 1710kHz
Ferrite rod antenna
MW
SW 1 - 7
5.90 - 6.20MHz (49 m)
Sockets
7.10 - 7.35MHz (41 m)
9.40 - 9.90MHz (31 m)
Headphones Socket 3.5mm dia.
11.6 - 12.10MHz (25 m)
13.57 - 13.87MHz (21 m)
DC Socket 4.0mm dia. Centre pin negative
15.1 - 15.73MHz (19 m)
17.48 - 17.9MHz (16 m)
18
R9968 Issue 2.pmd
18
10/21/2005, 2:03 PM
Guarantee
This receiver is guaranteed for twelve months from the date of delivery to the original owner against failure due to faulty workmanship or component
breakdown, subject to the procedure stated below. Should any component or part fail during this guarantee period it will be repaired or replaced
free of charge.
The guarantee does not cover:
1. Damage resulting from incorrect use.
2. Consequential damage.
3. Receivers with removed or defaced serial numbers.
4. Telescopic aerials.
Procedure:
Any claim under this guarantee should be made through the dealer from whom the instrument was purchased. It is likely that your Roberts' dealer
will be able to attend to any defect quickly and efficiently but should it be necessary the dealer will return the instrument to the Company’s service
department for attention. In the event that it is not possible to return the instrument to the Roberts' dealer from whom it was purchased, please
contact Roberts Radio Technical Services department at the address shown on the rear of this manual before taking further action.
These statements do not affect the statutory rights of a consumer.
If you need any further advice, please call our Technical Helpline on :-
19
020 8758 0338 (Mon-Fri)
R9968 Issue 2.pmd
19
10/21/2005, 2:03 PM
ROBERTS RADIO TECHNICAL SERVICES
97-99 Worton Road
Isleworth Middlesex
TW7 6EG
Technical Helpline:- 020 8758 0338
R9968 Issue 2.pmd
(Mon-Fri)
Website: http://www.robertsradio.co.uk
Issue 2
20
10/21/2005, 2:03 PM