1
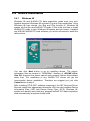
PCIS-OPC
OPC Server for NuDAQ PCI DAQ Cards
Windows NT/98/2000
User’s Guide
Recycled Paper
©Copyright 2001 ADLINK Technology Inc.
All Rights Reserved.
Manual Rev. 2.00: March 20, 2001
Part No : 50-10020-100
The information in this document is subject to change without prior notice
in order to improve reliability, design and function and does not represent
a commitment on the part of the manufacturer.
In no event will the manufacturer be liable for direct, indirect, special,
incidental, or consequential damages aris ing out of the use or inability to
use the product or documentation, even if advised of the possibility of
such damages.
This document contains proprietary information protected by copyright. All
rights are reserved. No part of this manual may be reproduced by any
mechanical, electronic, or other means in any form without prior written
permission of the manufacturer.
Trademarks
NuDAQ and PCIS-OPC are registered trademarks of ADLINK Technology
Inc. IBM PC is a registered trademark of International Business Machines
Corporation. Intel is a registered trademark of Intel Corporation. Other
product names mentioned herein are used for identification purposes only
and may be trademarks and/or registered trademarks of their respective
companies.
Getting service from ADLINK Tech. Inc.
Customer Satisfaction is always the most important thing for ADLINK Tech
Inc. If you need any help or service, please contact us and get it.
ADLINK Technology Inc.
Web Site
Sales & Service
Technical
Support
TEL
Address
http://www.adlink.com.tw
[email protected]
NuDAQ
[email protected]
NuDAM
[email protected]
NuIPC
[email protected]
NuPRO
[email protected]
Software
[email protected]
AMB
[email protected]
+886-2-82265877
FAX
+886-2-82265717
9F, No. 166, Jian Yi Road, Chungho City, Taipei, 235 Taiwan, R.O.C.
Please inform or FAX us of your detailed information for a prompt,
satisfactory and constant service.
Detailed Company Information
Company/Organization
Contact Person
E-mail Address
Address
Country
TEL
FAX
Web Site
Questions
Product Model
Environment to Use
Challenge Description
Suggestions for ADLINK
¨OS
¨Computer Brand
¨M/B:
¨Chipset:
¨Video Card:
¨Network Interface Card:
¨Other:
¨CPU:
¨Bios:
Table of Contents
How to Use This Guide .......................................................iii
Chapter 1 Introduction to PCIS-OPC .............................. 1
Chapter 2 Installation .......................................................... 2
2.1
System Requirements...................................................... 2
2.2
Software Component Installation ...................................... 3
2.3
Directories and Files ........................................................ 4
2.4
Device Installation ........................................................... 5
2.4.1
Windows 98.....................................................................................5
2.4.2
Windows NT....................................................................................6
2.4.3
Windows 2000............................................................................. 10
Chapter 3 OPC Interface of NuDAQ PCI card OPC
Server ................................................................12
3.1
OPCServer Object......................................................... 12
3.2
OPCGroup Object ......................................................... 14
3.3
EnumOPCItemAttributes Object ..................................... 15
3.4
Custom Interface/Client Side .......................................... 16
Chapter 4 Configuration and Diagnostic .....................17
4.1
Configuration................................................................. 17
4.1.1
Adding a New Device................................................................. 18
4.1.2
Search Devices............................................................................ 20
4.1.3
Adding a New Item ...................................................................... 20
4.1.4
Adding New Items....................................................................... 20
Table of Contents • i
4.1.5
Modifying an Existing Item ......................................................... 21
4.1.6
Saving Configuration................................................................... 21
4.1.7
Loading Configuration File......................................................... 21
4.2
Diagnostic..................................................................... 22
4.2.1
Start Diagnostic........................................................................... 22
4.2.2
Reading Item ................................................................................ 22
4.2.3
Writing Item .................................................................................. 22
4.2.4
Stop Diagnostic............................................................................ 22
Chapter 5 OPC Client Sample Program .......................23
Appendix - Notes of Using OPC/DCOM .......................29
Product Warranty/Service................................................30
ii • Table of Contents
How to Use This Guide
This manual is designed to help you use the PCIS-OPC software. It is
organized as follows:
l
Chapter 1, "Introduction to PCIS-OPC" describes the PCIS-OPC
software.
l
Chapter 2, "Installation" describes the system requirements and
the step of installing PCIS-OPC software and NuDAQ PCI devices.
l
Chapter 3, “OPC Interface of PCIS-OPC” lists the interface the
NuDAQ PCI card OPC server provides.
l
Chapter 4, “Configuration and Diagnostic” describes how to
configure and diagnose the NuDAQ PCI card OPC server.
l
Chapter 5, “OPC Client Sample Program” des cribes the OPC
client sample program included in the software.
l
Appendix, “Notes for Using OPC/DCOM" describes the Windows
environment setting for using OPC/DCOM and some notes.
How to Use This Guide • iii
1
Introduction to PCIS-OPC
The PCIS-OPC software is an OPC compliant server that enables data
exchange between OPC clients and NuDAQ PCI data acquisition cards.
The OPC server is fully compliant with OPC Data Access Specification 2.0.
It follows the requirements of the OPC specification to provide access to
data to an OPC client. This server implements version 2.04 of the OPC
custom interface that is typically used by C++ and Delphi programs. Also it
provides immediate compatibility with a very wide range of application
software systems. Any software system with OPC client capability can
access the OPC server to monitor and control data to and from the
NuDAQ PCI data acquisition cards.
The software includes the NuDAQ PCI card OPC server. A graphical
configuration utility is bundled in the OPC server to let you configure and
diagnose the operation of the OPC server. You can set the attributes of
each data item (I/O point). OPC client software can then access these
data items via this name assigned in the server.
Introduction to PCIS-OPC • 1
2
Installation
2.1 System Requirements
The software requires the following minimum configuration:
l
An IBM PC/AT or compatibles
l
Windows NT version 4.0 SP4 (or greater), Windows 2000, or
Windows 98.
Note: PCIS-OPC can not be used in Windows 95.
l
At least 64 MB RAM
l
5 MB free hard drive space
l
A CD-ROM drive for installing the software.
l
NuDAQ PCI cards the NuDAQ PCI card OPC server supports
2 • Installation
2.2 Software Component Installation
The Setup program provided by PCIS-OPC performs all tasks necessary
for installing the software components.
Step 1. Place the “ADLINK All-in-one CD” in your CD-ROM drive.
Step 2. If autorun setup program is not loaded, choose Run from the
taskbar, then type x:\setup in the Run dialog box. (where x
indicates the CD-ROM drive)
Step 3. Choose Software Package item, then you can find PCISOPC installation.
Step4. Setup first displays a Welcome dialog box. Please click Next
button to go on the installation. Setup then prompts the
following dialog box for you to type your name, the name of the
company you work for, and the product serial number. You
have to enter the valid serial number to get a valid license.
Otherwise you can only run the server in 120 minutes demo
mode.
Step5. Click Next button then follow the guide to setup the software.
Installation • 3
[Windows NT only]
Because Windows NT is not a Plug and Play system, you have to register
the device driver manually. When the software component installation
process is completed, Setup will launch the NuDAQ PCI Configuration
Utility, PciUtil, for you to register the driver.
For the details of the driver registry in Windows NT, please refer to section
2.4.2.
2.3 Directories and Files
The installation program will copy all necessary files to your computer,
register all components with Windows, and create icons in the Start menu.
When the installation process is completed, the installation directory
should contain the following files and sub-directories:
File/Sub-directory
NQOPCSvr.exe
Doc <DIR>
Description
NuDAQ PCI card OPC server
Include the PDF documents of NuDAQ PCI
card OPC server
Doc\PCISOPC Manual.pdf NuDAQ PCI card OPC server manual file
Help <DIR>
Online help files
Samples <DIR>
An OPC client sample program
4 • Installation
2.4 Device Installation
2.4.1
Windows 98
Windows 98 and NuDAQ PCI data acquisition cards work very well
together because Windows 98 includes Plug and Play capabilities. Once
Windows 98 has started, the Plug and Play function of Windows 98
system will find the new NuDAQ PCI cards. If this is the first time to install
NuDAQ PCI cards in your Windows 98 system and you haven’t installed
any ADLINK NuDAQ PCI card software, you will be informed to install the
device driver.
You can click Next button to go on installing device. The device
information files are located in “DASK98Inf” directory of ADLINK All-inOne CD. However the device cannot work properly without the software
driver files. The installation of any NuDAQ PCI device will get the
unsuccessful device installation. Therefore we suggest you just click
Cancel button to skip it.
After installing PCIS-OPC software component, the INF files and Driver
files are copied into appropriate directories. With the well-installed Device
Information Files (.INF) and Device Driver Files (.SYS), Windows 98
system will identify and install any plugged NuDAQ PCI data acquisition
card automatically at system startup time.
Installation • 5
After installing PCIS-OPC software component then re-entering Windows
98, to ensure the success of hardware device installation, you can open
the Device Manager in Start>>Settings>>Control Panel>>System, and
then select the Device Manager tab.
In Device Manager, you should find the device in NuDAQ. You can
double-click the device, select the Resources tab to check if I/O port and
IRQ resources for the device are allocated successfully.
2.4.2
Windows NT
Because Windows NT is not a Plug and Play system, you have to register
the device driver manually by NuDAQ PCI Configuration Utility. This utility
accompanied with PCIS-OPC is provided for making the driver registries
and card configuration. The configuration setting by this utility is the buffer
size of the continuous AI/AO/DI/DO operation. The continuous operation
means performing data acquisition with pacer trigger and interrupt/DMA
transfer. Since NuDAQ PCI card OPC server does not use this
functionality, it does not use the buffer. To save the system memory, you
can set the buffer size to 0.
The main window of NuDAQ PCI Configuration utility, PciUtil, is shown
below. In Windows NT system, if any PCI card driver has been registered,
it will be shown on the Registered Driver list.
6 • Installation
To register one of NuDAQ PCI card drivers, click N e w … button and a
Driver Configuration window appears.
In this window, users can select the driver you want to register and input
the parameters in the box corresponding to AI, AO, DI, or DO buffer size
for the requirement of your applications. As described above, you can set
buffer size to 0.
After the device configurations of the driver you select is finished, click OK
button to register the driver and return to the PciUtil main window. The
driver you just registered will be shown on the Registered Drivers list as
the following figure:
Installation • 7
Then you can select Exit! command in the menu bar or Done button to
exit the driver registry utility. To make the registered drivers work, you
have to restart Windows NT system.
After re-entering Windows NT and the NuDAQ PCI devices you wish to
operate have been plugged in your computer, make sure the device
drivers corresponding to those NuDAQ PCI cards are already started. For
NuDAQ PCI card OPC server to be able to communicate with NuDAQ PCI
card, device driver AdlDask as well as the card’s own device driver (e.g.
PCI6208, PCI7200, PCI7230, PCI7234, PCI7248, PCI7250, PCI7252,
PCI7296, PCI7432, PCI7433, PCI7434, PCI8554, PCI9111, PCI9112,
PCI9113, PCI9114, or PCI9118, etc.) must be started. You can open the
Control Panel, double-click Devices, and a Devices window will be shown
as below.
If the device status is none, you have to select the AdlDask and the device
from the device list and then press the Start button.
8 • Installation
Note: The AdlDask driver must have been started as you set the
card’s own device driver status as started.
Installation • 9
2.4.3
Windows 2000
Windows 2000 and NuDAQ PCI data acquisition cards work very well
together because Windows 2000 includes Plug and Play capabilities.
Once Windows 2000 has started, the Plug and Play function of Windows
2000 system will find the new NuDAQ PCI cards. If this is the first time to
install NuDAQ PCI cards in your Windows 2000 system and you haven’t
installed any ADLINK NuDAQ PCI card software, you will be informed to
install the device driver.
You can click Next button to go on installing device. The device
information files are located in “DASK2000Inf” directory of ADLINK All-inOne CD. However the device cannot work properly without the software
driver files. The installation of any NuDAQ PCI device will get the
unsuccessful device installation. Therefore we suggest you just click
Cancel button to skip it.
After installing PCIS-OPC software component, the INF files and Driver
files are copied into appropriate directories. With the well-installed Device
Information Files (.INF) and Device Driver Files (.SYS), Windows 2000
system will identify and install any plugged NuDAQ PCI data acquisition
card automatically at system startup time.
After installing PCIS-OPC software component then re-entering Windows
2000, to ensure the success of hardware device installation, you can open
the Device Manager in Start>>Settings>>Control Panel>>System, and
then select the Hardware tab.
10 • Installation
In Device Manager, you should find the device in NuDAQ Boards. You
can double-click the device, select the Resources tab to check if I/O port
and IRQ resources for the device are allocated successfully.
Installation • 11
3
OPC Interface of NuDAQ
PCI card OPC Server
OPC Specification defined the standard OPC interface. Users can use the
OPC interface to communicate with OPC server. Following description is
the interface of NuDAQ PCI card OPC server.
3.1 OPCServer Object
IOPCCommon
HRESULT
SetLocaleID (dwLcid);
HRESULT
GetLocaleID (pdwLcid);
HRESULT
QueryAvailableLocaleIDs (pdwCount, pdwLcid);
HRESULT
GetErrorString (dwError, ppString);
HRESULT
SetClientName (szName);
IOPCServer
HRESULT
AddGroup (szName, bActive, dwRequestedUpdateRate,
hClientGroup, pTimeBias, pPercentDeadband, dwLCID,
phServerGroup, pRevisedUpdateRate, riid, ppUnk);
HRESULT
GetErrorString (dwError, dwLocale, ppString) ;
HRESULT
GetGroupByName (szName, riid, ppUnk);
12 • OPC Interface of NuDAQ PCI card OPC Server
HRESULT
GetStatus (ppServerStatus);
HRESULT
RemoveGroup (hServerGroup, bForce);
HRESULT
CreateGroupEnumerator (dwScope, riid, ppUnk);
IConnectionPointContainer
HRESULT
EnumConnectionPoints (IEnumConnectionPoints ppEnum);
HRESULT
FindConnectionPoint (REFIID riid, IConnectionPoint ppCP);
IOPCItemProperties
HRESULT
QueryAvailableProperties (szItemID, pdwCount,
ppPropertyIDs, ppDescriptions, ppvtDataTypes);
HRESULT
GetItemProperties (szItemID, dwCount, pdwPropertyIDs,
ppvData, ppErrors);
HRESULT
LookupItemIDs (szItemID, dwCount, pdwPropertyIDs,
ppszNewItemIDs, ppErrors);
IOPCBrowseServerAddressSpace
HRESULT
QueryOrganization (pNameSpaceType);
HRESULT
ChangeBrowsePosition (dwBrowseDirection, szString);
HRESULT
BrowseOPCItemIDs (dwBrowseFilterType, szFilterCriteria,
vtDataTypeFilter, dwAccessRightsFilter, ppIEnumString);
HRESULT
GetItemID (szItemDataID, szItemID);
HRESULT
BrowseAccessPaths (szItemID, ppIEnumString);
OPC Interface of NuDAQ PCI card OPC Server • 13
3.2 OPCGroup Object
IOPCGroupStateMgt
HRESULT
GetState (pUpdateRate, pActive, ppName, pTimeBias,
pPercentDeadband, pLCID, phClientGroup, phServerGroup);
HRESULT
SetState (pRequestedUpdateRate, pRevisedUpdateRate,
pActive, pTimeBias, pPercentDeadband, pLCID, phClientGroup);
HRESULT
SetName (szName);
HRESULT
CloneGroup (szName, riid, ppUnk);
IOPCSyncIO
HRESULT
Read (dwSource, dwCount, phServer, ppItemValues, ppErrors);
HRESULT
Write (dwCount, phServer, pItemValues, ppErrors);
IOPCAsyncIO2
HRESULT
Read (dwCount, phServer, dwTransactionID, pdwCancelID,
ppErrors);
HRESULT
Write (dwCount, phServer, pItemValues, dwTransactionID,
pdwCancelID, ppErrors);
HRESULT
Cancel2 (dwCancelID);
HRESULT
Refresh2 (dwSource, dwTransactionID, pdwCancelID);
HRESULT
SetEnable (bEnable);
HRESULT
GetEnable (pbEnable);
14 • OPC Interface of NuDAQ PCI card OPC Server
IOPCItemMgt
HRESULT
AddItems (dwCount, pItemArray, ppAddResults, ppErrors);
HRESULT
ValidateItems(dwCount, pItemArray, bBlobUpdate,
ppValidationResults, ppErrors);
HRESULT
RemoveItems (dwCount, phServer, ppErrors);
HRESULT
SetActiveState (dwCount, phServer, bActive, ppErrors);
HRESULT
SetClientHandles (dwCount, phServer, phClient, ppErrors);
HRESULT
SetDatatypes (dwCount, phServer, pRequestedDatatypes,
ppErrors);
HRESULT
CreateEnumerator (riid, ppUnk);
IConnectionPointContainer
HRESULT
EnumConnectionPoints (ppEnum);
HRESULT
FindConnectionPoint (riid, ppCP);
3.3 EnumOPCItemAttributes Object
IEnumOPCItemAttributes
HRESULT
Next (celt, ppItemArray, pceltFetched);
HRESULT
Skip (celt);
HRESULT
Reset (void);
HRESULT
Clone (ppEnumItemAttributes);
OPC Interface of NuDAQ PCI card OPC Server • 15
3.4 Custom Interface/Client Side
IOPCDataCallback
HRESULT
OnReadComplete (dwTransid, hGroup, hrMasterquality,
hrMastererror, dwCount, phClientItems, pvValues, pwQualities,
pftTimeStamps, pErrors);
HRESULT
OnWriteComplete (dwTransid, hGroup, hrMastererr, dwCount,
phClientItems, pErrors);
HRESULT
OnCancelComplete (dwTransid, hGroup);
HRESULT
OnDataChange (dwTransid, hGroup, hrMasterquality,
hrMastererror, dwCount, phClientItems, pvValues, pwQualities,
pftTimeStamps, pErrors);
IOPCShutdown
void
ShutdownRequest (szReason);
IAdviseSink (old)
void
OnDataChange (pFE, pSTM);
Note: all other functions can be stubs which return E_NOTIMPL.
About the detail of each method of interface, please refer to “OPC Data
Access Custom Interface Specification” manual on the OPC Foundation
website http://www.opcfoundation.org.
16 • OPC Interface of NuDAQ PCI card OPC Server
4
Configuration and
Diagnostic
4.1 Configuration
The graphical configuration and diagnostic functions are bundled in
NuDAQ PCI card OPC server (NQOPCSvr.exe). That is, the user
interface of the NuDAQ PCI card OPC server is the configuration/
diagnostic window. You can use it to set up and maintain the OPC server.
It provides fields for specifying the properties of devices (NuDAQ PCI data
acquisition cards ), and items (channel or port on the device). You can
save the configuration to a file. The NuDAQ PCI card OPC server uses
the configuration file you loaded to operate with the devices. The NuDAQ
PCI card OPC server automatically loads the default configuration file
NuDAQ.cfg when starting.
The following sections will guide you through the configuration procedures.
Configuration and Diagnostic • 17
4.1.1
Adding a New Device
From the Tree Browser:
In Configuration view, click the right button on the root (NuDAQ OPC
Server), then select the Add Device command in the popup menu. The
Add Device dialog box will appear.
From the menu bar:
In Configuration view, select Add Device from the Server menu to bring
up the Add Device dialog box.
1.
In the Add Device dialog box, select the NuDAQ PCI card type
and the card index you want to add in your configuration. The
card index represents the sequence number of the cards
belonging to the same card type series plugged in the PCI slots.
The card index number setting is according to the PCI slot
sequence on the computer. The first card (in the most prior slot)
is with card index 0. For example, suppose there are one PCI9111DG card, one PCI-9111HR card, and two PCI-9112 cards
plugged on your PC. PCI-9111DG card is plugged in the prior
slot than the PCI-9111HG card. The PCI-9111DG card should
be set to card index 0. The PCI-9111HR card set to card index 1.
The PCI-9112 card in the prior slot set to card index 0. The other
PCI-9112 card set to card index 1. The following table categories
the NuDAQ PCI devices by card type series.
18 • Configuration and Diagnostic
Card Type Series
Device Types
PCI-6208 Series
PCI-6208V, PCI-6216V, PCI-6208A
PCI-6308 Series
PCI-6308V, PCI-6308A
PCI-7200
PCI-7200
PCI-7230
PCI-7230
PCI-7233
PCI-7233
PCI-7234
PCI-7234
PCI-7248
PCI-7248, PCI-7224
PCI-7249
PCI-7249
PCI-7250
PCI-7250
PCI-7252
PCI-7252
PCI-7296
PCI-7296
PCI-7396
PCI-7396, PCI-7348
PCI-7432
PCI-7432
PCI-7433
PCI-7433
PCI-7434
PCI-7434
PCI-9111 Series
PCI-9111DG, PCI-9111HR
PCI-9112
PCI-9112
PCI-9113
PCI-9113
PCI-9114 Series
PCI-9114DG, PCI-9114HG
PCI-9118 Series
PCI-9118DG, PCI-9118HG, PCI-9118HR
2.
3.
After clicking the OK button, if the selected NuDAQ PCI data
acquisition card needs more properties (e.g.: I/O port setting),
another dialog box will be prompted for you to set the properties.
The new device appears in the Tree Browser and the List View.
Then you can add items to this device.
Configuration and Diagnostic • 19
4.1.2
Search Devices
In addition to adding the device manually, you can utilize the Search
Devices command to list all of the NuDAQ PCI cards currently plugged on
the computer.
From the menu bar:
Select Search Devices from the Server menu to bring up the Search
Devices dialog box.
From the Tree Browser:
Click the right button on the root (NuDAQ OPC Server) then select the
Search Devices command in the popup menu. The Search Devices
dialog box will appear.
1. In the Search Devices dialog box, the list box lists the NuDAQ
PCI cards plugged in the PCI slots. Select the NuDAQ PCI card
you want to add into your configuration, then click Add button.
2. If the selected NuDAQ PCI data acquisition card needs more
properties (e.g.: I/O port selection), another dialog box will be
prompted for you to set the properties.
3. The new device appears in the Tree Browser and the List View.
Then you can add items to this device.
4.1.3
Adding a New Item
From the Tree Browser and List View:
In Configuration view, click the right button on the device you want to add
item to, then select the Add Item in the popup menu. The Add Item dialog
box will appear.
From the menu bar:
In Configuration view, select Add Item from the Device menu to bring up
the Add Item dialog box.
1. In the Add Item dialog box, you need to enter the item name,
and select the properties of this item, then click the OK button.
2. The new item appears in the Tree Browser and the List View.
4.1.4
Adding New Items
From the Tree Browser and List View:
In Configuration view, click the right button on the device you want to add
items to, then select the Add Items in the popup menu. The Add Items
dialog box will appear.
20 • Configuration and Diagnostic
From the menu bar:
In Configuration view, select Add Items from the Device menu to bring up
the Add Items dialog box.
1. In the Add Items dialog box, you will see all the valid items in this
device. You can click on the item name column to modify the
item name, and right click on the range/port/mode column of the
item to change the property(if this property is writeable). You can
select the items you want to add, and click the Add button, or
click Add All button to add all items.
2. The new item appears in the Tree Browser and the List View.
4.1.5
Modifying an Existing Item
From the Tree Browser and List View:
In Configuration view, click the right button on the item you want to modify
then select the Edit Item in the popup menu. The Edit Item dialog box will
appear.
From the menu bar:
In Configuration view, select Edit Item from the Device menu to bring up
the Edit Item dialog box.
1. You can modify the properties of this item , then click the OK
button.
2. The item updates automatically in the Tree Browser and the List
View.
4.1.6
Saving Configuration
You can save the configuration into a file. The default file name extension
is CFG.
From the menu bar:
Select the Save or Save As… command from the File menu.
4.1.7
Loading Configuration File
You can load the existing configuration file.
From the menu bar:
Select Open… from the File menu.
Note: The NuDAQ PCI card OPC server automatically loads
configuration file NuDAQ.cfg (if the file exists) when starting.
Configuration and Diagnostic • 21
4.2 Diagnostic
4.2.1
Start Diagnostic
You can diagnose the NuDAQ PCI card OPC server eas ily with the
Diagnostic view.
From the menu bar:
Select Start Diagnostic from the Diagnostic menu to bring up the
Diagnostic view.
4.2.2
Reading Item
The values of the readable items are updated periodically.
4.2.3
Writing Item
If you want to output a value to a writable item, please click the right
button on the item then select the Write command in the popup menu. A
dialog box will appear for you to set the output value. You can enter the
value and click the OK button to write a value to the item.
4.2.4
Stop Diagnostic
From the menu bar:
Select Stop Diagnostic from the Diagnostic menu to stop the diagnostic
operation and change to Configuration view.
Note: When in Diagnostic status (in Diagnostic view), you can not
modify the configuration setting, until you execute Stop
Diagnostic.
22 • Configuration and Diagnostic
5
OPC Client Sample Program
This section describes how to run the ALINK OPC Client sample program.
Before we continue, please make sure that PCIS-OPC software and the
NuDAQ PCI devices are installed correctly. Also, you should have run
NuDAQ PCI card OPC server (NQOPCSvr.exe) to configure the devices
and items existed on the server, and place the generated file NuDAQ.cfg
in the directory where NuDAQ PCI card OPC server locates.
Step 1. Click the Create Instance button to launch the NuDAQ PCI
card OPC server. A dialog box appears to let you choose
which OPC Server (NuDAQ.OPC.2, NuDAM.OPC.2 , or
HSL.OPC.2) you want to launch.
OPC Client Sample Program • 23
Step 2. The Browse Items button is now enabled, and the NuDAQ
PCI card OPC server icon appears on the task bar.
Step 3. Click
the
Browse
Items
button
to
query
IOPCBrowseServerAddressSpace interface and acquire all
items defined in the NuDAQ PCI card OPC server. All items
are listed in the Server Item List. There are two columns in the
list. The first column is the name of each item, which is
presented in device.item format. The second column is the
access right of each item. “R” represents readable. “W”
represents writable. “R/W” represents both readable and
writable. Now the Add Group button should be enabled.
24 • OPC Client Sample Program
Step 4. Click the Add Group button to add a new group to the NuDAQ
PCI card OPC server. You should enter Group Name,
Requested Update Rate, Client Handle, and select if this group
is active. A new group will appear in the Group List. There are
three columns in the Group List list. The first column is the
name of a group. The second column indicates the
active/inactive status of the group. The third column represents
the server-revised update rate (in mini-seconds) for that group.
Step 5. In the Group List area, you can right-click on a group to set
group active/inactive status.
OPC Client Sample Program • 25
Step 6. After groups have been added, you can select some items and
click Add Item button to add these items to a selected group.
Or you can click Add All Items button to add all items on the
server to a selected group.
Now we should take a look at the Items in Current Group list. There are
eight columns in the list, which are described as follows:
l
Item Name: It is presented in the device.item format.
l
Data Type: canonical data type
l
Vaule: current data value
l
R/W: access right
l
Time Stamp: indicates the time when the item value is acquired.
l
C/H: client handle. A handle defined in client to identify a specified
item.
l
S/H: server handle. A handle defined in server to identify a
specified item.
l
HRESULT: return error for each item when performing read/write.
Step 7. After adding items to a selected group, you can perform
read/write operation. Or you can build a connection point
between server and client. Hence there will be a callback
occurred when the item values change.
26 • OPC Client Sample Program
Step 8. To perform asynchronous read, click Read button. The server
will read value from corresponding hardware for each item.
The value and other parameters returned will be presented in
the Items in Current Group list.
Step 9. To perform synchronous write, you should first set a value to a
writable item. To do this, you can right-click on an item with
“W” or “R/W” access right. And a dialog box will appear for you
to enter the item value. And then click the Write button, the
value you specified will write to the hardware.
OPC Client Sample Program • 27
Step 10.If you want to build a connection between server and client,
click the Advise button. It advises the NuDAQ PCI card OPC
server of client’s IOPCDataCallback interface. After that, once
item values change, the NuDAQ PCI card OPC server will
invoke OnDataChange() to notify the client. The changed
values will be presented in the Items in Current Group list.
28 • OPC Client Sample Program
Appendix - Notes of Using OPC/DCOM
1.
2.
3.
4.
5.
When the Installation of PCIS-OPC is successful, the NuDAQ
PCI OPC server has been registered in system registry. Or you
can register it manually by executing the command “NQOPCSvr
-RegServer” in DOS Prompt.
Because the OPC server is based on the COM/DOCM of
Microsoft, your Windows system must support DCOM capability.
DCOM is a standard part of the Windows NT 4.0 distribution.
You preferably have applied the latest Service Pack for Windows
NT 4.0 (above Service Pack 2).
DCOM is a standard part of the Windows 98/2000 distribution.
You must make sure the setting of the following registry keys.
\HKEY_LOCAL_MACHINE\SOFTWARE\Microsoft\OLE\EnableRemoteConnect = ‘Y’
\HKEY_LOCAL_MACHINE\SOFTWARE\Microdoft\OLE\EnableDCOM = ‘Y’
6.
The “client” machine would do the same configuration above.
You must log on with the same user ID as on the “server”
machine.
Appendix - Notes of Using OPC/DCOM • 29
Product Warranty/Service
ADLINK warrants that equipment furnished will be free from defects in
material and workmanship for a period of two years from the date of
shipment. During the warranty period, we shall, at our option, either repair
or replace any product that proves to be defective under normal operation.
This warranty shall not apply to equipment that has been previously
repaired or altered outside our plant in any way as to, in the judgment of
the manufacturer, affect its reliability. Nor will it apply if the equipment has
been used in a manner exceeding its specifications or if the serial number
has been removed.
ADLINK does not assume any liability for consequential damages as a
result from our product uses, and in any event our liability shall not exceed
the original selling price of the equipment. The remedies provided herein
are the customer’s sole and exclusive remedies. In no event shall
ADLINK be liable for direct, indirect, special or consequential damages
whether based on contract of any other legal theory.
The equipment must be returned postage-prepaid. Package it securely
and insure it. You will be charged for parts and labor if the warranty period
is expired or the product is proves to be misuse, abuse or unauthorized
repair or modification.
30 • Product/Warrty Service