1
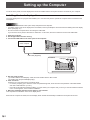
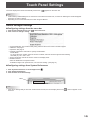
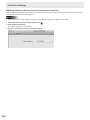
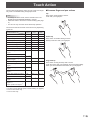
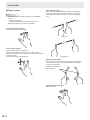
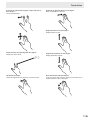
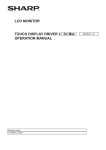
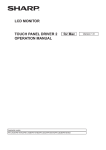
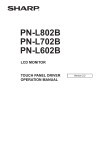
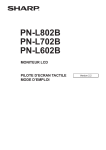
LCD MONITOR
TOUCH DISPLAY DRIVER
OPERATION MANUAL
Applicable models
PN-K322B/PN-K322BH/LL-S201A
for Mac
Version 1.0
Contents
Introduction.......................................................................3
System Requirements...................................................3
Setting up the Computer..................................................4
Installing the touch display driver..................................4
Touch Panel Settings........................................................5
How to configure settings..............................................5
Calibration.....................................................................7
Properties......................................................................8
Uninstalling the Driver Software...................................10
Touch Action................................................................... 11
Important Information
•This software has been shipped after strict quality control and product inspection. If, however, you find any failure or
malfunction, contact your product dealer.
•Please understand that SHARP CORPORATION bears no responsibility for errors made during use by the customer or a
third party, nor for any other malfunctions or damage to this software arising during use, except where indemnity liability is
recognized under law.
•Transcribing or duplicating part or all of this manual and/or this software without permission from our company is not
permitted.
•As a part of our policy of continuous improvement, SHARP reserves the right to make design and specification changes for
product improvement without prior notice.
•The contents or details may vary depending on the screen configuration and OS version, etc.
•This manual does not contain basic operating instructions for Mac OS.
Trademarks
•Apple, Mac and Mac OS are registered trademarks of Apple Inc.
•Intel is a trademark or registered trademark of Intel Corporation or its subsidiaries in the U.S.A. and other countries.
• All other brand and product names are trademarks or registered trademarks of their respective holders.
E
2
Introduction
System Requirements
To use the touch panel, the touch panel must be connected to a computer, and the touch display driver must be installed on the
computer.
OS
Mac OS X v10.6, Mac OS X v10.7, Mac OS X v10.8
CPU
Intel processor
Memory
At least 2 GB
Free space on hard drive
At least 5 MB
TIPS
• Depending on the application software, touch operation may not be possible (for example, if the application processes mouse
and other operations independently).
3
E
Setting up the Computer
To use the touch panel, the touch display driver must be installed and the touch panel must be connected to your computer.
Installing the touch display driver
The touch display driver is a program that enables you to use the touch panel to operate the computer that is connected to the
touch panel.
Caution
• To install, an administrator name (user name) and password are required.
• If an older version of the touch display driver is installed, remove (uninstall) the old version before installing the touch display
driver. (See page 10.)
• Do not touch the touch panel when connecting the USB cable.
If you touch the touch panel, it will lead to a malfunction. In this case, disconnect and then reconnect the USB cable.
1. Start your computer.
2. Exit all applications that are running.
3. Connect the USB cable for the touch panel to the computer.
To the USB terminal
of the computer
USB port
USB cable (Supplied)
LL-S201A
USB port
4. Run the setup program.
(1) Double-click the “TouchDisplay” folder, and then double-click the “Mac” folder.
(2) Double-click “SharpTouchDisplay.mpkg”.
5. Click “Continue”.
Follow the on-screen instructions to install the driver.
• If a screen prompting you to enter the name and password appears, enter the name and password of the administrator
and click “Install Software” (or “OK”).
• If the “When this software finishes installing, you must restart your computer. Are you sure you want to install the software
now?” screen appears, click “Continue Installation”.
6. When the installation finished screen appears, click “Restart”.
This completes the installation of the touch display driver.
Each time the computer is started, the touch display driver will start automatically to enable the touch panel to be used.
E
4
Touch Panel Settings
The touch display driver starts automatically and the icon (
) appears on the menu bar.
TIPS
• If PN-K322B (or PN-K322BH) and LL-S201A are connected at the same time, a screen for selecting the model will appear
each time you select a setting.
• Depending on the connected model, the screen image is different.
How to configure settings
nConfiguring settings from the menu bar
1. Click the touch display driver icon (
2. Click a menu to change a setting.
) on the menu bar.
•
•
•
•
Current Resolution: The model currently being used and the current screen resolution appear.
Calibration: See page 7.
Properties: See page 8.
Hardware Information: Select this to specify “Rotate Mode”.
-Rotate Mode:
To correct the touch position when the screen is rotated, select the screen angle from the following:
Standard (0°) / 90° / 180° / 270°
• Version Information: Shows the version of the touch display driver.
• Disable TD Driver:
Select to disable the touch panel function.
To disable a single touch panel function, see “Function Setting”. (See page 9.)
nConfiguring settings from System Preferences
1. Click “System Preferences” from the Apple menu (
2. Click “SharpTouchDisplay”.
3. Click the menu and select settings.
).
Menu
TIPS
• If the “Show Setting Utility in menu bar” checkmark is removed, the touch display driver icon (
menu bar.
) does not appear on the
5
E
Touch Panel Settings
nSettings when two devices are connected at the same time
If PN-K322B (or PN-K322BH) and LL-S201A are connected at the same time, select the model whose settings will be changed.
* Two models cannot be set at the same time.
Caution
• If two displays of the same model are connected, touch operation will only be enabled on one model.
1. Click “System Preferences” from the Apple menu ( ).
2. Click “SharpTouchDisplay”.
The “Device Selection” screen appears.
3. Select the model whose settings you want to change.
E
6
Touch Panel Settings
Calibration
If black bands appear at the top and bottom or left and right of the screen, perform position adjustment so that the mouse cursor
correctly moves to the point that is touched.
* If black bands appear both at the top and bottom and at the left and right, the touch position is not correct. In this case, change
the display.
nCalibration Method
Follow the steps below to configure the setting.
1. Click the touch display driver icon (
2. Click “Calibration”.
) on the menu bar.
Auto
If black bands appear on the screen, position adjustment is automatically performed.
Select “Auto” and click on “Apply”.
Manual
If the automatically adjusted touch position is not correct, enter the display resolution (width, height) and click “Apply”.
In the case of PN-K322B (or PN-K322BH), please check the menu screen. In addition, in the case of LL-S201A, please check
by touching [Input Select] on the menu screen.
For details, see the LCD MONITOR manual.
7
E
Touch Panel Settings
Properties
Settings for the touch action can be configured in the properties.
nDouble Click Range
Set the range over which the position can shift between the first touch and the second touch and still be recognized as a doubleclick (“Narrow” (8 pixels) to “Wide” (64 pixels)). To return the setting to the default setting, click “Default” (32 pixels).
nDouble Click Speed
Set the time that is recognized as a double-click. When a second touch occurs within the set time after the first touch, it is
recognized as a double-click.
Speed Setting (Auto)
The inside of the frame can be touched twice (double-clicked) to set the speed automatically based on the interval between the
touches.
Set Manually
The speed can be set manually from “Slow” (about 1 second) to “Fast” (about 0.3 seconds).
Test
When the inside of the frame is double-clicked by touching it twice, the screen changes. If the screen does not change, repeat
the setting.
Default
Click to restore the default setting.
TIPS
• Depending on the application software, changing the setting may not have any effect (for example, if the setting is set
separately in the application).
E
8
Touch Panel Settings
nRight-click
You can set press and hold to be recognized as a right click.*
Enable press and hold for right-clicking
When the checkbox is selected, press and hold is recognized as a right click.
Press and Hold Duration
Set the time until press and hold is recognized as a right click (“Short” (0.5 sec) to “Long” (1.5 sec)).
* If the Mac OS left-click long press action interferes with the press and hold action, do the following:
• Use “Click or tap with two fingers”
• Adjust “Press and Hold Duration” to a longer setting (toward “Long”)
nFunction Setting
Select the touch action to be used. (See page 11.)
Touch actions that are followed with a
desired action.
mark have multiple actions that can be used. Click a touch action and selected the
Caution
• Touch actions that can be used vary depending on the OS.
*
OS X v10.8/v10.7
OS X v10.6
* OS X v10.8 only
9
E
Uninstalling the Driver Software
Caution
• To uninstall, an administrator name (user name) and password are required.
1. Disconnect the USB cable.
2. Execute uninstall.
(1) Double-click the “TouchDisplay” folder, and then double-click the “Mac” folder.
(2) Double-click “TouchDisplayDriver Uninstaller.app”.
(3) Click “Uninstall”.
•If a screen prompting you to enter the name and password appears, enter the name and password of the administrator
and click “OK”.
3. When the uninstall finished screen appears, click “Quit”.
This completes the uninstallation.
E
10
Touch Action
Touch modes are finger/pen mode, pen-only mode, and fingeronly mode. The default setting is finger/pen mode.
TIPS
• To change the touch mode, see the manual for the LCD
MONITOR (PN-K322B/PN-K322BH/LL-S201A).
• Select the action to be used in Function Setting. (See page
9.)
• You can not only move the cursor without tap operation.
nCommon finger and pen actions
Tap
Same action as left-clicking a mouse.
Touch with your finger/pen.
Touch actions that can be used on this device vary depending
on the OS.
OS
Touch Action
Tap
OS X
v10.6
OS X
v10.7
OS X
v10.8
Yes
Yes
Yes
Double-tap
Yes
Yes
Yes
Drag-and-drop
Yes
Yes
Yes
Yes *1
Yes *1
Yes *1
Yes
Yes
Click or tap with two fingers
Yes
*1
Scroll with two fingers
Pinch with two fingers
Yes
*1
Rotate with two fingers
Yes *1
Double-tap with two fingers
No
Scroll left or right with two
fingers
No
*1
Yes
Yes *1
Yes *1
Yes *1
*1
Yes *1
Yes
Yes *1, *2
Yes *1, *2
Double-tap
Same action as double-clicking a mouse.
Quickly touch twice with your finger/pen.
Swipe with two or three fingers
Swipe with three fingers
Yes *1
Swipe left from the right edge
with two fingers
No
No
Yes *1
Tap with three fingers
No
Yes *1
Yes *1
Swipe left or right with three
fingers
No
Yes *1, *2
Yes *1, *2
Swipe left or right with four
fingers
Yes *1
Swipe up with three or four
fingers
No
Yes *1, *2
Yes *1, *2
Swipe down with three fingers
No
Yes *1, *2
Yes *1, *2
Swipe down with four fingers
Yes *1
No
Yes *1
Yes *1
Yes *1
Yes *1
Yes *1
Pinch with thumb and three
fingers
Spread with thumb and three
fingers *3 /
Swipe up with four fingers *4
*1
*2
*3
*4
Drag-and-drop
Same action as drag-and-drop with a mouse.
Touch the screen with your finger/pen and move without lifting.
When you have finished the movement, lift your finger/pen.
he device can be switched ON/OFF.
T
ctions can be selected. (See “Function Setting” on page 9.)
A
OS X v10.7/v10.8 only.
OS X v10.6 only.
11
E
Touch Action
nFinger actions
TIPS
• The screen may not respond correctly in the following
cases:
Touching is too quick
The distance between the two points is too short
• Operation with the touch pen is not possible.
Pinch with two fingers
Use in a screen that is capable of reduction/enlargement.
Touch the screen with two fingers and move your fingers
closer together to reduce the view, or apart to enlarge the
view.
Click or tap with two fingers
Same action as a secondary click.
Reduction
Scroll with two fingers
Use in screens that can be scrolled.
With your two fingers touching the screen, move in the
direction you want to scroll. The screen scrolls in the direction
of the movement.
The scroll direction can be changed.
Enlargement
Rotate with two fingers
Use this action in a screen that is capable of image rotation.
Touch the screen with two fingers and rotate to rotate the
screen in that direction.
Rotate two fingers in the
same direction.
Double-tap with two fingers
Use smart zoom.
E
12
Touch Action
Scroll left or right with two fingers / Swipe with two or
three fingers
Use cross page swipe.
Swipe left or right with three or four fingers
Move an application to the front.
Swipe up with three or four fingers
Display Mission Control.
Swipe left from the right edge with two fingers
Display the notice center.
Tap with three fingers
Check the tapped text in a dictionary or other resource.
Swipe down with three or four fingers
Display Application Exposé.
Pinch with thumb and three fingers
Touch the screen with 4 fingers, and move your thumb and 3
fingers together to open Launchpad.
13
E
Touch Action
Spread with thumb and three fingers / Swipe up with four
fingers
Touch the screen with 4 fingers, and move your thumb and 3
fingers apart to show the desktop. (OS X v10.7/v10.8)
Swipe with 4 fingers to show the desktop. (OS X v10.6)
E
14
PN-K322BPN-K322BHLL-S201A DM EN13J(1)