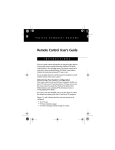
1
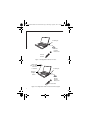
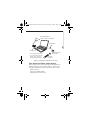
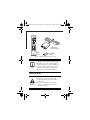
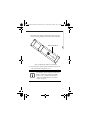
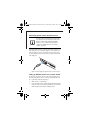
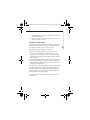
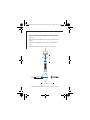
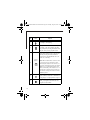
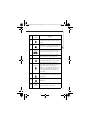
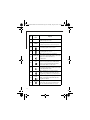
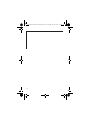
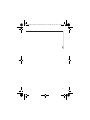
Vista Remote B5FJ-5401-01EN-00.fm Page 1 Thursday, August 9, 2007 3:39 PM
Fujitsu Computer Systems Corporation
Remote Control User’s Guide
I N S T R U C T I O N S
This user’s guide contains information on using the Fujitsu Remote
Control with systems running Microsoft® Windows Vista® Home
Premium or Windows Vista® Ultimate edition as the operating system.
You are strongly advised to read this manual to familiarize yourself with
the features of the remote control.
Determining Your System Configuration
Your remote control can be used with your computer whether you have
a TV tuner or not. If you do not have a TV tuner, you can use the remote
control to perform such operations as playing DVDs, listening to music,
or viewing digital photo albums.
If you have a TV tuner installed (built-in, installed on PC Card, or
connected externally via USB), you can use the remote to control the
channel and volume, pause live TV, and record TV programs.
Figs. 1 through 3 illustrate the three ways your system can be
configured:
■
■
■
No TV Tuner
Built-in TV Tuner with direct signal
External TV Tuner
Note that the port locations and system
configurations illustrated in this manual may differ
from your actual configuration. See you system
user’s guide for actual location/configuration.
Vista Remote B5FJ-5401-01EN-00.fm Page 2 Thursday, August 9, 2007 3:39 PM
To USB port
Remote
Control
IR Receiver
OK
+
+
1
2
5
DEF
7
JKL
S
PQR
4
ABC
GHI
8
Z
0
WXY
6
AR
CLE
MNO
3
TUV
9
ER
ENT
Remote
Control
Figure 1. Configuration with no TV Tuner
RF Coaxial
cable to cable
connector
or antenna
To USB port
Antenna
Adapter
Cable
Remote
Control
IR Receiver
OK
+
GHI
+
1
JKL
7
2
PQRS
ABC
4
R
8
MNO
3
CLEA
TUV
DEF
5
0
9
Z
WXY
6
R
ENTE
Remote Control
Figure 2. Configuration with TV Tuner and Direct Signal
2
Vista Remote B5FJ-5401-01EN-00.fm Page 3 Thursday, August 9, 2007 3:39 PM
RF Coaxial cable to
cable connector or antenna
To USB port
To USB port*
Remote Control
IR Receiver
+
OK
ABC
JKL
2
7
PQRS
4
+
GHI
1
DEF
TUV
9
WXYZ
6
0
MNO
8
3
R
CLEA
5
ENTER
*Some external TV tuners can
be connected via USB; other
designs can be connected
via PC or ExpressCard slot.
Remote
Control
Figure 3. Configuration with External TV Tuner
Items included in Remote Control Package
Before using the remote control, make sure the following items are
included in the remote control package (Figure 5). Be sure to have
these items at hand before you proceed to use the remote control:
■
■
■
Remote control
Two size AA alkaline batteries
Optical remote control receiver
3
Vista Remote B5FJ-5401-01EN-00.fm Page 4 Thursday, August 9, 2007 3:39 PM
OK
+
+
ABC
1
GHI
2
JKL
DEF
3
Optical Remote
Control IR Receiver
MNO
4
5
6
PQRS
TUV
WXYZ
7
8
9
0
CLEAR
ENTER
Remote
Control
2 AA Alkaline
Batteries
Figure 4. Remote Control and Accessories
■
■
Info
Use only the remote that came with this
package when operating Vista Media Center.
No cables or accessories other than those
shown in Figure 5 are included. Additional
accessories such as antenna cables, relay
connectors, video cable, S-video cable, or
audio cable are commercially available.
Installing Batteries
■
■
Warning
4
Properly insert batteries using the correct
polarities (+, -). If they are incorrectly
inserted, damage to the remote control
could result.
If you do not intend to use the remote
control for an extended period of time,
remove the batteries.
Vista Remote B5FJ-5401-01EN-00.fm Page 5 Thursday, August 9, 2007 3:39 PM
1. Open the lid of the battery compartment on the bottom of the
remote control by pushing it in the direction shown in Figure 5.
Battery Compartment
Figure 5. Opening the battery compartment
2. Insert the batteries with the polarities indicated on the bottom
of the compartment and replace the cover.
In order to allow a suspended system to “wake
up” using the remote control, you must ensure
that it is enabled in the Windows Mobility
Center. To do so, follow the instructions in
“Setting up Mobility Center to use remote
control” on page 6.
5
Vista Remote B5FJ-5401-01EN-00.fm Page 6 Thursday, August 9, 2007 3:39 PM
Connecting optical remote control IR receiver
In order to allow a suspended system to “wake
up” using the remote control, you must ensure
that it is enabled in the Windows Mobility
Center. To do so, follow the instructions in
“Setting up Mobility Center to use remote
control” on page 6.
Connect the USB connector on the end of the remote control to one
of the USB ports on your computer (Figure 7). Note that the location of the USB port on your system may not be the same as that
shown in the figure. Refer to the system user’s guide for the location
of the USB ports.
Figure 6. Connecting the optical remote control receiver
Setting up Mobility Center to use remote control
In order for your remote control to work with your LifeBook, you
must first ensure that it is able to “wake up” using a USB device. To
do so, perform the following simple steps:
1.
2.
6
Click on Start -> Control Panel.
If you are in Classic View, double-click the Windows Mobility
Center icon. If you are in Control Panel Home View, first click
Mobile PC, then select Windows Mobility Center.
Vista Remote B5FJ-5401-01EN-00.fm Page 7 Thursday, August 9, 2007 3:39 PM
3.
4.
Find the tile labeled “Wake up by USB device”, and see if it is
set to Enable or Disable.
If it is set to Enable, click the [Change] button. If it is set to
Disable, no action is required.
Using the remote control
To use the remote control, you must use the remote control receiver
included with the remote control. If your system has an infrared
port, it cannot be used to operate the remote control.
Note the following when using the remote control:
■
The receiver should be placed in a location where it is not
obstructed. You should be able to point the remote control
directly at the receiver. Keep the receiver out of direct sunlight,
otherwise reception may prove faulty and the effective distance
may be affected.
■
If a plasma display, plasma TV, or halogen heater is located close
to the device, the remote control may not work properly due to
infrared interference. Relocate the devices if they interfere with
the remote control operation.
Using the remote control is fairly intuitive. For specific information
on using particular features, click the Start button to display the
main menu. Scroll down to Settings and press the OK button. A
submenu containing a variety of help topics appear. Click on the
desired submenu to access related topics.
To exit the Help menu, click on the Start button to return to the
main menu.
7
Vista Remote B5FJ-5401-01EN-00.fm Page 8 Thursday, August 9, 2007 3:39 PM
Effective distance/location for remote control
(Figure 12)
Horizontal (left and right from center-point): Approximately 45
degrees
Vertical (left and right from center-point): Approximately 45
degrees
Distance from remote control to receiver: 3 meters max.
45o 45o
3 meters
OK
+
+
ABC
1
GHI
2
JKL
DEF
3
MNO
4
5
6
PQRS
TUV
WXYZ
7
8
9
0
CLEAR
ENTER
45o
45o
3 meters
Figure 7. Effective distance/location of remote control
8
Vista Remote B5FJ-5401-01EN-00.fm Page 9 Thursday, August 9, 2007 3:39 PM
Remote control features
Each button on the remote control is explained in this section.
2
1
3
24
4
23
5
22
6
21
7
8
OK
20
9
10
19
+
+
18
17
ABC
11
12
13
DEF
1
2
3
GHI
JKL
MNO
4
5
6
PQRS
TUV
WXYZ
7
8
9
14
0
16
CLEAR
ENTER
15
Figure 8. Remote control buttons
9
Vista Remote B5FJ-5401-01EN-00.fm Page 10 Thursday, August 9, 2007 3:39 PM
No.
Purpose/
Icon
Play
1
Pause
2
Purpose
Pressing this button causes a selected
recording to start playing.
If you press this button while a DVD, a
recording, or live TV is playing, play will
stop temporarily. Pressing this button while
play has been paused, play will restart.
Pressing this button while the computer is
active will normally put the computer into
standby. Pressing this button while the
computer is in standby will take the computer out of standby.
Power
Button
3
4
5
10
Stop
Fwd
Note: When a USB remote control receiver
is connected to your system, the action
invoked by the button on the remote control can be changed by going to the Power
Options icon on the Control Panel. Select
“Choose what the power button does” in
the left pane. Select the desired action for
the remote control power button from the
available options.
Pressing this button while recording a program or while an audio CD or DVD video is
being played, record/play will be stopped.
When watching a recorded program or
DVD, pressing this button will cause the
program to fast forward.
Vista Remote B5FJ-5401-01EN-00.fm Page 11 Thursday, August 9, 2007 3:39 PM
No.
Purpose/
Icon
Skip
Pressing this button will cause the program
or DVD being viewed to jump to the next
chapter.
More
Pressing this button will display all relevant
information on replaying DVD-VIDEO, CD
music, or recorded programs on screen.
6
7
8
Navigation
Buttons
9
OK
10
Mute
Ch/Pg
11
Live TV
12
DVD Menu
13
14
Purpose
Numeric/
Letter
Keypad
Pressing one of these buttons allow you to
move the cursor left, right, up, or down.
Pressing this button will select or execute
the item where the cursor is placed.
Pressing the Mute button will turn off
sound temporarily until you press it again.
When the (+) button or (-) button is
pressed, the channel will switch to the next
higher channel (+) or the next lower
channel (-). This button will also go to the
previous or next page of a menu or onscreen notification that is more than one
screen high.
Pressing this button will display in fullscreen the program on the channel tuned in
the last time.
Pressing this button will display the main
DVD menu.
Pressing the buttons allows you to input
numbers or letters on the screen.
11
Vista Remote B5FJ-5401-01EN-00.fm Page 12 Thursday, August 9, 2007 3:39 PM
No.
Purpose/
Icon
Purpose
15
ENTER
Pressing this button will enter the letters or
numbers input on screen.
16
CLEAR
Pressing this button will clear the numbers
or letters input on the screen one by one.
17
18
19
Recorded TV Pressing this button will display a list of all
recorded programs on the screen.
Guide
Volume
Up/Down
Start
20
21
22
23
24
12
Pressing this button will display the TV
program guide on screen.
When the (+) button or (-) button is
pressed, the volume will switch to the next
higher (+) or the next lower (-)
volume level.
Pressing this button will start up Media
Center. Pressing this button while Media
Center is running will display the Media
Center Main Menu on the screen.
Back
Pressing the Back button returns you to the
previously viewed screen.
Replay
When watching a recorded program or
DVD, pressing this button will cause the
program to go back 6-7 seconds per press.
Rew
When watching a recorded program or
DVD, pressing this button will cause the
program to rewind.
Record
Pressing this button while in television
mode brings up a menu from which you
can choose what and when to record.
Vista Remote B5FJ-5401-01EN-00.fm Page 13 Thursday, August 9, 2007 3:39 PM
13
Vista Remote B5FJ-5401-01EN-00.fm Page 14 Thursday, August 9, 2007 3:39 PM
14
Vista Remote B5FJ-5401-01EN-00.fm Page 15 Thursday, August 9, 2007 3:39 PM
15
Vista Remote B5FJ-5401-01EN-00.fm Page 16 Thursday, August 9, 2007 3:39 PM
1250 E. Arques Avenue (M/S 122),
Sunnyvale, California 94085
For more information, call 1-877-372-3473 or visit our Web site
at www.shopfujitsu.com.
For technical support call 1-800-8fujitsu or send e-mail to:
[email protected]
Fujitsu and the Fujitsu logo are registered trademarks of Fujitsu, Ltd.
Microsoft, Windows, and Windows Vista are trademarks or registered
trademarks of the Microsoft Corporation. All other trademarks
mentioned herein are the property of their respective owners. We
cannot guarantee the accuracy of the contents of this document. We
disclaim liability for errors, omissions or future changes.
© 2007 Fujitsu Computer Systems Corporation. All rights reserved.
B5FJ-5401-01EN-00
16