1
Using AlliedWare Plus
TM
How To | Get Started With The AlliedWare PlusTM Operating
System
Introduction
This How To Note introduces a number of commonly-used management features of the
AlliedWare PlusTM operating system (OS), the next generation operating system for Allied
Telesis, Inc’s high performance layer 3 managed switches.
Contents
Introduction .............................................................................................................................
Contents ............................................................................................................................
Related How To Notes ......................................................................................................
Which products and software version does it apply to? ...................................................
1
1
2
2
Important differences between the AlliedWare OS and the AlliedWare Plus OS ................... 3
How to log in ........................................................................................................................... 4
How to get command help ...................................................................................................... 5
How to work with command modes ....................................................................................... 9
How to see the current configuration .................................................................................... 14
Default settings ...................................................................................................................... 15
The default settings ......................................................................................................... 16
How to change the password ................................................................................................. 17
How to set a management IP address .................................................................................... 17
How to save and boot from the current configuration ..........................................................
How to save to the default configuration file .................................................................
How to create and use a new configuration file .............................................................
How to return to the factory defaults ..............................................................................
18
18
18
20
How to see system information ............................................................................................. 21
AlliedWare Plus TM
O P E R AT I N G S YS T E M
C613-16105-00 REV D
www.alliedtelesis.com
Introduction
How to set system parameters ...............................................................................................
How to change the telnet session timeout .......................................................................
How to name the switch .................................................................................................
How to display a text banner at login .............................................................................
23
23
23
24
How to set the time and date .................................................................................................
How to show current settings .........................................................................................
How to set the time and date ...........................................................................................
How to set the timezone .................................................................................................
How to configure summer-time ......................................................................................
25
25
25
26
26
How to add and remove users ............................................................................................... 28
Pre-encrypted passwords ................................................................................................ 29
How to undo settings ............................................................................................................. 30
How to use the no parameter .......................................................................................... 30
How to use the default parameter ................................................................................... 30
How to work with files ..........................................................................................................
How to list files ...............................................................................................................
How to display the contents of configuration and text files ...........................................
How to navigate through the file system ........................................................................
How to copy files ............................................................................................................
How to use the editor ......................................................................................................
31
31
33
33
35
37
How to upgrade the firmware ................................................................................................ 38
Appendix: Commands available in each mode .....................................................................
User Exec mode ..............................................................................................................
Privileged Exec mode .....................................................................................................
Global Configuration mode ............................................................................................
39
39
40
41
Related How To Notes
You also may find the following AlliedWare Plus How To Notes useful:
How To Configure Basic Switching Functionality With The AlliedWare PlusTM Operating
System
How To Configure EPSR (Ethernet Protection Switching Ring) to Protect a Ring from
Loops
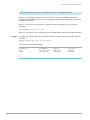
Which products and software version does it apply to?
This How To Note applies to the following Allied Telesis switches, running AlliedWare Plus
OS software version 5.2.1 or later:
2
SwitchBlade x8100 switch and SwitchBlade x908 switch
x510, x610, x600 and x900 series switches
Important differences between the AlliedWare OS and the AlliedWare Plus OS
Important differences between the AlliedWare OS and
the AlliedWare Plus OS
The most noticeable differences between the AlliedWare Plus OS and the AlliedWare OS are:
The command mode hierarchy. With the AlliedWare Plus OS, you go into an appropriate
mode before entering configuration or monitoring commands.
For details of the modes, see "How to work with command modes" on page 9.
The style of the commands. Because you go into a configuration mode, the AlliedWare
Plus OS already knows that you are entering a configuration command. Therefore, you do
not have to begin commands with keywords like create. This means that many commands
are shorter.
How the switch identifies values in commands. The AlliedWare Plus OS either has
parameter keywords immediately followed by a space and their value (for an example, see
"How to add and remove users" on page 28), or simply has a series of space-separated
values (for an example, see "How to set the time and date" on page 25). For many
commands, you must enter the values in the correct order. The ? help makes this easy by
prompting you for values one at a time.
How to undo an action or remove a setting. Mostly you remove settings by re-entering
the configuration command with the keyword no before it. See "How to undo settings" on
page 30.
The things the command line warns you about. In the AlliedWare Plus OS:
If you try to create an object (such as a user, trigger etc) and an object with that name
already exists, the switch overwrites the original object. It does not warn you before
doing so.
The file copying commands are an example of an exception to this—the switch asks if
you want to overwrite the file.
3
You only get a message telling you that an operation failed, not if it succeeds. If the
switch does not display an error message, you can assume the command was successful.
Port numbering. In the AlliedWare Plus OS, switch ports are named portx.y.z (e.g.
port1.0.1), where:
the first number (x) is the stack ID number
the second number (y) is the module number (0 for base ports and higher numbers for
XEMs)
the third number (z) is the port number.
Associating VLANs with switch ports. In the AlliedWare Plus OS, VLANs are configured
as an attribute of switch ports. To associate a VLAN with a port, you enter Interface
Configuration mode for the port, not for the VLAN. For details and examples, see How To
Configure Basic Switching Functionality With the AlliedWare Plus Operating System.
Flash compaction. In the AlliedWare Plus OS, Flash compaction takes up to a minute. The
command line is unresponsive during this time. Do not power cycle the switch during Flash
compaction.
How to log in
How to log in
1. Set the console baud rate
Set the baud rate of your terminal emulator to 115200.
For bootloader version 1.0.8 and earlier, this is the switch’s default value. You can use a
bootloader menu option to change it, but the first time you access the switch, you must use
115200.
Note that in bootloader version 1.0.9, the default baud rate will change to 9600.
2. Login with manager/friend
Like in AlliedWare, the defaults are:
username: manager
password: friend
The switch logs you into User Exec mode. From User Exec mode, you can perform high-level
diagnostics (some show commands, ping, traceroute etc), start sessions (Telnet, SSH), and
change mode.
4
How to get command help
How to get command help
The following kinds of command help are available:
lists of valid parameters with brief descriptions (the ? key)
completion of keywords (the Tab key)
error messages for incomplete or incorrect syntax
View a list of valid parameters
To get syntax help, type ? after:
Example
the prompt, to list all commands available in the
mode you are in
one or more parameters, to list parameters that
can come next in the partial command
one or more letters of a parameter, to list
matching parameters
Tip:
The AlliedWare Plus OS only displays
one screenful of text at a time, with the
prompt “--More--” at the end of each
screenful. Press the space bar to
display the next screenful or the Q key
to return to the command prompt.
To see which commands are available in User Exec mode, enter “?” at the User Exec mode
command prompt:
awplus>?
This results in the following output:
Exec commands:
clear
disable
echo
enable
exit
help
logout
mstat
mtrace
ping
quit
remote-command
show
ssh
telnet
terminal
traceroute
5
Reset functions
Turn off privileged mode command
Echo a string
Turn on privileged mode command
End current mode and down to previous mode
Description of the interactive help system
Exit from the EXEC
Show statistics after multiple multicast traceroutes
Trace multicast path from source to destination
Send echo messages
Exit current mode and down to previous mode
Remote stack member command execution
Show running system information
Open an SSH connection
Open a telnet connection
Set terminal line parameters
Trace route to destination
How to get command help
Example
To see which show commands that start with “i” are available in User Exec mode, enter “?”
after show i:
awplus>show i?
This results in the following output:
interface
ip
ipv6
Example
Interface information
Internet Protocol (IP)
Internet Protocol version 6 (IPv6)
To use the ? help to work out the syntax for the clock timezone command (page 26), enter the
following sequence of commands:
awplus(config)#clock ?
summer-time Manage summer-time
timezone
Set clock timezone
awplus(config)#clock timezone ?
TIMEZONE Timezone name, up to 6 characters
awplus(config)#clock timezone NZST ?
minus negative offset (West of Greenwich)
plus
positive offset (East of Greenwich)
awplus(config)#clock timezone NZST plus ?
OFFSET Time zone offset to UTC in HH or HH:MM format
awplus(config)#clock timezone NZST plus 12
The above example demonstrates that the ? help only indicates what you can type next. For
commands that have a series of parameters, like clock timezone, the ? help does not make the
number of parameters obvious.
6
How to get command help
Complete keywords
To complete keywords, type Tab after part of the command.
If only one keyword matches the partial command, the AlliedWare Plus OS fills in that
keyword. If multiple keywords match, it lists them.
Example
To use Tab completion to enter the command show ip dhcp server summary, enter the
following commands. We have included “<Tab>” to show where to type the Tab key—it is not
displayed on screen.
awplus>show ip <Tab>
as-path-access-list
dhcp
domain-name
forwarding
irdp
name-server
pim
route
bgp
dhcp-relay
extcommunity-list
igmp
mroute
nat
protocols
rpf
awplus>show ip d<Tab>
dhcp
dhcp-relay
domain-list
awplus>show ip dhcp <Tab>
binding pool
server
awplus>show ip dhcp server s<Tab>
statistics summary
awplus>show ip dhcp server su<Tab>mmary
7
community-list
domain-list
filter
interface
mvif
ospf
rip
domain-name
How to get command help
View command messages
The switch displays the following generic error messages about command input:
% Incomplete command—this message indicates that the command requires more
parameters. Use the ? help to find out what other parameters are available.
awplus(config)#interface
interface
% Incomplete command.
% Invalid input detected at '^' marker—this indicates that the switch could not process the
command you entered. The switch also prints the command and marks the first invalid
character by putting a '^' under it. Note that you may get this error if you enter a command in
the wrong mode, as the following output shows.
awplus#interface port1.0.1
interface port1.0.1
^
% Invalid input detected at '^' marker.
% Unrecognized command—when you try to use ? help and get this message, it indicates
that the switch can not provide help on the command because it does not recognise it. This
means the command does not exist, or that you have entered it in the wrong mode, as the
following output shows.
awplus#interface ?
% Unrecognized command
The AlliedWare Plus OS does not tell you when commands are successful. If it does not
display an error message, you can assume the command was successful.
8
How to work with command modes
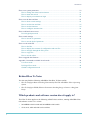
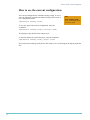
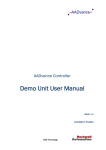
How to work with command modes
The following figure shows the command mode hierarchy and the commands to use to move
to lower-level modes.
AlliedWare Plus CLI modes
User
Exec mode
Command mode
enable
Command used to
enter the next
command mode
Privileged
Exec mode
configure terminal
Global
Configuration
mode
interface
[interface name]
router [routing
protocol ]
Interface
mode
Router
mode
Other
sub-modes
cli-modes.eps
User Exec mode
User Exec mode is the mode you log into on the switch.
It lets you perform high-level diagnostics (show commands, ping, traceroute etc), start
sessions (Telnet, SSH), and change mode.
For a list of commands available in this mode, see "User Exec mode" on page 39.
The default User Exec mode prompt is awplus>.
9
How to work with command modes
Privileged Exec mode
To change from User Exec to Privileged Exec mode, enter the
command:
awplus>enable
Tip:
en is a short-cut for
enable
Privileged Exec mode is the main mode for monitoring—for
example, running show commands and debugging. From
Privileged Exec mode, you can do all the commands from User Exec mode plus many system
commands.
For a list of commands available in this mode, see "Privileged Exec mode" on page 40.
The default Privileged Exec mode prompt is awplus#.
Global Configuration mode
To change from Privileged Exec to Global Configuration mode,
enter the command:
awplus>configure terminal
Tip:
conf t is a short-cut for
configure terminal
From Global Configuration mode, you can configure most
aspects of the switch.
For a list of commands available in this mode, see "Global Configuration mode" on page 41.
The default Global Configuration mode prompt is awplus(config)#.
10
How to work with command modes
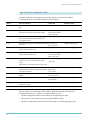
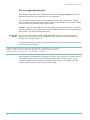
Lower-level configuration modes
A number of features are configured by entering a lower-level mode from Global
Configuration mode. The following table lists these features.
Mode
What it configures
Command
Default prompt
Interface
Switch ports, VLANs, the management Eth
port.
interface name
awplus(config-if)#
Class map
QoS classes, which isolate and name specific
traffic flows (classes) from all other traffic.
(first enable QoS globally awplus(config-cmap)#
with mls qos enable)
class-map name
EPSR
Ethernet Protection Switching Ring, a loop
protection mechanism with extremely fast
convergence times.
epsr configuration
Line
Console port settings or virtual terminal settings line console 0
for telnet.
line vty number
awplus(config-line)#
Ping poll
Ping polling, which checks whether specified
devices are reachable or not.
awplus(config-ping-poll)#
Policy map
QoS policies, a collection of user-defined QoS (first enable QoS globally awplus(config-pmap)#
classes and the default class.
with mls qos enable)
ping-poll number
awplus(config-epsr)#
policy-map name
Policy map class
The QoS actions to take on a class-map, and
which class-maps to associate with a QoS
policy.
(in Policy map mode)
awplus(config-pmap-c)#
class name
This mode is a sub-mode of Policy map mode.
Route map
Route maps, which select routes to include or route-map name
exclude from the switch’s routing table and/or deny|permit
route advertisements.
entry-number
awplus(config-route-map)#
Router
Routing using BGP, IP, IPv6, OSPF, RIP, or
VRRP.
router protocol
other-parameters
awplus(config-router)#
MST
Multiple Spanning Tree Protocol.
spanning-tree mst
configuration
awplus(config-mst)#
Trigger
Triggers, which run configuration scripts in
response to events.
trigger number
awplus(config-trigger)#
VLAN database
VLANs.
vlan database
awplus(config-vlan)#
Some protocols have commands in both Global Configuration mode and lower-level
configuration modes. For example, to configure MSTP, you use:
11
Global Configuration mode to select MSTP as the spanning tree mode
MST mode to create instances and specify other MSTP settings
Interface Configuration mode to associate the instances with the appropriate ports.
How to work with command modes
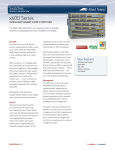
Returning to higher-level modes
The following figure shows the commands to use to move from a lower-level mode to a
higher-level mode.
AlliedWare Plus CLI modes - returning to higher-level modes
User
Exec mode
Command mode
disable
Command used to
return to this
command mode
Privileged
Exec mode
exit
end
or Ctrl+Z
or Ctrl+C
Global
Configuration
mode
exit
exit
exit
Interface
mode
Router
mode
Other
sub-modes
cli-modes-return.eps
Examples
To go from Interface Configuration to Global Configuration mode:
awplus(config-if)#exit
awplus(config)#
To go from Interface Configuration to Privileged Exec:
awplus(config-if)#end
awplus#
To go from Privileged Exec to User Exec:
awplus#disable
awplus>
12
How to work with command modes
Entering Privileged Exec commands when in a configuration mode
When you are configuring the switch, you are likely to want to enter show commands to
confirm the configuration. This can mean you change often between configuration modes and
Privileged Exec mode.
However, you can run Privileged Exec commands without changing mode, by using the
command:
do <command you want to run>
However, you cannot use the ? help to find out command syntax when using the do command.
Example
To display information about the IP interfaces when in Global Configuration mode, enter the
command:
awplus(config)#do show ip int brief
This results in the following output:
Interface
eth0
vlan1
.
.
.
13
IP-Address
172.28.8.200
unassigned
Status
admin up
admin up
Protocol
running
running
How to see the current configuration
How to see the current configuration
The current configuration is called the running-config. To see it,
enter the following command in either Privileged Exec mode or
any configuration mode:
awplus#show running-config
Tip:
show running-config
works in all modes except
User Exec mode.
To see only part of the current configuration, enter the
command:
awplus#show running-config |include <word>
This displays only the lines that contain word.
To start the display at a particular place, enter the command:
awplus#show running-config |begin <word>
This searches the running-config for the first instance of word and begins the display with that
line.
14
Default settings
Default settings
When the switch first starts up with the AlliedWare Plus OS, it applies default settings and
copies these defaults dynamically into its running-config.
These default settings mean that the AlliedWare Plus OS:
15
encrypts passwords, such as user passwords
records log message priority in log messages
turns on jumbo frame support for all ports
turns on the telnet server so that you can telnet to the switch
enables the switch to look up domain names (but for domain name lookups to work, you
have to configure a DNS server)
turns off L3 multicast packet switching in the switch’s hardware. This prevents L3
multicasts from flooding the switch’s CPU in its default state as an L2 switch
sets the maximum number of ECMP routes to 8
turns on RSTP on all ports. Note that the ports are not set to be edge ports
sets all the switch ports to access mode. This means they are untagged ports, suitable for
connecting to hosts
creates VLAN 1 and adds all the switch ports to it
allows logins on the serial console port
allows logins on VTY sessions (for telnet etc)
has switching enabled, so layer 2 traffic is forwarded appropriately without further
configuration
allocates all the routing table memory space to IPv4 routes (instead of IPv6 routes)
has ports set to autonegotiate their speed and duplex mode
has copper ports set to auto MDI/MDI-X mode
has all switch ports attached to VLAN 1
Default settings
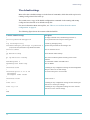
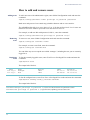
The default settings
Most of the above default settings are in the form of commands, which the switch copies to its
running-config when it first boots up.
The switch stores a copy of the default configuration commands in the running and startup
configs and uses that file as its default start-up file.
For more information about start-up files, see "How to save and boot from the current
configuration" on page 18.
The following figure shows the contents of the default file.
Contents of default settings
Description
!
An empty comment line (comments begin with an !).
service password-encryption
!
Forces passwords in the script to be encrypted.
log record-priority
Records log message priority.
username manager privilege 15 password 8
$1$bJoVec4D$JwOJGPr7YqoExA0GVasdE0
Specifies the password for the manager user
service telnet
!
Turns on the telnet server.
ip domain-lookup
!
Allows domain name lookups.
no ip multicast-routing
!
Turns off L3 multicast packet switching in the switch
hardware.
maximum-paths 8
Sets maximum number of ECMP routes.
spanning-tree mode rstp
!
Turns on RSTP.
interface eth0
!
A heading for any configuration settings for the management
eth0 port. There are no eth0 settings.
interface port1.0.1-1.0.24
switchport
switchport mode access
!
Sets each switch port to access mode.
interface vlan1
!
Creates VLAN 1.
line con 0
A heading for any configuration settings for the console port.
There are no console port settings.
line vty 0 32
A heading for any configuration settings for VTY sessions.
There are no VTY session settings.
!
end
16
How to change the password
How to change the password
To change the password for the manager account, enter Global Configuration mode and enter
the following command:
awplus(config)#username manager password <new-password>
The password can contain any printable character and is case sensitive.
How to set a management IP address
This section describes how to set an IP address on the eth0 management port.
1. If desired, check the current configuration
After logging in, enter Privileged Exec mode by using the command:
awplus>enable
Then check the current configuration by using one of the following commands:
awplus#show ip interface eth0 brief
This results in the following output:
Interface
eth0
IP-Address
172.28.8.200
Status
admin up
awplus#show running-config interface eth0
This results in the following output:
!
interface eth0
ip address 172.28.8.200/16
!
2. Enter Interface Configuration mode for the eth0 interface
Enter Global Configuration mode and enter the command:
awplus(config)#interface eth0
3. Enter the IP address and mask
Enter the command:
awplus(config-if)#ip address <address/mask>
For example, to set the address to 172.28.8.210/16, enter the command:
awplus(config-if)#ip address 172.28.8.210/16
17
Protocol
running
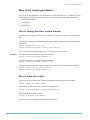
How to save and boot from the current configuration
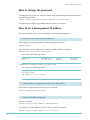
How to save and boot from the current configuration
This section tells you how to save your configuration and run the saved configuration when
the switch starts up.
You can either:
save the configuration to the switch’s default configuration file (called “default.cfg”). By
default, the switch uses that file at start-up.
create a new configuration file and set the switch to use the new configuration file at
start-up.
How to save to the default configuration file
Enter Privileged Exec mode and enter the command:
awplus#copy running-config startup-config
The parameter startup-config is a short-cut for the current boot configuration file, which will
be the default configuration file unless you have changed it, as described in the next section.
How to create and use a new configuration file
1. Copy the current configuration to a new file
Enter Privileged Exec mode and enter the command:
awplus#copy running-config <filename>.cfg
Example
To save the current configuration in a file called example.cfg, enter the command
awplus#copy running-config example.cfg
2. Set the switch to use the new file at startup
To run the new file’s configuration when the switch starts up, enter Global Configuration
mode and enter the command:
awplus(config)#boot config-file <filename>.cfg
Example
To run the commands in example.cfg on startup, enter the command
awplus(config)#boot config-file example.cfg
18
How to save and boot from the current configuration
3. Display the new settings
To see the files that the switch uses at startup, enter Privileged Exec mode and enter the
command:
awplus#show boot
The output looks like this:
Boot configuration
-------------------------------------------------------------------Current software
: r1-5.2.1.rel
Current boot image : flash:/r1-5.2.1.rel
Backup boot image : Not set
Default boot config: flash:/.configs/default.cfg
Current boot config: flash:/example.cfg (file exists)
4. Continue updating the file when you change the configuration
When you next want to save the current configuration, enter Privileged Exec mode and enter
the command:
awplus#copy running-config startup-config
The parameter startup-config is a short-cut for the current boot configuration file.
19
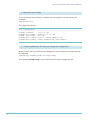
How to save and boot from the current configuration
How to return to the factory defaults
The switch dynamically adds the default settings to the running-config at start-up if the default
file is not present. This section describes how to use this feature to return to the factory
defaults.
Completely
restore
defaults
To completely remove your configuration and return to the factory default configuration,
delete or rename the default file and make sure no other file is set as the start-up configuration
file.
To find the location of the default boot configuration file, enter Privileged Exec mode and
enter the command:
awplus#show boot
To delete the default file when it is the current boot configuration file, enter Privileged Exec
mode and enter either of the commands:
awplus#delete force <filename>
or:
awplus#erase startup-config
Caution: Erasing startup-config deletes the current boot configuration file—it does not
simply stop the file from being the boot file.
To make sure that no other file is loaded at start-up, enter Global Configuration mode and
enter the command:
awplus(config)#no boot config-file
Partially
restore
defaults
To partially restore the default settings, make a configuration file that contains the settings you
want to keep and set this as the start-up configuration file. On start-up, the switch will add the
missing settings to the running-config.
For example, to use default settings but still keep an IP address on the eth0 management port,
create a file like the following one and set it as the boot configuration file:
awplus#show file eth0-ip.cfg
!
interface eth0
ip address 172.28.8.210/16
!
ip route 0.0.0.0/0 172.28.0.1
!
end
20
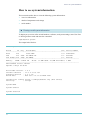
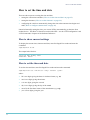
How to see system information
How to see system information
This section describes how to view the following system information:
overview information
details of temperature and voltage
serial number
Viewing overall system information
To display an overview of the switch hardware, software, and system settings, enter User Exec
or Privileged Exec mode and enter the command:
awplus#show system
The output looks like this:
Switch System Status
Tue Jun 12 16:41:17 2007
Board
ID Bay
Board Name
Rev Serial number
-------------------------------------------------------------------------------Base
270
x900-24XT
C-0 P1FY7502C
PSU
212 PSU1 AT-PWR01-AC
F-1 4221F7E
Fan module 214 PSU2 AT-FAN01
F-1 422177F
-------------------------------------------------------------------------------Memory:
DRAM: 514472 kB
Flash: 31.0MB Used: 25.0MB Available: 6.0MB
-------------------------------------------------------------------------------Environment Status: Normal
Uptime: 0 days 00:08:48
Bootloader version
Current software
Software version
Build date
:
:
:
:
1.0.8
r1-5.2.1-rc3.rel
5.2.1 rc3
Mon Jul 9 11:31:09 NZST 2007
Current boot config: flash:/.configs/default.cfg (file exists)
Territory
: europe
System Name
System Contact
System Location
21
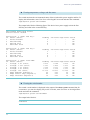
How to see system information
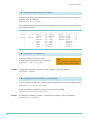
Viewing temperature, voltage, and fan status
The switch monitors the environmental status of the switch and its power supplies and fan. To
display this information, enter User Exec or Privileged Exec mode and enter the command:
awplus#show system environment
The output looks like the following figure. This device has a power supply unit in the first
PSU bay and a fan in the second PSU bay.
Environment Monitoring Status
Overall Status: Normal
Resource ID: 1 Name: PSU bay 1
ID Sensor (Units)
1
Device Present
2
PSU Overtemp
3
PSU Fan Fail
4
PSU Power Good
Reading
1
0
0
1
Low Limit High Limit Status
Ok
Ok
Ok
Ok
Resource ID: 2 Name: PSU bay 2
ID Sensor (Units)
1
Device Present
2
PSU Overtemp
3
PSU Fan Fail
4
PSU Power Good
Reading
1
0
0
0
Low Limit High Limit Status
Ok
Ok
Ok
Ok
Resource ID: 3 Name: x900-24XT
ID Sensor (Units)
1
Voltage: 2.5V (Volts)
2
Voltage: 1.65V (Volts)
3
Voltage: 3.3V (Volts)
4
Voltage: 1.8V (Volts)
5
Voltage: 12V (Volts)
6
Temp: Ambient (Degrees C)
7
Temp: Sensor chip (Degrees C)
8
Temp: Internal (Degrees C)
Reading
2.578
1.629
3.352
1.797
11.938
25
45
38
Low Limit High Limit Status
2.344
2.865
Ok
1.488
1.816
Ok
2.973
3.627
Ok
1.615
1.979
Ok
10.813
13.188
Ok
-127
55
Ok
-127
75
Ok
-127
75
Ok
Viewing the serial number
The switch’s serial number is displayed in the output of the show system command, but for
convenience, you can also display it by itself. To do this, enter User Exec or Privileged Exec
mode and enter the command:
awplus#show system serialnumber
The output looks like this:
P1FY7502C
22
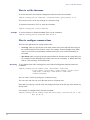
How to set system parameters
How to set system parameters
You can set system parameters to personalise the switch and make it easy to identify it when
troubleshooting. This section describes how to configure the following system parameters:
telnet session timeout
switch name
login banner
How to change the telnet session timeout
By default, telnet sessions time out after 10 minutes of idle time. If desired, you can change
this.
To change the timeout for all telnet sessions, enter Global Configuration mode and enter the
commands:
awplus(config)#line vty 0 32
awplus(config-line)#exec-timeout <new-timeout>
The new timeout value only applies to new sessions, not current sessions.
Examples
To set the timeout to 30 minutes, enter the command:
awplus(config-line)#exec-timeout 30
To set the timeout to 30 seconds, enter the command:
awplus(config-line)#exec-timeout 0 30
To set the timeout to infinity, so that sessions never time out, enter either of the commands:
awplus(config-line)#no exec-timeout
awplus(config-line)#exec-timeout 0 0
How to name the switch
To give the switch a name, enter Global Configuration mode and enter the command:
awplus(config)#hostname <name>
For example, to name the switch “switch1.mycompany.com”:
awplus(config)#hostname switch1.mycompany.com
The prompt displays the new name:
switch1.mycompany.com(config)#
The name can contain hyphens and underscore characters.
23
How to set system parameters
However, the name must be a single word, as the following example shows.
awplus(config)#hostname switch1.mycompany.com more words
hostname switch1.mycompany.com more words
^
% Invalid input detected at '^' marker.
It also cannot be surrounded by quote marks, as the following example shows.
awplus(config)#hostname "switch1.mycompany.com more words"
% Please specify string starting with alphabet
Removing the
name
To remove the hostname, enter the command:
switch1.mycompany.com(config)#no hostname
The prompt changes back to the default prompt:
awplus(config)#
How to display a text banner at login
By default, the switch displays the AlliedWare Plus OS version and build date at login. You
can customise this by changing the Message of the Day (MOTD) banner.
To enter a new MOTD banner, enter Global Configuration mode and enter the command:
awplus(config)#banner motd <banner-text>
The text can contain spaces and other printable characters. You do not have to surround words
with quote marks.
Example
To display “this is a new banner” when someone logs in, enter the command:
awplus(config)#banner motd this is a new banner
This results in the following output at login:
awplus login: manager
Password:
this is a new banner
awplus>
Removing the
banner
To return to the default banner (AlliedWare Plus OS version and build date), enter the
command:
awplus(config)#banner motd default
To remove the banner instead of replacing it, enter the command:
awplus(config)#no banner motd
24
How to set the time and date
How to set the time and date
There are three aspects to setting the time and date:
setting the current time and date ("How to set the time and date" on page 25)
setting the timezone ("How to set the timezone" on page 26)
configuring the switch to automatically change the time when summer-time begins and
ends ("How to configure summer-time" on page 26)
Instead of manually setting the time, you can use NTP to automatically get the time from
another device. This How To Note does not describe NTP—see the “NTP Configuration” and
“NTP Commands” chapters of the Software Reference.
How to show current settings
To display the current time, timezone and date, enter Privileged Exec mode and enter the
command:
awplus#show clock
The output looks like this:
14:55:14 Thu 24 May 2007
Timezone: UTC+0
How to set the time and date
To set the time and date, enter Privileged Exec mode and enter the command:
awplus#clock set <hh:mm:ss> <day> <month> <year>
where:
25
hh is two digits giving the hours in 24-hour format (e.g. 14)
mm is two digits giving the minutes
ss is two digits giving the seconds
day is two digits giving the day of the month
month is the first three letters of the month name (e.g. sep)
year is four digits giving the year
How to set the time and date
How to set the timezone
To set the timezone, enter Global Configuration mode and enter the command:
awplus(config)#clock timezone <timezone-name> {plus|minus} 0-12
The timezone-name can be any string up to 6 characters long.
To return the timezone to UTC+0, enter the command:
awplus(config)#no clock timezone
Example
To set the timezone to Eastern Standard Time, use the command:
awplus(config)#clock timezone EST minus 5
How to configure summer-time
There are two approaches for setting summer-time:
Recurring
recurring, when you specify the week when summer-time starts and ends and each year
the switch changes the time at those weeks. For example, Eastern Daylight Time (EDT)
starts at 2 am on the second Sunday in March and ends at 2 am on the first Sunday in
November.
date-based, when you specify the start and end dates for summer-time for a particular year.
For example, Eastern Daylight Time (EDT) starts at 2 am on Sunday, 11 March 2007 and
ends at 2 am on Sunday, 4 November 2007.
To set summer-time with recurring dates, enter Global Configuration mode and enter the
command:
awplus(config)#clock summer-time <zone-name> recurring
<start-week> <start-day> <start-month> <start-time>
<end-week> <end-day> <end-month> <end-time>
<offset-minutes>
The zone-name can be any string up to 6 characters long.
The start-time and end-time are in the form hh:mm, in 24-hour time.
Note that if you specify 5 for the week, this changes the time on the last day of the month, not
the 5th week.
For example, to configure EDT, enter the command:
awplus(config)#clock summer-time EDT recurring 2 Sun Mar 02:00 1 Sun
Nov 02:00 60
26
How to set the time and date
Date-based
To set summer-time for a single year, enter Global Configuration mode and enter the
command:
awplus(config)#clock summer-time <zone-name> date
<start-day> <start-month> <start-month> <start-time>
<end-day> <end-month> <end-week> <end-time>
<offset-minutes>
The zone-name can be any string up to 6 characters long.
The start-time and end-time are in the form hh:mm, in 24-hour time.
For example, to configure EDT for 2007, enter the command:
awplus(config)#clock summer-time EDT date 11 Mar 2007 02:00 4 Nov
2007 02:00 60
27
How to add and remove users
How to add and remove users
Adding users
To add a new user with administrative rights, enter Global Configuration mode and enter the
command:
awplus(config)#username <name> privilege 15 password <password>
Both name and password can contain any printable character and are case sensitive.
The AlliedWare Plus OS gives you a choice of 1 or 15 for the privilege level. Level 1 users are
limited to User Exec mode so you need to set most users to level 15.
For example, to add user Bob with password 123$%^, enter the command:
awplus(config)#username Bob privilege 15 password 123$%^
Removing
users
To remove a user, enter Global Configuration mode and enter the command:
awplus(config)#no username <name>
For example, to remove user Bob, enter the command:
awplus(config)#no username Bob
You can delete any user except the user called “manager”, including the user you are currently
logged in as.
Displaying
users
To list the currently logged-in users, enter User Exec or Privileged Exec mode and enter the
command:
awplus#show users
The output looks like this:
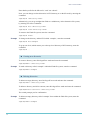
Line
130 vty 0
131 vty 1
User
manager
Bob
Host(s)
idle
idle
Idle
01:36:37
00:00:00
Location
10.33.27.11
10.33.22.13
To list all configured users, enter User Exec or Privileged Exec mode and enter the command:
awplus#show running-config |include username
The output looks like this:
username manager privilege 15 password 8 $1$bJoVec4D$JwOJGPr7YqoExA0GVasdE0
username Bob privilege 15 password 8 $1$gXJLY8dw$iqkMXLgQxbzSOutNUa5E2.
28
How to add and remove users
Pre-encrypted passwords
The running-config output above includes the number 8 after the password parameter. This
indicates that the password is displayed in its encrypted form.
You can enter the number 8 and a pre-encrypted password on the command line. You may
want to pre-encrypt passwords if you need to load them onto switches via an insecure method
(such as HTTP, or by emailing them to remote users).
Caution: Only enter the number 8 if you are entering a pre-encrypted password—otherwise,
you will be unable to log in using the password and will be unable to access the switch through
that username. The next section describes why.
Testing this
feature
If you want to test the effect of this, create a new user for the test instead of using the
manager user. The test stops you from logging in as the test user, so you need to have the
manager user available to log in as.
The following output shows how specifying the number 8 puts the password into the runningconfig exactly as you typed it:
awplus(config)#username Bob privilege 15 password 8 friend
awplus(config)#show running-config |include username Bob
username Bob privilege 15 password 8 friend
After entering the command above, logging in as “Bob” with a password of “friend” does not
work. This is because the switch takes the password you enter (“friend”), hashes it, and
compares the hash with the string in the running-config (“friend”). The hashed value and
“friend” are not the same, so the switch rejects the login.
29
How to undo settings
How to undo settings
There are two possibilities for undoing settings: the no parameter and the default parameter.
How to use the no parameter
To undo most settings, simply re-enter the first parameters of the configuration command with
the parameter no before them.
Example
You can set the timezone to Eastern Standard Time by entering the command:
awplus(config)#clock timezone EST minus 5
To remove the timezone setting, enter the command:
awplus(config)#no clock timezone
How to use the default parameter
Some commands have a default parameter that returns the feature to its default setting.
Example
You can change the login banner to “this is a new banner” by entering the command:
awplus(config)#banner motd this is a new banner
To return to the default banner, enter the command:
awplus(config)#banner motd default
Note that this command also has a no parameter that lets you remove the banner altogether.
30
How to work with files
How to work with files
The AlliedWare Plus OS lets you create directory trees for file storage. This section shows:
"How to list files" on page 31—listing files and seeing how much free space you have
"How to navigate through the file system" on page 33—identifying the current directory,
changing directories, and creating and deleting directories
"How to copy files" on page 35—copying within Flash memory, to and from NVS and SD
card, and to and from a TFTP server
"How to use the editor" on page 37
How to list files
Listing files
To list files, enter Privileged Exec mode and enter the command:
awplus#dir
The output lists files and directories in order of modification date, descending. It looks like
this:
-rw534 Jul 12 2007 17:52:50
-rw534 Jul 12 2007 17:12:50
-rw- 12429011 Jul 12 2007 16:26:06
stp.cfg
example.cfg
r1-5.2.1-rc3.rel
Listing files including hidden system files
The dir command does not list all files—it hides system files and directories because users
generally do not need to create or edit them. To list all files including system files, enter
Privileged Exec mode and enter the command:
awplus#dir all
The output looks like this:
drwx
0 Jul 12 2007 17:16:32
-rw401 Jul 12 2007 17:16:32
-rw534 Jul 12 2007 17:52:50
-rw- 12429011 Jul 12 2007 16:26:06
drwx
216 Jul 9 2007 11:31:18
drwx
0 Jun 13 2007 04:31:51
-rw17 Jun 13 2007 04:27:27
-rw9 Jun 12 2007 23:09:19
drwx
0 Jul 10 1977 23:40:00
The hidden files and directories begin with a dot.
31
./
example.cfg
stp.cfg
r1-5.2.1-rc3.rel
../
.configs/
.release
.ash_history
.ssh/
How to work with files
Seeing information about the file system
To display information about the different memory types on the switch, enter Privileged Exec
mode and enter the command:
awplus#show file systems
The output includes the amount of free memory and the prefix you type to access that memory
type, and looks like this:
Size(b) Free(b) Type
Flags Prefixes
S/D/V
Lcl/Ntwk Avail
------------------------------------------------------------------31.0M
6.0M
flash
rw flash:
static local
Y
system
rw system:
virtual local
499.0k
444.0k
nvs
rw nvs:
static local
Y
sdcard
rw card:
dynamic local
N
tftp
rw tftp:
network
scp
rw scp:
network
sftp
ro sftp:
network
http
ro http:
network
-
Listing files in a subdirectory
To list the contents of a directory, enter
Privileged Exec mode and enter the command:
awplus#dir <directory-name>
Example
Tip:
You can specify the directory with or
without a / after the directory name.
To display the contents of a directory called “example”, enter the command:
awplus#dir example
Listing files in NVS memory or on an SD card
To list the contents of a directory in NVS, enter Privileged Exec mode and enter the command:
awplus#dir nvs:<directory-name>
To list the contents of a directory on an SD card, enter the command:
awplus#dir card:<directory-name>
Example
To display the contents of a directory in NVS called “example”, enter the command:
awplus#dir nvs:example
32
How to work with files
How to display the contents of configuration and text files
To display the contents of a file, enter Privileged Exec mode and enter the command:
awplus#show file <filename>
Example
To display the contents of the file called “example.cfg”, enter the command:
awplus#show file example.cfg
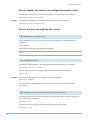
How to navigate through the file system
Showing the current directory
To see which directory you are currently in, enter Privileged Exec mode and enter the
command:
awplus#pwd
For the top-level directory, the output looks like this:
flash:
Changing directories
To change to another directory, enter Privileged Exec mode and enter the command:
awplus#cd <directory-name>
To go to a directory one level higher in the directory tree, enter the command:
awplus#cd ..
Example
To change to a directory called “example”, enter the command:
awplus#cd example
To go up one level, which returns you to the top level directory, enter the command:
awplus#cd ..
Changing to a directory in NVS memory or on an SD card
To change to the top-level directory in the NVS memory file system, enter Privileged Exec
mode and enter the command:
awplus#cd nvs:
To change to the top-level directory on an SD card, enter the command:
awplus#cd card:
33
How to work with files
Note that the prefix for the SD card is “card” not “sdcard”.
Next, you can change to other directories in NVS memory or on the SD card, by entering the
command:
awplus#cd <directory-name>
Alternatively, you can go straight from Flash to a subdirectory in the alternative file system,
by entering one of the commands:
awplus#cd nvs:<directory-name>
awplus#cd card:<directory-name>
To return to the Flash file system, enter the command:
awplus#cd flash:
Example
To change to the directory within NVS called “example”, enter the command:
awplus#cd nvs:example
To go up one level, which returns you to the top-level directory of NVS memory, enter the
command:
awplus#cd ..
Creating new directories
To create a directory, enter Privileged Exec mode and enter the command:
awplus#mkdir <directory-name>
Example
To make a directory called “example” within the Flash file system, enter the command:
awplus#mkdir example
Deleting directories
To delete an empty directory, enter Privileged Exec mode and enter the command:
awplus#rmdir <directory-name>
To delete a directory and all its contents, enter Privileged Exec mode and enter the command:
awplus#delete recursive <directory-name>
The switch prompts you for confirmation.
Example
To delete an empty directory called “example” from within the Flash file system, enter the
command:
awplus#rmdir example
34
How to work with files
How to copy files
Copying within a file system
Within a
directory
To copy a file within the same directory, enter Privileged Exec mode and enter the command:
awplus#copy <source-filename> <destination-filename>
If the file already exists, the switch asks whether to overwrite it, with a message like this:
Overwrite flash:/example.cfg? (y/n)[n]:
To overwrite, press the “y” key then the Enter key.
Between
directories
To copy a file to another directory within the same file system, enter the command:
awplus#copy <source-filename> <directory-name>/
The / after the directory name is required. Otherwise the switch displays an error
(“37: Destination file is a directory”).
The switch then prompts you for the destination filename. To give the copy a new name, type
the name at the prompt. You can include directory names in the path.
To use the same filename as the original, press the Enter key (do not press the “y” key—that
names the copy “y”).
Example
To put a copy of example.cfg into the example directory, enter the command:
awplus#copy example.cfg example/
The prompt and messages look like this:
Enter destination file name [example.cfg]:
Copying from source file, please wait...
Copying to destination file, please wait...
0: Successful operation
35
How to work with files
Copying to and from NVS or SD card
To copy between file systems, you need to specify the file system prefix (nvs: or card:).
For example, to copy from Flash to NVS when your current directory is the top-level Flash
directory, enter Privileged Exec mode and enter the command:
awplus#copy <source-filename> nvs:
The switch prompts you for the filename, as described in the previous section.
To copy from NVS to Flash when your current directory is the top-level Flash directory, enter
the command:
awplus#copy nvs:<source-filename> <destination-filename>
Example
To copy the file “example.txt” from the directory in NVS called “example” to the top level of
Flash, enter the command:
awplus#copy nvs:example/example.txt example.txt
Copying to and from a TFTP server
To copy a file from a TFTP server to Flash memory,
enter Privileged Exec mode and enter the command:
awplus#copy tftp flash
The switch prompts you for the:
TFTP server hostname (you can enter its IP
address instead)
source filename on the TFTP server
destination filename in Flash on the switch
Tip:
You can specify the server and
filename in the command instead of
waiting for prompts. Use a format like
the following:
copy tftp://172.1.1.1/example.cfg
flash
To copy a file from Flash to a TFTP server, enter the command:
awplus#copy flash tftp
Follow the prompts for source filename, server, and destination filename.
Example
To copy example.cfg to the TFTP server at 172.1.1.1, enter the command:
awplus#copy flash tftp
The prompts, responses, and messages look like this:
Enter source file name []:example.cfg
Enter destination host name []:172.1.1.1
Enter destination file name [example.cfg]:
Copying from source file, please wait...
Copying to destination file, please wait...
0: Successful operation
36
How to work with files
How to use the editor
The inbuilt editor is JOE (Joe’s Own Editor).
To edit an existing file, enter Privileged Exec mode and enter the command:
edit <filename>
To open the editor with a empty file, enter the command:
edit
When you save the new file, you may need to specify the file system to store it on. For Flash,
use flash:<filename>.
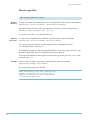
Using JOE
To format and manipulate text in JOE, you use control-character sequences. The following
table summarises a few useful sequences—for details, see:
joe-editor.sourceforge.net/manpage.html.
Function
Control-character sequence
Access the help
Ctrl-K-H
Save the file without exiting (for new files, this prompts for a
filename)
Ctrl-K-D
Save the file and exit (this prompts for a filename)
Ctrl-K-X
Exit without saving the file
Ctrl-C
Go to the beginning of the file
Ctrl-K-U
Go to the end of the file
Ctrl-K-V
Go up one screenful of text in the file
Ctrl-U
Go down one screenful of text in the file
Ctrl-V
Select a block of text:
37
Mark the beginning of the block
Ctrl-K-B
Mark the end of the block
Ctrl-K-K
Copy and paste a selected block of text
Place cursor at destination then
enter Ctrl-K-C
Move a selected block of text
Place cursor at destination then
enter Ctrl-K-M
Delete a selected block of text
Ctrl-K-Y
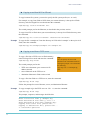
How to upgrade the firmware
How to upgrade the firmware
New releases of the AlliedWare Plus OS become available regularly. Contact your customer
support representative for more information.
1. Put the new release onto your TFTP server
2. If necessary, create space in the switch’s Flash memory for the new release
Note that you cannot delete the current release file.
3. Copy the new release from your TFTP server onto the switch
Follow the instructions in "Copying to and from a TFTP server" on page 36.
4. Set the switch to boot from the new release
Enter Global Configuration mode and enter the command:
awplus(config)#boot system <filename>.rel
5. Check the boot settings
Enter Privileged Exec mode and enter the command:
awplus#show boot
6. Reboot
Enter Privileged Exec mode and enter the command:
awplus#reload
38
Appendix: Commands available in each mode
Appendix: Commands available in each mode
This appendix lists the commands available in the following command modes for software
version 5.2.1:
"User Exec mode" on page 39
"Privileged Exec mode" on page 40
"Global Configuration mode" on page 41
User Exec mode
awplus>?
Exec commands:
clear
disable
echo
enable
exit
help
logout
mstat
mtrace
ping
quit
remote-command
show
ssh
telnet
terminal
traceroute
39
Reset functions
Turn off privileged mode command
Echo a string
Turn on privileged mode command
End current mode and down to previous mode
Description of the interactive help system
Exit from the EXEC
Show statistics after multiple multicast traceroutes
Trace multicast path from source to destination
Send echo messages
Exit current mode and down to previous mode
Remote stack member command execution
Show running system information
Open an SSH connection
Open a telnet connection
Set terminal line parameters
Trace route to destination
Appendix: Commands available in each mode
Privileged Exec mode
awplus#?
Exec commands:
activate
cd
clear
clock
configure
copy
debug
delete
dir
disable
dot1x
echo
edit
enable
erase
exit
help
license
logout
mail
mkdir
move
mstat
mtrace
no
ping
platform
pwd
quit
reboot
reload
remote-command
restart
rmdir
show
ssh
stack
telnet
terminal
test
traceroute
trigger
undebug
write
40
Activate a script
Change the current working directory
Reset functions
Manage clock
Enter configuration mode
Copy from one file to another
Debugging functions (see also 'undebug')
Delete a file
List the files on a filesystem
Turn off privileged mode command
IEEE 802.1X Port-Based Access Control
Echo a string
Text Editor
Turn on privileged mode command
Erase the system startup configuration
End current mode and down to previous mode
Description of the interactive help system
Activate software feature license
Exit from the EXEC
Send an email
Make a new directory
Rename or move a file
Show statistics after multiple multicast traceroutes
Trace multicast path from source to destination
Negate a command or set its defaults
Send echo messages
Configure global settings for the platform asic
Print the current working directory
Exit current mode and down to previous mode
Halt and perform a cold restart
Halt and perform a cold restart
Remote stack member command execution
Restart routing protocol
Remove a directory
Show running system information
Open an SSH connection
Virtual Chassis Stacking (VCS)
Open a telnet connection
Set terminal line parameters
Test device functionality
Trace route to destination
Automatic scripted responses to device events
Disable debugging functions (see also 'debug')
Write running configuration to memory, network, or terminal
Appendix: Commands available in each mode
Global Configuration mode
awplus(config)#?
Configure commands:
access-list
arp
auth-mac
banner
bgp
boot
class-map
clock
crypto
debug
default
do
dot1x
enable
epsr
exception
exit
fib
gvrp
help
hostname
interface
ip
ipv6
key
lacp
line
log
mac
mail
max-fib-routes
max-static-routes
maximum-access-list
maximum-paths
mls
no
ntp
ospf
pam
ping-poll
platform
policy-map
radius-server
rip
rmon
route-map
router
router-id
--More--
41
Add an access list entry
Address Resolution Protocol (ARP)
IPI MAC-Based Authentication
Define a login banner
Border Gateway Protocol (BGP)
Boot configuration
Class map command
Manage clock
Security Specific Commands
Debugging functions (see also 'undebug')
Restore default settings
To run exec commands in config mode
IEEE 802.1X Port-Based Access Control
Modify enable password parameters
Ethernet Protection Switching Ring (EPSR)
Configure exception settings
End current mode and down to previous mode
FIB information
GARP Vlan Registration Protocol
Description of the interactive help system
Set system's network name
Select an interface to configure
Internet Protocol (IP)
Internet Protocol version 6 (IPv6)
Authentication key management
LACP commands
Configure a terminal line
Logging control
mac address
Send an email
Set maximum fib routes number
Set maximum static routes number
Maximum access-list entries
Set multipath numbers installed to FIB
Multi-Layer Switch(L2/L3)
Negate a command or set its defaults
Configure NTP
Open Shortest Path First (OSPF)
Pluggable Authentication Module
Ping Polling
Configure global settings for the switch asic
Policy map command
RADIUS server configuration commands
Routing Information Protocol (RIP)
Remote Monitoring Protocol (RMON)
Create route-map or enter route-map command mode
Enable a routing process
Router identifier for this system
service
show
snmp-server
spanning-tree
ssh
stack
system
telnet
trigger
username
virtual-server
vlan
vrrp
Modify use of network based services
Show running system information
Manage snmp server
Spanning tree commands
Secure Shell
Virtual Chassis Stacking (VCS)
System properties
Configure telnet
Select a trigger to configure
Establish User Name Authentication
Virtual-server configuration
Configure VLAN parameters
Start VRRP configuration
C613-16105-00 REV D
North America Headquarters | 19800 North Creek Parkway | Suite 100 | Bothell | WA 98011 | USA | T: +1 800 424 4284 | F: +1 425 481 3895
Asia-Pacific Headquarters | 11 Tai Seng Link | Singapore | 534182 | T: +65 6383 3832 | F: +65 6383 3830
EMEA & CSA Operations | Incheonweg 7 | 1437 EK Rozenburg | The Netherlands | T: +31 20 7950020 | F: +31 20 7950021
alliedtelesis.com
© 2013 Allied Telesis Inc. All rights reserved. Information in this document is subject to change without notice. All company names, logos, and product designs that are trademarks or registered trademarks are the property of their respective owners.