1
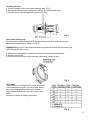
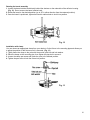
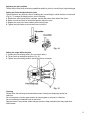
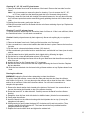
Multi Profile Spot
ORDERCODE 30645
Congratulations!
You have bought a great, innovative product from Showtec.
The Showtec Multi Profile Spot brings excitement to any venue. Whether you want simple plug-&-play action
or a sophisticated DMX show, this product provides the effect you need.
You can rely on Showtec, for more excellent lighting products.
We design and manufacture professional light equipment for the entertainment industry.
New products are being launched regularly. We work hard to keep you, our customer, satisfied.
For more information: [email protected]
You can get some of the best quality, best priced products on the market from Showtec.
So next time, turn to Showtec for more great lighting equipment.
Always get the best -- with Showtec !
Thank you!
Showtec
Showtec Multi Profile Spot™ Product Guide
Warning..…...................................................................................……………………………………………
Safety-instructions………………………………………………………………………………………….…...
Operating Determinations………………………………………………………………………………………
Rigging……………………………………………………………………………………………………………
2
2
3
4
Description..…..............................................................................……….…………………………………..
Features ………………………………...….……………………….……….………….………………….…...
5
5
Installation...............................................................................…...…………………………………….…….
Installing the Lamp ........................................................………………………………………..…………..
6
6
Set Up and Operation.....................................................................……..……………………………….….
Lens Locations....................................................................………………….…………………....................
Centering and adjusting the lamp.....................................................………………….…………………......
Focusing the beam.....................................................................................................................................
Color frame retaining clip............................................................................................................................
Color Notes.................................................................................................................................................
Shaping the beam.......................................................................................................................................
Pattern projection........................................................................................................................................
Drop-in Iris-slot............................................................................................................................................
Rotating the barrel assembly......................................................................................................................
Installation with clamp................................................................................................................................
Adjusting the yoke position...............................................................................................................…......
Setting the fixture height within the yoke...................................….......................................................…...
Setting the angle within the yoke.................................................................................................…...........
6
7
7
8
8
8
9
9
9
10
10
11
11
11
Cleaning.................................…......................................................……….………………………………...
Cleaning 19°, 26°, 36° and 50° glass lenses.……………………………………..….………………….….
Cleaning 5° and 10° Polymer lenses..…………………………………………………………..…..…..…...
Cleaning the reflector..……………………………………................................….………………….…......
11
12
12
12
Maintenance...................................................................................………..………….…….………………. 13
Changing the Lamp........................................................................…………………….…………………. 13
Troubleshooting............................................................................………………….………………….…… 13
No Light............................................………………….……………………………………………………… 13
Product Specifications.................................................................……………….…….……………………
14
1
WARNING
CAUTION!
Keep this device away from rain and moisture!
Unplug mains lead before opening the housing!
FOR YOUR OWN SAFETY, PLEASE READ THIS USER MANUAL CAREFULLY
BEFORE YOUR INITIAL START-UP!
SAFETY INSTRUCTIONS
Every person involved with the installation, operation and maintenance of this device has to:
be qualified
follow the instructions of this manual
CAUTION! Be careful with your operations.
With a dangerous voltage you can suffer
a dangerous electric shock when touching the wires!
Before your initial start-up, please make sure that there is no damage caused by transportation. Should
there be any, consult your dealer and do not use the device.
To maintain perfect condition and to ensure a safe operation, it is absolutely necessary for the user to follow
the safety instructions and warning notes written in this manual.
Please consider that damages caused by manual modifications to the device are not subject to warranty.
This device contains no user-serviceable parts. Refer servicing to qualified technicians only.
IMPORTANT:
The manufacturer will not accept liability for any resulting damages caused by the non-observance of
this manual or any unauthorized modification to the device.
•
•
•
•
•
•
•
•
•
•
•
•
•
•
•
•
•
•
•
Never let the power-cord come into contact with other cables! Handle the power-cord and all
connections with the mains with particular caution!
Never remove warning or informative labels from the unit.
Do not open the device and do not modify the device.
Never run the device without lamp!
Never ignite the lamp if the objective-lens or any housing-cover is open, as discharge lamps may
expose and emit a high ultraviolet radiation, which may cause burns.
Never look directly into the light source.
Never leave any cables lying around.
Never use the device during thunderstorms.
Do not insert objects into air vents.
Do not connect this device to a dimmerpack.
Do not switch the device on and off in short intervals, as this would reduce the lamp’s life.
Do not touch the device’s housing bare-handed during its operation (housing becomes very hot).
Do not shake the device. Avoid brute force when installing or operating the device.
Only use device indoor, avoid contact with water or other liquids.
Only operate the fixture after having checked that the housing is firmly closed and all screws are
tightly fastened.
Only operate the device after having familiarized with its functions.
Avoid flames and do not put close to flammable liquids or gases.
Always replace the lamp, when it is damaged or deformed due to the heat.
Always keep case closed while operating.
2
•
•
•
•
•
•
•
•
•
•
•
•
•
•
•
•
•
•
•
Always hang the device with the color frame retaining clip in the locked position.
Always allow free air space of at least 50 cm around the unit for ventilation.
Always disconnect power from the mains, when device is not used, before cleaning or when
replacing lamp! Only handle the power-cord by the plug. Never pull out the plug by tugging the
power-cord.
Make sure that the device is not exposed to extreme heat, moisture or dust.
Make sure that the available voltage is not higher than stated on the rear panel.
Make sure that the power-cord is never crimped or damaged. Check the device and the power-cord
from time to time.
Make sure that no side forces can impact on the truss system.
If the lens is obviously damaged, it has to be replaced. So that its functions are not impaired, due to
cracks or deep scratches.
If device is dropped or struck, disconnect mains power supply immediately. Have a qualified
engineer inspect for safety before operating.
If the device has been exposed to drastic temperature fluctuation (e.g. after transportation), do not
switch it on immediately. The arising condensation water might damage your device. Leave the
device switched off until it has reached room temperature.
If your Showtec device fails to work properly, discontinue use immediately. Pack the unit securely
(preferably in the original packing material), and return it to your Showtec dealer for service.
For adult use only. The Multi Profile Spot must be installed out of the reach of children. Never leave
the unit running unattended.
For replacement use lamps and fuses of same type and rating only.
Allow time to cool down, before replacing lamp.
The user is responsible for correct positioning and operating of the Multi Profile Spot. The
manufacurer will not accept liability for damages caused by the misuse or incorrect installation of this
lighteffect.
This device falls under protection class I. Therefore it is essential to connect the yellow/green
conductor to earth.
During the initial start-up some smoke or smell may arise. This is a normal process and does not
necessarily mean that the device is defective.
Repairs, servicing and electric connection must be carried out by a qualified technician.
WARRANTY: Till one year after date of purchase.
CAUTION ! EYEDAMAGES !.
Avoid looking directly into the light source.
(meant especially for epileptics) !
OPERATING DETERMINATIONS
This device is not designed for permanent operation. Consistent operation breaks will ensure that the device
will serve you for a long time without defects.
The minimum distance between light-output and the illuminated surface must be more than 0.5 meter.
The maximum ambient temperature ta = 45°C must never be exceeded.
The relative humidity must not exceed 50 % with an ambient temperature of 45° C.
If this device is operated in any other way, than the one described in this manual, the product may suffer
damages and the warranty becomes void.
Any other operation may lead to dangers like short-circuit, burns, electric shock, lamp explosion, crash etc.
You endanger your own safety and the safety of others!
3
Rigging
Please follow the European and national guidelines concerning rigging, trussing and all other safety issues.
Do not attempt the installation yourself !
Always let the installation be carried out by an authorized dealer !
Procedure:
•
•
•
•
•
If the Multi Profile Spot is lowered from the ceiling or high joists, professional trussing systems have
to be used.
Use a clamp to mount the Multi Profile Spot, with the mounting-bracket, to the trussing system.
The Multi Profile Spot must never be fixed swinging freely in the room.
The installation must always be secured with a safety attachment, e.g. an appropriate safety net or
safety-cable.
When rigging, derigging or servicing the device, always make sure, that the area below the
installation place is blocked and staying in the area is forbidden.
Improper installation can cause serious damage to people and property !
Connection with the mains
Connect the device to the mains with the power-plug.
Always pay attention, that the right color cable is connected to the right place.
Cable
Pin
International
BROWN
FASE
L
BLUE
NUL
N
YELLOW/GREEN
EARTH
Make sure that the device is always connected properly to the earth!
4
Description of the device
Features
The Showtec Multi Profile Spot from Showtec is also suitable for Goboprojection.
• 575W Lampe
• 15000 Lumen bei 3265 ºK
Overview
Fig. 1
Fig. 2
5
Installation
Installing the Lamp
The Showtec Multi Profile Spot uses a HPL-575 Lamp (ordercode 80812O / 80812G / 80815G), as
manufactured by all popular manufacturers. Use only the appropriate lamp for your unit.
Note that, product versions that use other lamps, may be offered in the future. Check your product
specification label for information.
Always disconnect from electric mains power supply before changing lamps.
The lamp has to be replaced when it is damaged or deformed due to the heat.
Do not install lamps with a higher wattage! Lamps with a higher wattage generate temperatures the
device was not designed for.
Damages caused by non-observance are not subject to warranty.
Procedure :
1. Disconnect the Multi Profile Spot before installing the lamp.
2. Loosen the knurled bolt on the back of the lamp housing and pull the housing out.
3. Holding it by the base, remove the lamp from its retention box. Do not touch the lamp bulb glass. Oil on
hands shortens the lamp life. (If you touch the bulb glass, wipe off the glass with a clean, lint-free towel
and rubbing alcohol.)
4. line up the lamp base with the hole of the retention box (Fig. 3).
5. Push down on the lamp base until the lamp seats firmly. Caution/ Improperly installed lamps cause
premature lamp failure and socket problems.
6. If your lamp is not same as Figure 3, and it is same as Figure 4, please remove the retention box. then
firmly insert the lamp into the socket by pushing the lamp base. (Not: Remain the retention box for the
future).
7. Reinstall the lamp housing by aligning the bolt hole and tightening the knurled bolts.
Fig. 3
Fig. 4
Set Up and Operation
Follow the directions below, as they pertain to your preferred operation mode.
Before plugging the unit in, always make sure that the power supply matches the product specification
voltage. Do not attempt to operate a 120V specification product on 230V power, or vice versa.
6
Lens Locations
The different lenses used in the Moon Light are not interchangeable. When installing a new lens, refer to the
illustration below for proper placement. Also, remember to have the lens' color designator dot facing the
color frame.
Fig. 5
Centering and adjusting the lamp
The marked "A,B,C" three adjustive screws located on the rear lamp housing allow you to center the lamp
within the reflector and adjust its beam field (See Figure 6 mark A. B. C.).
1. Turn on the Moon Light and aim it at a flat surface.
2. Loosen (counterclockwise) or tighten (clockwise) the A, B, C three screws in turn until the lamp is
centered within the reflector and achieve an optimum flat field (most bright and most rounded).
Fig. 6
7
Focusing the beam
1. Loosen the beam focus knob located under the barrel (Fig. 7).
2. Slide the lens tube forward or backward to achieve the desired beam edge.
3. Once the fixture is focused.tighten the beam focus knob.
Fig. 7
Color frame retaining clip
The color frame holder is equipped with a spring-loaded retaining clip thap prevents color
frames and accessories from falling out (Fig. 8).
WARNING! Make sure all color frame accessories are locked in position with the retaining clip
before hanging the Source Four.
1. Release the retaining clip by pushing it sideways while gently pulling backwards.
2. Insert the color frame.
3. Lock the retaining clip by pushing sideways while gently pushing forward.
Fig. 8
Color Notes
The performance of saturated colors is not guaranteed
with low temperature ranges. For best results, always
use a high quality and temperature color medium.
This product color extender may help increase your
gel life.
Contact your dealer for ordering information.
Fig. 9
8
Shaping the beam
You may shape the beam with the shutters, a pattern, an optional drop-in iris, or by rotating the barrel.
Pattern Projection
The pattern holder slot is on the top side of the barrel and in front of the shutters. It accommodates A-size,
B-size and glass pattern holders (Fig.10).
Fig. 10
Note: Because the Multi Profile S|pot is 3 inches wide, you can use A-size patterns for maximum pattern
effectiveness.
Use an optional donut in the accessory holder to enhance pattern projection.
Drop-in Iris-Slot
The Drop-in Iris slot is located on the top of the barrel and in front of the pattern holder slot. It
accommodates either a drop-in iris or a motorized pattern device. When the slot is not in use, a small sheet
metal cover secured with 2 screws prevents light leakage (Fig.11).
1. Use a scredriver to loosen the screws on ht edrop-in iris slot cover. Do not remove the screws.
2. Slide the cover completely forward to expose the slot.
3. Insert the iris or motorized pattern device. For an iris, install the flat side towards the shutters and make
sure that the iris handle extends from the slot.
4. Slide the slot cover back towards the shutters, until it meets the iris handle. Leave enough space to move
the iris handle.
5. Secure the drop-in iris slot cover by tightening the screws.
Fig. 11
9
Rotating the barrel assembly
1. Loosen the barrel rotation knob directly behind the shutters on the underside of the reflector housing
(Fig. 12). Do not remove the barrel rotation knob.
2. Rotate the barrel to the desired position (up to 25º in either direction from the centered position).
3. Once the barrel is positioned, tighten the barrel’s rotation knob to lock it into position.
Fig. 12
Installation with clamp
You can choose an appropriate clamp from your dealer to fix the fixture to the mounting pipe and allows you
to adjust the position of the fixture once it is mounted. (Fig. 13).
1. Tightly fasten the clamp to the yoke with the provide yock bolt and lock washer.
2. Place the clamp on the mounting pipe, then tighten the pipe bolt to secure it.
3. Loosen the clamp pan screw and rotate the yoke to the desired position.
4. Tighten the pan screw to lock the fixture into position.
Fig. 13
10
Adjusting the yoke position
The device provides multi-positioning capabilities within its yoke for overall fixture height and angle.
Setting the fixture height within the yoke
The device has a two-position yoke for modifying the overall height in which the fixture is mounted
(Fig 14). To change the height position, do the following:
1. Remove the yoke locking knobs, washers, and hex bolts from either side of the fixture.
2. Raise or lower the fixture to the desired position within the yoke.
3. Replace the yoke's hex bolts.washers, and locking knobs.
4. Tighten the yoke knobs to secure the fixture in position.
Fig. 14
Setting the angle within the yoke
1. Loosen the yoke locking knobs. (Do not remove them.)
2. Tilt the fixture to the desired position (Fig. 15).
3. Tighten the yoke locking knobs to secure the fixture in position.
Fig. 15
Cleaning
Please follow the following recommendations when cleaning and inspecting lenses and
reflectors:
Do not use glass or window type cleaners on lenses (glass or polymer) or reflectors.
Do not use abrasive materials such as steel wool.
Replace lenses if they contain visible damage (cracks or deep scratches) that may impair their
effectiveness.
11
Cleaning 19°, 26°, 36°, and 50° glass lenses
1. Remove the beam focus knob at the bottom of the barrel. Remove the lens tube from the
barrel.
Note: It is not necessary to remove the lens for cleaning. If you do remove the 19°, 26°,
or 50" lens, make sure the identifying paint dot is not removed during cleaning.
2. Dampen a clean lint-free cloth with vinegar or household ammonia. You may also use water,
but it will leave spots that can be removed by gently polishing the lens with a clean and dry
cloth.
3. Starting from the center, gently wipe the lens.
4. Slide the lens tube back into the barrel with the color frame-retaining clip on top. Replace the
beam focus knob.
Cleaning 5° and 10° polymer lenses
To quickly clean the lenses.remove dust with a blast of oil-free air. If this is not sufficient, follow
the instructions below. You will need a screwdriver
Caution! Handle polymer lenses by their edges only. Never rub anything dry on a polymer
lens.
1. Remove the beam focus knob. Gently pull the lens tube out of the barrel.
2. Use a screwdriver to remove the brackets that hold the lens in place. Remove the lens from
the tube.
3. Dip the lens in a clean alcohol/water mixture (10% alcohol).
4. Use a moistened nylon bristle brush to wash the lens1 smooth side in a linear (non-circular)
motion.
5. Use the same brush to lightly wash the lens' ridged side by following its ridges.
6. Dip the lens in a clean alcohol/water mixture (10% alcohol).
7. Dry the smooth and ridged surfaces with an air gun. Make sure that the airflow moves liquid
away from you.
8. Inspect the lens for dirt. Repeat steps 3-7 if necessary.
9. Set the lens back in the lens tube with the ridged side facing the front of the tube. Replace
the lens brackets.
10. Slide the lens tube back into the barrel with gel frame retainer on top. Replace beam focus
knob.
Cleaning the reflector
WARNING! Unplug the fixture before attempting to clean the reflector.
To quickly clean the reflector, remove the lens tube and clean the dust from the reflector
with a blast of oil-free air. You may also wipe the reflector with a clean lint-free cloth. If either
method is not sufficient, follow the instructions below. You will need a screwdriver to
complete this procedure.
1. Remove the barrel rotation knob located at the bottom of the barrel. Use a screwdriver to
remove the retainer bolt located on top of the reflector housing.
2. Rotate the barrel 45° in either direction. Carefully remove the barrel from the reflector
housing.
3. Dampen a clean lint-free cloth with alcohol or distilled water. (Alcohol is recommended.)
4. Gently wipe the reflector.
5. Insert the barrel into the reflector housing with the iris/pattern slot on top. (Line up the
triangles on both parts.)
6. While pressing in gently.rotate the barrel 45° clockwise until it sets into position. Then,
rotate the barrel counterclockwise 45°. The barrel should be firmly attached and the
triangles should line up again.
7. Replace the barrel rotation knob and tighten the retainer bolt.
12
Maintenance
The operator has to make sure that safety-relating and machine-technical installations are to be inspected
by an expert after every four years in the course of an acceptance test.
The operator has to make sure that safety-relating and machine-technical installations are to be inspected
by a skilled person once a year.
The following points have to be considered during the inspection:
1. All screws used for installing the device or parts of the device have to be tightly connected and must
not be corroded.
2. There may not be any deformations on housings, fixations and installation spots.
3. Mechanically moving parts like axles, eyes and others may not show any traces of wearing.
4. The electric power supply cables must not show any damages or material fatigue.
The Showtec Multi Profile Spot requires almost no maintenance. However, you should keep the unit clean.
Otherwise, the light-output will be significantly reduced. Disconnect the mains power supply, and then wipe
the cover with a damp cloth. Do not immerse in liquid. Wipe lens clean with glass cleaner and a soft cloth.
Do not use alcohol or solvents.
The front glass will require weekly cleaning, as smoke-fluid tends to build up residues, reducing the lightoutput very quickly.
Please clean internal components once a year with a light brush and vacuum cleaner.
Keep connections clean. Disconnect electric power, and then wipe the DMX and audio connections with a
damp cloth. Make sure connections are thoroughly dry before linking equipment or supplying electric power.
Changing the Lamp
1. Disconnect mains power supply, and allow 15 minutes to cool down.
2. Loosen the knurled bolt on the back of the lamp housing and pull the housing out.
3. Holding it by the base, remove the lamp from its retention box.
4. Follow directions for installing a new lamp, page 6.
Troubleshooting
This troubleshooting guide is meant to help solve simple problems.
If a problem occurs, carry out the steps below in sequence until a solution is found. Once the unit operates
properly, do not carry out following steps.
1. If the device does not operate properly, unplug the device.
2. Check the fuse, power from the wall, all cables etc.
3. If all of the above appears to be O.K., plug the unit in again.
4. If you are unable to determine the cause of the problem, do not open the device, as this may damage the
unit and the warranty will become void.
5. Return the device to your Showtec dealer.
No Light
This troubleshooting guide is meant to help solve simple problems. If a problem occurs, carry out the steps
below in sequence until a solution is found. Once the unit operates properly, do not carry out following
steps.
If the light effect does not operate properly, refer servicing to a technician.
Response: Suspect two potential problem areas: the power supply or the lamp.
1. Power supply. Check that the unit is plugged into an appropriate power supply.
2. The lamp. Replace the old lamp with a new one with the same specifications. See page 10 for replacing
the lamp.
13
Product Specification
Model: Showtec Multi Profile Spot
Voltage : AC 230V-50Hz (CE)
Power: max. 750W
Dimensions :570 x 270 x 270 mm (LxWxH)
Weight : 2,4 kg
Lamp
Allowed lamp models*:
Osram HPL-575 (300hr) 575W ordercode 80812O)
GE HPL-575 (300hr) 575W ordercode 80812G
GE HPL-575 (1500hr) 575W ordercode 80815G
Extra’s
Goboholder ordercode 30648
Iris Multi Profile ordercode 30649
5º Lens for Multi Profile Spot ordercode 30677
10º Lens for Multi Profile Spot ordercode 30678
Minimum distance:
Minimum distance from flammable surfaces: 1m
Minimum distance to lighted object: 2m
*: Versions for other lamps may be produced. Please check the specification label on your product.
Design and product specifications are subject to change without prior notice.
14
2005 Showtec.