1
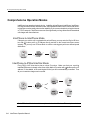
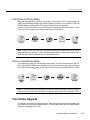
InterPhone
Operation Manual
Voice Communication for Free
DSG Technology, Inc.
http://www.dsgtechnology.com
TABLE OF CONTENTS
Chapter 1
Understanding Your InterPhone
1-1
Overview
1-2
All-in-one Design
1-2
User-friendly Interface
1-2
Comprehensive Operation Modes
1-4
InterPhone-to-InterPhone Mode 1-4
InterPhone-to-IPStar/InterStar Mode
1-4
InterPhone-to-Phone Mode
1-5
Phone-to-InterPhone Mode
1-5
Free Online Upgrade
1-5
Chapter 2
Installing Your InterPhone
Installing Your InterPhone
Ready to Configure
2-3
Chapter 3
2-1
2-2
Configuring Your InterPhone
3-1
Using Keypad & Buttons to Configure InterPhone
Main Menu & Sub Menu
3-3
Basic Setup
3-3
IP Address
3-4
Gateway IP Address
3-4
Subnet Mask
3-4
DHCP Function
3-5
ITSP Setup
3-5
ITSP Account
3-6
Your Phone Number
3-6
Long-distance Code
3-6
International Code
3-7
Country Code
3-7
Exit to Main Menu
3-7
System Setup
3-7
Device ID
3-7
DNS Address
3-8
E-mail Address
3-8
Play Volume
3-8
Voice Quality
3-8
3-2
Table of Contents
n Table Of Contents
Data Control
3-9
Jitter Delay
3-9
PSTN Flash Time
3-9
System Clock
3-9
Auto Upgrade
3-10
Telnet Password
3-10
Exit to Main Menu
3-10
How to Edit Your Phone Book
Speed Dial (PSTN)
3-11
Speed Dial (I-PHONE)
3-11
Exit Setup
3-12
Chapter 4
3-10
Making Internet Phone Calls
4-1
Make Sure You Are Online
4-2
Making A Device-to-Device Phone Call
4-2
Dialling the Device ID Number
4-3
Dialling the IP Address
4-3
Using the Speed Dial Buttons
4-3
Making A Device-to-Phone Phone Call
4-4
Dialling the Phone Number
4-4
Using the Speed Dial Buttons
4-4
Making A Phone-to-Device Phone Call
4-5
Monitoring the Status of InterPhone
4-5
Power On Status
4-5
Network Status
4-6
During Talking
4-6
To End an Internet Call
4-6
To Receive an Internet Call
4-7
To Pick Up Another Incoming Phone Call
4-7
Chapter 5
Upgrading Your InterPhone
Upgrading the Latest Software Version
Restoring Original Version
5-2
InterPhone Operation Manual
5-1
5-2
n Table Of Contents
Chapter 6
How to Subscribe Calling Points
6-1
Purchasing Calling Points
6-2
Checking Your Account Balance
6-2
Appendix A: Troubleshooting the InterPhone
Problems of Configuration
A-1
Problems of Making Internet Phone Calls
LCD Messages
A-3
Appendix B: Specifications
A-1
A-2
B-1
Table of Contents
n Table Of Contents
InterPhone Operation Manual
CHAPTER 1
Understanding Your InterPhone
Congratulations! You have selected the future-proof Internet Telephony product.
InterPhone is an innovative and standards compliant Voice over Internet Protocol (VoIP)
solution for corporation and individuals. InterPhone allows various connection modes such
as InterPhone-to-InterPhone, InterPhone-to-IPStar, InterPhone-to-InterStar, InterPhone-toPhone and Phone-to-InterPhone via Internet or other TCP/IP networks.
InterPhone provides Ethernet phone, digital phone, and mini-hub functions. It allows users
to receive phone calls from both Internet and PSTN (Public Switched Telephone Network) at
the same time. By using InterPhone, you will not miss any phone calls.
You start saving big budgets by owning an InterPhone today! Better yet, thanks to DSG’s
JustDialIt Technology, your receiver end does not need another InterPhone to enjoy this
advanced VoIP technology. Your long-distance and international call charges will disappear
with this extraordinary device. It is the first intelligent Ethernet Phone that offers full duplex,
supreme quality and low latency voice conversation via Internet/Intranet at extra-low charges.
Note: IPStar and InterStar are series of DSG Internet phone devices. Please visit
http://www.dsgtechnology.com for more details.
Understanding Your InterPhone
1-1
n Overview
Overview
In the past, real-time voice communication is sent over the Public Switched Telephone Network
(PSTN). With the circuit switched technology, every call takes up a dedicated bandwidth. Endto-end calls are established on the basis of a sequence of dialled digits, and the PSTN dedicates a physical path between callers. Although the telephone equipment establishes the call
path at the beginning of the call, the path may change between calls, but not during any specific
call.
In comparison with the PSTN, an Internet Protocol (IP) network has a packet-switched
architecture. Data are transmitted in packets, and the path from end to end can vary within an
established session. The data packets also contain the destination IP address information,
with which packets are routed. As networking environments change, routing devices are updated with dynamic protocols.
InterPhone is a complete Ethernet telephone set, which transmits voice traffic over IP-based
packet switched networks, and it is able to use as a traditional PSTN telephone.
All-in-one Design
InterPhone has its own processor and network interface; it works independently and intelligently!
Simply dial the IP address or device ID of the remote party from your InterPhone, then you are
ready to talk via the Internet. All of the communication costs will be eliminated except a local
Internet connection charge. InterPhone is the most convenient Ethernet phone for users to
make Internet phone calls remaining the same habit as they make IDD (International Direct
Dialling) calls.
1-2
InterPhone Operation Manual
n User-friendly Interface
User-friendly Interface
With LCD display and function keys, InterPhone is extremely easy to use and to configure.
Smart setup program makes your InterPhone ready to go in three minutes. You can clearly
monitor all the system status from the LCD panel.
LCD Panel
Incoming Call
Alert Light
Configuration
Buttons
Speed Dial
Buttons
Volume Control
Buttons
DTMF Digit
Buttons
I - PHONE
Mode Button
Incoming Call
Holding Button
Calling Points
Display Button
Phone Functions
Buttons
Speaker Mode
Button
Understanding Your InterPhone
1-3
n Comprehensive Operation Modes
Comprehensive Operation Modes
InterPhone is an amazing electronic device. In addition to InterPhone-to-InterPhone, InterPhoneto-IPStar and InterPhone-to-InterStar modes, the unparalleled InterPhone-to-Phone and Phoneto-InterPhone modes greatly enhance the capability of voice communication by using the Internet
or TCP/IP networks. InterPhone users can save significantly on long-distance and international
call charges with these features.
InterPhone-to-InterPhone Mode
If the party you wish to call is equipped with an InterPhone, you may enter the Device ID Number with
button prefix or IP address directly and talk to the remote InterPhone owner
instantly. Or you may use IP Phone Book to call the receiving party with user-defined speed
dial buttons.
InterPhone-to-IPStar/InterStar Mode
Every DSG’s VoIP client device has a unique ID number. Make sure that your receiving
InterStar/IPStar user is already online, then simply dial the ID number with
button prefix or IP
address, if it is available, of the receiving device and you will be automatically connected. Thus
all your connection charges can be saved!
Note: IPStar is a Modem-based Internet phone device. InterStar is an Ethernet phone device.
1-4
InterPhone Operation Manual
n Free Online Upgrade
InterPhone-to-Phone Mode
With great interoperability, InterPhone is capable of connecting to PSTN, regular telephone
system, by transferring through other Internet Telephony products, such as DSG IP1000 and
IP2000 Gateway. With an active ITSP (Internet Telephony Service Provider)
Account or Device ID Number, you can call all the covered areas with ultra low rates. In this
mode, the receiver end does not need any InterPhone or VoIP device.
Note: IP1000, IP2000 are DSG VoIP Gateways connecting the Internet and PSTN (Public
Switched Telephone Network). A VoIP Gateway enables callers using Internet to talk to regular phone users without traditional telecommunication services.
Phone-to-InterPhone Mode
For regular phone users, you can also enjoy the savings! To call an InterPhone user, first you
dial to a local DSG IP2000 Internet Gateway. Once you are connected, simply dial the six-digit
Device ID Number with
button prefix and you can talk to any worldwide InterPhone users!
Note: To use InterPhone-to-Phone Mode or Phone-to-InterPhone Mode, callers must subscribe the services provided by DSG Internet Telephony Network from DSG compatible ITSPs.
Free Online Upgrade
The design of InterPhone is extremely flexible. New selections and options will be added into
your InterPhone via the online upgrade function. You are guaranteed to enjoy the latest Internet
Telephony technologies at no cost.
Understanding Your InterPhone
1-5
n Free Online Upgrade
1-6
InterPhone Operation Manual
CHAPTER 2
Installing Your InterPhone
Connecting InterPhone is easier than connecting a lap top PC.
In your InterPhone package, you will find:
l
l
l
l
l
An InterPhone main unit
A handset
A handset cord
Two stands
A 12V/1A DC power adapter
l
l
l
l
l
A RJ-11 phone line cord
A RJ-45 network cable
An operation manual
A quick start
A warranty card
Installing Your InterPhone
2-1
n Installing Your InterPhone
Installing Your InterPhone
As shown in the following graph, connecting InterPhone is as simple as connecting a lap top
PC.
1.Plug an Ethernet port with the Internet connection into the RJ45 jack labelled LAN.
2.Plug a regular phone line into the RJ11 jack labelled LINE.
3.Plug power adapter into a power outlet. Plug the DC adapter connector into InterPhone
power socket labelled DC 12V.
2-2
InterPhone Operation Manual
n Ready to Configure
Ready to Configure
After you plug the power connector into InterPhone, you will see InterPhone’s LCD panel
shows the following messages:
After you see the running message on the LCD panel, you have successfully completed
the installation. You can start to configure your InterPhone by simply pressing ENTER
button to go to the menu.
Installing Your InterPhone
2-3
n Ready to Configure
2-4
InterPhone Operation Manual
CHAPTER 3
Configuring Your InterPhone
With the smart configuration program, the InterPhone is ready to use in three
minutes!
Before You Start
To use InterPhone as an Ethernet phone, you need to subscribe an Internet access line from your
local ISP. It could be xDSL, Cable Modem or Leased Lines. You should have the following
information:
1)
2)
3)
IP Address: _ _ _ . _ _ _ . _ _ _ . _ _ _
Gateway IP Address: _ _ _ . _ _ _ . _ _ _ . _ _ _
Subnet Mask: _ _ _ . _ _ _ . _ _ _ . _ _ _
Configuring Your InterPhone
3-1
n Using Keypad & Buttons to Configure InterPhone
Using Keypad & Buttons to Configure InterPhone
To configure your InterPhone, use the keypad on the InterPhone to enter and scroll the menu
and to input the necessary information as below. Keep the handset on-hook (on the phone)
while you are inputting data.
< Control Panel >
< Key Pad >
l Check Device ID Number and ITSP Account balance
< Control Panel >
l
To go to the Main Menu, press ENTER button.
l
To go to Sub-menu, go to the Main Menu first ; with setup
items containing sub-menu displayed, press ENTER
button.
l
To edit setup items, select the setup item you want to
edit, then press ENTER button to input data. After complete inputting data, press ENTER again to save.
l
Press <LEFT> or <RIGHT> to move the previous or next
item.
< Key Pad >
l
3-2
To input data from telephone keypad,please refer to Key& Characters Table.
InterPhone Operation Manual
n Main Menu & Sub Menu
Main Menu & Sub Menu
IP ADDRESS GATEWAY IP
SUBNET
MASK
DHCP
SPEED DIAL
SPEED DIAL
(I PHONE)
(PSTN)
01: (Name) / (Phone Number) 01: (Name) / (IP, ID,phone)
.
.
02:
02:
.
.
03:
03:
.
.
*
..
.
..
.
21: (Name) / (Phone Number) 21: (Name) / (IP, ID,phone)
EXIT TO MAIN
EXIT TO MAIN
*
ITSP SETUP
SYSTEM SETUP
ITSP ACCOUNT
YOUR PHONE NO.
LONG DIST CODE
INT’L CODE
COUNTRY CODE
EXIT TO MAIN
DEVICE ID
DNSADDRESS
E-MAIL ADDRESS
PLAY VOLUME
VOICE QUALITY
DATA CONTROL
JITTER DELAY
PSTN FLASH TIME
SYSTEM CLOCK
AUTO UPGRADE
TELNET PASSWORD
EXIT TO MAIN
DOWNLOAD NOW
RESTORE
EXIT
EXIT SETUP
Basic Setup Items:
After you complete the Basic Setup, you are able to make Internet phone calls from your InterPhone
to anyone equipped with any of DSG VoIP devices such as InterPhone, IPStar, and InterStar.
ITSP Setup Items:
After you subscribe calling points provided by DSG Internet Telephony Networks and complete
the ITSP Setup, you are able to make Internet phone calls from your InterPhone to any regular
telephone user at ultra low rates.
Basic Setup (InterPhone-to-InterPhone/IPStar/InterStar Mode)
IP ADDRESS GATEWAY IP
SUBNET
MASK
DHCP
SPEED DIAL
(PSTN)
SPEED DIAL
(I PHONE)
ITSP SETUP
SYSTEM SETUP
EXIT SETUP
Before you start using your InterPhone, you need to subscribe an Internet access line from your
local ISP. It can be xDSL, Cable Modem, or Leased Line. To make Device-to-Device Internet phone
calls, only IP ADDRESS, GATEWAY IP and SUBNET MASK information are required.
Configuring Your InterPhone
3-3
n Basic Setup (InterPhone-to-InterPhone/IPStar/InterStar Mode)
IP Address (Required)
IP Address is an identifier for device on a TCP/IP network. Your IP Address allows other VoIP
devices on the Internet to find your location. The format of an IP address is a 32-bit numeric
address written as four numbers separated by periods.
Step1
Press ENTER button to go to Main Menu. The first item is
IP ADDRESS. Press ENTER button to edit.
Step 2
Use the keypad to input the IP Address obtained from
your ISP. ( e.g. _ _ _ . _ _ _. _ _ _. _ _ _ )
Step 3
Press ENTER to save and exit edit mode.
Note: The IP address you entered must be a real IP Address and not used by other equipment
such as PC or printer server on the LAN.
Note: In a DHCP network environment or your ISP assigns dynamic IP to you, please go to
DHCP item and enable the DHCP function, and then you can skip the Basic Setup.
Gateway IP Address (Required)
The purpose of a gateway is to link two different types of networks. For example, the Gateway
IP Address for a LAN to connect to the WAN is the IP Address of the router.
Step 1
With GATEWAY IP displayed, press ENTER to edit.
Step 2
Use the keypad to input the Gateway IP Address.
( e.g. _ _ _. _ _ _. _ _ _. _ _ _ )
Step 3
Press ENTER to save and exit edit mode.
Subnet Mask (Required)
Subnet Mask is a mask used to determine which subnet an IP address belongs to. It enables the
network administrator to divide the host part of the address into two or more subnets.
3-4
InterPhone Operation Manual
Step 1
With SUBNET MASK displayed, press ENTER to edit.
Step 2
Use the keypad to input your subnet mask information.
( e.g. _ _ _. _ _ _. _ _ _. _ _ _ )
Step 3
Press ENTER to save and exit edit mode.
n DHCP Function
DHCP Function
IP ADDRESS GATEWAY IP
SUBNET
MASK
DHCP
SPEED DIAL
(PSTN)
SPEED DIAL
(I PHONE)
ITSP SETUP
SYSTEM SETUP
EXIT SETUP
InterPhone supports DHCP (Dynamic Host Configuration Protocol) which is a protocol for assigning dynamic IP addresses to devices on a network. Because a device can be assigned a
different IP address every time it connects to the network, therefore a new device can be added
to a network without the hassle of manually assigning it a unique IP address.
Step 1
If your network is under DHCP environment, with DHCP
displayed, press ENTER.
Step 2
Press <RIGHT> to select “On” to enable DHCP function.
Step 3
Press ENTER to save and exit.
Note: Once you enable DHCP function, you can skip Basic Setup and you will not be able to
configure Basic Setup items.
Note: If you are use a steady real IP Address for your InterPhone, please remain the default
“Off” for this item.
ITSP Setup (InterPhone-to-Phone Mode)
IP ADDRESS GATEWAY IP
SUBNET
MASK
DHCP
SPEED DIAL
(PSTN)
SPEED DIAL
(I PHONE)
ITSP SETUP
SYSTEM SETUP
EXIT SETUP
ITSP ACCOUNT
YOUR PHONE NO.
LONG DIST CODE
INT’L CODE
COUNTRY CODE
EXIT TO MAIN
ITSP (Internet Telephony Service Provider) provides telephony service over the Internet. If you
would like to call a receiver not equipped with DSG’s VoIP product, you will have to subscribe
ITSP services provided by DSG Internet Telephony Network. This section consists of all settings
for you to use DSG Internet Telephony Service.
Configuring Your InterPhone
3-5
n ITSP Setup (InterPhone-to-Phone Mode)
ITSP Account (Required for InterPhone-to-Phone Mode)
If you would like to call a receiver not equipped any VoIP device, you have to subscribe DSG
Internet Telephony Service. You will be given calling points stored in a 10-digit ITSP Account or
come with your 6-digit Device ID Number. With a valid account, you can make Internet phone calls
to any regular telephone within service areas.
Step 1
With ITSP ACCOUNT displayed, press ENTER to edit.
Step 2
Use the keypad to input the 10-digit ITSP Account number
obtained from DSG compatible ITSPs.
Step 3
Press ENTER to save and exit edit mode.
Note: If your calling points are stored directly into your Device ID Number, please leave the ITSP
ACCOUNT item as blank.
Note: The default account is Device ID Number preset in your device when you purchase the
InterPhone. You may ask your retailer or dealer to credit the default account so you can use it
instantly. You may also send a mail to [email protected] for more information.
Note: To check your account balance, please press DISPLAY button. You will see your Device ID
Number and/or ITSP Account balance on the LCD panel.
Your Phone Number (Optional)
Step 1
With YOUR PHONE NO. displayed, press ENTER to edit.
Step 2
Use the keypad to input your phone number associated
with your InterPhone.
Step 3
Press ENTER to save and exit edit mode.
Long-distance Code (Required for InterPhone-to-Phone Mode)
3-6
InterPhone Operation Manual
Step 1
With LONG DIST CODE displayed, press ENTER to edit.
Step 2
Use the keypad to input the code for making a domestic
long-distance phone call. (e.g. The long-distance code in
USA is 1.)
Step 3
Press ENTER to save and exit edit mode.
n System Setup
International Code (Required for InterPhone-to-Phone Mode)
Step 1
With INT’L CODE displayed, press ENTER to edit.
Step 2
Use the keypad to input the code for making an international phone call. (e.g. The international code in USA is
011.)
Step 3
Press ENTER to save and exit edit mode.
Country Code (Required for InterPhone-to-Phone Mode)
Step 1
With COUNTRY CODE displayed, press ENTER to edit.
Step 2
Use the keypad to input the country code. (e.g. The country code of USA is 1.)
Step 3
Press ENTER to save and exit edit mode.
Exit to Main Menu
With EXIT TO MAIN displayed, press ENTER to leave ITSP SETUP
section.
System Setup
IP ADDRESS GATEWAY IP
SUBNET
MASK
DHCP
SPEED DIAL
(PSTN)
SPEED DIAL
(I PHONE)
ITSP SETUP
This section consists of all system settings for your InterPhone device. You can
adjust these settings to maximize the performance of InterPhone. With SYSTEM
SETUP displayed, press ENTER to go to Sub-menu.
Device ID (Non-editable)
SYSTEM SETUP
EXIT SETUP
DEVICE ID
DNSADDRESS
E-MAIL ADDRESS
PLAY VOLUME
VOICE QUALITY
DATA CONTROL
JITTER DELAY
PSTN FLASH TIME
SYSTEM CLOCK
AUTO UPGRADE
TELNET PASSWORD
EXIT TO MAIN
Every InterPhone has its unique 6-digit Device ID Number. You may find your Device ID on this item
or at the bottom of the InterPhone. You can talk to other online DSG VoIP Device (InterPhone,
IPStar, InterStar) by simply dialling the receiver’s Device ID Number with a prefix
and a
suffix
button. This is a non-editable field.
Configuring Your InterPhone
3-7
n System Setup
DNS Address
DNS (Domain Name Service) is an Internet service that translates domain names into IP addresses.
If one DNS server doesn’t know how to translate a particular domain name, it asks another one,
and so on, until the correct IP address is returned.
Step 1
With DNS ADDRESS displayed, press ENTER to edit.
Step 2
Use the keypad to input the DNS address.
Step 3
Press ENTER to save and exit edit mode.
Note: InterPhone has a preset DNS address. Unless your ISP requires a specific DNS Address,
you may use the default setting.
E-mail Address (Optional)
Step 1
With E-MAIL ADDRESS displayed, press ENTER to edit.
Step 2
Use the keypad to input your e-mail address.
Step 3
Press ENTER to save and exit edit mode.
Play Volume
This item allows you to adjust the level of play volume.
Step 1
With PLAY VOLUME displayed, press ENTER to edit.
Step 2
Use <- RINGER> or <RINGER+> button to adjust the level
of play volume. The valid range is from 1 to 9. The default
setting is 5.
Step 3
Press ENTER to save and exit edit mode.
Voice Quality
InterPhone complies with ITU G.723.1 standard. Two data rates 5.3K and 6.3K bps are available.
This item allows you to adjust the data compression rates. On PSTN, the data compression
rate is 64K bps. Using InterPhone, you can save a lot the usage of your bandwidth.
3-8
InterPhone Operation Manual
Step 1
With VOICE QUALITY displayed, press ENTER to edit.
Step 2
Use <- RINGER> or <RINGER+> button to select between
rates. The default rate is 6.3K.
Step 3
Press ENTER to save and exit edit mode.
n Jitter Delay
Data Control
This item allows you to select the number of frames for each data packet. One frame is defined as
Low, two for Medium, and three for High. The lower the frame number is, the higher the reliability
will be, but the higher bandwidth will be consumed.
Step 1
With DATA CONTROL displayed, press ENTER to edit.
Step 2
Use <- RINGER> or <RINGER+> button to select from Low,
Medium or High. The default level is Low.
Step 3
Press ENTER to save and exit edit mode.
Jitter Delay
Jitter is the variation of delayed data experienced during the packet routing and switching over
the Internet. Occasionally, the Internet traffic flow is not stable, you can adjust the value to
HIGH in order to obtain a better voice quality. The lower jitter delay is, the shorter delay will be
but the voice quality might not be good.
Step 1
With JITTER DELAY displayed, press ENTER to edit.
Step 2
Use <- RINGER> or <RINGER+> button to select the level
from Low, Medium or High. The default rate is Low.
Step 3
Press ENTER to save and exit edit mode.
PSTN Flash Time
The PSTN flash time depends on the request of your regional telephony system or PBX system.
The valid range is from 100 to 2000 ms.
Step 1
With PSTN FLASH TIME displayed, press ENTER to edit.
Step 2
Use <- RINGER> or <RINGER+> button to select the level.
The default setting is 600 ms.
Step 3
Press ENTER to save and exit edit mode.
System Clock
This item allows you to set up the clock of your InterPhone.
Step 1
With SYSTEM CLOCK displayed, press ENTER to edit.
Step 2
Use <- RINGER> or <RINGER+> button to adjust the time.
InterPhone uses the 24-hour setting. The valid range is
from 00:00:00 to 23:59:59.
Step 3
Press ENTER to save and exit edit mode.
Configuring Your InterPhone
3-9
n How to Edit Your Phone Book
Auto Upgrade
This function allows you to download new version of software through Internet to your InterPhone.
Step 1
With AUTO UPGRADE displayed, press ENTER to go to
DOWNLOADNOW.
Step 2
Press ENTER to download. InterPhone will connect to DSG
Download Server and download the latest software ver
sion automatically.
Step 3
After complete the upgrading process, press any button
to exit.
Note: To restore to the previous software version, please refer to Chapter 5 Upgrading Your
InterPhone.
Telnet Password
This item allows you to remotely edit the setting of your InterPhone by Telnet program.
Step 1
With TELNET PASSWORD displayed, press ENTER to edit.
Step 2
Use the keypad to input your password so that you can
remote control your InterPhone by using Telnet.
Step 3
Press ENTER to save and exit edit mode.
Exit To Main Menu
With EXIT TO MAIN displayed, press ENTER to leave SYSTEM SETUP section.
How to Edit Your Phone Book
InterPhone provides two types of Phone Books for your speed dialing. You may store the
numbers frequently used to the Phone Book so that you can make a phone call by simply press
a speed dial button.
3-10 InterPhone Operation Manual
n Exit Setup
Speed Dial (PSTN)
InterPhone provides the speed dial function on PSTN mode. You can save up to 21 entries of
frequently used Phone Number.
Step 1
With SPEED DIAL (PSTN) displayed, press ENTER to edit.
Step 2
Press ENTER to input data for the 1st entry.
Step 3
Key in the Name referring to Key & Characters Table.
Press ENTER to save and edit phone number.
Step 4
Key in the Phone Number. Press ENTER to save and exit.
Step 5
Press <RIGHT> to scroll to the next entry.
Step 6
Repeat steps 2 to 4 to input more entries.
Step 7
You can scroll to EXIT TO MAIN and press ENTER to exit to
the main menu.
Note: If you are at the extension side and need to dial “0” to get a line, you may save the phone
number with “0” as a prefix.
Speed Dial (I-PHONE)
InterPhone provides the speed dial function on I-PHONE Mode. You can save up to 21 entries
of frequently used IP Address, Device ID Number or Phone Number.
Step 1
With SPEED DIAL (I-PHONE) displayed, press ENTER to
edit.
Step 2
Press ENTER to input data for the 1st entry.
Step 3
Key in the name referring to Key & CharactersTable. Press
ENTER to save and edit IP, ID, or Phone Number.
Step 4
Key in the IP Address (e.g. _ _ _
___
___
_ _ ) or ID Number (e.g.
_ _ _ _ _ _ ) or Phone
Number. Press ENTER to save and exit.
Step 5
Press <RIGHT> to scroll to the next entry.
Step 6
Repeat steps 2 to 4 to input more entries.
Step 7
You can scroll to EXIT TO MAIN and press ENTER to exit to
the main menu.
_
Note: When you edit Phone Number for using Device-to-Phone mode, if you are at the extension
side and need to dial “0” to get a line, please save the phone number with “0” as a prefix.
Configuring Your InterPhone
3-11
n Exit Setup
Exit Setup
With EXIT SETUP displayed, press ENTER to leave the main menu.
3-12 InterPhone Operation Manual
CHAPTER 4
Making Internet Phone Calls
With DSG JustDialIt Technology, operating InterPhone is just like using a regular
phone!
If you have finished the configuration in Chapter 3, then you are set to go with your newly programmed InterPhone.
You may make a Device-to-Device Internet call by using your InterPhone to call other DSG VoIP
products such as InterPhone, IPStar or InterStar.
l InterPhone-to-InterPhone Mode
l InterPhone-to-IPStar Mode
l InterPhone-to-InterStar Mode
You may also make a Device-to-Phone Internet call by using your InterPhone to call any regular
telephone users. On this operation mode, you need to subscribe DSG’s Internet Telephony Network Service.
l InterPhone-to-Phone Mode
You may also make a Phone-to-Device Internet call by using a regular telephone to call an InterPhone.
On this operation mode, you need to subscribe DSG’s Internet Telephony Network Service.
l Phone-to-InterPhone Mode
Making Internet Phone Calls
4-1
n Make Sure You Are Online
Make Sure You Are Online
Before you make an Internet call, your InterPhone has to be connected to the Internet successfully.
After you complete the configuration and exit the setup, you will see the running message shown
on the LCD panel. Press any DTMF digit button on the keypad to switch to network monitoring
mode.
On PSTN Mode, if you see a steady (non-flashing)
sign on
the LCD panel, it means you are connected to the Internet
successfully.
a staedy sign
You may also press I-PHONE button to switch to I-PHONE Mode.On
I-PHONE Mode, if you see a steady (non-flashing) @ sign on the
LCD panel, it means you are connected to the Internet successfully.
a staedy sign
If you see a flashing (PSTN Mode) or @ sign (I-PHONE Mode), it means you are
not connected to the Internet successfully. Please check your basic setup again.
Making a Device-to-Device Phone Call
Using an InterPhone to call the other InterPhone/IPStar/InterStar
Make sure your InterPhone is online. Make sure the remote party you wish to call is equipped with
a DSG’s VoIP product such as InterPhone, IPStar or InterStar and it is online. Use one of methods
as below to call the remote party.
4-2
InterPhone Operation Manual
n Dialling the Device ID Number
Dialling the Device ID Number
Step 1
Press I-PHONE button (LED on), pick up the handset or
press SPEAKER PHONE button and you will hear a ready
tone.
Step 2
Dial the Device ID Number of the remote party (dial as
_____
).
_
Example: Every DSG’s VoIP product has a unique 6-digit ID Number found at the bottom of
the device. If the receiving party’s InterPhone ID Number is 555888, then you dial 555888
to call.
Note: This method is not available for Intranet (TCP/IP Networks) users.
Dialling the IP Address
Step 1
Press I-PHONE button (LED on), pick up the handset or
press SPEAKER PHONE button and you will hear a ready
tone.
Step 2
Dial the receiving party’s IP Address directly. (dial as _ _ _
___
___
___
)
Example: If the IP Address of the receiving InterPhone is 200.111.66.8, then you dial
200 111 66 8
to call.
Using the Speed Dial Buttons
Step 1
Press I-PHONE button (LED on), pick up the handset or press SPEAKER PHONE button
and you will hear a ready tone.
Step 2
Press one speed dial button ranges from 1-21 that you have programmed.
Example: If on your phone book you save
button) to call.
55588 as Speed Dial No. 1, press 1 (Speed Dial
Making Internet Phone Calls
4-3
n Making a Device-to-Phone Phone Call
Making a Device-to-Phone Phone Call
Using an InterPhone to call a regular phone
To use InterPhone-to-Phone mode, you need to subscribe DSG Internet Telephony Network Service.
You will then have calling points stored directly into your 6-digit Device ID Number or into a 10digit ITSP Account. Please check http://www.dsgtechnology.com or refer to Chapter 6 How to
Subscribe Calling Points for further information. Use one of the methods as below to call the
remote party.
Note: Make sure you have valid calling points in your Device ID Number or ITSP Account before
you make Device-to-Phone calls.
Dialling the Phone Number
Step 1:
Press I-PHONE button (LED on), pick up the handset or
press SPEAKER PHONE button and you will hear a ready
tone.
Step 2:
Dial the receiver’s phone number as you usually do via
IDD.
Example: If you are in the US, your international access code will be 011. If the receiver’s phone
number is 81(country code), 3(area code), 5551234(phone number), dial 011-81-3-5551234 to
call.
Using the Speed Dial Buttons
4-4
Step 1
Press I-PHONE button (LED on), pick up the handset or press SPEAKER PHONE button
and you will hear a ready tone.
Step 2
Press one speed dial button ranges from 1-21 that you have programmed.
InterPhone Operation Manual
n Making a Phone-to-Device Phone Call
Example: If on your phone book, you save 0118135551234 as Speed Dial No. 1, press 1 (Speed
Dial button) to call.
Making a Phone-to-Device Phone Call
Using a regular phone to call an InterPhone
For users without an InterPhone, they can still talk to InterPhone users by calling to DSG IP2000
Internet Telephony Gateway. Users must apply for an active ITSP account which is available
from DSG compatible ITSPs.
Step 1
Dial to the local IP2000 Internet Telephony Gateway access phone number (please
check with local distributors).
Step 2
Follow the voice prompt and enter the 10-digit account number.
Step 3
Another voice prompt would ask for the remote InterPhone’s 6-digit Device ID Number.
Step 4
Enter the receiver’s Device ID Number and you will be connected to the remote InterPhone
user automatically.
Monitoring the Status of InterPhone
Power On Status
After you plug the power cord to your InterPhone, you will see the LCD panel showing the
software version and the running message.
software version
running message
Making Internet Phone Calls
4-5
n Monitoring the Status of InterPhone
Network Status
Press any DTMF digit button on the keypad to switch from the running message to the network
monitoring status. You will see your Device ID Number, Internet connection status and online
duration.
One PSTN Mode:
Device ID number
online duration
a steady sign
On I-Phone Mode: (by pressing I-PHONE button)
During Talking
During an Internet call, the LCD panel of InterPhone
will show:
volume level
network connection
quality
To End an Internet Call
If you wish to end your call, you may:
l Simply hand up the phone or
l Perform a hook-flash or
l Press I-PHONE button to end a call.
4-6
InterPhone Operation Manual
conversation
duration
voice delay
n To Pick Up Another Incoming Phone Call
To Receive an Internet Call
Once your InterPhone is connected to the Internet, you may accept the calls from the other
InterPhone, InterStar, IPStar or regular phone users. You cannot receive calls only when you
are in the configuration mode.
To Pick Up Another Incoming Phone Call (Call Waiting)
InterPhone allows you to pick up phone calls from the Internet and PSTN at the same time. On
either PSTN or I-PHONE mode, when you are on the phone and there comes another incoming
phone call from the other mode, InterPhone will alert you with a flashing light.
You can press HOLD button to hold the Internet/PSTN phone call and pick up the incoming PSTN/
Internet phone call. You can also press I-PHONE button to hang up the call and pick up the
incoming phone call.
Making Internet Phone Calls
4-7
n To Pick Up Another Incoming Phone Call
4-8
InterPhone Operation Manual
CHAPTER 5
Upgrading Your InterPhone
Now with our online upgrade feature, your InterPhone ensures you to enjoy
the latest Internet Telephony technologies without any charge!
Upgrade Notification
You can upgrade your InterPhone whenever a new software version becomes available. Upgrades will enhance the performance and add more features to your InterPhone. With such a
convenient feature, you are guaranteed to have the most updated InterPhone!
Note: Before the upgrading or restoring process, make sure that your InterPhone is successfully
connected to the Internet.
Upgrading Your InterPhone
5-1
n Upgrading the Latest Software Version
Upgrading the Latest Software Version
To upgrade your InterPhone with the newest software version, follow the instructions below.
The upgrade process will only take about three to ten minutes depending on the Internet traffic.
Step 1
Press ENTER and scroll the main menu to SYSTEM SETUP.
Step 2
Press ENTER and scroll the sub-menu to AUTO UPGRADE.
Step 3
Press ENTER; with DOWNLOAD NOW displayed, press ENTER to download the latest
version. InterPhone will connect to DSG Download Server and download the latest
software version automatically
Step 4
If the new software version is downloaded successfully, the LCD message will
show “Version is Updated. Press Any Button To Continue!”. Press any button to exit.
Restoring Original Version
InterPhone has a powerful auto-recovery capability! If there is any error that occurs during the
downloading process or other unexpected conditions, InterPhone will automatically restore the
default software version.
When you upgrade your InterPhone to the new software version, InterPhone will automatically
store the original version as a backup. If for any reason you wish to discard your new version
and restore the old version, you may follow the steps below:
5-2
InterPhone Operation Manual
n Restoring Original Version
Step 1
Press ENTER and scroll the main menu to SYSTEM SETUP.
Step 2
Press ENTER and scroll the sub-menu to AUTO UPGRADE.
Step 3
Press ENTER and scroll the menu. With RESTORE displayed, press ENTER to restore to
the previous software version.
Step 4
If the new software version is downloaded successfully, press any button to
exit.
Upgrading Your InterPhone
5-3
n Restoring Original Version
5-4
InterPhone Operation Manual
CHAPTER 6
How to Subscribe Calling Points
(Device-to-Phone and Phone-to-Device Mode)
DSG Technology is the pioneer providing Device-to-Phone and Phone-toDevice capability! An InterPhone is all you need for huge savings on longdistance or international calls!
The DSG Internet Telephony Network is an integrated global telephony system based on Internet
environment that provides various services such as Phone-to-Phone, Device-to-Phone, Phoneto-Device operation modes. The Device-to-Phone mode allows your InterPhone to connect to a
compatible gateway, such as DSG IP2000, so that the receiving party is able to receive an Internet
phone call with a regular phone. In order to use the above mentioned modes, you have to
subscribe the services provided by DSG Internet Telephony Network. You will be given calling points
stored in a 10-digit ITSP Account or come with 6-digit Device ID Number.
Note: Before you use Device-to-Phone mode, make sure that you have entered all related
information needed in the ITSP SETUP section. Please refer to Chapter 3 Configuring Your
InterPhone for details.
How to Subscribe Calling Points
6-1
n Purchasing Calling Points
Purchasing Calling Points
After you subscribe the services provided by DSG Internet Telephony Services, you will be
given calling points. The calling points can be stored in a 10-digit ITSP Account generated by
distributors; they can also be stored directly in your 6-digit Device ID Number shown at the
bottom of your InterPhone.
There are three ways to get calling points:
l You already have a pre-programmed Device ID Number when you purchase your
InterPhone, and you may ask the dealer or retail store to add a value of calling
points to your Device ID Number or
l You may apply for a new prepaid ITSP Account from your dealer or retail store and
enter the ITSP Account number into your InterPhone or
l You may also apply for an ITSP Account through the Internet
Please check the web site http://www.dsgtechnology.com periodically or send a mail to sales@dsg.
com.tw to get the information about compatible ITSP dealers list and calling rates. The DSG web
site will show you how to apply for a valid account from our ITSP partners. You may also get the
new information such as calling rates on your InterPhone LCD panel dynamically when you make
an Internet call.
Note: DSG is a system provider of Internet Telephony solutions and does not provide any
telephony services. DSG will take no responsibility for using these services.
Checking Your Account Balance
You can check your Device ID Number and ITSP Account balance by simply press DISPLAY
button on the InterPhone. The balance will show on the LCD panel.
You may also check your balance on I-PHONE mode (LED on).
Please pick up the handset or press SPEAKERPHONE button.
Dial 88 to check ITSP Account balance or 99 to check
Device ID Number balance. The balance will show on the LCD
panel.
6-2
InterPhone Operation Manual
n Appendix A : Troubleshooting the InterPhone
Appendix A : Troubleshooting the InterPhone
Problems of Configuration
1. How do I know if my configuration is successful?
After you complete Basic Setup, on the LCD panel you will see a steady
or a steady @ sign on I-PHONE Mode.
sign on PSTN Mode
2. If my sign (on PSTN Mode) or @ sign (on I-PHONE Mode) is not steady,ie,flashing,
what should I do ?
Check the Basic Setup Items: IP Address, Gateway IP Address, Subnet Mask. You may get
the above information from your ISP or MIS personnel.
3. Do I need a real IP address to configure my InterPhone?
Yes! You need to assign a real IP address to your InterPhone. Moreover, this IP address
cannot be shared by other equipment on the LAN.
4. If my ISP assigns a dynamic real IP to me, what I should do?
Some broadband operators assign dynamic IP addresses to subscribers. InterPhone supports
DHCP function. Make sure the dynamic IP is real IP. Go to DHCP setup item and enable this
function.
5. If there is a DHCP on the LAN, what I should do?
InterPhone supports DHCP function. If there is a DHCP server on your network environment,
simply go to DHCP setup item and enable this function.
6. What kind of network interface does my InterPhone support?
InterPhone provides value added voice communications for broadband or wideband users. It
supports Ethernet interface from Leased Line, xDSL and Cable Modem.
7. There is a firewall on my LAN. Will it block my voice?
If there is a firewall on your LAN, it blocks the voice packets, too. At this moment, the remote
party can hear your voice but the remote party’s voice will be blocked by the firewall. Please
advise your MIS personnel to open UDP 1101 port and TCP 1100 port so that the voice data
can pass through.
8. If I have a PBX in my office, can I share the InterPhone so that everyone can use it?
The home version of InterPhone is designed for individual users. We don’t recommend you
equip home version of InterPhone on your PBX system. The impedance might cause noises.
We recommend you to use the other DSG Ethernet Phone Device “InterStar” for PBX
application.
9. Can I upgrade my InterPhone?
Yes! DSG Technology keeps on providing more functions to users. To download the latest version,
simply go to SYSTEM SETUP and enter AUTO UPGRADE item. Press ENETR button. InterPhone will
download the latest software for you automatically.
Troubleshooting the InterPhone
A-1
n Problems of Configuration
Problems of Making Internet Phone Calls
1. How do I call the other DSG VoIP product such as InterPhone, IPStar or InterStar?
Every DSG VoIP product has its unique 6-digit Device ID Number shown at the bottom. Make
sure the receiver’s device is online, then pick up the handset, and dial
xxxxxx
to call.
2. If the receiver is not equipped with any VoIP product, can I still use my InterPhone
to make phone calls?
DSG has established a global Internet Telephony Network which routes Internet phone calls to
and from any regular PSTN telephone. After you apply the services from DSG ITSP
distributors, you will be given calling points. With valid calling points in your InterPhone, you
can make Internet phone calls to any regular telephone users.
3. Where can I purchase calling points?
Please refer to distributors in your area or send a mail to [email protected] for more
information. The calling points can be stored directly into your 6-digit Device ID Number or to a
10-digit ITSP Account. Please notice that the valid period of calling points is six months.
4. How can I check my account balance?
Press DISPLAY button on the InterPhone, the Device ID Number and ITSP Account balance will
show on the LCD panel. Or on I-PHONE Mode, press SPEAKERPHONE or pick up the handset,
then press 88 to check ITSP Account balance or 99 to check Device ID Number
alance.
5. If I cannot make an Internet phone call to a regular telephone ,what should I do?
Make sure you have valid calling points stores in your Device ID Number or ITSP Account.
6. I have valid calling points in my InterPhone, but I still cannot make Device-toPhone calls. What should I do next?
Check the following setup items are correct: Long Distance Code, International Access Code,
Country Code and ITSP Account (if any).
7. On I-PHONE Mode, why can’t my call be transferred directly to an extension?
On I-PHONE Mode, due to the hardware limitation, InterPhone cannot send DTMF signals.
Therefore you may have to require the operator to transfer your call to an extension side.
8. Why does it sometimes take so long to connect to the remore party?
The Internet quality affects the quality and connection speed of Internet phone calls. Check
your Internet condition. You may judge it by the time it takes to get your account balance
report, server found message, and network % shown on the LCD panel. Your DNS setting
may also affects your time of finding servers and remote parties.
A-2
InterPhone Operation Manual
n LCD Messages
LCD Messages
LCD Messages
Meanings
Balance XXXX
Your ITSP account or device ID number balance is XXXX points.
DHCP Fail
After you enable DHCP, it appears when your ISP doesn’t support
this function. Please disable your DHCP.
Dialling Fail
Interrupt the dialling process or dial fail.
Expired
Account expired.
Input Error
Input the wrong device number in length
Internet Error
Internet connection bad or cannot connect to Tracking Server
within 60 secs.
XXXXXX Call
Receiving an Internet phone call from Device No. XXXXXX.
Line Busy
ITSP network is busy.
Link XXXXXX
Have found your counter part’s IPStar/InterStar No. XXXXXX and
is in connection process.
Network Error
Internet connection bad when link with Path Searching Server.
No Answer
Your counter part does not pick up the phone.
No Path Server
Connect to Path Searching Server error.
No Service
The telephone number you dialled is not in the service area or check
the settings of area codes.
Party Busy
Your counter part is busy.
Party Off Line
Your counter part is not online.
Please Wait
Initialisation in process. Please wait a moment to start.
Ready for Dial
Ready for dial a telephone number.
Search XXXXXX
In search of Device ID No. XXXXXX.
Server Busy
The destination ITSP network is busy now or Billing Server connection
error.
Server Found
Found Path Searching Server and connecting to ITSP.
The End
Conversation end.
User Break
User interrupts the connecting process.
Troubleshooting the InterPhone
A-3
n LCD Messages
A-4
Wait for Ans.
Waiting for the remote party answering the call.
Wrong Account
Your account is not correct or your account has no balance.
Wrong Device
Input your own Device ID Number
Wrong Device ID
Input the wrong Device ID Number or wrong ID length of your counter
part.
Wrong Direct IP
Direct IP is xxx.xxx.xxx.xxx.
Wrong IP Range
Input an invalid IP.
Wrong Number
The telephone number you entered has length error.
InterPhone Operation Manual
n Appendix B : Specifications
Appendix B : Specifications
Dimensions
242mmx208mmx74mm (9.5"x8.2"x2.9")
Weight
Approximately 1.5 kg (3.21 Lbs)
Power Input
DC 12V 1A
Temperature
0~50 C (32~122 F)
Humidity
10% to 90% non-condensing
Internal RAM
2 M bytes
Flash Memory
1 M bytes
LCD Display
20x2 LCD display
Telephone Interface
Two RJ11 jacks to line and phone
Voice Compression
G.711, G.723.1, G.729
Network Protocol
TCP/IP, UDP, DHCP, BootP, Telnet
Network Interface
Two RJ45 jacks to LAN and PC
Button Features
9 function keys and 21 programmable buttons
o
o
with LED indicators.
Optional VoIP Protocols
H.323, MGCP, SIP
Specifications
B-1
DSG Technology
11F, No. 97, Song Ren Road, Taipei, Taiwan
Tel: 886-2-87892020
Fax: 886-2-87805511
http://www.dsg.com.tw
DSG Technology USA
20265 Valley Blvd Suite N. Walnut, CA 91789, USA
Tel: 1-909-5958908
Fax: 1-909-5955508
http://www.dsgtechnology.com
Copyright c 2001 DSG Technology, Inc. All rights reserved. DSG, DSG Technology, and the DSG
Technology logo are registered trademarks of DSG Technology, Inc. or its affiliates in the U.S. All other
trademarks mentioned in this document are the property of their respective owners. The use of the
word partner does not imply a partnership relationship between DSG and any of its resellers.
InterPhone Operation Manual