1
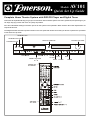
Model:
AV101
Quick Set Up Guide
Complete Home Theater System with DVD/CD Player and Digital Tuner
This Quick Set Up Guide will help you get your new Emerson Home Theater System connected, positioned, and operating so you
can begin enjoying movies and music as quickly as possible.
All of the initial default settings have been pre-set for the system to be operated in North America. No further adjustments are
required at this time.
The diagrams below show the important controls on the front panel and remote control that you will use to perform the operations
in this Quick Set Up Guide.
STANDBY LED
STANDBY BUTTON
MASTER VOLUME
REMOTE SENSOR
POWER SWITCH
TUNING 6/5 OPEN
PLAY
CLOSE
PRESET STATION
STOP PAUSE
6/5
DSP MODE
DVD
TUNER
( / )
( / )
BASIC SETUP AND CONNECTIONS
1.) Carefully remove the system from the display carton and confirm that you have the following items:
•
Main Unit x 1.
•
Video Cable x 1.
•
Satellite Speakers x 5.
•
AM and FM Antennas.
•
Subwoofer x 1.
•
Owner’s Manual.
Remote Control x 1.
•
Rubber Feet x 20.
•
Save the carton and all packing materials.
2.) Install batteries (not included) in the remote control.
3.) Place the main unit in the desired location but do not connect the AC power cord at this time.
4.) Refer to the following connection diagram.
•
Connect all 6 speakers to the color coded terminals on the back of the main unit.
•
Connect your TV to the back of the main unit using the supplied video cable (yellow plugs on each end).
•
Connect the AM and FM antennas to the back of the main unit.
•
Connect the power cord of the main unit to a 120V 60Hz AC household outlet.
•
Press the POWER switch on the front of the main unit to turn on the main power. The red STANDBY LED turns ‘On’.
Note: In order to use the remote control to turn the system ‘On’and ‘Off’the main POWER switch on the front panel must be ‘On’.
We suggest that this POWER switch be left in the ‘On’position at all times. If your system will not be used for an extended period,
such as a two week vacation for example, you can set the main POWER switch back to the ‘Off’position.
AM Loop
Antenna
(Included)
FM Antenna
(Included)
RIGHT
FRONT
CENTER
LEFT
FRONT
SUB-WOOFER
AM LOOP
FM
L
TV/AUX
INPUT
ANTENNA SOCKET
R
+
_
R
RIGHT
SURROUND
L
VIDEO
(AUDIO)
INPUT
MAIN
SPEAKER
L
R
+
+
_
_
SUBWOOFER
AUDIO (DVD)
OUTPUT
S-VIDEO
OUT
REAR SPEAKER
COAXIAL
OUT
+
_
CENTER
SPEAKER
R
REAR
SPEAKER
L
SUBWOOFER
(PRE OUT)
VIDEO
OUTPUT
LEFT
SURROUND
120V 60HZ
AC outlet
Video In Jack
POSITIONING THE SPEAKERS
Refer to the following speaker positioning diagram. All 5 satellites should be approximately the same distance from your listening
position.
•
Place center speaker either directly above or below your TV screen.
•
Place front left and right speakers to the left and right of TV at approximately the same height as the center speaker.
•
Place rear left and right speakers either in line with, or behind your listening position, at ear level, or slightly above, when seated.
•
Place subwoofer on the floor in front of the room, either next to TV or in the corner, facing your listening position.
or
Surround-right
(Included)
Surround-left
(Included)
or
Surround-left
(Included)
Surround-right
(Included)
or
Note: Speaker pedestals are for illustration only. Pedestals are not included.
DVD PLAYBACK
1.) Turn on your TV. If necessary press the Source or Video button on your TVs front panel or TV remote control to select the
external source connected to your TVs Video In jack. (If necessary refer to your TVs instruction manual.)
2.) Press the STANDBY button on the AV101 remote control to turn the system ‘On’. If necessary press the DVD button on the front
panel or the FUNCTION button on the AV101 remote control repeatedly to select the DVD function. The AV101 front panel
display will show “DVD”, and the DVD logo screen should appear on your TV.
3.) Press the OPEN/CLOSE button on the remote control or front panel to open the Disc Tray.
Note: Remote must be pointed at the front of the player to operate properly.
4.) Insert DVD movie disc in tray with printed side facing up. Press OPEN/CLOSE button to close the disc tray. Player will read
the disc and display shows LOADING. On some discs playback will start automatically. On other discs the DVD Menu
Screen will appear. Press PLAY button to begin playback, or use the Cursor buttons (3/4/5/6) and then the ENTER
button to select other playback options from the DVD menu.
5.) When you play A DVD movie disc, the player will automatically select DOLBY DIGITAL audio mode. If the DVD disc is
recorded with Dolby Digital soundtrack you will hear sound from all 5 satellites plus subwoofer. If the DVD disc does not
come with DOLBY DIGITAL and comes either Dolby Surround, Dolby Pro Logic or 2 channel Stereo soundtrack, the subwoofer
will not operate. In this case press the DSP MODE button on the front panel or the remote control to select 2 CH. STEREO
audio mode. This will activate the subwoofer.
6.) Rotate the MASTER VOLUME control of the player or press the VOLUME 5/6 buttons of the remote control to adjust
volume level as desired.
7.) When finished watching, press the STOP button and/or the OPEN/CLOSE button. Remove the disc, then press the STANDBY
button on the remote control to turn the player ‘Off’. The STANDBY indicator comes ‘On’again.
IMPORTANT INFORMATION ABOUT INDIVIDUAL DVD DISC MENUS
There is no universal standard for the audio default setting of individual DVD movie discs. Some DVD movie discs have both
Dolby Digital and DTS audio soundtracks in addition to Dolby Pro Logic and normal stereo. Some discs will automatically begin
playback after they are inserted in the player and the drawer is closed. On other discs a “Disc Menu” will appear and playback will
not begin until you press the PLAY or ENTER buttons. In the Disc Menu you also select the type of audio output and the
languages for the soundtrack and subtitles. It may also allow you to jump to specific scenes or chapters and play some special
features, if included on the disc.
The producer of the disc decides which default settings to use. For example the disc producer may decide to use “2 channel
stereo” as the default audio setting on a particular movie disc. If you do not change the default setting on the Disc Menu the
soundtrack will be heard in stereo, only from the front left and right speakers and the subwoofer.
The producer of the disc may decide to use a different language as the default setting for the audio soundtrack and the subtitles,
especially if it is a foreign film. They may also decide to use subtitles ‘On’as their default setting in the Disc Menu. If you prefer
to hear the soundtrack in English and cancel the subtitles you must use the Cursor buttons (3/4/5/6) and the ENTER
button on the remote control to select the appropriate options in the “Disc Menu”.
If you begin playing the disc and find that the settings are not what you expected (for example, the subtitles are ‘On’or not all
speakers are operating), press the DVD MENU button on the remote control to ‘return’to the “Disc Menu”, then use the Cursor
buttons (3/4/5/6) and the ENTER button to select the desired settings and resume playback.
CD PLAYBACK
Note: It is not necessary to turn on your TV to listen to audio CDs.
1.) Press STANDBY button on the remote control. The front panel display comes ‘On’.
2.) Press DVD button on front panel or press FUNCTION button on remote control to select DVD/CD function.
3.) Press OPEN/CLOSE button. Disc tray opens.
4.) Insert your CD in the drawer with label side facing up. Press OPEN/CLOSE button to close the disc tray. The player reads
the disc and the display shows the total tracks and playing time.
5.) Press PLAY button to begin playback.
6.) Rotate the MASTER VOLUME control or press the VOLUME 5/6 button on the remote control to adjust the sound level.
7.) When finished listening press the STOP button and/or the OPEN/CLOSE button. After removing the disc, press the STANDBY
button to turn the player ‘Off’.
LISTENING TO RADIO
1.) Press the STANDBY button on the AV101 remote control to turn the system ‘On’.
2.) Press the TUNER button on the front panel or press the FUNCTION button on the remote control to select the Tuner
function. Press the TUNER button on the front panel or press the FUNCTION button on the remote control again to switch
between AM and FM bands.
3.) Press the TUNING 5or 6 buttons on the front panel or on remote control until the desired radio station frequency appears
on the front panel display.
4.) Rotate the MASTER VOLUME control or press the VOLUME 5/6 button on the remote control to adjust volume.
5.) When finished listening, press the STANDBY button on the remote control to shut the system system ‘Off’.
EMERSON
Part No.: 16-2876BQ
308-01
PRINTED IN CHINA