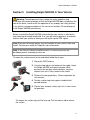
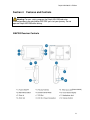
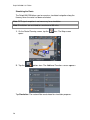
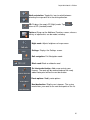
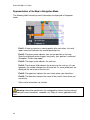
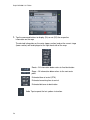
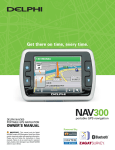
1
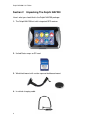
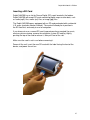
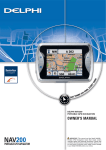
Delphi NAV200 U.S. Edition
Welcome
Thank you for purchasing the Delphi NAV200 U.S. Edition Portable GPS Navigation
System. This system will direct you to virtually any destination without the need for
map books or second-hand instructions.
The Global Positioning System (GPS) is available free of charge at any time, and
is accurate within 16.5 feet. The maps in the Delphi NAV200 package provide
street-level detail, allowing door-to-door navigation. They even include points of
interest, such as hotels, parks, and airports.
In addition, the Delphi NAV200 can play audio (mp3 or wav) files and video (avi)
files as well as display pictures (jpg, gif, png), enhancing the entertainment
options in your vehicle.
Delphi NAV200 features:
• 400 MHz CPU for fast navigation calculations and map rendering
• Bright, colorful, non-reflective touch screen LCD display
with high gain antenna
• Fast-start, high-speed GPS
• Easy to use Software based on Microsoft® Windows® CE
• Navigation map files information pre-installed on SD memory card
(included)
Use this manual to help install Delphi NAV200 in your vehicle, learn how to
operate it effectively and safely, and find out about the different features.
Contacting Technical Service Support
For additional information in solving problems with Delphi NAV200, contact
Delphi at 1.877.667.8700 Monday - Friday, 8:00 am - 8:00 pm, Saturday, 10:00
am – 4:00 pm, Eastern Standard Time, or visit
www.shopdelphi.com
This is the safety alert symbol. It is used to alert you to potential injury
hazards. Obey all safety messages that follow this symbol to avoid
possible injury or death.
2
Delphi NAV200 U.S. Edition
Warning:
DANGER OF ACCIDENT
When using your Delphi NAV200 in a vehicle, it is your sole responsibility to
install, secure, and use the device in a manner that will not cause accidents,
personal injury, or property damage, or in any manner obstruct your view or
interfere with the operation of vehicle safety equipment.
The user of this product is solely responsible for observing safe driving
practices. Do not operate your Delphi NAV200 while driving. Park the vehicle
first. Do not use the navigation system or entertainment features if it presents
a risk to you or any other person or if it is a distraction.
OBEY ALL TRAFFIC LAWS
The user is solely responsible for obeying the local traffic laws and observing
all road signs. Local traffic laws and actual traffic signs always have priority
over the information and directions received from the navigation system. The
navigation instructions might be inaccurate or incorrect due to detours and
construction.
DELPHI DISCLAIMS ALL LIABILITY FOR ANY USE OF THIS PRODUCT
IN A WAY THAT MAY CAUSE ACCIDENTS, DAMAGE, OR THAT MAY
VIOLATE THE LAW.
Caution: To avoid overheating of the unit, do not leave Delphi NAV200
on the dash or windshield while your vehicle is unattended, especially in
strong sunlight. Do not use or handle Delphi NAV200 while it is hot. Let it cool
away from heat sources before handling it.
* Microsoft and Windows are trademarks of Microsoft Corporation.
3
Delphi NAV200 U.S. Edition
Table of Contents
4
Section 1
About GPS / Introduction …………………………………. 6
Section 2
Unpacking Delphi NAV200 ………………………………... 8
Memory Cards …………………………………………10
Accessories and Replacement Parts …………………10
Section 3
Installing NAV200 in Your Vehicle……………………….11
Section 4
Features and Controls …………………………………….13
Delphi NAV200 Receiver Controls …………………..13
Section 5
Getting Started………………………………………………14
Powering Up ……………………………………………..14
Inserting a SD Card …………………………………….15
Home Screen …………………………………………….16
Section 6
Navigation……………………………………………………17
Driver Protection ………………………………………..17
Using the Keyboard …………………………………….18
Character Keyboard …………………………………..18
Command Buttons ………………………………………20
Lists ……………………………………………………….22
Adjusting the Volume …………………………………22
Initializing Delphi NAV200 ……………………………23
Selecting User Mode ……………………………………23
Standard Mode ………………………………………..25
Extended Mode ………………………………………..26
Selecting a Destination …………………………………27
Entering an Address …………………………………..27
Selecting a Point of Interest …………………………28
Point of Interest Nearby …………………………28
Point of Interest in a Certain City ………………30
Point of Interest Nationwide ……………………32
Selecting Destinations on the Map ………………..34
Favorites ………………………………………………36
Recent Destinations …………………………………..38
Using Your Home Address ………………………….39
Destination Management ………………………………40
Saving a Destination ………………………………….40
Renaming a Destination ………………………………40
Deleting a Destination ………………………………41
Route Planning (Itineraries) ……………………………42
Indicating Route Points ………………………………42
Editing, Saving, and Managing Itineraries ………..44
Calculating the Route …………………………………48
Displaying the Route on the Map ………………….49
Delphi NAV200 U.S. Edition
Simulating the Route …………………………………50
Starting Navigation in Extended Mode ………………51
Section 7
Working With the Map ……………………………………..53
Operating the Map ………………………………………53
Representation of the Map in Navigation Mode ……56
Displaying Additional Information on the Map …….57
Configuring Delphi NAV200 …………………………59
Section 8
Useful Functions for Navigation…………………………61
Adding a Route Point During Navigation ……………61
Next Destination ………………………………………..61
Blocking a Route Section ………………………………61
Section 9
Music Mode ………………………………………………….63
Playing an Audio File ……………………………………64
Section 10
Movie Mode ………………………………………………….67
Playing a Video File …………………………………….68
Section 11
Picture Mode………………………………………………...69
Viewing an Image File ………………………………….70
Section 12
Game Mode …………………………………………………71
Section 13
Calculator Mode …………………………………………….72
Section 14
World Clock Mode ………………………………………….73
Section 15
Settings ………………………………………………………73
Screen Settings ………………………………………….73
Configure Settings ………………………………………74
Section 16
Troubleshooting ……………………………………………75
Contacting Technical Service Support ………………75
Technical Information …………………………………76
FCC Statement …………………………………………77
Section 17
Warranty ……………………………………………………..78
5
Delphi NAV200 U.S. Edition
Section 1
About GPS / NAV 200 Introduction
The Global Positioning System (GPS) is a network of satellites launched by the
U.S. military beginning in the1970s. The satellites continuously transmit accurate
time and position information, which is freely used by commercial and military
applications worldwide. GPS receivers, such as Delphi NAV200, are designed to
pick up the high-frequency radio signals from these satellites and use the
information to help determine your exact location. Today, there are many
applications that use GPS—from marine to automotive, aviation, and military.
There are 24 satellites in total, orbiting approximately 12,000 miles above the
Earth. While a GPS receiver can detect signals from up to 12 satellites at any
one time, only three are needed to provide the two-dimensional position (latitude
and longitude), or “fix,” that is required for vehicle and marine navigation
systems. Aviation applications also need altitude, and therefore need information
from at least four satellites.
The Delphi NAV200 is designed specifically to use the continuous stream of GPS
information to help find your current position and to calculate the best route to
your desired destination using the road maps stored in its memory. With voice
and visual commands, the Delphi NAV200 helps guide you to your destination.
For best results when using Delphi NAV200:
• When the Delphi NAV200 is connected to power for the first time, leave it
connected for about two hours to charge the battery.
• Plan your route before your journey. If you need to set up a new itinerary
en route, safely park your vehicle before making changes.
• GPS signals cannot pass through solid materials other than glass. So
when you are inside a building or tunnel, GPS may not be available.
Likewise, signal reception can be affected by overhead cover such as
trees. Wireless devices may also interfere with signals, causing variable
reception.
• While the Delphi NAV200 can be operated by finger touch, more precise
control can be achieved by using the stylus. Do not use other sharp
objects, which can damage the LCD screen.
• Never clean the Delphi NAV200 with the power on. Use a soft, lint-free
cloth moistened with water to wipe the screen and the exterior. Do not use
paper towels to clean the screen. Do not place anything on top of the
Delphi NAV200. Do not drop the Delphi NAV200 or subject it to severe
shock.
6
Delphi NAV200 U.S. Edition
• Keep the Delphi NAV200 away from excessive moisture and extreme
temperatures. Do not subject the Delphi NAV200 to sudden and severe
temperature changes that could cause condensation inside. In the event
of moisture condensation, allow the Delphi NAV200 to dry out completely
before use.
• Always disconnect the Delphi NAV200 from the power supply when leaving
the car parked for a long period or when not using the system during travel.
Failure to do so could drain the vehicle’s battery as the Delphi NAV200
continuously draws power, even when the power is off.
Warning: Never attempt to disassemble, repair, or make any modification to
the Delphi NAV200. Doing so could result in personal injury, death, and/or
damage to the Delphi NAV200 and/or to your vehicle.
Warning: This device contains a non-replaceable lithium-ion internal battery
that can burst or explode, releasing hazardous chemicals.
To avoid risk of fire or explosion, do not attempt to replace the Delphi NAV200
battery. The Delphi NAV200 battery is not user-replaceable.
To reduce risk of fire or injury, never disassemble, crush, puncture, or dispose of
the Delphi NAV200 in fire or water.
Warning: Never use the power adapter in a high-moisture environment, or
touch it when your hands or feet are wet. Make sure there is adequate ventilation
around the adapter when in use, and do not cover it with paper, vinyl, cloth
(including the carrying case) or any other material. The adapter must be
connected to the correct power source. Do not attempt to service the unit if its
power lead or body becomes damaged or exposed to excess moisture.
Caution: Keep SD cards in a well-protected case to avoid dust and
humidity. Make sure no foreign objects can enter the SD slot.
7
Delphi NAV200 U.S. Edition
Section 2
Unpacking The Delphi NAV200
Here’s what you should find in the Delphi NAV200 package:
1. The Delphi NAV200 unit with integrated GPS receiver
2. United States maps on SD card
3. Windshield mount with suction cup and dashboard mount.
4. In-vehicle charging cable
8
Delphi NAV200 U.S. Edition
5. Stylus Pen
6. NAV200 Owners Kit:
•
•
Quick Reference Guide
DVD Containing:
- User manual in Adobe Acrobat PDF format
- Adobe Acrobat Reader software
- Copy of United States map files, that can be
preloaded to an SD card if original becomes lost or damaged.
9
Delphi NAV200 U.S. Edition
Memory Cards
The Delphi NAV200 has 32 megabytes of internal memory available for the
operational system (Microsoft Wince Net Core version 4.2). SD (secure digital)
Memory cards are available for purchase and should be used to store other
media files such as video (avi), images (jpg, gif, png) and/or audio (mp3, wav)
files.
An SD card can be plugged into the slot in the Delphi NAV200 and can be
purchased with various memory capacities. An SD card with 256 megabytes of
memory or more (up to 2GB) can be used. Delphi recommends the use
se
of following SD card brands: Kingston, Kingmax, Transcend, and SanDisk..
Caution: Do Not ADD or DELETE files from the SD card containing the map
data.
Accessories and Replacement Parts
You will be able to purchase the following items from the Delphi Website.
•
External GPS antenna: 15-foot cable with MMCX connector;
required if your vehicle is fitted with a heat-reflective or
heated windshield, or for extra GPS performance in weak
signal areas
•
SD card reader: an external device that connects to your
computer so that you can download maps, audio files, movie
files, and photos directly onto an SD memory card
•
Vehicle mount kit: includes suction mount so you can
transfer the Delphi NAV200 to another vehicle easily
•
Protective carrying case
•
12 V vehicle power adapter: ideal when using Delphi
NAV200 in more than one vehicle
•
Updated maps
For further information on replacement parts and accessories, visit
www.shopdelphi.com
10
u
eh
Delphi NAV200 U.S. Edition
Section 3
Installing Delphi NAV200 in Your Vehicle
Warning: To avoid personal injury, follow the safety guidelines and
installation instructions provided so that the Delphi NAV200 does not obstruct the
view of the driver, interfere with the operation of any airbags and safety features
in the vehicle, or become airborne in the case of an accident. Do not attempt to
install Delphi NAV200 while driving.
Before installing the Delphi NAV200, check whether your vehicle is fitted with a
heat-reflecting or heated windshield. If so, you will need to purchase an external
antenna from your retailer to allow your unit to pick up the GPS signals.
Note: Alternative-mounting options may be available for your vehicle make and
model. Contact your retailer or Delphi for more information.
Note: In the state of California and Minnesota, it is necessary to use the
dashboard mount, according to state law.
To mount the suction mount to the windshield, follow these steps:
1. Flip up the GPS Antenna
2. Using the two tabs on the bottom of the cradle, locate
the Delphi NAV200 and rotate rearward. While
pushing in the two grey release buttons, continue
rotation until unit is firmly seated in the cradle
3. Release the two grey buttons. Reverse operation for
unit removal.
4. Position suction cup firmly against windshield at
desired location.
5. Flip the lever towards suction cup. Unit is now secure
for operation.
To remove the suction cup, pull the lever up. Pull the release tab to release
the suction.
11
Delphi NAV200 U.S. Edition
If the suction cup does not adhere, clean the mounting area of the windshield
with a cloth dampened with isopropyl alcohol. Let the area dry, then reapply
the suction cup. When the outside temperature is cold,, the windshield may
need to be heated before the suction cup will adhere.
12
Delphi NAV200 U.S. Edition
Section 4
Features and Controls
Warning: For your safety, program the Delphi NAV200 and enter
information about your destination BEFORE you start your journey. Do not
operate Delphi NAV200 while driving.
NAV200 Receiver Controls
(Not available)
13
Delphi NAV200 U.S. Edition
Section 5
Getting Started
Warning: For your safety, program the Delphi NAV200 and enter
information about your destination BEFORE you start your journey. Do not
operate Delphi NAV200 while driving.
Powering Up
Power on
Press the Power button located on the
lower left side for at least one second.
Power off
Press the Power button located on the
lower left side for at least one second.
Note: The Delphi NAV200 will continue to charge if connected to a 12V power
jack even when powered down.
Enter screen saving mode
14
Press Screen Saver Mode button. The
device continues to operate, but the
screen will appear blank.
Delphi NAV200 U.S. Edition
Inserting a SD Card
Delphi NAV200 has a slot for Secure Digital (SD) cards located in the bottom.
Delphi NAV200 will accept SD cards containing digital maps or other data, such
as audio (mp3) files, movie (avi) files, or image (jpg) files.
The Delphi NAV200 comes equipped with an SD card preloaded with continental
U.S. maps (excludes Alaska & Hawaii). The card will already be in position in
the SD card slot, and ready to use for navigation.
If you choose to use a second SD card (separate purchase required) for music,
movie or picture viewing, remove the navigation system SD card by slightly
pushing the top of the card to release it, then pull it out of the slot.
Make sure the card is not in use before removing it.
Power off the unit, insert the new SD card with the label facing the front of the
device, and power the unit on.
15
Delphi NAV200 U.S. Edition
Home Screen
The main menu offers eight options, each of which are detailed in the sections
that follow:
At any time you can return to this menu by pushing the Main Menu button or by
closing the current mode (accomplished by tapping the “x” in the upper right
corner of the screen).
16
Delphi NAV200 U.S. Edition
Section 6
Navigation Mode
Warning: For your safety, program the Delphi NAV200 and enter
information about your destination BEFORE you start your journey. Do not
operate Delphi NAV200 while driving. Park the vehicle first.
DELPHI DISCLAIMS ALL LIABILITY FOR ANY USE OF THIS PRODUCT IN A
WAY THAT MAY CAUSE ACCIDENTS, DAMAGE, OR THAT MAY VIOLATE
THE LAW.
Driver Protection
The driver must not operate this unit while the vehicle is moving. When the
Delphi NAV200 is powered on, a protection screen is displayed:
I accept must be selected to continue. Selecting I decline causes the program to
terminate.
17
Delphi NAV200 U.S. Edition
Using the Keyboard
The Delphi NAV200 lets you enter addressee information with the character
keyboard.
Character Keyboard
Use your finger or the stylus to enter letters by tapping the appropriate letter. All
letters are upper case in the Delphi NAV200.
Tap the
icon to enter a space.
Tap the
icon to delete the previous character.
Tap the
icon to enter numbers, e.g. when entering a ZIP code.
Tap the
icon to return to character entry mode.
icon to enter a special character. The special characters
Tap the
keyboard appears:
18
Delphi NAV200 U.S. Edition
As soon as you have entered a special character, the standard letter keyboard
reappears.
Note: It is not necessary to enter special characters, but it may be helpful in
entering names for saved destinations and itineraries.
Note: You can also move the cursor anywhere on the screen by simply tapping
on the place where you want it.
19
Delphi NAV200 U.S. Edition
Command Buttons
The following buttons appear at the bottom of every navigation screen:
Back: Tap this icon to return to the previous screen. (This icon is
not available on the Main Screen.)
Main Screen: Tap this icon to open the Main Screen.
In addition, you will see one of three GPS symbols in the upper right corner:
No GPS: A GPS receiver is not connected or the power supply is
interrupted.
No Signal: A GPS receiver is connected, but no signal is being
received.
GPS Ready: Signal received.
Tapping the
20
icon displays the current GPS status screen:
Delphi NAV200 U.S. Edition
GMT:
Greenwich Mean Time
Longitude/Latitude: Current position
Satellites: Number of received satellites; at least three satellites must be
received for navigation
HDOP:
Horizontal Dilution of Precision (Indicates the quality of position
determination. Theoretically, any value from 1 to 50 may occur.
The smaller the value, the more accurate the position
determination. A 1 indicates no deviation from the real position.
Values up to 8 are acceptable for navigation.)
Speed:
Your current speed
Position: Your current location
Tap Save current position to add the current address to your Favorites.
Tap Close window to exit.
There are three types of command buttons in the Delphi NAV200:
1. Command buttons with a defined functionality: These buttons are
designed to execute a function, e.g., Save, OK, Cancel, Show Map,
Navigation, etc.
2. Buttons to select one of two possibilities: These buttons are designed to
select one of two possibilities, e.g., User mode, Yes/No, On/Off. When
you tap one of these buttons, the display key switches to the other
possibility. Often this change must be confirmed by tapping another button
(normally OK or Save) before the current screen closes.
21
Delphi NAV200 U.S. Edition
3. Buttons to enter data: These are actually entry fields, like City or Zip,
Street, Category, etc. When you tap an entry field, another screen with a
keyboard, list, or both will appear. The entry must be confirmed by tapping
another button (normally OK or Save) before the current screen closes.
Lists
Often you will be asked to select an item from a list. One entry is always
highlighted. Scroll through list with the
desired entry with the
buttons and select your
icon.
Adjusting the Volume
Volume cannot be adjusted via the touch screen. To adjust the volume, turn the
dial located on the right side of the device.
22
Delphi NAV200 U.S. Edition
Initializing the Delphi NAV200
The Delphi NAV200 receives GPS signals continuously via the antenna. In order
for your antenna to receive signals, ensure that:
1. The unit is outside or in a vehicle parked outside.
2. The antenna is pointing horizontally out through your windshield and
has a clear view of the sky.
When you first power on the unit and program a route, it may take several
minutes for the unit to get its first GPS fix. You can minimize this time by
remaining stationary until the GPS signal is received.
The initialization process of the Delphi NAV200 starts automatically when
entering Navigation mode. Within 15 seconds, the GPS icon should switch from
to
.
Then, as soon as the signals of at least three satellites
are being received, the icon will switch to
. This procedure may
take up to 20 minutes on the first initialization.
Note: This initialization process must be carried out only once. After that the
receiver will be ready in about a minute. A new initialization may be necessary if
the device is not used for a long time. In this case, it should take only about 10
minutes.
Selecting User Mode
The Delphi NAV200 can be operated in two different user modes for navigation:
1. Standard: Standard mode is recommended for most users.
2. Extended: Extended mode offers additional features that enhance
the functionality of Delphi NAV200.
23
Delphi NAV200 U.S. Edition
To change the mode, follow these steps:
1.
In the Main Menu, tap Settings. The Settings screen appears:
2. The User mode entry should be at the top of the list. If not, tap the
icon until it is selected.
3. Tap
.
The User mode screen appears:
The current mode is indicated in the Current user mode field.
4. Tap the Current user mode field to switch to the other user mode.
5. Tap
24
to save the changes.
Delphi NAV200 U.S. Edition
Note: When you switch to Standard mode, a dialog window will ask whether you
want to keep the configuration changes made in extended mode. This dialog
window appears even if you have not made any configuration changes. Tap Yes
if you want to keep these changes.
The User mode screen will close and the Main Menu screen of the selected
mode will appear.
Standard Mode
The Standard mode Main Menu screen appears:
The following functions are accessed from the Standard mode Main Menu
screen, and are explained fully in the pages that follow.
Tap the Navigation icon to enter a destination with no
stopover.
Tap the Home icon to navigate to your home address.
Tap the Saved destinations icon to
navigate to a favorite address.
Tap the Recent destinations icon to select
a destination entered previously.
Tap the Map icon to show the current map.
Tap the Settings icon to modify the settings of Delphi
NAV200.
Tap the Exit icon to quit.
25
Delphi NAV200 U.S. Edition
Extended Mode
The Extended mode Main Menu screen appears:
The following functions are accessed from the Extended mode Main Menu
screen, and are explained fully in the pages that follow.
Tap the Navigation icon to enter a destination with no
stopover.
Tap the Home icon to navigate to your home address.
Tap the Route planning icon to plan a
route.
Tap the Show map icon to display the map
currently in use.
Tap the Settings icon to modify the settings of Delphi
NAV200.
Tap the Exit icon to quit.
26
Delphi NAV200 U.S. Edition
Selecting a Destination
Entering an Address
To enter an address, follow these steps:
1. (Standard Mode) In the Main Menu, tap
Destination screen appears:
. The
Tap the State entry field and select the appropriate entry.
1. (Extended Mode) In the Main Menu, tap
Destination screen appears:
. The
Tap the State entry field and select the appropriate entry.
2. On the Destination screen, tap Enter Address. The Address screen
appears:
27
Delphi NAV200 U.S. Edition
Tap the City entry field if you want to enter the destination city name, or
tap the ZIP entry field to enter a ZIP code.
3. Tap the Street entry field and enter a street name.
4. Tap the No. field and enter the street address number, if known.
Alternatively, tap the Intersection entry field and enter a cross street. You
will be directed to this intersection.
Selecting a Point of Interest
Points of Interest (POI) are stored in the Delphi NAV200 database and
include ports, airports, restaurants, hotels, gas stations, public buildings, and
more.
Note: You can only select a POI nearby when the GPS receiver is turned on and
a GPS signal is being received.
Point of Interest Nearby
To select a POI nearby, follow these steps:
1. (Standard Mode) In the Main Menu, tap
Destination screen opens:
Tap …nearby GPS position.
28
. The
Delphi NAV200 U.S. Edition
1. (Extended Mode) In the Main Menu, tap
The Destination screen opens:
.
Tap Point of interest to view the Point of Interest screen:
Tap …nearby GPS position.
29
Delphi NAV200 U.S. Edition
The POI Nearby screen appears:
Tap the Radius entry field to select a radius around your current position
where you want to search for points of interest.
2. Tap the Category entry field (optional) to select a type of POI to
search for. Only POI within the indicated radius will be listed.
3. Tap the Subcategory entry field (optional) to refine your search.
4. Tap the Point of interest entry field to select a specific POI.
Point of Interest in a Certain City
To select a POI nearby, follow these steps:
1. (Standard Mode) In the Main Menu, tap
Destination screen opens:
Tap the State entry field and select the appropriate entry.
Then tap …in a browsed city.
30
. The
Delphi NAV200 U.S. Edition
1. (Extended Mode) In the Main Menu, tap
Destination screen appears:
. The
Tap Point of interest to view the Point of Interest screen:
Tap …in a browsed city.
The POI in a city screen appears:
Tap the City or ZIP entry field to enter a location where you want to
search.
31
Delphi NAV200 U.S. Edition
2. Tap the Category entry field (optional) to select a type of POI to search
for. Only POI within the selected city will be listed.
3. Tap the Subcategory entry field (optional) to refine your search
4. Tap the Point of interest entry field to select a specific POI.
Point of Interest Nationwide (Extended Mode Only)
1. In the Main Menu, tap
appears:
. The Destination screen
Tap Point of interest to view the Point of Interest screen:
Tap …nationwide.
32
Delphi NAV200 U.S. Edition
2. The POI Nationwide screen appears:
3. Tap the Category entry field (optional) to select a type of POI to search
for.
4. Tap the Point of interest entry field to select a specific POI.
33
Delphi NAV200 U.S. Edition
Selecting Destinations on the Map (Extended Mode Only)
The Delphi NAV200 allows you to indicate a destination directly on the map.
In addition to selecting cities and streets, you may also select points of
interest quickly.
To select a destination on the map, follow these steps:
1.
In the Main Menu, tap
opens:
. The Destination screen
Tap the State entry field and select the appropriate entry.
2. Tap Select on map. The Map screen appears:
3. Tap on the desired destination location and hold. An orange circle
appears around your selection:
34
Delphi NAV200 U.S. Edition
The Delphi NAV200 then displays information about your selection, along
with several options:
Select from the following options:
Start navigation to your selected destination.
[!] Caution: Using this function while you are already navigating deletes all
current destinations, including stopovers.
Save the destination in Saved Destinations.
Search for a nearby POI.
35
Delphi NAV200 U.S. Edition
Add the selection to your itinerary. The selected point will be
marked by a small flag. It will also be added to the list of
route points on the Route Planning screen, where it will be
labeled as your destination point. Note: Using this function
while you are already navigating causes an immediate
recalculation of your route.
Make the selection your next stopover on your itinerary. Your
route will be recalculated immediately.
Favorites
All destinations you have saved by tapping the
icon are listed on the
Favorites screen. On this screen, you can select destinations for navigation,
rename destinations, and delete destinations.
To use Favorites, follow these steps:
1. (Standard Mode) In the Main Menu, tap Saved destinations.
1. (Extended Mode) In the Main Menu, tap
Destination screen appears:
36
. The
Delphi NAV200 U.S. Edition
2.
The Favorites screen appears:
Tap on your choice to highlight it, then tap
3. The Address screen appears:
Select from the following options:
Start navigation to your selected destination.
[!] Caution: Using this function while you are already navigating deletes all
current destinations, including stopovers.
View the selection on the map.
Save the destination in Saved Destinations.
37
Delphi NAV200 U.S. Edition
Recent Destinations
The Delphi NAV200 remembers recently selected destinations. On this
screen, you can select destinations for navigation, add destinations to
Favorites, and delete destinations.
To use Recent Destinations, follow these steps:
1. (Standard Mode) In the Main Menu, tap
.
1. (Extended Mode) In the Main Menu, tap
The Destination screen appears:
Tap
.
2. The Recent Destinations screen appears:
Tap on your choice to highlight it, then tap
3. The Address screen appears:
38
.
Delphi NAV200 U.S. Edition
Select from the following options:
[!] Caution: Using this function while you are already navigating deletes all
current destinations, including stopovers.
View the selection on the map.
Save the destination in Saved Destinations.
Using Your Home Address
To store your home address, select Settings on the Main Menu and then
select home address to enter.
If you have stored your home address, you may quickly begin navigation
icon on the Main Menu. The
home from any location by tapping the
route is calculated based on your settings in Routing Options.
39
Delphi NAV200 U.S. Edition
Destination Management
The Delphi NAV200 stores destinations in two locations: Favorites and Recent
Destinations.
Saving a Destination
1. After you have entered or selected a destination, you can save it to
Favorites by tapping
.
icon to edit.
If you have opened the Recent Destinations list, tap the
2. The Name of Destination screen appears:
Enter a name for the destination.
3. Tap
. The destination has now been added to Favorites.
Renaming a Destination
1. On the Destination screen, tap
Favorites screen appears:
40
. The
Delphi NAV200 U.S. Edition
2. Select the destination you want to rename.
3. Tap the
icon to edit. The Name of Destination screen appears:
4. Enter the new name.
5. Tap
. The destination has now been renamed.
Deleting a Destination
The Delphi NAV200 allows you to delete a destination from either the
Favorites or Recent Destinations list by following these steps:
1. Select the entry to be deleted.
2. Tap the
icon to delete. The confirm screen appears:
41
Delphi NAV200 U.S. Edition
Tap
. The destination has now been deleted.
Route Planning (Itineraries with Stopovers) (Extended Mode
Only)
The Delphi NAV200 allows you to plan itineraries even when not receiving a GPS
signal. These itineraries can then be stored for later use.
Indicating Route Points
1. On the Main Menu, tap
screen appears:
. The Route Planning
2. Tap the
icon to enter the first route point. The Destination screen
appears. Enter a destination as described in “Selecting a Destination.”
42
Delphi NAV200 U.S. Edition
3. Tap Add to route. The Route Planning screen appears. The destination is
added as route point 1.
4. Repeat steps 2-3 for every route point you want to add to the itinerary.
43
Delphi NAV200 U.S. Edition
Editing, Saving, and Managing Itineraries
The Delphi NAV200 allows you to save multiple itineraries for later use. At
any time, you can add route points, modify the order of route points, or
display the itinerary on the map.
The following options are available on the Route Planning screen:
Note: Icons are deactivated if the list does not contain a route point.
Up: Scroll up through list.
Down: Scroll down through list.
Route point up: Move the selected route point up the list, e.g.
route point 3 becomes route point 2.
Route point down: Move the selected route point down the list,
e.g. route point 2 become route point 3.
Delete: Delete the selected route point.
Add route point: Add a new route point ahead of the currently
selected route point.
Save itinerary: Only itineraries that contain at least one route
point can be saved. When tapped, the Name of the Itinerary
screen appears:
Enter a name and tap
. Note: Only the route points will be saved. If
you load an itinerary, you will have to recalculate it.
44
Delphi NAV200 U.S. Edition
Load itinerary: Load a saved itinerary. The Select Itinerary
screen appears:
Select the desired itinerary and tap
.
Rename itinerary: Rename a saved itinerary. The Select
Itinerary screen appears:
Select the desired itinerary and tap
screen appears:
. The Name of the Itinerary
45
Delphi NAV200 U.S. Edition
Enter the new name of the itinerary and tap
. The Select Itinerary
screen reappears. The itinerary has been renamed.
Tap
to load the renamed itinerary or
Planning screen without loading an itinerary.
to open the Route
Delete itinerary: Delete an itinerary. The Select Itinerary screen
appears:
46
Delphi NAV200 U.S. Edition
Tap
Tap
to delete the selected itinerary. The confirm screen appears:
. The deleted route no longer appears.
47
Delphi NAV200 U.S. Edition
Calculating the Route
An itinerary may be calculated even if no GPS signal is being received so you
can get an impression of the route.
Note: When you start navigation, the system identifies your current location and
makes it the start point. The first indicated route point becomes your first
stopover.
1.
On the Route Planning screen, tap the
icon to calculate the
distance and the estimated duration of the route. The Route Options
screen opens:
2. Set the route options. For detailed information on setting route options,
see “Configuring The Delphi NAV200.”
Note: The standard settings for the route options may be changed on the Route
Options screen. For detailed information on changing the standard settings refer
also to “Configuring The Delphi NAV200.”
3. Tap Calculate route. The route is being calculated. A message window
informs you of the progress of the calculation:
48
Delphi NAV200 U.S. Edition
When the route is calculated, the total distance and the estimated time from
the first to the last route point are displayed below the route points list of the
Route Planning screen.
The distance and estimated time of each stage will also be indicated with the
selected route point entry.
Displaying the Route on the Map
On the Route Planning screen, tap the
on the map. The Map screen opens:
icon to display the entire route
The route is highlighted in orange.
The route points are marked by flags.
49
Delphi NAV200 U.S. Edition
Simulating the Route
The Delphi NAV200 allows you to execute a simulated navigation along the
itinerary when the route has been calculated.
Note: GPS signal reception is not necessary for a simulation.
Note: Simulations are restricted to a maximum of 60 miles.
1. On the Route Planning screen, tap the
opens:
2. Tap the
icon. The Map screen
options icon. The Additional Functions screen appears:
Tap Simulation. The route will be recalculated for simulation purposes.
50
Delphi NAV200 U.S. Edition
The simulation will begin when the calculation has finished.
To stop the simulation at any time, tap the
The Additional Functions screen opens. Tap
options icon.
.
Starting Navigation in Extended Mode
1. Once a destination has been selected, tap
screen appears:
. The Route Options
2. Set the route options. For detailed information on setting route options,
see “Configuring The Delphi NAV200.”
Note: The standard settings for the route options may be changed on the Route
Options screen. For detailed information on changing the standard settings refer
also to “Configuring The Delphi NAV200.”
51
Delphi NAV200 U.S. Edition
3. The system calculates the route and the map screen appears:
Your current position is indicated by a green arrow. The calculated route is
highlighted in orange.
Note: When you start navigation after having planned or loaded an itinerary, then
your current position is the start point of the route. The first indicated route point
is then the first stopover on your route.
If the Delphi NAV200 is not receiving a GPS signal, the following message
appears:
You have two options:
1. Wait until a GPS signal is achieved.
2. Tap
52
to cancel and try again later.
Delphi NAV200 U.S. Edition
Section 7
Working With the Map
Operating the Map
To access the map in Standard mode:
1. Tap Show on map on the Address screen after entering an
address.
To access the map in Extended mode:
1. Tap on Show map on the Main Menu.
2. Tap on Select on map on the Destination screen.
3. Tap on Show on map on the Address screen after entering an
address.
The Map screen appears:
53
Delphi NAV200 U.S Edition
On the Map screen, you have several control options:
Tap on map: A quick tap accesses the Additional Functions screen, where
you can make adjustments. Tapping and holding on the map brings up
information about the selected point.
Hide/show icons: Hide all icons so you can see more of the
map. Tap again to restore icons. Note: Also tap this icon to
restore the standard view of the map if you have modified it,
as described below.
Frozen position (default): Makes the map scroll
continually. Your current position (green arrow) is always
centered in the bottom third of the map.
Frozen map: Freezes the map in its current location. Your
current position (green arrow) moves over the map and may
even leave it. Note: This mode applies automatically when
you scroll the map in Navigation mode. Select this mode
when you want to select a destination from the map while
navigation is in progress.
Zoom: Use these icons or the +/- buttons to scale the map
up or down. You can also select a portion of the map to
zoom in on by drawing a rectangle on the map with the
stylus, beginning with the upper left corner. Zoom out by
beginning with the lower right corner.
Zoom bar: Tap one of the bar sections to adjust the map
scale.
Scroll: Tap to enter scroll mode, which enables you to scroll
the map by tapping on the map and dragging it in any
direction. Tap again to disable scroll.
Entire Route: Tap the Itinerary Icon to display the whole
itinerary.
54
Delphi NAV200 U.S. Edition
North orientation: Toggle this icon to switch between
orienting the map north or in the driving direction.
3D: Displays the map in 3D (flight) mode. Tap
return to 2D (standard) mode.
to
Options: Brings up the Additional Functions screen, where a
variety of adjustments can be made, including:
Night mode: Adjusts brightness of map screen.
Settings: Displays the Settings screen.
Quit navigation: Exit Navigation mode.
Block road: Block or unblock a road.
Set interim destination: Add a new route to your
itinerary. The route will be recalculated and the newly
added route point will be the next destination.
Route options: Modify route options.
Next destination: Skip the next stopover. The system
recalculates your route to the next route point on the list.
55
Delphi NAV200 U.S. Edition
Representation of the Map in Navigation Mode
The following fields containing useful information are displayed in Navigation
mode:
Field 1: If there are two turns coming quickly after each other, the small
upper arrow field indicates the second upcoming turn.
Field 2: The green arrow indicates your current position on the map.
Since the displayed sector changes continually, your position is centered.
(Exception: Frozen map mode.)
Field 3: The larger arrow indicates the next turn.
Field 4: The distance field indicates the distance to the next turn. As you
approach, the number changes to a distance bar. As more yellow bars are
displayed, the closer you are to the turn.
Field 5: The upper bar indicates the next street where you should turn.
Field 6: The lower bar indicates the name of the current street where you
are driving.
Other useful information can include:
Warning: Information contained in the cartographic material can be incorrect
depending on current conditions, roadwork, etc. Obey all current applicable traffic
laws.
56
Delphi NAV200 U.S. Edition
Displaying Additional Information on the Map.
The Delphi NAV200 allows you to determine which information is to be displayed
on the map. Modifying any configuration begins on the Settings screen.
1. Open the Settings screen
- by tapping the Settings button on the Main screen
- or by tapping the Additional Functions button (or short into the
map) and selecting Settings
2. Select Map information using the arrow buttons:
The Info bar at the bottom of the map displays the altitude, the compass, and
the current speed.
3. Tap the command buttons to display (On) or not (Off) the respective
information on the map.
The desired information on the entire route (upper section) and on the current
stage (lower section) will be displayed at the right hand side of the map.
4. Tap the respective command button to display (On) or not (Off) Points of
Interest on the map.
5. Tap the respective command button to display (On) or not (Off) Street names
on the map.
6. Via the arrow buttons select Route information:
57
Delphi NAV200 U.S. Edition
7. Tap the command buttons to display (On) or not (Off) the respective
information on the map.
The desired information on the route (upper section) and on the current stage
(lower section) will be displayed at the right hand side of the map.
Route – All information below refers to final destination
Stage – All information below refers to the next route
point.
Estimated time of arrival (ETA)
Estimated remaining time to arrival
Estimated distance to destination
Info: Tap to repeat the last spoken instruction.
58
Delphi NAV200 U.S. Edition
Configuring the Delphi NAV200
The Delphi NAV200 allows you to adjust what informational items are displayed
on the screen. These options are accessed through the Settings menu:
Whenever a change is made to any of these options, tap
modifications.
to save the
Routing options: Adjust preferred travel options
Time zone: Change current time zone.
Format: Change time from 12 to 24 hour clock; change distance from
miles to kilometers.
Home address: Enter or edit your home address.
User mode: Standard or Extended
Map Information: Turn ON or OFF the info bar, Points of Interest, or
street names.
Route Information: Turn ON or OFF select features.
Representation: Adjust brightness level.
59
Delphi NAV200 U.S. Edition
Auto Mode: Adjust view for 2D or 3D preferences.
Itinerary: Turn ON or OFF proceeding automatically to next destination.
Product Information: Display of product information only.
60
Delphi NAV200 U.S. Edition
Section 8: Useful Functions for Navigation
Adding a Route Point During Navigation (Extended Mode Only)
The Delphi NAV200 allows you to add a new route point to your itinerary at any
time. Your route will be recalculated in order to make the new route point the next
destination.
1.
2.
3.
4.
In Navigation mode, tap briefly anywhere on the map.
Tap Set interim destination. The Destination screen appears.
Set the new route point as described in “Selecting a Destination.”
Tap Set as Route Point.
Next Destination (Extended Mode Only)
Skip the next stopover. The system recalculates your route to the next route
point on the list.
Blocking a Route Section
The Delphi NAV200 allows you to block out certain roads from being
calculated into your routes if necessary to avoid known construction, traffic
backups, etc.
Note: A manual road block is valid for the current navigation session only; the
road will be unblocked when you set another session.
1. Tap the
option button.
2. Tap Block road. The blocking screen appears.
3. Enter how far ahead you want to block the road.
4. Tap
. This forces a recalculation of the route:
The blocked section of road will be highlighted in red on the map.
61
Delphi NAV200 U.S. Edition
To unblock a blocked section of road, briefly tap on the map and then tap
Unblock. Delphi NAV200 uses the route that had been originally calculated.
62
Delphi NAV200 U.S. Edition
Section 9 Music Mode
Warning: For your safety, DO NOT operate the Delphi NAV200
entertainment features while driving. Movie and music (MP3) playing, picture
viewing, world clock, and calculator are intended for use while you are not driving
your vehicle.
DELPHI DISCLAIMS ALL LIABILITY FOR ANY USE OF THIS PRODUCT IN A
WAY THAT MAY CAUSE ACCIDENTS, DAMAGE, OR THAT MAY VIOLATE
THE LAW.
The Delphi NAV200 can playback audio files saved in mp3, and wav format on
an SD card. (Adding music, movies or pictures requires a higher capacity SD
card not included and the ability to download MP3 files from a computer. An SD
card reader may be required if your computer is not equipped with an SD card
slot.)
When entering Music mode, the last file played is highlighted as “current.” If the
last music file does not exist on the SD card currently installed, the first file
available on the current card is listed.
63
Delphi NAV200 U.S. Edition
Playing an Audio File
Audio functions are controlled by tapping on the various buttons located on the
control bar in the lower half of the screen:
Play: Pressing the Play button plays the file listed at Current Music. The
screen will display current playback time and playback status. If a file is
damaged, the next file will be played without opening a popup screen.
If all files are damaged, a popup screen opens and all audio playback stops.
Pause: Playback stops temporarily. Current status is displayed as “Pause.”
The Play button is deactivated and the Pause button activated. The playback
indicator on the playback bar stops moving.
64
Delphi NAV200 U.S. Edition
Stop: Playback stops. Current status is displayed as “Stop.” Current playing
time is displayed as “00:00:00.” If Previous or Next is selected during stop,
only the file name moves; playback remains stopped.
Repeat: Default is All Repeat mode. Tapping this option cycles through “All
Repeat > All Play > 1 Track Repeat > All Play.” The repeat setting remains
when Music mode is exited, and is saved for the next session.
Mute: Mutes all volume. Press again to turn sound on again.
65
Delphi NAV200 U.S. Edition
Previous/Next: Tap the arrows or press the +/- buttons to select the next
or previous audio file in the list. If the file is damaged, Delphi NAV200
automatically skips to the next available file.
List: Displays the play list screen. The file currently being played is
highlighted. This screen allows you to scroll through your list of audio files,
or arrange them randomly or alphabetically. Press Play to play the
highlighted file, or tap Cancel to return to the previous screen.
66
Delphi NAV200 U.S. Edition
Section 10 Movie Mode
Warning: For your safety, DO NOT operate the Delphi NAV200
entertainment features while driving. Movie and music (MP3) playing, picture
viewing, world clock, and calculator are intended for use while you are not driving
your vehicle.
DELPHI DISCLAIMS ALL LIABILITY FOR ANY USE OF THIS PRODUCT IN A
WAY THAT MAY CAUSE ACCIDENTS, DAMAGE, OR THAT MAY VIOLATE
THE LAW.
The Delphi NAV200 can playback video files saved in avi format on an SD card.
(Adding movies requires a higher capacity SD card not included and the ability to
download avi files from a computer. An SD card reader may be required if your
computer is not equipped with an SD card slot.)
When entering Movie mode, the most recent file played is automatically and is
listed in the control bar at the top of the screen, along with playtime. Successive
files are played automatically in order.
If a file is damaged, a popup message will appear stating: “Cannot play this file,”
and play will stop.
67
Delphi NAV200 U.S. Edition
Playing a Video File
At any time, tapping on the video portion of the screen will alternate between full
screen mode and menu mode. Menu options on the control bar include:
Review: Tap to rewind file; button turns red and file rewinds in 10second increments. Tap again to resume play at current location.
Note: Tapping Review and Play/Pause in rapid succession will
begin play from the beginning of the file.
Play/Pause: Tap to begin play; tap again to pause. Tapping while
in pause resumes play from current location. Note: Tapping
anywhere on the video screen will also begin play.
Fast-forward: Tap to fast forward file; button turns red and file
advances in 10-second increments. Tap play to resume play at
current location.
List: If multiple files are available, they are displayed on the Movie
play list screen. The file currently being played is highlighted. This
screen allows you to
scroll through your list of audio files. Press Play to play the
highlighted file, or tap Cancel to return to the previous screen.
Mute: Mutes all volume. Press again to turn sound on again. (Note:
Mute button is located in upper left corner of movie display screen.)
68
Delphi NAV200 U.S. Edition
Section 11 Picture Mode
Warning: For your safety, DO NOT operate the Delphi NAV200
entertainment features while driving. Movie and music (MP3) playing, picture
viewing, world clock, and calculator are intended for use while you are not driving
your vehicle.
DELPHI DISCLAIMS ALL LIABILITY FOR ANY USE OF THIS PRODUCT IN A
WAY THAT MAY CAUSE ACCIDENTS, DAMAGE, OR THAT MAY VIOLATE
THE LAW.
The Delphi NAV200 allows you to view images saved in gif, jpg or png format on
an SD card on the display screen. (Adding pictures requires a higher capacity SD
card not included and the ability to download gif, jpg, or png files from a
computer. An SD card reader may be required if your computer is not equipped
with an SD card slot.)
When entering Picture mode, the last file viewed is highlighted in the control bar,
along with the number of files in the index.
69
Delphi NAV200 U.S. Edition
Viewing an Image File
Menu options on the control bar include:
Previous: Views the previous image.
Next: Views the next image.
Note: If a file is damaged, Delphi NAV200 automatically skips to the next
available image.
Full size: Expands the image to full screen.
Note: Tapping on the image also alternates between full screen view and control
bar view
List: If multiple files are available, they are displayed on the Picture list
screen. The file currently being shown is highlighted. This screen allows you
to scroll through your list of files. Press View to view the highlighted file, or tap
Cancel to return to the previous screen.
Enlarge/reduce: Pressing the +/- buttons on Delphi NAV200 while in Full
Screen Picture mode will enlarge or reduce the image size two times or four
times. Use the stylus to tap on the red arrows to move the image across the
screen.
70
Delphi NAV200 U.S. Edition
Section 12 Game Mode
Warning: For your safety, DO NOT operate the Delphi NAV200
entertainment features while driving. Movie and music (MP3) playing, picture
viewing, world clock, and calculator are intended for use while you are not driving
your vehicle.
DELPHI DISCLAIMS ALL LIABILITY FOR ANY USE OF THIS PRODUCT IN A
WAY THAT MAY CAUSE ACCIDENTS, DAMAGE, OR THAT MAY VIOLATE
THE LAW.
The Delphi NAV200 offers the classic game of Othello.
NAV200 is the black player; the user is white. To play, tap twice on the square
where you wish to place your disc.
The object of the game is to have the majority of your color discs on the board at
the end of the game.
A move consists of “outflanking” your opponent’s disc(s), then NAV200’s discs
will be flipped to white. To outflank means to place a disc on the board so that
your opponent’s row (or rows) of disc(s) is bordered at each end by a white disc.
(A “row” may be made up of one or more discs.)
When it is no longer possible for either player to move, the game is over. The
player with the majority discs on the board is the winner.
Note: It is possible for a game to end before all 64 squares are filled.
71
Delphi NAV200 U.S. Edition
Section 13 Calculator Mode
Warning: For your safety, DO NOT operate the Delphi NAV200
entertainment features while driving. Movie and music (MP3) playing, picture
viewing, world clock, and calculator are intended for use while you are not driving
your vehicle.
DELPHI DISCLAIMS ALL LIABILITY FOR ANY USE OF THIS PRODUCT IN A
WAY THAT MAY CAUSE ACCIDENTS, DAMAGE, OR THAT MAY VIOLATE
THE LAW.
Delphi NAV200 features a standard calculator offering add, subtract, multiply,
and divide functions.
When Calculator mode is entered, the Delphi NAV200 will display:
Tap on the various numbers and function keys as a standard calculator.
72
Delphi NAV200 U.S. Edition
Section 14 World Clock Mode
Delphi NAV200 allows you to check the current time of any city in the world.
When the World Clock mode is entered, the screen displays the time in the city
where you currently are located.
Note: World clock will work properly only when it has signed on from GPS
satellites.
Tap the arrow buttons to cycle through different time zones.
Section 15 Settings
Delphi NAV200 allows you to adjust the screen settings and configurations to
personal preferences.
Screen Settings
Tap the screen to calibrate the device, adjust LCD brightness, select an opening
screen to be displayed at startup, and to select a preferred language.
Tap Save to save your settings
73
Delphi NAV200 U.S. Edition
Configure Settings
Tap the screen to select a popup sound, a button sound, and time zone.
Tap Save to save your settings.
74
Delphi NAV200 U.S. Edition
Section 16 Troubleshooting
The Delphi NAV200 unit is designed and built to provide trouble-free
performance. If it does not appear to be functioning properly, please follow these
troubleshooting guidelines.
No GPS fix:
1. Check the satellite icon in the upper right corner of the map view
screen.
2. Make sure the antenna on the unit is pointed outward and upward,
providing a clear view of the sky.
3. Ensure that the vehicle does not have a heat-reflecting or heated
windshield. These cut out GPS signals. An external antenna can be
purchased from your retailer to help ensure adequate GPS signal
reception.
4. The first time you use Delphi NAV200, it may take several minutes to
get the first GPS fix. The unit self-calibrates and locates the satellites.
The information it discovers this time is stored in memory so from that
point on, it should take less than 40 minutes to get a fix. If you travel
overseas, the unit can take up to 20 minutes to acquire a first fix.
GPS randomly loses its fix:
Many factors can affect GPS reception. It is best to be outdoors with a
clear view of the sky.
The GPS receiver continues to search for a signal and automatically
recalculates the route once the reception is restored.
No audible destination instructions:
Check the volume. Adjust volume with dial on right side of unit.
Unit does not start:
Check that you have followed the instructions. If the unit still does not
work, call Delphi Customer Service (1-877-667-8700) or check the Delphi
website: www.shopdelphi.com .
Contacting Technical Service Support
For additional information in solving problems with Delphi NAV200, contact
Delphi at 1.877.667.8700 Monday - Friday, 8:00 am - 8:00 pm, Saturday 10:00
am – 4:00 pm, Eastern Standard Time, or visit
www.shopdelphi.com .
75
Delphi NAV200 U.S. Edition
Technical Information
Dimensions
134 mm x 80 mm x 29 mm
Weight:
190g
Specifications
Screen size … 3.5" diagonal (89 mm)
Screen resolution … 320 x 240 pixels
Number of colors … 16.7M
Microprocessor … Samsung S3C2440/400 MHz
Onboard storage memory (for OS) … 32 MB
GPS accuracy … 16.5' (5 m), 95%
Time to GPS fix (cold start) … 2 min
Time to GPS fix (hot start) … 15 sec
Map data … NAVTEQ
76
Delphi NAV200 U.S. Edition
FCC Statement
This equipment has been tested and found to comply with the limits for a Class B
digital device, pursuant to Part 15 of the FCC rules. These limits are designed to
provide reasonable protection against harmful interference in a normal
installation. This equipment generates, uses, and can radiate radio frequency
energy and, if not installed and used in accordance with the instructions, may
cause harmful interference to radio communications. However, there is no
guarantee that interference will not occur in a particular installation. If this
equipment does cause harmful interference to radio or television reception, which
can be determined by turning the equipment off and on, the user is encouraged
to try to correct the interference by one or more of the following measures:
• Reorient or relocate the receiving antenna
• Increase the separation between the equipment and receiver
• Connect the equipment into an output on a circuit different from that to
which the receiver is connected
• Consult the dealer or an experienced electronics technician for help
• A shielded cable must be used when connecting a peripheral to the
serial ports
• Modifications not expressly approved by the manufacturer could void the
user’s authority to operate the equipment under FCC rules
77
Delphi NAV200 U.S. Edition
Section 17 Warranty
Delphi Product & Service Solutions (“Delphi”) warrants all Delphi NAV200
systems sold by Delphi (“Products”) to be free of defects in material and
workmanship, subject to the following conditions.
The duration of Delphi’s warranty with respect to the Delphi NAV200 is limited to
one (1) year from the date of sale to the original consumer purchaser.
No other express warranties are made with respect to any Product. All
implied warranties, including warranties of merchantability and fitness for a
particular purpose are limited to the warranty period set forth above. This
warranty is not transferable and applies only to the original consumer
purchaser of the Product.
Delphi will, as its sole obligation under this warranty, replace or repair, at its
option, any Product that does not conform to this warranty. Under no
circumstances will Delphi be liable for any incidental or consequential damages
under this warranty or any implied warranties.
Delphi will not be responsible for damage resulting from any (i) deviation from
Delphi’s operating instructions as printed in Delphi’s catalog or on any packaging,
labels, or other literature provided with a Product, (ii) installation of a Product in a
manner which is inconsistent with Delphi’s written instructions, (iii) alteration or
modification of a Product, (iv) misuse, (v) neglect, (vi) abuse, (vii) accident, (viii)
normal wear and tear, (ix) commercial use, (x) service by anyone other than a
Delphi authorized repair facility, or (xi) other improper application, installation, or
operation of the Product.
How you (the Customer) can get service:
To obtain warranty service during the first thirty (30) days after the date of
purchase, you must return the defective Product with the original receipt to
the original place of purchase. To obtain warranty service during the
remainder of the warranty period, you must contact Delphi by phone at
1.877.667.8700.
If warranty service is needed at any time during the warranty period,
the purchaser will be required to furnish a sales receipt/proof of
purchase indicating the date of purchase, amount paid, and place of
purchase. Customers who fail to provide such proof of purchase will
be charged for the repair of any Product.
How state law relates to the warranty:
Some states do not allow limitations on how long implied warranties last,
or the exclusion or the limitation of incidental or consequential damages.
78
Delphi NAV200 U.S. Edition
So the above limitations or exclusions may not apply to you. This warranty
gives you specific legal rights. You may also have other rights that may
vary from state to state.
NO PERSON IS AUTHORIZED BY DELPHI TO MODIFY OR ADD TO THIS
LIMITED WARRANTY.
79
Delphi NAV200 U.S. Edition
Product and Service Solutions
Delphi Corporation
1441 West Long Lake Road
Troy, Michigan 48098-5090
U.S.A
www.shopdelphi.com
© 2007 Delphi Corporation. All rights reserved.
80