1
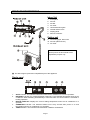
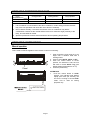
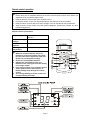
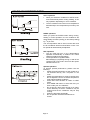
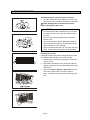
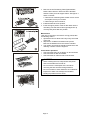
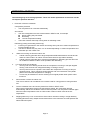
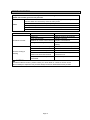
18000BTU HIGH WALL SPLIT
AIR CONDITIONER
(DC INVERTER / COOLING / HEATING)
Model PMINV18
Before using your air conditioner,
please read this manual carefully
and keep it for future reference.
Read This Manual
HFC
R410A
Inside you will find many helpful hints on how
to use and maintain your air conditioner. Just
a little preventative care on your part can
save you a great deal of time and money
over the life of your air conditioner. You'll find
answers to common problems in the
troubleshooting chart.
CONTENTS
Section
Page
Precautions – safety, installation, use
3
Specification
4
Production description
5
- Display panel
Operating temperatures
6
Operating instructions
6
- Manual operation
6
- Remote control operation
7
- Operating mode
8
- Airflow direction control
9
How the air conditioner works
10
Care and maintenance
11, 12
Operation tips
13, 14
Trouble shooting
15
Service and warranty
16
Page 2
SAFETY
PLEASE NOTE.
A technically competent person should install this air conditioning unit. If in doubt please seek
advice.
There are no user serviceable components. In the event of failure, please contact your supplier or
another qualified service engineer.
Do not allow any unqualified person to remove any panels or dismantle any part of the unit, as this is
a risk to personal safety.
Always be aware of electrical safety requirements when installing or working this and any equipment
using high voltages. Always disconnect from the power source when working and always ensure
that the unit is satisfactorily earthed.
INSTALLATION
•
•
•
•
•
This unit must be connected to the power supply via a 20amp fused spur.
Ensure that the indoor unit is level.
Ensure that the drain hose is correctly installed.
Do not install the unit in very damp areas or where the unit is subject to an excessive direct
heat source.
Ensure that the outdoor unit is level and protected from hazards.
USING THE AIR CONDITIONER
•
•
•
•
•
•
•
Avoid excessive cooling.
Do not place foreign objects into the air outlets.
Always switch the unit off if you suspect that it may not be operating correctly.
Do not wash the unit with excessive water. Only use a damp cloth or sponge and disconnect
from the power source before any cleaning is undertaken
Do not operate the controls with wet hands..
Disconnect the unit from the power supply if the unit is not used for a long period.
Follow the filter-cleaning regime detailed later in this manual
Page 3
SPECIFICATION
Product
Model (Indoor)
Model (Outdoor)
Cooling Capacity
Heating Capacity (Heat Pump)
EER
Refrigerant
Design Pressure
Net Weight (Indoor unit)
New Weight (Outdoor unit)
Rated Voltage
Rated Frequency
Rated Current
Rated Input Power
Max Current
Max Input Power
Outdoor Unit Resistance Class
Connector Type
Working environment
18000BTU High Wall Split – DC Inverter Air Conditioner
PMINV18INT
PMINV18EXT
18,000 BTU/H
18,000 BTU/H
Class A
R410A / 1700g
Hi 4.2Mpa / Low 1.5MPa
15.0 Kgs
52.8 Kgs
220-240V~
50Hz
Cooling 3.5~7.8A
Heating 3.1~9.8A
Cooling 1550W
Heating 1450W
15A
2700W
IP24
Easy fit quick connector
O
O
-15 C to 50 C
Page 4
PRODUCT DESCRIPTIONS
Indoor Unit
1.
2.
3.
4.
5.
6.
7.
8.
Front panel
Air inlet
Air filter
Air outlet
Horizontal airflow grille
Vertical airflow louvre
Display panel
Remote controller
Outdoor unit
9. Connecting pipe, drain hose
10. Air inlet (side and rear)
11. Air outlet
NOTE:
All the pictures in this manual are for
explanation purpose only
The above figure represents a simplified layout of the appliance.
Display panel
1.
2.
3.
4.
5.
AUTO indicator: This indicator illuminates when the air conditioner is in AUTO operation.
DEFROST Indicator (For cooling& heating model only): This indicator illuminates when the air
conditioner starts defrosting automatically or when the warm air control feature is activated in
heating operation.
DIGITAL DISPLAY: Displays the current setting temperature when the air conditioner is in
operation.
OPERATION indicator: The indicator flashes once every second after power is on and
illuminates when the air conditioner is in operation.
TIMER indicator: The indicator illuminates when TIMER is set ON/OFF.
Page 5
OPERATING TEMPERATURE RANGE
Mode
Cooling operation
Heating operation
Drying operation
Temperature
Room temperature
≥ 17OC
≤30OC
> 10OC
Outdoor temperature
18OC ~ 50OC
-15OC ~ 34OC
10OC ~ 50OC
CAUTION:
1. If air conditioner is used outside of the above conditions, certain safety protection features
may come into operation and cause the unit to function erratically.
2. Room relative humidity. If over 80% the surface of the air conditioner may attract
condensation. Please set the vertical airflow louvre to its maximum angle (vertically to the
floor), and set HIGH fan model.
3. Optimum performance will be achieved with the above operating temperatures.
OPERATING INSTRUCTIONS
Manual operation
This is used to start the appliance if the remote control is not working.
1. Open and lift the front panel up to an
angle until it remains fixed with a
clicking sound.
2. Push to select AUTO, COOL or OFF.
3. Push the control button to AUTO
position, the indicator is ON, the unit
will work in forced AUTO mode (the
O
default setting temperature is 24 C).
4. Close the panel firmly.
Panel
ATTENTION
Push the control button to COOL
position. The indicator light flashes
rapidly (five times per second), the
unit now is running in forced COOL
mode. This is used for testing
purposes only.
AUTO/COOL
Page 6
Remote control operation
1.
2.
3.
4.
5.
Important
Ensure there are no obstacles between the remote control and the receiver of the indoor unit
otherwise the air conditioner will not work.
Keep the Remote Control away from any liquid source.
Protect the remote control from high temperatures and exposure to direct sunshine.
Keep the indoor receiver away from direct sunlight or the Air Conditioner may malfunction.
Keep Remote Control away from EMI (Electro-Magnetic Interference) caused by other
household appliances.
Remote control specification
Rated Voltage
3.0VDC (2xAAA batteries
include)
2.0VDC
Lowest working
voltage
Transmission
11M (maximum)
distance
O
O
Working
-5 C to 50 C
temperature
Note:
1. Batteries contain materials, which are
hazardous to the environment; they must
be removed from the appliance at the end
of their life and disposed of safely.
2. Do not use rechargeable batteries.
3. Replace the used batteries with new
batteries of the same type when the display
is no longer visible.
4. If the remote control is not used for several
weeks, please remove the batteries, as
battery leakage may damage the remote
control.
5. The average battery life under normal use
is approximately 6 months.
Page 7
1. TEMP
O
button: Use to set the room temperature down to 17 C
O
2. TEMP
button: Use to set the room temperature up to 30 C
3. MODE button: Press to select operation mode.
4. SWING button: Press to change the louvre angle.
5. RESET button: Press the recessed RESET button to reset all settings in remote control.
6. AIR DIRECTION button: Press to turn the directional swing of horizontal louvre.
Press and hold for two +2 seconds to turn the Auto swing feature on.
Press it again to stop louvre swing operation.
NOTE: If the louvre position affects the cooling or heating function, the system will adjust the
swing angle automatically.
7.
8.
9.
10.
LED DISPLAY button: Press to turn the display on or off.
FAN SPEED button: Press to select AUTO, LOW, MED or HIGH fan speed setting.
ON/OFF button: Press to turn the air conditioner on or off.
TIMER ON button: When the appliance is off, this button is used to switch the air conditioner on
automatically. Press to set the desired time up to 24 hours. Simply set 0:00 to turn the timer off.
11. SLEEP button: Press to go into Energy-Saving mode. This function is only available in COOL,
HEAT and AUTO mode. The pre-set condition is maintaining the most comfortable room
temperature.
Note: Press any button to return to normal operation.
12. TIMER OFF button: When the appliance is on, this button is used to switch the air conditioner off
automatically. Press to set the desired time up to 24 hours. Simply set 0:00 to turn the timer off.
13. LOCK button: Press the recessed LOCK button, all current settings are locked. All remote
control buttons are disabled. To cancel the LOCK mode, press the LOCK button again.
14. TURBO button: Press to set turbo fan setting.
Operation modes
AUTO mode
1. Press the MODE button to select AUTO mode.
2. Press TEMP button to set the desired room temperature. .
NOTE
* In AUTO mode, the air conditioner will automatically choose the mode from COOL, FAN and
HEAT by sensing the difference between the actual ambient room temperature and the set
temperature.
* If you are uncomfortable in AUTO mode, change to other mode settings.
COOL/HEAT/FAN modes
1.
Press the MODE button to select the desired operation mode.
2.
Press TEMP button to set the desired room temperature under COOL/HEAT mode.
3.
Press FAN SPEED button to select the desired speed setting.
DRY mode
1.
Press the MODE button to select DRY mode.
2.
Press TEMP button to set the desired room temperature
NOTE
*
The air conditioner is operating on and off automatically in dry mode.
Page 8
Airflow direction control
Suitably adjust the airflow direction otherwise it
may cause uneven room temperature.
Adjustable the horizontal louvre using the remote
controller.
Adjustable the vertical louvre manually.
To set the vertical airflow (up – down) direction
When the air conditioner running. Pressing the AIR
DIRECTION button in remote control to adjust the
O
louvre to desired angle. There is 6 move in every
switch press.
To set the horizontal airflow direction (left – right)
Adjust the vertical louvre manually using the lever on
left or right side (depending on model) of the vertical
louvre arm
Auto swing the airflow direction (up – down) –
using this feature when the air conditioner is on
Hold the AIR DIRECTION button at least 2
seconds or press the SWING button on remote
control. The horizontal louvre will swing up and
down automatically.
Press SWING button again to stop.
CAUTION
The SWING and AIR DIRECTION button will
be disabled when the air conditioner is not
operating. As will the TIMER ON function..
Do not operate the air conditioner for long
periods with the airflow direction set downward
in cooling or dry mode. Otherwise,
condensation may occur in the surface of the
horizontal lovre.
Do not move the horizontal louvre manually.
Always use the SWING or AIR DIRECTION
button. If you move this louvre manually, it may
cause the unit malfunction or damage the
motor.
If the louvre should malfunction, stop and
re-start the air conditioner .
When the air conditioner is restarted
immediately after stopping the horizontal louvre
may not move for approximately 10 seconds
under system self regulation.
Open angle of horizontal louvre should be as
wide as possible as COOLING or HEATING
performance may be impaired due to too
restricted an airflow area.
DO NOT operate the unit with closed horizontal
louvre.
When the air conditioner is connected to power
(initial power connection), the horizontal louvre
may generate a sound for approximately 10
seconds, this is normal.
Page 9
HOW THE AIR CONDITIONER WORKS
AUTO operation
When you set the air conditioner to AUTO mode,
it will automatically select cooling, heating, or fan
only operation depending on room conditions.
The air conditioner will control room temperature
automatically to the temperature point set by the
user.
SLEEP operation
When you press the SLEEP button during cooling,
heating or AUTO operation, the air conditioner will
automatically increase (cooling) or decrease (heating)
O
by 1 C per hour.
The set temperature will be fixed 2 hours later and
the air conditioner will be turned off after 7 hours. The
fan speed will automatically be adjusted.
DRY operation
The dry mode will turn on the dehumidifying
operation automatically to balance the rooms
relative humidity and temperature.
The temperature is regulated while
dehumidifying by repeating turning on and off the
cooling mode or fan mode. The AUTO fan speed
indicator will turn on.
Optimal operation
To achieve optimal performance, please note the
following:
Adjust the airflow direction so that cooled air is
not directed directly onto occupants of the
room.
Adjust the temperature to achieve comfort level.
Do not adjust the unit to excessive temperature
level against ambient conditions.
Close doors and windows in COOL or HEAT
mode.
Use TIMER ON button to select the time you
wish to start your air conditioner.
Do not put any object near air inlet or air outlet,
as the efficiency of the air conditioner may be
reduced and the air conditioner may be stop
running.
Clean the dust filter periodically.
Do not operate unit with horizontal louvre
closed.
Page 10
CARE OF MAINTENANCE
Cleaning the grille, case and remote controller
Turn the system off before cleaning. To clean, wipe
with soft, dry cloth. DO NOT use bleach or abrasives.
NOTE: Supply power must be disconnected
before cleaning the indoor unit.
CAUTIONS
A cloth dampened with cold water may be used on
the indoor unit if it is very dirty. Then wipe it with a
dry cloth.
Do not use a chemical treated cloth or duster to
clean the unit.
Do not use benzene, thinner, polishing powder, or
similar solvents for cleaning. These may cause the
plastic surface to crack of deform.
O
Never use water hotter than 40 C to clean the front
panel, it could cause deformation or discoloration.
Cleaning the air filter
A clogged air filter reduces the cooling efficiency of the
unit. Please clean the filter once every 2 weeks.
1. Lift the indoor unit panel upward until it holds with a
clicking sound.
2. Take hold of the handle of the air filter and lift it up
slightly to take it out from the filter holder, then pull it
downwards.
3. Remove the Active Carbon & Dust Filter from the
indoor unit. Clean it with a vacuum cleaner or
water .The filter must be dry before returning to the
unit.
Page 11
4. Remove the Air Freshening Filter (Optional filter:
Plasma dust collector / Silver ion filter / Bio filter /
Vitamin C filter) from its support frame. See figures 1
and 2 on the left.
Clean the air freshening filter at least once a month
and replace it every 4-5 months.
Clean using a vacuum cleaner,
5. Install the filter back into position.
6. Insert the upper portion of the air filter back into the
unit taking care that the left and right edges line up
correctly and place filter into position.
Maintenance
If the unit is not going to be used for a long period, take
the following action:1. Operate the fan for about half a day to dry the inside
of the unit
2. Stop the air conditioner and disconnect power.
Remove the batteries from the remote controller.
3. The outdoor unit requires periodic maintenance and
cleaning. Contact a service engineer.
Check before operation
Check that the wiring is not broken or disconnected.
Check that the air filter is installed.
Check that the air outlet or inlet is not blocked.
CAUTIONS
When cleaning the unit, firstly ensure that power
and circuit breaker are turned off.
Do not touch the metal parts of the unit when
removing the filter. Avoid touching metal fins.
Do not use water to clean inside the air conditioner.
Exposure to water can damage the insulation,
leading to possible electric shock.
Page 12
OPERATIONAL FEATURES
The following may occur during operation. These are normal operational occurrences and do
not require specialist attention.
1. Protection of the air conditioner
Compressor protection
The compressor has 3 minutes restart delay
Anti-cold air
The unit is designed not to blow cold air whilst in HEAT mode, for example.
When heating has just started.
Defrosting
Low set temperature heating.
The indoor /outdoor fans stop running when in defrosting mode.
Defrosting (cooling and heating model only)
Frost may be generated on the outdoor unit during heat cycle when outdoor temperature is
low and humidity is high.
The time to defrost may vary from 4 to 10 minutes depending on outdoor temperature and
frost build up in the outdoor unit.
2.
White mist coming out from the indoor unit.
A white mist may generate due to large temperature differential between air inlet and air
outlet on COOL mode in an indoor environment that has a high relative humidity.
A white mist may generate due to moisture generated from defrosting process when the
air conditioner restarts in HEAT mode operation after defrosting.
3.
Low noise of the air conditioner
You may hear a low hissing sound when the compressor is running or has just stopped
running. This sound is from refrigerant flowing or coming to a stop.
You may also hear a low “squeak” sound when the compressor is running or has just
stopped running. This is caused by heat expansion and cold contraction of the plastic
parts in the unit as the temperature is changing.
A noise may be heard due to louvre reverting to its original position when power is first
turned on.
4.
Dust is blown out from the indoor unit.
This occurs when the air conditioner has not been used for a long period or during first time
use.
5.
The air conditioner turns to FAN only mode from COOL or HEAT mode.
When indoor temperature reaches the temperature setting, the compressor will stop
automatically, and the air conditioner turns to FAN only mode. The compressor will start again
when the indoor temperature rises on COOL mode or falls on HEAT mode to the set
temperature.
6.
Dripping water may occur on the surface of the indoor unit when cooling in a high relatively
humidity (RH above 80%). Adjust the horizontal louvre to the maximum air outlet position and
select HIGH fan speed.
Page 13
7.
Heating mode
The air conditioner draws in heat from the outdoor unit and releases it via the indoor unit
during heating operation. When the outdoor temperature falls, heat drawn in by the air
conditioner decreases accordingly. At the same time, heat loading of the air conditioner
increases due to a large difference between indoor and outdoor temperature. If a comfortable
temperature can’t be achieved by the air conditioner, you should use a supplementary heating
device for a short period..
9.
Auto-restart function
Power failure during operation will stop the unit completely.
For units without auto-restart feature, when the power restores, the OPERATION indicator will
flash in the indoor unit. To restart operation, push the ON/OFF button on the remote control.
10.
Lighting or a wireless telephone operating nearby may cause the unit to malfunction. Turn off
the main power then re-start.
Page 14
TROUBLESHOOTING
Stop the air conditioner immediately if one of the following faults occur. Disconnect the
power and contact your services provider.
OPERATION indicator or other indicators flash rapidly (5 times every second)
and this flash can’t be fixed by reset the main power.
Fuse blows or circuit breaker trips frequently.
Fault
Foreign bodies penetrate the air conditioner.
The remote control does not work or works abnormally.
Other abnormal situations occur.
Malfunctions
Unit does not start
Unit not cooling or
heating
Cause
Power cut
Fuse may be blown
Batteries in remote control are low
Wrong timer setting
Incorrect temperature setting
Air filter is blocked
Doors or windows are open
Air inlet or outlet of indoor or
outdoor unit has been blocked.
Compressor 3 minutes protection
is activated.
What should be done?
Wait for power to be restored.
Replace new fuse
Replace new batteries
Check and cancel the timer
setting
Set temperature correctly.
Clean the air filter
Close the doors or windows
Clear obstruction away then
restart the unit.
Wait for compressor restart.
CAUTIONS
If trouble unable to resolve, please contact your local dealer or customer service centre.
Do not attempt to repair the unit yourself. Always consult an authorized service provider.
Page 15
SERVICE AND WARRANTY
• For your convenience, record the complete model number and product (located on the Product
Identification Plate), the date you purchased the product, and attach your purchase receipt as
proof of purchase.
• To ensure your product is covered by warranty, the complete faulty product together with your
purchase receipt should be returned to your retailer.
ONE (1) YEAR LIMITED WARRANTY
Save This Warranty Information
EHS (International) Ltd. Guarantees this product free from defects in materials and
workmanship for a period of one (1) year.
Should this unit be operated under conditions other than those recommended, at voltages
other than the voltage indicated on the unit, or any attempts made to service or modify the
unit, will render this WARRANTY VOID. The product you buy may sometimes differ slightly
from illustration. This warranty is in addition to, and does not affect, your statutory rights
Should you have a problem with this product, please call our Help Desk on: (0870) 742 5021.
This product has been manufactured to comply with EEC Directives 73/23/EEC and 89/336/EEC
Waste electrical products should not be disposed of with household waste.
Please recycle where
facilities exist. Check with your Local Authority or retailer for recycling advice.
EHS, Manchester, M17 1RN
EHS 06/08
Page 16