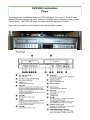
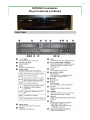
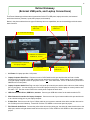
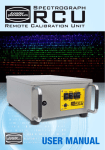
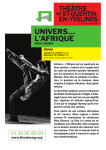
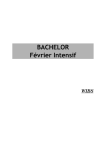
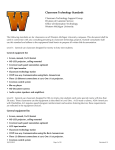
1
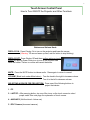
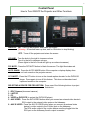
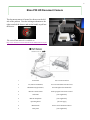
Media Services/Instructional Technology Support Services Waymon L. Hickman Building, Room 131 1665 Hampshire Pike Columbia, TN 38401 CLASSROOM TECHNOLOGY GUIDE Bob Trybalski, Coordinator [email protected] 931.540.2869 Bill Williams, Electronic Media Technician [email protected] 931.540.2888 Bo Bollinger, Coordinator/Theater & Event Services [email protected] 931.540.2885 2 TABLE OF CONTENTS Touch Screen Control Panel ·············································· 3 Control Panel ·································································· 5 Elmo P30HD Document Camera ········································· 6 Elmo HV-5100XG Document Camera ·································· 9 DVD/VHS Machines ························································ 11 Laptop Connections/Extron Cubby······································ 13 External USB Ports/Extron Cubby ······································ 13 Laptop Connections/Extron Hideaway ································· 14 External USB Ports/Extron Hideawary ································· 14 Troubleshooting Tips ······················································· 15 3 Touch Screen Control Panel How to Turn ON/OFF the Projector and Other Functions Buttons and Volume Knob DISPLAY ON: Press Display On to turn on the projector and lower the screen. (Warning: 90 second warm up time; wait for button to stop blinking) DISPLAY OFF: Press Display Off and then confirm action on touch screen by tapping Power Down icon to turn off the projector and raise the screen. Failure to confirm will cancel the action. MUTE: Press the MUTE button to silence audio. Press again to return to normal. VOLUME (Black knob under Mute button): Turn the knob to the right to increase volume. Turn it to the left to decrease volume. SELECTING A DEVICE FOR PROJECTION: Press one of the following buttons to project that device. 1 - PC 2 - LAPTOP: After pressing button, tap one of the icons on the touch screen to select proper cable. See next page for explanation of touch screen. 4 - AUXILARY (Not functional—future use) 5 - DOC Camera (document camera). 4 Touch Screen Control Panel Continued Touch Screen Functions Home Screen: The home screen displays the classroom location and Columbia State logo. Tapping the home screen has the same affect as pressing the Display On button. It will lower the screen and turn on the projector. Laptop Screen: After pressing the Laptop button, the touch screen will change to give two input cable options. Tap the icon of the cable connected to the laptop. Any mobile device that accepts an HDMI type cable may be plugged in to the projection system. Tap the appropriate icon to project on the screen. Adapters may be available in the classroom for Apple products. PIC MUTE: Tap the Pic Mute icon to temporarily dim the projector bulb and raise the screen (the projector does not turn off). Tap the icon again to return to normal. This icon appears on every screen of the device selected for projection. 5 Control Panel How to Turn ON/OFF the Projector and Other Functions DISPLAY: ON - Turns on the projector and lowers the screen (Warning: 90 second warm up time; wait for ON button to stop blinking) OFF - Turns off the projector and raises the screen VOLUME: Turn the knob to the right to increase volume. Turn it to the left to decrease volume. (Green lights to the left of knob will light up as volume increases.) PIC MUTE: Press the PIC MUTE button to blank the screen. The light illuminates red. AUTO IMAGE: Press the AUTO IMAGE button if the computer or laptop display does not look normal on the projector screen. CC ON/OFF: Press the CC button to turn on the closed caption decoder for the DVD/VHS player. Press again to turn off this feature. This does not decode closed captioned media on the computer. SELECTING A DEVICE FOR PROJECTION: Press one of the following buttons to project that device. 1 - DOC Camera (document camera) 2 - LAPTOP 3 - PC 4 - VIDEO or DVD/VCR (to project the DVD/VHS player) 5 - AUX VIDEO. Press the AUX VIDEO button when you connect an external video device’s RCA output to the external video ports on the hideaway. 6 - AUX S-VIDEO. Press the AUX S-VIDEO button when you connect an external video device’s s-video output to the S-Video port on the hideaway. The RCA audio output of the s-video device must be plugged into the RCA port on the hideaway if audio output is needed. 6 Elmo P30 HD Document Camera The document camera is located in a drawer on the left side of the podium. Turn the locking mechanism to the right to unlock the drawer and use the handle to pull out the drawer. The entire Elmo manual is available at: http://www.elmousa.com/sites/default/files/P30HD%28EN%29.pdf 1 Zoom Dial Use to zoom in and out 2 AF (Auto Focus Button) Use to activate/deactivate auto focus 3 Illumination (Light Source) Provides light to document table 4 Remote Control Sensor Picks up signal from remote control 5 Side Panel [Not Applicable] 6 Built in microphone [Not Applicable] 7 Operating Panel [See next page] 8 Main Switch Powers on/off document camera 9 Rear panel [Not Applicable] 7 Elmo P30 HD Document Camera 1 Zoom Dial Use to zoom in and out 2 AF (Auto Focus Button) Use to activate/deactivate auto focus 3 Illumination (Light Source) Provides light to document table 4 Remote Control Sensor Picks up signal from remote control 5 Side Panel [Not Applicable] 6 Built in microphone [Not Applicable] 7 Operating Panel [See next page] 8 Main Switch Powers on/off document camera 9 Rear panel [Not Applicable] Diagram on the Elmo illustrates how to unfold for operation. Reverse action to put in resting position. 8 Elmo P30 HD Document Camera Continued Note: Page numbers in legend refer to Elmo manual. 9 Elmo HV-5100XG Document Camera 10 Elmo HV-5100XG Document Camera Elmo Remote Control The Elmo remote control has all of the functions of the Front Operation Panel with added functions to make operation easier. 11 DVD/VHS Combination Player The College uses two different brands of DVD/VHS player; JVC and LG. Each of these players functions basically the same, and are no different than a consumer model you may have at home. The DVD/VHS player is located inside the equipment cabinet. Each unit has a remote control located in the teacher station drawer. 12 DVD/VHS Combination Player Continued (LG Model) 13 Extron Cubby (External USB ports, and Laptop Connections) The Extron Cubby provides external connections for the PC’s USB ports, laptop connection, and other mobile devices (I-Pads, I-pods, MP3 players, and etcetera). 2 & 3. Laptop Connections 5. USB Ports 1. A/C Power 4. HDMI Cable 6. Internet Connection 1. A/C Power for Laptop and other mobile devices provides110V power. 2. Laptop Computer Video Port. Connect the VGA Cable into a similar looking port on your laptop. Press DISPLAY ON to lower screen and power on projector. Select Laptop on the control panel and tap the icon of the cable on the touch screen to see the device’s video on projection screen. 3. Laptop Computer Audio Port. Plug the mini audio jack into headphone port on your laptop. You can also plug an I-Pod or MP3 player into this port. Select Laptop on the control panel and tap the VGA cabke icon on the touch screen to hear the audio. 4. HDMI Cable for Laptop Connection and other mobile devices. HDMI (High-Definition Multimedia Interface) is a digital replacement for existing analog audio/video standards. Many newer computer, audiovisual, and mobile devices use this type of interface to transmit audio and video data to displays such as projectors and televisions. Plug the HDMI cable into the device, select Laptop on the control panel, and tap the icon of the HDMI cable on the touch screen to project and/or hear the device. 5. USB Port for Flash Drives, USB Drive, etcetera. Connect your USB device here for the teacher station’s PC. 6. Wired Internet Connection for Laptop Computer. Connect the internet cable to the similar looking port on your laptop computer. 14 Extron Hideaway (External USB ports, and Laptop Connections) The Extron Hideaway provides external connections for the PC’s USB ports, laptop connection, and external audio/visual devices (cameras, I-pods, MP3 players, and etcetera). Notice in the pictures below that one type of hideaway has more capabilities, but each essentially provide the same basic functions. 2. Laptop Computer Video Port 3. Laptop Computer Audio Port 1. A/C Power for Laptop 4. USB Port for Flash Drives, USB Drives, etcetera. 5. Wired Internet Connection for Laptop Computer 6. S-Video Port 7. RCA Video & Audio Ports 1. A/C Power for Laptop provides 110V power. 2. Laptop Computer Video Port. Connect one end of VGA Cable into this port and the other end into a similar looking port on your laptop. Press ON to lower screen and power on projector. Select Laptop on the control panel to see the laptop computer’s video on projection screen. TIP: If the video looks “cut off” on the screen, press AUTO IMAGE on the control panel. 3. Laptop Computer Audio Port. Plug one end of mini audio jack into this port and the other end into a similar looking port on your laptop. You can also plug an I-Pod or MP3 player into this port. Select Laptop on control panel to hear the audio. TIP: Use the volume knob on the control panel to adjust the audio level. 4. USB Port for Flash Drives, USB Drive, etcetera. Connect your USB device here for the teacher station’s PC. 5. Wired Internet Connection for Laptop Computer. Connect one end of your internet cable to this port and the other to a similar looking port on your laptop computer. 6. S-Video Port. Connect one end of your S-Video cable to your camera or external video device and the other end to the S-Video port on the hideaway. Press AUX S-Video or S-VIDEO on the control panel to project. 7. RCA Video & Audio Ports. Connect the yellow video wire to the yellow port, the white left channel audio wire to the white port, and the red right channel audio wire to the red port. Press VIDEO or AUX VIDEO on the control panel to project. 15 Having difficulties with equipment in the classroom? The following troubleshooting guide may help to solve the problem. Further assistance, including a personal tutorial session, may be arranged by contacting Bob Trybalski, Coordinator, Instructional Technology Support Services at (931) 540-2869 or [email protected]. Cabinet doors locked? The keys should be next to the computer keyboard or in the drawer. None of the equipment is working! Is the master power switch, located inside the cabinet, on? Are all the components inside the cabinet turned on? Projector Problems Have you turned on the projector using the control panel or touch screen? It is a black box mounted on the countertop. Look for the "ON" or “DISPLAY ON” button . Have you selected the correct input source? Press the button on the control panel that corresponds with the device you are using. Screen Problems The screen will automatically lower when you press the "ON" or “DISPLAY ON” button on the countertop control panel. Try pressing the “ON” or “DISPLAY ON” button again after the projector is on and the button stops blinking. Computer Problems Have you turned the computer power on? Have you turned on the power to the monitor? Have you "logged on" to the network? Is the computer not projecting? Check to see if the projector is turned on and the correct input source (PC) is selected on the control panel. Volume problem? Use the control panel’s volume knob to adjust the sound. Double-click the speaker icon on the computer's taskbar to adjust the output volume and un-check the mute box. Document Camera/Visual Presenter (Elmo) Is the power turned on? On some models, the power switch is located in the rear of the document camera near the power cord. Is the document camera not projecting? Check to see if the projector is turned on and the correct input source (DOC CAM) is selected on the control panel. Is the document dark? Check to see if the upper lamps are turned on. Also, you may need to adjust the iris. Is the document bright? Try turning off the upper lamps and/or adjusting the iris. Is the transparency dark? Check to see if the base lamp is turned on and try adjusting the iris. If your document camera does not have a base lamp, check to see if the upper lamps are on and/or try adjusting the iris. Is the transparency bright? Try turning off the base lamp or the upper lamp and adjusting the iris. Is the document or transparency out of focus? Try pressing auto-focus or manually adjusting the focus. Is the remote control's batteries dead? Contact Media Services for new batteries. 16 TROUBLESHOOTING CONTINUED VHS Machine Is the power turned on? Is there a tape in the machine? The machine will not play the tape. Have you tried another tape? Did you press VHS on the remote control or front of the machine? Is the VHS machine not projecting? Check to see if the projector is turned on and the correct input source (VIDEO or DVD/VCR) is selected on the control panel. Is the remote control's batteries dead? Contact Instructional Technology Support Services for new batteries. Volume problem? Use the control panel’s volume knob to adjust the sound. DVD Player Is the power turned on? Is there a DVD or CD in the machine? The machine will not play the disc. Have you tried another disc? Did you press DVD on the remote control or front of the machine? Is the DVD machine not projecting? Check to see if the projector is turned on and the correct input source (VIDEO or DVD/VCR) is selected on the control panel. Is the remote control's batteries dead? Contact Instructional Technology Support Services for new batteries. Volume problem? Use the control panel’s volume knob to adjust the sound.