1
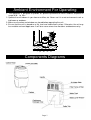
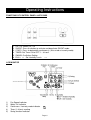
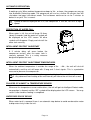
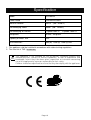
USERS MANUAL
Read This Manual
Model No.
ECO20LDK
Inside you will find many helpful hints on how
to use and maintain your dehumidifier properly.
Just a little preventative care on your part can
save you a great deal of time and money over
the life of your dehumidifier. You'll find many
answers to common problems in the chart of
troubleshooting tips. Review the chart of
Troubleshooting Tips before calling your
service engineer.
This dehumidifier may have been selected for quality test,
therefore some condensation may remain.
CONGRATULATIONS on your purchase of the SMART & FRESH
ECO20LDK Carbon Filter Dehumidifier
You have purchased a high quality dehumidifier capable of extracting humidity of 20 litres per
day at 80%RH 30 . This unique unrivalled dehumidifier is packed full of features that you will
find beneficial.
℃
1)
2)
3)
4)
Intelligent Controls to save energy and prolong the life of your unit
Carbon Filter to give you fresh air
Silent Mode to give you a powerful and yet a quiet unit
LCD display panel
Intelligent Control
1) Intelligent Energy™
Your dehumidifier is programmed with Intelligent Energy™ to help you save energy by
automatically lowering its fan speed when your desired or the set humidity is reached
within the Auto and Manual modes. The illumination of your LED display will automatically
shut off and comes back on.
2) Intelligent Protect™
Your dehumidifier is designed with Intelligent Protect™ to help protect your compressor
hence prolongs the life your unit. Intelligent Protect is a unique pre-programmed variable
time delay for starting and stopping the compressor in your dehumidifier. The time delay
varies between 1 minute to 10 minutes depending on the settings, ambient conditions and
functions selected.
Carbon Filter
Carbon filter provides air filtration system to remove airborne particles, contaminants and
impurities. This will provide protection against dust mite, pet allergen, pollen and mould spores.
Recommended for asthma sufferers.
Silent Mode
Activate the Silent Mode for peace and quiet.
LCD Display Panel
A large LCD Display (7.5cm x 3.75cm) that provides a number of indicators and readings:1)
2)
3)
4)
5)
6)
Fan Speed indicator
Water Full indicator
Continuous / Laundry mode indicator
Timer (1-8 hour) reading
Swing function indicator
Auto Defrost indicator
Page 2
7) Silent mode on indicator
8) Humidity reading - displays AMBIENT humidity when
is on and displays SET humidity
when symbol
is off. (To display SET humidity level, press
button once. Reading
will revert to AMBIENT humidity level after 3 seconds).
9) Dry mode on indicator
10) Ambient room temperature ( )
△▽
℃
Page 3
Index
Safety Precautions……………………………………………..5
BS Plug Wiring………………………………………………….6
Ambient Environment For Operating…………………………7
Components Diagrams ……..…………………………………7
Operating Instructions
Functions of Control Panel & Key Pads……………………………..8
LCD Monitor……………………………………………….…….8
Operation of Key Pads- Auto, Manual & Continuous…………….10-12
Timer…………………………………..………………….…..12
Swing……………………………………………..…….……..12
Automatic Defrosting…………………………………………….13
Protection Of Water Full
Intelligent Protect On Restart………………………...…………...13
Intelligent Protect On Extreme Temperatures……………………....13
Failures Of Humidity & Temperature Sensor………………….…….13
Water Drip Proof Device……………………………….…………13
Continuous Drainage…………………………………………....
………………………….……………..13
14
Maintenance & Cleaning……………………………………....14
Specification…………………………………………………….15
Service And Warranty……………………………………….…16
Responsible Disposal & Recycling …………………….….…17
Page 4
!
1
Safety Precautions
Do not install and use the unit before carefully reading this instruction guide. Please
retain this manual for product warranty and future reference.
)Do not place your dehumidifier close to other high 2)Never place unit in or allow contact with water or
temperature appliance to avoid fire or damage.
3
rain or in a bathroom.
)Always ensure unit is upright, do not use when unit 4)Always ensure the inlet and outlet ventilation is not
blocked at all times.
is not upright or at a slanted angle. Disconnect
unit if unit topples over. Leave unit upright for at
least 2 hours before switching on.
)
5 Ensure there is 30 cm of clear space on all sides of
the unit.
7
9
)Never pull the socket with damp hands.
)
6 Do not spray water on the unit, spraying water may
cause malfunctioning and electric shock.
8
)Do not pull the cable when removing the plug from
the mains.
)If the supply cord is damaged, it must be replaced
by the manufacturer, its service agent or similarly
qualified persons in order to avoid a hazard.
Page 5
BS Plug Wiring
Wiring Instructions: Should it be necessary to change the plug please note the wires in the mains
lead are coloured in accordance with the following code:
BLUE - NEUTRAL
BROWN - LIVE
GREEN AND YELLOW – EARTH
As the colours of the wires in the mains lead of this appliance may not correspond with the
coloured markings identifying the terminals in your plug, proceed as follows:
1. The BLUE wire is the NEUTRAL and must be connected to the terminal which is marked
with the letter N or coloured BLACK..
2. The BROWN wire is the LIVE and must be connected to the terminal which is marked
with the letter L or coloured RED.
3. The GREEN/YELLOW is the EARTH and must be connected to the terminal which is
marked with the letter E or
or coloured GREEN OR GREEN/YELLOW.
4. Always ensure that the cord grip is positioned and fastened correctly.
If a 13A (BS 1363) fused plug is used it must be fitted with a 13A fuse. If in doubt consult a
qualified electrician.
Wiring for a 13 Amp Plug (BS1363)
Please note. The Earth Terminal is marked with the letter E or
Page 6
Earth Symbol.
Ambient Environment For Operating
1. The appliance is designed to provide an optimum performance within ambient temperature
range of 5 to 35
2. Operate the unit indoors in your house or office, etc. Never use it in a wet environment such as
bathroom or outdoors.
3. Make sure the door and window are closed before operating the unit.
4. Ensure that the unit is placed on a flat, level and stable floor surface. Otherwise, the unit may
be unstable and can topple over. It will also cause excessive vibrations and become noisy.
℃
℃
Components Diagrams
Page 7
Operating Instructions
FUNCTIONS OF CONTROL PANEL & KEY PADS
1.
2.
3.
4.
5.
6.
On / Off: Power On / Off
SILENT: Press the button to activate and deactivate SILENT mode
CONTI.: Press to dehumidify continuously. (Also used as laundry mode)
TIMER: Set Timer ON of OFF 1 – 8 hours
SWING: Oscillation Setting.
RH%
Set Humidity Level
or
△▽:
△ ▽
LCD MONITOR
1)
2)
3)
4)
5)
Fan Speed indicator
Water Full indicator
Continuous / Laundry mode indicator
Timer (1-8 hour) reading
Swing function indicator
Page 8
6)
7)
8)
Auto Defrost indicator
Silent mode on indicator
Humidity reading - displays AMBIENT humidity when
is on and displays SET humidity
when symbol
is off. (To display SET humidity level, press
button once. Reading
will revert to AMBIENT humidity level after a few seconds).
9) Dry Key to indicate Auto and Manual mode on indicator
10) Ambient room temperature (degrees )
△▽
℃
Page 9
OPERATION OF KEYS PADS
Plug into power socket:
The unit will beep 3 times, air louvre goes into closed position.
MODES
1) AUTO
2) MANUAL
3) CONTINUOUS
1) AUTO MODE
Switching on AUTO mode
Press ON button to switch on AUTO mode.
•
•
•
•
•
The unit will beep once to indicate power on
The DRY key will appear on the LCD display
The louver opens to a wide position
Your dehumidifier will be set at a default humidity level of 60% RH. (pressing the
or
once will display the set humidity level for a few seconds and then revert back to the
ambient humidity level)
The fan will be at high fan speed.
△
▽
SILENT Activation
Press SILENT button to activate the SILENT function within the DRY mode.
•
•
Your dehumidifier will be set at the default humidity level of 60% RH.
The fan will be on low fan speed.
Page 10
2) MANUAL MODE
Switching on MANUAL mode
Press
△▽ button to select desired humidity level.
Your humidity level can be selected in frequencies of 5%, ranging from 40% to 80%.
•
•
•
△ ▽
Your dehumidifier will be set at your selected humidity level. (pressing the
or
once
will display the set humidity level for a few seconds and then revert back to the ambient
humidity level)
The DRY key will remain on the LCD display
The fan will be at high fan speed.
SILENT Activation.
To activate the SILENT function within the MANUAL mode:
1) Press “SILENT” button once. The
key will appear on the LCD display.
2) Then press
to select your desired humidity level.
△▽
•
•
△ ▽
Your dehumidifier will be set at your selected humidity level. (pressing the
or
once
will display the set humidity level for a few seconds and then revert back to the ambient
humidity level)
The fan will be on low fan speed.
TIP
If you set your humidity level at below the ambient humidity level, your dehumidifier will extract water.
If you set your humidity level at above the ambient humidity level, your dehumidifier will not extract water.
Eg.
Ambient humidity = 55%
Your air is still too damp, then you need to select a lower humidity level, say, 40%
Press
△▽ button until 40% is displayed on your LCD panel.
Page 11
3) CONTINUOUS MODE
Switching on CONTINUOUS mode
Press CONT button.
•
•
will appear on the LCD display.
Your dehumidifier will run continuosly.
The fan will be at high fan speed.
Pressing the
△▽ symbol or
symbol will reset the dehumidifier to the AUTO mode.
TIMER:
You can set your dehumidifier ON or OFF Timer between 1 – 8 hours (in hourly frequencies).
1) To Set Timer ON
•
•
•
Switch dehumidifier OFF
Press TIMER to select number of hours (1 – 8 hours)
The unit will switch ON to AUTO mode after the number of hours you have selected
has elapsed.
2) To Set Timer OFF
•
•
Press TIMER whilst dehumidifier is running to select number of hours (1-8 hours)
The unit will switch OFF after the number of hours you have selected has elapsed.
Note – the timer function can only be set to turn the unit ON or OFF but not ON and OFF
simultaneously.
SWING:
Press to oscillate air louvre from 45 to 90 degree automatically.
stationary angle within 45 to 90 degree range.
Page 12
Press again to fix a
AUTOMATIC DEFROSTING:
℃
A working cycle: When ambient temperature drops to 16 or lower, the compressor may go
into Automatic Defrosting mode. The compressor will run for a further 25 minutes then will
shut down and goes into defrost mode. The fan blower continues to run for 7 minutes to
defrost in a cycle. This is normal.
!
Symbol of defrost displayed on LCD, the compressor is shut off, fan runs at high
speed.
PROTECTION OF WATER FULL
When water is full, the unit will beep 10 times
(about 5 seconds) and the water full symbol will
be displayed on the LCD screen. All other
symbols will disappear. Empty and reinstall the
water tank securely.
INTELLIGENT PROTECT ON RESTART
A 3 minute delay will occur before the
compressor restarts after the water tank is
securely replaced. This is a safety measure
designed to protect the unit.
由此方向取出水箱
INTELLIGENT PROTECT ON EXTREME TEMPERATURES
℃
℃
When the ambient temperature is outside the range of 0 - 40 , the unit will shut off
automatically and the unit will beep with 3 long and 2 short signals. This is a protection
measure to preserve the compressor.
!
1. All function keys are out of functions, you should plug off to restart the unit.
2. Any abnormal over heating of the unit internally will cause the unit shut off as well.
FAILURES OF HUMIDITY & TEMPERATURE SENSOR
Whenever the temperature sensor malfunctions, the unit will go into Intelligent Protect mode,
no operation is allowed, and the “EO” symbol will be displayed on the LCD screen. You may
restart it after trouble shooting is completed.
WATER DRIP PROOF DEVICE
When water tank is removed, there is an automatic stop device to avoid condensation water
to drip excessively inside the unit.
Page 13
CONTINUOUS DRAINAGE
Remove water plug and connect with PVC hose to the spigot
!
1. PVC hose must be placed on the ground flatly.
2. Do not tangle the hose.
3. Do not immerse the end of water outlet into other receptacle to avoid water flow
blockage.
Maintenance & Cleaning
Before any maintenance or cleaning, switch off and unplug the unit.
Do not place the unit in direct sunlight.
Remove the water tank with care.
If not using the unit for a long period, switch off and unplug the unit, empty the water tank,
and pack it after 2 days, then, keep it in dry and in a ventilated place.
Only use a soft clean cloth for all cleaning purpose. Do not use gasoline, paint thinner or
other chemicals to clean the unit.
Cleaning mesh filter: Remove the air filter (back of the unit) in the direction as shown below.
Use a vacuum cleaner or water to clean, then air dry and replace. Filter must be cleaned at
least once a week and replaced at least once every six months. You can add a Carbon Filter
Mesh to enhance the air quality which must be replaced every 3 months To order filters,
please ring 020 8459 2458 quoting : ECO20LDK Carbon Filter Mesh or Air Filter.
过 进网
滤 框
网
Air
Filter
Page 14
Air
Intake
Frame
Specification
Model
ECO20LDK
Power Rated
220-240VAC/50Hz
Moisture removal
20 L/D (30
Dehumidifying Power
360W
Dehumidifying Air Volume
L speed:130m3/h
Refrigerant
R134a / 160 grams
Capacity of Water Tank
4.5L
Unit Dimension:
366 (W) × 330 (D) × 590 (H) mm
℃ RH80%)
(30℃ RH80%)
H speed: 165m3/h
CAUTION
1. The appliance shall be installed in accordance with national wiring regulations.
2. The fuse link is TUE (AC250V,10A)
!
This appliance is not intended for use by person (including children) with
reduced physical, sensory or mental capabilities, or lack of experience and
knowledge, unless they have been given supervision or instruction concerning
use of the appliance by a person responsible for their safety.
Children should be supervised to ensure that they do not play with the appliance.
Page 15
Service And Warranty
TWO (2) YEAR LIMITED WARRANTY
Save This Warranty Information
EcoAir guarantees this product free from defects in materials and workmanship of
the unit (filters are excluded) for a period of two (2) years from the date of purchase.
This unit must be operated under conditions as recommended, at voltage indicated
on the unit. Any attempts made to service or modify the unit, will render this
WARRANTY VOID. The actual product may differ slightly from illustration. This
warranty is in addition to, and does not affect, your statutory rights.
For further information, please contact 020 8459 2458.
This product has been manufactured to comply with the EC Directives 2006/95/EC
and 2004/108/EC.
Page 16
Responsible Disposal & Recycling
When your appliance reaches the end of its life, please dispose responsibly.
DO NOT: You must not dispose this appliance as unsorted waste or with your domestic household waste. Please
observe local regulations for disposal.
•
Most local authorities have specific collection systems for appliances where disposals are free of charge to
the end user.
•
When replacing an existing appliance with a new appliance, your retailer may take back the old appliance
for disposal.
Page 17