1
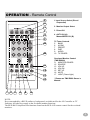
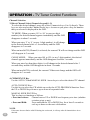
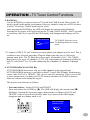
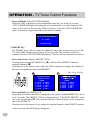
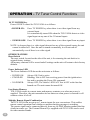
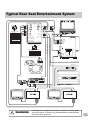
®
TCS-V430A
Multi-Zone AV Controller / TV Tuner
OWNER’S MANUAL
!
WARNING
It is dangerous and illegal for the driver to watch the TV/Video while
driving the vehicle. The driver may be distracted from looking ahead
and an accident could occur.
Caution
• Read this manual thoroughly before starting installation and operation. You will find a number of Safety Warnings
in this manual to tell you about things that could hurt you or other people if you were to ignore the Warnings. We
cannot be responsible for problems resulting from failure to observe the Warnings in this manual.
• This manual uses a symbol to show how to use this product safely and to avoid harm to yourself and others and
damage to your property. Here is what this symbol means. Understanding it is important for reading the Manual.
• Meaning of Symbol:
!
WARNING
This symbol means there is something that could cause serious injury or
death to you or other people.
DO NOT DISASSEMBLE OR ALTER
Attempts to disassemble or alter this product can lead to accidental fires or electrical shock.
KEEP SMALL ARTICLES OUT OF THE REACH OF CHILDREN
Keep small articles (wire-ties, etc.) out of reach of children. If swallowed, consult a physician immediately.
USE ONLY IN CARS WITH A 12 VOLT NEGATIVE GROUND
Use only in cars with a 12 volt negative (–) ground electrical system. (Check with your dealer if you are not sure.)
Failure to do so may result in fire, etc.
BEFORE WIRING, DISCONNECT THE CABLE FROM THE NEGATIVE BATTERY TERMINAL
Before doing any electrical wiring, disconnect the cable from the negative (–) terminal of the battery. Failure to do so
may result in electric shock or injury due to electrical shorts.
KEEP ELECTRICAL CABLES TOGETHER TO AVOID OPERATING HAZARDS
Dress the wiring to keep them from interfering with the operation of the steering wheel, gear lever, brake pedals, etc.
DO NOT CUT AWAY INSULATION FROM ANY WIRE TO POWER OTHER EQUIPMENT
Tapping power from wiring to supply voltage to another piece of equipment could exceed the current carrying
capacity of that wire. This could result in fire or electric shock.
DO NOT INSTALL IN LOCATIONS WHICH MIGHT HINDER VEHICLE OPERATION
Do not install in locations which might create hazards for the vehicle occupants or hinder vehicle operation (such as
the steering wheel or gear shift) by obstructing forward vision or hampering movement etc.
DO NOT DAMAGE PIPES OR WIRING WHEN DRILLING HOLES
When drilling holes in the chassis for installation, take precautions so as not to contact, damage or obstruct pipes,
tanks or electrical wiring. Failure to take such precautions may result in fire.
DO NOT USE NUTS OR BOLTS IN THE BRAKE SYSTEM FOR INSTALLATION OR GROUND
CONNECTIONS
Never use safety-related parts such as bolts or nuts in the steering or brake systems or tanks to make wiring
installations or ground connections. Using such parts could disable control of the vehicle and cause fire etc.
HALT USE IMMEDIATELY IF A PROBLEM APPEARS
When problems appear, stop using the system immediately and contact the dealer from whom you purchased the
equipment. Some problems which may warrant immediate attention include a lack of sound, noxious odors or smoke
being emitted from the unit, or foreign objects dropped inside the unit.
DO NOT OPERATE THE EQUIPMENT OR LOOK AT THE SCREEN WHILE DRIVING
Do not change settings while driving. If operation requiring a prolonged view of the display is required, stop the
vehicle in a safe location before attempting operation.
DO NOT INSTALL THE MONITOR NEAR THE PASSENGER SEAT AIR BAG
Ensure that the location chosen for the monitor does not interfere with the operation of the passenger seat air bag.
This will prevent the triggered air bag from launching the display towards passengers, possible causing injury.
HAVE THE WIRING AND INSTALLATION DONE BY EXPERTS
The wiring and installation of this unit requires special technical skill and experience. To ensure safety, always
contact the dealer where you purchased this unit to have the work done.
DO NOT INSTALL IN LOCATIONS WITH HIGH MOISTURE OR DUST
Avoid installing the unit in locations with high incidence of moisture or dust. Moisture or dust that penetrates into this
unit may cause smoke or fire.
MAKE THE CORRECT CONNECTIONS
Failure to make the correct connections can cause fire or accident to occur.
ARRANGE THE WIRING SO IT IS NOT CRIMPED OR PINCHED
Route the cables and wiring so as not to be crimped by moving parts like seat rails or to make contact with sharp
spots which could damage the wiring.
DO NOT RAISE THE VOLUME EXCESSIVELY
Keep the volume at a level where you can still hear outside noises while driving. Driving while unable to hear outside
sounds could cause an accident.
!
PRECAUTIONS
This symbol means important instructions. Failure to heed them can
result in injury or material property damage.
Temperature
Be sure the temperature inside the vehicle is between +60°C (+140°F) and –10°C (+14°F) before turning your unit on.
Fuse Replacement
When replacing the fuse(s), the replacement must be of the same amperage as shown on the fuse holder. If the
fuse(s) blows more than once, carefully check all electrical connections for shorted circuitry. Also have your vehicle’s
voltage regulator checked.
Maintenance
If you have problems, do not attempt to repair the unit yourself. Return it to your Alpine dealer or the nearest Alpine
Service Station for servicing.
Installation Location
Make sure the TCS-V430A will not be exposed to:
• Direct sun and heat
• High humidity
• Excessive dust
• Excessive vibrations
FEATURES/DESCRIPTION
The Alpine TCS-V430A is a sophisticated Multi-zone, AV Controller with a built-in TV tuner
(designed for U.S. broadcasts only). It realizes an across-the-board entertainment system for the
mobile environment by creating individual AV spaces for each occupant. With the ability to select
up to 4 AV sources (including the the built-in TV Tuner) and 3 outputs, 3 separate monitors can be
controlled independently. The TV tuner is a high performance, 4-channel diversity, stereo (MTS)
receiver, capable of receiving both standard broadcasts as well as cable (181 channels total). In
addition, a special interface allows easy expansion using Alpine’s overhead monitors.
!
WARNING
It is dangerous and illegal for the driver to watch TV/Video while driving any
vehicle. The driver may be distracted from looking ahead and an accident
could occur.
Features:
AV Control
•
•
•
•
•
•
•
•
•
1 Internal AV Input (4-channel diversity, TV Tuner (U.S. NTSC only)
3 External AV Inputs: DVD, VCR, AUX (Audio L/R, Composite Video)
3 Individually controllable outputs (dedicated Overhead Monitor, MON2, MON3)
Audio gain adjustment for each AV input (including internal TV tuner)
Infrared, wireless remote control
On Sscreen display (OSD) for each monitor output
Last status memory
Multiple IR Remote IN (for connection to Alpine products having remote out)
IR Remote OUT (for connection with Alpine products with remote in)
TV Tuner
•
•
•
•
•
181 Channels (TV: 2 - 69; Cable: 1 - 125)
Cable Ready
Multi-sound: Stereo —> SAP —> Mono
Auto Program (2 modes for both TV and Cable, 4 total)
Channel Preset (TV = 10, Cable = 10)
AV Expansion using Alpine’s Overhead Monitors
The TCS-V430A is easily expanded when either of Alpine’s Overhead Monitor units (TMXR680A/R705) are connected. Each of the Overhead Monitors has 2 additional AV inputs. When
connected to the TCS-V430A with the KCE-508V extension DIN, the second AV input will be
available. To simplify this switching further, even when the source is selected from the overhead
monitor, the AV Controller will be switched automatically and source information will be displayed
in the OSD.
4
OPERATION - Remote Control
2
1 Input Source Select (Direct/
Sequential)
10
2 Monitor Output Select
11
1
12
3 Direct CH
4 AUTO CH (A)
Manual/SEEK CH (B)
3
1
4A
4B
16
15
13
14
7 17
5
6
9
TV Tuner Controls
5
BAND
6
A.PGM
7
PRESET
8
DISP
9
AUDIO
10 TV POWER
Overhead Monitor Control
(TMX-R680A)
11 MONITOR POWER
12 SOURCE
13 VOL UP
14 VOL DN
15 SET UP
16 MUTE
17 LIGHT (Dome Light)
* Please see TMX-R680 Owner’s
Manual
8
NOTE:
Keys surrounded by a BLUE outline or background, are dedicated for the AV Controller or TV
functions. All other keys apply to the Overhead monitor functions.
The RUE-R4151 duplicates the functions found on the RUE-4150 remote control for the overhead
monitors.
5
OPERATION - AV Control Functions
1. Source Selection
To select any of the four sources directly, press one of the remote control keys listed below:
• TV (Built-in TV Tuner)
• DVD (External DVD input)
• VCR (External VCR input)
• AUX (External AUX input)
2. Monitor Selection
Up to a maximum of 3 monitors can be connected to the TCS-V430A. Monitor 1ST is
dedicated to Alpine’s Overhead Monitors through a proprietary mini-DIN connector.
This connector carries both video and stereo audio channels. However, a separate DINto-RCA adapter is included to interface with any type of NTSC monitor. Monitors 2ND
and 3RD are standard NTSC compatible outputs along with RCA-type, Left and Right
audio outputs.
Pressing any of the monitor keys once, will activate the functions for that monitor.
Repeated pressing will cycle through all of the sources for that monitor, without having
to use the SOURCE keys.
Changing Sources
There are several ways to change the source displayed on each of the monitors. Press any of the
MONITOR keys. The output to which the monitor is connected and the current source being
displayed will be shown in its OSD (On Screen Display) for about 8 seconds.
• Direct AV Source Selection
While the OSD is active, pressing any of the SOURCE keys will change the source for
the currently selected monitor. If no further keys are pressed for at least 8 seconds, the
OSD will automatically turn off and the last selection will remain active.
For example:
1) Press Monitor 2ND [A] (assume it is currently displaying the TV video)
2) The Monitor connected to the the 2ND output will display “MONITOR 2: TV”
3) Before its OSD turns off, Press any of the SOURCE keys [B] (DVD, VCR,
AUX) to change from TV to the desired source (DVD for this example).
A
B
6
A
1234567890123456789012345678901
1234567890123456789012345678901
1234567890123456789012345678901
1234567890123456789012345678901
1234567890123456789012345678901
1234567890123456789012345678901
1234567890123456789012345678901
1234567890123456789012345678901
1234567890123456789012345678901
1234567890123456789012345678901
1234567890123456789012345678901
1234567890123456789012345678901
1234567890123456789012345678901
1234567890123456789012345678901
1234567890123456789012345678901
1234567890123456789012345678901
1234567890123456789012345678901
1234567890123456789012345678901
MONITOR2: TV
1234567890123456789012345678901
1234567890123456789012345678901
1234567890123456789012345678901
1234567890123456789012345678901
B
1234567890123456789012345678901
1234567890123456789012345678901
1234567890123456789012345678901
1234567890123456789012345678901
1234567890123456789012345678901
1234567890123456789012345678901
1234567890123456789012345678901
1234567890123456789012345678901
1234567890123456789012345678901
1234567890123456789012345678901
1234567890123456789012345678901
1234567890123456789012345678901
1234567890123456789012345678901
1234567890123456789012345678901
1234567890123456789012345678901
1234567890123456789012345678901
1234567890123456789012345678901
1234567890123456789012345678901
MONITOR2: DVD
1234567890123456789012345678901
1234567890123456789012345678901
1234567890123456789012345678901
1234567890123456789012345678901
OPERATION - AV Control Functions
• Cyclic AV Source Selection
While the OSD is active, pressing the same Monitor key again will change its source.
Repeated pressing of this key will cycle through the sources as follows:
TV —> DVD —> VCR —> AUX —> TV
If no key is pressed for at least 8 seconds, the OSD will automatically turn off and the
last selection will remain active.
For example:
1) Press Monitor 2ND [A] (assume it is currently displaying the TV video)
2) The Monitor connected to the the 2ND output will display “MONITOR 2: TV”
3) Before its OSD turns off, Press the 2ND key again [B] to change the source to
DVD. Each successive press will change the source to VCR [C], then AUX [D]
and finally back to TV [A].
A
A ... B ... C ... D
12345678901234567890123456789012
B
12345678901234567890123456789012
12345678901234567890123456789012
12345678901234567890123456789012
12345678901234567890123456789012
12345678901234567890123456789012
12345678901234567890123456789012
12345678901234567890123456789012
12345678901234567890123456789012
12345678901234567890123456789012
12345678901234567890123456789012
12345678901234567890123456789012
12345678901234567890123456789012
12345678901234567890123456789012
12345678901234567890123456789012
12345678901234567890123456789012
12345678901234567890123456789012
12345678901234567890123456789012
MONITOR2: TV
12345678901234567890123456789012
12345678901234567890123456789012
12345678901234567890123456789012
12345678901234567890123456789012
12345678901234567890123456789012
12345678901234567890123456789012
12345678901234567890123456789012
12345678901234567890123456789012
12345678901234567890123456789012
12345678901234567890123456789012
12345678901234567890123456789012
12345678901234567890123456789012
12345678901234567890123456789012
12345678901234567890123456789012
12345678901234567890123456789012
12345678901234567890123456789012
12345678901234567890123456789012
12345678901234567890123456789012
12345678901234567890123456789012
12345678901234567890123456789012
12345678901234567890123456789012
12345678901234567890123456789012
MONITOR2: DVD
12345678901234567890123456789012
12345678901234567890123456789012
12345678901234567890123456789012
12345678901234567890123456789012
12345678901234567890123456789012
12345678901234567890123456789012
12345678901234567890123456789012
12345678901234567890123456789012
12345678901234567890123456789012
12345678901234567890123456789012
12345678901234567890123456789012
12345678901234567890123456789012
12345678901234567890123456789012
12345678901234567890123456789012
12345678901234567890123456789012
12345678901234567890123456789012
12345678901234567890123456789012
12345678901234567890123456789012
12345678901234567890123456789012
12345678901234567890123456789012
12345678901234567890123456789012
MONITOR2: AUX
12345678901234567890123456789012
12345678901234567890123456789012
12345678901234567890123456789012
12345678901234567890123456789012
12345678901234567890123456789012
12345678901234567890123456789012
12345678901234567890123456789012
12345678901234567890123456789012
12345678901234567890123456789012
12345678901234567890123456789012
12345678901234567890123456789012
12345678901234567890123456789012
12345678901234567890123456789012
12345678901234567890123456789012
12345678901234567890123456789012
12345678901234567890123456789012
12345678901234567890123456789012
12345678901234567890123456789012
12345678901234567890123456789012
12345678901234567890123456789012
12345678901234567890123456789012
12345678901234567890123456789012
MONITOR2: VCR
12345678901234567890123456789012
12345678901234567890123456789012
12345678901234567890123456789012
12345678901234567890123456789012
12345678901234567890123456789012
D
C
• Multi Selection Mode
In the MULTI SELECTION mode, sources for each of the monitors can be changed
from a single monitor. To display the MULTI SELECTION menu, press and hold the
Monitor key of the monitor currently being viewed. A list of each monitor and its
currently selected source is shown in the OSD.
The line describing the monitor being viewed will blink. Both Cyclic and Direct
Source selection is possible for the selected monitor.
To change monitors, press one of the other Monitor keys. Its line in the menu will
begin to blink to indicate selection has been completed. If no key is pressed within
about 8 seconds, the Menu screen will disappear and any changes will be set.
7
OPERATION - AV Control Functions
For example:
1) While viewing 2ND monitor, Press and Hold Monitor 2ND key [A] (assume it is
currently displaying the TV video)
2) The Monitor connected to the 2ND output will display:
3) Before the OSD turns off, Press the 2ND key again to [B] change the source for
MONITOR2 to DVD. Each successive press will change the source to VCR,
then AUX and finally back to TV. Or, pressing any of the Direct Source selection
keys will also change source.
A ... B
MONITOR1 : DVD
MONITOR2 : TV
MONITOR3 : AUX
This line will be
blinking
PRESS MONITOR KEY THEN
PRESS AV SOURCE KEY
B
MONITOR1 : DVD
MONITOR2 : DVD
MONITOR3 : AUX
This line will be
blinking
PRESS MONITOR KEY THEN
PRESS AV SOURCE KEY
4) Press any of the other Monitor keys to change the AV output. If the 3RD
Monitor Output is pressed [A], the MONITOR3 line in the menu will blink.
Change the source for this monitor as previously described. Either Direct Source
or Cyclic selection is available for each Menu item.
A
MONITOR1 : DVD
MONITOR2 : TV
MONITOR3 : AUX
This line will be
blinking
PRESS MONITOR KEY THEN
PRESS AV SOURCE KEY
NOTE:
8
When using non-Alpine AV products, it is possible to select an output that is not connected or ON.
When this happens, the monitor currently being viewed will be unable to perform any functions until
the OSD is turned off on the other monitor. Pressing the SOURCE key will turn off the Menu
immediately (before the 8 second delay).
OPERATION - AV Control Functions
Audio Gain Adjust
The audio level for each AV input (4 total) can be adjusted individually. This will compensate for
the inherent differences in output level for the various sources connected to the controller.
Entering “Input Level Setting” screen
Press and hold the “TV” Power button [A].
The “Input Level Setting” screen will be displayed on all connected monitors (as shown below).
INPUT LEVEL SETTING
–
O
A
TV
DVD
VCR
AUX
+
O
O
O
O
NOTE: This OSD will remain active indefinitely, until the user manually turns it off.
• AV Source Selection
Initially, the TV source blinks in the OSD. This indicates the active source. Any
adjustment applies to the active source only. To select another
source, use the AUTO CH buttons [A] to move up or down in the
menu. In addition, pressing any of the AV SOURCE buttons will
activate its corresponding source directly.
For example (assume TV is blinking):
1) Press the AUTO CH UP button and AUX starts blinking
2) Press the DVD button and DVD in the Menu starts blinking
A
B
• Level Adjust
Once the Source has been selected, use the MANUAL SEEK buttons [B] to
adjust its Level up or down.
As the level is adjusted, the bar centered at zero (default) will extend to either the
positive or negative direction. At the same time, the numerical indicator (initially 0)
will either increase (maximum = 7) or decrease (minimum = –7).
Listen to each output and match levels according to your personal preferences.
NOTE:
Any button, besides the ones used in the adjustment process, can be pressed to leave the Level
Adjustment screen.
9
OPERATION - TV Tuner Control Functions
Channel Selection
3. Direct Channel Select (Numeric keypad 0 - 9)
To select the desired channel, press any of the 10 numeric keys (0 to 9) directly. These
keys are also used as the Channel Preset keys. As soon as you press a key, the number
that you selected is displayed in the OSD.
TV MODE: When you enter ‘02’ to ‘69’ (or any two digit
number), the desired channel appears immediately and the OSD
disappears in about 3 seconds.
__
CH 24
When you enter ‘2’ to ‘9’ (or any 1 digit number), it will change
to the desired channel after a 3 second delay and the OSD
disappears in 3 seconds.
When an invalid CH (Channel) is selected, the current CH will not change and the OSD
will disappear in 3 seconds.
CABLE MODE: When you enter 001 to 125 (or any 3 digit number), the desired
channel appears immediately and the OSD disappears in about 3 seconds.
When you enter less than three digits, it will change to the desired channel after 3
seconds delay and the OSD disappears in about 3 seconds.
When an invalid CH is selected, the current CH does not change and the OSD will
disappear in 3 seconds.
4. CH DOWN/UP Key
Use the AUTO CH and MANUAL SEEK Arrow keys to select the desired TV channel.
AUTO CH DN/UP Keys
Use this key to select any CH which was set by the AUTO PROGRAM function. Press
the UP or DOWN keys to move up or down in sequential order.
MANUAL SEEK DN/UP Key
This key has two functions as follows.
• Press and release:
Channel moves UP or DOWN one frequency at a time (whether
a station exists or not).
• Press and Hold:
Press and hold the UP or DOWN key for at least 2 seconds to
seek up or down to the next valid station.
NOTE:
10
If the tuner does not find a valid CH during the seek mode, it will stop after all channels have been
checked.
OPERATION - TV Tuner Control Functions
5. BAND Key
Use the BAND Key to choose between TV mode and CABLE mode. Most of time TV
mode is used for the mobile environment. However, should a camp site or RV Park have
a cable TV hook-up, CABLE mode may be used.*
After pressing the BAND key, the OSD will display the current status (blinking).
Pressing the key again, will toggle between the TV and CABLE BAND. After 8 seconds
or when any other key is pressed, the OSD display will disappear and changes will be
set.
TV / CABLE SELECTION
TV
CABLE
TV/CABLE Selection screen
TV Blinking indicates current
mode.
* To connect CABLE TV, an F-connector-to-mini-phono jack adapter must be used. This is
available at any electrical parts shop. Plug the adapter into any one of 4 Diversity
antenna input jacks. The TV Band can receive up to 68 channels (2-69). The CABLE
Band can receive up to 125 channels (1-125). The total number of channels available for
both TV and Cable TV is 181 (after subtracting the redundant 12, channels 2 through
13).
6. AUTO PROGRAM (A.PGM) Key
AUTO PROGRAM memorizes only receivable channels in the current band.
AUTO PROGRAM memory is available on both TV and CABLE Bands. Each memory
can be either LOCAL or TRAVEL. This gives a total of 4 memories. This is very useful
to store stations near your home in LOCAL memory and then use TRAVEL memory
when on vacation in an unfamiliar region.
This key has two functions as follows:
• Press and release: Switch LOCAL and TRAVEL
Press and release the A.PGM key [A]. The OSD will display the current status [B]
(blinking). Pressing the key again toggles between the two Modes (LOCAL and
TRAVEL). After 8 seconds or when any other key is pressed, the OSD display
disappears and any change made is set.
A
AUTO PROGRAM
(PRESS&HOLD->SET)
LOCAL
TRAVEL
B
11
OPERATION - TV Tuner Control Functions
• Press and Hold: Start AUTO PROGRAM
While the OSD is displayed, press and hold the same key for at least 2 seconds,
AUTO PROGRAM begins searching the selected band for receivable channels. The
status of the search is shown in the OSD (see below). Once the AUTO PROGRAM
starts, it cannot be stopped until the entire band is scanned.
AUTO PROGRAM SCANNING
TV
LOCAL
SEARCH CH XX
7. PRESET Key
The PRESET key is able to assign any channel to any of the numeric keys 0 to 9. The
TV and CABLE Bands can have up to 10 presets each. This memory is entirely
separate from the AUTO PROGRAM memory. This key has two functions as follows.
• Press and release: Display PRESET CH list
Pressing and releasing the PRESET key [A] will list all the PRESETs and their
assigned channels [B].
Pressing one of the numeric keys while the OSD is displayed, changes the channel to
the one corresponding to the stored PRESET.
A
C
B
This line is blinking.
CHANNEL PRESET
CHANNEL PRESET
(PRESS&HOLD->SET)
(PRESS&HOLD->SET)
CABLE
0 : CH 07 5 : CH32
1 : CH 13 6 : CH35
2 : CH 24 7 : CH41
3 : CH 29 8 : CH--4 : CH 31 9 : CH---
CABLE
0 : CH 07 5 : CH32
1 : CH 13 6 : CH35
2 : CH 24 7 : CH41
3 : CH 29 8 : CH--4 : CH 31 9 : CH---
• Press and Hold: Set PRESET CH
Regardless of whether the OSD is displayed or not, press and hold PRESET key for at
least 2 seconds. The PRESET CH List is displayed and “CHANNEL PRESET” at the
top of the screen blinks [C]. This indicates that the current channel can be assigned to
one of the PRESETS.
Pressing one of the numeric keys assigns the current channel to that PRESET number.
After 8 seconds, the OSD display disappears.
12
OPERATION - TV Tuner Control Functions
8. AUDIO Key
Use the AUDIO Key to change the audio setting for TV and CABLE..
Press AUDIO key [A] to display the current Audio status (blinking). Pressing the key
again will cycle through the three settings (STEREO —> SAP —> MONO). After 8
seconds or when any other key is pressed, the OSD disappears and any change made is
set.
AUDIO SELECTION
STEREO
SAP
MONO
B
A
9. DISPLAY Key
The DISPLAY Key [A] displays the current TV and AV Controller status for TCSV430A.
After 8 seconds or when any other key is pressed, the OSD disappears.
This key has two functions as follows:
• Press and release [A]: Display current TV status [B]
OSD gives the CH Audio status, TCS-V430A AUDIO mode, BAND, A.PGM and
Channel for TV.
A
B
TV Audio
CH 24
SAP
STEREO
AUDIO
Mode
CH
TV
LOCAL
BAND
A.PGM
MEMORY
• Press and Hold [A]: Display current AV Controller status
OSD will display the monitor number and currently assigned AV input source on all
monitors.
Monitor 1
1234567890123456789012345
1234567890123456789012345
1234567890123456789012345
1234567890123456789012345
1234567890123456789012345
1234567890123456789012345
1234567890123456789012345
1234567890123456789012345
1234567890123456789012345
1234567890123456789012345
1234567890123456789012345
1234567890123456789012345
1234567890123456789012345
1234567890123456789012345
MONITOR1: TV
1234567890123456789012345
1234567890123456789012345
1234567890123456789012345
Monitor 2
1234567890123456789012345
1234567890123456789012345
1234567890123456789012345
1234567890123456789012345
1234567890123456789012345
1234567890123456789012345
1234567890123456789012345
1234567890123456789012345
1234567890123456789012345
1234567890123456789012345
1234567890123456789012345
1234567890123456789012345
1234567890123456789012345
1234567890123456789012345
MONITOR2: DVD
1234567890123456789012345
1234567890123456789012345
1234567890123456789012345
Monitor 3
1234567890123456789012345
1234567890123456789012345
1234567890123456789012345
1234567890123456789012345
1234567890123456789012345
1234567890123456789012345
1234567890123456789012345
1234567890123456789012345
1234567890123456789012345
1234567890123456789012345
1234567890123456789012345
1234567890123456789012345
1234567890123456789012345
1234567890123456789012345
MONITOR3: AUX
1234567890123456789012345
1234567890123456789012345
1234567890123456789012345
13
OPERATION - TV Tuner Control Functions
10. TV POWER Key
Power ON/OFF control for TCS-V430A is as follows:
• POWER ON:
Press TV POWER key when there is no video signal from any
external input.
It is automatically turned ON when the TCS-V430A detects a video
signal input on any one of the 3 External inputs.
• POWER OFF: Press TV POWER key when there is no video signal from any input.
NOTE: As long as there is a video signal detected on any of the external inputs, the unit
cannot be turned off. Once the unit is turned on manually, it will not turn off
automatically even if there is no video signal.
OTHER FEATURES
Reset Switch
The reset switch, located on the side of the unit, is for returning the unit back to its
original factory settings.
All memory contents will be erased and all settings on the unit will return to their factory
defaults.
Power Indicator LED
The Power Indicator LED shows the unit status as follows:
• POWER ON:
• STAND-BY:
• NO POWER:
Always ON; Unit is active.
Blinking; Unit is OFF but receiving power from the iginition/acc
line and is awaiting the Power ON command.
Always OFF; The vehicle’s IGN/ACC line is OFF or the fuse has
burned out. The unit cannot be turned ON.
Last Status Memory
TCS-V430A retains its current status and memory contents even when no power is
supplied. Therefore, the unit remembers its last status so when power is restored it will
continue where it left off.
Multiple Remote Signal Combination
The TCS-V430A can accept up to 3 remote inputs for user convenience. This enables
remote control operation from whichever monitor that the passenger is watching.
The remote signal can be connected directly from any ALPINE Monitor product that has
a built-in remote eye. The External Remote Eye supplied with TCS-V430A can be used
for other monitor brands.
14
OPERATION - TV Tuner Control Functions
REMOTE 1 (DIN)
TMXR680A
√
TMXR705
√
TMEM750A
√*
EXT. EYE
√
√
√
√
REMOTE 2 IN
REMOTE 3 IN
AV H/U**
√*
√
√
Notes :
* The remote signal output on any monitor can also be connected to the mini-DIN terminal as
Monitor 1, using the DIN to RCA Interface Adapter that comes with TCS-V430A.
** Such as Alpine models CVA-1003, CVA-1005, IVA-C800, etc.
CAUTION
TV picture quality in the mobile environment is affected by the movement of the vehicle
and other reception conditions not found in the home. TV reception is also affected by the
antenna used, type of car, installation, location and more.
This product utilizes a 4-Channel diversity antenna system designed especially for in car
use. Some performance increase may be realized by upgrading the antenna from any other
third-party supplier.
Under the following conditions, the image quality may be impaired.
•
•
•
•
•
Between buildings or other large structures, mountains, valley or canyon
Near high-voltage wires or neon signs
A passing automobile, motor bike, train, or plane
Near the transmission antenna of a radio station or an amateur wireless station, or
when a wireless device is being used in the vehicle
Large distance from the broadcast station
15
WIRING/CONNECTIONS
Mini-DIN to RCA Interface
IR Remote In (White/Brown)
The Remote In wire connects to any
ALPINE Mobile Video product which
has an external remote output
function.
AV RCA Connector (Video, Audio R,
Audio L)
These RCA-type connectors connect
to any AV source.
Video Out (Yellow)
Right Channel Audio (Red)
Left Channel Audio (White)
16
WIRING/CONNECTIONS
Remote OUT
(WHITE/BROWN)
Ignition Switch/ACC
(RED)
Fuse Holder
Ground/Chassis
(BLACK)
Cable Color
Ignition/ACC ............................................................................................................... Red
Ground/Chassis ....................................................................................................... Black
Remote Output ............................................................................................. White/Brown
Remote Output
The Remote Output wire connects to any ALPINE Mobile Video product which has an
external remote input function. For example, products such as a DVD and VCR .
Ground (GND)
Connect this lead to a good chassis ground on the vehicle. Make sure the connection is
made to bare metal and is securely fastened using a sheet metal screw.
Ignition/ACC
This is a switched +12V for the main unit. It will be powered when the Ignition key
position is ACC.
17
SPECIFICATIONS
Main Unit
Product Type ..................................................... Video Switcher and Mobile TV system
Television system ................................................................................................. NTSC
Channel coverage ............................ TV: CH 2 - CH 13 (VHF), CH 14 – CH 69(UHF)
................................................................................................ CABLE: CH 1 – CH 125
Power Requirement ............................................... 14.4 VDC (11 –15 VDC allowable)
Current Drain ....................................................700mA in operation, 30mA in stand-by
Video Input ................................................................................ 1.0V p-p 75ohm / RCA
Audio Input ................................................................................ 1.0V rms. (max) / RCA
Video Output............................................................... 1.0V p-p 75ohm / RCA and DIN
Audio Output ........................................................................ 1.0V rms. / RCA and DIN
(Input gain level continuously adjustable)
Operating Temperature ....................................... : +32 °F to +122 °F (0 °C to + 50 °C)
Current Draw ....................................................................................... 50 mA (Standby)
.................................................................................................................. 600 mA (ON)
Dimensions (D x W x H) .........................................................Main Unit (chassis only)
184 x 145 x 35 mm (7.24 x 5.71 x 1.38 in.)
....................................................... Main Unit (including RCA’s and mounting flange)
202 x 158 x 35 mm (7.95 x 6.22 x 1.38 in.)
Weight ....................................................................................................... 720 g/1.59 lb.
Wireless remote control
Power Source .......................................................................... DC 3V AAA battery x 2
Remote control range.......................................... about 2m (6.5 feet) within 30 degrees
Dimensions (D x W x H) ............................. 147 x 63 x 16 mm (5.72 x 2.48 x 0.63 in.)
Weight ....................................................................................................... 73.7 g/2.6 oz.
96.4 g/3.4 oz. (with batteries)
Accessories
RUE-4151 Remote Control ............................................................................................. x 1
Mini-DIN to RCA interface ............................................................................................. x 1
Power Supply Connector ................................................................................................. x 1
External Remote Eye ....................................................................................................... x 1
External Remote Connectors ........................................................................................... x 2
4 CH Diversity Antennae ............................................................................................ x 2 pr.
Batteries (AAA) .............................................................................................................. x 2.
NOTES:
Due to continuous product improvements, specifications and design are subject to change without notice.
The LCD panel is manufactured using an extremely high precision manufacturing technology. Its effective pixel ratio is
over 99.99%. This means that 0.01% of the pixels could be either always ON or always OFF.
18
Typical Rear Seat Entertainment System
MONITOR 2
RESET
DVD
3
VCR
9
MONITOR 3
VIDEO
1
5
R
AUDIO
4
8
L
L
AUDIO
R
6
AUX IN
7
2
VIDEO
MONITOR 1
VIDEO
Male DIN Cable
1
RCA Video (+)
2
RCA Video (-)
3
RCA Right (+)
L
AUDIO
REMOTE 2
R
REMOTE 3
White/Brown - IR Remote Output 1
DIVERSITY ANTENNA
4
RCA Left (+)
5
RCA Audio Ground (-)
1
6
IR Code
2
Shell Ground
7
3
AUX 1
A/V Switch (-)
Ignition / Accessory
9
FM A NTENN A
AUX2
8
POWER SUPPLY
R
4
AU DI O
AUX I NPUT
L (MONO)
/////ALPINEMULTI-ZONE AV CONTROLLER / TV TUNER
TCS-V430A
VID EO
4
Front View Power Connector
2
Red - Accessory
3
Brown/White - IR Remote
Black - Ground
4
AU DI O
AUX OUTPUT
L (MONO)
CONN ECTI ON S
VID EO
CONN ECTOR
CONN ECTOR
1 6 1 5 1 4 1 3 1 2 11 1 0 9
8
DI SPLA Y OUTPUT
7
6 5
4
Co nn e ct o r Co l o r
Pi n NO .
1 Red
3
4 Gr a y
( Gr i s)
5 Gr a y / Bl a c k ( Gr i s/ No i r )
6 W h it e
( Bl an c )
7 W h i t e / Bl a c k( Bl an c / No i r )
8 Bl a c k
(N o i r )
9 Bl u e
( Bl e u )
A i- NET
1 0 Bl u e / W h i t e ( Bl e u / Bl an c )
11 Y e ll o w / Bl u e( Ja u n e / Bl e u )
1 2 Vi o l e t
( Vi o l e t )
1 3 Vi o l e t / Bl a c k( Vi o l e t / No i r )
1 4 Gr ee n
( Ve rt )
1 5 Gr ee n / Bl a c k( Ve rt / No i r )
1 6 Y e ll o w
( Ja u n e )
FRON T
REA R
3
2
1
Co nn e ct i o n
( Roug e )
2 Pi n k/ Bl a c k ( Ro se / No i r )
L
Empty
R
R
1
NA VI GA TI ON I NPUT
White/Brown - IR Remote Output 2
3
White/Brown - IR Remote Output 1
2
White/Brown - IR Remote Input
1
Sw i tch ed Po w e r
(Ig n it io n ) L e ad
A u d i o I n t e rr u p t
in Le ad
4
3
2
1
Co nn e ct o r Co l o r
Pi n NO .
Co nn e ct i o n
1 W h i t e / Br o w( nBl an c / Br u n )
2 W h i t e / Br o w( nBl an c / Br u n )
3
4 Y e ll o w / Bl a c( kJa u n e / No i r )
REMO TE OUT
Re m o t e Ou t AUX 1
Re m o t e Ou t AUX2
Foo t Br a k e
Fr o n t SP ( R) +
Fr o n t SP ( R) —
Fr o n t SP (L) +
Fr o n t SP (L) —
Gr ou n d L e a d
Po w e r A n t e nna
Le a d
Re m o t e Tu r n - On
Le a d
Pa r k i n g - Br a k e
Re a r SP ( R) +
Re a r SP ( R) —
Re a r SP (L) +
Re a r SP (L) —
Ba tt e r y L e a d
POW ER SUPPLY
• Fo r de t a i l ed e x p l ana t i o n s, r e f e r t o th e GUID E FOR
I NSTA LL A TI ON A ND CONN ECTI ON S.
• Fu r na h a r e Er k a r u n g e n , si e h e i n de r A NL EI TUNG
FUR EI NBAU UND A NSCHLUSSE.
• Pou r e x p l i c a t i o n de s de t a i l s, se r e p o rt e r a u GUID E
POUR I NSTA LL A TI ON ET CONN EXI ON S.
• Pe r l a sp i e g a zi o n e de i de tt a g l i , c o n su l t a r e l a GUI DA PER L I NSTA LL A ZI ON E E I COLL EGA M ENTI
AU DI O
• Se I NSTA LL A TI ON S OCH A NSLUTNI NGSA NVI SI NI NGA RNA f o r na r m a r e an v i sn i n g a r .
SUB W .
40W X4 A M PLI FI ER
(Optional IVA-C800)
Red - Accessory (+12v)
Black - Ground
SP
(Optional Video Game Console)
§
VIDEO
(Optional DVA-5205)
(Optional CHA-S624)
WIDE COLOR LCD MONITOR TME-M750
WIDE COLOR LCD MONITOR TME-M750
TV TUNER INPUT
NAVIGATION INPUT
DISPLAY OUTPUT
POWER SUPPLY
TV TUNER INPUT
MOBILE COLOR MONITOR TME-M750
NAVIGATION INPUT
DISPLAY OUTPUT
MOBILE COLOR MONITOR TME-M750
AUX 2
AUX 2
PHONE OUTPUT
PHONE OUTPUT
VIDEO
DN
POWER
UP
SELECT
L
AUDIO
R
VIDEO
L
AUDIO
R
VIDEO
POWER
VOLUME
(Optional TME-M750)
!
WARNING
POWER SUPPLY
DN
UP
L
AUDIO
R
VIDEO
L
AUDIO
R
SELECT
VOLUME
(Optional TME-M750)
It is dangerous and illegal for the driver to watch the TV/Video while
driving the vehicle. The driver may be distracted from looking ahead
and an accident could occur.
19
R
ALPINE ELECTRONICS, INC.
Tokyo office; 1-1-8 Nishi Gotanda,
Shinagawa-ku, Tokyo 141-8501, Japan
Tel.: (03) 3494-1101
ALPINE ELECTRONICS OF AMERICA, INC.
19145 Gramercy Place, Torrance,
California 90501, U.S.A.
Tel.: 1-800-ALPINE1 (1-800-257-4631)
1-888-NAV-HELP (1-888-628-4357)
ALPINE ELECTRONICS OF CANADA, INC.
Suite 203, 7300 Warden Ave. Markham, Ontario
L3R 9Z6, Canada
Tel.: 1-800-ALPINE1 (1-800-257-4631)
ALPINE ELECTRONICS OF AUSTRALIA PTY. LTD.
6-8 Fiveways Boulevarde Keysborough Victoria 3173,
Australia
Tel.: (03) 9769-0000
ALPINE ELECTRONICS GmbH
Kreuzerkamp 7-11 40878 Ratingen, Germany
Tel.: 02102-45 50
ALPINE ITALIA S.p.A.
Via C.Colombo 8, 20090 Trezzano
Sul Naviglio MI, Itary
Tel.: 02-48 47 81
ALPINE ELECTRONICS FRANCE S.A.R.L.
98, Rue De La Belle Etoile, Z.I. Paris Nord II B.P.50016
F-95945, Roissy, Charles De Gaulle Cedex, France
Tel.: 01-48 63 89 89
ALPINE ELECTRONICS OF U.K., LTD.
13 Tanners Drive, Blakelands,
Milton keynes MK14 5BU, U.K.
Tel.: 01908-61 15 56
ALPINE ELECTRONICS DE ESPANÃ, S.A.
Portal De Gamarra 36, Pabollón 32
01013 Vitoria(Alava)-Apdo. 133, Spain
Tel.: 34-45-283588
Printed in Taiwan R.O.C
21