1
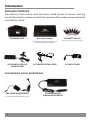
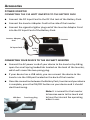
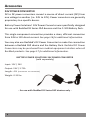
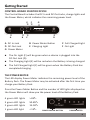
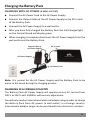
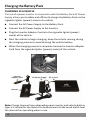
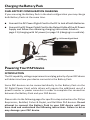
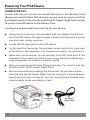
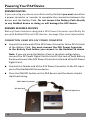
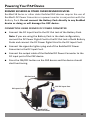
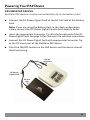
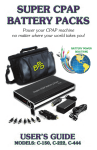
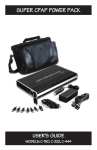
C-100 USER’S GUIDE The freedom to power your PAP device no matter where your world takes you! Your PAP device doesn’t have to keep you from enjoying the great outdoors... perfect for tent campers & use in RVs. Table of Contents INTRODUCTION Product Specifications Package Contents Intended Use Compatibility Warranty 1 2 3 3 3 IMPORTANT NOTES Run Times ResMed Device Warning Humidifier Usage Power Backup Usage 4 4 5 5 ACCESSORIES Power Inverter 24V Power Converter 6-7 8 GETTING STARTED Control Board Identification The Power Meter Turning the Battery Pack On/Off Initial Battery Usage Using the Battery Pack Inside the Carrying Case 9 9 10 10 10 CHARGING THE BATTERY PACK Charging with AC Power Charging in a Foreign Country Charing in a Vehicle Dual Battery Configuration Charging 11 11 12 13 Table of Contents POWERING YOUR PAP DEVICE Introduction Connector Tips Respironics Devices ResMed Devices S9 Series Devices S8 Series & Older Devices Fisher & Paykel Devices DeVilbiss Devices 13 14 15 16 16 17 18 19 POWERING OTHER DEVICES 20 BATTERY PACK CARE INSTRUCTIONS Understanding Lithium-Ion Batteries Battery Pack Storage 21 21 SAFETY WARNINGS 22 DISPOSAL OF LITHIUM-ION BATTERIES 22 Introduction PRODUCT SPECIFICATIONS DIMENSIONS Size: 7.5” x 4.25” x 0.75” (L x W x H) Weight: 1.6 lbs ELECTRICAL Cell Type: Rechargeable lithium-ion Battery Capacity: 100 Wh Output Voltage Range: 9 - 12.6 V Output Current Range: 0 - 4.5 A (8A maximum) Power Gauge: Four stage LED display RECHARGE TIME 4-5 hours (per Battery Pack when fully discharged) BATTERY LIFE SPAN Under normal conditions the life span of the Battery Pack is generally around 400-500 charge/discharge cycles. The amount of charge the Battery Pack will hold will gradually decrease due to usage and aging. This gradual decrease in charge capacity is true for all rechargeable lithium-ion batteries. Factors that can influence battery life span include: how it is used how often it is used how well it is taken care of how it is stored See page 21 for Battery Pack Care Instructions. 1 Introduction PACKAGE CONTENTS Your Battery Pack comes with the items listed below. If you are missing any of these items, please contact the company from whom you purchased your Battery Pack. CARRYING CASE AC POWER SUPPLY & POWER CORD BATTERY PACK(S) CONNECTOR TIPS Battery Pack is sold in a single or dual battery configuration package. Seven (7) unique connector tips. DC POWER PIGTAIL CORD DC INPUT CORD ACCESSORIES (SOLD SEPARATELY) 24V POWER CONVERTER For use with ResMed S9 devices only. 2 150W MODIFIED SINE WAVE INVERTER Introduction INTENDED USE Battery Packs are intended to provide external power to PAP (positive airway pressure) devices; however, when used in conjunction with a power inverter, they may also be used to power other small electronic devices such as smartphones, iPods, laptops and iPads. See page 20 for additional information regarding powering other devices. Please note that use of the Battery Pack with a device that requires higher wattage requirements may cause the Battery Pack’s internal circuitry to shut off to protect from overrun. COMPATIBILITY Battery Packs are compatible with most makes and models of PAP devices; however, some devices will require the additional use of a power converter or power inverter in conjunction with the Battery Pack. See pages 15-19 for information regarding your specific PAP device. The DC Power Pigtail Cord or Connector Tips included with the Battery Pack may not be compatible with your PAP device as some manufacturers require the use of a specific DC cable with built-in fuses or special connection types. When in doubt, please contact the manufacturer of your device. Below is the contact information for the most common PAP device manufacturers: Respironics 1-800-345-6443 www.respironics.com ResMed 1-800-424-0737 www.resmed.com Fisher & Paykel 1-800-707-5454 www.fphcare.com DeVilbiss 1-800-338-1988 www.devilbisshealthcare.com WARRANTY Battery Pack, components and accessories are under warranty for manufacturing and quality defects for six (6) months. 3 Important Notes RUN TIMES Multiple factors will affect Battery Pack actual run times including, but not limited to, device type, whether a power inverter or power converter is used, pressure setting, and altitude. The use of heated humidification or heated tubing will significantly reduce expected run times. Average run times are based on Respironics System One and ResMed S-9 Series PAP devices with no heated humidification or heated tubing. SINGLE BATTERY CONFIGURATION Respironics & other 12V devices: 1-3 nights *ResMed & other 24V devices: 1-2 nights DUAL BATTERY CONFIGURATION Respironics & other 12V devices: 3-5 nights *ResMed & other 24V devices: 2-3 nights *Use of a power converter or power inverter required. RESMED DEVICE WARNING If you are using any device manufactured by ResMed you must use either a power converter or power inverter to complete the connection between the device and the Battery Pack. A power converter or power inverter must be used because ResMed devices operate from a 24V direct current and the plugs may run opposite polarity from other manufacturer devices. Do not connect the Battery Pack directly to any ResMed model device as doing so will damage the device. See pages 16-17 for additional instructions regarding ResMed devices. 4 Important Notes HUMIDIFIER USAGE The use of heated humidification or heated tubing will significantly reduce the expected run time of the Battery Pack due to the amount of power required for the humidifier heating plate. To obtain optimal Battery Pack performance we recommend you forgo the use of heated humidification. Using cool or “passover” humidification will not reduce expected run times. Please note that some manufacturers do not recommend the use of humidification when an external battery is used to power their device or they may recommend the use of a modified or pure sine wave power inverter in conjunction with the battery. Please check the manual for your specific PAP device for disclaimers regarding humidification usage. POWER BACKUP USAGE Standard smart chargers keep the Battery Pack topped off and ready to go as an emergency power backup during power outages. If you know that a power outage is eminent or probable, you may connect your device to the Battery Pack and plug the Battery Pack into a wall outlet. In the event you lose power the Battery Pack will automatically begin powering your device. Do not consistently use the Battery Pack as a power backup option as this will reduce its overall life. Only use the Battery Pack in this manner when you know that a power outage is eminent. 5 Accessories POWER INVERTER Sine wave power inverters are used to change direct current (DC) to alternating current (AC). Power inverters are universal and can be used with any device. Using a modified or pure sine wave power inverter in conjunction with the Battery Pack allows you to: Power Devices Without DC Capability To power a PAP device or other small electronic device that does not have DC capability, you must use a power inverter to complete the connection between the device and the Battery Pack. Charge the Battery Pack in a Vehicle The use of a power inverter in conjunction with the Battery Pack AC Power Supply allows you to safely and efficiently recharge your Battery Pack via the cigarette lighter (power) socket of a vehicle. See page 12 for additional information. Power Other Small Electronic Devices To power a small electronic device that does not have a DC cable with a cigarette lighter plug, use a power inverter to complete the connection between the device and the Battery Pack. See page 20 for additional information. Battery Power Solutions offers an incredibly small, yet powerful 150 Watt Modified Sine Wave Power Inverter. Sine wave inverters may also be purchased from electronics retailers. BATTERY POWER SOLUTIONS MODIFIED SINE WAVE POWER INVERTER (sold separately) Output Rated Power: 120W (continuous) - 150W (maximum) Dimensions: 5.25" x 2.75" x .5" (LxWxH) Weight: 0.5 lbs 6 Accessories POWER INVERTER CONNECTING THE 150 WATT INVERTER TO THE BATTERY PACK Connect the DC Input Cord to the DC Out Jack of the Battery Pack. Connect the Inverter Adaptor Cord to the side of the Inverter. Connect the cigarette lighter plug end of the Inverter Adaptor Cord into the DC Input Cord of the Battery Pack. Inverter Adaptor Cord Inverter DC Input Cord DC Out Jack CONNECTING YOUR DEVICE TO THE 150 WATT INVERTER Connect the AC power cord of your device to the Inverter by sliding open the small spring loaded tab located on the back of the Inverter, which will reveal the two-prong plug. If your device has a USB cable, you can connect the device to the Inverter via the USB port located on the back of the Inverter. Once the connection between the Battery Pack, Inverter and your device is complete, press the ON/OFF button on your device and it should start functioning. USB Port Two-Prong Plug Note: It is normal for the Inverter to become warm to the touch and to hear the internal fan operating when in use. 7 Accessories 24V POWER CONVERTER DC to DC power converters convert a source of direct current (DC) from one voltage to another (i.e. 24V to 12V). Power converters are generally proprietary to a specific device. Battery Power Solutions’ 24V Power Converter was specifically designed for use with ResMed S9 Series PAP devices and the C-100 Battery Pack. This single component connection provides a clean, efficient conversion from 24V to 12V direct current. See page 16 for additional information. You may also use ResMed’s DC Power Converter to make the connection between a ResMed PAP device and the Battery Pack. ResMed DC Power Converters may be purchased from medical equipment retailers who sell ResMed products. See page 17 for additional information. BATTERY POWER SOLUTIONS 24V POWER CONVERTER (sold separately) Input: 12V / 24V Output: 24V / 3.75A Length: 4 ft (connector to connector) Weight: 0.35 lbs - for use with ResMed S9 Series PAP devices only - 8 Getting Started CONTROL BOARD IDENTIFICATION The Control Board includes the DC In and DC Out Jacks, charge lights and the Power Meter, which indicates the remaining power level. E F G A B D C A DC In Jack D DC Out Jack G Power Meter B Power Meter Button E Charging Light C Full Charged Light F On Light The On Light (F) will be green when a device is plugged into the DC Out Jack (D). The Charging Light (E) will be red when the Battery is being charged. The Full Charged Light (C) will be green when the Battery Pack has completed charging. THE POWER METER The LED display Power Meter indicates the remaining power level of the Battery Pack. The Power Meter may be activated after the first time you charge your Battery Pack. Press the Power Meter Button and the number of LED lights displayed on the Power Meter will show you the power level of the Battery Pack. 4 green LED lights > 85% 3 green LED lights 50-85% 2 green LED lights 15-50% 1 green LED light < 15% POWER METER BUTTON POWER METER 9 Getting Started TURNING THE BATTER PACK ON/OFF The Battery Pack will turn on or off automatically when a device is plugged into or disconnected from the Battery Pack. If the Battery Pack stops functioning, reconnect the AC Power Supply to the Battery Pack to reset the internal circuitry. INITIAL BATTERY USAGE Before using your Battery Pack for the first time be sure to charge it fully using AC power (a wall outlet). During the initial charge, the Battery Pack may indicate that charging is complete after just 10 or 15 minutes as the Battery Pack is already charged before it leaves the factory. USING THE BATTERY PACK INSIDE THE CARRYING CASE The Carrying Case of the Battery Pack was designed with a clear access window which allows you to use and/or charge the Battery Pack while it is inside of the Carrying Case. Place the Battery Pack in the Carrying Case with the Control Board facing toward the clear access window. If you are using the Battery Pack in the dual configuration, place both Battery Packs in the Carrying Case with the Control Boards facing toward the clear access window. Pull open the flap of the clear access window. Insert the appropriate connection cord (DC Power Pigtail Cord, DC Input Cord, Power Converter Cord, or AC Power Supply Cord) to the DC Out Jack of the Battery Pack. Note: The connection cord used will depend upon whether you are charging or using the Battery Pack. See pages 11-20 for connection configuration information. 10 Charging the Battery Pack CHARGING WITH AC POWER (A WALL OUTLET) Connect the AC Power Cord to the AC Power Supply. Connect the Output Cable of the AC Power Supply to the DC In Jack of the Battery Pack. Connect the AC Power Supply to a wall outlet. After you have fully charged the Battery Pack the Full Charged light on the Control Board will display green. When charging is complete disconnect the AC Power Supply from the wall outlet and the Battery Pack. Output Cable of AC Power Supply DC In Jack AC Power Supply AC Power Cord Note: It is normal for the AC Power Supply and the Battery Pack to be warm to the touch during the charging process. CHARGING IN A FOREIGN COUNTRY The Battery Pack AC Power Supply will operate on any AC current from 100 V to 240 V and 50/60 Hz without any adjustment. You will only need an international electrical adapter plug in order to charge the Battery Pack from AC power (a wall outlet) in a foreign country. International adapter plugs can be purchased from electronics retailers. 11 Charging the Battery Pack CHARGING IN A VEHICLE The use of a power inverter in conjunction with the Battery Pack AC Power Supply allows you to safely and efficiently charge the Battery Pack via the cigarette lighter (power) socket of a vehicle. Connect the AC Power Supply to the Battery Pack. Connect the AC Power Supply to the Inverter. Plug the Inverter Adaptor Cord into the cigarette lighter (power) socket of the vehicle. Start the vehicle to begin charging. Keep the vehicle running during the charging process to avoid draining the vehicle battery. When the charging process is complete remove the Inverter Adaptor Cord from the cigarette lighter (power) socket of the vehicle. Inverter Adaptor Cord AC Power Supply DC In Jack Inverter Note: Charge times will vary depending upon inverter and vehicle battery type. It is normal for the Inverter to become warm to the touch and to hear the internal fan operating when in use. 12 Charging the Battery Pack DUAL BATTERY CONFIGURATION CHARGING If you are using the Battery Pack in the dual configuration you may charge both Battery Packs at the same time. Connect the DC Power Pigtail Cord to the DC In Jack of both Batteries. Connect the DC Power Pigtail Cord to the Output Cable of the AC Power Supply and follow the remaining charging instructions listed on page 11 (charging with AC power) or page 12 (charging in a vehicle). DC Power Pigtail Cord Output Cable of AC Power Supply Powering Your PAP Device INTRODUCTION The DC capability, voltage requirements and plug polarity of your PAP device will determine how your device connects to the Battery Pack. Some PAP devices can be connected directly to the Battery Pack via the DC Pigtail Power Cord; while others will require the additional use of a power inverter or power converter in order to complete the connection between the Battery Pack and your PAP device. Please refer to the following pages for specific setup instructions for Philips Respironics, ResMed, Fisher & Paykel, and DeVilbiss PAP devices. Do not attempt to connect the Battery Pack to your PAP device until you have read and understand the following instructions. Failure to do so may damage your PAP device. 13 Powering Your PAP Device CONNECTOR TIPS If your PAP device can be connected directly to the Battery Pack (Respironics and DeVilbiss PAP devices) you will need to insert one of the provided Connector Tips into the end of the DC Power Pigtail Cord in order to connect the PAP device to the Battery Pack. Locating the appropriate Connector Tip for your device: Compare the Connector Tips provided with your Battery Pack to the tip of the PAP device AC power supply. Choose the Connector Tip that you feel most closely matches. Locate the DC input port on the PAP device. Try to insert the Connector Tip you have chosen into the DC input port of the device. The Connector Tip should insert easily - do not force it. Make sure the Connector Tip sits securely in the DC input port. If the Connector Tip is loose try another one as you want to avoid using a loose Connector Tip if there is a better match. Once you have found the best fitting Connector Tip, insert it into the female end of the DC Power Pigtail Cord. We recommend either keeping the Connector Tip you have chosen inserted into the DC Power Pigtail Cord or storing it a separate place away from the other Connector Tips so it can be easily located when you are ready to use your Battery Pack. PAP DC Input Port 14 Connector Tip DC Power Pigtail Cord Powering Your PAP Device RESPIRONICS DEVICES Respironics PAP devices may be connected directly to the Battery Pack. Connect the DC Power Pigtail Cord to the DC Out Jack of the Battery Pack. Note: If you are using the Battery Pack in the dual configuration, simply connect the DC Power Pigtail Cord to the DC Out Jack of both Battery Packs. Insert the appropriate Connector Tip into the female end of the DC Power Pigtail Cord. See page 14 for Connector Tip instructions. Connect the DC Power Pigtail Cord with appropriate Connector Tip to the DC input port of the Respironics PAP device. Press the ON/OFF button on the PAP device and the device should start functioning. PAP DC Input Port DC Power Pigtail Cord DC Out Jack SINGLE BATTERY CONFIGURATION DUAL BATTERY CONFIGURATION 15 Powering Your PAP Device RESMED DEVICES If you are using any device manufactured by ResMed you must use either a power converter or inverter to complete the connection between the device and the Battery Pack. Do not connect the Battery Pack directly to any ResMed device as doing so will damage the PAP device. RESMED S9 SERIES DEVICES Battery Power Solutions designed a 24V Power Converter specifically for use with ResMed S9 Series PAP devices. See page 8 for more information. CONNECTION USING BPS 24V POWER CONVERTER Connect the male end of the 24V Power Converter to the DC Out Jack of the Battery Pack. You must connect the 24V Power Converter to the Battery Pack before you connect to the ResMed S9 device. Note: If you are using the Battery Pack in the dual configuration, connect the DC Power Pigtail Cord to the DC Out Jack of both Battery Packs and connect the 24V Power Converter to the end of the DC Power Pigtail Cord. Connect the female end of the 24V Power Converter to the DC input port of the ResMed S9 Series device. Press the ON/OFF button on the PAP device and the device should start functioning. 24V Power Converter 16 DC Out Jack PAP DC Input Port Powering Your PAP Device RESMED S8 SERIES & OTHER OLDER RESMED DEVICES ResMed S8 Series or other older ResMed PAP devices require the use of ResMed’s DC Power Converter or a power inverter in conjunction with the Battery Pack. Do not connect the Battery Pack directly to any ResMed device as doing so will damage the PAP device. CONNECTION USING RESMED DC POWER CONVERTER Connect the DC Input Cord to the DC Out Jack of the Battery Pack. Note: If you are using the Battery Pack in the dual configuration, connect the DC Power Pigtail Cord to the DC Out Jack of both Battery Packs and connect the DC Power Pigtail Cord to the DC Input Cord. Connect the cigarette lighter plug end of the ResMed DC Power Converter to the DC Input Cord. Connect the output cable of the ResMed DC Power Converter to the DC input port of the PAP device. Press the ON/OFF button on the PAP device and the device should start functioning. DC Out Jack PAP DC Input Port DC Input Cord ResMed DC Power Converter 17 Powering Your PAP Device FISHER & PAYKEL DEVICES Fisher & Paykel PAP devices do not have DC capability and therefore require the use of a power inverter to complete the connection between the PAP device and the Battery Pack. CONNECTION USING BPS 150W POWER INVERTER Connect the DC Input Cord to the DC Out Jack of the Battery Pack. Note: If you are using the Battery Pack in the dual configuration, connect the DC Power Pigtail Cord to the DC Out Jack of both Battery Packs and connect the DC Power Pigtail Cord to the DC Input Cord. Connect the DC Input Cord and the AC power cord of the PAP device to the Inverter. See page 7 for Inverter connection instructions. Press the ON/OFF button on the PAP device and the device should start functioning. PAP AC Power Cord DC Out Jack DC Input Cord BPS 150W Power Inverter 18 Powering Your PAP Device DEVILBISS PAP DEVICES DeVilbiss PAP devices may be connected directly to the Battery Pack. Connect the DC Power Pigtail Cord to the DC Out Jack of the Battery Pack. Note: If you are using the Battery Pack in the dual configuration, simply connect the DC Power Pigtail Cord to both Battery Packs. Insert the appropriate Connector Tip into the female end of the DC Power Pigtail Cord. See page 14 for Connector Tip selection instructions. Connect the DC Power Pigtail Cord with appropriate Connector Tip to the DC input port of the DeVilbiss PAP device. Press the ON/OFF button on the PAP device and the device should start functioning. PAP DC Input Port DC Power Pigtail Cord DC Out Jack 19 Powering Other Devices The Battery Pack can be used to power other small electronic devices such as smartphones, iPads, portable DVD players, iPods, and laptops. If the electronic device operates from a 12V direct current and has a DC cable with a cigarette lighter plug you can connect the device directly to the Battery Pack via the DC Input Cord. If the electronic device does not have a DC cable with a cigarette lighter plug or does not operate from a 12V direct current you will need to use a power inverter to complete the connection between the device and the Battery Pack. See pages 7-8 for more information on power inverter usage. 20 Battery Pack Care Instructions UNDERSTANDING LITHIUM-ION BATTERIES Rechargeable lithium-ion batteries have quickly become the emerging standard for portable power in consumer devices due to their light weight, high energy density, lack of memory effect, and charge longevity. They are also more environmentally friendly as they do not contain toxic materials such as Cadmium or Mercury. Understanding common phenomenon with rechargeable lithium-ion batteries can help you better care for your Battery Pack and answer many common questions regarding usage. Lithium-ion batteries do not suffer from the memory effects that are associated with other types of battery chemistries. This means that the battery does not need to be completely discharged before charging. Upon initial use or after a prolonged storage period, lithium-ion batteries may require 3-4 charge/discharge cycles before achieving their maximum capacity. Lithium-ion batteries will self-discharge when unused; therefore, it may be necessary to recharge the battery after a storage period. The amount of charge lithium-ion batteries will hold will gradually decrease due to usage and aging. Over time, the actual battery capacity decreases as less and less active material within each lithium-ion cell is available to electrochemically store a charge. This loss in capacity (aging) is true for all rechargeable lithium-ion batteries. It is normal for a lithium-ion battery and its AC power supply to become slightly warm to the touch during charging and discharging. BATTERY PACK STORAGE Charge to approximately 40% of capacity before storage. Store in a dry, cool place away from heat, direct sunlight and metal objects. 21 Safety Warnings By purchasing, using or possessing any of Battery Power Solutions’ products, you are agreeing to hold harmless Battery Power Solutions, it’s subsidiaries, affiliates, owners, officers and employees from any and all claims or liability for any damage to any property or injury, illness or death of any person when such damage, injury, illness or death shall be caused in whole or in part from use of the product(s). Battery Packs are manufactured with a PCB (Protective Circuit Board) which provides internal protection against thermal runaway (overheating), over charging and discharging, over voltage, over current, and short circuiting. THE FOLLOWING SAFETY WARNINGS MUST BE OBSERVED AT ALL TIMES: Do not drop, hit, crush, or otherwise abuse the Battery Pack as this may result in the exposure of the cell contents, which are corrosive. Do not expose the Battery Pack to rain or moisture of any type. Do not expose the Battery Pack to fire or extreme heat. Do not incinerate. Exposure of the Battery Pack to extreme heat may result in an explosion. Do not disassemble the Battery Pack (remove the cover) or attempt to repair the Battery Pack as there are no user-serviceable parts inside. Periodically inspect connection cords, connector tips and the power supply for damage or signs of wear. Discontinue use if damaged. Disposal of Lithium-Ion Batteries Lithium-ion batteries should be recycled. Some states have specific laws regarding the disposal of lithium-ion batteries. You should contact your local Government Household Hazardous Waste Agency for information on state battery disposal regulations. For information on where you can recycle your batteries at no cost, visit www.call2recycle.org or call 1-877-723-1297. 22 1-877-445-5228 [email protected] www.batterypowersolutions.net CPAP BATTERY PACK USER’S GUIDE January 2014