1
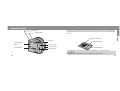
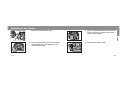
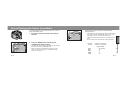
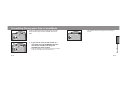
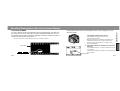
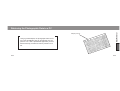
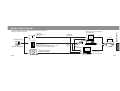
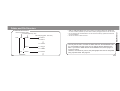
Set Up
Data
Memory
DATA SAVER DS-100
Data
Retrieval
Appendix
E INSTRUCTION MANUAL
Printed in Japan
9222-8793-10 P-A008
For Proper And Safe Use
Read and understand all warnings before using this product.
Set Up
WARNING
Use caution, accidents may occur when using this product near young children.
This mark on this product certifies that it meets the
requirements of the EU (European Union) concerning
interference causing equipment regulations. CE stands for
Conformité Européenne (European Conformity).
E2
E3
The data number, printed on the “0” frame, is used to match the stored photograhic
data to the corresponding roll of film
Data collected by the Data Saver DS-100 can be displayed on the camera’s display or
compiled to a list and displayed on your PC.
• SmartMedia™ is a trademark of the Toshiba Corporation.
• Windows®, Microsoft®, and Microsoft Excel® are registered trademarks of the Microsoft
Corporation.
• Other corporate and product names are the trademarks and registered trademarks of
their respective companies.
E4
SmartMedia Caution
SmartMedia is a precision electrical storage device. If not carefully treated, the recorded data may be damaged or destroyed. Please use caution when using and handling this item.
Minolta is not responsible for any losses if:
•
•
•
•
•
User or other persons mishandle the SmartMedia.
Card is exposed to an electrical shock and/or static electricity.
The card is removed from the DS-100 while data is being written or formated.
The card has not used for a long time.
Card exceeds its recommended product life.
Important data should be saved on a back-up disk.
E5
Set Up
Designed for the Maxxum/Dynax 7 Series, the Data Saver DS-100 makes it possible
to record photographic data for each exposure to a SmartMedia™ card. The data from
as many as 400 36-exposure rolls of film can be saved to a single 4MB card.
Table of Contents
For Proper and Safe Use.............................................2
Table of Contents .........................................................6
Names of Parts.............................................................8
Inserting the SmartMedia Card..................................10
Attaching to the Camera ............................................12
Formatting a SmartMedia Card .................................14
Data Memory
Saving Photographic Data to SmartMedia ................16
Overwriting Photographic Data to SmartMedia .........18
E6
Data Retrieval
Recalling Photographic Data to the CameraDisplay .20
Retrieving the Photographic Data to a PC ................24
System Requirements................................................26
Folder and File Structure ...........................................28
Opening the Data .......................................................30
Data display - Spreadsheet..................................30
Data display - Plain Text ......................................34
Set Up
Set Up
Appendix
Photographic Data which can be saved. ...................36
Care and Storage.......................................................38
SmartMedia Note .......................................................40
Display Information.....................................................44
Specifications .............................................................46
E7
Names of Parts
Access lamp
Set Up
The 4MB 3.3V SmartMedia card provided with the Data Saver DS-100 has already been
properly formatted for use with the DS-100. See page 14 to format cards not included with
this unit.
Data-full lamp
Electrical contact area
Rear cap
Write (Record)
Button
Card slot door
Format button
Mounting index
Write-protect area
Index label area
Card window
• The Data Saver DS-100 uses only 3.3v SmartMedia. You can not use 5.5v
SmartMedia.
• 64Mb or larger SmartMedia can not be used with the DS-100.
E8
E9
Inserting the SmartMedia Card
The 4MB 3.3V SmartMedia card provided has already been properly formatted for use
with the DS-100. See page 14 to format cards not included with this unit.
3. Insert the card into the card slot, contactside down.
Set Up
1. Open the card-slot door.
4. Close the card-slot door.
2. Remove the card from its anti-static case.
• Don’t touch the card’s contacts.
• Save the anti-static case for future storage of the
SmartMedia card.
E10
E11
Attaching to the Camera
3. Gently insert the Data Saver DS-100 into the
mount, then turn it clockwise until it clicks
into the locked position.
2. Turn the camera switch to OFF and align the
red mounting dots on the Data Saver DS100 and camera body.
4. Slide the main switch to ON.
Set Up
1. Remove the body and rear caps.
E12
E13
Formatting a SmartMedia Card
1. To format a SmartMedia card, insert the card
into the card slot.
E14
2. Simultaneously push the FORMAT and the
WRITE buttons until the ACCESS lamp
(green) starts to blink.
• If the SmartMedia card is not formated, the ACCESS
lamp (red) and the DATA-FULL lamp (yellow)will blink
rapidly. Keep pressing the FORMAT and WRITE buttons
until the ACCESS lamp changes to green and blinks
slowly.
• When a card is formated, all the previous data stored on
the card will be lost.
• When the green ACCESS lamp stops blinking, formating
is complete.
E15
Set Up
The 4MB, 3.3V SmartMedia card provided with the Data Saver DS-100 has already
been properly formatted for use with the Data Saver DS-100. See below to format cards
not included with this unit.
Minolta’s Image Memory Card RM-2S/RM-4S is not usable with the DS-100 since it
requires 5.5v.
See page 42 for explanation of SmartMedia cards.
Saving Photographic Data to SmartMedia
1. Insert the card into the card slot and close
the door.
2. Press the WRITE buton until the green
ACCESS lamp starts to blink.
• The Data Saver DS-100 takes the data from the camera
and stores it onto the SmartMedia card.
• When the DATA FULL lamp blinks (yellow), the card
does not have enough capacity. To overwrite stored
data, refer to page 18.
E16
When data is bering recorded, the ACCESS lamp
(green) will blink.
• The Data Saver DS-100 takes the data from the camera
and stores it onto the SmartMedia card. So even if the
same data is on the card, it will be overwritten.
• The data recording time depends on the capacity of the
card.
• Do not remove the card while data is being recorded.
Capacity
of card
2MB
4MB
8MB
16MB
32MB
Maximum recording
time for 7 rolls of film
(approximate)
27 seconds
41
42
73
74
Data Memory
The Maxxum/Dynax 7 camera can store up to 7 rolls of
films’ photographic data.
E17
Overwritting Photographic Data to SmartMedia
When the DATA-FULL lamp (yellow) blinks, the card
doesn’t have enough memory available to store the
data.
• The ACCESS lamp stops blinking when overwritting is
finished.
Data Memory
1. If you want to overwrite data stored on a
card, keep pressing the WRITE button (for
more than 3 seconds) until the green
ACCESS lamp starts to blink.
• If data is overwriten to a card which doesnt have enough
room, the oldest data will be overwritten first.
E18
E19
FILM DATA NUMBER
In order to identify the photographic data with the developed film, the data number is exposed on the “0” frame when the film cartridge is loaded into the camera (providing data memory has been selected). Each time another roll of film is
loaded, the data number increases by 1.
• For more information on data numbers, refer to your camera’s manual.
Film leader
Photographic data stored in the SmartMedia cards, can be displayed on your
camera’s display.
1. Attach the Data Saver DS-100 to the camera
and slide the main switch to ON.
• The ACCESS lamp (green) will come on in
approximately 8 seconds.
• When the DS-100 has a defective SmartMedia , the
ACCESS lamp will be red and the Data Full lamp
(yellow) will blink rapidly, When this happens, data
cannot be displayed.
2. Follow the camera’s instructions and recall
the data.
• For the Maxxum/Dynax 7, press the DATA button on the
control panel.
• The method of displaying the data may differ, depending
on the camera.
Data number
E20
Data number
E21
Data Retrieval
Recalling Photographic Data to the Camera Display
A,C
A
3. Turn the front or rear control dial to select
the data number.
4. Follow the camera’s instructions and recall
the data.
• The following procedure is for the Maxxum/Dynax 7
camera. For other cameras, refer to their cameras’
manuals.
• For the Maxxum/Dynax 7, press the ADJ button on the
control panel.
• The first frame’s data will appear.
A. By turning the front dial while pressing the AEL button,
you can select dn1-9.
B. Turn the rear dial to move the data numbers by 100.
C. Turn the front dial to change the data number by 1 each
time.
B
• Film speed will appear whenever a film area is selected
that contains photographic data.
A
E22
B
5. Select the desired frame whose data you
wish to view.
• For the Maxxum/Dynax 7, slowly turn the front or rear
control dial. For other cameras, refer to their camera’s
manual.
• If the front or rear control dials are moved too quickly,
incorrect data may be displayed.
C
E23
Data Retrieval
Recalling Photographic Data to the Camera Display
Data Retrieval
Retrieving the Photographic Data to a PC
Sample print out
Using a general adapter, the photographic data recorded on the SmartMedia card can be retrieved and compiled on a PC. With a spreadsheet application (such as
Microsoft Excel), the data can then be printed out in a
list.
E24
E25
System Requirements
Desk-top PC w/o pc card slot.
Use SCSI port
Data Retrieval
In order to retrieve/print out the photographic data, any one of the
following sustems is required.
Flash bus
FUJIFILM FD-A1
(ver.2.0.1)
to a floppy
disk drive
Print out
SmartMedia card
2-32MB
SmartMedia (SSFDC)
FUJIFILM PC-AD3
FD-A1 (ver.2.0.1)
Minolta’s PC card adapter CA-15 cannot
be used due to its 5v specification.
to PC
card
slot
Minolta’s PC
card drive
CD-10 is
recommended.
USB CARD READER
OLYMPUS MAUSB-1
Laptop PC with
pc card slot
to USB Terminal
E26
OS: Windows 95/98
E27
SmartMedia File Structure
Ist level (Camera’s ID #)
2nd level (data # by 100)
3rd level (File name - film roll #)
Root
Id1
Data00
• 8MB and 16MB SmartMedia cards have a capacity for 9 folders (Fdata01-09). 32MB cards
can hold 19 folders (Fdata01-19). Each folder contains photographic data for 100 rolls of film.
• Do not delete the file named Nextarea. This file contains necessary operational instructions
for the SmartMedia.
• All files are written in DOS Txt format.
dn1-0001.txt
dn1-0002.txt
dn 1-0000.txt
Data01
dn 1-0100.txt
dn 1-0199.txt
Id2
Data00
dn 2-0000.txt
Use only the DS-100 to overwrite or delete data from the SmartMedia card.
It is not possible to do this using your PC without causing damage to the
data. If you want to delete data on the SmartMedia card, refer to page 14
on how to format.
However, once stored in your PC, the photographic data can be manipulate
using a spread sheet. See page 30.
Nextarea
E28
E29
Data Retrieval
Folder and File Structure
3. From file, open and select the
SmartMedia file. The window at
the left will appear.
Using Spreadsheet Software
This manual uses Microsoft Excel as an example of using a spread sheet.
Delimited
• Other spreadsheet software may be different and requite different steps.
• If you don’t have any spreadsheet software, refer to page 34.
• Choose the Delimited setting shown in the
figure at the left and then click on Next.
• Details of window may be different,
depending on the software version in use.
• If you cannot locate the exact file you want,
select All files from the options in the File
Origin drop-down menu.
1. Connect the SmartMedia card to the PC using any of the methods
shown on page 26-27.
2. Start the Excel program.
File origin
E30
Next
E31
Data Retrieval
Opening the Data
Opening the Data
3. Select Tab and then click on
Next.
4. Select all the data, and click on
Text.
5. Click on Finish.
Next
E32
• The photographic data layout is
dependent on the spreadsheet software
used.
• You can underline data, print, or save as
desired.
• Refer to your spreadsheet’s instruction
manual for information on how to
manipulate the data.
Scroll bar
Finish
E33
Data Retrieval
Text
Tab
Opening The Data
Viewing data without spreadsheet software
After Data is Displayed
Data Retrieval
Photographic data is shown on page 33.
1. Connect the SmartMedia card to the PC using any of the methods
shown on page 26-27.
• You can underline data, print, or save as desired.
2. Select the drive containing the SmartMedia card file and choose the
desired file.
3. Double click on the file.
• If the file doesn’t automatically open, it may be necessary to first open the text software.
4. The photographic data will appear.
E34
E35
Photographic Data which can be Saved
Output device
Item
Body ID number
Photographic Data Number
Film Speed
Camera Display
Data output to
(eg:Maxxum/Dynax7)
PC
dnx
-xxxx
ISO:xxx
Item
Data output to
Output device Camera Display
(eg:Maxxum/Dynax7)
PC
Lens focal length and max f-no.
Lens
Exposure Compensation
(including exposure bracketing)
+/_
Exposure mode
PASM
Flash exposure mode
Meter
FL+/_
Frame Number
Frame
Flash exposure compensation
(including flash bracketing)
Shutter Speed
Shutter
Date of picture
Aperture
E36
FNo.
Time of picture (hour and minute)
Appendix
The photographic data shown below can be displayed on the camera or transfered to a PC .
yy/mm/dd
Time
E37
Care and Storage
• This product is
designed for use
from –20 to 50 °C
(4 to 122 °F).
• Never leave it
where it may be subjected to extreme
temperatures such as in the glove
compartment of a car.
• To prevent condensation from forming, place the prooduct in a sealed
plastic bag when bringing it from cold
environment to a warm environment.
Allow it to come to room temperature
before removing it from the bag.
E38
Saving Important Data
Others
Storage
• Check the product’s function carefully, before saving important data.
• Minolta is not responsible for any
loss that may occur due to an equipment malfunction.
• This product is not waterproof or
splashproof. When using the product
in the rain, it should be protected.
• Do not drop or subject this product to
impact. Damage may result.
• If a SmartMedia card is stuck in the
Data Saver DS-100, do not use force
to remove it. Contact an authorized
Minolta Service Facitity.
• If the product is dirty, wipe it gently
with a soft, clean, dry cloth. If it
comes in contact with sand, gently
blow away loose particles - wiping
may scratch the surface.
• Store in a cool, dry, and well-ventilated area away from dust and chemicals such as moth balls. For long
periods, place the product in an airtight container with a silica gel drying
agent.
Appendix
Operating Temperature and
Conditions
E39
Proper Handling
• Never use organic solvents to clean
the product.
• When carrying or storing SmartMedia,
keep it inside an anti-static case. The
DS-100 case has a pocket which holds
a SmartMedia card with an anti-static
case.
Questions and Service
• If you have questions about this product,
contact your local camera dealer or write
to the Minolta distributor in your area.
• Before shipping your product for repair,
please contact an authorized Minolta
Service Facility for details.
E40
• When necessary, gently wipe the card clean with a soft, clean, dry cloth.
• Use only the index labels provided with the SmartMedia. .
• To write protect the card, place the write-protection seal over the card’s write-protect
area.
- Be sure to affix the seal within the write-protect area so the seal lays flat (no
bubbles or raised edges).
- The DS-100 cannot write or delete data when the write protection seal is placed
over the write protect area.
- Data can be read by your PC when the write protection seal is placed over the
write protect area.
- Remove the seal to cancel write-protect.
- Write-protect may not work if the seal is dirty. Clean the seal with a soft, clean,
dry cloth.
E41
Appendix
SmartMedia Notes
SmartMedia (SSFDC)
The following SmartMedia cards are usuable:
• The SmartMedia is a precision electrical storage device. Handle accordingly.
• The card should not be exposed to an electrical shock and/or static electricity.
• Do not bend, drop, or subject the card to impact.
The Data Saver DS-100 uses only 3.3v SmartMedia. You can not use
5.5v SmartMedia.
E42
Smart media size
Memory Capacity
2MB
400 Rolls (36 exposures)
4MB
400 Rolls (36 exposures)
8MB
900 Rolls (36 exposures)
16MB
900 Rolls (36 exposures)
32MB
1900 Rolls (36 exposures)
• The larger the capacity of the card, the longer the time required for recording and
formatting.
• Due to the cluster layout of the SmartMedia cards, 2MB and 4MB cards have the
same capacity. This is also true for the 8MB and 16MB cards.
E43
Appendix
Care in Handling the SmartMedia
Display Information
When using the WRITE and FORMAT buttons, they must be pressed for a minimum of 3 seconds for the signals to be processed properly.
Explanation
Action
The DS-100 is sucWhen camera main
switch is turned on, the cessfully connected
ACCESS lamp (green) to the camera.
is on for 5 seconds.
ACCESS lamp (green)
blinks.
DATA FULL lamp
(yellow) - blinks
E44
Writing data
Page
ACCESS (red) and
DATA FULL (yellow)
lamps blink slowly.
Explanation
SmartMedia card is not
properly formatted.
Action
Simultaneously press
the FORMAT and
WRITE buttons.
Page
14
13
Do not remove the
SmartMedia card from the
DS-100 while saving data.
16
• Replace card
Card does not have • Overwrite by pressing
enough capacity to
WRITE button until
hold the data.
ACCESS lamp turns green.
18
• No card in DS-100
• Insert card into DS-100
ACCESS (red) and • The write protect seal is • Remove the write proon the card.
tect seal
DATA FULL (yellow)
• The SmartMedia card
• Insert a correct (3.3v)
lamps blink rapidly.
does not meet the
card ino the DS-100.
required specifications.
11
Remove the DS-100 from the camera and reattach. If problem persist, contact an authorized
Minolta Service Facility.
12
Lamps do not
illuminate.
E45
Appendix
Display
Display
Specifications
E46
Photographic Data Saver
SmartMedia (3.3V type)
Minolta Data Saver DS-100 optimized file format
Plain text
Data number (one number per exposure, including the
camera ID number),
Year/ month/ day, hour/ minute,
Shutter speed,
Aperture,
Focal length,
Smallest f- number,
Exposure mode,
Exposure compensation (exposure bracket included),
Metering mode,
Flash compensation (including flash bracketing increment),
Film speed (one per roll of film)
Operating Temperatures:
Size:
Weight:
0 to 50 °C (32 to 122° F)
65.5 x 35 x 65 mm (WxHxD)
55g (w/o cap and case)
Specifications are based on the latest information available at the time of printing and are
subject to change without notice.
E47
Appendix
Type:
Data Memory:
File Format:
File Type:
Data Memory Items:
Minolta Co., Ltd.
Minolta Europe GmbH
Reparatur/Repair
Minolta France S.A.
Minolta (UK) Limited
Minolta Austria Ges. m.b.H.
Minolta Camera Benelux B.V.
Belgium Branch
Minolta (Schweiz) AG
Minolta Svenska AB
Finland Branch
Minolta Portugal Limitada
Minolta Corporation
Head Office
Los Angeles Branch
Minolta Canada Inc.
Head Office
Vancouver Branch
Minolta Hong Kong Limited
Minolta Singapore (Pte) Ltd.
Shanghai Minolta Optical
Products Co., Ltd.
3-13, 2-Chome, Azuchi-Machi, Chuo-Ku, Osaka 541-8556, Japan
Minoltaring 11, D-30855 Langenhagen, Germany
Senator-Helmken-Strasse 1, D-28197 Bremen, Germany
365 Route de Saint-Germain, F-78420 Carrieres-Sur-Seine, France
7 Tanners Drive, Blakelands, Milton Keynes, MK14 5BU, England
Amalienstrasse 59-61, A-1131 Wien, Austria
Zonnebaan 39, P.O. Box 6000, NL-3600 HA Maarssen, The Netherlands
Prins Boudewijnlaan 1, B-2550 Kontich, Belgium
Riedstrasse 6, CH-8953 Dietikon, Switzerland
Albygatan 114, S-171 54 Solna, Sweden
Niittykatu 6 PL 37, SF-02201 Espoo, Finland
Av. do Brasil 33-A, P-1700 Lisboa, Portugal
101 Williams Drive, Ramsey, New Jersey 07446, U.S.A.
11150 Hope Street Cypress, CA 90630, U.S.A.
369 Britannia Road East, Mississauga, Ontario L4Z 2H5, Canada
230-3771 Jacombs Road, Richmond, B.C. V6V 2L9, Canada
Room 208, 2/F, Eastern Center, 1065 King’s Road, Quarry Bay, Hong Kong
10, Teban Gardens Crescent, Singapore 608923
368 Minolta Road, Songjiang, Shanghai, China
© 2000 Minolta Co., Ltd. under the Berne
Convention and Universal Copyright Convention