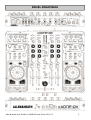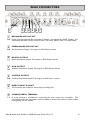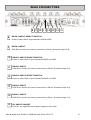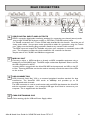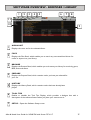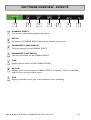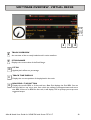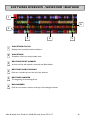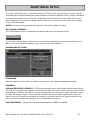
1
USER GUIDE Allen & Heath User Guide for XONE:DX with Serato ITCH 1.7 Publication AP7820 1 Limited One Year Warranty This product is warranted to be free from defects in materials or workmanship for period of one year from the date of purchase by the original owner. To ensure a high level of performance and reliability for which this equipment has been designed and manufactured, read this User Guide before operating. In the event of a failure, notify and return the defective unit to ALLEN & HEATH Limited or its authorised agent as soon as possible for repair under warranty subject to the following conditions Conditions Of Warranty The equipment has been installed and operated in accordance with the instructions in this User Guide. The equipment has not been subject to misuse either intended or accidental, neglect, or alteration other than as described in the User Guide or Service Manual, or approved by ALLEN & HEATH. Any necessary adjustment, alteration or repair has been carried out by ALLEN & HEATH or its authorised agent. This warranty does not cover fader wear and tear. The defective unit is to be returned carriage prepaid to ALLEN & HEATH or its authorised agent with proof of purchase. Units returned should be packed to avoid transit damage. In certain territories the terms may vary. Check with your ALLEN & HEATH agent for any additional warranty which may apply. This product complies with the European Electro magnetic Compatibility directives 89/336/EEC & 92/31/EEC and the European Low Voltage Directives 73/23/EEC & 93/68/EEC. This product has been tested to EN55103 Parts 1 & 2 1996 for use in Environments E1, E2, E3, and E4 to demonstrate compliance with the protection requirements in the European EMC directive 89/336/EEC. During some tests the specified performance figures of the product were affected. This is considered permissible and the product has been passed as acceptable for its intended use. Allen & Heath has a strict policy of ensuring all products are tested to the latest safety and EMC standards. Customers requiring more information about EMC and safety issues can contact Allen & Heath. XONE:DX User Guide AP7820 Issue 2 Copyright © 2010 Allen & Heath Limited. All rights reserved Allen & Heath Limited Kernick Industrial Estate, Penryn, Cornwall, TR10 9LU, UK http://www.allen-heath.com http://www.xone.co.uk Allen & Heath User Guide for XONE:DX with Serato ITCH 1.7 2 CONTENTS Warranty .............................................. Packed Items ........................................ Power Supply ....................................... System Requirements ........................ Software Installation Mac .................. Software Installation PC .................... Panel Drawings .................................... Rear Connectors ................................ Front Panel Connectors.................... Mixer Section....................................... Master Section .................................... Library Navigation .............................. Transport Controls ............................ Hotcue Points ...................................... Looping ................................................. Beatgrid / Sync / Autotempo ........... Advanced Play Features ..................... Effect Units ........................................... Effect Types ........................................... Direct Input.......................................... Software Overview ............................ Main Screen Overview ...................... Importing Music .................................. Preparing Files ..................................... Organising Your Library..................... History .................................................. Recording and Auxiliary Inputs........ Additional Setup.................................. Whitelabel Audio Files....................... Troubleshooting and Support .......... Corrupt Files ....................................... MIDI Control Values-Mixer / FX ..... MIDI Control Values-Virtual Decks MIDI Return Values ............................ Block Diagram ..................................... Specifications ....................................... Registering Your XONE:DX............. Allen & Heath User 2 4 5 6 7 9 11 12 15 16 18 19 21 23 24 26 30 31 33 35 36 44 46 47 48 51 53 54 59 60 61 62 63 64 65 66 67 Guide for XONE:DX PACKED ITEMS Check that you have received the following: Safety Sheet Important ! Read this sheet before starting. Retain for future reference. Xone:DX Professional DJ Controller. Check that the rear panel optical out blank plug is fitted. Type A-B USB Lead To connect the Xone:DX to your computer. Power Supply Fit the correct mains adaptor for your region. Allen & Heath User Guide for XONE:DX with Serato ITCH 1.7 4 POWER SUPPLY The Xone:DX contains its own Universal Voltage Input Power Supply unit with interchangeable heads for territory specific mains electricity outlets. The power supply comes with a pin protector that needs to be removed before the desired head can be fitted. To remove the pin protector, pull down on the release mechanism and pull the protector out from the bottom. To attach the required head, locate at the top first and then push down to locate and lock in the release mechanism. Allen & Heath User Guide for XONE:DX with Serato ITCH 1.7 5 SYSTEM REQUIREMENTS PLEASE NOTE: These are the minimum requirements to run ITCH with the Allen & Heath Xone:DX. For best performance and for use in professional situations we recommend you buy a higher spec computer. The minimum system requirements are: WINDOWS • 32-bit • Windows 7 / Vista: Intel* processor, 1.8GHz Core 2 Duo; 2GB RAM • Windows XP: Intel* processor, 1.8GHz Core 2 Duo; 1GB RAM • 64-bit • Windows Vista: Intel* processor, 2.2Ghz Core 2 Duo; 4GB RAM • Windows 7: Intel* processor, 2.4GHz Core 2 Duo; 4GB RAM • 1024 x 768 screen resolution • Available USB2.0 Port • Available hard disk space for music MACINTOSH • Mac OS X 10.6 • 32-bit: Intel processor, 1.8GHz Core Duo; 1GB RAM • 64-bit: Intel processor, 2.4GHz Core Duo; 4GB RAM • Mac OS X 10.5 and 10.4.11 • Intel processor, 1.8GHz Core Duo; 1GB RAM • 1024 x 768 screen resolution • Available USB2.0 Port • Available hard disk space for music PLEASE NOTE: The above is the minimum requirement to run ITCH. For best performance and for use in professional situations we recommend you buy a higher spec computer. If you are looking at buying a computer with an AMD Turion or Athlon processor please visit: http://serato.com/faq/#4781 Allen & Heath User Guide for XONE:DX with Serato ITCH 1.7 6 SOFTWARE INSTALLATION - MAC Free updates to the ITCH software are available from http://www.serato.com/itch. We suggest you check the website for the latest version before installing. To begin installation: • Either Insert the Serato ITCH install CD into your computers CD drive and browse to it using ‘Finder’. • Or Browse using ‘Finder’ to the location where the ITCH download installer was saved, double click the ITCH .dmg file to mount the image on your system, and browse to that volume. • Then: Double click the file called ITCH installer.mpkg. 1. The following screen will appear. Click ‘Continue’. 2. Accept the License Agreement and then click ‘Continue’. 3. Choose the hard disk you want to install to and click ‘Continue’. Allen & Heath User Guide for XONE:DX with Serato ITCH 1.7 7 SOFTWARE INSTALLATION - MAC 4. Confirm the install location and click ‘Install’. 5. ITCH will now be installed. 6. A confirmation screen will appear when the install is complete. STARTING THE SOFTWARE The ITCH software is installed in your applications folder. To start ITCH, double click the ITCH icon in your applications folder. When the software launches ITCH will automatically detect the Allen & Heath XONE:DX if connected. Allen & Heath User Guide for XONE:DX with Serato ITCH 1.7 8 SOFTWARE INSTALLATION - PC Free updates to the ITCH software are available from http://www.serato.com/itch. We suggest you check the website for the latest version before installing. The installer should start automatically, if not: • Either Insert the Serato ITCH install CD into your computer’s CD drive and browse to it using Windows Explorer. • Or Browse using Windows Explorer to the location where the ITCH download installer was saved, unpack the ITCH .zip file and browse to the extracted contents. • Then: 1. The following screen will appear. Click ‘Continue’. 2. Accept the License Agreement and then click ‘Continue’. 3. Choose the location you want to install to and click ‘Continue’. Allen & Heath User Guide for XONE:DX with Serato ITCH 1.7 9 SOFTWARE INSTALLATION - PC 4. ‘Complete’ will perform a standard installation. Click ‘Next’ to continue. 5. Confirm the installation options and click ‘Install’. 6. ITCH will now be installed. 7. A confirmation screen will appear when installation is complete. STARTING THE SOFTWARE The ITCH software is installed in the following location: WINDOWS XP: Start > All Programs > Serato > ITCH WINDOWS VISTA: Windows Menu > All Programs > Serato > ITCH To start ITCH, browse your START menu and click the ITCH icon. When the software launches ITCH will automatically detect the Allen & Heath XONE:DX if connected. Allen & Heath User Guide for XONE:DX with Serato ITCH 1.7 10 PANEL DRAWINGS Allen & Heath User Guide for XONE:DX with Serato ITCH 1.7 11 REAR CONNECTORS 1 2 3 4 5 6 7 1 BALANCED MIX OUTPUT Phase inverted balanced Mix (Soundcard Output 1-2) outputs on XLR-3 sockets. For unbalanced operation use Pin 2 and Ground—DO NOT SHORT PIN 3 TO GROUND. 2 UNBALANCED MIX OUTPUT Mix (Soundcard Output 1-2) output on RCA Phono sockets. 3 BOOTH OUTPUT Booth (Soundcard Output 3-4) output on RCA Phono sockets. 4 AUX OUTPUT Auxiliary (Soundcard Output 5-6) output on RCA Phono sockets. 5 CUE BUS OUTPUT Cue Bus (Soundcard Output 7-8) output on RCA Phono sockets. 6 DIRECT INPUT SOCKET 3.5mm stereo jack socket for Direct Input (see Page 34). 7 CHASSIS EARTH TERMINAL A screw terminal is provided for connecting the earth straps from turntables. This connection earths the metal parts of the turntable to reduce hum, buzz or similar audible noise getting into the system. Allen & Heath User Guide for XONE:DX with Serato ITCH 1.7 12 REAR CONNECTORS 8 9 10 11 12 13 14 15 8 DECK 4 INPUT SELECT SWITCH Switch to select Deck 4 input between LINE and MIC. 9 DECK 4 INPUT RCA Phono sockets for external connection to Deck 4 (Soundcard Input 7-8). 10 DECK 3 INPUT SELECT SWITCH Switch to select Deck 3 input between PHONO and LINE. 11 DECK 3 INPUT RCA Phono sockets for external connection to Deck 3 (Soundcard Input 5-6). 12 DECK 2 INPUT SELECT SWITCH Switch to select Deck 2 input between PHONO and LINE. 13 DECK 2 INPUT RCA Phono sockets for external connection to Deck 2 (Soundcard Input 3-4). 14 DECK 1 INPUT RCA Phono sockets for external connection to Deck 1 (Soundcard Input 1-2). 15 DC INPUT SOCKET Connect the supplied external power supply to this socket. Allen & Heath User Guide for XONE:DX with Serato ITCH 1.7 13 REAR CONNECTORS 16 17 18 19 16 SPDIF DIGITAL INPUT AND OUTPUTS SPDIF is a popular digital audio interfacing standard for connecting two channel (stereo) audio using a single COAX (RCA phono socket) or OPTICAL (TOSLINK socket) cable. For reliable connection use a 75 ohm COAX cable intended for this function. Avoid the use of cheap audio cables. Use purpose made optical fibre cables for connection using the Toslink port. Make sure the blanking plug provided is fitted to any unused Toslink sockets. The SPDIF input and outputs are available only when your computer is connected via the USB port. The computer provides the clocks needed for the soundcard to function. Sample rates of 44.1, 48, 88.2 and 96kHz are supported. 17 MIDI IN / OUT Connect to either a MIDI interface or directly to MIDI compatible equipment using a standard 5 pin DIN (MIDI) lead. The MIDI output socket data duplicates what is sent via the USB connection to the PC. Incoming MIDI is merged with the Xone:DX MIDI and transported, via USB, to the PC or Mac. Incoming MIDI data can also be used to remotely control the status of the LEDs on the surface. 18 USB CONNECTOR USB (Universal Serial Bus) V2.0 is an external peripheral interface standard for data transmission. The Xone:DX USB works at 480Mbps and provides up to 20 uncompressed audio channels. The USB connection is used to send/receive audio and MIDI data between the Xone:DX and the connected computer. Use a standard USB type A to B lead to connect to your computer. This is supplied with the Xone:DX. 19 CABLE RETAINING CLIP Cable retaining clip for USB and Power Supply cables. Allen & Heath User Guide for XONE:DX with Serato ITCH 1.7 14 FRONT PANEL CONNECTORS 1 2 3 4 1 HEADPHONES OUTPUTS Stereo 1/4” TRS jack and 3.5mm mini-jack. Plug in good quality stereo headphones intended for DJ monitoring. Use closed-ear headphones that provide maximum acoustic isolation when cueing your sources. We recommend that you use high quality headphones rated between 30 to 100 ohms impedance. 8 ohm headphones are not recommended. 2 MIC EQ CONTROLS The MIC equaliser provides a tool to adjust the tonal quality of the sound to correct source problems such as microphone response, proximity effect, noise and feedback, to help the voice cut through the mix, or to adjust the overall ‘feel’. Start with the EQ controls set to their mid (flat) position, then adjust to achieve the desired sound. 3 MIC INPUT Balanced XLR. Plug in a DJ, guest or announcement microphone here. Use a good quality low impedance dynamic mic such as those specifically designed for vocals. Do not use high impedance or unbalanced microphones, or condenser types which require phantom power. Use the best professional grade balanced cables and connectors you can afford, as these are typically subject to intense use and abuse in the club environment. 4 MIC LEVEL CONTROL Adjusts the input sensitivity of the Mic channel to match the connected source to the console’s 0dB operating level. When the Mic channel is not in use, always turn the level control fully anti-clockwise to prevent unwanted noise from this sensitive input entering the main Mix. Allen & Heath User Guide for XONE:DX with Serato ITCH 1.7 15 MIXER SECTION The Xone:DX mixer section allows control of all four deck channels simultaneously, regardless of which deck layer is chosen. THRU mode may also be selected on each channel, allowing the playback of external audio sources such as turntables or CD players. FX1 AND FX2 ASSIGN The Xone:DX features two effects processors FX1 and FX2. When the FX1 or FX2 buttons are pressed, the channel’s audio will be routed to the designated effects processor. The FX buttons are post fader, hence any adjustment made to the trim, EQ or fader controls will affect the audio being sent to the effects processor. Selecting both FX1 and FX2 on a single channel will route the output from FX1 into the input of FX2, chaining the effects processors together. If both FX1 and FX2 are selected for a single channel, any other channels with FX1 selected will automatically be routed into FX2. The FX2 light will flash to indicate this forced chaining of the effects processors. To disengage the effects chaining, press all of the non-flashing FX2 lights below the selected FX1 lights. ADJUSTING GAIN / LEVEL The LEVEL knob at the top of the channel strip allows you to boost or cut the volume of the track before you control it with the up fader for mixing. It is best to have the level of the track adjusted so that in the loudest part of the song the 0dB blue light on the channel meter is lighting up but is not permanently lit. Setting the LEVEL so all tracks are metering in this manner makes it easy to balance the mix between them with the EQ and faders. Pressing CUE on a channel will display the tracks volume on the master channel meters. TIP: Using this technique will allow you to bring any of the channel faders fully up, making it impossible to push an individual channel too loud in relation to the other channels. If you adjust the gain level too high, the limiter in ITCH will activate to attempt to prevent the audio clipping or distorting. When activated, the limiter light will appear at the top of the ITCH screen to alert you to decrease the gain level. EQUALISING EQ is used to boost and cut specific frequencies. The Xone:DX features 3-band EQ with low, mid and high frequency controls. The knobs go from full cut (or kill) when turned all the way left, unity when facing straight up, and +6 dB of boost when turned all the way to the right. EQ is used to balance the sound of tracks that have been mastered differently, to make a track sound “right” on your particular system, or for creative mixing techniques. With EQ, less is usually better - when boosting do so sparingly. Cutting frequencies is also usually better than boosting them. For example if you have a track with too much mid range, rather than boosting bass and treble to compensate it is better to cut back the mid range. Every speaker system and room has a different frequency response so you will need to adjust your EQ to suit. Allen & Heath User Guide for XONE:DX with Serato ITCH 1.7 16 MIXER SECTION CHANNEL METERS The level of the audio through the channel is displayed on the channel meter. The meters are configured as Post EQ and Pre Fade. It is best to set the channel level so that it peaks at +6 maximum, as this will provide some headroom for EQ adjustment before the audio lights the PK! LED and distorts. CROSSFADE / CROSSFADE ASSIGN Each of the Xone:DX’s four channels can be assigned to either side of the crossfader, or disabled altogether if needed. Set the XFADE toggle switch to the left to assign the channel to the X (left side), or to the right to assign the channel to the Y (right side) of the crossfader. To disengage the channel from the crossfader, set the toggle switch to its centre position. HEADPHONE / CUE When CUE is pressed on a track, the audio is sent into the headphones so that you can cue the track without it appearing in the main mix. The headphone LEVEL knob controls The headphone volume. You can adjust the balance of the mix in the headphones between what is playing and what is cueing by pressing SHIFT and turning the SCROLL knob. Turn the dial to the left to adjust the balance towards the MASTER output or to the right to adjust the balance towards the CUE signal. You can split the headphone output by selecting SPLIT CUE. This will send the CUE signal to one headphone speaker and the MASTER output to the other. THRU (SHIFT MODE) Holding SHIFT and CUE will set the selected channel to THRU mode, allowing you to playback external audio sources through the software. NOTE: These signals will be routed through software – the lower the buffer setting in your ITCH setup screen the lower the latency will be. CHANNEL FADER The Channel Fader adjusts the level of the channel audio in the mix outputs. Allen & Heath User Guide for XONE:DX with Serato ITCH 1.7 17 MASTER SECTION CHANNEL METERS The Channel Meters display the level of the Main Mix Bus. The meter display is sourced pre Master level and so does not represent the signal level on the outputs. During normal operation the meters display the level of the left and right channel of the program material. In SPLIT CUE mode, the left meter displays the level of the CUE signal and the right meter displays the level of the program signal. MASTER / BOOTH LEVEL CONTROLS MASTER - the Master control adjusts the Master output level of the Xone:DX. The Master output is provided by balanced XLR connectors and unbalanced Phono/RCA connectors. BOOTH - the Booth control adjusts the Booth output level of the Xone:DX. This allows for adjustment of the DJ booth monitor speaker without altering the Master output level. LIBRARY NAVIGATION See Page 19. HEADPHONE MONITORING PHONES LEVEL CONTROL - adjusts the level of the signal sent to the head phones. The headphones can be connected to the Xone:DX via 1/4 inch and 3.5mm Jack sockets. SPLIT CUE - The Split Cue button sets the monitoring system to Split Cue mode, illuminating the corresponding LED. ! Warning ! To avoid damage to your hearing do not operate the headphones or sound system at excessively high volume. Continued exposure to high volume sound can cause frequency selective or wide range hearing loss. Allen & Heath User Guide for XONE:DX with Serato ITCH 1.7 18 LIBRARY NAVIGATION The library contains all the music that you have added to ITCH. By using ‘Browse’ and ‘Search’ you can easily narrow down your selection to find the track you want. TIP: You can change the size of your library text by using the keyboard shortcuts Ctrl + and Ctrl -. HARDWARE NAVIGATION CONTROLS AREA - Pressing the AREA button will toggle between ‘Files’, ‘Crates’ and ‘Browse’ panels within ITCH. SORT COLUMN - Pressing AREA and SHIFT will toggle between the first four columns in your Library to sort. Use the ◄ (BACK) button to move the cursor between adjacent columns in the browser view or to move through any ‘Browse’ field available. SCROLL - The SCROLL knob controls cursor movement in ITCH allowing you to navigate up and down through the library. FWD - Use the FWD button to move the cursor between adjacent columns in the browser view, or to move through any ‘Browse’ field available. PREP - Pressing SHIFT and FWD will add the song selected in your library to the prepare panel. Use the ► (FWD) button to move the cursor between adjacent columns in the browser view or to move through any browse field available. VIEW - Pressing VIEW will swap between library view and full virtual deck and waveform view. MOUSE AND KEYBOARD As well as using the Xone:DX control surface you can also use the cursor keys and mouse to navigate the library. The cursor keys work as UP, DOWN, FWD and BACK. SEARCHING ITCH includes a search function to help you find tracks quickly and easily. Just enter text into the search box and ITCH will automatically find as you type. TIP: Use the keyboard shortcut CTRL + F to jump to the search box. This keyboard shortcut will also take you out of any crate or playlist that you might be in and into your main library, so you can find any track in your collection. If you then click on a crate or playlist, the search query will be cleared. To select which fields the search function will look through, click on the left hand side of the search box. The drop down menu shows which fields are currently being used. Press ESC or the X button on the right of the search box to clear the search. Allen & Heath User Guide for XONE:DX with Serato ITCH 1.7 19 LIBRARY NAVIGATION BROWSING Press the VIEW button to open the ‘Browse’ panel. Use the SCROLL KNOB to navigate the ‘Browse’ panel. The ‘Browse’ panel will open above the main file library. The filters are ‘genre’, ‘BPM’, ‘artist’, and ‘album’. You can narrow down your search by selecting the specific genre, BPM or name of the track you’re looking for and ITCH will show the results on the main library window. You can move between the four filters with the ► (FWD) and ◄ (BACK) buttons, the computer keyboard or by clicking with the mouse. LIBRARY STATUS ICONS The column at the far left shows the status of each track, examples of these icons are below. ITCH has detected some corruption in the MP3 file. If possible, re-encode the MP3.* The track has been imported from the iTunes library. The track has been imported from iTunes but is corrupt * The track cannot be found. Most likely the file has been renamed or moved. ITCH is trying to import a track from the iTunes library, but cannot find the file. Tracks that are read-only have a locked icon. * See CORRUPT FILES page 60. PREPARE The ‘Prepare Panel’ is an area for holding tracks, much like preparing a set by lifting records partially out of your record bag. Click the ‘Prepare’ button in ITCH to open the ‘Prepare Panel’. Navigate through your library with the keyboard and use the mouse to drag tracks or crates into the prepare window or onto the prepare tab. These tracks will be removed from the prepare panel once they have been played. All tracks in the prepare panel will be discarded when you exit ITCH. You can also hold down the SHIFT and press the SCROLL knob on the Xone:DX to add the currently selected song to the prepare crate. Allen & Heath User Guide for XONE:DX with Serato ITCH 1.7 20 TRANSPORT CONTROLS ASSIGNING A DECK The Allen and Heath Xone:DX has the ability to control 4 virtual decks, with a layer switchable deck selection for the left and right deck controls. By pressing the LAYER button on deck 1/2 you will switch between controlling either virtual deck 1 or virtual deck 2 inside ITCH with the left hand deck controls. By pressing the LAYER button on deck 3/4 you will switch between either virtual deck 3 or virtual deck 4. When you have selected your deck the platter control section, loop section, cue section will become active for that virtual deck only. Switching between decks will alter the deck control’s LED colour allowing you to quickly see which deck you have selected and which parameters you are able to adjust for the selected deck. You can still use all the Xone:DX mixer, effects and library functions in any deck mode. LOADING A DECK Once you have located the track you want to play in the library, you can load it using the deck LOAD button. PLAY / PAUSE To begin playback press the PLAY / PAUSE button for that deck on the Xone:DX. Playback will start from the beginning of the track. Pressing PLAY / PAUSE during play back will pause playback at the current position. Pressing it again will resume playback from that position. NOTE: When ‘Play from Start’ is selected on the setup screen, the deck will try to skip any silence at the start of the track, and play from the start of the audio. See page 54. TEMPORARY CUE The temp cue function allows you to set a temporary cue point in a track that is not saved into the file. This is useful for finding a point in a track and then being able to easily start again from this point as you get your mix right. While paused you can use the platter to fine tune the playhead placement to ensure your cue point is set exactly on a downbeat. If no temp cue is set, pressing the TEMP CUE button while playback is paused will create one at the current playhead location. Once the temp cue is set, holding the TEMP CUE button whilst paused will play from the temp cue point. Releasing the button will pause playback and return to the temp cue. This is good for stuttering in the start of a track. If you press the PLAY/PAUSE button whilst you are holding down the TEMP CUE button, playback will continue when you let both buttons go. This allows you to cue a track in from pause mode and then continue playback once you know the mix is right. The TEMP CUE button can also be pressed whilst the track is playing at any point to return to this point and put the deck in pause. To change the location of the temp cue put the deck in pause with the playhead at a different location and press the TEMP CUE button again. The temp cue point is also useful to repeatedly start from a preset point in the track. This allows you to easily drop in a few times until you get it right. Allen & Heath User Guide for XONE:DX with Serato ITCH 1.7 21 TRANSPORT CONTROLS PLATTER The Xone:DX platters have different modes depending on what state of play the virtual decks are in. When the track is playing, the platters are either in BEND, SCRATCH or SCRUB/SKIP mode, depending upon the state of the SCRUB/SKIP light. Press the SCRUB/SKIP button to cycle through the modes. The SCRUB/SKIP light indicates which mode you are in. BEND MODE (PLAYING) When the SCRUB/SKIP light is out, the platters are in BEND mode. When in BEND mode, platter movements bend the pitch of the audio up or down to align the beats of one track to another. SCRATCH MODE (PLAYING) When the track is playing, and the SCRUB/SKIP light is permanently on, the platters are in SCRATCH mode. Platter movements push the track forwards and backwards to find a specific part of the audio, much like moving a record. Playback will continue as soon as you stop moving the platter. If you desire to release playback in your own time, or you want to cue something up, hold SHIFT while moving the platter. Playback will then not begin until SHIFT is released. SCRUB/SKIP MODE (PLAYING) When the track is playing, and the SCRUB/SKIP light is flashing, the platters are in SCRUB/SKIP mode. If the loaded track has a beatgrid, platter movements SKIP the playhead forwards and backwards whilst retaining the synchronisation of the master clock. Each full platter rotation will skip eight bars. If the loaded track does not have a beatgrid, platter movements SCRUB the audio, just like when a track is paused. PITCH The playback speed of the track is controlled by the PITCH knob. By default the knob is set to fine tune pitch adjustments, and turning the knob anti-clockwise will slow the track down, turning it clockwise will speed the track up. Pressing and holding the PITCH knob down will allow you to make coarse (big) pitch adjustments. The PITCH LED lights will illuminate to indicate an increase or decrease in pitch. When using SYNC with two or more tracks, adjusting the PITCH of any one track will adjust the tempos of all the other Synced tracks, keeping the Sync lock. PITCH RANGE You can change the pitch range of the XONE:DX pitch knob from +/-8% to 16% or 50%. To change the pitch range to the next available amount hold SHIFT and press the PITCH knob down. NOTE: ITCH can play your music at a large range of speeds with or without keylock. For more information see Keylock on page 30. Allen & Heath User Guide for XONE:DX with Serato ITCH 1.7 22 HOTCUE POINTS HOTCUE POINTS The Xone:DX features controls for four hotcue slots. To create a hotcue point, press one of the HOTCUE buttons for the deck. The button will light up to show that there is a point set. To delete a hotcue point hold SHIFT and press the HOTCUE button for the point you want to delete. Once a hotcue point is set, you can trigger it at any time by pressing the relevant HOTCUE button. If playback is paused, triggering a hotcue point will play from that point for as long as the button is held down, and will return to the hotcue point and pause when the button is released. TIP: Holding down the HOTCUE button and pressing play will switch to play mode. You can also jump to cue points using keyboard shortcuts. You can only jump to hotcue points on the currently selected deck layer: 1 through 4 for the cue points on deck layer 1+2 6 through 9 for the cue points on deck layers 3+4 Your hotcue points are saved to the file and recalled the next time it is loaded. They are not lost if the file is moved or renamed. If you press and hold these keyboard shortcuts while the track is playing, the cue point will be repeatedly triggered, producing a stuttering effect. TIP: The rate of cue point stuttering is controlled by your operating system keyboard repeat rate settings. Windows users: Keyboard properties are in the Control Panel. Mac users: Keyboard and Mouse are in System Preferences. TIP: If no cue is present, then the CUE buttons set the cue point. Pressing again will play the cue point. VISUAL AID : CUE POINT STATUS Notice that the stripe on the Virtual Deck jumps to the 12 o’clock position and changes colour when you set a cue point - you are at the cue point when the stripe is one solid colour and at the 12 o’clock position. As the track plays on beyond the position of the cue point, the coloured stripe will shorten by a fifth for each rotation. Likewise, as you approach the cue point, the colour will grow by a fifth each rotation. Each hotcue point is displayed in a different colour: Hotcue 1 Hotcue 2 Hotcue 3 Hotcue 4 - Red Brown Blue Yellow Allen & Heath User Guide for XONE:DX with Serato ITCH 1.7 23 LOOPING LOOPING There are three different types of looping you can use in ITCH; Manual, Auto-Loop and Loop Roll. ITCH automatically defaults to Auto-Loop mode. Loop areas show up green in the main waveform display. AUTO LOOP Auto looping allows you to create loops that will automatically sync in time with the music. This is great for creating loops on the fly and other creative mixing techniques. The loop length can range from 1/32 of a beat up to 32 beats long (8 bars) and is calculated using the tracks BPM value (tracks must have a BPM value set for auto looping to be available). Choose the loop length using the LENGTH knob on the Allen & Heath Xone:DX. The current auto loop length is displayed beside the virtual deck inside ITCH. Press the loop ON / OFF button to activate the auto loop with the selected loop length, which is snapped to the beat closest to the playhead. The length can be adjusted while the loop is active using the LENGTH knob. The loop is disabled by pressing the ON / OFF button again. LOOP MOVE / SHIFT Press the left or right MOVE buttons to shift the selected loop region to the left or right. It will move the loop region the same distance as the length of the loop itself in the direction you select. The loop region length will remain unchanged. The loop will only be moved when it reaches its endpoint. LOOP ROLL LOOP ROLL performs a standard auto-loop but when the loop is turned off the playback position is returned to the position where it would be if it had not entered the loop (much like censor). The range of values available for loop roll is 1/32 of a beat through to 32 bars. Use short loop lengths to create “stutter” type effects. The other difference between loop roll and standard auto loop is the “roll” is momentary. To activate loop roll press and hold down the LENGTH knob, releasing to turn the roll off. You can change the loop roll length by turning the dial clockwise or anti-clockwise to select a longer or shorter loop roll time division, even when holding down the knob. The current loop roll length is displayed beside the virtual deck and is the same as the auto-loop length. NOTE: When LOOP ROLL is selected when in a manual or auto loop, this will override the other loop mode, and the track will jump back to where the playhead would have been as if you exited the original loop when activating loop roll. Allen & Heath User Guide for XONE:DX with Serato ITCH 1.7 24 LOOPING MANUAL LOOPS To create a manual loop you must enter an IN and an OUT point allowing you to create unique loops or loop lengths for music, for which you don’t have BPM information. Scrub through the track until you find the desired loop start and press the IN button in the Loop Section. Then scroll the track until you find the desired out point, at which you can press the OUT button to set the loop outpoint and turn the loop on. The ON/OFF button will light to indicate that you are in a loop and playback will begin to loop between the IN point and the OUT point. Turn the loop off by pressing the ON/OFF button. Whilst in a manual loop, pressing the IN or OUT buttons and moving the deck platter will adjust the position of the IN or OUT points to fine-tune your loop. Holding SHIFT and pressing the OUT button will clear that out point. Holding SHIFT and pressing the IN button will clear that in point. STORING LOOPS You can store manual or auto loops for recall at a later stage. To store a manual loop hold down SHIFT and press STORE LOOP to automatically store in the current slot. To store an auto loop hold down SHIFT and press STORE LOOP to automatically store the loop to the next empty loop slot. TIP: To lock or unlock a loop click the small lock icon inside the ITCH loop interface. NOTE: You can’t alter or save to a locked loop slot. RECALL LOOPS / LOOP JUMP To recall a loop press SHIFT + SLOT SELECT to cycle through all available stored loops inside ITCH. Pressing ON will activate the recalled loop and immediately jump to the beginning of the loop. Pressing SHIFT + ON will activate the loop. However, the playhead won’t jump to the loop start but wait until the playhead reaches the loop region before looping. Allen & Heath User Guide for XONE:DX with Serato ITCH 1.7 25 BEATGRID / SYNC / AUTO TEMPO THE BEATGRID A beatgrid is a series of markers within a track that indicate a beat or a transient within the music structure. A beatgrid allows ITCH to know precisely where each beat occurs, and where each bar is within the music structure. This accurate beat information opens up the possibilities for users to further manipulate a track and for precise track syncing and advanced looping features. Calculating the track’s BPM when analyzing an audio file will evaluate the average BPM of a given track. Some track’s BPMs are linear, so setting an accurate beatgrid is easy, only requiring you to set the first downbeat Beat Marker. If you have tracks with variable BPMs you can also set custom beat markers, which will snap the track more accurately to the grid. BEATGRID WAVEFORM VIEW The beatgrid is placed on top of the waveform overview. It is displayed as follows: A thick white bar line bar indicates the beginning of each bar. Each beatgrid bar has the bar number at the top of the marker. The first downbeat Beat Marker will be number 1. Each beatgrid bar is divided up into 4 thin line divisions. A thick red line will indicate a manually set Beat Marker. BEFORE CREATING A BEATGRID Setting up a beatgrid relies on the track having an accurate BPM value calculated, so ITCH can set the beatgrid markers on the track’s beats or transients. (See page 46 for Analyzing Files.) NOTE: The BPM analyzing has been greatly refined in ITCH 1.6 and later. It is highly recommended that you force re-analyze your entire library again using this new analyze calculation. In offline mode, hold down Ctrl and click the ‘analyze files’ button to re-analyze your files. CREATING A BEATGRID ITCH will attempt to determine the first transient (this could be a kick drum or bass note) and use this to calculate the first Beat Marker. Once the first Beat Marker is set, ITCH uses the track's BPM to automatically create a beatgrid throughout the track. If the BPM is very accurate this could be all you need to do. If not, you may need to adjust the beatgrid, or place further Beat Markers to allow for some tempo variations. To check if the beatgrid has calculated the markers correctly you can skip forwards into the track to see if the markers fall on the beats or not (after a breakdown is a good place). It is also a good idea to go to the track’s outro and see if the markers are still falling on the beats. Allen & Heath User Guide for XONE:DX with Serato ITCH 1.7 26 BEATGRID / SYNC / AUTO TEMPO SET A BEAT MARKER Pressing SET will place another marker at the playhead position. The Beat Marker will snap to the closest transient. SETTING A BEAT MARKER WHEN PLAYING A TRACK When you press SET when playing a track you can tap in markers. The Beat Marker will snap to the closest transient. CLEARING A MARKER If you have set an incorrect marker, or you don’t want the first cue point to be the track’s downbeat, you can clear one or more markers. To clear the closest marker to the playhead press SHIFT + SET to delete. NOTE: To clear all markers, continually press SHIFT + SET until the entire beatgrid disappears. ADJUST THE GRID Beatgrid markers may not always be correctly estimated, so you may need to make occasional adjustments. To adjust the beatgrid hold the ADJUST button and move the platter back and forth. The beatgrid will expand or contract to follow your movements from your last set Beat Marker (the red line). When you are happy with the placement of the grid, release the ADJUST button and you can stop moving the platter; the grid will stay adjusted. SLIP BEAT GRID If your beatgrid is sitting perfectly on the track’s beats but the track’s groove or feel is sounding slightly out, you may need to slip the beatgrid. This will move the entire grid slightly to get a perfect fit with the other track’s groove. To slip the grid hold down SHIFT + ADJUST and move the platter to suit. SKIP When beatgrid is set for a track, you can SKIP using the platters to move forwards and back wards in tempo synced jump divisions. Each full platter rotation will Skip 8 bars. SYNC There are two ways to Sync the tracks together: SYNC USING BPM BPM Sync is an advanced feature that will automatically align the transients (usually the drums) in the playing tracks. If neither track being synced has a beatgrid, then a one time sync is performed that aligns the Allen & Heath User Guide for XONE:DX with Serato ITCH 1.7 27 BEATGRID / SYNC / AUTO TEMPO transients at that time but does not aim to keep the tracks' tempos matched. If you have dropped your next track in but it’s not quite in time, by pressing SYNC you can perform an automatic beat sync. Pressing the SYNC button will snap the current/slave track’s beat with the master track’s beat (see ‘Master Clock/Slave’ below). SYNC works by snapping the two closest transients together. It is best when the tracks' tempos are as close to each other as possible. You may also want to press auto-tempo to match the tempos (see Auto Tempo below). SYNC USING BEATGRID If your track has a Beatgrid then syncing a track will permanently snap to the other track’s beatgrid markers. Press SYNC to sync tracks together. Using Beatgrid Sync this way, will continually snap the beatgrid of both tracks together, keeping the tracks synced together permanently, even if you alter one of the track’s pitch dial or the track itself alters tempo. NOTE: The slave track will attempt to snap to the master track’s BAR position, not just the closest transient. AUTO TEMPO To simplify getting your tracks in time, ITCH features auto tempo. Pressing SHIFT + SYNC (AUTO TEMPO) for a deck will automatically match its tempo to that of the other track’s BPM value. Auto tempo requires a BPM value to be set for each track to work. NOTE: Using auto-tempo is not as precise as using a beatgrid with SYNC. With auto-tempo you may find a BPM ‘average’ slowly drifts out, or your tracks don’t sync to the start of bars. MASTER CLOCK / SLAVE When using the SYNC function ITCH uses a Master Clock, which is a master tempo that all decks are synced to. The Master Clock will show in the middle of the virtual deck area, and will indicate which decks are currently synced to the displayed tempo value. The Master Clock will take its tempo from the first deck on which the SYNC function is engaged. All subsequent decks which use the SYNC function will have their tempo synced to that of the Master Clock. If the pitch of any synced deck is adjusted, the Master Clock and all other synced decks will also be adjusted to match. The Master Clock will be cleared if all decks which are synced then have the SYNC function disengaged. Allen & Heath User Guide for XONE:DX with Serato ITCH 1.7 28 BEATGRID / SYNC / AUTO TEMPO KEYBOARD SHORTCUTS & BEATGRID IN THE OFFLINE PLAYER The following keyboard and mouse shortcuts can be used instead of using the controls on the Xone:DX. To use these shortcuts Grid Edit mode must be turned on, which is done by clicking the Grid Edit button on the Virtual Deck or by pressing Alt + Space Bar (repeatedly pressing Alt + Space Bar will cycle through the Virtual Decks). These shortcuts can also be used to create and edit Beat Grids in the ITCH offline player. Function Keyboard Grid Edit Mode On/Off Alt + Space Bar Save Grid Changes Cancel Grid Changes Set Grid Marker Delete Closest Grid Marker Enter Esc X Delete Delete All Markers Adjust Beat Grid Fast Adjust Beat Grid Slip Beat Grid Shift + Delete Left/Right Arrow* Shift + Left/Right Arrow* Ctrl + Left/Right Arrow* Shift + Ctrl + Left/Right Arrow* Tap the Space Bar Fast Slip Beat Grid Tap Calculate Beat Grid Mouse Click "grid edit" on virtual deck/offline player Alt + double click Alt + Shift + Click Alt + hold click and drag * For all the left/right arrow key commands, you can use the up/down arrow keys instead when in vertical display mode. Allen & Heath User Guide for XONE:DX with Serato ITCH 1.7 29 ADVANCED PLAY FEATURES KEY LOCK Normally when changing the speed of a track you will hear a change in the pitch of the music. With KEYLOCK on, when you change the speed the pitch will stay the same. This is useful to avoid two tracks sounding out of tune when mixing them together. Press the KEYLOCK/ QUARTZ button on the Xone:DX to turn keylock on and off. QUARTZ LOCK When QUARTZ LOCK is on, the pitch is reset to zero. This overrides any PITCH SHIFT or slider settings. Any pitch setting you might have will return once you turn QUARTZ LOCK off. Hold down the SHIFT button then press the KEYLOCK/QUARTZ button to turn QUARTZ LOCK on and off. CENSOR Pressing the CENSOR button on the Xone:DX reverses playback temporarily. When released, playback resumes from where the playhead would have been if censor was not pressed. It is used to censor out portions of a track. REVERSE Pressing SHIFT + CENSOR will toggle reverse playback on. CONTINUOUS AUTOPLAY Click the CONT button inside ITCH’s virtual deck area to enable continuous autoplay. With this setting turned on, when one track finishes playing, the next track starts automatically. Load from a crate to play through the songs in that crate, or from your library to play through your library. NOTE: Play from start must be checked in the setup screen for auto play to work correctly, see page 54. REPEAT When the end of the track is reached, the track will return to the start and playback will continue. Allen & Heath User Guide for XONE:DX with Serato ITCH 1.7 30 EFFECT UNITS The Xone:DX features two effects processors. Each mixer channel can be sent to either or both of the effect units. DEPTH The DEPTH knob controls the amount the effect is applied to the control signal. MOD The MOD DEPTH knob controls the modulation depth or feedback of the effect. X The X knob controls extra effect parameters. TIME ITCH effects are synchronized to the track’s BPM. The effect parameters will modulate or repeat at the cycle division you set with the TIME knob. Each of the time settings represent a division of a single beat. A value of ‘1’ means a 1 beat cycle, so a value of ‘4’ indicates 4 beats (a whole bar), while ‘¼‘ indicates a quarter of a beat (a musical 16th note). TIME will alter a different effect parameter for each effect. Check the effects types on page 32 to see which parameter this controls for the chosen effect. ON/OFF Switches the effect ON and OFF. The LED will illuminate when the effect is on. TAP/AUTO Tap mode is useful for when you are playing a track without BPM information, or if you want to create a unique time division. Pressing the TAP/AUTO button in time with the beat will enter manual BPM mode, with the LED flashing in time with the inputted tempo. To revert to Auto Tempo mode again, just hold down the TEMPO button until the LED is permanently illuminated. BEATS / FREE Pressing the BEATS/FREE button will allow user to enter freeform mode with the TIME dial while the button is illuminated. Freeform mode allows the user to use the knob to dial through time divisions that aren’t synced with the beats, scrolling through millisecond divisions for more fine tuned effects manipulation. Pressing the BEATS/FREE button again will revert back to syncing the effect to the track’s beats. Allen & Heath User Guide for XONE:DX with Serato ITCH 1.7 31 EFFECT UNITS SELECTING AN EFFECT Press the SELECT EFFECT button to enter effect select mode. Rotate the TIME/ACTIVATE knob to scroll through the effects list inside ITCH pressing the ACTIVATE knob down to select. FX CUE (SHIFT Mode) Pressing SHIFT and the SELECT EFFECT button will send the effected signal to audition on your headphones. FX CUE is useful to audition the effect before bringing it into the mix when the effect is switched off. When FX CUE is active the LED will flash. NOTE: FX CUE will be muted when using certain buffered effects (ECHO and REVERB). Allen & Heath User Guide for XONE:DX with Serato ITCH 1.7 32 EFFECT TYPES This chapter describes the basic effects shipped with the Xone:DX and ITCH 1.6. Check online for new updates and new effect types: www.serato.com/downloads/itch REVERB Reverb is a series of small natural delays or reverberations of the audio signal, creating a spacious atmospheric trail such as you would hear in a cave or in an enclosed space. These reverb ’reflections’ are audio ripples that sound like the music is bouncing around from wall to wall. As a digital effect, reverb can allow you to create a sense of space and atmosphere. The time knob adjusts how long the reverb trail is held before dissipating. As the reverb depth becomes fully wet, the original sound gradually disappears. DELAY A delay is when a part of the audio signal is repeated at a later stage. Often called an echo, the delayed signal will repeat the audio signal for a set amount of times (‘feedback’). Increasing the FX MIX level will blend the delay level into the original level, until you have 100% delay blended into the original signal. ECHO Similar to the Delay, the Echo effect will repeat the original signal at a later stage for a set number of times before the echo trail dissipates. Echo emulates classic Tape Echo effect units, with a warmer, more analogue sound, where the user is able to control the warmth/colour of the effected signal, rather than a clean digital delay. The level will increase as the effect wetness is increased, until only the full wet delay is playing with no original signal. LPF (Low Pass Filter) The Low Pass Filter acts like an equalizer that cuts the top end out of the frequency spectrum, allowing only the audio below the filter cut off point to pass through, sweeping down towards the low end of the signal. Resonance can be added, making the effect cut off point more pronounced. HPF (High Pass Filter) The High Pass Filter acts like an equalizer that cuts the bass out of the frequency spectrum, allowing only the audio above the filter cut off point to pass through, sweeping up towards the top end of the signal. Resonance can be added, making the effect cut off point more pronounced. PHASER The phaser uses filters to shift the frequency spectrum to create a sweeping effect on the audio source. A low frequency oscillator will alter the speed of the sweep, the feedback will adjust the intensity of the effect. The FX mix will change the depth and feedback of the effect. FLANGER The flanger effect is when two identical sound sources are mixed together at slightly different times, creating a more natural sounding audio sweep up and down the frequency spectrum as you change the time parameter. As you feedback more of the original source into the effect, the flanger will become more intense. The FX mix will change the depth and feedback of the effect. Allen & Heath User Guide for XONE:DX with Serato ITCH 1.7 33 EFFECTS EFFECT TYPES TYPES TREMOLO The Tremolo modulates the signal volume, lowering and increasing it rhythmically to the set time divisions, as if you were performing a series of cuts on the mixer’s cross fader. The TIME knob determines the rate of the volume drop, while the FEEDBACK knob modifies the modulation on the signal volume. The depth of the cut is determined by the WET/DRY amount, with 100% being a cut to silence. BITCRUSHER Bitcrusher adds distortion and lowers the bit rate resolution of the audio source. This effect can either sound glitchy or overdriven depending on what point your feedback or bit depth is set to. REPEATER This effect repeats audio chunks similar to a loop roll function. You can control Repeater mix depth, the ‘chance’ the playing audio stream will be repeated, the count at which the audio section will be repeated for, and the time of the audio division to be repeated. REVERSER This effect reverses a section of the audio signal, mixing it with the original audio. You can control the depth of the effect mix, the length of the audio stream to be reversed, and the probability of repeating audio. BREAKER The breaker acts like a classic turntable styled 'stop' breaking function, where the audio winds down to a complete stop before resuming playback once again. Depending on the length of the time set this effect can sound like a quick fire stop button break all the way through to the classic "turning the turntable off" technique, allowing the audio to slow down to a complete stop. Allen & Heath User Guide for XONE:DX with Serato ITCH 1.7 34 DIRECT INPUT In the unlikely event of a software or computer failure, the Xone:DX has a Direct Input system that allows an external audio source to be played through its balanced output stage while the software or computer is restarted. It is also possible to perform a hard reset on the soundcard whilst the software or computer is shut down. DIRECT INPUT SOCKET The 3.5mm Direct Input socket is located on the rear panel below the chassis earth Terminal, this allows for the connection of an external audio source in the event of a system failure. It is recommended that the external audio source used has its own output level control to avoid overload if connected to a large sound system. ANALOGUE OUTPUT CONTROL The MIX and BOOTH controls provide analogue control over their corresponding outputs. This allows for complete attenuation of the soundcard outputs (MIX 1-2, BOOTH 3-4) in the event of a system failure. The MIX output is attenuated before the balanced output stage, so the position of the MIX Level control will not affect the level of the audio on the Direct Input socket. SOUNDCARD HARD RESET The internal soundcard of the Xone:DX can be reset by pressing the recessed button in the base of the unit. The button is located to the right of the front left rubber foot. The soundcard should only be reset if the Xone:DX fails to connect after the software or computer has been restarted. WARNING: Please ensure that the MIX and BOOTH level controls are fully down (anti-clockwise) before the reset button is activated as digital enumeration noise may be passed to the soundcard outputs. SYSTEM RESTORE SEQUENCE In the event of a system failure: 1. 2. 3. 4. 5. 6. Turn down the MIX and BOOTH output controls Start playback on the external device that is connected to the Direct Input socket Restart software and computer if necessary Reset soundcard if necessary Turn up MIX and BOOTH outputs and mix software audio to external audio Stop playback on external audio device Allen & Heath User Guide for XONE:DX with Serato ITCH 1.7 35 SOFTWARE OVERVIEW The above screenshot displays the ITCH software. To achieve a detailed overview, the software GUI will be split into the following sections: BROWSER / LIBRARY EFFECTS MASTER SECTION DECKS WAVEFORM / BEATGRID Allen & Heath User Guide for XONE:DX with Serato ITCH 1.7 36 SOFTWARE OVERVIEW - BROWSER / LIBRARY 1 2 3 4 5 6 7 8 11 10 9 1 ALBUM ART Displays the cover art for the selected album. 2 FILES Displays the Files Panel, which enables you to search any connected hard drives for tracks to import into your library. 3 BROWSE Displays the Browse Panel, which enables you to browse your library for tracks by genre, BPM, artist and album. 4 PREPARE Displays the Prepare Panel, which contains tracks you have pre-selected for your set. 5 HISTORY Displays the History Panel, which contains tracks that have already been played. 6 TOOL TIPS Enables or disables the Tool Tips Display, which provides a dialogue box with a description of the software feature when you place your mouse over it. 7 SETUP - Opens the Software Setup screen. Allen & Heath User Guide for XONE:DX with Serato ITCH 1.7 37 SOFTWARE OVERVIEW - BROWSER / LIBRARY 1 2 3 4 5 6 7 8 11 10 9 8 SEARCH - Searches your library for the text entered in this field. 9 LIBRARY - Displays the songs available in your current selection. 10 CRATE LIST - Displays the list of Crates and Sub-Crates available. 11 CPU USAGE METER - Shows overall CPU usage for your computer. Allen & Heath User Guide for XONE:DX with Serato ITCH 1.7 38 SOFTWARE OVERVIEW - EFFECTS 1 2 3 4 5 6 7 1 CURRENT EFFECT The currently selected effect applied to the channel. 2 DEPTH The amount of CURRENT EFFECT applied to the selected audio sources. 3 PARAMETER 1 (MOD DEPTH) The first parameter for the CURRENT EFFECT. 4 PARAMETER 2 (INTENSITY) The second parameter for the CURRENT EFFECT. 5 TIME Displays the time division for the CURRENT EFFECT. 6 AUTO A Displays which source tempo the CURRENT EFFECT is following. Will show MASTER when a track is syncing to Master Clock. 7 CUE Displays if the effect is being sent to the headphone cue for auditioning. Allen & Heath User Guide for XONE:DX with Serato ITCH 1.7 39 SOFTWARE OVERVIEW - MASTER SECTION 1 4 2 5 3 6 7 8 9 10 1 MASTER SYNC Displays which decks are syncing to the Master Clock. 2 MASTER CLOCK Displays the current Master Tempo. 3 RECORD BUTTON Starts / stops recording. 4 TEMPO MATCH DISPLAY Displays tempos of all tracks to visually aid mixing. 5 RECORDING TIMER Timer for current recording. 6 SAVE BUTTON Saves the current recording to disk. 7 RECORDING FILENAME FIELD Filed for entering filename to save current recording. 8 RECORD SOURCE SELECTOR Drop down menu to select recording source. 9 RECORDING METER Peak Program meter for recording input. 10 RECORD GAIN Adjusts the level of the recording. Allen & Heath User Guide for XONE:DX with Serato ITCH 1.7 40 SOFTWARE OVERVIEW - VIRTUAL DECKS 1 2 3 4 5 1 VIRTUAL DECK FOCUS Displays the currently focused deck layer. 2 ARTIST NAME Artist tag for the current track. 3 AUTOLOOP VALUE Shows the current autoloop setting in beats. 4 TRACK NAME Title tag for the current track. 5 6 7 6 7 PLAYBACK MODE Toggles between single and continuous playback modes. Single playback mode plays only one track, stopping when it is finished. Continuous playback mode will automatically play the next track in the crate when one track ends. Whenever a new track is loaded the setting will remain the same. REPEAT MODE Toggles repeat mode on or off for the track (when playback mode is set to single) or crate (when playback mode is set to continuous). Whenever a new track is loaded this will default to OFF. KEY Key tag for the current track. Allen & Heath User Guide for XONE:DX with Serato ITCH 1.7 41 SOFTWARE OVERVIEW - VIRTUAL DECKS 12 11 8 8 TRACK OVERVIEW An overview of the currently loaded track’s entire waveform. 9 PITCH RANGE Displays the current value of the Pitch Range. 10 PITCH Applied pitch offset as a percentage. 11 TRACK TIME DISPLAY Displays the current position of the playhead in the track. 12 9 10 BPM FIELD / TAP BUTTON Displays the track’s BPM, or if the track has a Beat Grid displays the Grid BPM. You can click this field to ‘tap’ out a time, from which the software will approximate and save a new BPM. If there is no BPM for the track, it will display TAP to prompt you to tap out a suggested tempo Allen & Heath User Guide for XONE:DX with Serato ITCH 1.7 42 SOFTWARE OVERVIEW - WAVEFORM / BEATGRID 1 6 2 3 4 1 WAVEFORM FOCUS Displays the currently focused waveform. 2 WAVEFORM Waveform of the currently loaded track. 3 BEATGRID BEAT MARKER A thick red line will indicate a manually set Beat Marker. 4 BEATGRID BAR DIVISIONS Each bar is divided up into four thin line divisions. 5 BEATGRID MARKER The beginning of each beatgrid bar. 6 BAR NUMBER Each bar has the bar number at the top of the beatgrid marker. Allen & Heath User Guide for XONE:DX with Serato ITCH 1.7 5 43 MAIN SCREEN OVERVIEW VIRTUAL DECK The virtual deck shows the speed and position of a track. When a track is loaded to the virtual deck it will change from black to white with a black stripe. As the track progresses, the virtual deck will rotate. The circular progress bar around the edge is a visual representation of the position within the track, and will begin flashing 20 seconds from the end of the track to warn you that the track is nearing its end. TRACK DISPLAY When a track is loaded, the track name, artist, length and pitched BPM are displayed in the track title bar. If any of this information is not contained in the file it will not be displayed. Displayed below this are pitch, playback, repeat and auto loop. The time and remaining time are displayed in minutes and seconds. The pitched BPM is the recalculated BPM value of the track relative to the position of the PITCH knob. Pitch displays the pitch value relative to the position of the PITCH knob. PLAYBACK allows you to select which playback mode you want. SINGLE means once the end of the track is reached you will hear silence. CONT means when the end of the track is reached the next track in the playlist will commence. If REPEAT is on, when the end of the track is reached the track will return to the start and playback will continue. Auto Loop displays the current loop slot. For more on loops see page 24. TAP TEMPO If a track has no BPM information stored, the tap tempo box is displayed where the BPM is usually displayed in the track title bar. Pressing Alt + space bar activates the tempo tapper for the layer focused left virtual deck (press Alt + space bar a second time to activate the tempo tapper for the layer focused right virtual deck). Changing the layer focus will enable you to tap tempo for the other virtual decks. To calculate, tap the space bar along with the beat. After you’ve tapped the first beat, you can switch to double time tapping, halftime, start of each bar etc. The range is set by the first two taps, after that you can switch to any steady rhythm you feel comfortable with – quarter notes, half note, whole notes. The Esc key resets the BPM, the enter key saves the BPM to the track. You can also use the mouse if you prefer by clicking in the tap tempo box and clicking the mouse button in time. NOTE: You don’t need to be at Zero on the PITCH knob, ITCH does the maths for you. Allen & Heath User Guide for XONE:DX with Serato ITCH 1.7 44 MAIN SCREEN OVERVIEW TRACK OVERVIEW DISPLAY This area provides a complete overview of the waveform of the track and includes a marker to show the current position within the track. This view is useful for finding transitions within the track. The waveform is coloured according to the spectrum of the sound; red representing low frequency bass sounds, green representing mid frequency sounds and blue representing high frequency treble sounds. You can jump to different positions within the track by clicking on the track overview display. Grey lines behind the overview show the length of the track - a thin grey line every minute, and a thick grey line every 5 minutes. If you have not analyzed your files the overview will be filled when you load the track onto a virtual deck. TIP: Analyze files before you play. MAIN WAVEFORM DISPLAY This area provides a close-up view of the track, including colour-coding to show the frequency of the sound; red representing low frequency bass sounds, green representing mid frequency sounds and blue representing high frequency treble sounds. You can also switch to a 3-band spectrum view by holding the Ctrl key and clicking on the waveform. Click and hold on the waveform to ‘scrub’ or make fine adjustments to your position within the track. The main waveform is zoomed around the current position in the track. TIP: Use the + and – keys to zoom in and out. NOTE: The waveforms scale with the PITCH knob to make it easier to see when beats are aligned and in time. TEMPO MATCHING DISPLAY The tempo matching display area provides a helpful tool for beat matching. ITCH detects the beats within the track and places a row of red peaks (for the tracks on virtual decks 1 and 3) above a row of orange peaks (for the tracks on virtual decks 2 and 4) in the tempo matching display area. When tracks are matched to the same tempo, the peaks will line up. This display does not show the relative timing of the beats, only the tempos of the tracks. The peaks will still line up when the tracks are playing at the same tempo but are out of sync. Allen & Heath User Guide for XONE:DX with Serato ITCH 1.7 45 IMPORTING MUSIC ADDING FILES TO THE ITCH LIBRARY There are several ways to add files to your ITCH library: Press the AREA button on the Allen & Heath Xone:DX until the files panel opens in ITCH where you can browse your hard drives for music to add. Loading a file to either deck from the files panel will automatically add it to your library. You can also access the files panel in ITCH using your mouse by clicking on the files button in the main screen. You can drop files and folders directly into the library (including crates) or straight onto either virtual deck. Dragging a file or folder from Finder or Explorer into ITCH will also add the track to your library. TIP: Dragging a folder into the crates view will instantly create a Crate. Any external hard drive connected to your computer will show in the files panel. You can add files to your library from an external drive just like you would do when importing from the internal hard drive of your computer. If the external hard drive is not connected when you run ITCH any files added from this drive will not display in your library. The library information for files on your external drive is stored on the drive itself. This means if you add tracks on an external drive to your library and then plug that external drive into another machine running ITCH, the crates and tracks will automatically be visible in the other machine’s library. SHOWING YOUR ITUNES LIBRARY ITCH can import your iTunes™ library allowing you to play your iTunes music and access playlists. To enable this feature go to the set up screen, open the Library tab and check the ‘Show iTunes’ library box. NOTE: Your iTunes library can be minimized by clicking the iTunes library folder icon. HOW TO GET MUSIC FROM CDS INTO ITCH ITCH does not have a CD ripping function. We suggest you use a third party application to convert your audio CDs into a suitable file type for ITCH. We recommend 320 kbps MP3 files for a good balance of audio quality and file size. ITCH can play Audio CDs direct from your computer’s CD ROM or DVD drive; however playback performance can be impeded by the speed of the drive and computer. NOTE: We recommend ripping your CDs rather than playing from them directly. SUPPORTED FILE TYPES .MP3, .OGG, .AAC, .AIF, .WAV, .WL.MP3 Fixed and variable bit rate files are both supported. Tracks protected by DRM are not compatible with ITCH. Allen & Heath User Guide for XONE:DX with Serato ITCH 1.7 46 PREPARING FILES ANALYZING FILES Before you play your music in ITCH it is very important to analyze your files first. The analyze files function processes the tracks in your library to detect file corruption, prepare the waveform overviews, and if enabled, calculate the BPM values. HOW TO ANALYZE FILES To analyze your files open ITCH with the Allen & Heath Xone:DX disconnected. On the lower right side of the main screen you will see the analyze files button. Click this to automatically analyze all the tracks in your library that haven’t already been analyzed. TIP: You can also drag and drop individual folders, crates and files onto the button to analyze small or specific groups of files at a time. To force ITCH to re-analyze all files, hold Ctrl while clicking on the analyze files button. Dragging a file, folder or crate which has already been analyzed onto the button will also force ITCH to re-analyze these files. SET AUTO BPM If this option is checked, ITCH will calculate the BPM and add the value to your file during the analyze files process. The range drop down allows you to specify the BPM range of your tracks to avoid half or double BPM values being calculated. For example: You have a selection of house tracks, that you guess are in the 120 - 130 BPM range. Set the drop down range to 68-135 BPM, setting the lower and upper limits. That way, when ITCH runs into a 120 BPM file, it will know for sure that it is 120 BPM, and not a half value of 60 BPM (60 BPM is lower than the set threshold of 68 BPM). NOTE: As Auto BPM is part of the analyzing file process, it will not apply to any files that already have already been analyzed. Re-analyze these files with a new range to recalculate the BPM. TRACK GAIN Use the track gain knob to adjust the volume of individual tracks in your library. Any adjustment made to the gain of a track is saved to the file and will be reapplied when it is loaded again. The level meter shows the level sent to the hardware interface after both individual track gain and master gain adjustments. Offline Player The offline player is available when the Xone:DX is not connected and will output through the current default audio device. Load a track to the offline player by dragging and dropping onto the offline player or by pressing shift+left arrow. If the end of the loaded track is reached, the next track in the current playlist will automatically play next. TIP: The offline player is a useful tool for preparing crates, auditioning tracks, and setting cue and loop points. Allen & Heath User Guide for XONE:DX with Serato ITCH 1.7 47 ORGANISING YOUR LIBRARY ITCH can support an unlimited number of tracks – the only limitation is the size of the hard drive of your computer. A number of features are included to help you to keep your music organized and find tracks quickly and easily. MAIN LIBRARY VIEW CRATES ITCH uses digital crates for quick access to your favorite collections. There is no limit to the number of crates you can create, and any given track can be placed in multiple crates. The crate area is on the left hand side of the library. For example, you could organize your tracks into the following crates, where any one track would be filed in more than one crate. • Hip Hop • French Hip Hop • UK Hip Hop • Instrumental Hip Hop • Old School Hip Hop • Hip Hop Loops To make a new crate, click the + button. To rename a crate, double click the crate name. You can change the order of tracks within a crate by dragging them up or down. TIP: The ‘Protect Library’ option in the setup screen applies to removing, editing and renaming crates. Check this option to prevent changes to your crates. See page 55. SUBCRATES You can drag and drop crates into other crates to make subcrates. If you drag a crate to the very left of the crate panel, it will stay in the top level of the crate structure. If you drag the crate a little to the right, onto the name of another crate, it will make the crate you are dragging a sub crate of this crate. Subcrates can be opened and collapsed, allowing you to have a large number of crates whilst making them easy to browse. Allen & Heath User Guide for XONE:DX with Serato ITCH 1.7 48 ORGANISING YOUR LIBRARY SETTING UP COLUMNS The track information display area can be customized to display any of the columns listed below. • album • artist • bitrate • BPM • comment • composer • filename • genre • grouping • key • label • length • location • remixer • sampling rate • size • track • year Clicking on the triangle at the top right of the library will show the list so you can turn fields on and off. You can resize columns by grabbing the edge and dragging to the width you want. TAGGING Editing ID3 tags Much of the information associated with each track can be edited from within ITCH. Double click on the field within the main library to edit it. Filename, length, size, bit rate and sampling cannot be edited, this information is saved in the file itself. Note that the ‘Protect Library’ option in setup must be unchecked to allow edits (see page 55). TIP: Use the keyboard shortcut Ctrl + E to edit text. Hold down the Ctrl key and move with the arrow keys to change to a different field while staying in edit mode. When you have more than one track selected, editing tags changes all the tracks in your selection. TIP: The second column in the library is the label colour for that track. Click it to bring up a colour palette, and customize the virtual deck for that track. NOTE: Tracks that are read-only have a locked icon. ALBUM ART MP3 files can contain album art. To display this album art, click the show album art button. There are many third party applications available for adding album art to MP3s. LIBRARY AUTO-BACKUP ITCH will create a folder on your hard disk called Serato where it stores your library database, crate information and other information. The Serato folder is located in the ‘My Music’ folder on Windows and in the ‘Music’ folder on Mac. ITCH will also create a Serato folder on any external drive that you have added files from into the library. When you first exit ITCH you will be prompted to backup your library. This creates a copy of the Serato folder on your system drive and on any connected external drives containing a Serato folder. The backup folder is called ‘SeratoBackup’. After the initial backup, you will be prompted to backup again if the last backup on that drive is older than a week or if no backup exists. ITCH will only keep ONE backup at a time, so each time you backup ITCH will overwrite the previous backup. NOTE: If you have a previous version of ITCH or Scratch Live installed, the library folder will be called ScratchLIVE not Serato. Allen & Heath User Guide for XONE:DX with Serato ITCH 1.7 49 ORGANISING YOUR LIBRARY LIBRARY MANAGEMENT RESCAN ID3 TAGS The Rescan ID3 tags button is found in the Files panel and re-reads file tags for the entire library. Use this function if you have edited or modified file tags in other software. TIP: Rescanning the tags is a handy way to identify any files that can’t be found, for example, if the files have been re-named or moved. These tracks are then shown as red in the library pane, with a question mark icon in the status column. RELOCATE LOST FILES The relocate lost files button is located in the files panel. If you’ve moved the location of files which are already in your library, they will show up as not found and be displayed in red. Drag and drop a folder from Finder (Mac) or Explorer (Windows) onto the relocate lost files button to search it, and any subfolders, for files currently marked as not found in your library. Doing this will update the database with their new location. NOTE: Clicking the relocate lost files button will search all attached drives for missing files and can take some time. SERATO SCRATCH LIVE COMPATIBILITY Serato ITCH uses the same library as Serato Scratch Live. If you are an existing Scratch Live user all your music, loops and cue points will be available in ITCH. If you create a library in ITCH and then install Scratch Live the music loops and cues from ITCH will automatically be available in Scratch Live. Any changes made in either program will be written to the library so if you have existing cue and loop points, be aware of this when moving between systems. Allen & Heath User Guide for XONE:DX with Serato ITCH 1.7 50 HISTORY Pressing the history button in ITCH opens History Panel. This is a complete log of all the tracks you have played (in sessions) and allows you to export your ITCH session information as a data file. Each session is catalogued by date and time. Using the drop down arrow, you can navigate to and view detailed information of any previous sessions. There are columns for the period (i.e. date of session), name of track and artist name. In addition, these other categories listed below will give you more detailed information about your sessions: START TIME When viewing a track row, the start time of the track is displayed. When viewing a session row, the start time of the session is displayed with the date (in real time value). END TIME When viewing a track row, the end time of the track is displayed. When viewing a session row, the end time of the session is displayed with the date (in real time value). PLAYTIME When viewing a track row, the total played time of the track is displayed (e.g. 00:03:00). When viewing a session row, the total elapsed time of the session is displayed with date (e.g. 10/09/08 01:38:16). DECK The virtual deck the track was played on will be displayed under the deck column. In the track row, either left or right is displayed. The offline player will be listed as offline. NOTES Use this field to list particular information about your tracks and each session (i.e., note how you transitioned from one track to another). START SESSION / END SESSION To start or end a session, click the corresponding button. INSERT TRACK If you wish to add information for tracks not played in ITCH into your session (e.g., if you played one of your favorite vinyl or CD), select the track you want to insert after and click the insert track button. Double click the inserted track fields and edit your information accordingly. (Note that when exporting an m3u playlist [see ‘Exporting’ overleaf] inserted tracks will not be present.) Allen & Heath User Guide for XONE:DX with Serato ITCH 1.7 51 HISTORY Export You can export each session as a data file using the export button. Select a session, then choose your preferred file format, and click export. There are three possible export formats: • text - to create a simple text file with your session information contained within. • csv - to create a file for use in spreadsheet software. • m3u - to create a playlist file, which can be imported into media players. Note that an m3u does not contain audio itself, it only points to the location of your audio files. (Inserted tracks within sessions will not be included in an m3u playlist.) TIP: To make a new ITCH crate containing your session information, select a session and drag it to the ‘+‘ crate button. (This will automatically name the crate with the session date). Allen & Heath User Guide for XONE:DX with Serato ITCH 1.7 52 RECORDING AND AUXILIARY & MIC INPUTS RECORDING ITCH can capture recordings of your mix output, mic, or aux input channels. Recording controls are grouped into a strip below the Master Clock section. Select the source to record from the drop down menu. The recording meter shows the signal level that will be recorded to disk. The Mix source records the master output signal, post faders and EQ, pre master gain. Adjust the recording level using the controls for the applicable source being recorded. Click the REC button to start and stop recording. To save the recording to disk, type a filename into the text field, and click SAVE. Recordings are saved in the recordings folder inside your main library folder. If you forget to save a recording a temporary file will be saved to your Recordings Temp folder until you record again. NOTE: You can select the file format and bit depth for your recording in the playback tab of the setup screen. AUXILIARY INPUTS The Allen & Heath Xone:DX features 4 stereo auxiliary inputs. They are as follows: DECK 1 DECK 2 DECK 3 DECK 4 - LINE LINE / PHONO LINE / PHONO LINE / MIC NOTE: For decks 2-4 you will need to push the LN/PH or LN/MIC buttons to select between Line and Phono/Mic input. THRU MODE Setting a channel to thru mode allows you to monitor and play an external source connected to the aux inputs (e.g turntable / CD player etc). To set a channel to thru mode, press SHIFT + CUE. When in THRU mode, the CUE LED will light up orange. When a channel is set to thru, the deck identifier will change to say 'thru', and if you have a track loaded the waveform will turn grey. Allen & Heath User Guide for XONE:DX with Serato ITCH 1.7 53 ADDITIONAL SETUP The setup screen allows you to customize elements of ITCH to how you want them to work. Click the associated tabs to switch between five groups of options; Hardware, Playback, Library, Display, and Mixer. The version and build number of ITCH are displayed in the lower left hand corner of the setup screen. Also located here is the check for updates button. Click this to go online and see if there is an updated version of ITCH available. NOTE: You must be connected to the Internet for ‘Check for Updates’ to work. SOFTWARE VERSION The ITCH software version is displayed in the bottom left corner of the setup screen. The check for updates button will launch your web browser and take you to http://www.serato.com to tell you if there are updates available for your version of the ITCH software. HARDWARE OPTIONS FIRMWARE: Click the update firmware button to update your firmware if any update is displayed as available. GENERAL: USB BUFFER SIZE (LATENCY) - ITCH processes audio data in small chunks. When smaller chunks are used, the movement of the platter is translated into audio more often, which results in a lower overall system latency. However, this requires more processing power and therefore a higher CPU load, so lower buffer size settings require a more powerful computer to produce uninterrupted audio. If you want tighter control, you should try decreasing this setting; on the other hand, if you experience audio dropouts, you need to increase this setting (or use a more powerful computer). PLATTER SPEED - Changes the virtual deck speed between 33RPM and 45RPM. Allen & Heath User Guide for XONE:DX with Serato ITCH 1.7 54 ADDITIONAL SETUP PLAYBACK OPTIONS GENERAL: PLAYBACK KEYS USE SHIFT - With this option on, all cue point, loop, and general playback keys on the computer keyboard require Shift or Caps Lock to function. LOCK PLAYING DECK - When this option is checked, you can only load a track to a deck if it is paused. HI-FI RESAMPLER - This significantly reduces digital distortion at very slow or very fast playback speeds, increasing the CPU load slightly. This option is on by default. ON SONG LOAD: PLAY FROM START - Positions the playhead at the start of each track when loaded. If this setting is not enabled, freshly loaded tracks will continue to play from the point in the loaded track. This option is on by default. This option is overridden by ‘instant doubles’ and ‘play from first cue point’ options. NOTE: When ‘play from start’ is selected on the setup screen, the deck will try to skip any silence at the start of the track, and play from the start of the audio. INSTANT DOUBLES - This allows you to quickly match the playhead position of the same file on each deck. With this option set, when you load a track on one virtual deck that is already loaded on another virtual deck (it must be the same file), the playhead will jump to the position of the track that was loaded first, with the keylock state and looping settings copied. This setting overrides the ‘play from start’ and ‘play from first cue point’ options. PLAY FROM FIRST CUE POINT - Enable this option to start all tracks from the first cue point when loaded. This setting overrides the ‘play from start’ option. If the track has no cue points set it will play from the start. Allen & Heath User Guide for XONE:DX with Serato ITCH 1.7 55 ADDITIONAL SETUP BRAKING This controls how fast the track stops when the deck is paused. Counter-clockwise, the stop is immediate. Clockwise rotation increases the stopping time from a finger grab all the way to a slow turntable power-down. RECORDING: BIT DEPTH Select the recording bit depth as either 16 Bit or 24 Bit. FILE FORMAT Select the file format you wish the recording to be saved as (AIFF or WAV). LIBRARY OPTIONS SONG LIBRARY OPTIONS: SHOW ITUNES LIBRARY - Shows the current default iTunes library and iTunes playlists in the ITCH library. NOTE: The iTunes library can be minimized by clicking the small triangle in the blue iTunes folder icon. NOTE: ITCH cannot play files that have been protected by Digital Rights Management systems, such as those previously sold through the Apple iTunes Music Store. PROTECT LIBRARY - Uncheck this setting to remove tracks and crates from your library. Enable to lock your library and prevent accidental track or crate deletion. Enabling this setting will also lock all file tags and crate names, so that no text can be changed. CUSTOM CRATE COLUMNS - Check this option to set custom column views for each crate and playlist. When the option is off (default), all crates will share the same column configuration as the ‘All...’ crate. CENTER ON SELECTED SONG - With this option on, scrolling up and down in your library holds the selected track in the middle of the library panel. Allen & Heath User Guide for XONE:DX with Serato ITCH 1.7 56 ADDITIONAL SETUP SHOW ALL FILE TYPES Enable this option to show all files when importing tracks into your library. If this option is not selected, only files that ITCH can play will be displayed. INCLUDE SUBCRATE TRACKS Displays the tracks from any subcrates in their parent crate. With this off browsing in a crate will not show tracks that are in any subcrates of that crate. DISPLAY OPTIONS USER INTERFACE SETTINGS: MAXIMUM SCREEN UPDATES This slider allows you to lower ITCH’s screen refresh rate and potentially use less CPU. Users with slower computers or those running a recording program at the same time might like to do this if they are having performance issues. The default setting is 60 Hz, or refreshed 60 times per second. This setting applies to the entire ITCH user interface: the Virtual Decks, the Waveforms, the library, and the setup screen. HORIZONTAL WAVEFORMS Display the main waveforms horizontally across the bottom of the screen. LEFT VERTICAL WAVEFORMS Display the main waveforms vertically on the left side of the screen. RIGHT VERTICAL WAVEFORMS Display the main waveforms vertically on the right side of the screen. Allen & Heath User Guide for XONE:DX with Serato ITCH 1.7 57 ADDITIONAL SETUP MIXER OPTIONS GENERAL: CROSSFADER - Use the dropdown menu to configure the crossfader. There are three options: Normal: Standard crossfader style. Reverse: Reversed crossfader aka hamster style. Disabled: Crossfader is disabled. EQ - Gives you the option to select either 6DB or 12DB of gain for your equalizers. OUTPUT - Allows you to set the audio output to Mono or Stereo. HEADROOM - Use this dropdown to select how much additional headroom you would like. Each channel initially has 3dB headroom. Less headroom results in a louder output. CUE: OVERDRIVE - Turns up the headphone volume. CUE MIX - Allows you to adjust the balance of what you hear in the headphones. Turn the dial towards MSTR to adjust the balance towards the MASTER output or towards CUE to adjust the balance towards the CUE signal. FADERS: C/F CURVE - Adjusts the crossfader curve. Turn the dial to the left for a tighter "cut" and to the right for a more gradual fade. U/F CURVE - Adjusts the upfader curve. Turn the dial to the left for a tighter "cut" and to the right for a more gradual fade. Allen & Heath User Guide for XONE:DX with Serato ITCH 1.7 58 WHITELABEL AUDIO FILES Whitelabel audio files are a unique file format (file extension wl.mp3) developed by Serato. They are specially prepared for use in ITCH, with files pre-analyzed, tagged with song and artist info, BPM and album art where possible. Whitelabel audio files play as high quality 320kbps stereo audio in ITCH with an ITCH controller attached. Without an ITCH controller connected, or when playing these files through other mp3 software and devices, they will play as low quality 32kbps mono audio. Whitelabel audio files are promotional releases from record labels available to ITCH DJs for free from Whitelabel.net. WHITELABEL .NET The Serato Whitelabel Delivery Network is a unique system that allows record labels to digitally deliver promotional releases directly to DJs. To download Whitelabel audio files and to sign up to receive updates on the latest promotional releases, visit http://www.whitelabel.net/. Locked whitelabel .net Files Due to some labels’ licensing requirements, certain whitelabel audio files will require email and password verification to unlock them. If you have legitimately downloaded these tracks yourself, entering the email and password you use for whitelabel.net will unlock the files for playback within ITCH. If you are still having problems unlocking these files, please contact Serato support: www.serato.com/support. SYSTEM REQUIREMENTS Whitelabel.net is tested to work on these browsers: Internet Explorer 6 and above (7 and above highly recommended) Firefox 3 and above Safari 3 and above You will also need Flash installed and have Javascript enabled to be able to preview and download tracks. NOTE: Running Whitelabel audio files through Mixed In Key can cause the files to only play at 32kps in ITCH (even with an ITCH controller attached). At this time we advise you not to use Mixed In Key with Whitelabel audio files. Allen & Heath User Guide for XONE:DX with Serato ITCH 1.7 59 TROUBLESHOOTING AND SUPPORT TROUBLESHOOTING The following suggestions may help you if you are experiencing poor performance with ITCH. • Check for updates using the check for updates button in the setup screen or by visiting http://www.serato.com/itch • Close all other open programs Disable wireless and wired networking connections • Disable bluetooth devices • Disable antivirus software • Disable screen savers • Disable sleep mode • Increase the USB buffer size • Connect the Allen & Heath Xone:DX directly to a USB port on your computer, not via a USB hub • Try all USB ports, some work better than others Unplug other USB devices Run your laptop connected to power supply For more troubleshooting help visit http://www.serato.com/itch SUPPORT SOFTWARE UPDATES AND ONLINE SUPPORT For ITCH software updates and online support visit the ITCH website: http://www.serato.com/itch To help us with your support enquiry please have the following information available: - ITCH software version - Operating System - Computer model and system specifications OFFICIAL SUPPORT CHANEL For Allen & Heath Xone:DX hardware support and customer service, including warranty cover, contact your local Allen & Heath distributor or visit the website: www.xone.co.uk or http://allen-heath.helpserve.com Allen & Heath User Guide for XONE:DX with Serato ITCH 1.7 60 CORRUPT FILES Corrupt file: This MP3 contains invalid frames. This MP3 contains frames which do not conform strictly to the official MP3 specification. ITCH can not be certain that this file will play back 100% accurately. Corrupt file: This file contains corrupt frames that This file contains two or more contiguous corrupt frames. Since may result in audible glitches. corrupt frames are replaced with silence, this could result in what might sound like an audio glitch. Corrupt file: This file has been split. You should check the beginning for audio glitches. The first MPEG audio frame in this file refers to audio that should be present before it but is not. This is usually the result of incorrect MP3 editing. Since a corrupt frame is replaced with silence and most songs start with silence, the resulting silence might not be noticeable. All the same, listen to the beginning of the song, just to be sure. Corrupt file: This MP3 contains frames with cor- Decoding of an MPEG audio frame failed. This means that the frame rupt data. contained invalid data. As usual with corrupt frames, this frame will be played as silence. Corrupt file: This MP3 lost syncronization between ITCH is reading an old overview of an MP3 that has been edited in a the frame index and the frames. 3rd party editing program. Re-building the overviews for the affected files usually corrects this error. Corrupt file: This MP3 is completely invalid and is Self explanatory. Possible causes are disk bad sectors, file system not playable. corruption, wrong file types, wrong file extensions, etc Corrupt file: This file contains invalid audio data. ITCH encountered a lot of invalid data while looking for audio in this file. This message alerts you to the fact that the file you're trying to play contains corrupt data. This may, or may not, affect playback. Corrupt file: This MP3 contains no valid frames. No audio could be found in this file, which means it is completely unplayable as far as ITCH is concerned. Please make sure this really is an audio file. Unsupported file: This MP3 contains multiple lay- While scanning this file, ITCH found frames belonging to multiple ers. MPEG layers. ITCH does not support MP3s that contain frames from multiple layers – some frames may be output as silence. Unsupported file: This file is more than 2GB in Self explanatory. At the moment, ITCH does not support files that size. are 2GB in size (or larger). Unsupported file: This file has data blocks greater This file contains chunks of data that are larger than 2GB. ITCH than 2GB in size. does not support files that are more than 2GB in size. Corrupt file: This WAV contains no valid chunks. This WAV file contains no recognizable WAV data. It is quite possible that this might not be a WAV file. Unsupported file: This file's data is not in PCM WAV files can contain data in several formats. ITCH only supports format. WAV files that contain data in the PCM format. Unsupported file: This file has a sampling rate ITCH does not support sampling rates greater than 48 kHz. If you greater than 48kHz. see this message, the simplest approach is to re- sample the audio at 48 kHz and re-save the file. Unsupported file: This file uses more than 24 bits ITCH supports a maximum of 24 bits per sample of audio data. per sample. Corrupt file: This WAV is incomplete. ITCH expected more data in the file, but found none. This could be because the file was incorrectly truncated or because the data in the file is corrupt, causing ITCH to incorrectly estimate the amount of data present in the file. Corrupt file: This file contains corrupt blocks. This file contains blocks of data that report their size to be zero. This message was inserted to identify files that might cause lockups on previous versions of ITCH. ITCH could not find any audio in this file. Please check to make sure this file contains audio in a format that ITCH supports. Corrupt file: This song contains no audio data. Corrupt file: This song contains invalid samples. This file contains samples of audio that are too small to represent accurately and will therefore be truncated to zero. This should not result in any audible audio artifacts, but could cause audio dropouts on earlier versions of ITCH. Allen & Heath User Guide for XONE:DX with Serato ITCH 1.7 61 MIDI CONTROL VALUES - MIXER / FX SECTION CC0 CC15 CC16 CC32 F#-1 B-1 A0 D1 G-1 C0 Bb0 Eb1 CC17 CC4 CC7 CC25 CC1 CC19 CC24 CC10 CC2 CC5 CC23 CC26 CC9 CC11 ▼E-1 C#-1 D-1 Eb-1 F-1 CC22 CC12 CC27 CC14 CC34 ▼ Bb-1 G1 G#1 A1 B1 CC21 CC18 CC20 E0 F0 CC33 G#-1 Bb-1 A-1 C#0 Eb0 ▼G#0 D0 B0 F#0 C1 C#1 E1 F1 F#1 G0 CC3 CC6 CC8 CC28 C2 CC13 The MIDI messages transmitted from the MIXER and FX sections are as shown above. All messages are transmitted on MIDI Channel 12. Allen & Heath User Guide for XONE:DX with Serato ITCH 1.7 62 MIDI CONTROL VALUES - VIRTUAL DECKS C#-1 F-1 Bb-1 F#-1 B-1 D-1 G-1 C0 Eb-1 G#-1 C#0 ▼Eb0 C#-1 F-1 Bb-1 ▼Eb0 F#-1 B-1 CC35 D-1 G-1 C0 E0 Eb-1 G#-1 C#0 CC35 A0 Bb0 G#0 E-1 E0 ▼F0 G0 A-1 D0 F#0 RED Layer Channel 13 GREEN Layer Channel 14 A0 Bb0 G#0 E-1 ▼F0 G0 A-1 D0 F#0 RED Layer Channel 15 GREEN Layer Channel 16 The MIDI messages transmitted from the virtual decks are as shown above. It can be seen that the note and controller values are the same for both the left and right-hand decks. The messages are differentiated by the MIDI Channel that they are transmitted on. LAYER BUTTONS The behaviour of the layer button differs slightly to all of the other buttons within the virtual deck. If the left deck is on the RED layer (MIDI Channel 13), when the LAYER button is pressed its note message will be transmitted on Channel 14. This is to represent the fact that the GREEN layer transmits on Channel 14 (on the right-hand deck this would be Channel 16). Similarly, if the left deck is on the GREEN layer (MIDI Channel 14), when the LAYER button is pressed its note message will be transmitted on Channel 13 (Channel 15 for the right-hand deck). Allen & Heath User Guide for XONE:DX with Serato ITCH 1.7 63 MIDI RETURN VALUES C#-1 D-1 Eb-1 F#-1 B-1 A0 D1 G-1 C0 Bb0 Eb1 G1 F-1 G#1 A1 B1 G-1 C0 E0 G#-1 C#0 C#-1 C#-1 G-1 C0 G#-1 C#0 E0 CC17 F0 Bb-1 CC4 CC7 Eb0 C#1 CC25 F0 F#1 CC31 CC31 C2 G#0 E-1 G#0 G0 A-1 D0 E-1 F#0 RED Layer Channel 13 GREEN Layer Channel 14 MIXER / FX Channel 12 G0 A-1 D0 F#0 RED Layer Channel 15 GREEN Layer Channel 16 The LED’s on the Xone:DX can be turned On and Off via MIDI messages that are received from software. In the case of a switch state, a ‘Note On’ message will turn an LED ON and the corresponding ‘Note Off’ message will turn an LED OFF. A ‘Note On’ message with a velocity of zero is seen as a ‘Note Off’. The messages that illuminate the LED’s in the virtual decks are differentiated by MIDI Channel number. PITCH DISPLAY - The pitch display is controlled via a ‘Control Change’ message where MIDI value 63 will be the centre point when no pitch adjustment has been made. MIDI Value 0 and 127 will be the extremities of + and - pitch adjustment. CHANNEL METERS - The Channel Meters are controlled via a ‘Control Change’ message where MIDI value 0 relates to no signal and MIDI value 127 relates to full-scale signal. Allen & Heath User Guide for XONE:DX with Serato ITCH 1.7 64 USB 2.0 DAC DAC DAC DAC ADC Analogue Audio Digital Audio In Digital Audio Out MIDI In MIDI Out MIC ADC R I A A ADC R I A A ADC BLOCK DIAGRAM Allen & Heath User Guide for XONE:DX with Serato ITCH 1.7 65 SPECIFICATIONS Frequency Response SC in to SC out 96kHz Sample Rate 10 Hz to 20kHz +0/-1.0dB 10 Hz to 30kHz +0/-3dB THD + N Line In to Line Out +8 dBu < 0.008% Maximum Output Level (Balanced) +14dBu Maximum Output Level (Unbalanced) +8dBu Maximum Input Level +9dBu Dynamic Range Output 100dB System Dynamic Range Line In to Line Out 94dB Mic Sensitivity -50dBu to –30dBu RIAA Input Sensitivity 7-48mV 1KHz/330pF Dimensions and Weights The console is fitted with rubber feet for desktop operation. Width Height Depth Weight Desktop 400 mm(15.8”) 50 mm(2.0”) 325 mm(12.8”) 4.6kg (10.1 lbs) Packed 505 mm(19.9”) 140 mm(5.5”) 470 mm(18.5”) 6.0kg (13.2 lbs) 68.73 18.73 325.00 17.60 400.00 65.24 Allen & Heath User Guide for XONE:DX with Serato ITCH 1.7 66 REGISTERING YOUR XONE:DX See more products from ALLEN & HEATH at: www.allen-heath.com Large Live Sound mixers — iLive digital, ML and GL Series Small Format Live Sound mixers — ZED, MixWizards and PA Series DJ products — Xone Series Sound Management Series — iDR Series Registering your product Thank you for buying the Allen & Heath Xone:DX ITCH Controller.. We hope that you are happy with it and that you enjoy many years of faithful service with it. Please go to www.allen-heath.com/register.asp and register your product’s serial number and your details. By registering with us and becoming an official Registered User, you will ensure that any warranty claim you might make is actioned quickly and with the minimum delay. Alternatively, you may either copy or cut off this section of the page, fill in the details, and return it by mail to: Allen & Heath User Guide for XONE:DX with Serato ITCH 1.7 67