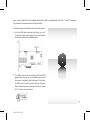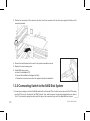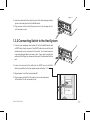
1
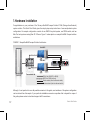
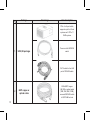
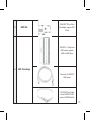
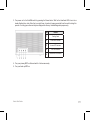
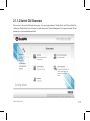
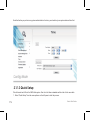
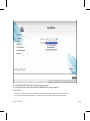
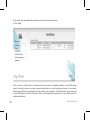
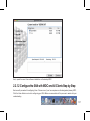
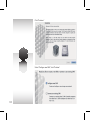
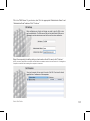
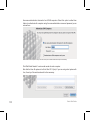
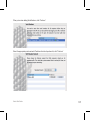
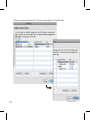
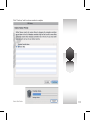
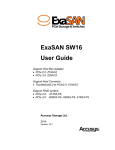
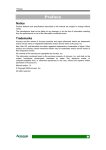
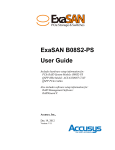
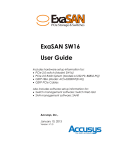
Compact Solution
Quick Start Guide
Includes setup information for :
Hardware set up: PCIe Switch SW04/08-G2, PCIe RAID System A08S-PS, QSFP cables and HBAs, Also
incloud software setup information for: Exsan Setup, Xsan setup.
2011, V.2
ExaSAN Compact Solution Quick Start Guide
TABLE OF CONTENTS
Page#
Hardware Installation.......................................................................................................................................1
Checking the Equipment You’ll Need.............................................................................................3
Understanding the Installation Steps................................................................................................. 6
Setting up the Hardware.........................................................................................................................6
Connecting to a Power Source and Powering On................................................................10
Software Installation and Configuration...............................................................................................13
ExaSAN Setup.............................................................................................................................................14
Xsan Setup...................................................................................................................................................20
Technical Support............................................................................................................................................35
The System Log..........................................................................................................................................36
Contact Us...................................................................................................................................................36
Our Website................................................................................................................................................. 36
Quick Start Guide
1
Hardware
Installation
Quick Start Guide
P1
1.Hardware Installation
Congratulations on your purchase of the “Accusys ExaSAN Compac Solutiont” SAN (Storage Area Network)
system solution. This Quick Start Guide gives the step-by-step setup instructions of one sample basic system
configuration. Our sample configuration consists of one RAID 8-bay disk system, one SW04 switch, and two
Mac Pro host systems running Mac OS X Server. Figure 1 below depicts our sample ExaSAN Compact solution
architecture.
FIGURE 1. Sample ExaSAN Compact Solution Architecture
Xsan MDC
Xsan MDC
SW04
A08S-PS
ConnectionLink
PCIx4 link (A08S-PS to SW04)
QSFP link (SW04 to Host)
Public network (Host to ether net switch)
Private network (Host to ether net switch)
Although it is not practical to cover all possible scenarios in this guide, most variations of the system configuration
can be derived from this sample. If your particular installation encounters a problem that is beyond the scope of
this guide, please contact our technical support staff for assistance.
P2
Quick Start Guide
1.1 Checking the Equipment You’ll Need
The list below consists of all the equipment you’ll need to set up the ExaSAN Compact Solution.
Note that while items 1 through 7 are Accusys-supplied equipment, they are not necessarily part of the ExaSAN
switch package. Refer to Packing List for a complete list of accessories which are included in your SW04 package.
With the help of your local ExaSAN distributor, any Accusys-supplied equipment which is not in the switch package
should have been ordered and delivered separately.
Also note that while items 8 through 11 are necessary for the system, they are not Accusys-supplied equipment and
therefore would not have been ordered from Accusys. Again with the help of your local ExaSAN distributor, your
other equipment should have been acquired from other vendors.
Verify that you have all of the system components before commencing hardware installation.
1. ExaSAN PCIe RAID disk system A08S-PS, one unit
2. ExaSAN PCIe Switch SW04, one unit
3. ExaSAN PCIe Switch Host Bus Adapters, one for each supported workgroup host system
4. QSFP PCIe copper or optical cables for connecting the switch to the workgroup host systems, one for each host
system
5. External PCIe x4 cable for connecting the switch to the RAID disk system, one unit
6. Power cords, one for the RAID system and another for the switch
7. CAT-5 cable for the LAN port of the switch, one unit
Quick Start Guide
P3
Package
Item Image
Item description
PCIe 4 or 8-port switch,
supports up to 4 or 8 host
systems and 3 PCIe 1.1
RAID systems
1
SW04/08 package
Power cord for SW04/08
switch
CAT-5 cable for the LAN
port of SW04/08 switch
2
P4
QSFP copper or
optical cable
20Gb QSFP copper
(2M, 5M) or optical cable
(10M, 30M, 50M, 100M),
connects SW04/08 switch
to QSFP HBA on host
3
QSFP HBA
20Gb QSFP PCIe x4 Host
Bus Adapter, supports PCIe
2.0 slot
10Gb PCIe 1.1 8-bay tower
RAID system, supports
SATA and SAS drives
4
A08S-PS package
Power cord for A08S-PS
RAID system
1.5M 10Gb PCIe x4 cable,
connect A08S-PS RAID
system to SW04/08 switch
P5
8. Ethernet switch and CAT-5 patch cables for the private Ethernet network of your SAN, one switch and one cable
for each host system
9. SAN management software (Xsan 2.0 and MetaSAN is recommended,also Xsan is included in MacOS 10.7).
10.Eight SAS (Serial Attached SCSI) or SATA (Serial Advanced Technology Attachment) HDD’s for the A08S-PS
RAID disk system (note that Enterprise HDD is recommended)
11.Two computers running Mac OS X Server operating system
1.2 Understanding the Installation Steps
Below is an outline of the installation steps for you to follow.
Step 1 Unpacking the switch, check against included packing list
Step 2 Installing Disk Drives, refer to the A08S-PS User Manual for instructions
Step 3 Installing HBA
Step 4 Connecting Switch to the RAID Disk System
Step 5 Connecting Switch to the Host Systems
Step 6 Connecting the Private LAN
Step 7 Powering the System On
Step 8 Create Array for Xsan Configuration
Step 9 Xsan Software Installation
Step 10 Xsan Configuration
1.3 Setting up the Hardware
1.3.1 Installing the HBA
Before the ExaSAN Compact Solution components are ready to be connected and powered on, you must install
one HBA in each workgroup client system. The HBA is compatible with PCIe x4, x8, and x16 slots. If a choice is
P6
Quick Start Guide
given, use the fastest PCIe slot available. Although the HBA is compatible with both PCIe 1.1 and 2.0 standards,
only the latter is recommended for best performance.
Follow these steps to install the card in each host system:
1. Hold the HBA with mounting plate facing your left.
Locate the “mode” jumper switch on the north edge at
center-right, as shown and labeled below.
2. This HBA card can be used both in DAS and SAN
applications, whether or not the HBA card was just
purchased or originally used in storage. In this case,
the HBA card is used for connecting the Compact
Switch. Please make sure the switch button is toward
the “1” position, as shown below.
P7
Quick Start Guide
3. Position the connector of the card over the slot, insert the connector into the slot, press gently but firmly until it
is securely seated.
4. Secure the metal bracket of the card to the system case with a screw.
5. Replace the outer casing cover.
6. Install HBA device driver
a. Insert the Installation CD
b. Launch the Installation Package (for Mac)
c. Follow the on-screen instructions to complete the driver installation
1.3.2 Connecting Switch to the RAID Disk System
1. Connect your storage unit to the ExaSAN switch with an External PCIe x4 cable. Insert one end of the PCIe cable
into the PCIe port on the back of the RAID system. Your cable connector is securely plugged when you hear a
"click". If you need to unplug the cable, pull the ring on the connector firmly until it is detached from the port.
P8
Quick Start Guide
2. Insert the other end of the cable into one of the three storage module
ports on the rear panel of the ExaSAN switch.
3. Plug a power cord into the AC power-in port in the storage unit; do
not turn power on yet.
1.3.3 Connecting Switch to the Host System
1. Connect your workgroup host system #1 to the ExaSAN switch with
a QSFP cable. Insert one end of the QSFP cable into one of the host
module ports on the rear panel of the switch. Your cable connector
is securely plugged when you hear a click. If you need to unplug the
cable, pull the ring on the connector firmly until it is detached from the
port.
2. Insert the other end of the cable into the QSFP port on the HBA,
which you installed on the host system earlier in Section 1.3.1.
3. Repeat steps 1 and 2 for host systems #2.
4. Plug a power cord into the AC power-in port on the rear panel
of the switch. Do not turn power on yet.
Quick Start Guide
P9
1.3.4 Connecting the Private LAN
In addition to the ExaSAN PCIe network, all computers for the SAN must be connected to a private Ethernet
network (the Private LAN). Xsan MDC servers and clients use this network instead of the ExaSAN network to
exchange file system metadata. Connect each SAN client and MDC servers to two Ethernet networks: one private
subnet for the SAN metadata and a separate connection for directory service, intranet, and Internet traffic (the
Public LAN).
The steps below apply to the Private LAN only. We assume that the Public LAN is already in place.
1. Connect your workgroup host system #1 to the private LAN Ethernet switch with a CAT-5 cable.
2. Repeat Step 1 for host systems #2.
3. Connect the ExaSAN switch to the private LAN Ethernet switch with a CAT-5 cable.
The client and metadata controller computers need static (fixed) IP addresses for both public and private Ethernet
network connections. Don’t use DHCP to assign dynamic IP addresses to Xsan devices. We suggest that you use
the following ranges of IP addresses for Xsan private metadata network:
• IP address range: 10.10.10.1 to 10.10.10.254
• Subnet mask: 255.255.255.0
1.4 Connecting to a Power Source and Powering On
Before powering on, make sure that all cables and cords are properly installed and connected.
1. If not yet plugged into the wall electrical outlet, plug the power cord for the storage unit and the ExaSAN switch
to a power source.
P10
2. Turn power on for the storage unit first by pressing the Power button. Proceed to the next step with switch
power. The Disk Status LEDs, which is the left column of 8 LEDs above the Power button, will not be active until
the switch is powered on.
Quick Start Guide
3. Turn power on for the ExaSAN switch by pressing the Power button. Wait for the Heartbeat LED to turn into a
steady flashing blue state. Note that you might hear a few short beeps generated from the switch during this
process. You may ignore them as they are designed for Accusys’ internal diagnostic purpose only.
No.
Name
1
Cooling Vents
2
Power LED Indicator
3
Access LED Indicator
4
Fan LED Indicator
5
Heartbeat LED Indicator
4. Turn your primary MDC on first and wait for it to become ready.
5. Turn your back up MDC on.
Quick Start Guide
P11
P12
Quick Start Guide
2
Software Installation
and Configuration
Quick Start Guide
P13
2. Software Installation and Configuration
Now that we have connected all hardware components and turned on the power, follow the steps in this section to
set up ExaSAN and Xsan.
2.3 ExaSAN Setup
2.3.1 Switch GUI Setup
The ExaSAN switch has a browser-based built-in GUI (Graphical User Interface) for administration and
configuration tasks.
2.1.1.1 Launch the Switch GUI
You may use either the FireFox or Safari browser to access
the switch GUI. We recommend that you use FireFox.
1. Launch the browser of your choice
2. Make sure that our pr ivate Ether net net wor k is
connected
3. Go to IP address 192.168.0.1
4. The GUI’s home page displays
5. Log in with default user name “admin” and password
“0000”
P14
Quick Start Guide
2.1.1.2 Switch GUI Overview
We are now at the switch GUI main menu page. You may toggle between “Config Mode” and “Monitor Mode” by
clicking the “Switch Mode” icon at the top. You may also go into “System Management” to change the switch IP and
password, or to set system date and time.
Quick Start Guide
P15
Note that before you perform any system administration function, you should set your system date and time first.
2.1.1.3 Quick Setup
We will create two LUNs in the RAID disk system. One is for the Xsan metadata and the other for the user data.
1. Select “Quick Setup” from the menu options on the left pane to start the process
P16
Quick Start Guide
2. In the “RAID LEVEL” field, select “R5” from the drop-down list
3. In the “SAN Software” filed, select “SAN With MetaData” from the drop-down list
4. Click “Next”
*Quick Setup only supports one-to-three unit A08S-PS, if your RAID system requirement is other form factor like 2U/3U/4U, you
may have to reset the setting through RAID Guide X. Please refer to the User Guide for the RAID configuration information.
Quick Start Guide
P17
As the result, two logical disks will be created as shown in the screenshot below.
5. Click “Apply”
After you click the “Apply” button, the system will start the process of initializing the disks in your RAID storage
system. During this process, you may experience deterioration in overall system performance, this is normal.
Please allow sufficient time and patience for this process. Upon completion, the LED indicators on the front panel
of your RAID system will reflect that status. Refer to the appropriate documentation of your RAID system for
additional information.
P18
Quick Start Guide
2.1.2 Verify Accessible LUNs
To view the two LUNs which we just created, open
the Mac “System Profiler” and then expand the
“Parallel SCSI” tab. You should see that two ExaSAN
LUNs are visible as described below.
Find one LUN in “SCSI target Device @0,” another
LUN in “SCSI Target Device @1.” Both are identified
with Manufacturer “ACCUSYS” and Model “A08SPS.”
Note that you will need to perform this check on all
computers in the SAN. If you do not see any LUN
here, you’d have to troubleshoot the connection
between the ExaSAN RAID system and the SW04
switch.
Quick Start Guide
P19
2.2 Xsan Setup
Now that we’ve completed the ExaSAN configuration, this section guides you through the setup of your Xsan
software: including how to check the accessible LUNs and use the Xsan Admin application, plus create and mount
an Xsan volume.
2.2.1 Setup Xsan with MDC (Metadata Controller) and Clients
First we will install the Xsan software and then create a SAN (Storage Area Network) without LUNs.
2.2.1.1 Install Xsan Software on MDC and All clients
Typically, there will be a primary MDC and a backup MDC. The MDCs require Xsan Admin and all other clients
require Xsan software. Since there are only two Mac Pro computers in our sample ExaSAN Compact setup, we are
making the following recommendations:
1. Make sure that both computers are running OS X Server operating system
2. Install Xsan Admin on both computers during the Xsan software installation process; so that we will have two
MDCs – one as the primary and the other as the backup
Follow the instructions below to install the Xsan software.
Insert the Install Disc. Double click the “Install Xsan” icon to start the installation process on the primary MDC.
Follow the on-screen instructions to complete the installation. Keep in mind to select “Custom Install” and the “Xsan
Admin” option during installation as shown below.
P20
Quick Start Guide
Next, repeat the same Xsan software installation on the backup MDC.
2.2.1.2 Configure the SAN with MDC and All Clients Step by Step
Next we will proceed with configuring Xsan. Choose one of your two computers as the designated primary MDC.
Click the Xsan Admin icon to start configuring your SAN. Below are screenshots of this process to assist with your
understanding.
P21
Click “Continue.”
Select “Configure new SAN,” click “Continue.”
P22
Fill in the “SAN Name” of your choice; also fill in the appropriate “Administrator Name” and
“Administrator Email” address. Click “Continue.”
Select the computer(s) to add by putting a check mark on the left for each, click “Continue.”
NOTE: you need to add at least one computer into the SAN as a metadata controller. Also see Section 2.2.1.3 “Adding More
Computers into the SAN” about adding more computers at a later time.
Quick Start Guide
P23
Use same authentication information for all SAN computers: Select this option to allow Xsan
Admin to authenticate all computers using the same administrator name and password you as
entered here.
Authenticate to SAN computers one by one: Select this option to authenticate each computer individually.
Click “Add Serial Number” to enter serial number for each computer.
Note that the Xsan file system is built into Mac OS X (Lion). If you are using a host system with
Lion, the entry of the serial number will not be necessary.
P24
Quick Start Guide
When you’re done adding Serial Numbers, click “Continue.”
Select the appropriate private network IP address from the drop-down list, click “Continue.”
Quick Start Guide
P25
You will not be able to go back for corrections beyond this point. Make sure
that the information in the summary is correct, click “Continue.”
Select the “Create one or more volumes later” option, click “Continue.”
Note: we will create an Xsan volume later.
P26
Click “Continue.”
Upon completion of Setup, you are presented with the
SAN overview as shown below.
P27
2.2.1.3 Add More Computers into the SAN
You can add more computers into the SAN by clicking the “Add (+)” button in the “Computers” pane.
2.2.2 Adding the ExaSAN RAID System into the SAN
Now we will check accessible LUNs and then create an Xsan volume.
2.2.2.1 Labeling LUNs
Before we label the two LUNs, first verify that they are listed in the “Parallel SCSI” pane under “Hardware.” Launch
Xsan Admin and then click the “LUNs” tab to check if the two LUNs are also there. Follow the screenshots below to
label the smaller of the two LUNs as “Meta-LUN.” Label the larger of the two LUNs as “Data-LUN.”
At first, see that there is no name assigned to either LUN under the “LUN Label” column header. The sizes of these
two LINs are at 372.58GB and 1.45 TB respectively.
Right-click on the 372.58GB LUN (smaller of the two), the options menu displays, select “Change LUN Label.”
P28
Quick Start Guide
Enter the LUN label name “Meta-LUN” for it in the subsequent dialogue box; click the “Label” button
to confirm the entry.
Quick Start Guide
P29
Next, do the same for the 1.45TB LUN (the larger of the two LUNs) using the label name “Data-LUN.”
Upon completion, you will have successfully labeled both LUNs as shown below.
P30
Quick Start Guide
2.2.2.2 Creating an Xsan Volume
In Xsan Admin, click “Volumes” and then click the “Add “ (+) button to start creating an Xsan volume.
Fill in the “Volume Name” of
your choice; we will use the
name “Demo” in our example.
Select the appropriate “Volume
Type” from the drop-down list.
Click “Continue.”
NOTE: select “Custom” in Volume Type for
now. You can fine-tune the volume settings
later.
Quick Start Guide
P31
Follow the on-screen instructions, click “Continue,” the result follows, click “Continue” again.
P32
Quick Start Guide
Click “Continue,” wait for volume creation to complete.
Quick Start Guide
P33
Upon completion of volume creation, they appear in the “Volume” tab as shown below.
2.2.2.3 Mounting or Un-mounting a Volume
In Xsan Admin, click the “Mounts” tab to check if the volume was mounted or not.
Select and right click a volume if you want to mount or un-mount it.
At this point, you have created an Xsan volume and mounted it. All host systems may
now access it as if it was a local disk.
P34
Quick Start Guide
3
Technical Support
Quick Start Guide
P35
3. Technical Support
3.1 The System Log
When you contact us for technical support, our support staff might ask for your system log file for
troubleshooting purpose.
Go to the ExaSAN switch GUI, select the “Event Management” icon. Follow instructions there to
download the log file.
3.2 Contact Us
For customer services and technical support, locate an Accusys office near you from the link below:
http://www.accusys.com.tw/about/contact.htm
or, you may e-mail us at: [email protected]
3.3 Our Website
Please visit our websites frequently for the most up-to-date product and support information.
All countries: www.accusys.com.tw
P36
Quick Start Guide
Quick Start Guide
P37
42-33000-5036