1
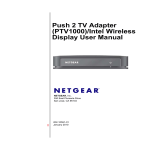
Push2TV Wireless Display Adapter User Manual Model: PTV3000 April 2013 202-11063-01 350 East Plumeria Drive San Jose, CA 95134 USA Push2TV Wireless Display Adapter PTV3000 Support Thank you for choosing NETGEAR. After installing your device, locate the serial number on the label of your product and use it to register your product at https://my.netgear.com. You must register your product before you can use NETGEAR telephone support. NETGEAR recommends registering your product through the NETGEAR website. For product updates and web support, visit http://support.netgear.com. Phone (US & Canada only): 1-888-NETGEAR. Phone (Other Countries): Check the list of phone numbers at http://support.netgear.com/general/contact/default.aspx. NETGEAR recommends that you use only the official NETGEAR support resources. Trademarks NETGEAR, the NETGEAR logo, and Connect with Innovation are trademarks and/or registered trademarks of NETGEAR, Inc. and/or its subsidiaries in the United States and/or other countries. Information is subject to change without notice. © NETGEAR, Inc. All rights reserved. Revision History Publication Part Number Publish Date Comments 202-11063-01 April 2013 First publication 2 Contents Chapter 1 Set Up the Push2TV Adapter Requirements . . . . . . . . . . . . . . . . . . . . . . . . . . . . . . . . . . . . . . . . . . . . . . . . 6 Push2TV Adapter Front, Rear, and Side Views . . . . . . . . . . . . . . . . . . . . . . 6 Connect Your Push2TV Adapter to the TV. . . . . . . . . . . . . . . . . . . . . . . . . . 7 Update the Software. . . . . . . . . . . . . . . . . . . . . . . . . . . . . . . . . . . . . . . . . . . 8 Connect to Your TV with Intel WiDi or Wi-Fi CERTIFIED Miracast . . . . . . . 9 Chapter 2 Connect Using Intel WiDi Open Intel WiDi on the Laptop . . . . . . . . . . . . . . . . . . . . . . . . . . . . . . . . . . 11 Use Intel WiDi to Connect to the TV. . . . . . . . . . . . . . . . . . . . . . . . . . . . . . 13 Play Local Media . . . . . . . . . . . . . . . . . . . . . . . . . . . . . . . . . . . . . . . . . . . . 16 Exit Intel WiDi . . . . . . . . . . . . . . . . . . . . . . . . . . . . . . . . . . . . . . . . . . . . . . . 16 Chapter 3 Connect Using Miracast What Is Miracast?. . . . . . . . . . . . . . . . . . . . . . . . . . . . . . . . . . . . . . . . . . . . 18 Connect with Miracast . . . . . . . . . . . . . . . . . . . . . . . . . . . . . . . . . . . . . . . . 18 Chapter 4 Change the Intel WiDi Settings Configure the Intel WiDi Properties . . . . . . . . . . . . . . . . . . . . . . . . . . . . . . 22 Modify the Intel WiDi Behavior Properties . . . . . . . . . . . . . . . . . . . . . . . 22 Modify the Intel WiDi Adapter Properties . . . . . . . . . . . . . . . . . . . . . . . . 24 Adjust the Sound . . . . . . . . . . . . . . . . . . . . . . . . . . . . . . . . . . . . . . . . . . . . 27 Global Volume Control on Your Laptop . . . . . . . . . . . . . . . . . . . . . . . . . 27 Windows Audio Mixer . . . . . . . . . . . . . . . . . . . . . . . . . . . . . . . . . . . . . . . 27 Change the Sound Using the Windows Control Panel . . . . . . . . . . . . . . 28 Configure the Autoconnect Option . . . . . . . . . . . . . . . . . . . . . . . . . . . . . . . 28 Configure Your Laptop to Display 1080p Resolution . . . . . . . . . . . . . . . . . 29 Reset the Intel WiDi Settings . . . . . . . . . . . . . . . . . . . . . . . . . . . . . . . . . . . 31 Chapter 5 Maintenance and Troubleshooting Update the Software. . . . . . . . . . . . . . . . . . . . . . . . . . . . . . . . . . . . . . . . . . 33 Change the Display Language . . . . . . . . . . . . . . . . . . . . . . . . . . . . . . . . . . 34 Troubleshoot the TV Display . . . . . . . . . . . . . . . . . . . . . . . . . . . . . . . . . . . 34 The Color on the Laptop Looks Different Than on the TV . . . . . . . . . . . 34 TV Display Shows a Different Image Than the Laptop. . . . . . . . . . . . . . 35 Adjust the Size of the TV Display in the Intel WiDi Setting . . . . . . . . . . . 35 The TV Screen Is Blank After the TV Is Connected . . . . . . . . . . . . . . . . 35 3 Push2TV Wireless Display Adapter PTV3000 The Display on the Laptop Differs from the Display on the TV. . . . . . . . 35 The TV Image Is Rough, Frozen, or Delayed. . . . . . . . . . . . . . . . . . . . . 36 Your Video Mode Has Changed. . . . . . . . . . . . . . . . . . . . . . . . . . . . . . . 37 Resolutions Supported by Intel WiDi . . . . . . . . . . . . . . . . . . . . . . . . . . . 37 Troubleshoot the Initial Setup. . . . . . . . . . . . . . . . . . . . . . . . . . . . . . . . . . . 37 Change the TV Input . . . . . . . . . . . . . . . . . . . . . . . . . . . . . . . . . . . . . . . 37 The Push2TV Adapter Encountered a Problem on Startup . . . . . . . . . . 38 The Push2TV Adapter Is Not Detected . . . . . . . . . . . . . . . . . . . . . . . . . 38 Security Code Message While You Attempt to Connect . . . . . . . . . . . . 38 Unsupported Audio Mode. . . . . . . . . . . . . . . . . . . . . . . . . . . . . . . . . . . . 38 Intel WiDi Requires a Different Security Profile . . . . . . . . . . . . . . . . . . . 39 The Wireless Switch on the Laptop Is Turned Off . . . . . . . . . . . . . . . . . 39 Intel My WiFi Technology Is Disabled . . . . . . . . . . . . . . . . . . . . . . . . . . 40 Resolve Firewall Issues . . . . . . . . . . . . . . . . . . . . . . . . . . . . . . . . . . . . . 40 Windows Power Saving . . . . . . . . . . . . . . . . . . . . . . . . . . . . . . . . . . . . . 41 Could Not Obtain a Network Address. . . . . . . . . . . . . . . . . . . . . . . . . . . 41 Check the WiFi Access Point Frequency . . . . . . . . . . . . . . . . . . . . . . . . 41 Common Solutions to Many Issues . . . . . . . . . . . . . . . . . . . . . . . . . . . . . . 41 Known Issues . . . . . . . . . . . . . . . . . . . . . . . . . . . . . . . . . . . . . . . . . . . . . . . 43 Appendix A Factory Settings and Technical Specifications Return the Push2TV Adapter to Factory Default Settings . . . . . . . . . . . . . 45 Technical Specifications. . . . . . . . . . . . . . . . . . . . . . . . . . . . . . . . . . . . . . . 46 Appendix B Notification of Compliance Appendix C Notification of Compliance 4 1. Set Up the Push2TV Adapter 1 With the NETGEAR Push2TV Wireless Display Adapter PTV3000 and Intel Wireless Display (WiDi) or Wi-Fi CERTIFIED Miracast, you can mirror the screen of your laptop, smartphone, or tablet wirelessly on your TV and enjoy and share your personal media collections, latest YouTube videos, downloaded or streamed movies, music, and a variety of other Internet content from the comfort of your home. The chapter contains the following sections: • Requirements • Push2TV Adapter Front, Rear, and Side Views • Connect Your Push2TV Adapter to the TV • Update the Software • Connect to Your TV with Intel WiDi or Wi-Fi CERTIFIED Miracast Note: For more information about the topics covered in this manual, visit the support website at http://support.netgear.com. Note: Firmware updates with new features and bug fixes are made available from time to time on http://downloadcenter.netgear.com. Some products can regularly check the site and download new firmware, or you can check for and download new firmware manually. If the features or behavior of your product do not match what is described in this guide, you might need to update your firmware. 5 Push2TV Wireless Display Adapter PTV3000 Requirements To wirelessly display content through the Push2TV adapter, you need the following: • TV with an HDMI connector • Push2TV adapter • HDMI cable • A smartphone, tablet, or laptop that is enabled for Intel WiDi or Miracast wireless display Push2TV Adapter Front, Rear, and Side Views The following figure shows the front panel, rear panel, and right side panel of the Push2TV adapter. Front panel Single-color white LED Rear panel Reset button USB power port HDMI port Right side panel WPS button Figure 1. Push2TV adapter front panel, rear panel, and right side panel Set Up the Push2TV Adapter 6 Push2TV Wireless Display Adapter PTV3000 Connect Your Push2TV Adapter to the TV Note: To connect your Push2TV adapter to your TV, you need an HDMI cable, which is sold separately from the Push2TV adapter. HDMI cable Power adapter USB cable Figure 2. Push2TV adapter cable connections To connect your Push2TV adapter: 1. Connect one end of the USB power cable to the USB power port on the rear panel of the Push2TV adapter. 2. Connect the other end of the USB power cable either to a USB port on the TV or to the power adapter. 3. (Optional) If you use the power adapter, plug the power adapter into an electrical outlet. The white LED on the front panel lights and remains lit during normal operation. You can skip this step if you connect the USB power cable to a USB port on the TV. 4. Connect one end of the HDMI cable to the HDMI port on the rear panel of the Push2TV adapter. 5. Connect the other end of the HDMI cable to the HDMI port on the TV. Note: Make sure that the cables are pushed all the way into their correct input positions. Set Up the Push2TV Adapter 7 Push2TV Wireless Display Adapter PTV3000 Update the Software NETGEAR recommends that you update the Push2TV adapter software as new updates support even more wireless display devices. To update the firmware: 1. Use you laptop, tablet, or smartphone to visit the NETGEAR Push2TV site software update site at http://www.netgear.com/landing/stream/tv/#push2tv. Note: If you cannot find a software update, visit the NETGEAR Download Center at http://downloadcenter.netgear.com and enter the model number PTV3000. 2. Download the software update. 3. Press and hold the WPS button on the side of the Push2TV adapter for about 7 seconds until the LED on the front panel starts blinking. WPS button 4. On your laptop, tablet, or smartphone, use the wireless network utility to find and connect to the Push2TV WiFi network name (SSID). 5. Open a browser on your laptop, tablet, or smartphone. You are automatically redirected to the Push2TV update page. 6. (Optional) If you are not automatically redirected, type http://192.168.3.1 into the browser address bar. 7. Follow the steps on the web page to upload the software that you downloaded in Step 1, and complete the installation. Note: For information about updating Intel WiDi software on your laptop, visit http://www.intel.com/go/wirelessdisplayupdate. You are now ready to connect with Intel WiDi or with Miracast. Set Up the Push2TV Adapter 8 Push2TV Wireless Display Adapter PTV3000 Connect to Your TV with Intel WiDi or Wi-Fi CERTIFIED Miracast The Push2TV adapter supports both Intel WiDi and Miracast, a new wireless display standard developed by the Wi-Fi Alliance. How Intel WiDi functions: 1. A laptop with Intel WiFi installed sends WiFi signals to the Push2TV adapter. 2. The Push2TV adapter translates the WiFi signals into an image, and sends the image to the TV. 3. The laptop manages the connection to the TV through the Push2TV adapter. For information about how to connect using Intel WiDi, see Chapter 2, Connect Using Intel WiDi. How Miracast functions: 1. A smartphone, tablet, or laptop that is enabled for Miracast sends WiFi signals to the Push2TV adapter. 2. The Push2TV adapter translates the WiFi signals into an image, and sends the image to the TV. 3. The smartphone, tablet, or laptop manages the connection to the TV through the Push2TV adapter. For information about how to connect using Miracast, see Chapter 3, Connect Using Miracast. Set Up the Push2TV Adapter 9 2. Connect Using Intel WiDi 2 This chapter provides information about how to connect to your Push2TV adapter by using Intel WiDi and perform basic tasks. Make sure that you have set up the Push2TV adapter and connected it to your TV before you follow the steps in this chapter. The chapter contains the following sections: • Open Intel WiDi on the Laptop • Use Intel WiDi to Connect to the TV • Play Local Media • Exit Intel WiDi Note: NETGEAR recommends that you update the Push2TV adapter’s firmware as new updates support even more wireless display devices. For more information, see Update the Software on page 33. 10 Push2TV Wireless Display Adapter PTV3000 Open Intel WiDi on the Laptop Multiple versions of Intel WiDi software exist, each with a slightly different look and feel. The precise steps in the following procedure might differ for different Intel WiDi software versions. However, the sequence of the steps should apply to all Intel WiDi software versions. To open Intel WiDi on the laptop and let Intel WiDi discover the Push2TV adapter for the first time: 1. Turn on the TV and the Push2TV adapter. 2. On your Intel WiDi-enabled laptop, start Intel WiDi by clicking the Intel WiDi icon. The Intel WiDi icon can be located in different places, depending on the laptop. The icon is usually pre-loaded and you can find it on your desktop or window start-up menu. Look for the following icon: 3. If you cannot find the Intel WiDi icon, do the following: a. On the laptop’s taskbar, click the Windows Start button. b. Type Intel Wireless Display into the search field. c. In the search results, click Intel Wireless Display. Note: If an autoconnect adapter is set up, Intel WiDi attempts to connect to it. For more information, see Configure the Autoconnect Option on page 28. 4. If a firewall blocks Intel WiDi and displays an alert message displays, do the following: Configure your firewall to allow access for both private and public networks. For firewall help, see Resolve Firewall Issues on page 40, or see your firewall’s user manual. 5. If the license agreement displays, do the following: a. Read the license agreement. b. Do one of the following: • If you agree to the terms of the license, click the I agree to the terms of this license button. • If you do not agree to the terms of the license, click the I do not agree button. In this situation, you cannot continue, and Intel WiDi closes. The Connected adapter screen displays. Intel WiDi now scans for an adapter. The status shows Scanning for adapters. Connect Using Intel WiDi 11 Push2TV Wireless Display Adapter PTV3000 6. If the application does not automatically begin scanning or if your adapter is not detected, click the Scan for available adapters button. If your adapter still does not display, see The Push2TV Adapter Is Not Detected on page 38. After the scan is complete, any adapters in range are displayed in the Detected adapters table, including the Push2TV adapter. Connect Using Intel WiDi 12 Push2TV Wireless Display Adapter PTV3000 The following information is displayed for each detected adapter: • Type. If this is a first-time connection, the circle on the TV icon is gray. If the connection has been used previously, the icon circle is orange. • Name. The name refers to the adapter and is initially set by the adapter manufacturer. If this is the initial setup, you can rename the adapter as described in Modify the Intel WiDi Adapter Properties on page 24. • ID. If the default name has not been changed, use the ID to distinguish multiple entries and find your adapter. • Model. This is the product model name of the adapter manufacturer. • Signal. The number of bars represents signal strength. The scale ranges from one bar (weakest signal) to five bars (strongest signal). If the signal strength falls below three bars, the bars turn from green to yellow. Continue with the next section, Use Intel WiDi to Connect to the TV. Use Intel WiDi to Connect to the TV Before you start the following procedure, make sure that you have completed the procedure in the previous section, Open Intel WiDi on the Laptop. On your laptop, you should have the Connected adapter screen of Intel WiDi open with the Push2TV adapter detected. Multiple versions of Intel WiDi software exist, each with a slightly different look and feel. The precise steps in the following procedure might differ for different Intel WiDi software versions. However, the sequence of the steps should apply to all Intel WiDi software versions. To connect to the TV from an Intel WiDi-enabled laptop for the first time: 1. On your TV, select the correct HDMI input source. The TV screen displays the Ready for connection message. 2. On your laptop, go back to the Connected adapter screen of Intel WiDi. Connect Using Intel WiDi 13 Push2TV Wireless Display Adapter PTV3000 3. Select the Push2TV adapter. 4. Click the Connect button. 5. If the TV displays a security code, enter the code in the Intel WiDi screen that pops up when a security code is required. The laptop and TV screens both display the message Connecting... Intel WiDi connects to the Push2TV adapter. Connect Using Intel WiDi 14 Push2TV Wireless Display Adapter PTV3000 You might see the following messages: Message Solution The laptop status shows Connecting... and the TV screen shows Ready for connection The connection failed. Do the following: 1. Click the Cancel connect button. 2. Try connecting again. After the laptop connects to the Push2TV adapter, the TV displays the message Connected. Please wait. Note: If this solution does not work, a firewall might block the connection. For more information, see Resolve Firewall Issues on page 40. The TV displays the message Intel WiDi is connected to the Push2TV adapter but the Push2TV adapter is Connected. Please wait for not connected to the TV. Do the following: more than 1 minute. 1. Click the Disconnect button to disconnect from the Push2TV adapter. 2. Try connecting again. Note: If this solution does not work, see Troubleshoot the Initial Setup on page 37 and Common Solutions to Many Issues on page 41. After a successful connection, the laptop and TV screen display the same images. You are now ready to enjoy and share your pictures, videos, and music. The connection time and start of screen mirroring vary depending on your WiFi environment. 6. (Optional) To move Intel WiDi out of the display area, use the Minimize button (_) instead of the Close button (red X) in the upper right corner of the application window. Note: For information about adjusting the settings on your TV, see Chapter 4, Change the Intel WiDi Settings. Note: For information about automatically connecting to an adapter after the first connection has been made, see Configure the Autoconnect Option on page 28. Connect Using Intel WiDi 15 Push2TV Wireless Display Adapter PTV3000 Play Local Media Many DVDs and Blu-ray discs include copy protection mechanisms that prevent playback over unprotected outputs. The Push2TV adapter can play protected content on a protected content–supported laptop with Intel WiDi application software version 2.1 or later. Closing the lid of the laptop might put the system to sleep or turn it off, and as a result, end the Intel WiDi session. However, you can prevent the Intel WiDi session from being terminated. To close the laptop lid and continue using Intel WiDi: 1. Click the Windows Start button. 2. Type Closing the lid in the search field. 3. Click the Change what closing the lid does link. 4. Next to the When I close the lid heading and under both the On battery and Plugged in headings, select Do nothing. 5. Click the Save changes button. Exit Intel WiDi This procedure applies when you are connected to the Push2TV adapter through Intel WiDi and want to disconnect. To exit Intel WiDi: 1. Click the Disconnect button. Wait until the Push2TV adapter disconnects. 2. Click the Close button (red X) in the upper right corner of application window. If you click the Close button while still connected, a pop-up screen displays. You are asked if you want to close the connection. 3. (Optional) To prevent the pop-up screen from displaying again, select the Don’t ask me next time check box. 4. Click Yes. Connect Using Intel WiDi 16 3. Connect Using Miracast 3 This chapter provides information about how to connect to your Push2TV adapter by using Miracast. Make sure that you have set up the Push2TV adapter and connected it to your TV before you follow the steps in this chapter. The chapter contains the following sections: • What Is Miracast? • Connect with Miracast Note: NETGEAR recommends that you update the Push2TV adapter’s firmware as new updates support even more wireless display devices. For more information, see Update the Software on page 33. 17 Push2TV Wireless Display Adapter PTV3000 What Is Miracast? Miracast is a new wireless display standard developed by the Wi-Fi Alliance that allows devices to use a WiFi connection to deliver audio and video content from one device to another, without cables or a connection to an existing WiFi network. The Push2TV adapter is Miracast certified by the Wi-Fi Alliance. Note: To operate Intel WiDi in Miracast mode in a Windows 7 or Windows 8 environment, Intel WiDi needs to run version 3.5 or later with WiFi driver version 15.3 or later. Connect with Miracast The Push2TV adapter supports Miracast for wireless display connections. You can launch the wireless display application on a Miracast-compatible smartphone, tablet, or laptop, and connect to your TV. To connect to the Push2TV adapter and the TV from a Miracast-enabled device for the first time: 1. Turn on the TV and the Push2TV adapter. 2. On your TV, select the correct HDMI input source. The TV screen displays the Ready for connection message. 3. On your smartphone, tablet, or laptop, find and start the wireless display application. The name and location of the application might differ by device. Connect Using Miracast 18 Push2TV Wireless Display Adapter PTV3000 4. On your smartphone, tablet, or laptop, use the wireless display app to search for the Push2TV adapter. 5. Tap or click the Push2TV adapter name. 6. If the TV displays a security code, enter the security code on the screen on your smartphone, tablet, or laptop. Connect Using Miracast 19 Push2TV Wireless Display Adapter PTV3000 On your smartphone, tablet, or laptop, a message might display to press the WPS button on the Push2TV adapter. 7. (Only if the message displays) On the Push2TV adapter, press the WPS button on the side for a very short time (less than 1 second) to activate the Wi-Fi Protected Setup (WPS) mode. WPS button The connection time and start of screen mirroring vary depending on your WiFi environment and the device used. After a successful connection, the smartphone, tablet, or laptop and TV screen display the same images. You are now ready to enjoy and share your pictures, videos, and music. Connect Using Miracast 20 4. Change the Intel WiDi Settings After you install the Push2TV adapter, you can adjust the Intel Wireless WiDi. The chapter contains the following sections: • Configure the Intel WiDi Properties • Adjust the Sound • Configure the Autoconnect Option • Configure Your Laptop to Display 1080p Resolution • Reset the Intel WiDi Settings 21 4 Push2TV Wireless Display Adapter PTV3000 Configure the Intel WiDi Properties The Properties button is available on the WiDi Connected adapter screen only when Intel WiDi is connected to an adapter. The Intel Wireless Display properties screen has two tabs: Behavior and Adapter. Multiple versions of Intel WiDi software exist, each with a slightly different look and feel. The precise steps in the following procedure might differ for different Intel WiDi software versions. However, the sequence of the steps should apply to all Intel WiDi software versions. Modify the Intel WiDi Behavior Properties The Intel WiDi adapter Behavior screen lets you configure Intel WiDi to be hidden (minimized) after the Push2TV adapter has connected to the TV, stop warnings and prompts from displaying, and change how the mouse pointer appears on the TV. To modify the Intel WiDi behavior properties: 1. On your laptop, start Intel WiDi by clicking the Intel WiDi icon. The Connected adapter screen displays. Intel WiDi now scans for an adapter. The status shows Scanning for adapters. After the scan is complete, any adapters in range are displayed in the Detected adapters table, including the Push2TV adapter. 2. Select the Push2TV adapter. 3. Click the Connect button. Intel WiDi connects to the Push2TV adapter. Change the Intel WiDi Settings 22 Push2TV Wireless Display Adapter PTV3000 4. Click the Properties button. The Behavior tab is selected automatically and the following screen displays: 5. (Optional) Configure the following options: • Automatically hide the Intel Wireless Display application after connecting. This option allows the application to minimize right after the Push2TV adapter has connected to the TV. Change the Intel WiDi Settings 23 Push2TV Wireless Display Adapter PTV3000 • • Don’t ask me again options. You can select the following check boxes to stop warnings and prompts from displaying: - Don’t warn me that the connection will end if I close the application while connected. - Don’t prompt me to upgrade the firmware. - Don’t prompt me to download software updates. Change how the mouse pointer appears on the TV. - Show the pointer on the TV. This option is selected by default. - Allow the pointer to change appearance based on the context. Select this check box to allow the pointer display on TV to be based on the pointer display on your laptop. 6. Click the OK button. The new settings are saved, the screen closes, ad the Connected adapter screen displays again. Modify the Intel WiDi Adapter Properties The Intel WiDi Adapter screen lets you can change the adapter name, set the autoconnect adapter, register the adapter, resize the TV picture, test the audio, and view various settings. To modify the Intel WiDi adapter properties: 1. On your laptop, start Intel WiDi by clicking the Intel WiDi icon. The Connected adapter screen displays. Intel WiDi now scans for an adapter. The status shows Scanning for adapters. After the scan is complete, any adapters in range are displayed in the Detected adapters table, including the Push2TV adapter. Change the Intel WiDi Settings 24 Push2TV Wireless Display Adapter PTV3000 2. Select the Push2TV adapter. 3. Click the Connect button. Intel WiDi connects to the Push2TV adapter. 4. Click the Properties button. 5. Click the Adapter tab. The following screen displays: Change the Intel WiDi Settings 25 Push2TV Wireless Display Adapter PTV3000 The following fields are displayed for information only: • Network address. The IP address. • Adapter ID. A preset and unchangeable number set by the adapter. • Adapter manufacturer. NETGEAR. • Adapter model. The model of the adapter that is connected. • Adapter hardware version. The version of the hardware. • Adapter firmware version. The version of the application. 6. (Optional) Configure the following options: • Adapter name. This is either the default name or the name you choose in the initial setup process. You can change the name at any time by typing a new name. If the default name is deleted and the Name field is left empty, the application restores the name to the previous value. Valid characters for adapter names include uppercase and lowercase letters A through Z, numbers, and punctuation marks, also defined as ASCII characters 32 through 126. • Automatically connect. Select this check box to enable the adapter to be set as the autoconnect adapter. For more information, see Configure the Autoconnect Option on page 28. • Register. Click the Register link to register your adapter with NETGEAR. Registration enables you to obtain support and get the latest software updates. 7. (Optional) Resize the TV picture: a. Click the Resize TV picture button. A new screen displays. If the laptop display is cropped or does not fill the entire TV screen, you can adjust the image. b. Click the plus icon to increase the size, or the minus icon to decrease the size. c. When the image is correct, click the OK button to return to the previous screen. Note: If the image still does not fit the entire TV screen, try adjusting the TV settings. 8. (Optional) Test the audio: a. Click the Test audio button. A new screen displays. b. Clicking the Play sample button. An audio sample plays. c. If you do not hear the audio sample on your TV, increase the volume of the TV speakers by using the TV remote. Change the Intel WiDi Settings 26 Push2TV Wireless Display Adapter PTV3000 Note: For more information about audio, see the following section, Adjust the Sound. d. Click the OK button. The previous screen displays. 9. Click the OK button. The new settings are saved, the screen closes, ad the Connected adapter screen displays again. Adjust the Sound When a Push2TV adapter connection from the laptop to the TV begins, the laptop’s sound is muted. When the connection ends, the laptop’s sound is enabled. Global Volume Control on Your Laptop Usually, the laptop’s sound is muted after the laptop is connected to the TV through Intel WiDi. Sometimes, however, other applications might automatically turn on the laptop’s sound, and you might hear the same sound from the laptop before you hear it from the TV. To turn off the volume from the laptop: 1. On the laptop, click the little speaker icon that is on the far right of the taskbar. A global volume control pop-up window displays. 2. Click the speaker icon just below the Volume slider. The laptop’s sound is muted. If the laptop’s sound keeps coming back on, try turning the volume all the way down. To turn the volume of the laptop all the way down: 1. On the laptop, click the little speaker icon that is on the far right of the taskbar. A global volume control pop-up window displays. 2. Drag the Volume slider all the way down. Windows Audio Mixer Attempting to change audio settings in the Windows Audio Mixer while using the Intel WiDi might cause a connection disruption. Usually the connection is automatically reestablished. The TV image might flicker during this time. If the connection is not automatically reestablished, manually reconnect. To find the audio mixer on your laptop: 1. On the laptop, click the little speaker icon that is on the far right of the taskbar. Change the Intel WiDi Settings 27 Push2TV Wireless Display Adapter PTV3000 A global volume control pop-up window displays. 2. Click the Mixer link at the bottom. Change the Sound Using the Windows Control Panel Using the audio device windows is another way to manage the sound on the laptop. To bring up the audio device window: 1. On your laptop, click the Windows Start button. 2. In the search field, type audio device. 3. Press the Enter key. Configure the Autoconnect Option You can use the autoconnect option to select an adapter that Intel WiDi connects to automatically. This is somewhat similar to selecting a default printer. You can configure only one adapter at a time as the autoconnect adapter. You can configure the autoconnect option only after you have successfully connected the adapter the first time and completed the security configuration. There are two situations in which autoconnect is attempted: • The autoconnect adapter is discovered when Intel WiDi is launched. • The autoconnect adapter is in the list of adapters when the Intel WiDi application is relaunched. In this case, if a connection is made, it is typically faster than when the autoconnect adapter is discovered because the application is already running and does not perform a new scan. To configure the autoconnect option on an adapter: 1. On your laptop, start Intel WiDi by clicking the Intel WiDi icon. The Connected adapter screen displays. Intel WiDi now scans for an adapter. The status shows Scanning for adapters. After the scan is complete, any adapters in range are displayed in the Detected adapters table, including the Push2TV adapter. 2. Select the Push2TV adapter. 3. Click the Connect button. Intel WiDi connects to the Push2TV adapter. 4. Click the Properties button. 5. Click the Adapter tab. 6. Select the Automatically connect check box. The adapter is set as the autoconnect adapter. If you have more than one adapter, any other adapter that previously had the autoconnect mode enabled now has the autoconnect mode disabled. Change the Intel WiDi Settings 28 Push2TV Wireless Display Adapter PTV3000 7. Click the OK button. The new settings are saved. Configure Your Laptop to Display 1080p Resolution To experience Intel WiDi in full HD 1080p resolution on your TV, you need to have an 1080p HDTV and one of the following: • A laptop with a 1920 x1080 panel in clone mode. • A laptop that is based on the Intel Huron River platform (or faster) in extend or remote only mode. Before you connect to the Push2TV adapter, the laptop screen resolution is 1280 x 800 or 1366 x 768, depending on the laptop: Figure 3. Laptop display setting before you connect to the Push2TV adapter After you have connected to the Push2TV adapter, your laptop displays two screens in clone mode (duplicated displays). This is the default display mode, and the resolution is 1280 x 720 for both screens. (This screen is shown in Step 3 of the following procedure.) To enable the laptop image to be displayed in 1080p resolution on your TV, you might need to change the display settings on your laptop and extend the display onto the TV screen. To extend the display from your laptop onto the TV screen when Intel WiDi is connected to the Push2TV adapter: 1. On your laptop, click the Windows Start button. 2. In the search field, type Connect to an external display. 3. Press the Enter key. Change the Intel WiDi Settings 29 Push2TV Wireless Display Adapter PTV3000 The screen that displays lets you change the appearance of your display: 4. From the Multiple Displays list, select Extend these displays. Screen 1 (the laptop) is reset to its default resolution of 1280 x 800 (or 1366 x 768), and screen 2 (the TV) remains at 1280 x 720 resolution. 5. Click screen 2. 6. For the Resolution settings, select 1920 x 1080. Now the TV displays full 1080p resolution. Change the Intel WiDi Settings 30 Push2TV Wireless Display Adapter PTV3000 Reset the Intel WiDi Settings Resetting reverts Intel WiDi to its default settings: To reset Intel WiDi: 1. On your Intel WiDi-enabled laptop, start Intel WiDi by clicking the Intel WiDi icon. The Connected adapter screen displays. 2. In the upper right corner, click Help. 3. Select About. 4. Click Reset Settings. The Reset Intel Wireless Display settings screen displays. 5. Click the Yes button. After you restart Intel WiDi, all detected adapters are displayed as if they were not previously connected. However, it is not necessary to enter a security code since the security settings are stored in the adapter. Change the Intel WiDi Settings 31 5. Maintenance and Troubleshooting 5 This chapter provides information about how to update the software on the Push2TV adapter and how to troubleshoot the Push2TV adapter, TV display, and initial setup. The chapter contains the following sections: • Update the Software • Change the Display Language • Troubleshoot the TV Display • Troubleshoot the Initial Setup • Common Solutions to Many Issues • Known Issues The following sources can provide additional troubleshooting information: • For information about your Intel WiDi software, visit www.intel.com/go/wirelessdisplayupdate. • For information about your TV, see the manufacturer’s documentation and support website. • For information about your smartphone, table, or laptop, see the manufacturer’s documentation and support websites. Note: For more information about the Push2TV adapter, visit http://www.netgear.com/landing/stream/tv/#push2tv and http://support.netgear.com. 32 Push2TV Wireless Display Adapter PTV3000 Update the Software NETGEAR recommends that you update the Push2TV adapter software as new updates support even more wireless display devices. To update the firmware: 1. Use you laptop, tablet, or smartphone to visit the NETGEAR Push2TV site software update site at http://www.netgear.com/landing/stream/tv/#push2tv. Note: If you cannot find a software update, visit the NETGEAR Download Center at http://downloadcenter.netgear.com and enter the model number PTV3000. 2. Download the software update. 3. Press and hold the WPS button on the side of the Push2TV adapter for about 7 seconds until the LED on the front panel starts blinking. WPS button 4. On your laptop, tablet, or smartphone, use the wireless network utility to find and connect to the Push2TV WiFi network name (SSID). 5. Open a browser on your laptop, tablet, or smartphone. You are automatically redirected to the Push2TV update page. 6. (Optional) If you are not automatically redirected, type http://192.168.3.1 into the browser address bar. 7. Follow the steps on the web page to upload the software that you downloaded in Step 1, and complete the installation. Note: For information about updating Intel WiDi software on your laptop, visit http://www.intel.com/go/wirelessdisplayupdate. Maintenance and Troubleshooting 33 Push2TV Wireless Display Adapter PTV3000 Change the Display Language CAUTION: Pressing the Reset button for more than 5 seconds erases the Push2TV adapter setup and causes the Push2TV adapter to return to factory default settings (see Return the Push2TV Adapter to Factory Default Settings on page 45). To change the adapter’s language display: 1. While the Push2TV adapter is turned on and connected to your TV, use a paperclip to press the Reset button less than 1 second. Reset button The language display on the TV changes. 2. Navigate through the language selections: • To step through the language selections, press the Reset button for less than 0.5 second. • To go back to the previous language selection, press the Reset button for more than 0.5 second but less than 5 seconds. 3. When the correct language is displayed, release the Reset button. Troubleshoot the TV Display This section describes how you can resolve problems with the TV display. The Color on the Laptop Looks Different Than on the TV Sometimes colors on the TV screen and the laptop might be a slightly different. To match the colors, change the TV settings until the screens are the same. (See your TV manual for color adjustment help.) Maintenance and Troubleshooting 34 Push2TV Wireless Display Adapter PTV3000 TV Display Shows a Different Image Than the Laptop If both the application and the TV screen show that you are connected, but they are not showing the same image, the laptop’s firewall might be stopping the connection. For more information, see Resolve Firewall Issues on page 40. Adjust the Size of the TV Display in the Intel WiDi Setting If the TV display shows areas of black around the edges or appears too large, you can adjust the Intel WiDi setting for your TV. For more information, see Modify the Intel WiDi Adapter Properties on page 24 (look for Step 7). The TV Screen Is Blank After the TV Is Connected When you use a laptop and a TV, sometimes the laptop’s display settings might be inadvertently changed. This might result in the TV showing a blank screen after it is connected. The TV screen might also be blank if the Push2TV adapter is too warm after being used for a long time. (The Push2TV adapter is not designed to be connected for more than 4 hours.) If this situation occurs, do not use the Push2TV adapter until it has cooled down. The Display on the Laptop Differs from the Display on the TV You can select the correct screen for display on the TV. To select which screen to use for display on the TV: 1. On the laptop keyboard, simultaneously press the Windows key and the P key. 2. In the pop-up window, select Duplicate. Your laptop screen should be duplicated on the TV. If it is not, proceed to the next step. 3. Click the Windows Start button. 4. In the search field, type Adjust screen resolution. 5. Press Enter. 6. From the Display list, select any option other than Multiple Monitors. 7. From the Multiple displays list, select either one of the duplicate combinations. 8. To try the new settings, click the Apply button. 9. Do one of the following: • If the laptop screen shows the combination of displays that you want: a. In the pop-up window, click the Keep changes button. b. Click the OK button. Maintenance and Troubleshooting 35 Push2TV Wireless Display Adapter PTV3000 • If the laptop screen does not show the combination of displays that you want: a. Click Revert. b. Go back to Step 6. c. Select another combination in Step 7. d. Complete the procedure. The TV Image Is Rough, Frozen, or Delayed To fix a rough, frozen, or delayed image, try each of the following steps individually: Check the laptop’s CPU status: 1. Right-click the taskbar. 2. Select Start Task Manager. 3. In the Task Manager window, click the Processes tab. 4. Under the CPU heading, check WiDiApp.exe. 5. If the WiDiApp.exe CPU number is 80 or higher, save documents, and close unused applications. Check the network link speed: 1. Right-click the taskbar. 2. Select Start Task Manager. 3. In the Task Manager window, click the Networking tab. 4. If the link speed is below 36 Mbps, move the Push2TV adapter to a different position that is farther away from other electronic equipment, or closer to the laptop. 5. If this does not help, try disconnecting the Push2TV adapter and connecting again. Change the channel on the wireless router. See the router’s manual for channel changing instructions. (If you are not using a router, see the next solution.) If you are not connected to a router, change the wireless channel by using the Intel My WiFi Utility: 1. At the right side of the taskbar, click the Intel My WiFi Technology icon. 2. Select Open Intel My WiFi Utility. Intel My WiFi Utility opens. Use the help document in the Intel My WiFi Utility. 3. Search for access points. 4. In the results, click Advanced Settings. 5. Follow the onscreen instructions. Maintenance and Troubleshooting 36 Push2TV Wireless Display Adapter PTV3000 Your Video Mode Has Changed The video display resolution might change while you are using Intel WiDi, and you might see a pop-up screen with the message Your video mode has changed. This can happen regardless of whether you change the display resolution manually or it is changed by another application. To reset the laptop display to the correct resolution: On the pop-up screen with the message Your video mode has changed, click the Restore settings and resume connection button. The application automatically resets the display to the correct settings. Resolutions Supported by Intel WiDi Intel WiDi supports one or more of the following resolutions: • 1280 x 720 • 1280 x 768 • 1280 x 800 • 1366 x 768 • 1440 x 900 • 1600 x 900, • 1920 x 1080. For information about viewing in HDTV 1080p resolution, see Configure Your Laptop to Display 1080p Resolution on page 29. Troubleshoot the Initial Setup This section describes how you can resolve problems that might occur during the initial setup. Change the TV Input Different TV brands have various methods of changing the TV input. Five of the most common processes are described in this section. If none of these processes apply to your TV, consult your TV owner’s manual for more help. • Some TV remote controls have buttons labeled HDMI, HDMI 1, HDMI 2, A/V, and so on. Press the appropriate button to choose the TV input. • Other TV remote controls include a button labeled Input, Source, TV, or TV/Video. Press this button to cycle the TV through the input options. Maintenance and Troubleshooting 37 Push2TV Wireless Display Adapter PTV3000 • Pressing the Input button on some remote controls results in a list of inputs on the TV screen. Simply select the input that you want. • You select the input on some TVs by pressing the Input button on the front or side panel of the TV screen. Simply press the button until the input that you want is selected. • Sometimes the inputs are located beneath the regular channels on the TV. Try selecting the lowest TV channel and then go down one channel. The Push2TV Adapter Encountered a Problem on Startup If the Push2TV adapter is experiencing technical difficulties, turn off the Push2TV adapter and turn it on again. The Push2TV Adapter Is Not Detected It might be necessary to scan multiple times. If rescanning does not solve the issue, make sure that the Push2TV adapter is turned on and that the TV is displaying the Ready for connection screen. Also, try moving the laptop or the Push2TV adapter to different places in the room. The Push2TV adapter and TV should be in the same room to work correctly. If this does not work, see Common Solutions to Many Issues on page 41. Security Code Message While You Attempt to Connect If you get a message That security code is not correct after you have entered a security code while you are trying to make a connection between the Push2TV adapter and your TV, you have entered the wrong security code. Make sure that you type the code exactly as shown on the TV screen. The security code number changes after an incorrect entry. If the connection fails right after you have entered a correct security code, you need to try to connect again and retype the security code. Unsupported Audio Mode The laptop has to have specific audio settings for Intel WiDi to work correctly. NETGEAR recommends that you do not adjust these settings to an unsupported audio mode. The Unsupported audio mode screen displays if the audio display settings need adjusting. To restore the audio settings to the correct values when the Unsupported audio mode screen displays: 1. On the Unsupported audio mode screen, click the Adjust audio settings button. Maintenance and Troubleshooting 38 Push2TV Wireless Display Adapter PTV3000 2. On the Sound screen, double-click Speakers. 3. On the Advanced tab select either 16 bit, 44100 Hz (CD Quality) or 48000 Hz (DVD Quality). Unpredictable results might occur if you select a different audio mode. 4. Click the OK button. Intel WiDi Requires a Different Security Profile You can allow Intel WiFi to automatically choose the correct security profile or configure the Intel WiDi security profile manually. The Security Profile Is Incorrect The wireless security settings have been reconfigured using the Intel My WiFi Utility. To allow Intel WiFi to automatically choose the correct security profile: 1. At the right side of the taskbar, click the Intel My WiFi Technology icon. 2. Select Disable Intel My WiFi Technology. 3. Start Intel WiDi by clicking the Intel WiDi icon. The Connected adapter screen displays. 4. Click the Scan for available adapters button. While scanning, Intel WiDi enables Intel My WiFi Technology and selects the correct security profile. Set the Correct Security Profile Manually If the previous procedure does not automatically select the correct security profile, you can configure the correct security profile manually. To configure the correct security profile manually: 1. At the right side of the taskbar, click the Intel My WiFi Technology icon. 2. Select Open Intel My WiFi Utility. The Intel My WiFi Utility opens. Use the help document in the Intel My WiFi Utility. 3. Search for security. 4. In the results, click Security Settings. 5. Follow the onscreen instructions. The Wireless Switch on the Laptop Is Turned Off Normally, WiFi allows the laptop to connect to the router for wireless Internet access. Intel WiDi uses WiFi to wirelessly connect the laptop to the TV through the Push2TV adapter. Maintenance and Troubleshooting 39 Push2TV Wireless Display Adapter PTV3000 For this WiFi connection to work correctly, three switches must be turned on. The first switch is the hardware switch. It is usually located around the edge of the laptop or above the keyboard. It might be identified by a pole with two half circles on each side. Check the laptop manual for the exact location. Turn on the switch and scan again. When needed, the other two switches are automatically turned on by the application. If it is still impossible to connect because the application is not automatically turning the other switches on, see Common Solutions to Many Issues on page 41. Intel My WiFi Technology Is Disabled Intel My WiFi Technology allows the laptop to become a WiFi access point for other laptops. If the laptop screen shows that Intel My WiFi Technology is disabled, you can have it automatically enabled. To automatically enable Intel My WiFi Technology: 1. At the right side of the taskbar, click the Intel My WiFi Technology icon. 2. Select Disable Intel My WiFi Technology. 3. Start Intel WiDi by clicking the Intel WiDi icon. The Connected adapter screen displays. 4. Click the Scan for available adapters button. While scanning, Intel WiDi enables Intel My WiFi Technology. If WiFi is off on your laptop, Intel WiFi asks if you would like to turn on Intel My WiFi Technology. 5. (Optional) Select Yes, and click the Scan for available adapters button again. If this solution does not work, see Common Solutions to Many Issues on page 41. Resolve Firewall Issues In some cases, the laptop’s firewall blocks the WiFi connection between the laptop and the Push2TV adapter. If the firewall does block the WiFi connection, you have to change the laptop’s firewall settings. The following instructions apply to a Microsoft Windows firewall. To allow Intel WiDi through a different firewall, see that firewall’s product manual. There might be inconsistent results allowing the application through a firewall that is not a Microsoft Windows firewall. To change Microsoft Windows Firewall settings on a laptop: 1. On your laptop, click the Windows Start button. 2. In the search field, type Allow a program through a Windows Firewall. 3. Press the Enter key. 4. In the firewall control panel, make sure that the Name, Private, and Public check boxes are selected for both WiDiApp and Wireless PAN DHCP Server. Maintenance and Troubleshooting 40 Push2TV Wireless Display Adapter PTV3000 5. Click the OK button. 6. Try again to connect to the Push2TV adapter. Windows Power Saving Microsoft Windows software might be set to dim the display or put the computer to sleep after a period. If this occurs, you need to change the laptop’s power settings. To change the laptop’s power settings and stop the laptop screen from dimming while using Intel WiDi: 1. On your laptop, click the Windows Start button. 2. In the search field, type Power Options. 3. Press the Enter key. 4. Under the Select a Power Plan heading, make sure that the Balanced radio button is selected. 5. Next to the Broadband radio button, click Change Plan Settings. 6. From the Turn of the display list, select a long period. 7. From the Put the computer to sleep list, select a long period. 8. Click Save changes. Could Not Obtain a Network Address Try closing Intel WiDi and restarting the laptop. The laptop’s firewall could be blocking the Push2TV adapter’s request for a network address. For information about how to allow the address request through a firewall, see Resolve Firewall Issues on page 40. If allowing the address request through the firewall does not resolve the issue, see Common Solutions to Many Issues on page 41. Check the WiFi Access Point Frequency Intel WiDi functions at either 2.4 GHz or 5 GHz on both the WLAN connection to the wireless router and the PAN connection to the Push2TV adapter. The operating mode of the PAN connection depends on the WLAN connection to the wireless router. If the WLAN is connected at 2.4 GHz, PAN operates at 2.4 GHz; If the WLAN is connected at 5 GHz, PAN operates at 5 GHz. If you change your WLAN connection, the PAN connection might be interrupted. Common Solutions to Many Issues This section describes solutions you could try if the other troubleshooting sections have not helped. Try each solution one at a time starting with Solution 1. Maintenance and Troubleshooting 41 Push2TV Wireless Display Adapter PTV3000 Solution 1: 1. Close Intel WiDi. 2. Start Intel WiDi by clicking the Intel WiDi icon. The Connected adapter screen displays. Intel WiDi now scans for adapters. 3. Select the Push2TV adapter. 4. Click the Connect button. Intel WiDi should connect to the Push2TV adapter. Solution 2: 1. Shut down the laptop. 2. Restart the laptop. 3. Start Intel WiDi by clicking the Intel WiDi icon. The Connected adapter screen displays. Intel WiDi now scans for adapters. 4. Select the Push2TV adapter. 5. Click the Connect button. Intel WiDi should connect to the Push2TV adapter. Solution 3: 1. Reset the Push2TV adapter. For information about resetting the Push2TV adapter, see Return the Push2TV Adapter to Factory Default Settings on page 45. 2. Start Intel WiDi by clicking the Intel WiDi icon. The Connected adapter screen displays. Intel WiDi now scans for adapters. 3. Select the Push2TV adapter. 4. Click the Connect button. Intel WiDi should connect to the Push2TV adapter. Solution 4: 1. Check the laptop’s firewall settings. A firewall might be blocking the application. For more information, see Resolve Firewall Issues on page 40. 2. Start Intel WiDi by clicking the Intel WiDi icon. The Connected adapter screen displays. Intel WiDi now scans for adapters. 3. Select the Push2TV adapter. 4. Click the Connect button. Intel WiDi should connect to the Push2TV adapter. Maintenance and Troubleshooting 42 Push2TV Wireless Display Adapter PTV3000 Solution 5: 1. Update the firmware. For more information, see Update the Software on page 33. 2. Start Intel WiDi by clicking the Intel WiDi icon. The Connected adapter screen displays. Intel WiDi now scans for adapters. 3. Select the Push2TV adapter. 4. Click the Connect button. Intel WiDi should connect to the Push2TV adapter. Known Issues This section lists known Intel WiDi issues and workarounds. • After you stop using the Intel WiDi application, you might have to manually enable the laptop’s sound. For more information, see Adjust the Sound on page 27. • If Intel WiDi is located in the Windows startup group, the application usually does not work. • Wait until Microsoft Windows has fully booted before opening Intel WiDi. • If the media application in use can be set to mute or unmute only for both the laptop and TV at the same time, NETGEAR recommends that you use a different media application. • Pressing Control + Alt + Delete on the laptop might freeze the TV image. • Changing the wireless LAN or connection settings when Intel WiDi is connected might cause momentary disruption of or end the connection. Note: For analog TVs, the Push2TV adapter does not support NTSC (National Television System Committee) format 4.43 variations on the composite interface. See the TV owner’s manual for NTSC variation information. Maintenance and Troubleshooting 43 A. Factory Settings and Technical Specifications This appendix covers the following topics: • Return the Push2TV Adapter to Factory Default Settings • Technical Specifications 44 A Push2TV Wireless Display Adapter PTV3000 Return the Push2TV Adapter to Factory Default Settings You can use the Reset button to restore factory default settings or to change the language (see Change the Display Language on page 34). Reset button Figure 4. Reset button To return the Push2TV adapter to factory default settings: WARNING: This procedure erases the security code for your Push2TV adapter. After you do this, you need to set up the Push2TV adapter again to function with your TV and your laptop as described in the previous chapters. 1. Turn on the Push2TV adapter. 2. Wait until the LED turns solid and the TV screen shows Ready for connection. 3. Using a paperclip, press and hold the Reset button for more than 5 seconds. The LED turns off and then starts blinking. 4. Release the Reset button when the LED starts blinking. The Push2TV adapter returns to its factory default settings. Factory Settings and Technical Specifications 45 Push2TV Wireless Display Adapter PTV3000 Technical Specifications Table 1. Feature Description Compatible Intel WiDi laptops • • • • • Intel Core i3, i5, or i7 processor Intel Graphics Media Accelerator HD graphics adapter Intel WiFi Link wireless networking adapter Microsoft Windows 7 and Windows 8 operating systems Intel Wireless Display (WiDi) software Network interface • • IEEE 802.11n 300 Mbps WiFi (b/g/n compatible) with WEP, WPA, and WPA2 support Dual Band: 2.4 or 5 GHz Wireless display • • • Intel Wireless Display (Intel WiDi 3.x) Wi-Fi Direct Wi-Fi CERTIFIED Miracast Video outputs • • • 480p (HDMI) 720p (HDMI) 1080p (HDMI) Audio output Digital over HDMI (5.1 surround sound pass-through and stereo) Power input • • Power consumption Less than 2W (typical) when streaming HD video Physical dimensions (L x D x H) 84 x 51 x 12 mm (3.3 x 2.0 x 0.47 in.) Weight 48 g (0.10 lb) Operating temperature 0 to 40ºC (32 to 105ºF) Electromagnetic compliance CE mark, Commercial; FCC Part 15, Class B; EN 55 022 (CISPR 22) Class B, C-Tick Power adapter safety approval CE mark, Commercial UL listed (UL 1950), C-Tick 5.0V, 1.0A power adapter USB powered Factory Settings and Technical Specifications 46 B. Notification of Compliance N E T GEAR ad ap ters B Regulatory Compliance Information This section includes user requirements for operating this product in accordance with National laws for usage of radio spectrum and operation of radio devices. Failure of the end-user to comply with the applicable requirements may result in unlawful operation and adverse action against the end-user by the applicable National regulatory authority. This product’s firmware limits operation to only the channels allowed in a particular Region or Country. Therefore, all options described in this user's guide may not be available in your version of the product. Europe – EU Declaration of Conformity Products bearing the marking comply with the following EU directives: • EMC Directive 2004/108/EC • Low Voltage Directive 2006/95/EC If this product has telecommunications functionality, it also complies with the requirements of the following EU Directive: • R&TTE Directive 1999/5/EC Compliance with these directives implies conformity to harmonized European standards that are noted in the EU Declaration of Conformity. For indoor use only. Valid in all EU member states, EFTA states, and Switzerland. This device may not be used for setting up outdoor radio links in France and in some areas the RF output power may be limited to 10 mW EIRP in the frequency range of 2454 - 2483.5 MHz. For detailed information the end-user should contact the national spectrum authority in France. FCC Requirements for Operation in the United States FCC Information to User This product does not contain any user serviceable components and is to be used with approved antennas only. Any product changes or modifications will invalidate all applicable regulatory certifications and approvals FCC RF Radiation Exposure Statement RF Exposure Information The radio module has been evaluated under FCC Bulletin OET 65C (01-01) and found to be compliant to the requirements as set forth in CFR 47 Sections, 2.1093, and 15.247 (b) (4) addressing RF Exposure from radio frequency devices. This model meets the applicable government requirements for exposure to radio frequency waves. FCC Declaration of Conformity We, NETGEAR, Inc., 350 East Plumeria Drive, San Jose, CA 95134, declare under our sole responsibility that the Push2TV Wireless Display Adapter PTV3000 complies with Part 15 Subpart B of FCC CFR47 Rules. Operation is subject to the following two conditions: 47 Push2TV Wireless Display Adapter PTV3000 • This device may not cause harmful interference, and • This device must accept any interference received, including interference that may cause undesired operation. FCC Radio Frequency Interference Warnings and Instructions This equipment has been tested and found to comply with the limits for a Class B digital device, pursuant to Part 15 of the FCC Rules. These limits are designed to provide reasonable protection against harmful interference in a residential installation. This equipment uses and can radiate radio frequency energy and, if not installed and used in accordance with the instructions, may cause harmful interference to radio communications. However, there is no guarantee that interference will not occur in a particular installation. If this equipment does cause harmful interference to radio or television reception, which can be determined by turning the equipment off and on, the user is encouraged to try to correct the interference by one or more of the following methods: • Reorient or relocate the receiving antenna. • Increase the separation between the equipment and the receiver. • Connect the equipment into an electrical outlet on a circuit different from that which the radio receiver is connected. • Consult the dealer or an experienced radio/TV technician for help. Canadian Department of Communications Radio Interference Regulations This digital apparatus (Push2TV Wireless Display Adapter PTV3000) does not exceed the Class B limits for radio-noise emissions from digital apparatus as set out in the Radio Interference Regulations of the Canadian Department of Communications. This Class [B] digital apparatus complies with Canadian ICES-003. Cet appareil numérique de la classe [B] est conforme à la norme NMB-003 du Canada Industry Canada This device complies with RSS-210 of the Industry Canada Rules. Operation is subject to the following two conditions: (1) This device may not cause harmful interference, and (2) this device must accept any interference received, including interference that may cause undesired operation. Caution: Ce dispositif est conforme à la norme CNR-210 d'Industrie Canada applicable aux appareils radio exempts de licence. Son fonctionnement est sujet aux deux conditions suivantes: (1) le dispositif ne doit pas produire de brouillage préjudiciable, et (2) ce dispositif doit accepter tout brouillage reçu, y compris un brouillage susceptible de provoquer un fonctionnement indésirable. IMPORTANT NOTE: Radiation Exposure Statement: This equipment complies with IC radiation exposure limits set forth for an uncontrolled environment. This equipment should be installed and operated with minimum distance 20cm between the radiator & your body. NOTE IMPORTANTE: Déclaration d'exposition aux radiations: Cet équipement est conforme aux limites d'exposition aux rayonnements IC établies pour un environnement non contrôlé. Cet équipement doit être installé et utilisé avec un minimum de 20 cm de distance entre la source de rayonnement et votre corps. Notification of Compliance 48 Push2TV Wireless Display Adapter PTV3000 Interference Reduction Table The following table shows the recommended minimum distance between NETGEAR equipment and household appliances to reduce interference (in feet and meters). Household Appliance Recommended Minimum Distance (in feet and meters) Microwave ovens 30 feet / 9 meters Baby Monitor - Analog 20 feet / 6 meters Baby Monitor - Digital 40 feet / 12 meters Cordless phone - Analog 20 feet / 6 meters Cordless phone - Digital 30 feet / 9 meters Bluetooth devices 20 feet / 6 meters ZigBee 20 feet / 6 meters Notification of Compliance 49 C. Notification of Compliance N E T GEAR du al b an d - wir eles s C Regulatory Compliance Information This section includes user requirements for operating this product in accordance with National laws for usage of radio spectrum and operation of radio devices. Failure of the end-user to comply with the applicable requirements may result in unlawful operation and adverse action against the end-user by the applicable National regulatory authority. This product's firmware limits operation to only the channels allowed in a particular Region or Country. Therefore, all options described in this user's guide may not be available in your version of the product. Europe – EU Declaration of Conformity Products bearing the marking comply with the following EU directives: • EMC Directive 2004/108/EC • Low Voltage Directive 2006/95/EC If this product has telecommunications functionality, it also complies with the requirements of the following EU Directive: • R&TTE Directive 1999/5/EC Compliance with these directives implies conformity to harmonized European standards that are noted in the EU Declaration of Conformity. For indoor use only. Valid in all EU member states, EFTA states, and Switzerland. This device may not be used for setting up outdoor radio links in France and in some areas the RF output power may be limited to 10 mW EIRP in the frequency range of 2454 - 2483.5 MHz. For detailed information the end-user should contact the national spectrum authority in France. FCC Requirements for Operation in the United States FCC Information to User This product does not contain any user serviceable components and is to be used with approved antennas only. Any product changes or modifications will invalidate all applicable regulatory certifications and approvals. FCC Guidelines for Human Exposure This equipment complies with FCC radiation exposure limits set forth for an uncontrolled environment. This equipment should be installed and operated with minimum distance of 20 cm between the radiator and your body. This transmitter must not be co-located or operating in conjunction with any other antenna or transmitter. FCC Declaration of Conformity We, NETGEAR, Inc., 350 East Plumeria Drive, San Jose, CA 95134, declare under our sole responsibility that the Push2TV Wireless Display Adapter PTV3000 complies with Part 15 Subpart B of FCC CFR47 Rules. Operation is subject to the following two conditions: • This device may not cause harmful interference, and • This device must accept any interference received, including interference that may cause undesired operation. 50 Push2TV Wireless Display Adapter PTV3000 FCC Radio Frequency Interference Warnings & Instructions This equipment has been tested and found to comply with the limits for a Class B digital device, pursuant to Part 15 of the FCC Rules. These limits are designed to provide reasonable protection against harmful interference in a residential installation. This equipment uses and can radiate radio frequency energy and, if not installed and used in accordance with the instructions, may cause harmful interference to radio communications. However, there is no guarantee that interference will not occur in a particular installation. If this equipment does cause harmful interference to radio or television reception, which can be determined by turning the equipment off and on, the user is encouraged to try to correct the interference by one or more of the following methods: • Reorient or relocate the receiving antenna. • Increase the separation between the equipment and the receiver. • Connect the equipment into an electrical outlet on a circuit different from that which the radio receiver is connected. • Consult the dealer or an experienced radio/TV technician for help. FCC Caution • Any changes or modifications not expressly approved by the party responsible for compliance could void the user's authority to operate this equipment. • This device complies with Part 15 of the FCC Rules. Operation is subject to the following two conditions: (1) This device may not cause harmful interference, and (2) this device must accept any interference received, including interference that may cause undesired operation. • For product available in the USA and Canada market, only channel 1~11 can be operated. Selection of other channels is not possible. • Pour les produits disponibles aux États-Unis / Canada du marché, seul le canal 1 à 11 peuvent être exploités. Sélection d'autres canaux n'est pas possible. • This device and its antenna(s) must not be co-located or operation in conjunction with any other antenna or transmitter. • Cet appareil et son antenne (s) ne doit pas être co-localisés ou fonctionnement en association avec une autre antenne ou transmetteur. Canadian Department of Communications Radio Interference Regulations This digital apparatus (Push2TV Wireless Display Adapter PTV3000) does not exceed the Class B limits for radio-noise emissions from digital apparatus as set out in the Radio Interference Regulations of the Canadian Department of Communications. This Class [B] digital apparatus complies with Canadian ICES-003. Cet appareil numérique de la classe [B] est conforme à la norme NMB-003 du Canada Industry Canada This device complies with RSS-210 of the Industry Canada Rules. Operation is subject to the following two conditions: (1) This device may not cause harmful interference, and (2) this device must accept any interference received, including interference that may cause undesired operation. Caution: The device for the band 5150-5250 MHz is only for indoor usage to reduce po-tential for harmful interference to co-channel mobile satellite systems. High power radars are allocated as primary users (meaning they have priority) of 5250-5350 MHz and 5650-5850 MHz and these radars could cause interference and/or damage to LE-LAN devices. Ce dispositif est conforme à la norme CNR-210 d'Industrie Canada applicable aux appareils radio exempts de licence. Son fonctionnement est sujet aux deux conditions suivantes: (1) le dispositif ne doit pas produire de brouillage préjudiciable, et (2) ce dispositif doit accepter tout brouillage reçu, y compris un brouillage susceptible de provoquer un fonctionnement indésirable. Avertissement: Le dispositif fonctionnant dans la bande 5150-5250 MHz est réservé uniquement pour une utili-sation à l'intérieur afin de réduire les risques de brouillage préjudiciable aux systèmes de satellites mobiles utilisant les mêmes canaux. Notification of Compliance 51 Push2TV Wireless Display Adapter PTV3000 Les utilisateurs de radars de haute puissance sont désignés utilisateurs principaux (c.-à-d., qu'ils ont la priorité) pour les bandes 5250-5350 MHz et 5650-5850 MHz et que ces radars pourraient causer du brouillage et/ou des dommages aux dispositifs LAN-EL. IMPORTANT NOTE: Radiation Exposure Statement: This equipment complies with IC radiation exposure limits set forth for an uncontrolled environment. This equipment should be installed and operated with minimum distance 20cm between the radiator & your body. NOTE IMPORTANTE: Déclaration d'exposition aux radiations: Cet équipement est conforme aux limites d'exposition aux rayonnements IC établies pour un environnement non contrôlé. Cet équipement doit être installé et utilisé avec un minimum de 20 cm de distance entre la source de rayonnement et votre corps. Interference Reduction Table The following table shows the recommended minimum distance between NETGEAR equipment and household appliances to reduce interference (in feet and meters). Household Appliance Recommended Minimum Distance (in feet and meters) Microwave ovens 30 feet / 9 meters Baby Monitor - Analog 20 feet / 6 meters Baby Monitor - Digital 40 feet / 12 meters Cordless phone - Analog 20 feet / 6 meters Cordless phone - Digital 30 feet / 9 meters Bluetooth devices 20 feet / 6 meters ZigBee 20 feet / 6 meters Notification of Compliance 52