1
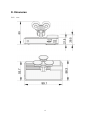
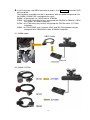
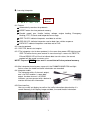
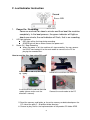
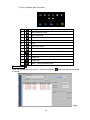
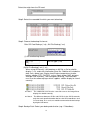
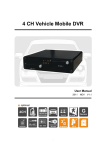
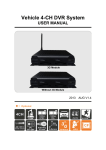
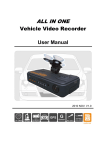
DV900/DV939/DV708
Black Box
Vehicle Video Recorder
User Manual
2011 JAN. V1.0
ATBS Technology Co.
http://www.tpms.tw/
Table of Contents
A. Features ......................................................................................................... 1
B. Specification.................................................................................................... 1
C. Structure of Product ........................................................................................ 3
D. Dimension........................................................................................................ 4
E. Installation Guide............................................................................................. 5
F. Led Indicator Instruction................................................................................... 8
G. Software Player Instruction ............................................................................. 9
H. Formatting Memory Card ............................................................................... 14
I.
Caution ...........................................................................................................15
J. Troubleshooting …………………………………………………………………...15
ATBS Technology Co.
http://www.tpms.tw/
A. Features
1.
Ideal for personal car, taxi, trucks and buses.
2.
Easy to install. Small in size to prevent blocking the driver's view.
3.
Plug-n-Play. It can be recorded traffic information and outside driving
conditions and inside sounds simultaneously.
4mm view angle 90 degrees(optional lenses M12)
Store with Micro-SDHC Card (recommend to use Class4 above
grade.)
4.
5.
6.
Image data stored in Micro-SDHC Card can be completely against
the vehicle moving in the shock.
7.
No needs to operate when plug the card to start recording with power.
8.
The full recording time and date can be showing in the monitor
9.
directly Overall Quick Search Event Log.
Ending File in Particular Format Saved Fine in Condition of Power Cut No
Battery
10. Professional file formats, without built-in lithium battery, no needs to
afraid of heat and bursting concerns, it is the real black box.
11. Using professional-grade compression engine with data files can’t be
modified to construct the best recorder.
12. Without any electromagnetic radiation or any electromagnetic
interference, the car will not interfere with GPS or wireless devices.
13. Using OBD2 connect to vehicle’s ECU communication, plug and play.
Traffic information can be translated to Excel file for traffic accident
analysis
B. Specifications
Item
Specification
Chipset
H.264 Image compression chip
Sensor Device
VGA CMOS Sensor
View Angle
4mmLens with view angle 90 degrees(optional for
M12)
Voltage
Start transient voltage 5V ± 5%
Operating Temp.
-10
℃ ~ 70℃
-1-
Storage Device
Silicon Power or Transcend Micro SDHC card Class 4
or above, (m i n c a p a c i t y 4 G a b o v e )
Recording Frame
640x480 Highest 30fps( NTSC ) / 25fps( PAL )
Recording content
Date, time, image, sound data, and traffic information
Storage Device
Specific format for specific software player.
Microphone
Built-in microphone
Time Setup
To set the time with Player in the micro SD card
(a)AV out( 1 Vp-p
Input and output device
Accessories
。
composite video output,
75ohms )
(b) Red Light: recording.
(c) Green light: Power
Note: The system is divided into NTSC / PAL both.
A. EDR interpreter and cable configured:
DV900: AT0428H (support 25 protocols/ 500 car
models) and CB0428_12V cable.
DV939:AT1939H and CB1939/CB0428_24V cable
DV708:AT1708H and CB1708/CB0428_24V cable
DV948:AT3648H and CB0428_12V cable
B. TV out cable
C. User manual
D. CD (Contains software player & manual)
Description
We suggest to format Micro SDHC card first with
Player and then put the card to record. Also the
machine E26 could format Micro SDHC card
automatically with a few minutes without interruption.
Important notice
Memory card formatted using the playback software,
windows will recognize the remaining capacity about
80MB for copy the playback software to memory card.
-2-
C. Structure of Product
Front View
Len
Back view
Record
Power LED
Micro SD card
Side view
Connect to EDR
AV out
3
D. Dimension
Unit
:mm
4
E. Installation Guide
2. Assemble the sucking disc and
1. Make the bracket facing upward.
Micro SD card.
3. Set up the machine in proper
4. Adjust the viewing angle.
position.
5
5. Install Interpreter: find OBD2 connecter & plug in. Use DVR cable to connect DVR
with interpreter.
The interpreter and cable must be in accordance with car model configuration, but
the DV900 / DV939 DVR is configured the same.
DV900 : for passenger car, OBD2 cable & AT0428H
DV939 : for J1939 heavy duty vehicle, configured with CB1939 or CB0428 ( OBD2
24V) cable , AT1939H interpreter
DV708 : for J1708 heavy duty vehicle, configured with CB1708 cable , AT1708H
interpreter.
DV948 : for FUSO,BENZ truck, Hyundai, HINO, and ISO CAN protocol vehicles,
configured with CB0428-24V cable, AT3648H interpreter.
5.1 DV900 model
AT0428H
5.2 DV939 & DV708:
6
6. Learning Interpreter
RESET
Button
6.1 Feature
Automatically searches for protocols.
RESET button for clear protocol memory.
Provide speed, rpm, throttle, battery voltage, engine loading, Emergency
Braking, DTC, Distance and temperature message.
OBD TX LED: indicate interpreter send data to vehicle.
OBD RX LED: indicate interpreter receive data from vehicle response.
DATA OUT: indicate interpreter send data out to DVR.
:
6.2 Learning protocol
6.2.1 ACC ON, do not start engine.
6.2.2 The interpreter start to learn protocol, in the same time power LED lighting, and
OBD TX led flash every one second. In case learning is successful, OBD2 TX,
RX and RS232 LED will flash to indicate data transfer status, the correct
protocol will be saved in memory also.
NOTE: To press RESET button over 1 second that will clear protocol memory.
6.3 After interpreter learning was successful, the DV900/DV939/DV708 red light
flashes mean the video and traffic information are recorded.
6.4 Interpreter cable:
The Interpreter offers 2 channels output,
one is for DVR another is spare data
output, the data channel is a RS232
interface; you can connect with a device to
monitor vehicle traffic information.
6.5 AV out confirm:
You can use AV out display to confirm the traffic information data whether it is
saved. Normally it will display image and date, time and throttle information.
7
F. Led Indicator Instruction
Record
Power LED
1.
Power On / Recording
Power on and wait for about a minute and then boot the machine
completely. In the boot process, the green indicator will light on
about one minute; the red indicator will flash, that is on recording.
I.
II.
LED light indicator:
● RED light will be flashing during recording.
● GREEN light will be on when connect the power well.
Power Off / Stop Recording
When the power is off, the machine will stop recording. You can remove
the SDHC card and put it to the card reader to connect to the PC for
playing the recorded files.
How to read the files from micro SD card?
Force reduction SD card, SD card pop
up lightly.
Remove the card from the machine.
Insert the SDHC card into the card
reader (please make sure the
direction is correct).
Connect the card reader to the PC
5. Read the memory card folder; or the entire memory card data backup on the
PC side of the path C: \ BlackBox folder directory.
6. Choose to play the file: the implementation of the product CD folder ATBS
8
CarBox2.exe
Screen as shown below, press
Play botton, Select the
memory card; or select 『Open Document』
Select the memory card or
the files stored on the hard disk to play; during file playback, if we want to
pause the playback, we could directly tap the pause button to pause playback
。
★Note: It is recommended to copy the product CD IBoxPlayer folder to the
computer and conduct the entire operation of software.
G. Software operation instruction
1. Viewer interface
OBD2
Play Speed
Volume
★ Caution:It needs to install DirectX 9.0 or above before
running this software.
9
2. Play & Settings Icon Instruction:
1
play previous file
2
play previous frame
3
play backward
4
Pause
5
Stop
6
Play
7
Play next frame
8
Play next file
9
Disk back up, transfer video and traffic information
10
setting
11
Open file
12
Snapshot
13
tools
,format memory card
Disk backup
Save the recorded files to your PC. Click on the button
as below
and it will pop up the screen
Step1:
10
Select the origin from the SD card
Setp2: Select the recorded file which you want to backup
Step3: Choose the backup file format
Offer SD Card Backup (*.sd) , AVI File Backup (*.avi)
(1) SD card backup format
SD File type (*.sd)
(2)AVI File Backup(*.avi) (*.srt)
When using AVI format, it will produce an AVI file, a file for subtitle
display (*.srt) ,and traffic information Excel file. Subtitle will include the
date, time, speed, rpm, Engine load, Engine temperature, throttle,
battery voltage, DTC( ON/OFF), cruise, clutch, brake, MAF, distance,
Average Fuel Economy , and Emergency Braking. These data but
must use the software player which supports subtitle display to show it
correctly.
★Note 1:The subtitle file must have the same file name as the image file to
display the subtitle correctly.
★Note 2:The difference between SD file and AVI file is that AVI file contains
only date and speed information but lose the GPS coordinates and
G-sensor data. As a result, we would recommend to do the backup
by original SD format.
Step4: Backup Path: Select your backup destination (e.g.: C:\blackbox)
11
Step5: Backup : Start backup the file to your specified destination
Setting
Before using the machine, please insert the micro SDHC card to the card reader and
connect to the PC to set up the machine. When finished, you can insert the card
back to the machine and start recording
1.
password
This function can encrypt the data and prevent others from accessing.
Maximum letters are up to 15 digits.
Example: 123456789012345
After setting the password up, you have to input password every time for
playing the files, modify the setting, formatting the SDHC card, etc.
Note: Please check if you have set capital letters for your password and
save your password well in other place to prevent from missing.
★
2.
Time zone
:
Local system time zone GMT
,or adjust your time zone for your area.
12
:
Time setting Use computer system for setting the time.
3.
Unit of speed : Select vehicle speed unit.
4.
Un i t of T em per a t ur e : S el ec t en g i ne t em per a tur e u n it .
5.
G - S e ns or s e ns it i v i t y:
O f f : tur n of f G - s ens or
l ig h t: G - s e ns or ac ti v e wh e n G f or c e
is l i gh t;
He a v y : G - s e ns or ac t i v e wh e n G
f or c e is lar g e.
6.
S ens or s e ns it i v it y:
It is c am er a s e ns or s e ns it i v it y. This
function is used to adjust the light
compensation, heavy: up compensation.
, def au l t is n or m al .
7.
A u d io R ec or d i n g: T ur n O N/O F F
O nc e it was tur ne d of f , th e s e tt i ng wi l l s a v e i n S D, yo u c a n
c onf ir m it f r om A V o u t v i de o d is pl a y a u di o d i s ab l e l o go .
Snapshot
While playing the recorded file, you can use this function
to snapshot
the picture and save it into your PC. Default saving path for snapshot
picture will be in x:\IBoxPlayer/Snapshot folder. File type: BMP
Volume control
Play BAR
You can use the mouse to drag the bar to search the video quickly.
Play speed
Support 2x, 4x fast forwarding
and -2x, -4x slow play mode.
13
H. Formatting Memory Card
1. When You Should Format SDHC CARD?
When you use the SDHC card for the first time or just purchase a new card, you
should format it in order to use it correctly. (The bundled SDHC card has been
formatted and tested by the manufacturer already.)
『
』
Click on Format to start formatting the SD card.
Notice
Before formatting SD
memory card, please
ensure to unlock it first.
When formatting is completed, please insert the card into the machine for
recording.
Insert the SDHC card
in correct direction.
Press the SDHC card
in until it is set.
14
Finished
2. Restoring Memory Card
When you have backup the recorded files into PC and want to use the
SDHC card for other purposes, you have to restore it first so it can be used
correctly.
How to restore it?
Steps:
1.) Insert the CD in your PC and click on Format to start formatting the
SD card.
2.) Click on
Restore to restore the SD card. Please see the following
steps as reference
『
『
』
』
After finished, the memory card can be used for other purposes.
3.Language setting: select operation language.
I. Caution:
:
1. Do not take off the Micro SD card under the recording or under power on
status.
2. Please insert /Take out the Micro SD under the power off status.
3. When the Micro SD card is full it will auto running recover. The first file will be
erased.
4. Do not operate interpreter when you are driving.
J. Troubleshooting:
:
1. Interpreter is not working.
A: If interpreter power LED is off, Check OBD connector whether is loose and
plug out /in OBD connector once.
2. The interpreter never learns protocol success.
A: Press RESET button over 1 second to clear memory, as the interpreter
support many car models, it may take a little time to learn correct protocol,
learning timing is about 2 ~3 minutes. Please check OBD TX LED flash
every second during leaning period.
3. If no recording
A: Check OBD2 cable Input and check the Micro SD is damaged or not.
15