1
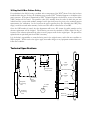
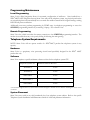
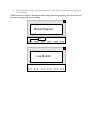
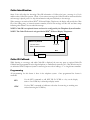
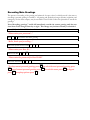
WIN S MART V OICE I NSTALLATION M ANUAL
®
®
WIN® Communications Corporation
This page is intentionally blank.
CHAPTER 1 WELCOME TO SMART VOICE ........................................................................................................................................................... 5
INTRODUCTION ................................................................................................................................................................................................................ 5
USING THIS MANUAL ...................................................................................................................................................................................................... 5
“Logging into User Mode” ......................................................................................................................................................................................... 5
SERVICE REQUIREMENTS................................................................................................................................................................................................. 6
CONTACT INFORMATION ................................................................................................................................................................................................. 6
WARRANTY INFORMATION.............................................................................................................................................................................................. 6
12 Month Limited Warranty ........................................................................................................................................................................................ 6
30 Day Out Of Box Failure Policy.............................................................................................................................................................................. 7
TECHNICAL SPECIFICATIONS ........................................................................................................................................................................................... 7
Port Configurations..................................................................................................................................................................................................... 8
Power Requirements ................................................................................................................................................................................................... 8
Port Upgrade Procedure............................................................................................................................................................................................. 8
Maximum Smart Voice Systems per Telephone System............................................................................................................................................... 8
PROGRAMMING MAINTENANCE ...................................................................................................................................................................................... 9
Local Programming .................................................................................................................................................................................................... 9
Remote Programming ................................................................................................................................................................................................. 9
TELEPHONE SYSTEM REQUIREMENTS ............................................................................................................................................................................. 9
Hardware .................................................................................................................................................................................................................... 9
Software....................................................................................................................................................................................................................... 9
System Placement........................................................................................................................................................................................................ 9
NECESSARY TOOLS FOR INSTALLATION ........................................................................................................................................................................ 10
CHAPTER 2 FEATURES .............................................................................................................................................................................................. 10
MAILBOXES ................................................................................................................................................................................................................... 10
MEMORY ....................................................................................................................................................................................................................... 10
SMART KEYS ................................................................................................................................................................................................................. 10
Overview ................................................................................................................................................................................................................... 10
Programming ............................................................................................................................................................................................................ 11
Usage......................................................................................................................................................................................................................... 11
SMART ACCESS INTERNAL LOGIN ................................................................................................................................................................................. 11
AUTO CONFIGURATION ................................................................................................................................................................................................. 11
LIVE MONITOR .............................................................................................................................................................................................................. 12
Overview ................................................................................................................................................................................................................... 12
Usage......................................................................................................................................................................................................................... 12
CALLER IDENTIFICATION ............................................................................................................................................................................................... 14
CALLER ID CALLBACK .................................................................................................................................................................................................. 14
Programming ............................................................................................................................................................................................................ 14
Usage......................................................................................................................................................................................................................... 15
CHAPTER 3 PROGRAMMING SMART VOICE...................................................................................................................................................... 17
INTRODUCTION .............................................................................................................................................................................................................. 17
CONFIGURE SYSTEM DATE AND TIME ........................................................................................................................................................................... 17
CREATING MAILBOXES.................................................................................................................................................................................................. 18
Automatic Mailbox Configuration............................................................................................................................................................................. 18
Custom Dial Plan ...................................................................................................................................................................................................... 18
Create Custom Normal User, Outside/Mailbox Only User, or Audiotext User Mailboxes....................................................................................... 19
SCREENS Menu Programming .............................................................................................................................................................................. 20
MAIN GREETINGS .......................................................................................................................................................................................................... 21
Greeting..................................................................................................................................................................................................................... 21
Whattodo ................................................................................................................................................................................................................... 21
HOLIDAY AND TEMPORARY GREETINGS ....................................................................................................................................................................... 22
Holiday Greeting and Whattodo ............................................................................................................................................................................... 22
Temporary Greeting and Whattodo .......................................................................................................................................................................... 22
GREETING SCRIPTS ........................................................................................................................................................................................................ 23
RECORDING MAIN GREETINGS ...................................................................................................................................................................................... 24
LOADING MAIN GREETINGS .......................................................................................................................................................................................... 25
CONFIGURING BUSINESS HOURS ................................................................................................................................................................................... 26
Day ............................................................................................................................................................................................................................ 26
Setting Business Hours.............................................................................................................................................................................................. 27
CONFIGURE SINGLE DIGIT USER OPTIONS .................................................................................................................................................................... 28
Setting Up Transfer Only Single Digit Users ............................................................................................................................................................ 28
Setting Up Single Digit Audiotext Options................................................................................................................................................................ 29
CONFIGURING THE DEFAULT OPERATOR ...................................................................................................................................................................... 30
Programming ............................................................................................................................................................................................................ 30
Recording .................................................................................................................................................................................................................. 30
Enabling the Greeting ............................................................................................................................................................................................... 31
Retrieving Messages.................................................................................................................................................................................................. 32
PUBLIC DISTRIBUTION LISTS ......................................................................................................................................................................................... 33
Creating New Distribution List ................................................................................................................................................................................. 33
Recording .................................................................................................................................................................................................................. 34
CHANGING USER PASSWORDS ....................................................................................................................................................................................... 35
Welcome to Smart Voice
Introduction
The WIN® Smart Voice, Voice Mail System is a digitally integrated circuit card which installs directly into all
WIN® 440CT Series Telephone Systems. Digital Integration allows Smart Voice to deliver advanced
features, yet is a cost-effective automated attendant/voicemail system specially designed to meet all the needs
of the small office user.
The Smart Voice, through digital integration, incorporates advanced features, which allow Smart Voice to
communicate information to your telephone set. Information such as: Number of Messages and Calling
Name and Number can be viewed directly on your telephone display. Smart Voice also incorporates display
controls allowing “Smart Key” navigation of User Mode Menus.
WIN® Smart Voice is scalable to 2, 4, 8, or 16 answering ports which may be used as automated attendant
and/or voice messaging ports.
Smart Voice may be configured to support multiple ACD Hunt Group applications.
Smart Voice provides 10 to 500 hours of voice storage through the use of Compact Flash Memory or a fixed
hard drive option available at the time of purchase.
Using This Manual
This Manual covers all new features provided by the Smart Voice, as well as, installation procedures.
The programming techniques discussed include:
♦ Telephone (DTMF) programming
♦ Visual programming via the “SCREENS ” DOS based Graphical User Interface
♦ Visual programming via the Windows Graphical User Interface
Throughout this manual, system prompts and installer instructions are discussed. When a system or
instruction prompt is shown it will be displayed as follows:
“System Speech will always be in italics and red type.”
Installer instructions are always shown within a box.
“Logging into User Mode”
When installing Smart Voice, from time to time the installer may be required to access the main greeting
prompt from Smart Voice. Due to the advanced features provided by Smart Voice, the process of logging
into a mailbox has changed from previous WIN® Communications voicemail systems.
When placing an internal call to Smart Voice, the caller is automatically prompted to enter the password for
the mailbox of the calling station. This means that to reach the main greeting of Smart Voice, the caller must
dial * * to exit User Mode and return to the main greeting. Another way to reach the main greeting is
to call in from an outside line.
Service Requirements
In the event of equipment malfunction an authorized Factory Representative must perform all required
maintenance. It is the user’s responsibility to report the need for service to the authorized representative. In
the case repairs are required, contact:
WIN® Communications Corporation
6755 Jimmy Carter Blvd.
Norcross, GA 30087
www.win-phone.com
Contact Information
Customer Service
Monday – Friday 8:30am – 5pm EST 1-800-289-9255
Technical Support
Monday – Friday 8:30am – 6pm EST** 1-800-283-7877 (PIN code required)
**After hours emergency support is available
Warranty Information
12 Month Limited Warranty
For twelve (12) months from the date of original purchase, WIN® Communications Corporation warrants
that the WIN® Smart Voice will be free from defects in material and workmanship, and WIN®’s liability is
limited solely to the repair or replacement, at WIN®’s option, of such defective parts which are:
1. Returned, shipping and handling charges prepaid, to the warehouse designated by WIN®, properly
packed and in good mechanical condition, with a statement included describing the defect.
2. Proven to be defective upon WIN®’s inspection. The cost of labor to inspect and remove defective
parts shall be borne by the installing or servicing party.
The above warranty does not apply to materials used outside of the Territory or to parts normally consumed
during operation.
WIN Communications cannot be held responsible in any way for digital information that may be lost during
the repair procedure.
30 Day Out Of Box Failure Policy
If a technician in the field is having a problem with a component of the WIN® Smart Voice, that has been
installed within the past 30 days, the technician must contact WIN® Technical Support to troubleshoot the
part in question. If the part is determined by WIN® Technical Support to be defective, an out of box failure
(OBF) number will be issued. The purchase order (PO) number from the order in which the part was
ordered and the system serial number (stamped on the part itself) must be given to the technical support
representative for verification. In the event that the part in question does not fall within the OBF policy
range, it could be covered under warranty. In this case a RA will be offered in lieu of an OBF.
Once the OBF number is issued, the sales department will issue a RC (return for credit) number and an
advance replacement will be shipped. The defective part must be returned to WIN® within 30 days of
issuance of the advance replacement in order to receive proper credit for the original part. The part will be
replaced with an equivalent part from WIN®’s inventory.
It is the dealer’s responsibility to return defective parts in the original carton, and in like new condition to
WIN® prepaid. WIN® reserves the right to apply reasonable charges to any equipment returned that is not
in like new condition.
Technical Specifications
S
M
T
V
LEDs
Channels
8-15
Compact Flash
Card Location
Backplane
Connecting
Point
Backplane
Connecting
Point
Manual Reset Button
LEDs
Channels
0-7
Fixed Hard
Drive
Mounting
Location
3v CMOS
Battery
COM2
9-Pin Male
COM1
9-Pin Male
HDD LED
Power LED
Port Configurations
Smart Voice may be ordered as a 2, 4, 8, or 16 port units, and may be expanded to a maximum of 16 ports.
Port upgrades are obtained in 4 port increments.
**Contact
Dealer Support Services (770)-447-9555 or Technical Support 1-800-283-7877 for ordering upgrade procedures
Power Requirements
Smart Voice installs directly into any WIN® 440CT Series cabinet. The Basic Service Cabinet supplies all
necessary power to Smart Voice.
Do not insert or remove Smart Voice while the telephone system is active. Smart Voice is not “hotswappable”.
Port Upgrade Procedure
Smart Voice is upgradeable in 4 port increments to 16 ports Contact your regional sales manager for pricing
and availability. Once the order for a port upgrade has been purchased, a technical support agent will
remotely configure Smart Voice to support the additional channels.
WIN® Technical Support does require an onsite technician at the time of upgrade.
Please note that some telephone system programming may be necessary for additional support of channels.
WIN® Technical Support does not provide this programming as part of the upgrade procedure.
Maximum Smart Voice Systems per Telephone System
Telephone System
Maximum Smart Voice Systems
WIN®48CT
1
WIN®96CT
2
WIN®128CT
2
WIN®128PCT
2
WIN®440CT
2
Programming Maintenance
Local Programming
Smart Voice’s digital integration allows for automatic configuration of mailboxes. Once installed into a
WIN®440CT Series Telephone System, Smart Voice will poll the telephone system, any physical port that has
an assigned telephone will automatically have a normal user mailbox created and be assigned message waiting
LED and cell phone notification.
Additionally, users may perform programming by DTMF tones via telephone programming or access the
SCREENS programming interface by connecting a Laptop / PC to Smart Voice.
Remote Programming
Smart Voice has a built in modem for remote connection to the SCREENS programming interface. The
modem is accessible from any voice port by dialing #*# during the main greeting.
Telephone System Requirements
NOTE: Smart Voice will not operate outside of a WIN®440CT product line telephone systems in any
capacity.
Hardware
Smart Voice is a proprietary voice processing circuit board specifically designed for the WIN® 440CT
product line only.
Software
Smart Voice requires a specific minimum software revision for the telephone system CPU.
Telephone System CPU
Minimum Software Revision
WIN®48CT
V5.015
WIN®96CT
V5.015
WIN®128CT
V9.015
WIN®128PCT
V9.015
WIN®440CT
V9.015
**Contact
Dealer Support Services (770)-447-9555 or Technical Support 1-800-283-7877 for details on obtaining the newest version
of software.
System Placement
Smart Voice may reside in any valid, numbered slot of any telephone system cabinet. Refer to the specific
Telephone System Installation and Maintenance Guide for valid card placement information.
Necessary Tools for Installation
The installing technician should be certified on the WIN®440CT Telephone system and be familiar with basic
voicemail terminology and methods. The physical tools required for installation are:
♦ A copy of this manual
♦ Phillips screwdriver
♦ Laptop
♦ Laptop PC must have an available serial COM port for connection to Smart Voice
♦ NULL Modem cable for Smart Voice SCREENS programming connection
♦ Serial modem cable for connection to the WIN® Telephone system
Features
Mailboxes
Smart Voice systems will support up to 65,000 mailboxes. Refer to the IVP Installation and Maintenance
Manual for more details on mailbox types and specifications.
Memory
Smart Voice provides a 128MB Compact Flash Memory Card or 18GB Fixed Hard Drive option for voice
storage. Smart Voice systems configured as 2, 4, 8, or 16 ports may be configured with the 128MB Compact
Flash Memory Card providing a minimum of 10 hours recording space. Smart Voice 4, 8, and 16 port
systems may be ordered with an optional fixed hard drive configuration that will allow for 500 hours of
recording space.
Smart Keys
Note: Only 32 Button Display Telephones allow smart Key operation.
WIN® 32 Button Display Telephone users have the option of using Smart Keys to maneuver within the User
Mode menus. The first six keys of the 32 Button Display Telephone may be configured as Smart Keys. 32
Button Display Telephones indicate the function of each key in the display of the telephone. The function of
each key will vary depending on which menu is active. Smart Keys are programmed by the installer and are
active only while logged into User Mode and cannot be used for any other function.
Overview
Smart Keys number 1 and 6 are fixed function keys, while Smart Keys 2 through 4 vary based on the menu
selected by the user. As shown in the following figure, Smart Key number 1 always returns the User to the
previous menu, or, if in the Main Menu, will log the User out of User Mode. When a User is logged out of
User Mode, the User is returned to the Main Greeting for the company. In this case the Smart Keys are
disabled.
Smart Key number 6 is also a fixed function key. When pressed, Smart Key 6 will always restart the speech
for the current menu. In the case that the current menu provides more options, Smart Key 6 will toggle the
display to show the additional/previous menu options.
Programming
NOTE: Smart Keys require the permanent use of feature keys 1 – 6 (the top row). These keys will
be programmed as Smart Keys and cannot be used for any other function.
Telephone System Programming:
Software Required:
V9.017
Hardware Required:
Smart Voice, 32D-TEL ONLY
Telephone System Programming:
STA
Identify 32D-TEL Terminal Type
KEY
Program VMCT+ Keys
Key 1: VMCT+ 1,
Key 2: VMCT+ 2
Key 3: VMCT+ 3,
Key 4: VMCT+ 4
Key 5: VMCT+ 5,
Key 6: VMCT+ 6
Smart Voice Programming
No programming necessary, this feature is automatic
Usage
Refer to Addendum B, User Mode Menus for a schedule of all User Mode Menus along with a guide for
Smart key usage.
Smart Access Internal Login
When accessing Smart Voice from any internal extension the Smart Voice utilizes the Smart-Access feature.
Each time an internal extension places an intercom (ICM) call to the Smart Voice, Smart Voice initiates a
User Mode login for the calling extension. The calling User is then prompted to enter the password for the
User ID to complete the login to User Mode.
Note: Should you wish to check your messages from an internal extension other than your own,
press ** to return to the Main Greeting and follow the instructions for an outside login.
Auto Configuration
Smart Voice uses digital integration features to automatically build a normal user mailbox for every physical
extension within the telephone system. This feature is automatically activated each time that Smart Voice is
power reset.
Live Monitor
Smart Voice can be configured to call your internal telephone anytime that a Caller is leaving a message in
your mailbox. Live Monitor allows a User to monitor the Caller while recording a message into the User’s
mailbox. WIN® 32 Button Digital Display Telephone Users have the option to retrieve the Caller from
Smart Voice and connect directly to the Caller.
Overview
Smart Voice provides WIN® 32 Button Digital Display Telephone Users the option of monitoring the
incoming caller’s message as it is being recorded. Once configured, each time a Caller begins to record a
message into a mailbox the User’s internal telephone extension will be called. When the User answers this
call they will be able to hear the message being recorded and have the option of pressing a key to interrupt
the message and connect directly to the Caller. This feature is similar to screening one’s home telephone calls
with an answering machine and then answering the call while the caller is recording the message.
Telephone System Programming:
Software Requirement:
V9.017
Hardware Requirement:
Smart Voice, 32D-TEL
Telephone System Programming Necessary:
COS
Add feature 49: Live Monitor Accept to the station’s COS.
KEY
Assign Smart Keys (VMCT+) to the 32 Button Display Telephone
(see Smart Keys)
Smart Voice Programming Necessary:
Smart Voice
Step 1 Enter SCREENS
Step 2 Select the Receptionist Menu
Step 3 Select the User Directory Menu
Step 4 Highlight the User ID to be modified.
Step 5 Press ENTER until page 2 of the User ID appears
Step 6 Press F4 to enter edit mode
Step 7 Highlight the “IVR or EMAIL Data” field.
Step 8 Toggle the Live Monitor Function.
To turn on Live Monitor place an “A” in this field.
To turn off Live Monitor leave this field blank.
Step 9 Press F10 to save the selection
Step 10 Exit the menu
Usage
Once configured, the Live Message Monitor feature is automatic.
1. When a Caller is recording a message the User’s telephone will ring. If the station is a display
telephone, the User will see “Monitor Request” in the display. Lifting the handset will allow the user to
monitor the message being recorded.
2. While monitoring a message, interrupt and retrieve the caller from the voicemail by pressing Key #1
on the telephone.
NOTE: Should you decide to interrupt the Caller during the message process, Smart Voice discards
the current message and ceases recording.
EXT509/Dana
Monitor Request
Live Monitor
Accept
EXT509/Dana
Live Monitor
Caller Identification
Smart Voice will collect the incoming Caller ID information of Callers who leave a message in a User’s
mailbox when Caller ID is present. When a User retrieves messages the Caller ID will be announced before
each message is played, press # to skip this information and proceed directly to the message.
When messages are retrieved from WIN® 32 Button Display Telephones, the display will provide the Caller
ID of the calling party, or internal extension number, that left the message and the date and time stamp
indicating when Smart Voice recorded the message.
NOTE: Caller ID is an optional feature and must be configured by the Telephone System Installer.
NOTE: The Caller ID feature is only provided to WIN® 32 Button Display Telephones.
Time
Date
02
EXT509/Dana
770-447-9555
WIN Communications
15-09:34
MSG
Caller ID
Information
Caller ID Callback
While listening to a message, and while Caller ID is displayed, the user may press an optional Caller ID
Callback button programmed on the digital telephone, to immediately return the call. Caller ID rules may be
set within the WIN® Telephone System for removing an area code or adding a “1” to long distance numbers.
Programming
All programming for this feature is done in the telephone system. Once programmed the feature is
automatic.
KEY
Use the KEY command to add KEY ID 50: VCBK to a key on the display
station. One VCBK key is allowed per display station
CIDC
Use the CIDC command to build area code rules for removing or retaining area
codes when using the VCBK key.
Usage
Press [ICM] and dial the WIN® Smart Voice
“Please enter your password…”
Enter the Password for the User
While listening to messages, Caller ID information will be shown in the display of the telephone.
Press the pre-programmed [VCBK] key to return the call.
Programming Smart Voice
Introduction
Smart Voice provides the ability to program voicemail via telephone DTMF.
Programming may be completed via a series of mailboxes designed to provide the installer with a menu
driven utility to easily configure the system.
Following is an explanation of the DTMF telephone programming. For detailed information on the
SCREENS programming interface, please reference the WIN® IVP Installation Manual
Configure System Date and Time
NOTE: Smart Voice synchronizes its clock based on the telephone system’s CPU.
The system date and time must be current for the system to operate properly. If the
system date and time is not set or the system has been reset, the following message plays:
“The current system date is invalid.”
Then, perform the following steps to set the system date and time.
Press [ICM] and dial the WIN® Smart Voice
“Please enter your password…”
Dial *
*
to return to the main greeting
“Hello, thank you for calling…”
Enter the System Access Code
WXY
9
WXY
9
WXY
9
“Please enter your User ID…”
Enter User ID
WXY
9
OPER
0
OPER
0
“Please enter the password for User ID 900”
Enter the Password
Press
Press
1
ABC
2
WXY
9
OPER
0
OPER
0
to review the current date and time settings
to change the current time.
“Enter the new time in 24-hour format…”
Press
DEF
3
to change the current date
“Enter the new date: YYMMDD”
OPER
When satisfied with the time date, press
0
to return to the whattodo.
*For security reasons, it is important that you change the password. You may change the password in
User Setup.
Creating Mailboxes
Smart Voice allows installers 3 options for creating Normal User Mailboxes.
♦ Automatic Configuration
♦ Build a custom dial plan via telephone programming
♦ Use the SCREENS programming interface
Automatic Mailbox Configuration
Smart Voice will automatically configure a Normal User mailbox for each physical station that has been
programmed into the telephone system when Smart Voice is powered up.
Each Normal User mailbox is built using the Normal User Template mailbox 961 and has 2 notification
event records built. Notification is assigned to each Normal User mailbox to turn on and off the message
waiting LED at the digital set and allows the User to access the Notification Menu in User Mode to
activate cell-phone notification and enter a telephone number.
Custom Dial Plan
To add additional Normal User mailboxes, Single Digit User mailboxes and, Audiotext boxes use the
Custom Dial Plan mailbox 912. You may create 2-digit, 3-digit, or 4-digit Users. When creating a custom
dial plan, keep several rules in mind:
♦ Maximum Ranges: 10-69 (2-digit range), 100-699 (3-digit range), and 1000-6999 (4-digit range).
♦ When entering a range of numbers, the Starting number and Last number of the range
must begin with the same lead digit. For example, 20 through 29, 200 through 299, or 2000
through 2999 are valid entries. 20 through 39, 200 through 499, or 2000 through 5999 are not
valid. To create Users 20 through 59, you must enter a single range at a time. First enter 20-29,
then 30-39, then 40-49, then 50-59.
♦ When entering a range of numbers, the Starting and Last User in the range must be the
same length (2-digits, 3-digits, or 4-digits). For example, 30-39, 300-399, or 3000-3999 are
valid entries. 30-300 and 300-3000 are not valid entries.
♦ Once you have established a range of Users for a specific leading digit, all subsequent
additions must be within the same extension length of that range
For example:
User Range Leading
Established
Digit
Locked-In
Extension
Length
Invalid subsequent adds
30-39
3
2
300-399 (3-digits), 3000-3999 (4-digits)
400-499
4
3
40-49 (2-digits), 4000-4999 (4-digits)
5000-5999
5
4
50-59 (2-digits), 500-599 (3-digits)
If a User already exists in a range, that User is skipped over in the creation of the range.
Each Normal User mailbox is built using the Normal User Template mailbox 961 and has 2 notification
event records built. Notification is assigned to each Normal User mailbox to turn on and off the message
waiting LED at the digital set and allow the User to access the Notification Menu in User Mode to
activate cell-phone notification and enter a telephone number
Outside user mailboxes are configured to allow the User to access the Notification Menu in User Mode to
activate cell-phone notification and enter a telephone number
Create Custom Normal User, Outside/Mailbox Only User, or Audiotext
User Mailboxes
Press [ICM] and dial the WIN® Smart Voice
“Please enter your password…”
Dial *
*
to return to the main greeting
“Hello, thank you for calling…”
Dial
WXY
9
1
ABC
2
“Select dial plan option. To exit, press * .”
OPER
Dial
0
“Enter confirmation code, press
Dial
WXY
9
OPER
0
WXY
9
OPER
0
#
when complete.”
#
1
“Press
to add normal users, or press
audiotext users”
Select a mailbox type to build
ABC
2
to add outside users, or press
DEF
3
to add
“Enter the starting number of the range, press
cancel.”
Enter the starting number, press
#
#
, when complete, or press * to
when complete.
“Enter last number of the range, press
Enter the last number, press
#
#
when complete, or press * to cancel.”
when complete.
“ You have selected…If this is correct, press
1
. If this is not correct, press
ABC
2
. To
cancel, press * .”
SCREENS Menu Programming
For detailed information on the SCREENS programming interface, please reference the WIN® IVP
Installation Manual.
Main Greetings
Customized greeting and whattodo messages for open and closed mode operation should be recorded
during the installation process.
All greetings and whattodos (daytime, nighttime, and emergency/temporary) are recorded from one User
ID – User ID 980. The greetings and whattodos are recorded as individual greetings (UV1-UV4 and
UV7-UV8) for this User.
♦ Greeting 1 (UV1): Daytime Greeting
♦ Greeting 2 (UV2): Daytime Whattodo
♦ Greeting 3 (UV3): Nighttime Greeting
♦ Greeting 4 (UV4): Nighttime Whattodo
♦ Greeting 5 (UV5): Holiday Greeting
♦ Greeting 6 (UV6): Holiday Whattodo
♦ Greeting 7 (UV7): Emergency Greeting
♦ Greeting 8 (UV8): Emergency Whattodo
Greeting
The first prompt a caller hears when reaching the WIN® Smart Voice is the greeting. The open greeting is
recorded in the personal greeting number 1 of User 980. The closed greeting is recorded in the personal
greeting number 3 of User 980. This prompt is heard only once during a call. The greeting should
welcome the caller and, like a human operator, confirm that the caller has reached the correct number.
“Thank you for calling ABC Company.”
The greeting should also contain any additional information the caller should hear only once.
“Thank you for calling ABC Company. Our office is currently closed.”
Whattodo
Immediately following the greeting, WIN® Smart Voice plays the whattodo. The open whattodo is
recorded in the personal greeting number 2 for User 980. The closed whattodo is recorded in the
personal greeting number 4 of User 980.
“If you know the extension number of the person you wish to reach, please enter it now.
For directory assistance, press 9 or hold for assistance.”
The whattodo informs the caller “what-to-do”, or gives the caller options. If single digit options are used,
they should be included as part of the whattodo. There are several states during the duration of a call in
which the caller is brought back to the whattodo.
♦ After leaving a message
♦ After entering an invalid selection or extension number
♦ After pressing 0 to exit from User mode
♦ After listening to an audiotext message
♦ When writing the script for the whattodo, three things should be kept in mind:
The whattodo is played immediately after the greeting, so the transition between the greeting and
whattodo should flow smoothly.
Callers may eventually come back to the whattodo, so the whattodo must make sense without being
prefaced by the greeting.
It is tempting to offer the caller as many options as possible. However, most callers only want one thing.
That is to talk to someone. Give the caller no more than three or four options in the whattodo.
Refer to the System Greeting Scripts worksheet to record the greeting and whattodo for both open and
closed modes. All recordings should be made from a quiet environment.
Holiday and Temporary Greetings
Holiday Greeting and Whattodo
The system allows you to play a different greeting during a holiday. Holiday greetings become active when
you place the system in “Holiday” mode. The holiday recordings will play until you place the system in
“Workday” mode. (See “Manually Select Open or Closed Mode”.)
Holiday greetings and whattodos are recorded in User ID 980:
♦ User 980 – Greeting 5: Holiday Greeting
♦ User 980 – Greeting 6: Holiday Whattodo
Temporary Greeting and Whattodo
A Temporary greeting and whattodo is typically used if your company is closed due to inclement weather
or some other reason. These recordings should explain when you would be back in operation and what
options the caller has at that time.
Temporary greetings become active as soon as you record them. These new recordings will play until the
next scheduled greeting change occurs. For example, if you plan to be closed on a Thursday, record your
temporary greeting just after the Thursday “open” greeting has loaded. WIN® Smart Voice will play the
temporary greeting/whattodo during the open hours. WIN® Smart Voice will automatically switch to the
closed greeting after hours and play the regular open greeting on Friday.
Temporary greetings and whattodos are recorded in User ID 980:
♦ User 980 – Greeting 7: Temporary Greeting
♦ User 980 – Greeting 8: Temporary Whattodo
If the system does not have an open/closed schedule, you may record a temporary greeting and whattodo
in User ID 980 – Greetings 3 and 4. Manually toggle the system from open to closed mode as needed.
(See “Manually Select Open or Closed Mode”.)
Greeting Scripts
Description
Open greeting
(980-Greeting 1)
Open whattodo
(980-Greeting 2)
Closed greeting
(980-Greeting 3)
Closed whattodo
(980-Greeting 4)
Written Script
Recording Main Greetings
The process of recording of the greeting and whattodo for open, closed, or holiday mode is the same as
recording a personal greeting in a mailbox. All greeting and whattodo messages (daytime, nighttime, and
emergency) for the main company may be recorded in User ID 980. Follow this procedure to record the
greetings.
Note: Recording greetings 7 and 8 will immediately override the current greeting until the next
time Smart Voice changes from day or night. This change may be done manually or scheduled.
Press [ICM] and dial the WIN® Smart Voice
“Please enter your password…”
Dial *
*
to return to the main greeting
“Hello, thank you for calling…”
Enter the System Access Code
WXY
9
WXY
9
WXY
9
“Please enter your User ID…”
Enter User ID:
WXY
9
TUV
8
OPER
0
“Please enter the password for User ID 980”
Enter the Password
WXY
9
TUV
8
OPER
0
“To play current personal greeting, press
GHI
4
1
, record current personal greeting press
press
OPER
0
, to replay options press * .”
, to select the next personal greeting press
JKL
5
, to exit this menu press
WXY
9
, to logout
Press
GHI
4
, to select the greeting number to be recorded, press
JKL
5
to begin recording.
Greeting 1: Daytime Greeting
Greeting 2: Daytime Whattodo
Greeting 3: Nighttime Greeting
Greeting 4: Nighttime Whattodo
Greeting 5: Holiday Greeting
Greeting 6: Holiday Whattodo
Greeting 7: Emergency Greeting (Plays immediately upon recording)
Greeting 8: Emergency Whattodo (Plays immediately upon recording)
“Begin speaking at the tone, press
#
Press
#
when complete.”
when recording is complete.
When the recording is complete, if you wish to review your recording, press
If you wish to re-record, press
JKL
5
1
.
, or, if you are satisfied with the recording, press
GHI
4
to select the
OPER
next personal greeting or, press
0
to return to the whattodo.
Loading Main Greetings
Once the greeting and whattodo for open and closed mode have been recorded, the new recordings may
be activated immediately using the following procedure for manually selecting open or closed mode.
Otherwise, the new recordings will play at their regularly scheduled time.
Press [ICM] and dial the WIN® Smart Voice
“Please enter your password…”
Dial *
*
to return to the main greeting
“Hello, thank you for calling…”
Dial
WXY
9
1
OPER
0
“To place the system into open mode, press
1
…”
Dial
1
, to manually place the system into open or closed mode.
To place in open mode, press
1
To place in closed mode, press
ABC
2
To place in holiday mode, press
To place in workday mode, press
DEF
3
GHI
4
“You have selected … if this is correct, press
If this is correct, press
1
1
if this is not correct, press
. If this is not correct, press
ABC
2
ABC
2
.”
, to cancel, press *
“Please wait while your changes are processed.”
Smart Voice will play “beep” tones indicating progress. You may wait for the system to complete
and return to the whattodo, or hang up.
Configuring Business Hours
WIN® Smart Voice automatically schedules events to run on specific days of the week at specific times.
You may activate an event that places the system in open mode during normal hours of operation (plays
the open greeting and whattodo) and another event that places the system in closed mode for after-hours
operation (plays the closed greeting and whattodo). Refer to the worksheet below while activating open
and closed modes.
Note: If you plan to use the same greeting/whattodo 24 hours a day, no adjustments should be
made to the scheduler.
Day
1
Monday
2
Tuesday
3
Wednesday
4
Thursday
5
Friday
6
Saturday
7
Sunday
8
Weekdays Mon-Fri
Open time for open greeting to play
Closed time for closed greeting to play
Setting Business Hours
Press [ICM] and dial the WIN® Smart Voice
“Please enter your password…”
Dial *
*
to return to the main greeting
“Hello, thank you for calling…”
Dial
WXY
9
1
OPER
0
“…Set business hours, press
Press
ABC
2
.”
ABC
2
“Enter the weekday number to modify…”
Press
Press
Press
Press
1
DEF
3
JKL
5
PRS
7
for Monday
Press
for Wednesday
ABC
2
for Tuesday
Press
for Friday
Press
for Sunday
Press
MNO
6
TUV
8
GHI
4
for Thursday
for Saturday
for all weekdays
“To change the open time…”
To change the open time,
1
To change the closed time, press
ABC
2
“Please enter the hour…”(24-hour format)
Enter the hour
“Please enter the minute…”
Enter the minute
“The event change you have requested is… If this is correct, press
correct, press
ABC
2
1
, if this is not
.
If this is correct, press
1
If this is not correct, press
“To make the changes effective, press
To make all changes effective, press
1
.
1
ABC
2
. To add more changes, press
To continue making changes, press
ABC
2
.”
ABC
2
Configure Single Digit User Options
Single Digit User IDs 1 through 6 may be set up to transfer callers to another extension (Transfer-Only)
or play an audiotext message to callers. A Single Digit User ID may be set up to both transfer to an
extension and play audiotext. However, only one of these functions will be active at a time, depending on
the call blocking status of the User ID (See “Single Digit Departmental Login”).
Setting Up Transfer Only Single Digit Users
Press [ICM] and dial the WIN® Smart Voice
“Please enter your password…”
Dial *
*
to return to the main greeting
“Hello, thank you for calling…”
Enter the System Access Code
WXY
9
WXY
9
WXY
9
“Please enter your User ID…”
Enter the User ID of the Single Digit User (1-6) to be modified
“Please enter the password for User ID…”
Enter the password for the selected User ID.
“To select Call Management…”
Press
JKL
5
for the User Setup Menu
“…play extension number, press
Press
TUV
8
PRS
7
, change extension number, press
TUV
8
”
to change the extension number of the mailbox.
Enter the new extension number. Press
#
when complete.
Note: When you enter an extension number for a Transfer-Only Single Digit User, you
automatically de-activate Call Blocking. The Call Blocking option then can be heard in Call
Management.
Setting Up Single Digit Audiotext Options
Press [ICM] and dial the WIN® Smart Voice
“Please enter your password…”
Dial *
*
to return to the main greeting
“Hello, thank you for calling…”
Enter the System Access Code
WXY
9
WXY
9
WXY
9
“Please enter your User ID…”
Enter the User ID of the Single Digit User (1-6) to be modified
“Please enter the password for User ID…”
Enter the password for the selected User ID.
“To select Call Management…”
Press
Press
ABC
2
JKL
5
Press
#
Press
1
for Call Management
to record the Audiotext message
, when recording is complete.
to review recording.
Note: If you have entered an extension number in User Setup for a Single Digit Audiotext User,
the call blocking feature is activated. You may now toggle this Single Digit User between
Audiotext and Transfer Only. If you have no plans of transferring with this User ID and you do
not want to hear the call blocking option, remove the extension. (See “Setting Up Transfer Only
Single Digit Users”.)
Configuring the Default Operator
The default Operator for WIN® Smart Voice is User ID 0. Whether a caller dials 0 or does not dial
anything from the main greeting he or she is directed to the extension programmed for User ID 0. WIN®
Smart Voice is pre-programmed with the extension 0 for User ID 0.
To change this, perform the following step:
Programming
Press [ICM] and dial the WIN® Smart Voice
“Please enter your password…”
Dial *
“Please enter your User ID…”
OPER
Enter User ID:
0
“Please enter the password for User ID 0”
OPER
Enter the Password
Press
Press
Press
WXY
9
JKL
5
TUV
8
0
to return to the User Menu
for the User Setup Menu
to change the extension number of the mailbox.
Enter the new extension number. Press
#
when complete.
Recording
The personal greeting for the Default Operator should explain to the caller that they are in a general
delivery mailbox and that they should leave their name, company name, callback number and whom they
are calling. This greeting is only played when call blocking is enabled
Press [ICM] and dial the WIN® Smart Voice
“Please enter your password…”
Dial *
*
to return to the main greeting
“Hello, thank you for calling…”
Enter the System Access Code
WXY
9
“Please enter your User ID…”
WXY
9
WXY
9
OPER
Enter User ID:
0
“Please enter the password for User ID 0”
OPER
Enter the Password
Dial
Dial
Dial
WXY
9
ABC
2
JKL
5
1
Press
0
to select the Main Menu
to select the Call Management Menu
to begin recording the greeting, press
#
when complete.
OPER
to review the recording.
Press
0
to return to the whattodo.
Enabling the Greeting
The operator manually enables call blocking when no one is able to take calls at the operator position.
Press [ICM] and dial the WIN® Smart Voice
“Please enter your password…”
Dial *
*
to return to the main greeting
“Hello, thank you for calling…”
Enter the System Access Code
WXY
9
WXY
9
WXY
9
“Please enter your User ID…”
OPER
Enter User ID:
0
“Please enter the password for User ID 0”
OPER
Enter the Password
Dial
Dial
WXY
9
ABC
2
0
to select the User Menu
to select the Call Management Menu
Toggle the Call Blocking status
Press
1
to Disable
Press
ABC
2
to Enable
OPER
Press
0
to return to the whattodo.
A common scenario is for the operator to turn call blocking on at night, disabling transfers to the
operator’s extension and allowing the caller to leave a message in the operator’s mailbox. It is the
operator’s responsibility to disable call blocking during business hours so that callers may get through to a
live person.
Retrieving Messages
Once call blocking has been enabled for User ID 0, messages will begin to accumulate in this box. It is the
operator’s responsibility to pick up these messages.
Press [ICM] and dial the WIN® Smart Voice
“Please enter your password…”
Dial *
*
to return to the main greeting
“Hello, thank you for calling…”
Enter the System Access Code
WXY
9
WXY
9
WXY
9
“Please enter your User ID…”
OPER
Enter User ID:
0
“Please enter the password for User ID 0”
OPER
Enter the Password
0
, Listen to messages.
Public Distribution Lists
WIN® Smart Voice automatically generates 3 public distribution lists:
1. User ID 950 includes all Normal and Outside Users
2. User ID 951 includes all Normal Users
3. User ID 952 includes all Outside Users
The System Administrator maintains these lists. You may create up to 7 additional public distribution
lists (User IDs 953-959) and record names for each list.
Creating New Distribution List
You may review list members, remove members from the distribution list, or add new Users to the
distribution list.
Press [ICM] and dial the WIN® Smart Voice
“Please enter your password…”
Dial *
*
to return to the main greeting
“Hello, thank you for calling…”
Enter the System Access Code
WXY
9
WXY
9
WXY
9
“Please enter your User ID…”
Enter User ID of the Distribution List
“Please enter the password for User ID…”
Enter the Password for the User ID
Press
1
to review the next or first member. Press
DEF
Press 3 to remove all members from list
from the list
Press
Press
JKL
5
WXY
9
to review the last member
ABC
2
to re-review the current member
Press
Press
PRS
7
GHI
4
to remove the current member
to add a new User ID
OPER
to exit
Press
0
to logout
Recording
You may record a name for each public distribution list.
Press [ICM] and dial the WIN® Smart Voice
“Please enter your password…”
Dial *
*
to return to the main greeting
“Hello, thank you for calling…”
Enter the System Access Code
WXY
9
WXY
9
WXY
9
“Please enter your User ID…”
Enter User ID of the Distribution List
“Please enter the password for User ID…”
Enter the Password for the User ID
Press
Press
Press
WXY
9
JKL
5
ABC
2
to return to the User Menu
to select the User Setup Menu.
to record the name, press
#
OPER
Press
0
to return to the Main Menu
when complete
Changing User Passwords
As the administrator of the system, you are responsible for the safe keeping of several User IDs. When
the system is installed, all passwords are the same as their corresponding User IDs. If security is an issue,
it is the System Administrator’s responsibility to change passwords to the following User IDs.
User IDs
Description
0
Default Operator
1–6
Single Digit Users
900
Administrator
980
Open and Close Greeting Recording
950 – 959
Public Distribution Lists Maintenance
To change a User’s password:
Press [ICM] and dial the WIN® Smart Voice
“Please enter your password…”
Dial *
*
to return to the main greeting
“Hello, thank you for calling…”
Enter the System Access Code
WXY
9
WXY
9
WXY
9
“Please enter your User ID…”
Enter User ID of the Distribution List
“Please enter the password for User ID…”
Enter the Password for the User ID
Press
Press
Press
WXY
9
JKL
5
1
to return to the User Menu
to select the User Setup Menu.
to change the password, press
OPER
Press
0
to return to the Main Menu
#
when complete
System Administrator Menu
User ID 900 is the only User with administrative privileges. Below are the available options from the
System Administrator menu:
1
PLAY THE CURRENT DATE AND TIME
This option plays the current date and time of the system.
ABC
2
CHANGE SYSTEM TIME
This option allows the System Administrator to change the time on the system.
DEF
3
CHANGE SYSTEM DATE
This option allows the System Administrator to change the system date.
GHI
4
RESET A PASSWORD
This option allows the System Administrator to change a User’s password to the default password.
JKL
5
ACTIVATE/DISABLE USERS
THis option allows the System Administrator to disable a User from the dialplan or reactivate a disabled
User.
MNO
6
RESET USER ID
This option enables the System Administrator to reset a User ID. The User’s password, name, personal
greetings, messages, and mailbox options will be reset.
PRS
7
AVAILABLE RECORDING SPACE
This option tells the System Administrator how much recording space is available.
TUV
8
NETWORK ADMINISTRATION
This option prompts the System Administrator to record names for AMIS network sites.
WXY
9
RETURN TO USER MENU
This option returns the System Administrator to the User menu.
OPER
0
LOG OUT
This option logs the System Administrator out and returns him/her to the main system greeting.
*
REPLAY MENU OPTIONS
To Access the System Administrator Menu
To Access the Administration User:
Press intercom and call the system.
Enter the password for User ID…
Dial * to the User Mode login greeting
Please enter the User ID…
Enter User ID:
WXY
9
OPER
0
OPER
0
Please enter the password for User ID 900.
* Enter the password for User ID 900. (Default password is
*For security reasons, it is important to change the password.
WXY
9
OPER
0
OPER
0
)
You may change the password in User Setup.
1
JKL
5
GHI
4
DEF
3
ABC
2
1
Play Saved Messages
Play First Message
Check Un-heard Sent Msgs
Un-erase all messages
Erase All Messages
Quick Messaging
Play Next Message
GHI
4
DEF
3
ABC
2
1
DEF
3
ABC
2
1
Set Certified
Set Private
Send Message with Opt
Special Delivery Options
Review Message Prefix
Record Message Prefix
Forward Message
Forward Current Message
Erase Current & Play Next Msgs
TUV
8
PRS
7
MNO
6
JKL
5
GHI
4
DEF
3
1
Advanced Options
Replay Current Message
Play Next Message
Message Management
Following is an overview of User Mode menus.
At any point the user may use a Smart Key to
access an option or simply dial the number of
the option on the keypad.
Addendum B User Mode
Menus
ABC
2
Append to Message
Send with Delivery Opt
Review Message
Select Network User ID
Select User ID
Select Personal List Number
JKL
5
GHI
4
DEF
3
Record Message
Send Message
TUV
8
Power Playback
Replay the Current Message
TUV
8
PRS
7
MNO
6
ABC
2
1
Reply/Send a New Message
Select Network User ID
Select User ID
Select Personal List Number
Append to Message Prefix
Reset Future Delivery
Set Future Delivery
Set Urgent
PRS
7
MNO
6
JKL
5
GHI
4
DEF
3
ABC
2
1
Select Personal Greeting
Delete Any Personal Greeting
Record Current Pers. Greeting
Select Next Personal Greeting
Change Call Screening
Change Call Blocking
Play the Current Pers. Greeting
Call Management
PRS
7
MNO
6
TUV
8
PRS
7
MNO
6
JKL
5
TUV
8
JKL
5
GHI
4
Add New User ID to List
Create/Select Existing List
Review Last User ID
Remove Current User ID
Remove All User ID’s From List
Re-review Current User
Review Next User
Change Notification Number
Disable All Notification
Enable All Notification
Notify Status
Review Dir. Assistance List
Change Dir. Assistance List
Change Msg Playback Order
Review Name
Record Name
Change Password
System Date and Time/ Administration
Quick Setup
MNO
6
JKL
5
GHI
4
DEF
3
ABC
2
1
User Setup
GHI
4
DEF
3
ABC
2
1
Notification Management
PRS
7
MNO
6
JKL
5
GHI
4
DEF
3
ABC
2
1
List Management
Record Any Personal Greeting
TUV
8
PRS
7
Move Forward Within Message
Move Back Within a Message
During Message Playback
TUV
8
PRS
7
JKL
5
GHI
4
DEF
3
TUV
8
#
*
Skip to Next Message Component
Pause Message Playback