1
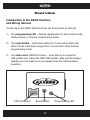
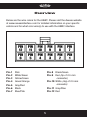
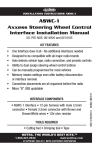
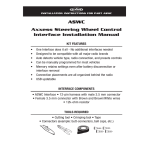
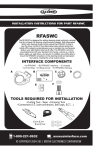
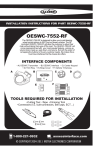
INSTALLATION INSTRUCTIONS FOR PART ASWC
ASWC
Axxess Steering Wheel Control
Interface Installation Manual
KIT FEATURES
•
•
•
•
•
OneInterfacedoesitall-Noadditionalinterfacesneeded
Designedtobecompatiblewithallmajorradiobrands
Autodetectsvehicletype,radioconnection,andpresetscontrols
Canbemanuallyprogrammedformostvehicles
Memoryretainssettingsevenafterbatterydisconnectionor
interfaceremoval
• Connectionplacementsareallorganizedbehindtheradio
• USBupdatable
TOOLS REQUIRED
M5
5
M3.
IGNI
TERM TION
INAL
S
M4
WIRE
CUTT
ER
ISO
M3
M2.
6
1.5
6
2.5
•Cuttingtool•Crimpingtool•Tape
•Connectors(example:butt-connectors,bellcaps,etc.)
METRA. THE WORLD’S BEST KITS.™
1-800-221-0932
metraonline.com
© COPYRIGHT 2004-2011 METRA ELECTRONICS CORPORATION
REV. 7/13/2012
•ASWCInterface•12-pinharnesswithmale3.5mmconnector
•Female3.5mmconnectorwithBrownandBrown/Whitewires
•12k-ohmresistor
INSTASWC
INTERFACE COMPONENTS
Table of Contents
Preface .............................................................................................. 3
Overview
– IntroductiontotheASWCInterfaceandWiringHarness .................4-5
ASWC
– Section1:Installation ....................................................................6-7
– Section2:Programming ................................................................8-9
– Section3:Troublshooting
AutoDetectMode ...................................................................... 10
ManualProgramming ...........................................................10-13
ChangingRadioType ............................................................13-14
ManualRadioTypeProgramming .........................................14-15
– Section4:Remapping
RemappingSWCButtons ........................................................... 16
ResettingOriginalSWCSettings ................................................ 17
ASWC Ledgend
– VehicleLEDFeedback..................................................................... 18
– RadioLEDFeedback ..................................................................18-19
– ButtonAssignment(remapping/manualprograming)....................... 19
Caution: Metra recommends disconnecting the negative battery
terminal before beginning any installation. All accessories, switches,
and especially air bag indicator lights must be plugged in before
reconnecting the battery or cycling the ignition.
Note: Refer to the instructions included with the aftermarket radio.
1-800-221-0932
AxxESSINTERfACE.COM
© COPYRIGHT 2004-2011 METRA ELECTRONICS CORPORATION
Preface
What you need to know before you begin
1) Knowthecorrectyear,make,andmodelofyourvehicle.
2) Besurethattheradioyouareinstallingiscompatiblewiththe
Axxesssteeringwheelcontrol(ASWC)interface(refertothe
aftermarketradioowner’smanual).
3) GototheAxxesswebsite(www.axxessinterface.com)andclick
on“SteeringWheelControl”(SWC),whichislocatedontheright
sideofthescreen.Onceyouputyourvehicleinformationinandhit
“Submit”,anewpagewillcomeupwithtwosourcesofinformation.
One,adocumentinPDFformlocatedbelowinthe“Documents”
tab.Andsecond,detailedinformationonwhichcolor(s)thesteering
wheelcontrolwireswillbeinyourvehicleunderthe“Vehicle
Information”tab.PrintthePDFdocumentsoyouhaveitinthe
vehicleduringtheinstallasitisthebestandeasiestsourceof
information.
Note: Even though we have done extensive research and
testing (to verify that the steering wheel control wire colors of the
vehicle(s) we list are correct) it is still your responsibility to verify
the steering wheel control wires with a multimeter. If you find a
discrepancy please notify our Tech Department at 1-800-253-TECH.
Please be in the vehicle when you call, with access to the interface
and vehicle wiring.
3
Overview
Introduction to the ASWC Interface
and Wiring Harness
OnthetopoftheASWCinterfacetherearethreepointsofinterest:
1) Theprogramming LED–flashesrapidlywheninautodetectmode,
flashesslowlyinmanualprogrammingmode.
2) Thereset button–Holddownbuttonfor3secondstostartauto
detectmode;holddownlongerthen10secondstostartmanual
programmingmode.
3) Theslide cover(USBPortCover)–Openthisuptorevealthe
USBupdateport.UsingtheUSB-CABupdatecableandtheAxxess
websiteyoucanmakesureyoualwayshavethelatestupdated
inventory.
USBPortCover
ResetButton
4
ProgrammingLED
Overview
BelowarethewirecolorsfortheASWC.PleasevisittheAxxesswebsite
atwww.axxessinterface.comfordetailedinformationonyourspecific
vehicleandforwhatcolorwire(s)tousewiththeASWCinterface.
Pin-1
Pin-2
Pin-3
Pin-4
Pin-5
Pin-6
Pin-7
Pin-8 Black/Green
Pin-9 Red(tip of 3.5 mm
connector)
Pink
White/Green
Yellow/Green
Green/Orange
Gray/Red
Black
Blue/Pink
Pin-10 White (ring of 3.5 mm
connector)
Pin-11 Gray/Blue
Pin-12 Red
5
Section 1: Installation
Onceyouhavecollectedorprintedouttheinformationsheetonyour
particularvehiclefromtheAxxesswebsite(www.axxessinterface.com)
you’rereadytoinstalltheASWC.
Installing the ASWC
1) ConnecttheBlackwireoftheASWCtoground.Youmayusethe
samegroundingpointastheaftermarketradio.
2) ConnecttheRedwireoftheASWCtoa12-voltaccessorywire,one
thatturns“on”and“off”withtheignitionkey.
3) LocatethecorrectSWCwire(s)inthevehicle’sradioprimaryor
secondaryharnessasdescribedinthevehicleinformationsheet
foundontheAxxesswebsite.Connectthecorrectwirecolor(s)from
theASWCtothesteeringwheelcontrolwire(s)inthevehicle.
Note: Metra recommends that the wire(s) are soldered for the
best and most secure connection. T-Taps or scotch locks are not
recommended due to the higher chance of an intermitted connection
or change in resistive values.
6
Section 1: Installation
4) IfyouareusinganEclipse,Kenwood,MetraOE,oranewerJVC
radio,plugtheincludedfemale3.5mmconnectorwiththeBrown
andBrown/Whitewiresintothemale3.5mmconnectorofthe
ASWCharness.
• For Kenwood and select JVC: ConnecttheSWCwire(normally
Blue/Yellow)totheBrownwireoftheASWC.Isolateandtape
theBrown/Whitewire,itwillnotbeused.
Note: Some newer Kenwood radios will auto detect as a JVC. If
this is the case, you can use a 12k-ohm resistor (included) in line
between the Blue/Yellow and Brown wire of the female 3.5 mm
jack during programming only. Or you can manually set the radio
type which is in the radio programming section of this manual.
• For Eclipse:ConnecttheEclipseSWCwires(normallyBrown
andBrown/Black)totheBrownandBrown/Whitewiresofthe
ASWC. BrowngoestoBrownandBrown/WhitegoestoBrown/
Black.Sometimesthisisreversed,reversethewiresifneeded.
• For Metra OE: ConnecttheSWCKey1wire(Gray)totheBrown
wireoftheASWC.
5) Forallotherradios,pluginthemale3.5mmconnectoroftheASWC
intothebackoftheaftermarketradio,designatedforanexternal
SWCcontrolinterface.Ifindoubtwherethe3.5mmconnectorof
theASWCgoespleaserefertotheaftermarketradiomanual.Once
allconnectionshavebeenmade,plugintheaftermarketradioifnot
donealready.
7
Section 2: Programming
TheASWCcanbeprogrammedintwoways.(1)Itcandoitbyitself
throughAutoDetectMode,or(2)itcanbemanuallyprogrammedin
non-datavehicles.Itisstronglyrecommendtostartwiththe
AutoDetectModefirst.
Auto Detect Mode: Overview
TheASWChastheabilitytoautodetectcertainvehiclesandtoknow
whataftermarketradioitisconnectedto.Thevehicleinfosheetfromthe
Axxesswebsite(www.axxessinterface.com)willindicateifyourvehicle
willlikelybeautodetectedandwhataction,ifany,isrequiredbyyoufor
thisprocesstotakeplace.
FortheAutoDetectfeaturetoworkthereare3possibleactions,however
onlyoneactionwillberequiredbyyoudependingonyourvehicle:
• Turntheignitiononandnootheractionisrequired.
• Turntheignitionon,pressandholdthe“VolumeUp”buttononthe
steeringwheel.
--- Or --• Turntheignitionon,pressandreleasethe“VolumeUp”button
repeatedlyonthesteeringwheel.
Asstatedbefore,onlyoneoftheseactionswillneedtobedone
dependingonyourvehiclefortheAutoDetectfeaturetowork.Please
refertothevehicleinfosheetprovidedontheAxxesswebsite.
Auto Detect Mode: Steps
1) Completeconnectionstothevehicleandtheaftermarketradio.
IfthisisthefirsttimetheASWCisbeinginstalledinavehicle:
2) Turntheignitionon;theLEDwillstartflashingrapidlywhichmeans
8
Section 2: Programming
theASWCislookingforthevehicleandtheradio.Gotostep4.
--- Or --IftheASWCwasinstalledinavehiclepreviously:
2) Turntheignitionon,theLEDwillflashonce,thengoout.
3) Holddowntheresetbuttonfor3secondsandthenreleaseit.
4) Performactionrequiredforyourparticularvehicleasnotedinthe
vehicleinfosheet.
5) AfteracoupleofsecondstheLEDshouldstopflashingandnotlight
upfor2seconds.Atthispointdonotpushanybuttons.
6) Afterthe2secondstherewillbeaseriesof7flashes,someshort
andsomelong.
7) TheLEDwillpauseforanother2secondsthenflashupto11times
(refertoASWCledgend).
8) Thisistheendoftheautodetectionstage.IftheASWCdetectedthe
vehicleandtheradiosuccessfullytheLEDwilllightupsolidred.
9) ForvehicleswithOEBluetoothbuttonspleasepress“Hangup”
or“Pickup”onyoursteeringwheelcontrolaftertheLEDonthe
ASWCgoessolid.IftheOEBluetoothbuttonsareabletobeused,
theLEDwillgooutafter3seconds.YourOEBluetoothbuttonsare
nowprogrammedtoyouraftermarketradiosBluetoothbuttons
(aftermarketradiomusthaveBluetoothcapabilities).
Tip: If the LED does not light up solid red refer to the
troubleshooting section.
10)Makesurethesteeringwheelcontrolbuttonsfunctioncorrectlyin
thevehicleandenjoy.
9
Section 3: Troubleshooting
Auto Detect Mode
SoyoutriedtheautodetectfeatureandattheendtheLEDdidnotstay
solidred.Insteaditstartedflashing,meaningthattheASWCdidnot
detectthevehicle.
Followthesestepstodeterminewhatmayhavehappened:
1) Verifythatyouhave12-voltaccessoryandagoodgroundto
theASWC.Sometimesthefactorygroundisnotsufficient,a
chassisgroundishighlyrecommended.IfyourvehiclehasaSWC
referencegroundwire,chassisgroundthataswell,alongwithyour
aftermarketradio.
2) Validateusingthevehicleinformationsheet(Axxesswebsite)that
thecorrectsteeringwheelcontrolwire(s),inthevehicle,were
connectedtothecorrectwire(s)totheASWC.
3) Confirmthatthe3.5mmconnectorisconnectedtoyourradio
securelyandinthecorrectlocation.
4) Ifusingthefemale3.5mmconnectorinEclipse,Kenwood,
selectJVC,orMetraOEradiosverifythattheradio’sSWCwireis
connectedtothecorrectwiretotheASWC.
Manual Programming Auto Detect Mode
IfyourvehicleisnotlistedforautodetectionbytheASWConthe
Axxesswebsite,www.axxessinterface.com,youcanmanuallyprograma
non-datavehiclebythefollowingsteps(haveASWClegendavailable).
10
Section 3: Troubleshooting
Note: Not every radio will have all the possible SWC commands on
the steering wheel. Aftermarket radios that do not have Bluetooth
will not recognize the PTT (Push To Talk) or “On/”off” Hook”
commands; however those buttons can be manually programmed to
do other commands in some cases. Please refer to the radio owner’s
manual or wireless remote for specific commands that the radio will
recognize.
1) Completeconnectionstothevehicleandtotheaftermarketradio,
makesurethe3.5mmconnectorisconnected.
IfthisisthefirsttimetheASWCisbeinginstalledinavehicle:
2) Turntheignitionon;theLEDwillstartflashingrapidly.
3) After10secondstheASWCwillgointotheLEDfeedbackmode.
AftertheseriesofLEDflashestheLEDwillstayinaslowconstant
flashstate.Gotostep4.
--- Or --IftheASWChasbeeninavehiclebefore:
2) Pressandholdtheresetbuttondownformorethen10seconds.
3) Afterthe10secondstheLEDwillbeginaslowconstantflash.
4) Atthispointpressandholdthe“VolumeUp”buttononthesteering
wheelfor7secondsuntiltheLEDgoessolidred.Nowreleasethe
“VolumeUp”buttonandtheLEDgoes“off”.“VolumeUp”hasnow
beenprogrammed.
11
Section 3: Troubleshooting
5) Nowpressandholdthe“VolumeDown”buttonuntiltheLED
goessolidred.ReleasethebuttonandtheLEDwillturn“off”.The
“VolumeDown”hasnowbeenprogrammed.
6) AtthispointgototheASWCLegendButtonAssignment
(remapping/manualprogramming)section,page19,andcontinue
with“SeekUp/Next”button.
7) Youcanendthishalfoftheprogrammingin2ways:
(1) Afterthelastbuttononyoursteeringwheelhasbeen
programmed(youdonothavetogothroughthewholelist)hold
downthe“VolumeUp”buttonforatleast
10seconds.TheLEDwillgointoaslowconstantblinkmode.
--- Or --(2) Afterthe18thbuttonisprogrammedorskippedtheLEDwillgo
backtotheslowconstantblinkmode.
Note: If at any time an error is made hold down the reset button
on the ASWC for 10 or more seconds. This will restart the
manual programming. Go back to Step 4 and start again.
8) Pressandholdthe“VolumeDown”buttonfor5secondstilltheLED
startstoflashquickly.
9) Releasethe“VolumeDown”button.
10) After4secondsoftheLEDflashingquicklytheLEDwillgoout
for2seconds.
12
Section 3: Troubleshooting
11) ThentheLEDwillflash,upto11times,dependingonwhatradiothe
ASWCthinksit’sconnectedto.
12) Makesurethenumberofflashesmatchwhatradioyouhave
installed.RefertotheChangingRadioTypesection,pages13-14.
13) IftheLEDflashesmatchtheradiothenholddownthe“Volume
Down”buttonuntiltheLEDgoessolidred.
14)Programmingforthevehicleandtheradioisnowcomplete.Testout
thesteeringwheelcontrolfunctionstomakesureitworkscorrectly.
Changing Radio Type
IftheLEDflashesdonotmatchtheradioyouhaveconnected,youmust
manuallyprogramtheASWCtotellitwhatradioitisconnectedto.
1) Tomanuallyprogramtheaftermarketradio,pressandholdthe
“VolumeDown”buttononthesteeringwheelcontroluntiltheLED
goessolidred,thenrelease“VolumeDown”.
2) AtthispointEclipseisprogrammed.IfyouareusinganEclipseradio
gotostep3.Ifyouareusingadifferentradiogotostep4.
3) Pressandhold“VolumeDown”for5seconds.TheLEDwillflash
oncethengosolidredindicatingtheprogramminghasfinished.Go
enjoyyourradio.
4) IfyouhaveadifferentradiothenEclipse,presstheVolumeUp
buttonagaintilltheLEDgoessolidred,thenrelease“VolumeUp”.
YouhavenowprogrammedKenwood.
13
Section 3: Troubleshooting
5) Hereisthecharttoshowhowmanypressesofthe“VolumeUp”
buttonisneededforwhichradioyouaretryingtoprogram:
1
2
3
4
5
6
7
8
9
10
11
Eclipse
Kenwood
Clarion“Type1”
SonyandDual
JVC
PioneerandJensen
Alpine*
Visteon
Valor
Clarion“Type2”
METRAOE
6) Oncetheradiomanufacturerhasbeenselectedhold“Volume
Down”foratleast5seconds.TheLEDwillflashthenumberoftimes
whichradiowasselectedthentheLEDwillremainontoindicatethe
ASWChasfinishedprogramming.
Manual Radio Type Programming
Ifonlychangingtheradiotypeisneededthenfollowthisprocedurebelow.
1) Withinthefirst25secondsofturningthekeyon,pressandhold
thecar’s“VolumeDown”button.
2) After15secondsofholding“VolumeDown”,theASWC’s
redLEDwillgoon.
3) Releasethe“VolumeDown”andtheLEDwillgo“off”.Wearenow
inradioprogrammingmode.
14
Section 3: Troubleshooting
4) Pressandreleasethe“VolumeUp”buttonforthedesiredradio
number(pleaserefertotheASWClegend).Foreachpressthe
redLED.Itwillgo“on”andthen“off”whenreleasedforfeedback.
5) Whenthedesiredradiotypehasbeenreached,Pressthe
“VolumeDown”button.
6) TheLEDwillgoonandwillremainon(approximately3seconds).
The ASWC is internally computing and storing this new information.
7) TheLEDwillgo“off”indicatingitiscompleted.
Note: If at any time the user fails to press any button for a period
of 10 seconds or more, this programing mode will abort.
15
Section 4: Remapping
Remapping the SWC (Steering Wheel Control) Buttons
OnceyouhavetheASWCprogrammedyoucanthenchangethe
steeringwheelcontrolbuttonassignment(s).Suchas,programingthe
“SeekUp”buttonasa“Mute”function.Followthestepsbelowto
remaptheSWCbuttons:
1) IdeallyhavetheASWCvisible,soyoucanseetheLEDflashesto
confirmbuttonrecognition.
2) Turning“off”theradioisrecommended.
3) Withinthefirst20secondsofturningtheignitionon,pressandhold
downthe“VolumeUp”buttonforatleast20seconds.
4) TheLEDwilllightupsolidred.Release“VolumeUp”andtheLED
willgoout.“VolumeUp”hasnowbeenprogrammed.
5) FollowthelistintheButtonAssignmentsection,page19,
toreferencetheorderofwhatbuttonsneedtobepressedand/or
howtobypassabutton.
6) Afterthelastbuttonisprogrammedonyoursteeringwheel(you
donothavetogothroughthewholelist),holddownthe“Volume
Up”buttonforatleast10secondsthentheLEDwillgoout.
--- Or --Afterthe18thbuttonisprogrammedorskippedtheLEDwillgooutand
theremappingiscompleted.
16
Section 4: Remapping
Resetting Orginal SWC Settings
Ifforanyreasonafterremappingthesteeringwheelcontrolsyou
wanttorevertbacktotheoriginalsteeringwheelcontrolsettings,
followthesesteps:
1) Withinthefirst20secondsofturningtheignitionon.Pressandhold
downtheoriginal“VolumeDown”button(notthe“VolumeDown”
buttonyoujustremapped)foratleast25seconds.
2) TheLEDwillturnonthenreleasethe“VolumeDown”buttonandthe
LEDwillturn“off”.
3) Theoriginalsteeringwheelcontrolsettingswillberestored.
17
ASWC Ledgend
For A and B:
Short flashesrepresentthesteeringwheelcontrolwire(s)thatare
notconnectedtothevehiclefromtheASWC.
Long flashesrepresentwire(s)thatareconnectedtothevehicle.
A. Vehicle LED Feedback
1stLEDflashistheWhite/GreenwireontheASWC
2ndLEDflashistheOrange/GreenwireontheASWC
3rdLEDflashistheGreen/OrangewireontheASWC
4thLEDflashistheGray/RedwireontheASWC
5thLEDflashistheBlack/Greenwire ontheASWC
6thLEDflashistheGray/BluewireontheASWC
7thLEDflashisthePinkwireontheASWC
B. Radio LED Feedback
1stLEDflashisforEclipse
2ndLEDflashisforKenwood
3rdLEDflashisforClarion(“Type”1)
4thLEDflashisforSonyandDual
5thLEDflashisforJVC
6thLEDflashisforPioneerandJensen
7thLEDflashisforAlpine*
8thLEDflashisforVisteon
9thLEDflashisforValor
10thLEDflashisforClarion(“Type”2)
11thLEDflashisforMetraOE
18
ASWC Ledgend
*Note (section B): If the ASWC flashes 7 times and you do not have an
Alpine radio connected to it that means that the ASWC did not see any
radio connected. Verify the 3.5 mm connector is connected to the SWC
input on the radio.
C. Button Assignment(remapping/manualprogramming)
1.VolumeUp
10.Band
2.VolumeDown
11.Play/Enter
3.SeekUp/Next
12.PTT(PushToTalk)
4.SeekDown/Prev
13.OnHook
5.Source/Mode
14.OffHook
6.Mute
15.FanUp
7.PresetUp
16.FanDown
8.PresetDown
17.TempUp
9.Power
18.TempDown
Note: Not all radios will have all of these commands. Please refer to the
radio owner’s manual or contact the radio vendor directly for specific
commands recognized by that particular radio.
If the next function on the list is not on the steering wheel press the
“Volume Up” button for 1 second, until the LED comes on, then release the
button. This tells the ASWC that the function is not available will move on
to the next function.
19
INSTALLATION INSTRUCTIONS FOR PART ASWC
IMPORTANT WARNING
Thisproductincludesinstructionsforinstallationwhichmustbecarefully
followed.Theinstructionsarewordedinsuchamannertoassume
thattheinstalleriscapableofcompletingthesetypeofelectronic
installations.Ifyouareunclearastowhatyouareinstructedtodoor
believethatyoudonotunderstandtheinstructionssoastoproperlyand
safelycompletetheinstallationyou should consult a technician who
does have this knowledge and understanding.
Failure to follow these instructions carefully and to install the
interface as described could cause harm to the vehicle or to safety
systems on the vehicle. Interference with certain safety systems
could cause harm to persons as well. If you have any questions in
this regard please call the Help line or Metra at
1-800-221-0932 for assistance.
KNOWLEDGE IS POWER
REV. 7/13/2012
INSTASWC
Enhance your installation and fabrication skills by
enrolling in the most recognized and respected
mobile electronics school in our industry.
Log onto www.installerinstitute.com or call
800-354-6782 for more information and take steps
toward a better tomorrow.
Metra recommends MECP
certified technicians
1-800-221-0932
AxxESSINTERfACE.COM
© COPYRIGHT 2004-2011 METRA ELECTRONICS CORPORATION