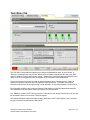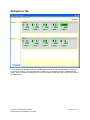
1
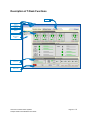
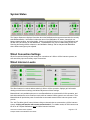
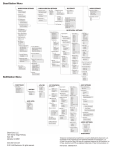
T-Desk SOFTWARE
USER GUIDE
FOR
TEMPEST ® 2400
WIRELESS INTERCOM SYSTEM
Table of Contents
Version 1.000
INTRODUCTION ....................................................................................................................................................... 3
PHYSICAL CONNECTION ...................................................................................................................................... 4
COMPUTER REQUIREMENTS .............................................................................................................................. 5
OBTAIN AND RUN T-DESK .................................................................................................................................... 5
DESCRIPTION OF T-DESK FUNCTIONS ............................................................................................................. 6
MENU BAR ................................................................................................................................................................. 7
BASESTATION NAVIGATION PANE .................................................................................................................... 7
TABS............................................................................................................................................................................. 7
BASESTATION SETTINGS TAB ............................................................................................................................. 7
SYSTEM STATUS ...................................................................................................................................................... 8
WIRED CONNECTION SETTINGS ........................................................................................................................ 8
WIRED INTERCOM LEVELS ................................................................................................................................. 8
AUX LEVELS .............................................................................................................................................................. 9
BASESTATION FUNCTIONS .................................................................................................................................. 9
DASHBOARD STATUS BAR .................................................................................................................................. 11
BELTSTATION SETTINGS TAB .......................................................................................................................... 12
INDIVIDUAL SETTINGS........................................................................................................................................ 12
TECH MENU TAB ................................................................................................................................................... 14
ALL SYSTEMS TAB ................................................................................................................................................ 15
Clear-Com Communication Systems
Tempest 2400 T-Desk Software User Guide
Page 2 of 16
Introduction
Tempest 2400 Wireless provides the Tempest Desk-top manager to simplify the process of optimizing
your Tempest Wireless systems. T-Desk (pronounced tee-desk) is a widget (a small computer program)
for monitoring and managing Tempest 2400 Wireless Intercom Systems. The software requires only a
simple installation, and so can run from a portable flash drive as well as being resident on a computer. It
provides an intuitive, self-evident method of optimizing multiple Tempest 2400 Wireless base stations and
their associated BaseStations. T-Desk allows a user to adjust critical BaseStations or BeltStation settings
from the computer. Tempest can connect to your computer via an existing computer network or directly
using manual mode.
Tempest 2400 is a full-featured wireless intercom system with functionality similar to most modern wired
intercom systems. It is capable of connecting to, and communicating with, most major brands of wired
intercom systems. A single, stand-alone Tempest base station with up to five BaseStations is as easy to
operate as a cell phone. However, optimizing multiple Tempest BaseStations while connected to one or
more wired intercom systems is not trivial. T-Desk displays all of the relevant information in a manner
that is easy to see and adjust.
Although making adjustments is very easy, knowing what to adjust requires familiarity with Tempest 2400
Wireless’ system performance. The best way to learn about the Tempest system is to become familiar
with the “REFERENCE MANUAL FOR TEMPEST 2400 WIRELESS INTERCOM SYSTEM”.
Inappropriate settings can induce echo, degrade clarity, and generate feedback or related artifacts. Time
spent with the manual will help you get the most from your Tempest Wireless Intercom by making setup
easy when interfacing to your existing equipment.
We are committed to providing you with a high quality product that will deliver years of trouble free
service. Should you experience any problem with your Tempest Wireless equipment, whether it is a
warranted problem, or service after you have owned the system for several years, we will be there to take
care of you.
Thank you for choosing Clear-Com for your wireless intercom needs.
Clear-Com Communication Systems
Tempest 2400 T-Desk Software User Guide
Page 3 of 16
Physical Connection
Dynamic Host Configuration Protocol (DHCP) is a system that allows each component on a computer
network to automatically obtain the network address information required for Network Interface Devices to
communicate with one another. With DHCP enabled on a Local Area Network (LAN), all network
connected Tempest Wireless BaseStations will automatically log on to T-Desk running on a single
computer. Automatic addressing includes TCP/IP address, subnet mask, and default gateway. Most
10/100 Ethernet devices are compatible and should configure properly when the BaseStation is set for
automatic DHCP.
Connect each Tempest BaseStation to the Local Area Network (LAN) with a standard CAT-5 patch cable
and open T-Desk on a computer that is connected to the same router or server as the BaseStations.
After about 10 seconds the BaseStation information will begin to load into T-Desk.
Automatic DHCP is enabled by default in the BaseStations, but through the BaseStation Tech Menu,
manual addressing can be selected, or addressing can be disabled.
If T-Desk is closed on one computer and opened on another computer, the new instance of T-Desk
should connect to all BaseStations.
Running multiple instances of T-Desk, either on the same computer or on multiple computers on the
same local network, is not supported. If BaseStations are logged onto T-Desk and a second instance of
T-Desk is opened, the second instance will not be recognized by the BaseStation(s) and the
BaseStation(s) will remain logged onto the first instance. This prevents anyone but the appropriate
administrator from accessing the BaseStations.
Direct Connection to a Computer
A single BaseStation can be connected directly to a computer without a local area network or router
connection. Without a connection that can automatically perform addressing, manual addressing is
required. Advance to the Tech Menu of the BaseStation, select LAN Settings, Select TCP/IP Mode and
change to “Manual” and exit. The “Manual” default settings should enable T-Desk to communicate with
the BaseStation provided the appropriate cable is connected.
Newer computers that have Auto-MDIX capability can use either standard CAT-5 cable or a crossover
cable. Auto-MDIX detects the connected cable type and configures the computer connection
appropriately. Otherwise a crossover cable is required between the BaseStation and the computer.
Advanced users may make adjustments to the TCP/IP address and other settings. Selecting “DHCP” and
then selecting “Manual” will restore the Manual setting defaults.
To manually enter IP address information advance to the Tech Menu >> LAN Settings, and first select
“TCP/IP Mode” and change to “Manual.” Then manually enter the TCP/IP address, and default gateway.
The “subnet mask” should normally be “255.255.255.000”. The MAC address is “read only” information.
To change the address values, advance to the screen for the appropriate address, turn the volume knob
to scroll the value, press enter to advance through the three digit portions of the address, and after
adjusting the last portion of the address, press enter to save the change.
Clear-Com Communication Systems
Tempest 2400 T-Desk Software User Guide
Page 4 of 16
Computer Requirements
T-Desk System Requirements:
Windows XP or Vista
512 MB system memory
XGA video screen - 1024 x 768 or greater resolution
Minimum 1.20 GHz-class CPU
Drive space requirement: 1 MB
Hardware and/or software firewalls must pass ports 50500 and 50501 UDP, and 50502 TCP.
Wired router with DHCP server support, with one wired Ethernet port per base station plus one wired port
for PC connectivity.
An Ethernet crossover cable may be needed for direct connection between the BaseStation and
computers not equipped with Auto-MDIX capability.
Obtain and Run T-Desk
T-Desk requires only a simple installation on your computer to work. Just click on the “Tempest Desktop
Software 1.000 Setup.exe” icon to run the setup program. Simply accept the licensing agreement and TDesk will be installed on you computer. Installation consists of just two files, an exe and a dll.
The T-Desk setup file is located on the CDROM labeled Tempest 2400 Wireless System & T-Desk
Software included with each Tempest base station or download from http://www.clearcom.com or
http://www.tempestwireless.com.
Drag and drop the T-Desk setup file to a convenient location such as the desktop. Click the T-Desk setup
file to install T-Desk.
Clear-Com Communication Systems
Tempest 2400 T-Desk Software User Guide
Page 5 of 16
Description of T-Desk Functions
Tabs
Wired
Connection
Menu
Bar
Settings
Belt System
Status
BaseStation
Navigation
Pane
BaseStation
Functions
Dashboard
Status Bar
Clear-Com Communication Systems
Tempest 2400 T-Desk Software User Guide
Page 6 of 16
The following pages provide a brief description of the T-Desk capabilities.
Menu Bar
The Menu Bar is a familiar feature of most applications and provides quick access to many options.
BaseStation Navigation Pane
All LAN connected BaseStations will be listed on the left side of the screen, in the
BaseStation Navigation Pane. Any of the BaseStations on the LAN can be selected
for monitoring or optimizing. The selected BaseStation is highlighted in yellow and
others are listed on a gray background. A colored ball indicates the status of the LAN
connection – green for good connection and red for weak connection. BaseStations
are not required to be named but descriptive names make managing multiple
systems easier.
Tabs
The tabs across the top of the screen include the BaseStation Settings tab, the BeltStation Settings tab,
the Tech Menu tab, and the All Systems tab. Click on the tab to advance to the related screen. From the
All Systems tab, select a BaseStation in the BaseStation Navigation Pane to return to the BaseStation
Settings tab.
BaseStation Settings Tab
The BaseStation Settings tab contains information related to the selected BaseStation and its associated
BeltStations that are logged on. It includes:
• The System Status area displays the name of the BaseStation selected and information regarding
the BeltStations that are logged onto that particular BaseStation.
• The Wired Connection area controls wired in/output levels, Aux IN, and Aux Out levels.
• The BaseStation Functions area controls how the BaseStation works as a user station, and
including controlling the Stage Announce settings.
• The Dashboard Status Bar displays critical system information and is displayed in the
“BaseStation Settings” tab, The BeltStation Setting tab, and the “Tech Menu.”
Clear-Com Communication Systems
Tempest 2400 T-Desk Software User Guide
Page 7 of 16
System Status
The System Status area displays information about the BeltStations that are associated with the currently
selected BaseStation. Information includes the name of the BeltStation, RF status, channels in use,
battery charge condition, and other details. Clicking on the Mic Kill button for any of the BeltStations will
de-latch the Talk button(s) for that BeltStation. The BeltStation user can re-enable talking at any time.
Selecting the Settings button advances to the BeltStation Settings Tab for that particular BeltStation
where feature settings may be adjusted.
Wired Connection Settings
Wired Connections Settings include settings for connections to 2-Wire or 4-Wire intercom systems, as
well as auxiliary input and auxiliary output connections.
Wired Intercom Levels
The Wired Intercom Levels tab allows selecting 2-Wire or 4-Wire operation, displays gain information
relating to wired intercom settings, and allows adjustment of those settings.
Master Mode is only available when two or more BaseStations are connected for 2-Wire operation, and
both slide switches are set to ClearCom mode, while an external 2-Wire system is not connected. Then
Master Mode will provide the power for audio that a connected external 2-Wire intercom system could
provide.
The “Null Two-Wire Hybrid” button initiates nulling on channels that are connected to a 2-Wire intercom
system. Nulling will interfere with normal communication! For reliable results, all Talk buttons must
be off for all Tempest BeltStations and all 2-Wire intercom interfaces.
Clear-Com Communication Systems
Tempest 2400 T-Desk Software User Guide
Page 8 of 16
Any connection made through 2-Wire intercom connections requires nulling. All 2-Wire intercom
interfaces experience echo due to inherent inefficiencies in the two-wire hybrid circuitry. When the circuit
is nulled, a tone is generated, the echo is monitored, and Tempest’s internal circuitry adjusts to minimize
the echo. See the Tempest Wireless manual for more about nulling the system.
There is additional critical wired intercom information on the Dashboard Status Bar.
Aux Levels
The Aux Levels tab allows adjustment of the Aux In and Aux Out levels. Adjusting the Aux In or Aux Out
level to “0” disables the function for the selected channel.
After the relative volumes have been determined, the ‘Lock Sliders’ check box can be checked so when
one slider is adjusted, the other sliders will follow. This allows adjustment of all sliders together for
occasions where the background noise level changes significantly.
When “Lock sliders” is checked it is good practice to use the lowest volume slider to adjust to a lower
level and the highest volume slider to adjust to a higher level. If a slider that is set to a lower level is used
to adjust to a higher volume, the lower level slider can push the higher level slider to maximum and the
lower level sliders continues to adjust higher, thus changing the relative levels.
BaseStation Functions
Clear-Com Communication Systems
Tempest 2400 T-Desk Software User Guide
Page 9 of 16
The BaseStation Functions area controls settings relating to BaseStation specific functionality and has
two tabs.
The left tab or Stage Announce and Relays tab controls and displays the volume of the Stage Announce
audio out from the Tempest BaseStation, and allows the Stage Announce relay to be enabled or disabled.
The “Relay” portion of the display indicates the condition of the 5 BaseStation relays – open or closed.
The right tab or Front Panel Settings tab controls and displays features found on the front of the
BaseStation.
Mic Gain controls sensitivity of the microphone that may be connected to the BaseStation. Headset
microphones may be of Electret or Dynamic type and the BaseStation automatically detects which type is
connected. The Mic gain for each type will require significantly different settings. The BaseStation will
remember the last setting for both types of microphone. A T-Desk user must have an awareness and
appreciation for the type of headset being used before attempting to adjust Mic gain.
LCD Display Contrast controls how or light or dark the text appears on the background.
LCD Display Backlight controls the brightness of the backlight.
Panel LED Indicator Brightness controls the brightness of the blue LEDs on the front of the BaseStation.
If the all of the lights on the front of the BaseStation are turned off there is no impact in T-Desk but it may
be impossible to read the display and so it may be impossible to make adjustments from the BaseStation
itself.
Front Panel Lock allows locking the BaseStation front panel buttons and knobs to minimize the probability
of inadvertent adjustments. The front panel can be unlocked by pressing MENU + ENT on the
BaseStation as well as from T-Desk..
Clear-Com Communication Systems
Tempest 2400 T-Desk Software User Guide
Page 10 of 16
Dashboard Status Bar
The Dashboard Status Bar is located along the bottom of the T-Desk display and provides continuous
monitoring and display of the following information:
MONITOR
BeltStation Battery Alert:
Base Power Supply:
Base Antenna:
Base Sync:
STATUS
OK / CHECK
N/A
Local / Remote
N/A
Channels A&B 2-Wire Type:
RTS / ClearCom / Bal
Channels C&D 2-Wire Type:
RTS / ClearCom / Bal
Frequency:
Mic Kill:
2.4GHz / 900MHz
A / B / C / D / All
All but Mic Kill are information only items. Click Mic Kill A / B / C / D / All to disable all Mics on the selected
channel or “All” to disable all Mics simultaneously.
Clear-Com Communication Systems
Tempest 2400 T-Desk Software User Guide
Page 11 of 16
BeltStation Settings Tab
The BeltStation Settings tab opens a screen with five additional tabs, each representing a slot for a
BeltStation associated with the currently selected BaseStation. Click on any of the individual BeltStation
tabs to adjust individual settings for that BeltStation.
Individual Settings
Click in the Belt Station Name text box and type a new name. Click on the “Rename BeltStation” button
to update the new name.
Click on the “Mic Kill” button to de-latch the Talk button(s) for the BeltStation.
Click on the drop-down arrows in the “Individual Relay” area to select the unique BaseStation relay the
BeltStation will activate and select the BeltStation control that will activate the relay.
Use the “LCD Backlight” control to turn the backlight off or on.
Use the “LED Brightness” control to adjust the LEDs that surround the talk buttons on the BeltStation.
“Talk A/B” and “Talk C/D” buttons can be set as ‘Latching’ or ‘Momentary’. ‘Momentary’ functions as
push-to-talk. ‘Disable’ permits listening on a channel but prevents talking on the channel.
Clear-Com Communication Systems
Tempest 2400 T-Desk Software User Guide
Page 12 of 16
Use “Channel Select A/B” or “Channel Select C/D’ buttons to completely disable any channel. Disabled
channels will be hidden on the BeltStation display.
Use “Stage Button” to enable the STAGE button on the BeltStation and to enable the relay that is
associated with the STAGE button by default.
Under “Volume Limits” adjust the sliders to control the Maximum and Minimum volume for the belt.
The minimum volume should be increased in cases where the BeltStation user needs to always have at
least low level audio in the headset. The maximum volume may be decreased in quiet environments
where audio may escape the headset unintentionally or for user comfort.
The “Call Button” can be enabled or disabled for each user.
“Call Alert” allows selecting how a CALL message will notify the user. Select a tone only or BeltStation
vibration only or both. “Both” is the default.
“Enter ISO” allows enabling or disabling ‘Wireless ISO’ sometimes referred to as ‘wireless-talk-around.’
‘Wireless ISO’ allows communication between wireless only users, bypassing any wired intercom that
may be connected, by pressing the ENTER button in a push-to-talk manner.
“Low Battery” allows enabling or disabling the low battery alert that may be heard in the headset.
Note that the Dashboard Status Bar appears along the bottom of the T-Desk display in the BeltStation
Settings tab just as it does in the BaseStation Settings tab.
Clear-Com Communication Systems
Tempest 2400 T-Desk Software User Guide
Page 13 of 16
Tech Menu Tab
The Tech Menu Tab provides an opportunity to change the BaseStation name, to select “Static” or
“Dynamic” slot assignment, and provides “display only” information regarding for the radio, local area
network, hardware version, and firmware version. “Display only” information cannot be adjusted from TDesk, but some of the parameters are configurable in the Tech Menu of the BaseStation.
Proper configuration of the radio is critical for best performance of the Tempest system. Failure to
operate in the proper frequency band has significant legal implications. The Radio Configuration
information should never be changed during normal operation, but is quickly available to confirm setup.
The information relating to the Local Area Network (LAN Settings) is normally obtained automatically.
The BaseStation LAN Information allows confirmation of proper operation.
The “Hardware Versions” and “Firmware Versions” information is not usually important to a user but may
be requested if there is ever a call for Technical support.
Note that the Dashboard Status Bar appears along the bottom of the T-Desk display in the Tech Menu
tab just as it does in the BaseStation Settings tab.
Clear-Com Communication Systems
Tempest 2400 T-Desk Software User Guide
Page 14 of 16
All Systems Tab
The All Systems tab displays the status of all BeltStations associated with all BaseStations currently on
the local area network. The All Systems tab is “display only” so changes cannot be initiated from this
screen. Once all systems are optimized, this screen provides an easy method for continuous monitoring
of all BeltStations.
Clear-Com Communication Systems
Tempest 2400 T-Desk Software User Guide
Page 15 of 16
Clear-Com Communication Systems
Tempest 2400 T-Desk Software User Guide
Page 16 of 16